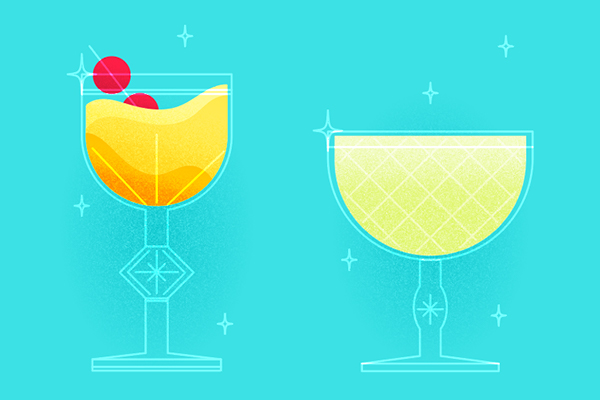
Using basic shapes and a fun, grainy texture, we’ll create a vintage cocktail design in no time flat. Perfect for Cinco de Mayo, retro-style parties, Mad Men-inspired designs, and more. Cheers!
Tutorial Details: How to Create a Vintage Cocktail Design in Adobe Illustrator
- Program: Adobe Illustrator CS6 – CC
- Difficulty: Intermediate
- Topics Covered: Design Theory, Shape Building, Rendering
- Estimated Completion Time: 20 Minutes
Final Image: Vintage Cocktail Design

Step 1
- Let’s begin with the mode basic of shapes: the square. Draw a square with the Rectangle Tool (M). Using the Direct Selection Tool (A) select the bottom two anchor points and pull the Live Corners of those anchor points toward the center of the shape in order to round out the bottom of the object. Draw a line across the top, if you wish, with the Line Segment Tool (/). This creates the cup of the vintage cocktail glass.

Step 2
Draw a narrow rectangle to create the glass’s stem. For a fun detail, add a square, Rotated 90°, in the center of the stem. Draw rectangle for he bottom of the glass (the base) and Unite your shapes in the Pathfinder panel. For an extra bit of design, use the Line Segment Tool to draw four lines to create a small sparkle (see below).

Step 3
For the liquid in the glass, redraw the cup shape drawn in Step 1 and fill it with the color of your choice. Add wavy shapes in different colors (use darker hues than your original color) on top of the original shape. Use the Shape Builder Tool (Shift – M) to select and delete the non-intersecting shapes of the liquid objects from the cup base. Group (Control-G) these objects together and place them behind the glass objects.
Add lines or cross-hatched markings to the glass if you wish. Consider adding a garnish to your drink like a citrus peel or cherries. Set the glass strokes’ Blending Mode to Overlay in the Transparency panel.

Step 4
To add a quick vintage texture, Copy (Control-C) and Paste (Control-V) each shape and apply a blck Linear Gradient to it going from 100% Opacity to 0% Opacity. Set its Blending Mode to Soft Light. Apply Grain effect (Effect > Texture > Grain) with the following attributes:
- Grain
- Intensity: 27
- Contrast: 36
- Grain Type: Stippled
Use the Gradient Tool (G) to adjust the placement of the gradient. You want the grainy texture to simply serve as a shadow, lightly texturing the object versus being applied to the entire thing.

Step 5
For alternative cocktails, consider a wider cup with a smaller stem and base. Instead of a diamond in the center, try an ellipse. Then, criss-cross line segments in order to add a diamond-like pattern to the glass. Finally, a minty green makes for a delicious, absinthe-style drink or a salty margarita.
Get millions of stock images and videos at the best price
Unlimited access. No attribution required. Starts at just $9/month.

Conclusion
Great job, you’re done! Consider adding some grainy texture to the background or even some cute sparkles to your final design.

