

Selecting multiple objects in Illustrator is essential to productivity. Illustrator has some great selection features: Select Same, Select Object, Magic Wand, and so on. One selection feature that I always use is Save Selection. I usually save selections early on in a illustration to easily come back to them even though the stroke, fill, and other attributes have be modified.
Save Selection
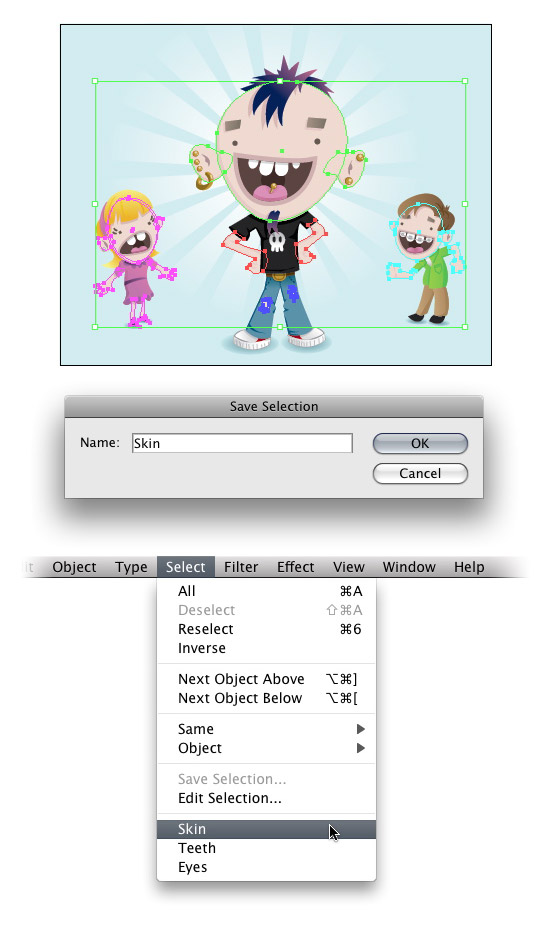
First, select everything that you want to save and then go Selection > Save. In the Save Selection dialog you can name the selection whatever you want. Now your saved selection will be accessible at the bottom of the Selection Menu! You can rename and delete these Saved Selections by going Selection > Edit Selection to bring up the Edit Selection dialog.


This is a good tip particularly to those new to the blogosphere. Short but very precise info Thanks for sharing this one. A must read post!
God bless you! I’ve been needing this feature forever, and just didn’t know where to look. <3
This is a topic which is near to my heart… Thank
you! Exactly where are your contact details though?
Hi there! Glad you like the article. Thanks for being a Vectips reader, and feel free to contact us by filling out this form: http://vectips.com/contact-vectips/.
Whoa. You just blew my mind. You know…you think you’ve got a pretty good idea of what’s up, and then you realize you’ve totally overlooked something so [d’oh!] simple.
Thanks for the tip(s)!
This is seriously helpful! Illustrator is such a comprehensive tool that you kind of never reach to these things under everything. But this will speed up the work flow so much. Thanks man.
really nice..plus great effect
http://www.advertising-agency.my
http://www.web-design.my
wow.. its really useful.. i never know this!
Awesome website, I linked you from http://www.project66.net/blog. Keep up those tuts 🙂
Nate,
Thanks! I’m glad you think so, because that is what I am striving for.
Yeah for VECTIPSY!!
Your site has moved to the top of my list.
The web is filled with tutorials but very few exhibit the clarity and thoughtfulness (not to mention utility) that your posts offer.
Thanks for making such a valuable resource availble.
Q: What do you call a Vectips subscriber who is giddy with enthusiasm for the great tips and insigts?
A: Vectipsy.
wow! that’s a great tip..will have to play around with that one
fabulous! this will save me from having to group things i really don’t want grouped…. that’s how i’ve been doing it, and it certainly doesn’t work as well as this! thanks for the tip. 🙂
Nice trick! I’ve been using Illustrator for about 7 years as well but I didn’t know about this little feature!
great tip! I am always amazed about all those featires of Ill that I never knew about!
7 years wow , i have only 1 ^-^ nice trick! i think it will save me a lot of time!
Aika,
Probably about seven years, I started using Illustrator when I was 19.
Thanks! Superhandy little function I didn’t know about 😀
Thanks for the tutorials, looking every day and know a lot of new!
How many years using Illustrator?
This can be useful if all paths selected have different colors, but when they share the same color is much more easy to use the Select > Same > Fill command, after selecting one of the Skin parts.
Such a simple thing but massively helpful. Thanks for sharing.
amazing! thanks again!