

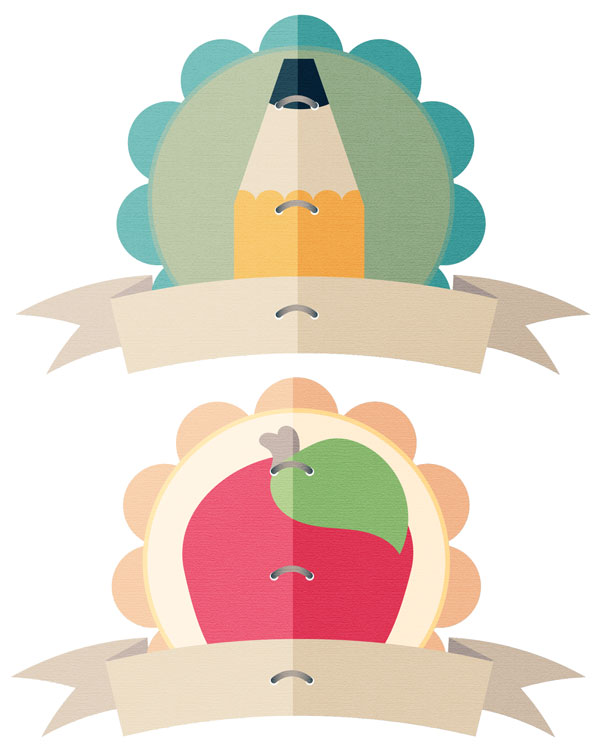
Summer is quite nearly over, and students of all ages are filling up classrooms once more. Take that inspiration and create your very own back to school banner vectors, ready for notebooks, newsletters, and more.
Tutorial Details: Back to School Banner Vectors
- Program: Adobe Illustrator CC5-CC 2014
- Difficulty: Beginner
- Topics Covered: Shape Building, Effects, Appearance Panel
- Estimated Completion Time: 30 Minutes
Final Image: Back to School Banner Vectors
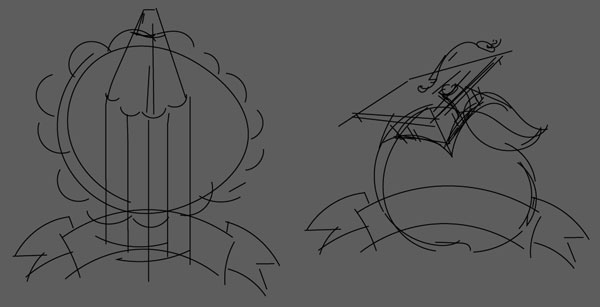
Step 1
For banners like these back to school banner vectors, I like to start with a quick sketch and play around with different designs. In this case, I used the Pencil Tool (N) with a default brush, Grouping (Control-G) the paths of each respective sketch together and putting them off to the side as my guide while creating the final back to school banner vector versions.
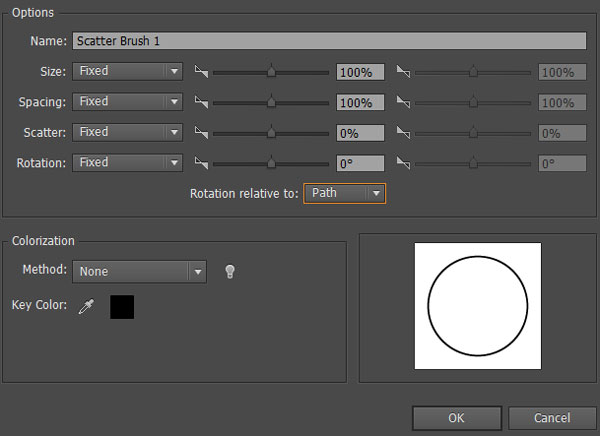
Step 2
In order to easily create the scalloped circle in the center of each school banner vector, use the Ellipse Tool (L) to draw a circle befitting the outer edge of your design. Select it and in the Brushes panel, create a new Scatter Brush. the only thing I changed in the options was setting Rotation relative to: Path. Hit OK and draw another ellipse with the new brush set as the stroke.
Step 3
Next step for these back to school banner vector – use the Ellipse Tool to draw a circle with the new brush set as the stroke. Doing so, you’ll wind up with a flower like the one below. Adjust the size of the ellipse to change the spacing of the little circles within the stroke.

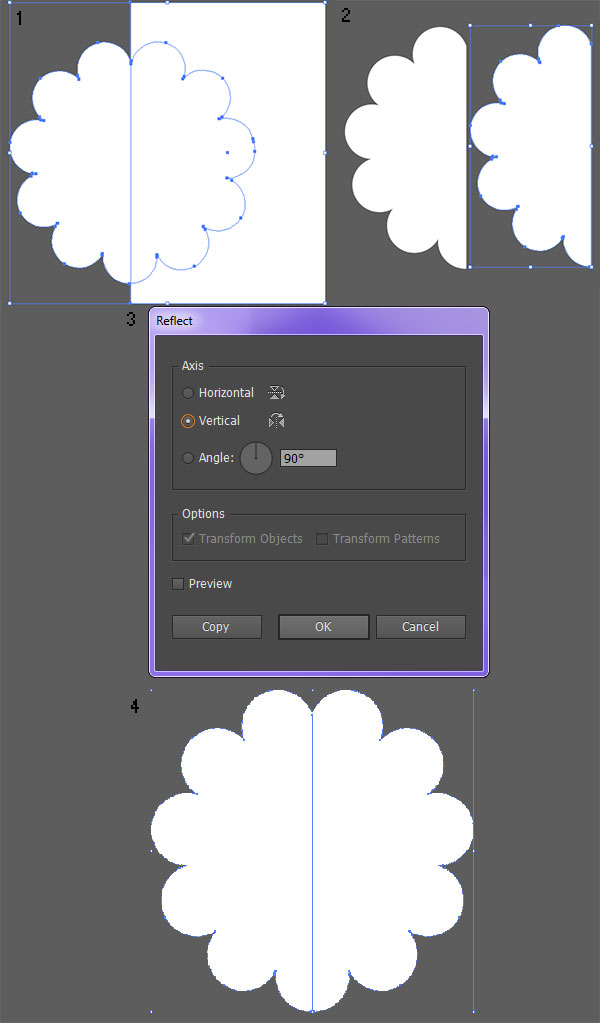
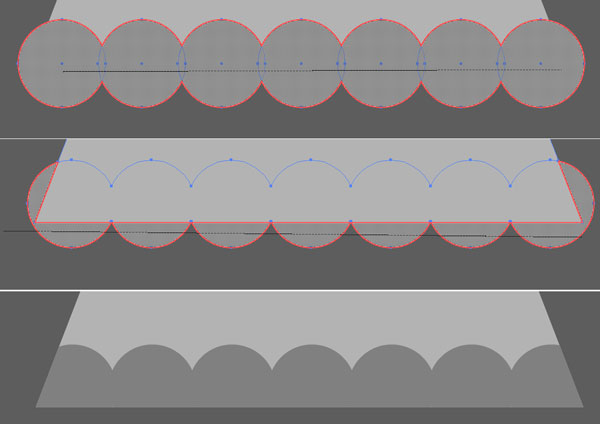
Step 4
This step is optional. If you want a perfectly symmetrical flower, Select your flower group and go to Object > Expand. You’ll have to delete the little boxes around the scatter brush’s ellipses (either using the Direct Selection Tool (A) to select each and delete them manually, or use the Magic Wand Tool (Y) to select the boxes and delete them in one go).
Unite the flower shape in the Pathfinder panel. Bisect it with a rectangle using the Rectangle Tool (M) and hit Minus Front in the Pathfinder panel. Copy (Control-C) and Paste (Control-V) the newly halved flower and Reflect the copied shape over a Vertical Axis. Align the two shapes (overlapping them slightly) and Unite in Pathfinder. A wee bit tedious to get a perfectly symmetrical shape, which is why I call this step “optional”.
Step 5
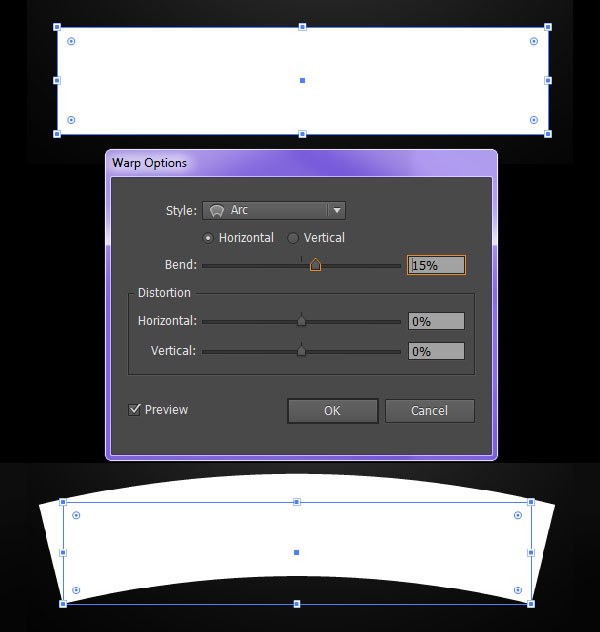
Let’s make a simple banner for our school banner vectors. Draw a horizontal rectangle with the Rectangle Tool. Apply a warp effect by going to Effect > Warp > Arc and use the following attributes:
Style:
- Arc
HorizontalBend:
- 15%
Expand the banner under Object.
Step 6
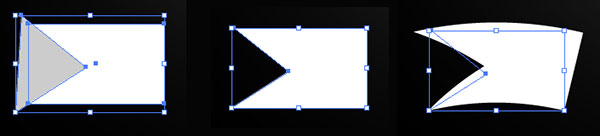
For the ends of the school banner vectors, draw a small rectangle and with the Pen Tool (P) a small triangle that overlaps one side of the rectangle. Hit Minus Front in Pathfinder and apply the same Arc from Step 5. Expand
Step 7
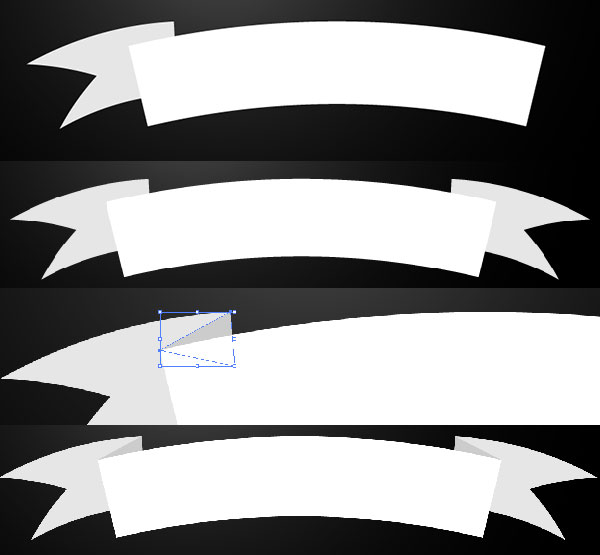
Place the banner end from Step 6 behind the curved banner shape of the back to school banner vector in the Layers panel. Copy, Paste, and Reflect the banner end for the right side of the banner. Use the Pen Tool to draw a small triangle behind the main banner shape but in front of the banner end (in the Layers panel). Repeat on the other side. Note that I’ve changed the fill colors of each section so they’re easily seen below. We’ll choose final colors for the design later in the tutorial (or you can do so now). Group (Control-G) together the banner components for the time being.
Step 8
Place the flower shape drawn previously behind the main banner shape within the back to school banner vector group. Draw an additional ellipse in the center of the flower. The colors shown here aren’t necessary, as they’re just to help differentiate between the levels of objects within the Layers panel.

Step 9
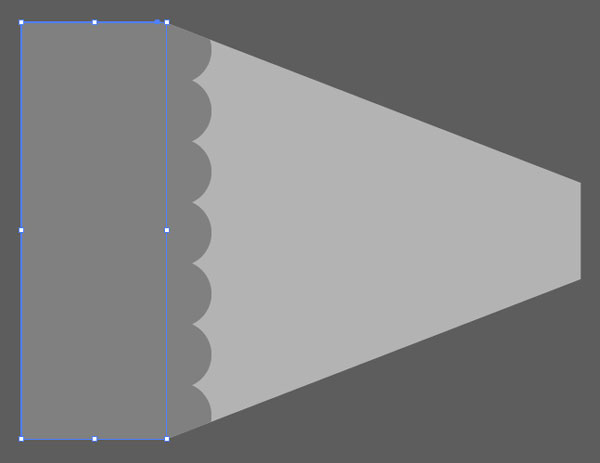
Let’s draw a pencil for our back to school banner vector! Start with a vertical rectangle. Use the Direct Selection Tool to angle the top rectangle anchor points inward. Repeat Step 4 with the pencil top in order to get a perfectly symmetrical object if you wish. Adjust its length and width according to your preference. Draw a series (in this case seven) of small circles along the bottom of the pencil top.
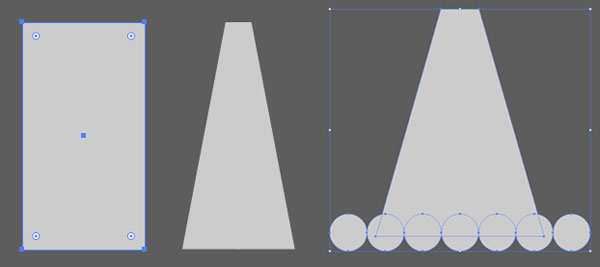
Step 10
Select the seven circles and use the Shape Builder Tool (Shift-M) to Merge them together by dragging the tool across the circles. Select both the pencil top and merged circles and select the portions of the circles that do not intersect with the pencil top. Deselect and Delete them. I’ve changed their color so it’s easy to see the result below.
Step 11
For clarity’s sake, I’ve turned the pencil top to the side. Draw a rectangle that connects to the corners of the pencil top. Unite the merged circles and the rectangle together in the Pathfinder panel.
Step 12
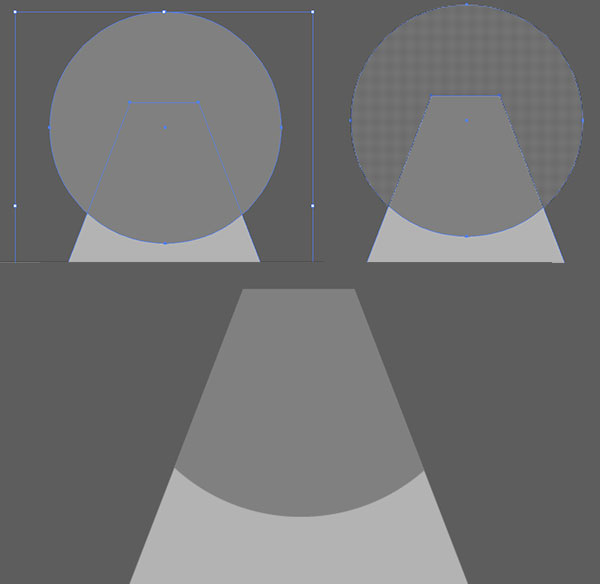
For the pencil’s lead, draw a circle that overlaps the top portion of the pencil’s point. Select both shapes and use the Shape Builder Tool to select the part of the circle that doesn’t intersect with the top of the pencil. Deselect both shapes and Delete the non-intersecting object.
Step 13
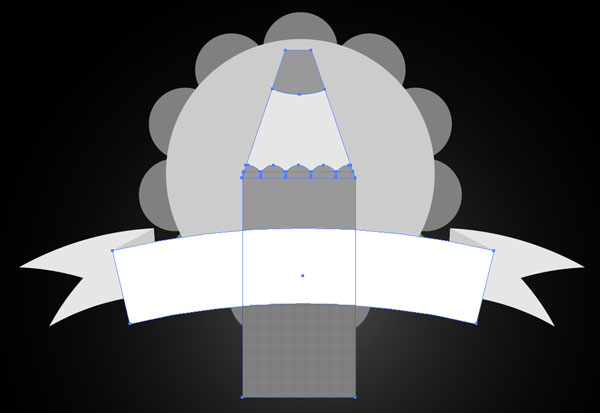
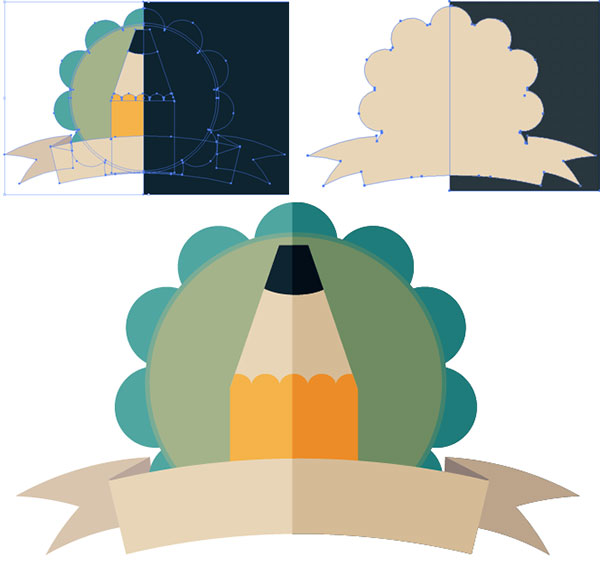
Group together the pencil components and place them beneath the main banner shape in the Layers panel. Use the Shape Builder Tool to delete the portion of the pencil and the flower shape that extend past the banner in this back to school banner vector.
Step 14
Now that we’re done building, it’s time for some color. I chose taupes for the banner, navy blue, and yellow for the pencil, and various greens for the flower shape behind the pencil. The following colors have been used in the example below:
Flower Shape:#4FA6A1
- ,
#7AAC95
- , and
#A4B38APencil Colors:#0E2430
- ,
#E8D5B7
- , and
#F5B349Banner:#BAA69B
- ,
#D9C5AE
- , and
#E8D5B7

Step 15
For the folded look of the design in these back to school banner vectors, draw a navy blue (#0E2430) rectangle over half of the design. Copy, Paste, and Unite the copied design in Pathfinder. Select the united design shape and rectangle and hit Minus Front in Pathfinder. Set the fill color to navy blue and the Blend Mode to Soft Light in the Transparency panel.
Step 16
I Copied and Pasted the first banner design, deleted the pencil components, and changed the colors of the flower shape for the next back to school banner vector design.

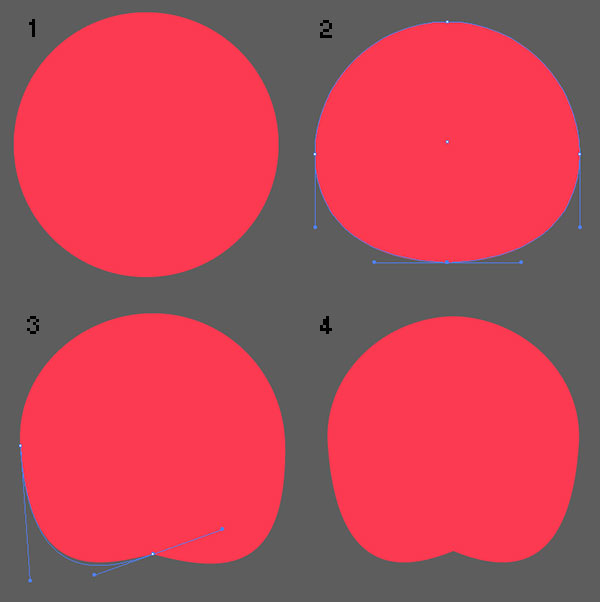
Step 17
The center of the second school banner vector will feature a cute little red apple. Draw a red circle. Use the Direct Selection Tool to push the bottom anchor point upward.Angle the side and bottom anchor point handles so either side of the bottom of the apple are rounded. Angle the anchor point handles inward so the bottom is narrower than the top (see below).
Step 18
Draw a leaf and apple stem with the Pencil Tool or more carefully with the Pen Tool. Group the apply components together and line it up on the new banner design.
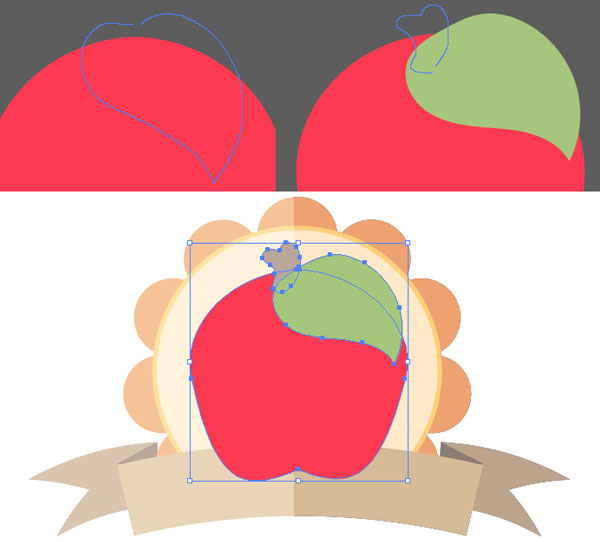
Step 19
Place the apple beneath the Soft Light object created in Step 15. Group this school banner vector design together.
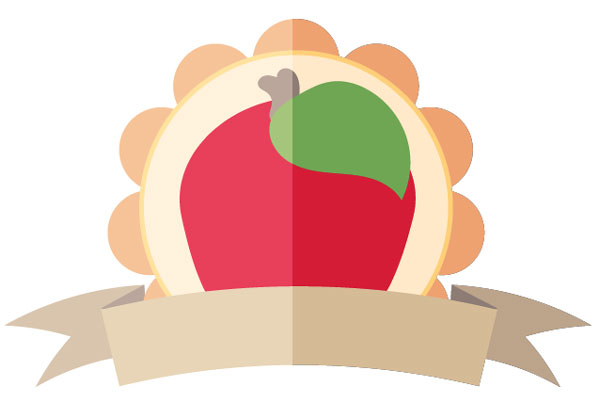
Step 20
For additional details within the school banner vector design, draw six small white circles with the Ellipse Tool in the center of the pencil design (see below). For each spiral, use the Pen Tool to draw a simple, 2pt or 3pt weight slightly curving, stroked line. Copy, Paste, and Expand each stroke and Group them together. Copy, Paste, and apply a Linear Gradient to the copied group that goes from navy blue at 100% to 0% to 100% Opacity.
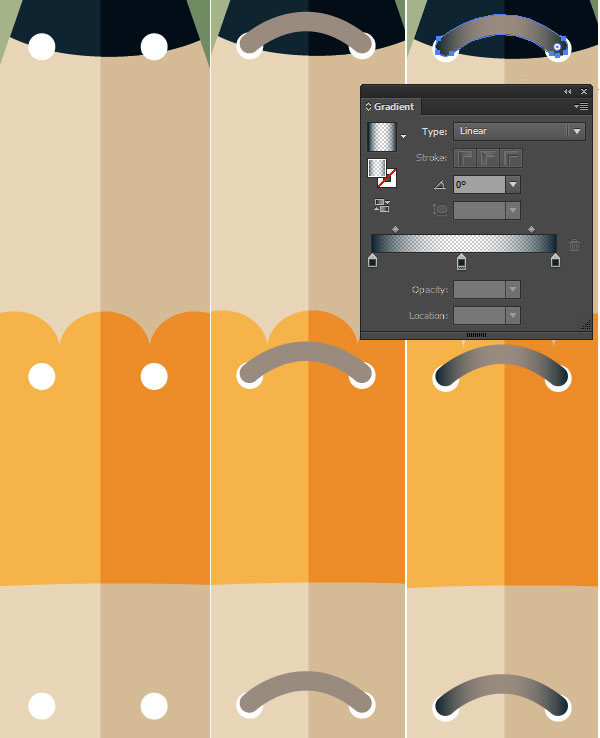
Step 21
Group together your pencil banner components and Copy, Paste, and Unite the copied group in the Pathfinder panel. Apply a linear gradient that goes from pink to orange to yellow.

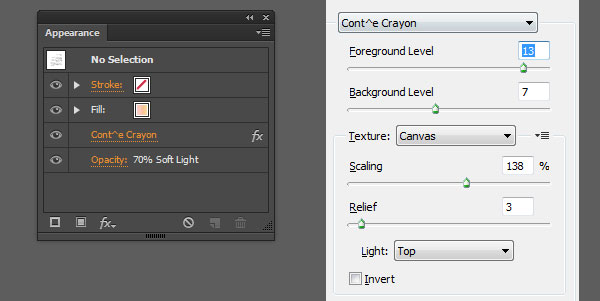
Step 22
In the Appearance panel, add the Conte Crayon effect with the following attributes:
Foreground Level:
- 13
Background Level:
- 7
Texture:
- Canvas
Scaling:
- 138%
Relief:
- 3
Light:
- Top
Set the Blend Mode to Soft Light.
Conclusion
Repeat Steps 20-22 on the apple school banner vector design and any other “Back to School” themed pieces you may have created. Alternatively, skip those steps and add titles to your work to create some cute school-themed stickers. Perhaps a whole sticker pack, ready for a teachers’ use is warranted. Happy creating and thanks for reading about these back to school banner vectors!
Author: Mary Winkler
Mary works under the brand Acrylicana® designing apparel, jewelry, and illustrating for companies like Disney, Jakks Pacific, Envato, and more. Check out Acrylicana.com for more artwork, tutorials, and more.


Good
why can you make a video. i thik that will be great.