
 Yes, you read that title correctly! I understand this tutorial title kind of seems like an oxy-moron. We are combining one of the most primitive and limited graphic techniques edited on a pixel level, with the modern sleek aesthetic of 3D effects. But the result is a juxtaposition so rockin it kicks you straight in your nostalgic keister!
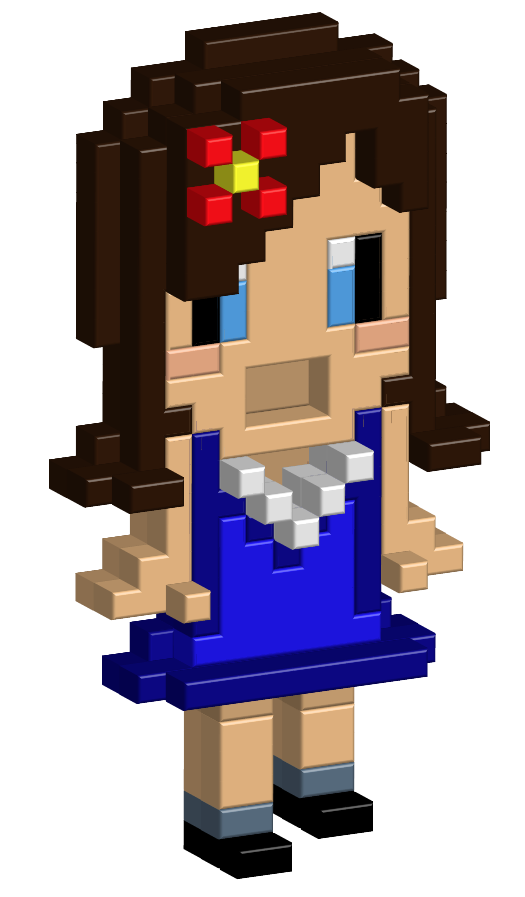
Okay……okay…..I’m the first to admit that Illustrator’s 3D effects are kind of like an old dog that knows 3 tricks, and that dog has three legs. I’m totally fine with that! I love Illustrator for its clean vector graphics . Consequently the 3D in Illustrator has turned into that thing I like to fool around with, but never use for actual design jobs. I was pleasantly surprised one day while applying Illustrator’s Extrude command to pixel art. I realized, that three legged dog still has some tricks up its sleeves when a little creativity and unconventional software use is combined. Below we have the results of the techniques used in this tutorial. Lets get to it and create some vector nectar!
Tutorial Details
- Program: Adobe Illustrator CS6 ( Grid tool available from CS4 onward, 3D available in all Illustrator CS versions)
- Difficulty: Intermediate-Advanced
- Topics covered: Live Paint, Pathfinder functionality, Extrude and Bevel,layers
- Estimated Completion Time: 20-40 minutes
Final Image

Step 1
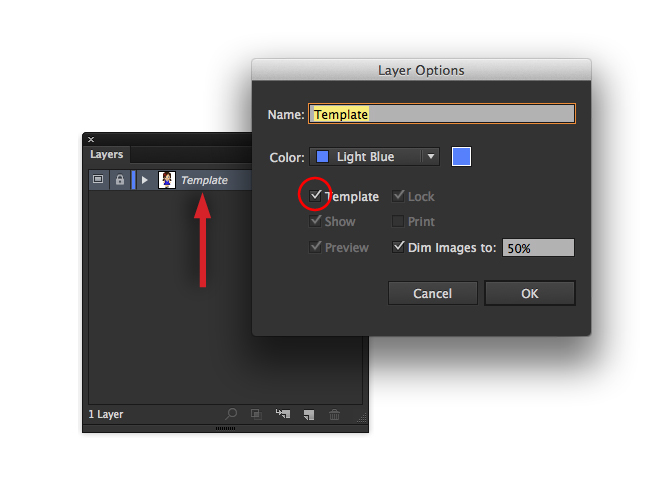
Lets start by creating a new document and template image for our pixel art. For this tutorial you can go ahead and copy/paste the character sprite I made of my lovely pixelated wife Lora. Once you understand the techniques to create 3D pixel art you can create your own characters or use your favorite classic video game characters!

By double-clicking the image thumbnail of the layer you posted the image in, you can enable the layer as a template. This will automatically lock and dim the layer to 50%. How convenient!
Step 2
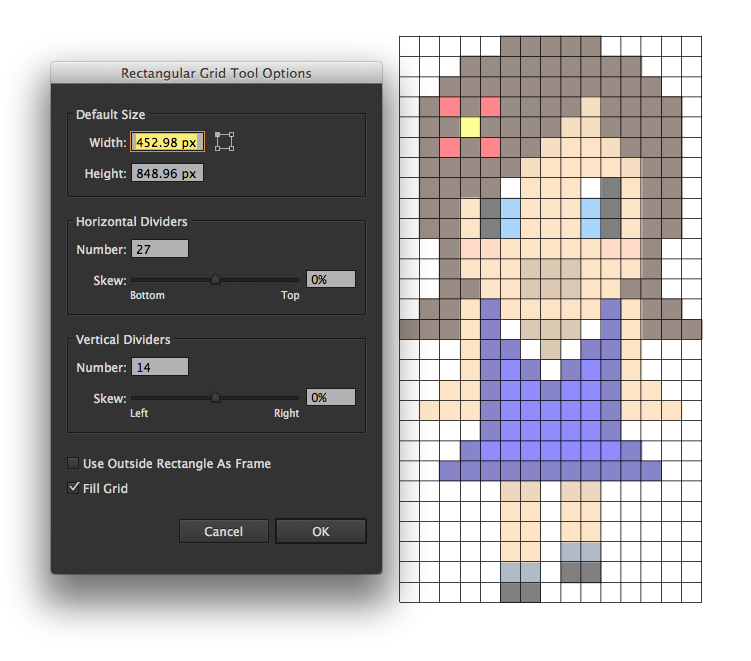
Once your template is in place, it is time to create a grid directly over our template layer. Lucky for us, Illustrator has a tool that will create grids for us! You will find the Rectangular Grid Tool under the Line Segment area of the Tools Panel. Hold the mouse down on the line segment tool to access a fly out panel which contains our desired tool. In the wink of an eye the Grid tool will turn from a lonely useless Illustrator tool into a champion of possibilities! Once available, double-click the Grid Tool icon in the Tools Panel to access the tools options. Set the horizontal dividers to 27, and the vertical dividers to 14. In a new top layer, drag the grid from one corner of the template to the other. Holding space bar while dragging will allow you to move the grid before placing it. Once your grid is placed over your template as pictured (pixel to pixel) it will be time to start creating pixel art!
Step 3
Select your grid and hit shortcut “K” on your keyboard to access the Live Paint Bucket. Hover the bucket over the grid and click to create a live paint grid. Now we shall paint!
You can sample the colors of the template underneath by using the Eyedropper Tool. You can toggle between shortcuts “i” and “k” until your retro masterpiece is complete. Since our template is dimmed, we can see what the heck we are doing. If you mess up, you can set your color fill to none “/” to erase your boo boos.Once you’r finished, select it again and hit shortcut “/” on your stroke to eliminate the stroke on the grid.

Step 4
If you are only interested in creating pixel art in Illustrator you can stop right here. But, if you want to add a few more design wizard creds to your ever expanding repertoire we must continue into the world of 3D! Altogether we are going to need a total of 4 different pixel sprite layers to complete our 3D design. Things are going to get much more complex from here. In order to get the best looking 3D design possible we are going to need to imagine our layers stacked in 3D space while we are designing them. If you have difficulty imagining things in 3D space then try this simple analogy. Imagine each one of these layers pictured below are flat Lego figures built out of square shaped pieces laying flat on the ground . When we subsequently stack each layer directly on top of the last eventually we have a completed figure with extra depth and unique grooves.
Create these 4 separate pixel sprite layers exactly as shown. One wrong pixel can create an incorrect looking design. Pay extra close attention to the necklace and neckline in the 1_Bottom layer as well as the transparency in the neckline and mouth in the 2_Middle layer. Those transparent parts are very important. Don’t forget the whites as well! For the rest of the tutorial I will be referring to these layers by the title I have given them in the layers panel.
![]()
Step 5
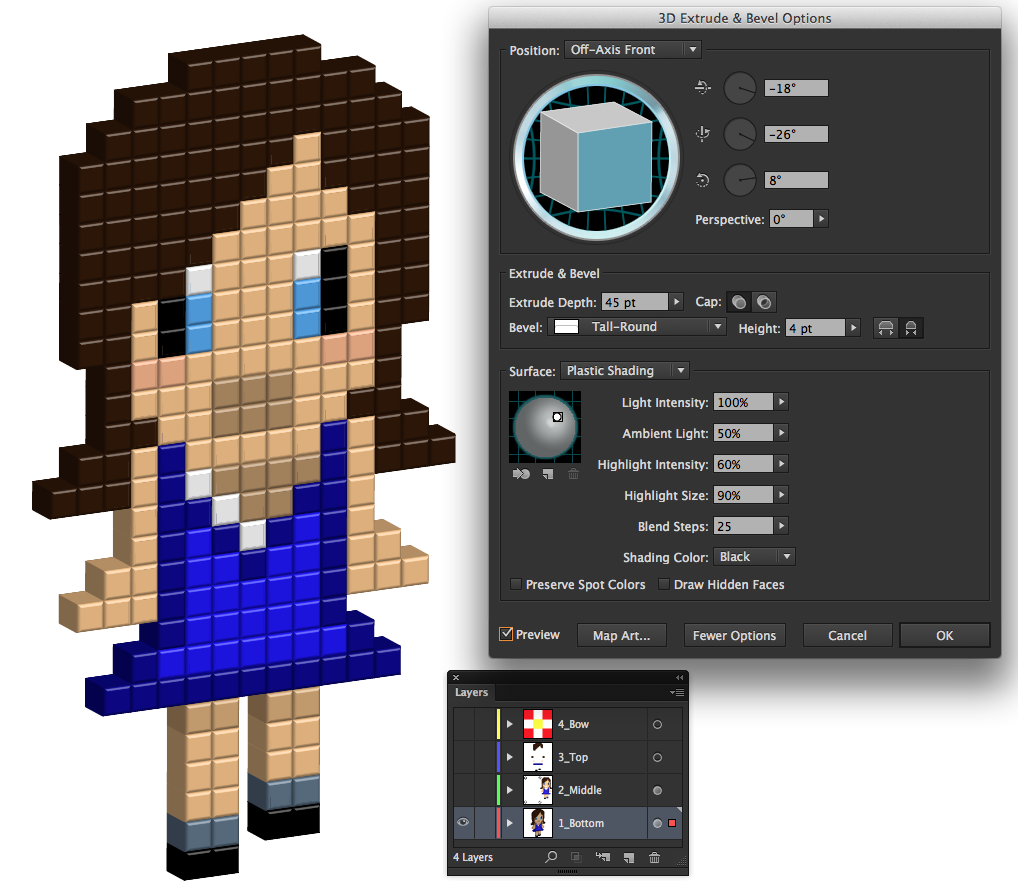
Once we have completed the four different pieces and have placed them in their respective layers we can try out Illustrator’s Extrude & Bevel effects on our pixel art.
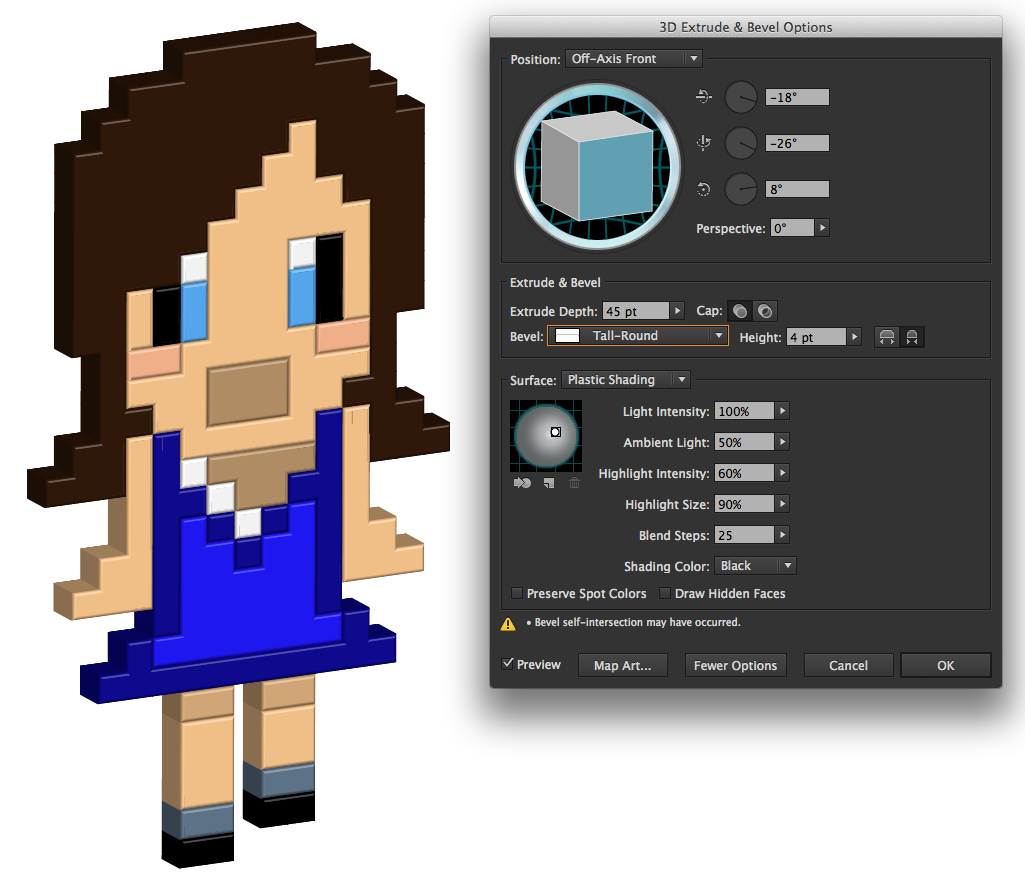
Select the 1_Bottom layer and go to Effect>3D>Extrude & Bevel. When we select Preview in the bottom left of the panel, we can see the effect applied to our pixel art. I havn’t changed any of the default settings in this example except for Extrude Depth and a Tall-Round bevel. I’m not going to go into all the details of the Extrude and Bevel options in this tutorial. You may experiment with the parameters to create what you feel are the best aesthetics for your pixel art.
Notice how your pixel art has each and every pixel block defined. If you like this effect you can go with this and ignore Step 6. If you want to have solid pieces like the final art I created then proceed to the next step.
Step 6
To create solid pieces defined by color in our pixel art we are going to put the Pathfinder to good use. Select your pixel art and go up to Object>LivePaint>Expand. With the art selected press shortcut Command(Ctrl)/Shift/G to Ungroup all of our individual pixels.
Double-click the Wand Tool to bring up the tool’s options. Make sure Fill Color is selected and your Tolerance is low. With our pathfinder ready we can now select each color group with the wand and Unite them as a solid piece with the Pathfinder’s Unite Shape Mode.
Make sure your other layers are locked or hidden or we inadvertently group pieces of our various layers together. Once the layer is finished make sure the art is selected and re-Grouped by hitting shortcut Command(Ctrl)/G. This will keep the 3D effect from from doing funky things.
Step 7
Now when we apply the Effect>3D>Extrude & Bevel we can see the new difference. Once again you may fiddle around with the parameters how you wish to give your art a good aesthetic.
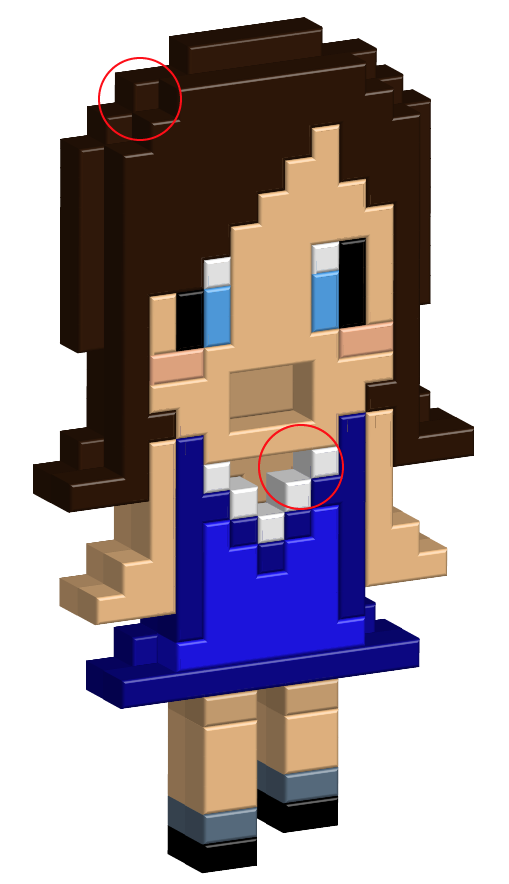
I will take this time as well to remind you that Illustrator’s 3D effects aren’t really the “End-all, Be-all” of 3D effects. So you may see some strange things especially since we are using the 3D in a somewhat unconventional way. You may get some artifacting and an occasional strange line. As you can see pictured in the left shoulder of my art. These can be easily remedied in our final product by creating some rectangle shape “patches” of the same color, or our final art can patched up later in Photoshop.
Step 8
Once you have your desired look you can apply the same effect and parameters to the 2_Middle layer. Place this layer directly over the 1_Bottom layer. You can use the Arrows on the keyboard to nudge the art up just right. Now you can start to see the great depth our pieces create when stacked up on each other. Look at the negative space areas of the mouth and neck! Rad!
Step 9
In our final step we will repeat Step 8 on our remaining layers. You have now created 3D pixel art in Adobe Illustrator!Finish up your art by creating a background and other characters or elements to your composition. Drop shadows can also be applied to these 3D layers for extra depth. Pat yourself on the back Vector Cadet!
Tutorial by Dan Grady
Dan Grady’s Internet Stuffs
My Website
My Youtube Channel
The Vector Sector


3d create game
Hello, I enjoy reading all of your article. I like to write a little comment to support
you.
wow! awesome!
Something weird happens for me. When i let go of the eyedropper, the whole grid gets filled. Also, when I somehow managed to get the flower to go red, and tried to get the middle, the whole flower turned yellow. Please Help!
I think that there is a mistake with the possition of the bow. The location in the template and in the 3D build up are different. It creates me a little bit of confusion.
By the way, this blog is amazing.
Thank you for all the “vectips”
The same thing happens to me!!
hi,
I tried to do the tutorial, but the gap for the mouth is being filled when I create the 3d. 🙁
I had the same problem 🙁
Very cool. I also like that animated gifs from my first tut on this site are becoming “a thing”!
Animated gifs are a great supplement to written tutorials. I’ve been using them on my own blog for a few years.
Thanks for the Great tutorial it’s been a fun playing around with your fav. game character and convert them into 3D.
welogodesigner
It’s really fun, and surprisingly quick and easy.