
 In the following tutorial, you will learn how to create a 3D text effect in Adobe Illustrator using only a piece of text. For starters you will learn how to create a dark, textured background and how to easily center it. Moving on, using a simple piece of text, taking full advantage of the Appearance panel and cleverly adjusting some of Illustrator’s basic effects, you will learn how to create this bold, 3D text effect.
Tutorial Details
- Program: Adobe Illustrator CS5
- Difficulty: Beginner-Intermediate
- Topics Covered: Basic Tools & Effects and the Appearance panel
- Estimated Completion Time: 45 minutes
Final Image
As always, this is the final image that we’ll be creating:

Step 1
Hit Command + N to create a new document. Select Pixels from the Units drop-down menu, enter 600 in the width box and 400 in the height box then click on the Advanced button. Select RGB, Screen (72ppi) then click OK.

Step 2
Pick the Rectangle Tool (M) and focus on your Toolbar. Remove the color from the stroke then select the fill and set its color at R=102 G=102 B=102. Now, simply click on your artboard to open the Rectangle window. Enter 610 in the Width box and 410 in the Height box then click the OK button to create the initial rectangle. Next, you will need to center it, so open the Align panel (Window > Align). Set the aligning to artboard (open the fly out menu and go to Show Options if you can’t see the Align To section as shown in the following image) then simply click the Horizontal Align Center and Vertical Align Center buttons. In the end, your rectangle should cover the entire artboard as shown in the following image.

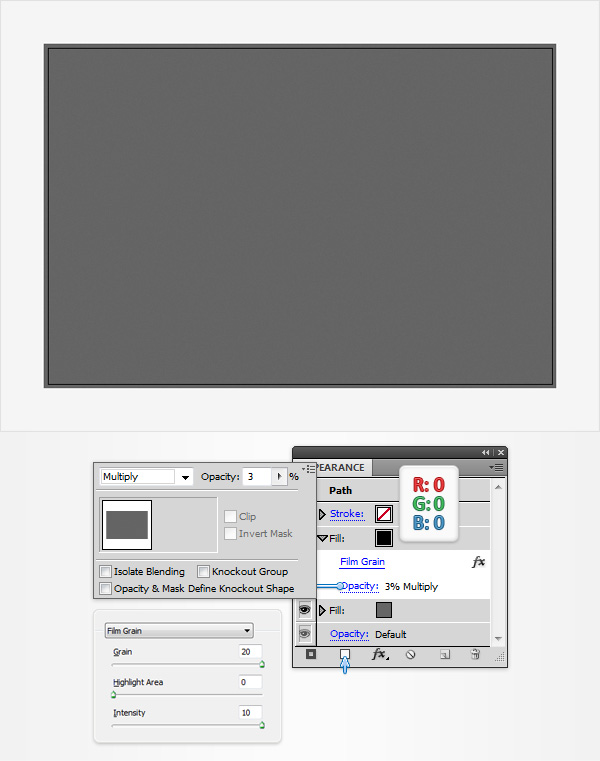
Step 3
Make sure that your rectangle is still selected, focus on the Appearance panel (Window > Appearance) and add a second fill using the Add New Fill button (pointed by the little, blue arrow in the following image). Select this new fill and set its color at black. Keep focusing on the Appearance panel and click on the little arrow icon that stands for your black fill. Simply click on that Opacity piece of text to open a fly-out Transparency panel. Change the Blending Mode to Multiply and lower the Opacity to 3% then go to Effect > Artistic > Film Grain. Enter the properties shown in the following image and click OK.
Step 4
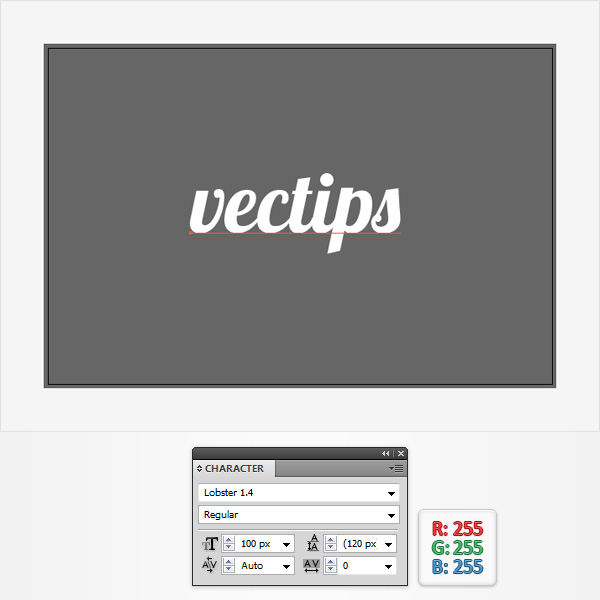
Grab the Type Tool (T) and simply click on your artboad. Type your text and use the Lobster 1.4 font with the size at 100pt and the color at white.
Step 5
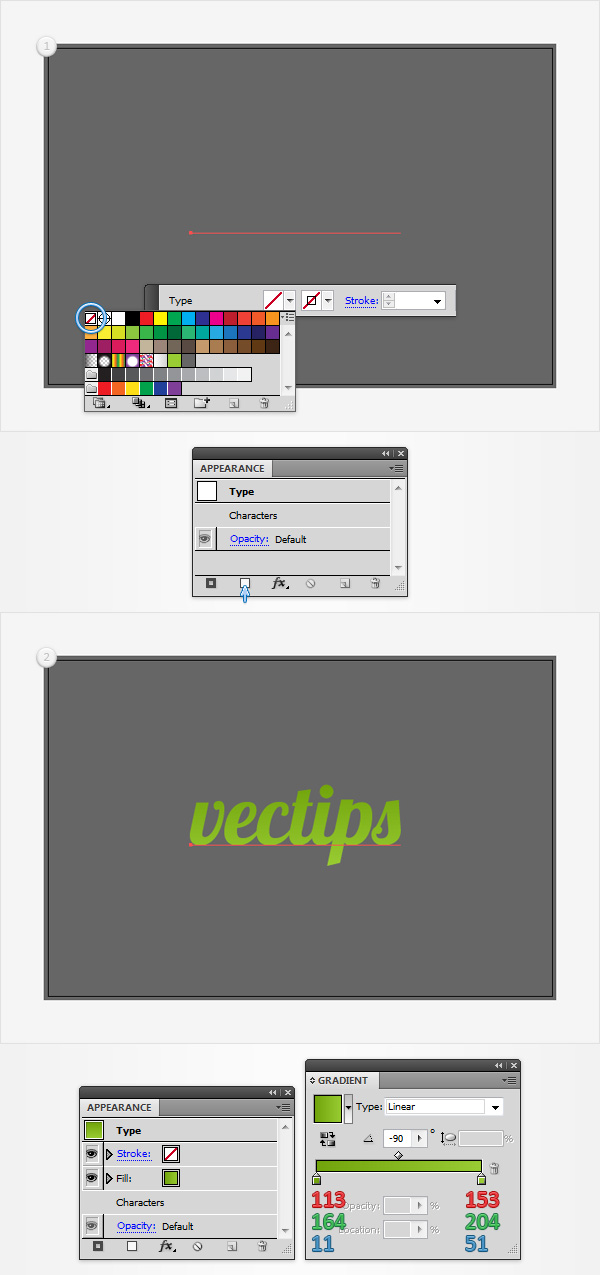
Select your piece of text, focus on the top bar and simply remove that white from the fill. This should make your text invisible. Make sure that your piece of text stays selected, focus on the Appearance panel and add a new fill using that same Add New Fill button. Select this new fill, open the Gradient panel (Window > Gradient) and simply click on the gradient thumbnail to add the default black to white linear gradient. Keep focusing on your Gradient panel, set the angle at -90 degrees, then move to the gradient colors. Select the right slider and set the color at R=153 G=204 B=51, then select the left slider and set the color at R=113 G=164 B=11. In the end, things should look like in the second image.
Step 6
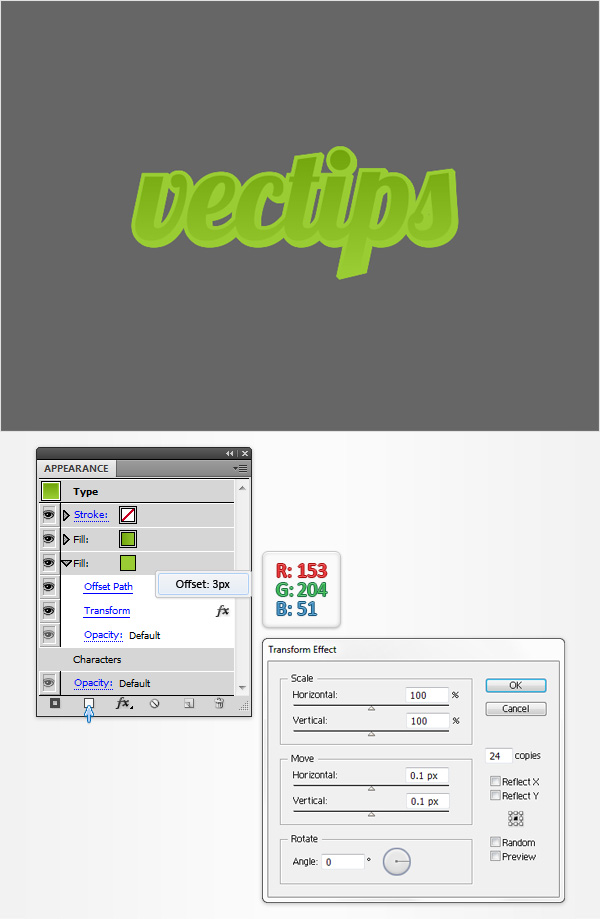
Select your piece of text, focus on the Appearance panel, add a second fill and drag it below the existing fill. Make sure that this new fill is selected, set its color at R=153 G=204 B=51 and go to Effect > Path > Offset Path. Enter a 3px Offset, click OK and go to Effect > Distort & Transform > Transform. Focus on the Move section, drag the Horizontal and the Vertical sliders at 0.1px, enter 24 in the copies box then click OK.
Step 7
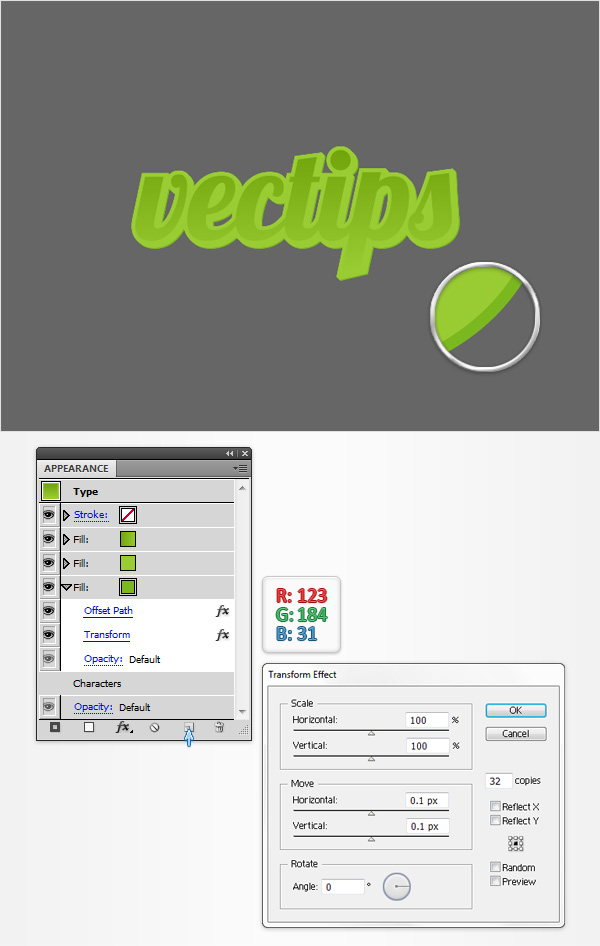
Make sure that your piece of text is still selected, focus on the Appearance panel, select the bottom fill and duplicate it using the Duplicate Selected Item button (pointed by the little, blue arrow in the following image). Select this new fill, drag it below the existing fills, set the color at R=123 G=184 B=31 and open the existing Transform effect. Simply enter 32 in the copies box and click OK.
Step 8
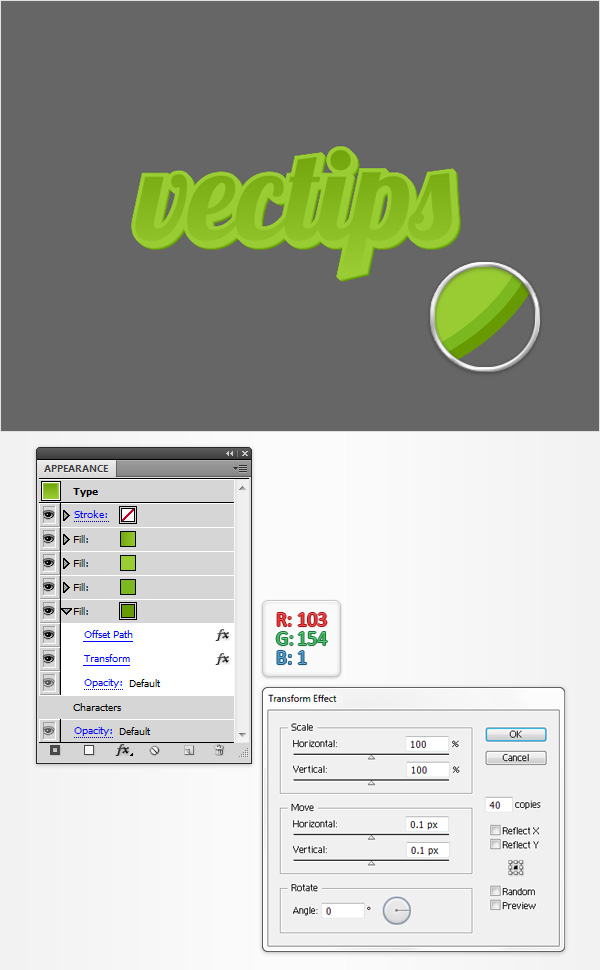
Make sure that your piece of text is still selected and focus on the Appearance panel. Select the bottom fill and duplicate it using that same Duplicate Selected Item button. Select this new fill, drag it below the existing fills, set the color at R=103 G=154 B=1 and open the existing Transform effect. Simply enter 40 in the copies box and click OK.
Step 9
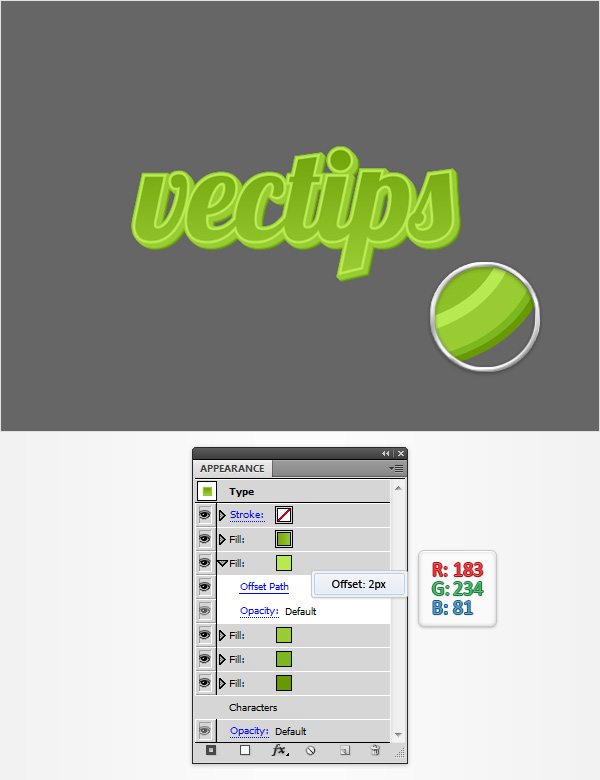
Make sure that your piece of text is still selected, focus on the Appearance panel and add a fifth fill. Select this new fill, set the color at R=183 G=234 B=81, drag it right below the top fill and go to Effect > Path > Offset Path. Enter a 2px Offset and click OK.
Step 10
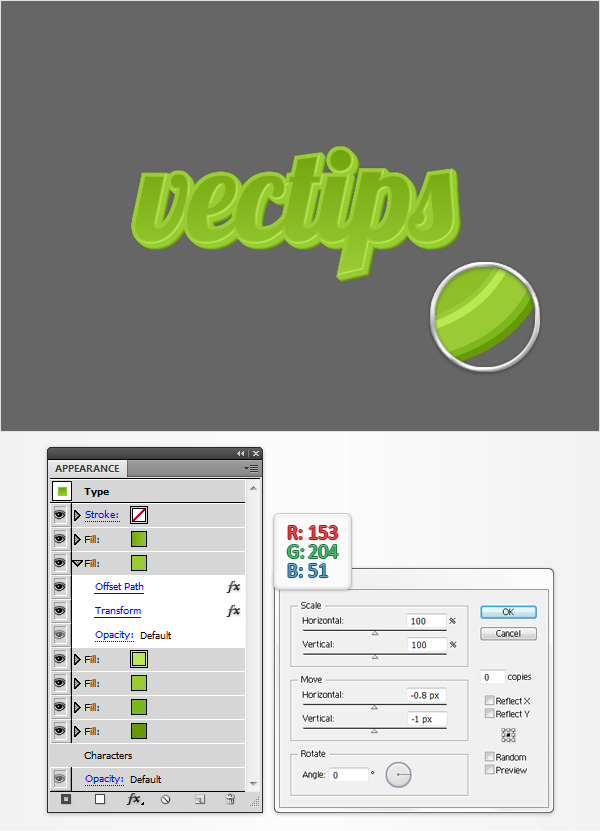
Make sure that your piece of text is still selected, focus on the Appearance panel, select the fill added in the previous step and duplicate it using the Duplicate Selected Item button. Select this new fill, set the color at R=153 G=204 B=51 and go to Effect > Distort & Transform > Transform. Focus on the Move section, drag the Horizontal slider at -0.8px and the Vertical sliders at -1px then click OK.
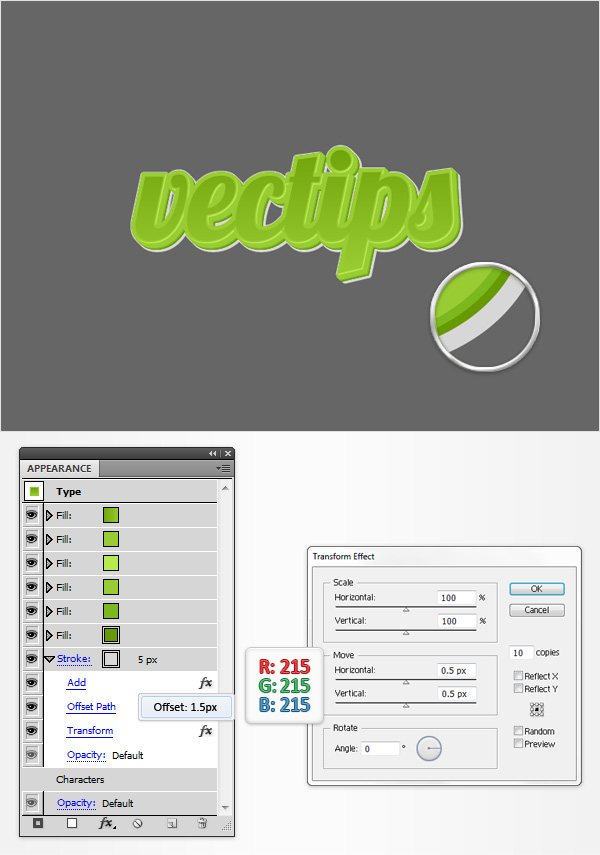
Step 11
Make sure that your piece of text is still selected and focus on the Appearance panel. Select the existing stroke, drag it below the fills, set the color at R=215 G=215 B=215 and the weight at 5px. Keep focusing on this grey stroke, make sure that it stays selected, go to Effect > Pathfinder > Add then go to Effect > Path > Offset Path. Enter a 1.5px Offset, click OK then go to Effect > Distort & Transform > Transform. Focus on the Move section, drag the Horizontal and the Vertical sliders at 0.5px, enter 10 in the copies box then click OK.
Step 12
Make sure that your piece of text is still selected and focus on the Appearance panel. Select the stroke and duplicate it using that same Duplicate Selected Item button. Select this new stroke, drag it below the existing stroke, set the color at R=240 G=240 B=240 and open the existing Offset Path effect. Simply enter a 5px Ofset and click OK.

Step 13
Make sure that your piece of text is still selected and focus on the Appearance panel. Select the top fill and go to Effect > Stylize > Drop Shadow. Enter the properties shown in the following image and click OK.
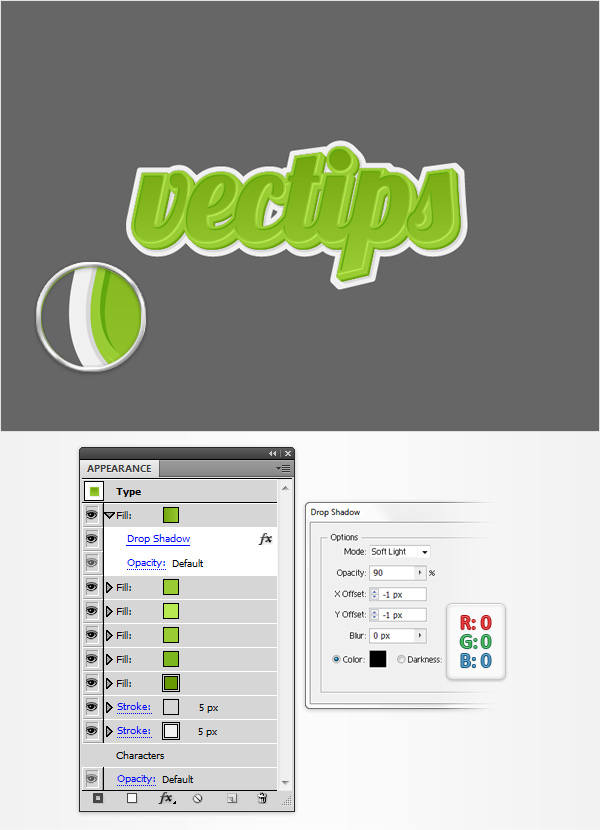
Step 14
Make sure that your piece of text is still selected and focus on the Appearance panel. Select the bottom fill and go to Effect > Stylize > Drop Shadow. Enter the properties shown in the top window (in the following image), click OK and go again to Effect > Stylize > Drop Shadow. Enter the properties shown in the middle window (in the following image), click OK and go one more time to Effect > Stylize > Drop Shadow. Enter the properties shown in the bottom window (in the following image) and click OK. In the end things should look like in the following image.
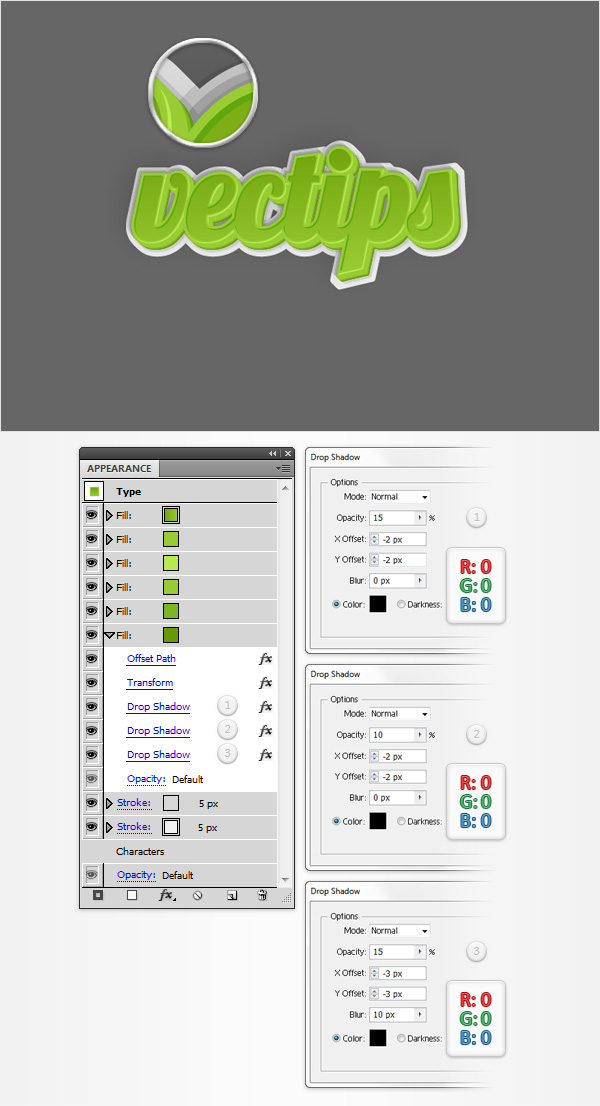
Step 15
Make sure that your piece of text is still selected and focus on the Appearance panel. Select the bottom stroke and add the three Drop Shadow effects (Effect > Stylize > Drop Shadow) shown in the following image.

And We’re Done!
I hope you’ve enjoyed this tutorial and can apply these techniques in your future projects.

Author:Andrei Marius
Andrei Marius is a self taught vector artist who is trying to make a living doing something that he likes. He spends most of his time working in Adobe Illustrator, trying to avoid the Pen Tool. You can find most of his vector experiments at this little website dedicate to Illustrator VforVectors.


Nice tutorial, thank you for sharing your knowledge on 3d affects for illustrator. I will be using this to create some 3d text for a client. Many thanks. Webbro
Excellent tutorial, thank you very much.
Fantastic tutorial. 3 D is no longer a mystery in Illustrator!
Excellent tutorial, thank you very much. Best regards
After step 8, the program hangs. Apparently I have a little RAM.
i love it
just have problem with much shadows 😀
and i was wanna print the result but i have error :/
Mersi frumos!
Great tutorial! One question, What’s the use of effect > pathfinder then ADD? I just didn’t see the changes. I enjoyed every steps and the cool thing here, it’s editable! Thank you so much.
Great question! Without this effect, the stroke will be applied to the outer edges of each individual letter like this. Once this technique is applied, your stroke should appear as one seamless line like this.
Thanks for always giving such great & helpful information!
Awesome techniques! thanks for the post
Muito bom cara!
Seu tutorial ficou de mais, Obrigadão 😀