
In this tutorial, I will show you how to create a briefcase icon with rectangles, ellipses, and gradients. This briefcase icon is great for web designs and user interfaces. Moreover, you can easily apply these techniques to other icons, logos, and illustrations.
Final Image
Below is the final icon we will be working towards.

Tutorial Details
- Program: Adobe Illustrator CS4
- Difficulty: Intermediate
- Topics Covered: Shape tools, Gradient panel, Effects
- Estimated Completion Time: 20-30 minutes
Step 1
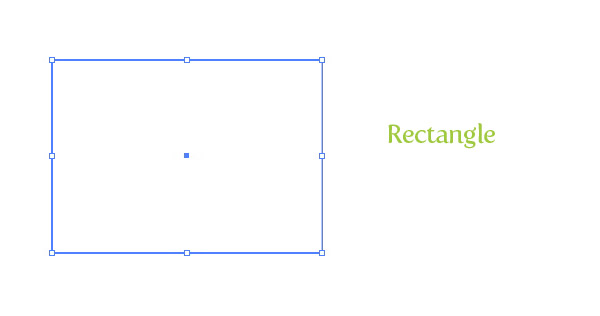
Create a new document and with the Rectangle tool (M), create a rectangle for the main body shape of the briefcase.
Step 2
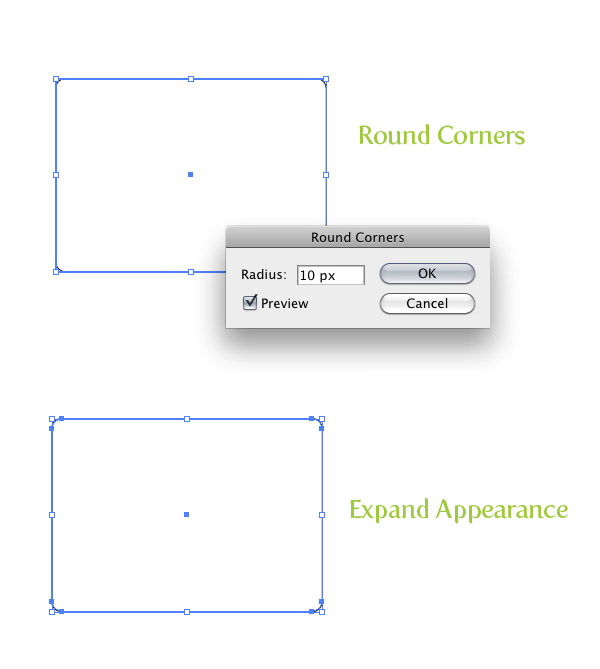
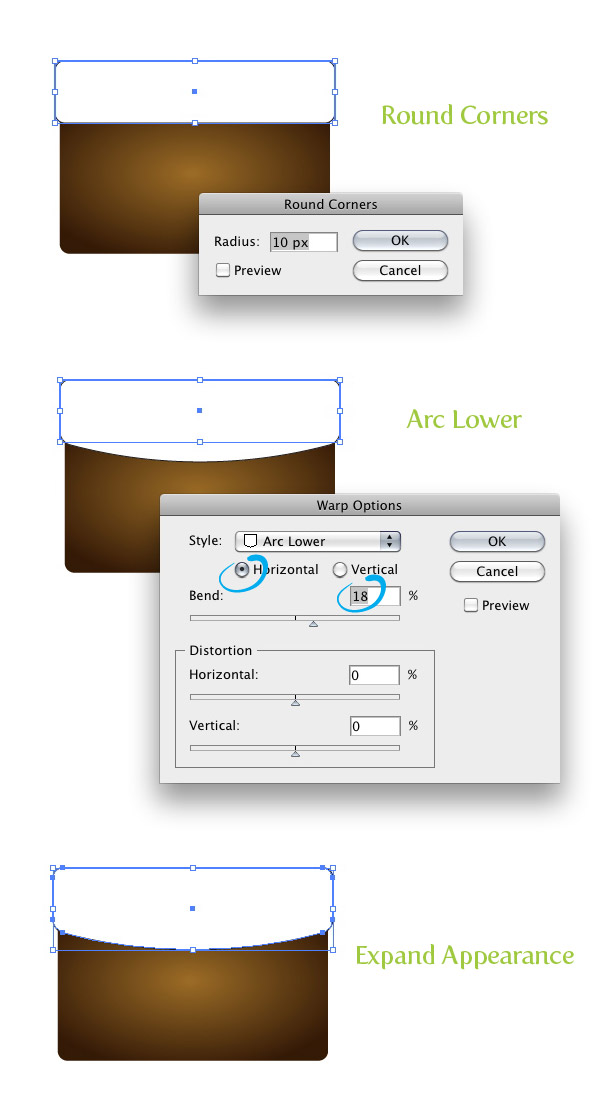
With the rectangle selected, go Effect > Stylize > Round Corners. In the Round Corners dialog, change the Radius to 10 px. This value might be different depending on the size of your main rectangle. Next, go Object > Expand Appearance.
Step 3
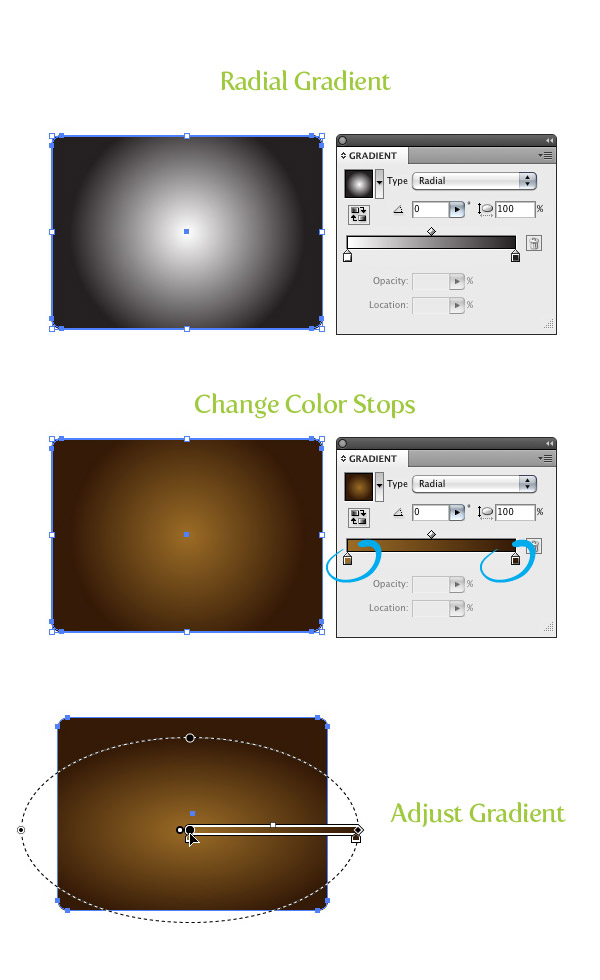
Fill the shape with a radial gradient form the Gradient panel. Change the first color stop in the gradient to a light brown color and the second color stop to a dark brown color. With the Gradient tool (G), scale the circumference of radial gradient vertically, expand the gradient past the left and right borders of the shape, and move it slightly towards the bottom of the shape.
Step 4
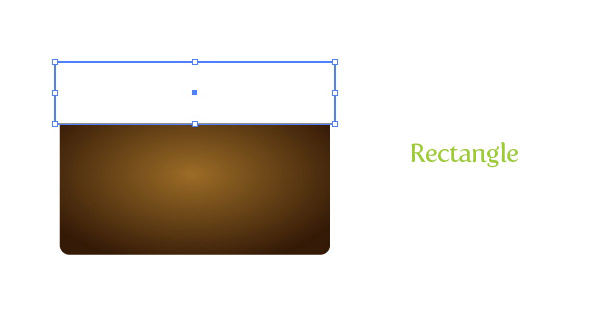
With the Rectangle tool (M), create a rectangle about a third tall and slightly wider than the size of the main shape. Place the new rectangle over the top part of the main body shape. This will be our flap.
Step 5
With the flap shape selected, go Effect > Stylize > Round Corners and change the Radius in the Round Corners dialog to 10 px. Next go, Effect > Warp > Arc Lower. In the Warp Options dialog make sure Horizontal is selected and change the Bend to 18. Now go Object > Expand Appearance.
Step 6
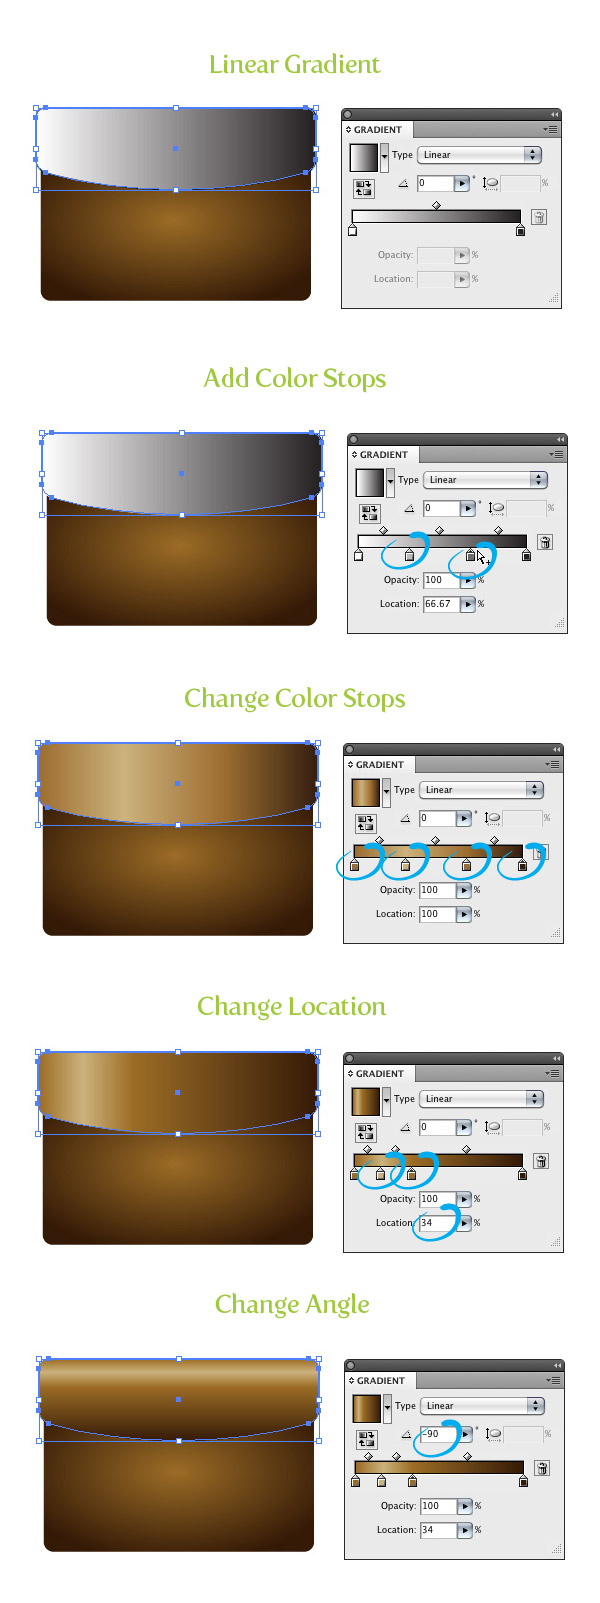
Fill the flap shape with a linear gradient from the Gradient panel. For this gradient we are going to add two color stop giving us a total of four color stops in the gradient. To add the color stops, simply click just below the Gradient Slider in the Gradient panel twice. Change the first color to a brown color, the second to a light brown color, the third the same brown color as the first color stop, and the last one to a dark brown color. Select the second color stop and change the Location from the Gradient panel to 16 and change the Location of the third color stop to 34. Next, change the Angle of the gradient to -90.
Step 7
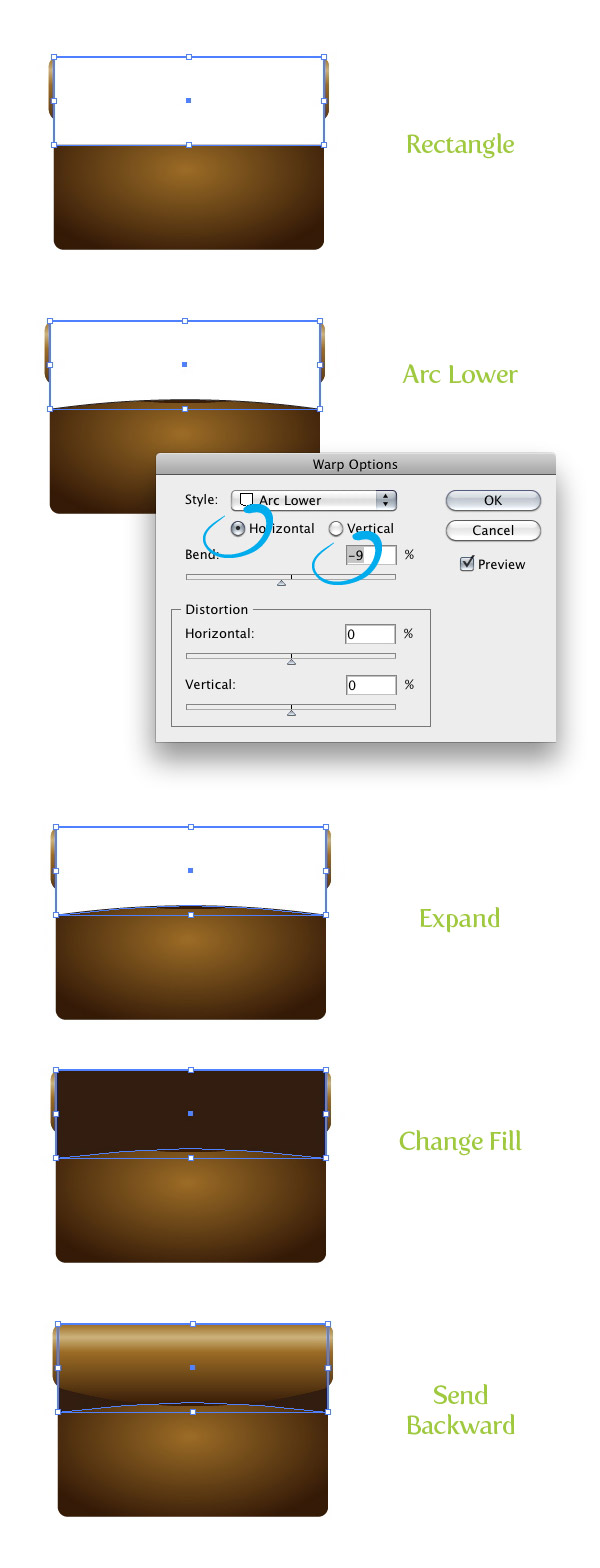
With the Rectangle tool (M), create a rectangle half the height and same width as the main shape. Go Effect > Warp > Arc Lower. In the Warp Options dialog, make sure Horizontal is select and change the Bend to -9. Expand the Appearance, fill the shape with your dark brown, and go Object > Arrange > Send Backward (Command + [ ).
Step 8
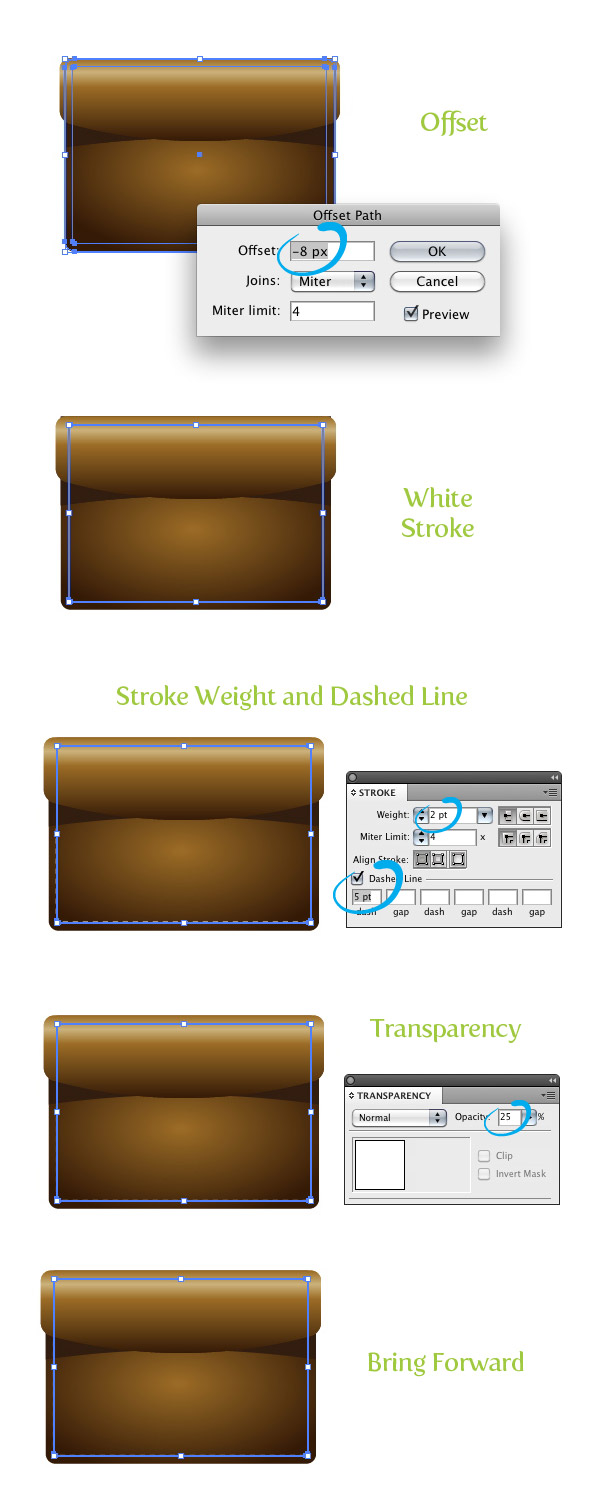
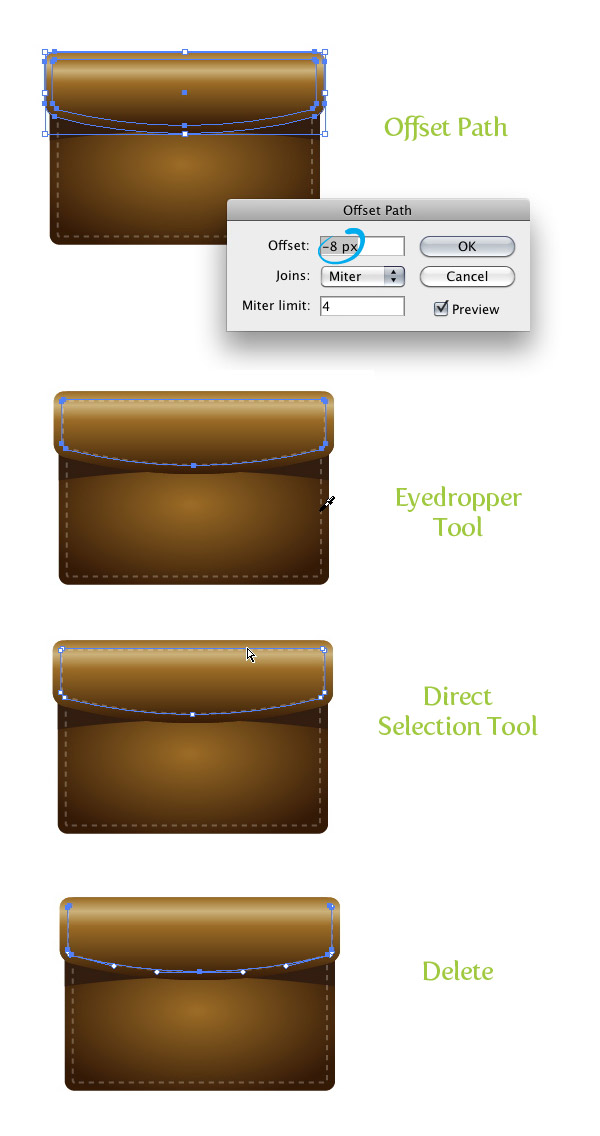
Select the main shape and go Object > Path > Offset. In the dialog, change the Offset to -8 px. Take off any fill and change the stroke color to white. From the Stroke panel, change the Weight to 2 pt and select a 5 pt Dashed Line. From the Transparency panel, change the Opacity to 25. Next, go Object > Arrange > Bring Forward (Command + ] ).
Step 9
Select the flap shape and go Object > Path > Offset and change the Offset to -8 px. With the new offset still selected use the Eyedropper tool (I) and sample the dashed line you created in the first step. Next, with the Direct Selection tool (A), select the top line in the new dashed line and delete it by pressing the Delete button.
Step 10
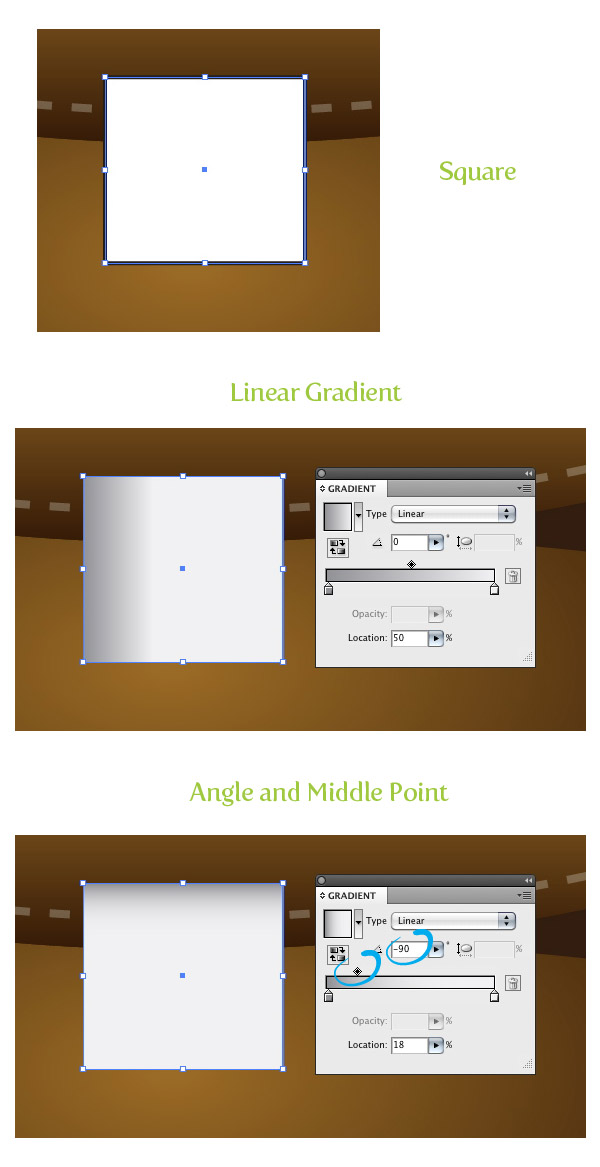
Create a small square with the Rectangle tool (M) and place it where the bottom of the flap shape arc. Fill the square with a linear gradient with the first color stop a gray color and the second color stop white. In the Gradient panel, change the Middle Point of the gradient to 18 and the Angle to -90.
Step 11
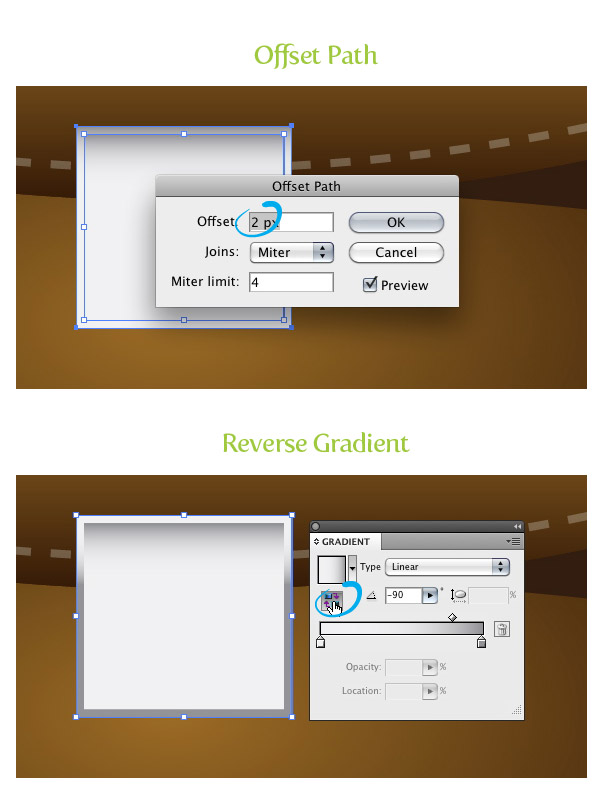
Offset to square by 2 px and press the Reverse Gradient button from the Gradient panel.
Step 12
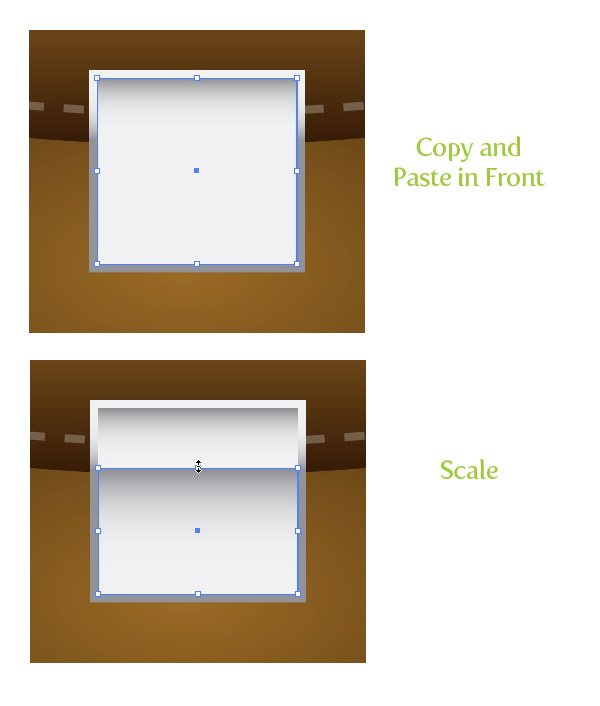
Select the original square, Copy (Command + C), and Paste in Front (Command + F). With the Selection tool (V), select the top of the square and scale it vertically down to about two thirds of its original size.
Step 13
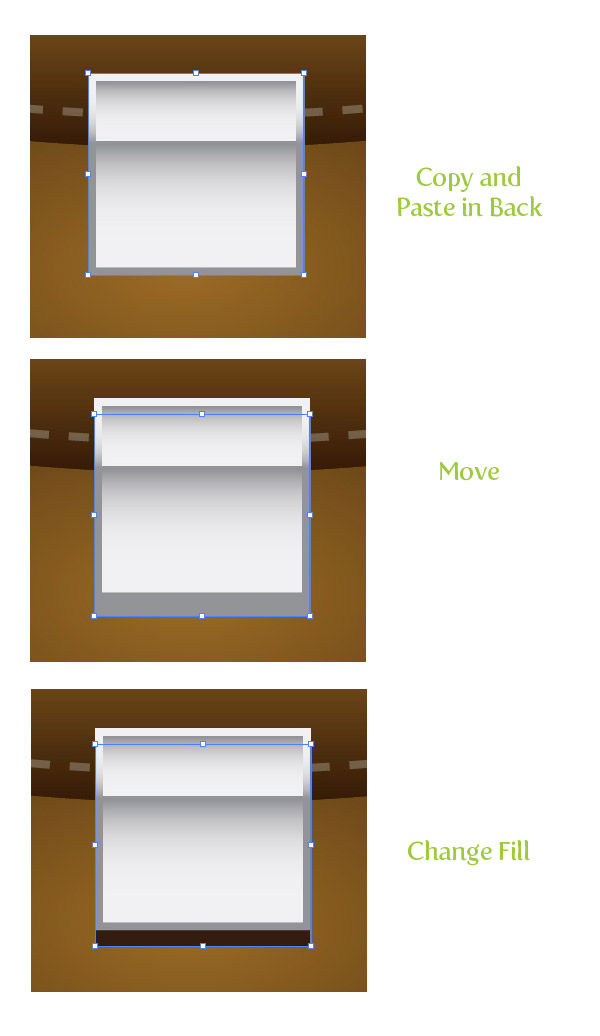
Select the offset square, Copy (Command + C), Paste in Back (Command + B), and move down slightly with the Selection tool (V). Next, change the fill to your dark brown color.
Step 14
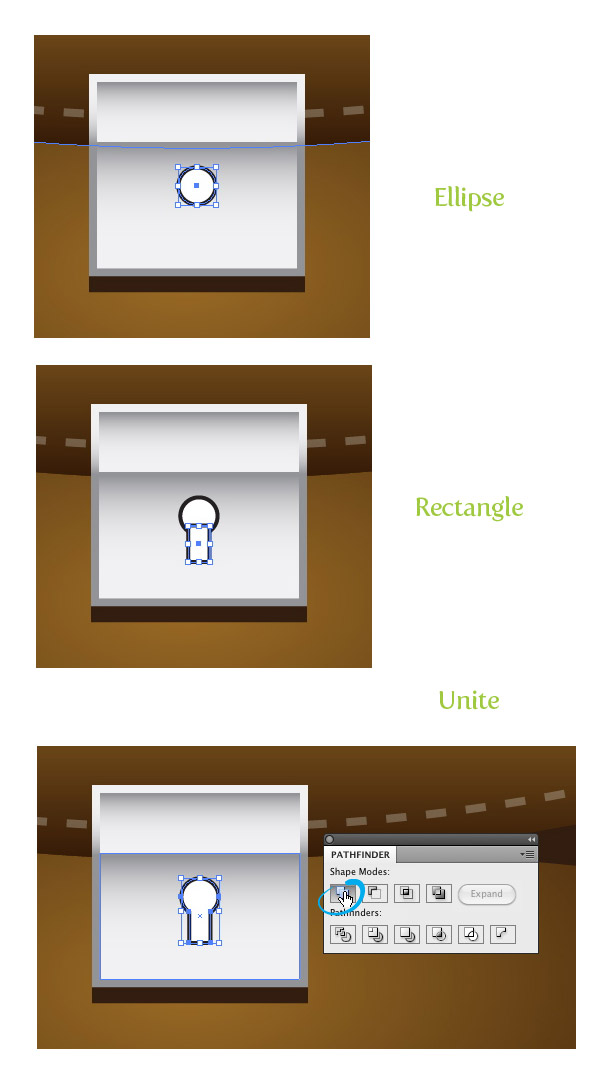
Draw a small ellipse in the bottom half of the square shapes and draw a thin rectangle coming out of the bottom of the circle. Select both shapes and press the Unite button in the Pathfinder panel.
Step 15
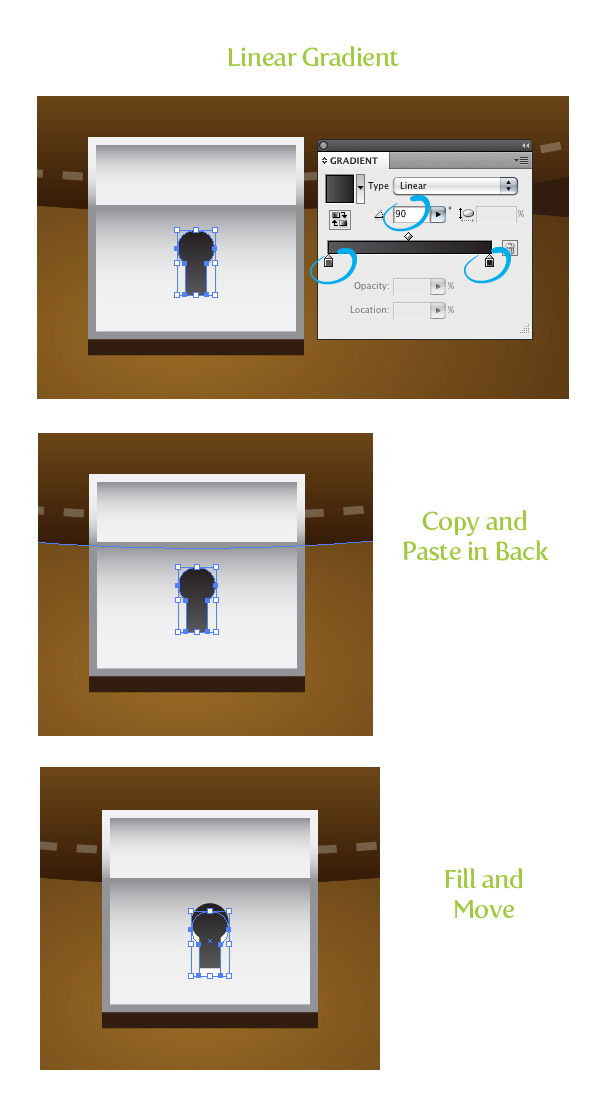
Fill the new shape with a linear gradient, change the first color stop a dark gray color, the second an even darker gray color, and change the Angle to 90. With the shape still selected, Copy (Command + C), Paste in Back (Command + B), move down slightly, and change the fill to white.
Step 16
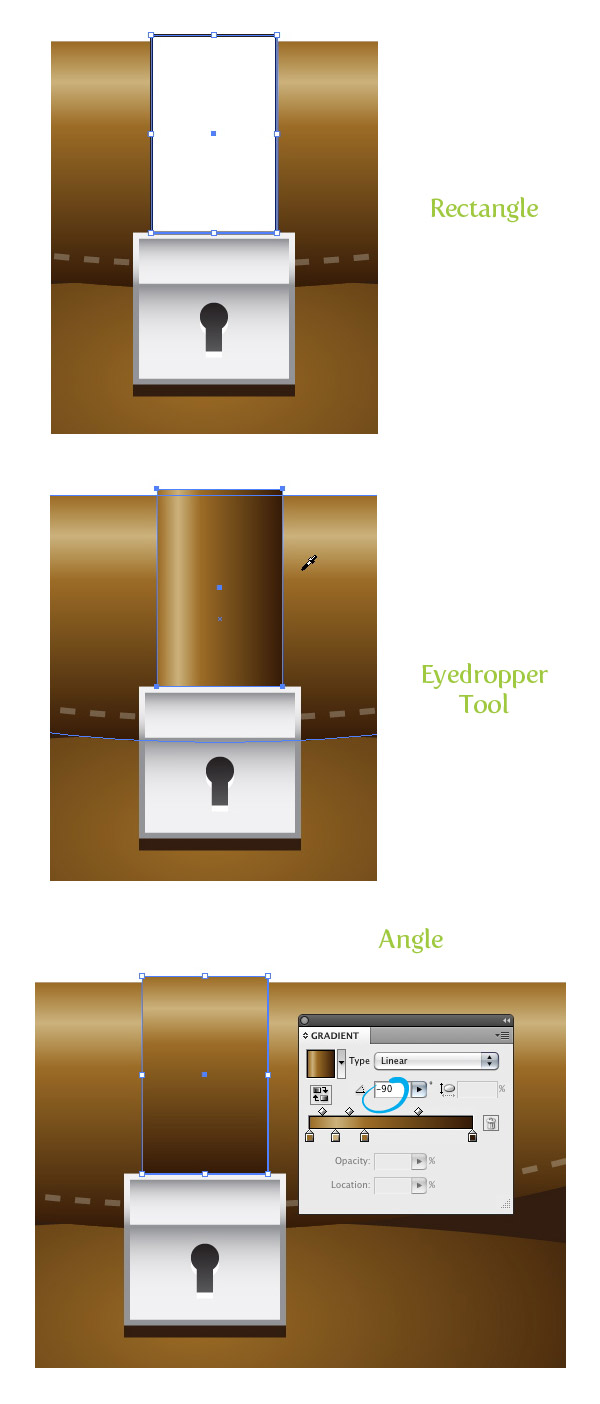
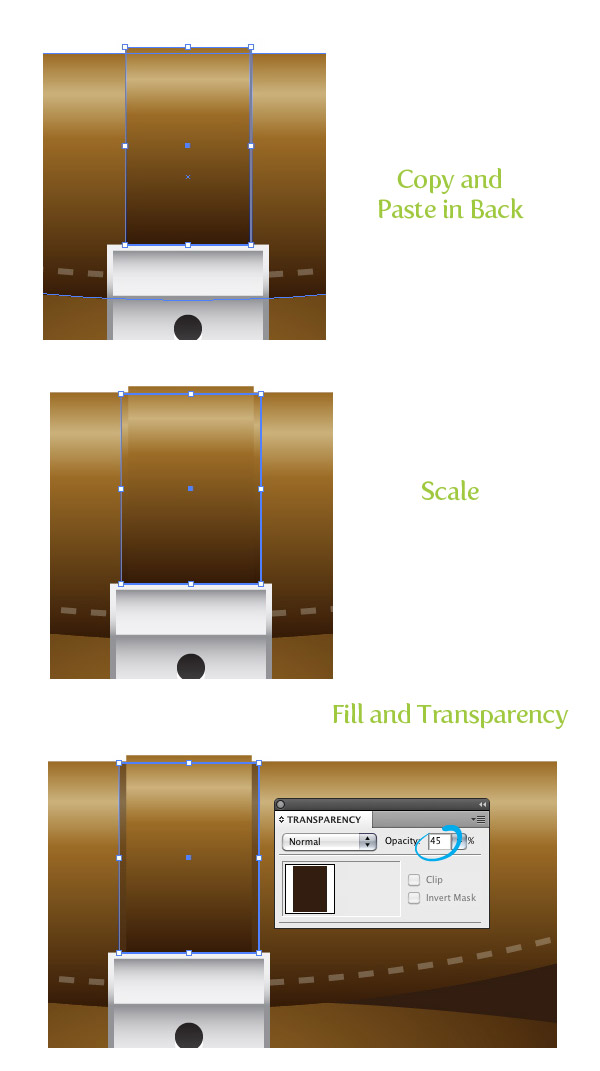
Create a rectangle from the top of the buckle shapes to slightly above the flap shape. Use the Eyedropper tool (I) and sample to flap linear gradient and change the Angle to -90.
Step 17
Select the new rectangle, Copy (Command + C), and Paste in Back (Command + B). With the Selection tool (V), widen the shape slightly and make the top of the copy line up with the top of the flap. Change the copy to your dark brown color and set the Opacity to 45 from the Transparency panel.
Step 18
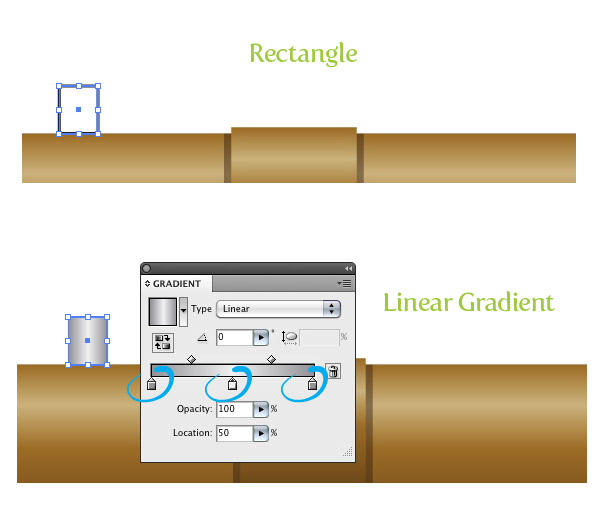
Create a small rectangle on top of the flap shape. Fill the rectangle with a three color stop gradient. Change the first color stop to a gray color, the second white, and the third to a gray color.
Step 19
Use the Selection tool (V), Hold down Alt/ Option, hold down Shift, and drag a copy of the rectangle to the opposite side of the top flap.

Step 20
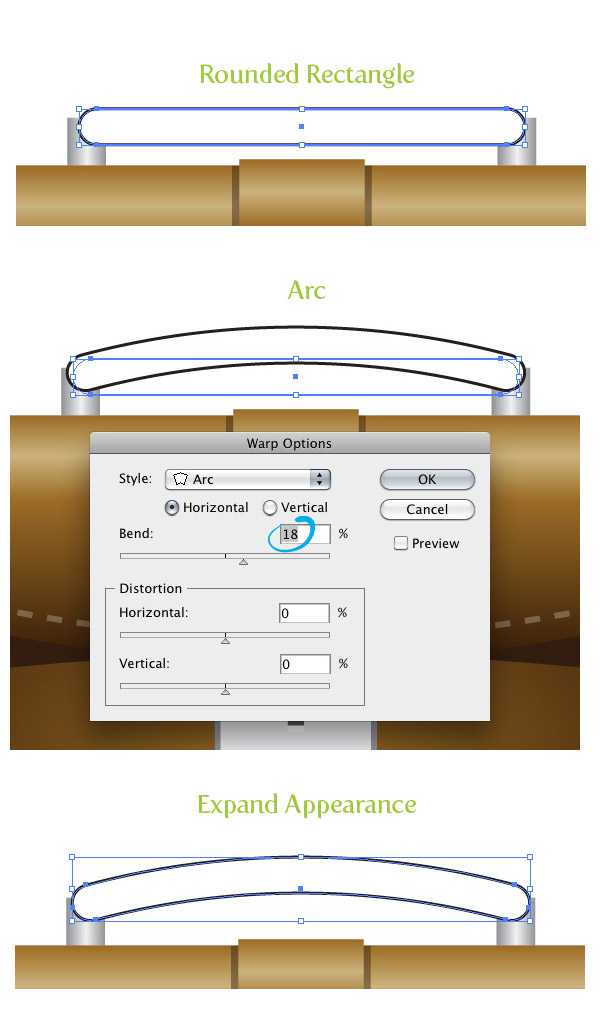
Use the Rounded Rectangle tool and create a thin rounded rectangle connecting the two small rectangles. With the rounded rectangle selected, go Effect > Warp > Arc, make sure Horizontal is selected, and change the Bend to 18. Next, go Object > Expand Appearance.
Step 21
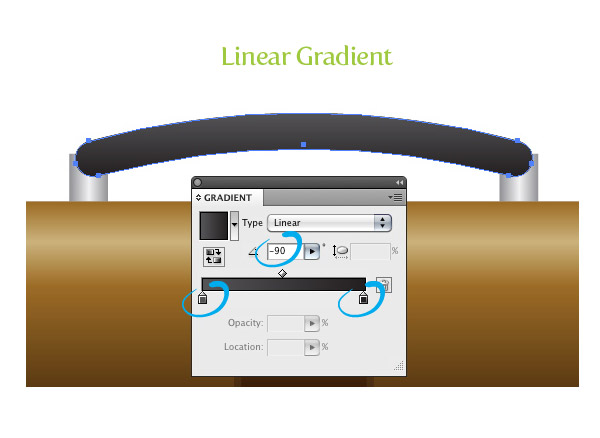
Fill the arc shape with a linear gradient, change the first color stop to a dark gray color, the second color stop to black, and change the Angle to -90.
Step 22
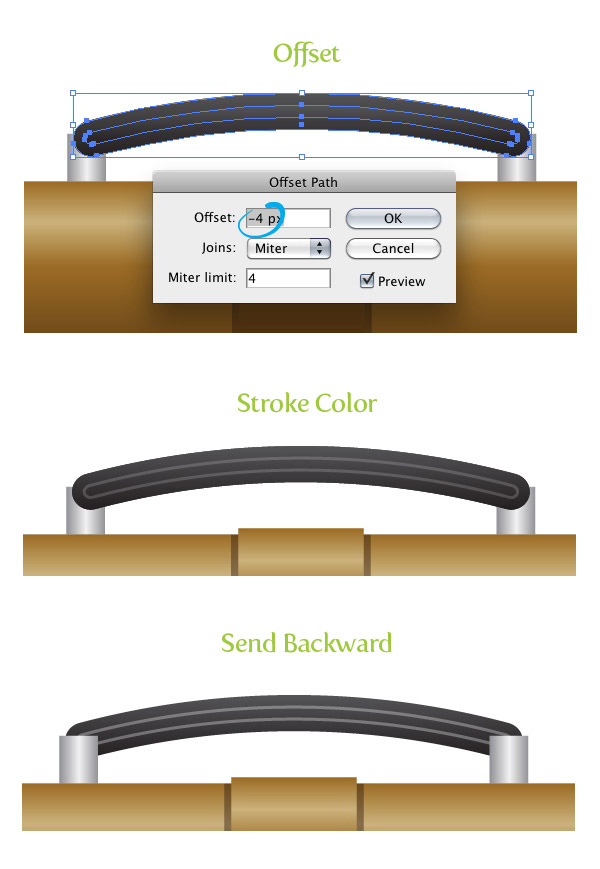
Offset the arc shape by -4 px and change the stroke color to a gray color. Select both arc shapes and send them behind the smaller square shapes.
Step 23
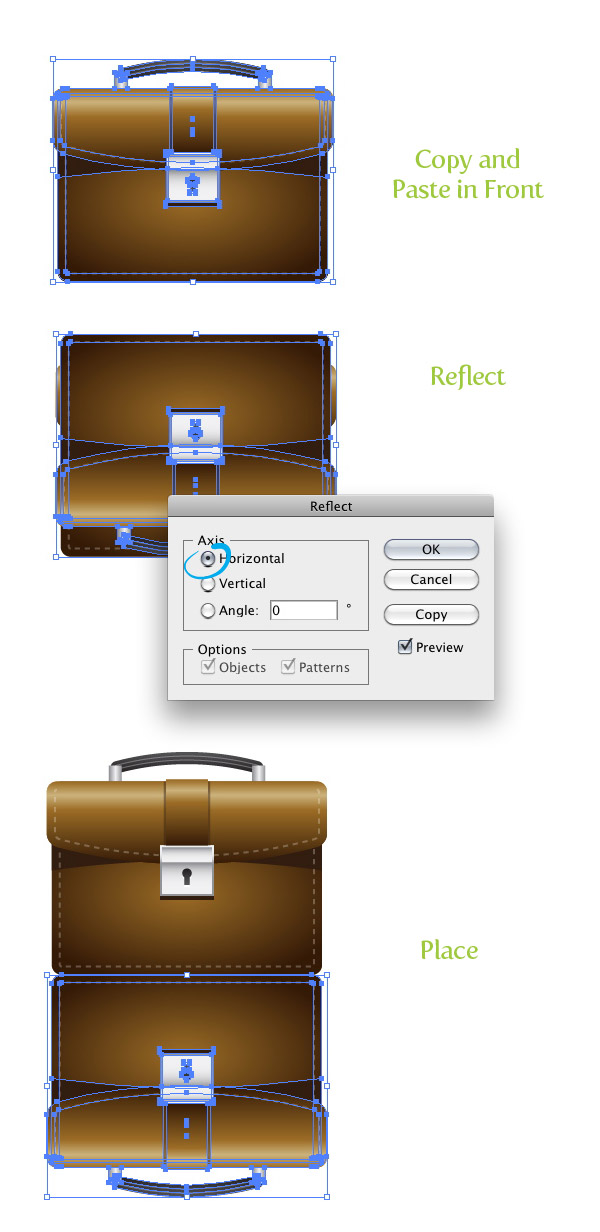
Select all the artwork we have created so far, Copy (Command + C), and Paste in Front (Command + F). With the copies still selected, go Object > Transform > Reflect. In the Reflect dialog change the Axis to Horizontal. Next, move the reflected copies right under the original artwork.
Step 24
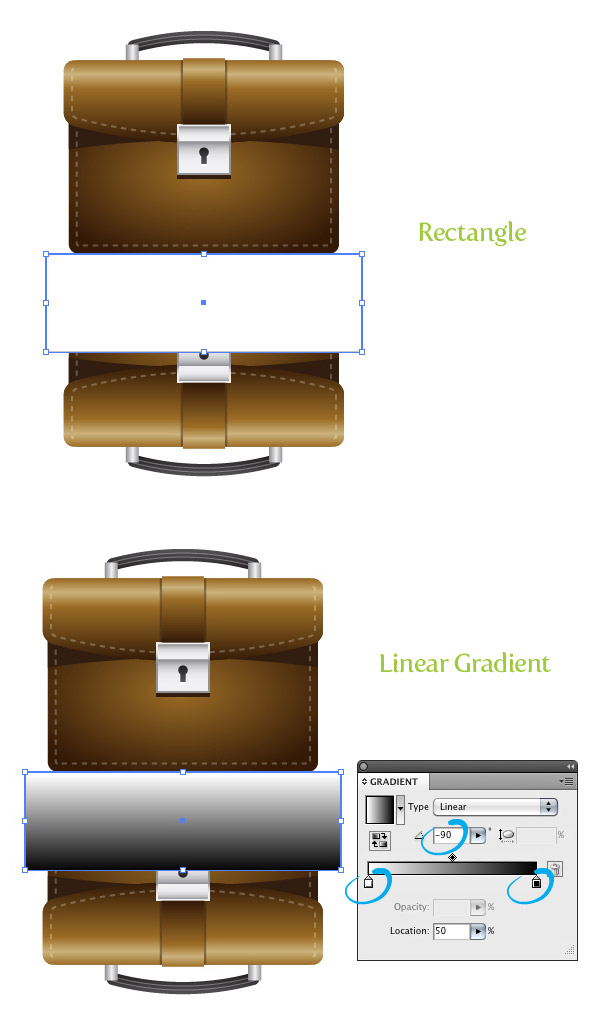
Create a rectangle over top half of the reflection. Fill the rectangle with a linear gradient, change the first color stop to white, the second color stop to a rich black and change the Angle to -90.
Step 25
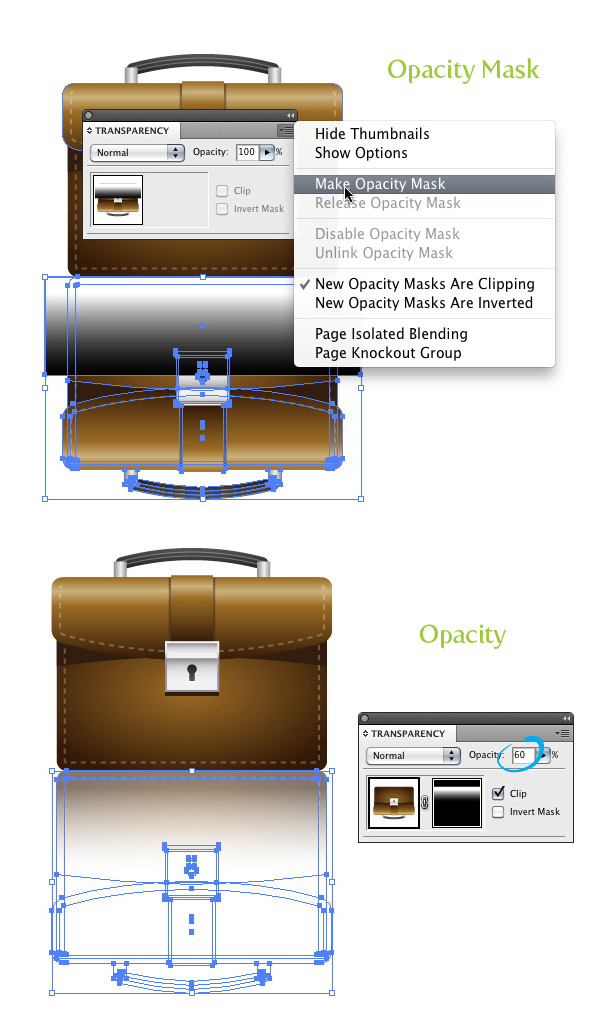
Select the reflection and gradient and choose Make Opacity Mask from the pop-up menu of the Transparency panel. Next, change the opacity of the mask to 60.
Step 26
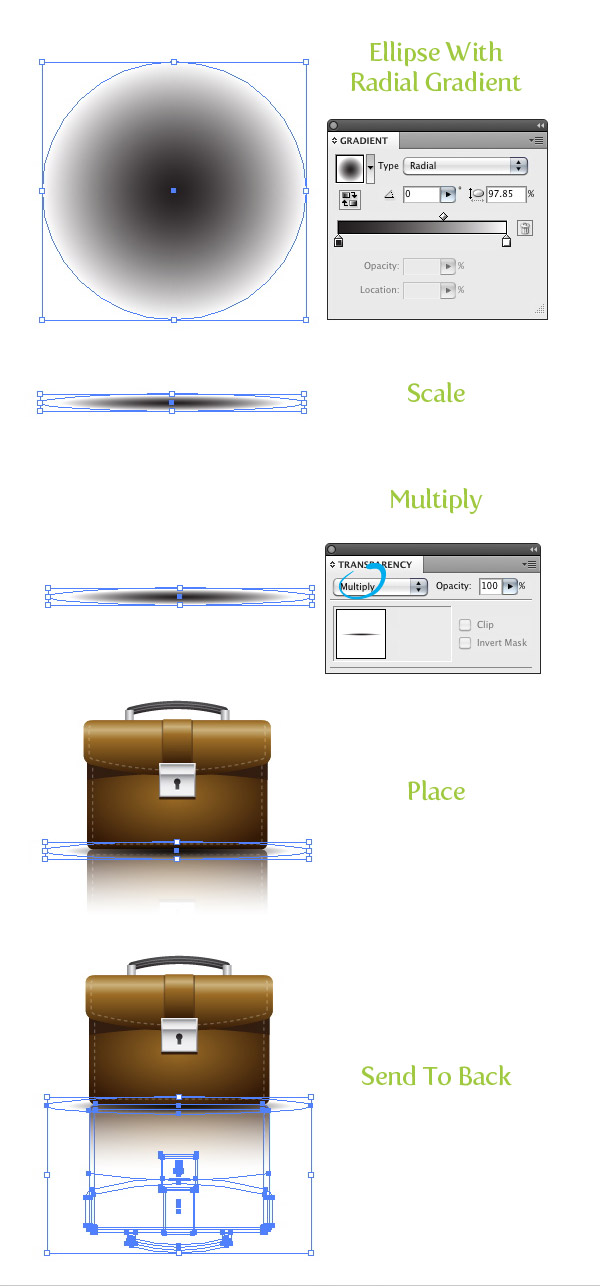
Create an ellipse bigger than the main briefcase artwork and fill it with a radial gradient. Scale the ellipse down vertically to about an eight of its original size. Set the Blending Mode to Multiply from the Transparency panel and place the ellipse over the bottom part of the briefcase. Select the ellipse and opacity mask and send them behind all other artwork. All done! You can also place your icon on different color backgrounds. In my example I placed the icon on a dark gray radial gradient background.
Final Image
Below is the final image again.


Hello. splendid job. I did not imagine this. This is a remarkable story. Thanks!
I just like the valuable info you supply to your articles. I’ll bookmark your weblog and check again right here frequently. I’m relatively certain I’ll learn plenty of new stuff proper here! Best of luck for the following!
Thank you for every other excellent article. The place else could anyone get that type of information in such a perfect means of writing? I’ve a presentation subsequent week, and I’m at the look for such information.
I have to point out my admiration for your kind-heartedness for persons that actually need help with this one content. Your real commitment to getting the solution all over appeared to be certainly insightful and have consistently enabled individuals just like me to attain their desired goals. The valuable instruction entails a whole lot to me and even further to my colleagues. Thanks a ton; from all of us.
You need to participate in a contest for top-of-the-line blogs on the web. I’ll suggest this site!
I’ve been surfing online more than 3 hours today, yet I never found any interesting article like yours. It is pretty worth enough for me. In my opinion, if all web owners and bloggers made good content as you did, the net will be a lot more useful than ever before.
Hmm it appears like your site ate my first comment (it was extremely long) so I guess I’ll just sum it up what I had written and say, I’m thoroughly enjoying your blog. I too am an aspiring blog writer but I’m still new to everything. Do you have any helpful hints for first-time blog writers? I’d genuinely appreciate it.
Hello! I’ve been reading your website for a long time now and finally got the bravery to go ahead and give you a shout out from Kingwood Texas! Just wanted to say keep up the great job!
Wow, fantastic blog layout! How long have you been blogging for? you make blogging look easy. The overall look of your web site is excellent, as well as the content!
very good put up, i actually love this web site, keep on it
I do not even know how I ended up here, but I thought this post was great. I do not know who you are but certainly you’re going to a famous blogger if you are not already 😉 Cheers!
Hello. impressive job. I did not imagine this. This is a remarkable story. Thanks!
This article is very useful
Thank you to the esteemed administrator of this site
Great Expleiaion.
hello, it looks like Old but good. I will try it, thanks.
Hey, I appreciate your help with this tut. thank you.
Hey, thats incredible! i learn a lot from your explanation, thank you.
Thanks for sharing
great
You are the best maan..
Thank you so much
Good Job
Thank you so much
thank bro sitem good..
Old but good I will try
very very nice
“This is the right website for anyone who hopes to understand this topic. You know a whole lot its almost hard to argue with you (not that I personally will need that .¦HaHa). You certainly put a new spin on a topic that has been written about for many years. Wonderful stuff, just wonderful!
“
Brilliant, I really love it – thanks for taking the time to share it with us
This an excelent tutorial but could anybody provide similar for Photoshop
Thanks anyway
This is an exelent tutorial. I’ll be more than happy if anyone could provide same for Photoshop.
Thanks Anyway
good job man !
The most beneficial point about this method it not simply looks interesting it priced perfectly.
This will make it easier for you to multi-task and run demanding applications.
What merchandise is your invited guests buying?
whoah this weblog is magnificent i like reading your articles.
Keep up the good work! You know, a lot of persons are hunting around for this information,
you could help them greatly.
Lest you cast me into the camp of these w/just a few feeds, let me notice I have over 200 subs.
I also make this with very antique and very sufficient bag.. thanks this blog
thanks for sharing
very helpful !
Good post.
Awesome Creations!!!…. Thanks alot posting it will help in develpoing our skills
Thanks Alot!!!
Thanks!
its very superb i learned it, thank you very much
wow! thanks tutorial i actually followed your easy steps and accomplished this creative breifcase 🙂 now i feel like every other retard on this website… but i enjoyed it loads
wow..! this was a great tut. i really enjoyed it. it gives great info and techniques.
thank you very much
best regards
this is nice and creative tutorials, so many many thanks.
nice tutorial…
thanx
very good tutorial
This is a great tutorial and I love the finished result!
Good site you have here.. It’s difficult to find excellent writing like yours nowadays. I honestly appreciate people like you! Take care!!
THANX. NICE TUTORIAL
Thanks a lot!
Thanks so much for your wonderful tutorial training!!! Awesome!!!
Finally find this trick! Thanks a lot.
Thanks. It helped me a lot. Since i was out of practice with Illustrator. I appreciate your help with this tut. 🙂
It’s a nice tutorial but I have a problem here with Step 22 – Offset the arc shape by -4 px and change the stroke color to a gray color. Select both arc shapes and send them behind the smaller square shapes.
I am not able to get the same effect as shown in the picture. Once I apply the offset, the arc became thinner.
Beautiful! Thank you very much!
Awesome results
really it’s good. great work..!
Thanks a lot for this excellent and easy tutorial.
Here is how my drawing turned out:
http://imageshack.us/photo/my-images/545/briefcasetutorial.png/
(The colors are a bit off and I couldn’t get the gradient effect in step 3 since I have an older version of Illustrator, but I think it worked out pretty well.)
awesome, i enjoyed doing this tutorial, thanxxxxx
Very useful tutorial for my business projects.
Great tutorial thanks
Good tutorial, i like it. Thanks for sharing.
It’s good to read a blog with some new info. on this. I keep reading the same rehashed material. Thanks for the informative post.
Wonderful!!!! Thanks!
Thanks! It’s good!
good,i like it
Excellent explanation and i can not help doing some imatating ! And thanks for your sharing !
I dont understand 3.step: How to make this circle? “With the Gradient tool (G), scale the circumference of radial gradient vertically, expand the gradient past the left and right borders of the shape, and move it slightly towards the bottom of the shape.”
Basically you fill the shape with a radial gradient and adjust the gradient with the Gradient tool. When you have the Gradient tool selected, you will see the circle selection area like in the preview (this is only in CS4 and above). Is this the part that you don’t understand?
yes, thanks! 🙂
thanks for share.
thanks for tutorial
really simple to crew.
Good work!
this is only tutorial with briefcase that you have? ther is a tuttorial with other style?
cute
nice nice…..have no words to say this is really nice are thank you i will try best to design like this. 🙂
Maybe a stupid question.. But how to make a background like that?
It is just a rectangle filled with a radial gradient.
I never really knew how to use illustrator properly and now I’m keen as to learn more. Thanks muchly 😀
Thank you. Very good tutorial.
wonderful tutorial
very pretty and easy to follow.
Brilliant, I really love it – thanks for taking the time to share it with us 🙂
great tutorial!
excellent explanation of the reflection
thanks!
As always, BIG tutorial, icon looks great!
flipping heck! thats incredible! i learn a lot from these posts.. excellent tutorial many thanks for sharing!
Excellently executed! Nice tut, thanks!
Awesome, you dont many icon tuts these days
nice results 🙂
dunno why you would use rectangle > round corners when you can just use the rounded rectangle tool though.
I think its simply to have better control which using the drawing tool doesn’t provide. Trust Ryan for what he does. He knows his stuff really well.
Very crisp and nice tutorial as always !!
Thanks to this tutorial, I made and learned something. Thank you!
Wonderful work Ryan – a couple of new tricks here. Expand Appearance (finally I understand!) and Opacity Mask… verrry interesting!
Thanks so much!
wonderful result
thnx alot!
Awesome results, it’s so clean!
The ofset path is a simple tricky tips I didn’t know beforee reading this tuts.
Thx a lot.