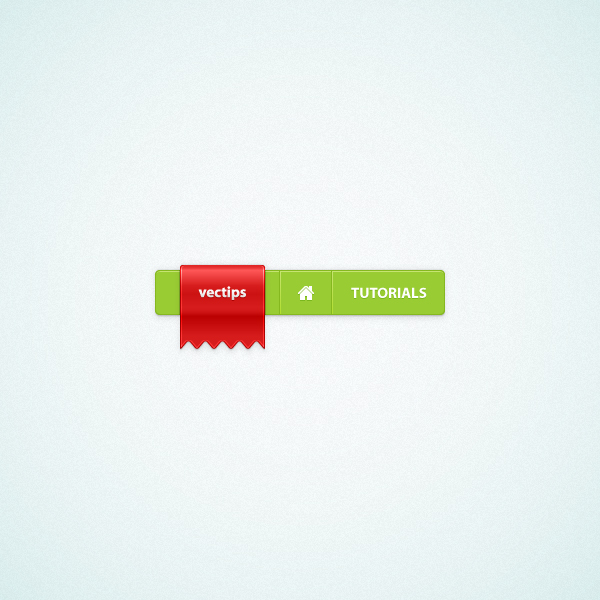
 In the following tutorial, you will learn how to create a simple menu bar and a sleek web ribbon in Adobe Illustrator. For starters you’ll create pixel perfect shapes using the grid and Snap to Grid option. Next taking full advantage of the Appearance panel and using basic vector shape building techniques, you will learn how to add highlights and shading for your menu bar. Finally, using the Zig Zag, the Rounded Corners effects, a complex linear gradient plus some simple Pathfinder options, you will learn how to create the web ribbon.
Tutorial Details
- Program: Adobe Illustrator CS5
- Difficulty: Beginner-Intermediate
- Topics Covered: Basic Tools and Effects, Pixel Perfect Vector Shape Building Techniques and the Appearance panel
- Estimated Completion Time: 45 minutes
Final Image
As always, this is the final image that we’ll be creating:
Step 1
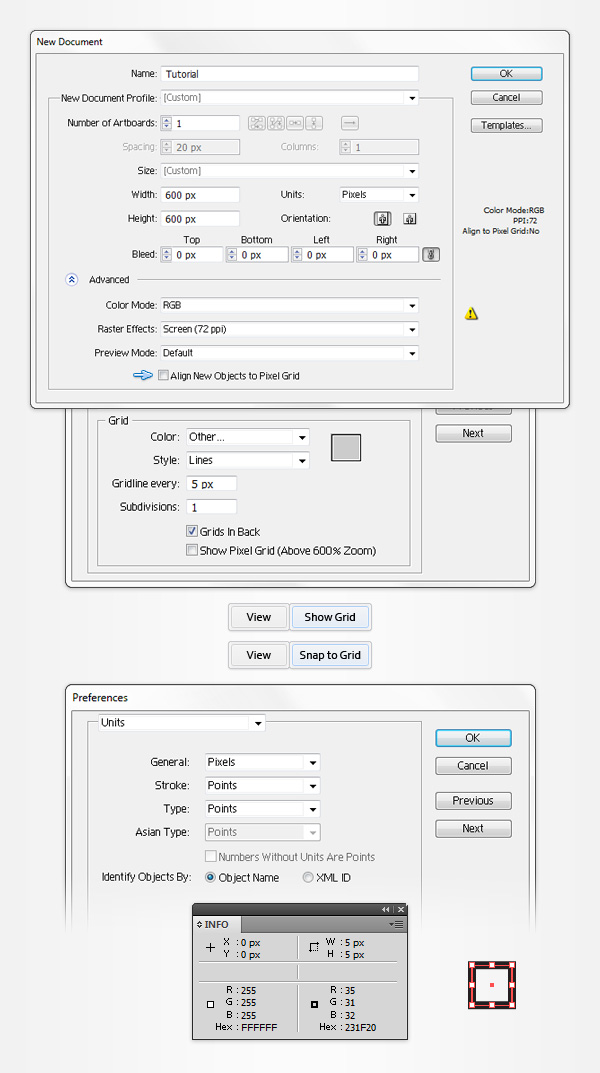
Hit Command + N to create a new document. Select Pixels from the Units drop-down menu, enter 600 in the width and height boxes then click on the Advanced button. Select RGB, Screen (72ppi) and make sure that the Align New Objects to Pixel Grid box is unchecked before you click OK. Enable the Grid (View > Show Grid) and the Snap to Grid (View > Snap to Grid). For starters you will need a grid every 5px, so simply go to Edit > Preferences > Guides > Grid, enter 5 in the Gridline every box and 1 in the Subdivisions box. You should also open the Info panel (Window > Info) for a live preview with the size and position of your shapes. Do not forget to set the unit of measurement to pixels from Edit > Preferences > Units > General. All these options will significantly increase your work speed.
Step 2
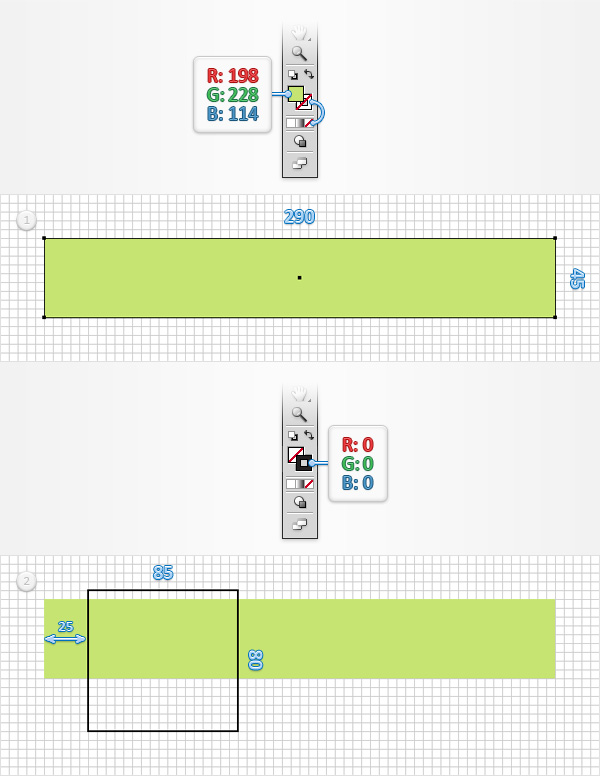
Pick the Rectangle Tool (M) and focus on your Toolbar. Remove the color from the stroke; then select the fill and set its color at R=198 G=228 B=114. Move to your Artboard and simply create a 290 x 45px rectangle, the Snap to Grid will ease your work. Return to your Toolbar, remove the color from the fill; then select stroke and set its color at black (R=0 G=0 B=0). Make sure that the Rectangle Tool (M) is still active, create an 85 x 80px shape and place it as shown in the second image. Once the again, the Snap to Grid will ease your work.
Step 3
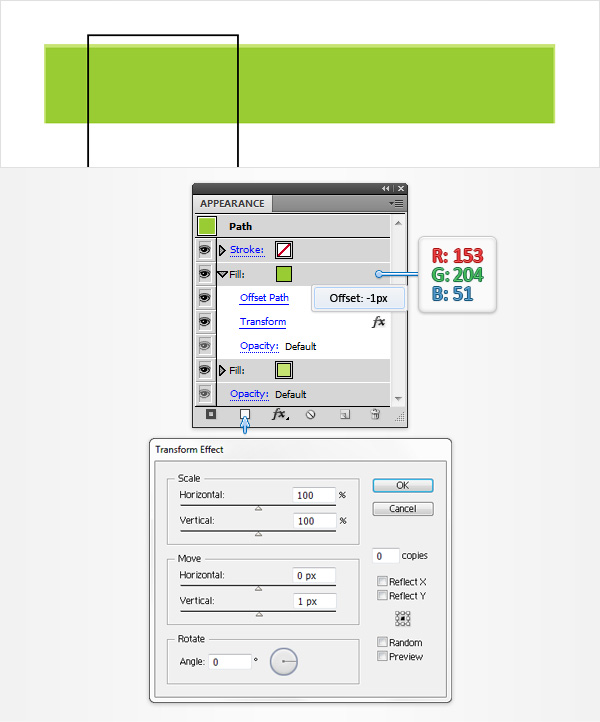
Select your green rectangle, focus on the Appearance panel (Window > Appearance) and add a second fill using the Add New Fill button (pointed by the little, blue arrow in the following image). Select this new fill, set the color at R=153 G=204 B=51 and go to Effect > Path > Offset Path. Enter a -1px offset, click OK and go to Effect > Distort & Transform > Transform. Focus on the Move section, drag the Vertical slider at 1px and click OK. In the end, things should look like in the following image.
Step 4
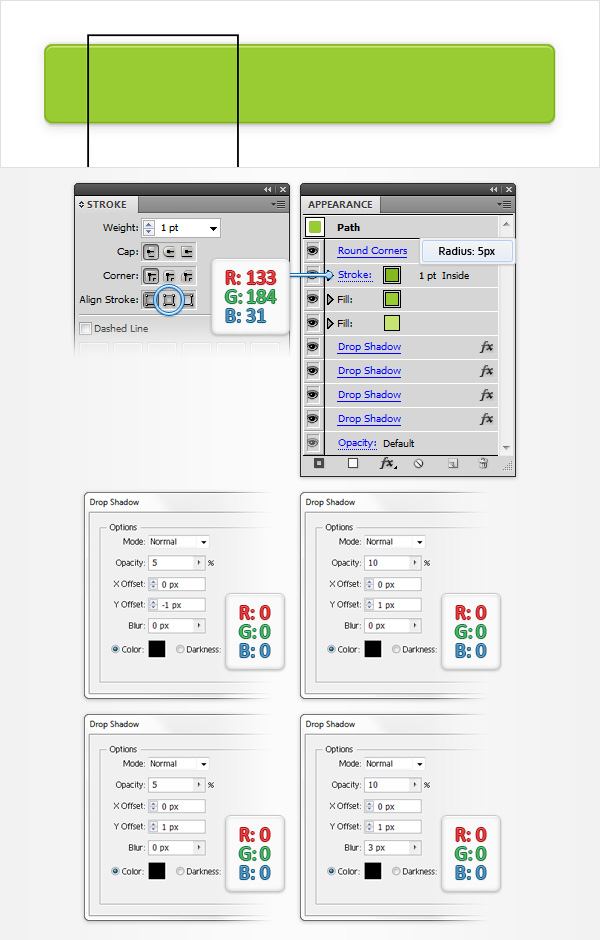
Reselect your green rectangle, focus on the Appearance panel, select the existing stroke and set its color at R=133 G=184 B=31. Make sure that this green stroke stays selected, open the Stroke panel (Window > Stroke), set the weight at 1pt and click on the Align Stroke to Inside button. Return to the Appearance panel, select the entire path (simply click on the “Path” piece of text from the top of the Appearance panel) and go to Effect > Stylize > Rounded Corners. Enter a 5px radius, click OK and go to Effect > Stylize > Drop Shadow. Enter the properties shown in the top, left window (in the following image), click OK and go again to Effect > Stylize > Drop Shadow. Enter the properties shown in the top, right window, click OK and go once again to Effect > Stylize > Drop Shadow. Enter the properties shown in the bottom, left window, click OK and go one more time to Effect > Stylize > Drop Shadow. Enter the properties shown in the bottom, right window and click OK.
Step 5
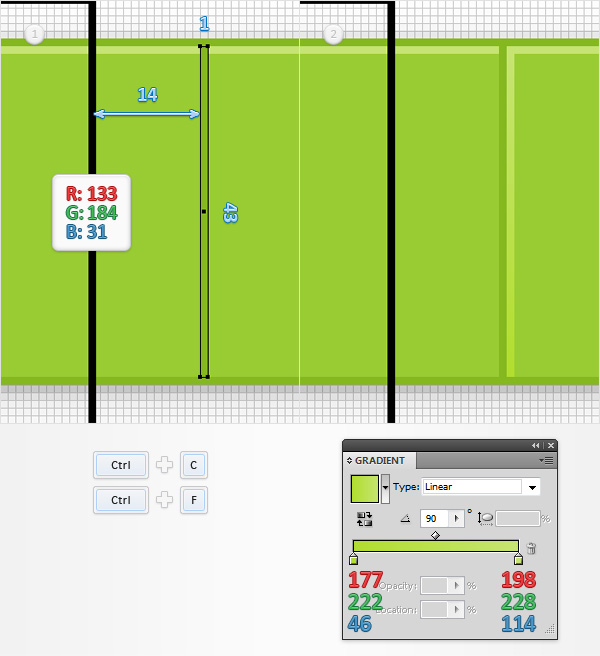
For the following steps, you will need a grid every 1px, so go to Edit > Preferences > Guides & Grid and enter 1 in the Gridline every box. Using the Rectangle Tool (M), create a 1 x 43px rectangle, set the fill color at R=133 G=184 B=31 and place it as shown in the first image. Make sure that this thin rectangle is selected and make a copy in front (CTRL + C > CTRL + F). Select this copy and simply drag 1px to the right. Make sure that your copy stays selected, open the Gradient panel (Window > Gradient) and simply click on the gradient thumbnail to add the default black to white linear gradient. Keep focusing on your Gradient panel, set the angle at 90 degrees then move to the gradient colors. Select the right slider and set the color at R=198 G=228 B=114; then select the left slider and set the color at R=177 G=222 B=46. In the end, things should look like in the second image.
Step 6
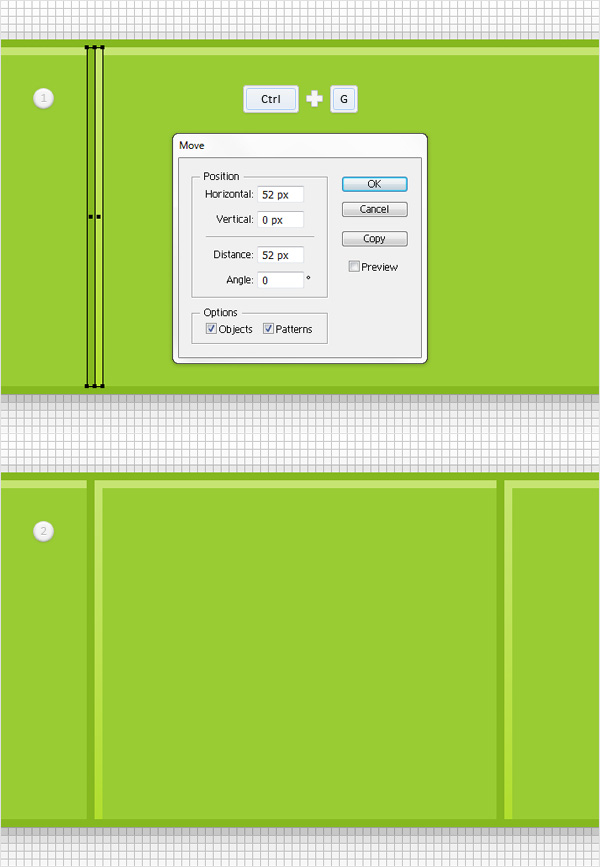
Reselect both thin rectangles made in the previous step and Group them (CTRL + G). Select this new group and go to Object > Transform > Move. Focus on the Position section, enter 52 in the Horizontal box then click the Copy button.
Step 7
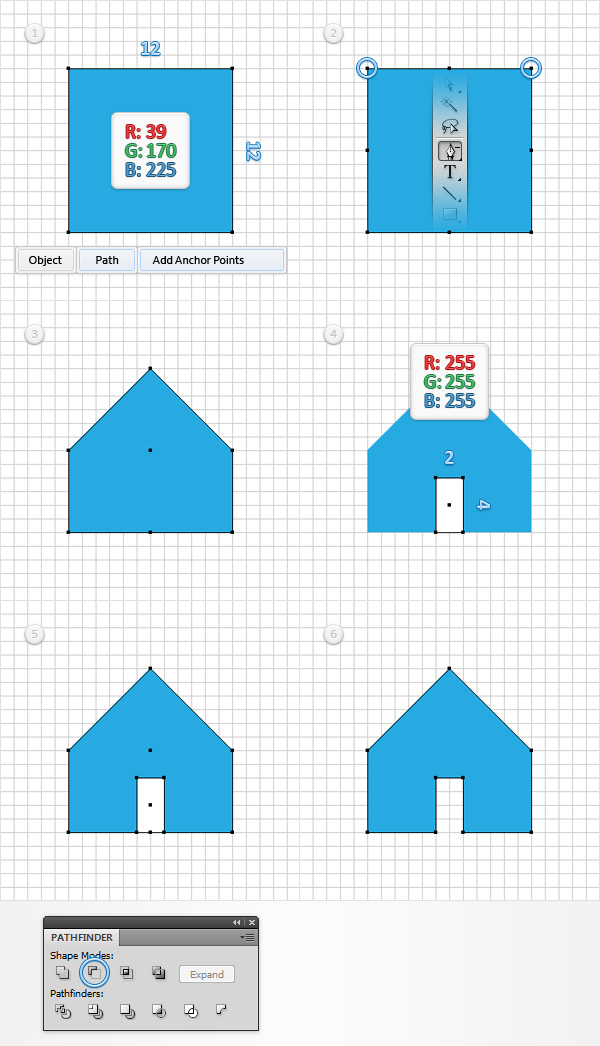
Using the Rectangle Tool (M), create a 12px square, fill it with R=39 G=170 B=225 and go to Object > Path > Add Anchor Points. Focus on the top side of this new rectangle, switch to the Delete Anchor Point Tool (-) and simply remove the corner anchor points highlighted in the second image. In the end, your blue shape should look like in the third image. Grab the Rectangle Tool (M), create a 2 x 4px shape, set the fill color at white and place it as shown in the fourth image. Select this white rectangle along with the blue shape, open the Pathfinder panel (Window > Pathfinder) and click the Minus Front button.
Step 8
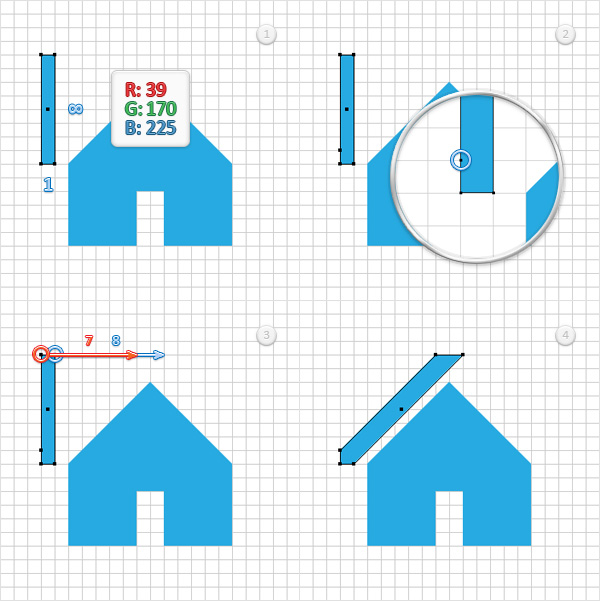
Using the Rectangle Tool (M), create a 1 x 8px shape, fill it with R=39 G=170 B=225 and place it as shown in the first image. Focus on the left side of this new rectangle, switch to the Add Anchor Point Tool (+) and simply add a new anchor point as shown in the second image. Move to the top side of this blue rectangle and grab the Direct Selection Tool (A). Select the right anchor point and drag it 8px to the right; then select the left anchor point and drag it 7px to the right. In the end, things should look like in the fourth image.
Step 9
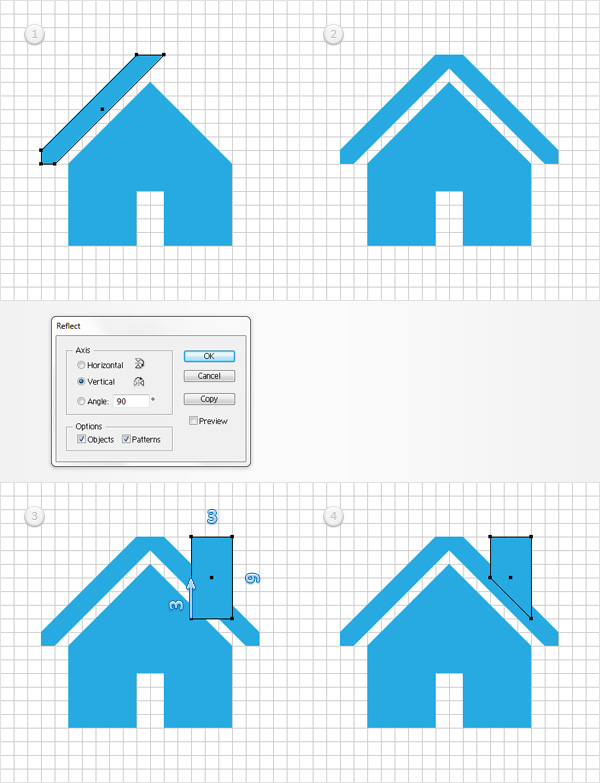
Reselect the blue shape made in the previous step and go to Object > Transform > Reflect. Check the Vertical box; then click the Copy button. Select the resulting shape and simply drag it 7px to the right. Using the Rectangle Tool (M), create a 3 x 6px shape, make sure that the fill color is set at R=39 G=170 B=225 and place it as shown in the third image. Focus on the bottom side of this new rectangle and switch to the Direct Selection Tool (A). Select the left anchor point and simply drag it 3px up.
Step 10
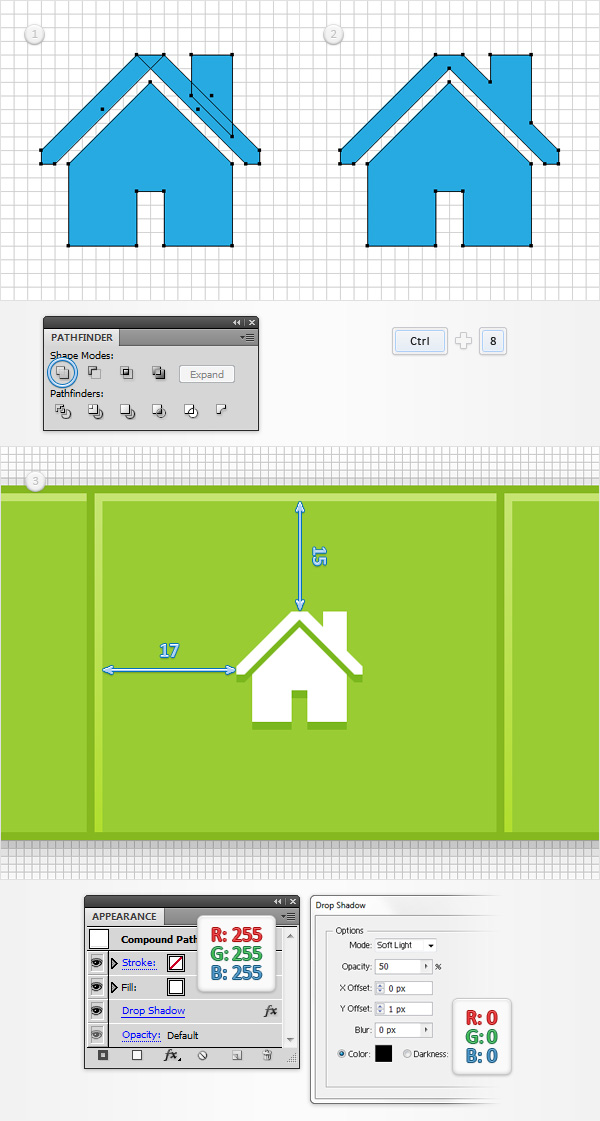
Reselect the four blue shapes made in the last three steps and click the Unite button from the Pathfinder panel. Select the resulting group of shapes and hit CTRL + 8 (or go to Object > Compound Path > Make) to turn it into a simple compound path. Make sure that this new compound path is selected, focus on the Appearance panel and simply replace the blue used for the fill with white. Move to your artboard, place your white compound path as shown in the third image and go to Effect > Stylize > Drop Shadow. Enter the properties shown below and click OK.
Step 11
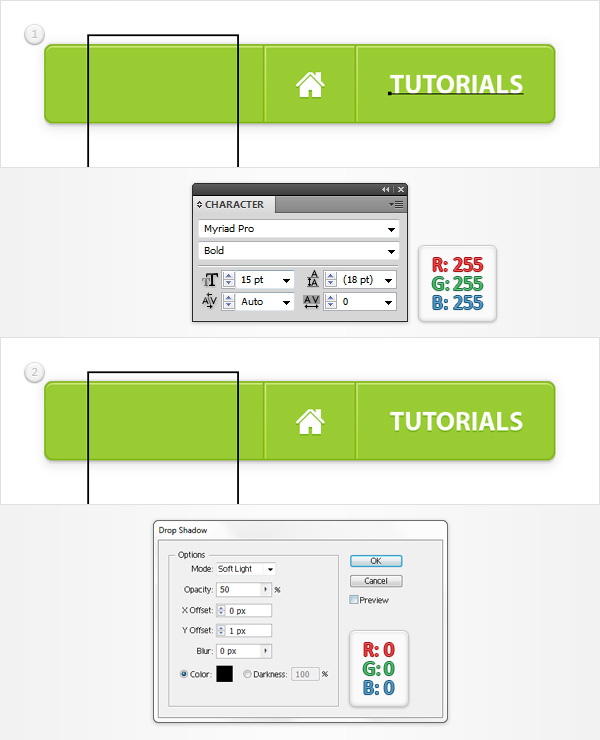
Disable the Grid (View > Hide Grid) and the Snap to Grid (View > Snap to Grid). Using the Type Tool (T), add the “TUTORIALS” piece of text and place it as shown in the first image. Set the color at white, use the Myriad Pro font then set the size at 15pt and the style at Bold as shown in the Character panel (Window > Type > Character) in the following image. Make sure that your piece of text is selected and go to Effect > Stylize > Drop Shadow. Enter the attributes shown in the following image and click OK.
Step 12
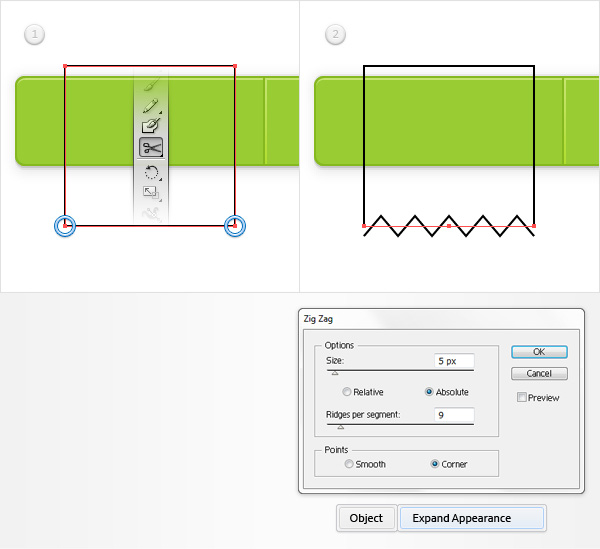
Focus on the rectangle with the black outline, grab the Scissors Tool (C) and simply click on the bottom anchor points (highlighted in the first image). This should divide your red rectangle in two separate paths, a simple horizontal path that represents the bottom side and a second path that represents the other three sides. Select only the horizontal path and go to Effect > Distort & Transform > Zig Zag. Enter the properties shown in the following image, click OK and go to Object > Expand Appearance.
Step 13
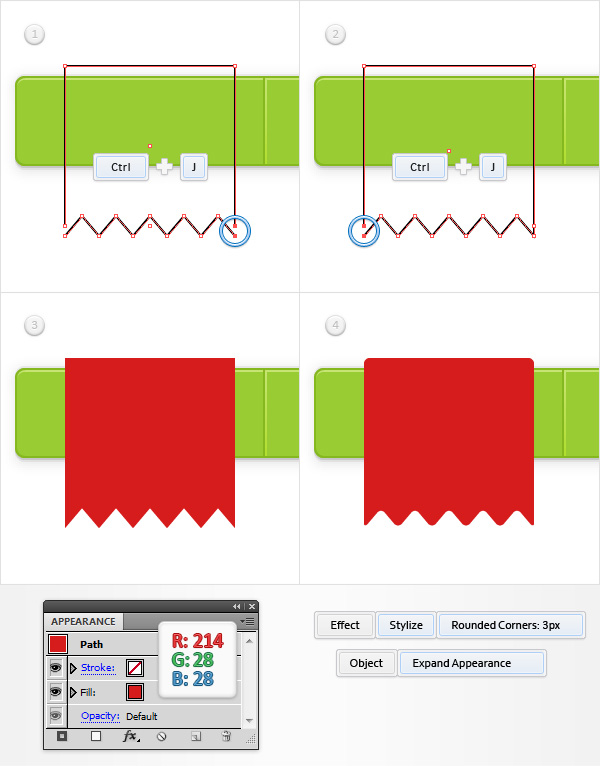
Pick the Direct Selection Tool (A), select the two anchor points highlighted in the first image and hit CTRL + J (or go to Object > Path > Join) to connect these two points. Continue with the Direct Selection Tool (A), select both anchor points highlighted in the second image and connect them using the same technique (CTRL + J or Object > Path > Join). In the end, your outlined paths should turn into a simple closed path. Select it, remove the color from the stroke, select the fill, set the color at R=214 G=28 B=28 and go to Effect > Stylize > Rounded Corners. Enter a 3px radius, click OK and go to Object > Expand Appearance.
Step 14
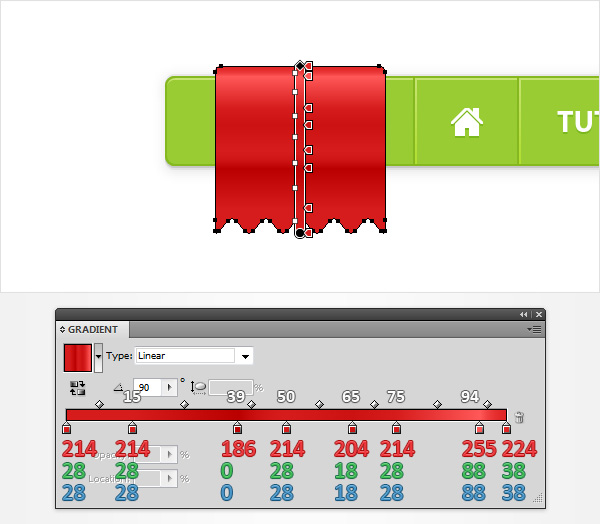
Reselect your red shape, focus on the Gradient panel and simply click on the gradient thumbnail to replace the flat color used for the fill with a simple linear gradient. Keep focusing on the Gradient panel, select the right slider and set the color at R=224 G=38 B=38; then select the left slider and set the color at R=214 G=28 B=28. Next, you will need to add new gradient sliders for this gradient. Focus on the gradient bar and simply click on it. Select that new gradient slider, set the color at R=214 G=28 B=28; then move to the Location box and set it at 15%. Keep focusing on your gradient bar, add five new gradient slider, use the colors shown below and place them as shown in the following image. Keep in mind that the white numbers from the Gradient image stand for Location percentage.
Step 15
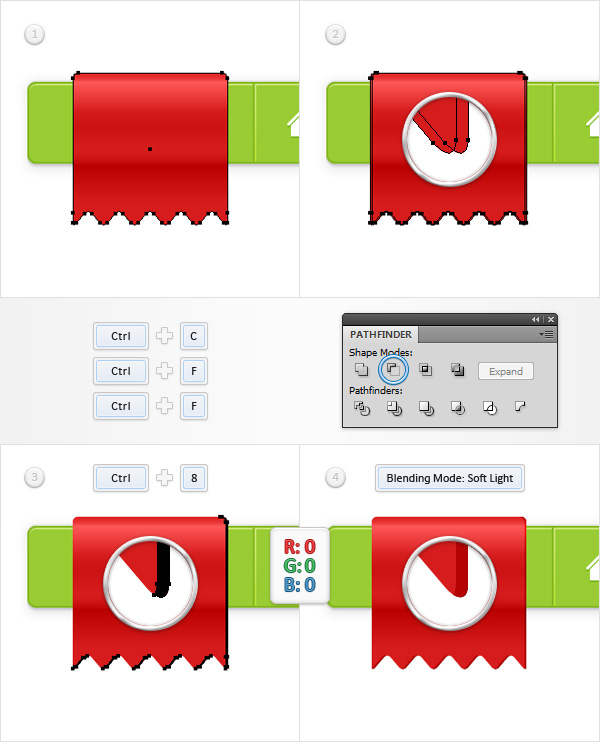
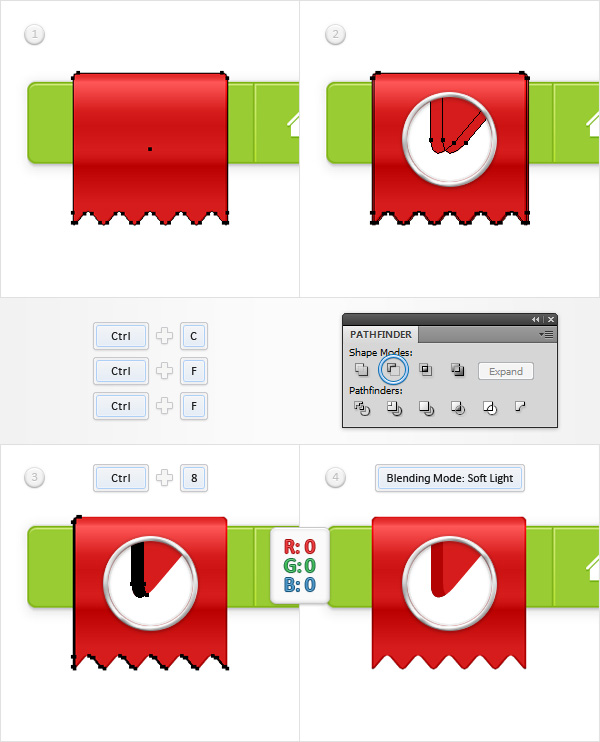
Go to Edit > Preferences > General and make sure that the Keyboard Increment is set at 1px. Reselect your red shape and make two copies in front (CTRL + C > CTRL + F > CTRL + F). Select the top copy and move it 1px to the left using the left arrow from your keyboard. Reselect both copies and click the Minus Front button from the Pathfinder panel. Select the resulting group of shapes, turn it into a compound path (CTRL + 8) and set the fill color at black. Make sure that this new compound path is selected, open the Transparency panel (Window > Transparency) and change the Blending Mode to Soft Light.
Step 16
Reselect your red shape and make two new copies in front (CTRL + C > CTRL + F > CTRL + F). Select the top copy and move it 1px to the right using the right arrow from your keyboard. Reselect both copies and click the Minus Front button from the Pathfinder panel. Turn the resulting group of shapes into a compound path (CTRL + 8) and fill it with black. Make sure that this new compound path is selected, go to the Transparency panel change its Blending Mode to Soft Light.
Step 17
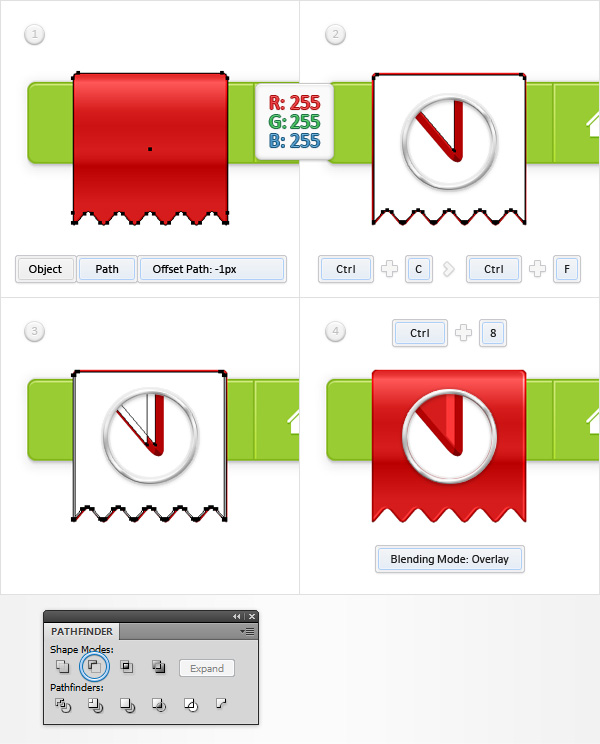
Reselect your red shape and go to Object > Path > Offset Path. Enter a -1px offset and click OK. Fill the resulting shape with white; then make a copy in front (CTRL + C > CTRL + F > CTRL + F). Select this copy and move it 1px to the left. Reselect both shapes made in this step and click the Minus Front button from the Pathfinder panel. Turn the resulting group of shapes into a compound path (CTRL + 8), go to the Transparency panel and change its Blending Mode to Overlay.
Step 18
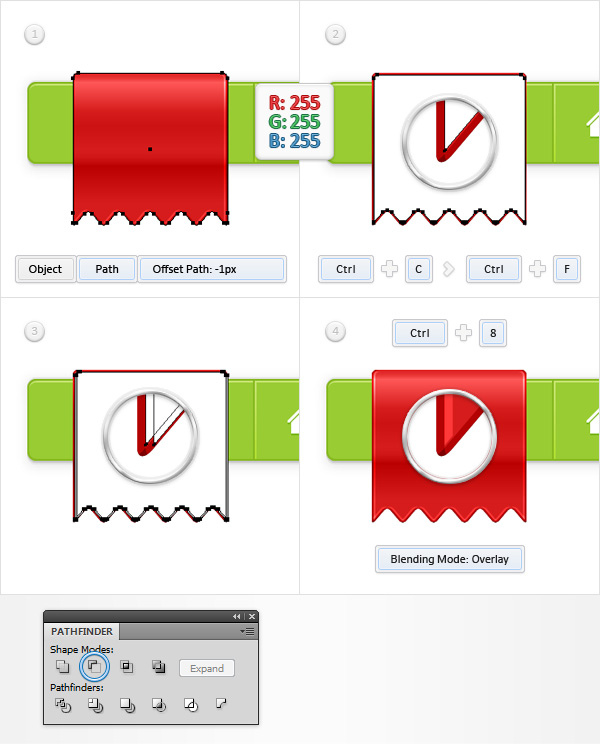
Reselect your red shape and go to Object > Path > Offset Path. Enter a -1px offset and click OK. Fill the resulting shape with white; then make a copy in front (CTRL + C > CTRL + F > CTRL + F). Select this copy and move it 1px to the right. Reselect both shapes made in this step and click the Minus Front button from the Pathfinder panel. Turn the resulting group of shapes into a compound path (CTRL + 8), go to the Transparency panel and change its Blending Mode to Overlay.
Step 19
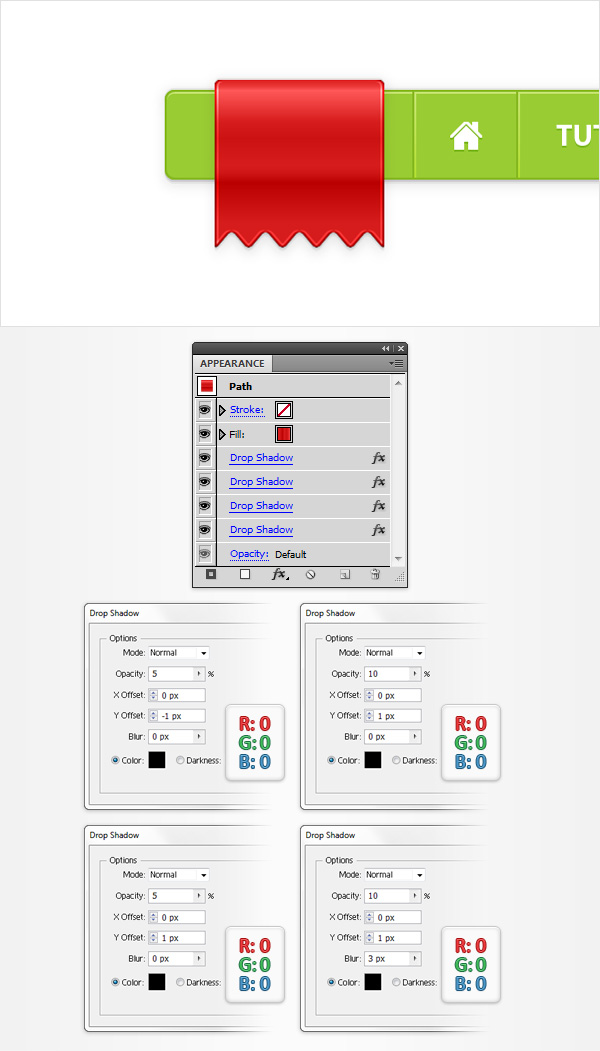
Reselect your red shape and simply add the four Drop Shadow effects (Effect > Stylize > Drop Shadow) shown in the following image.
Step 20
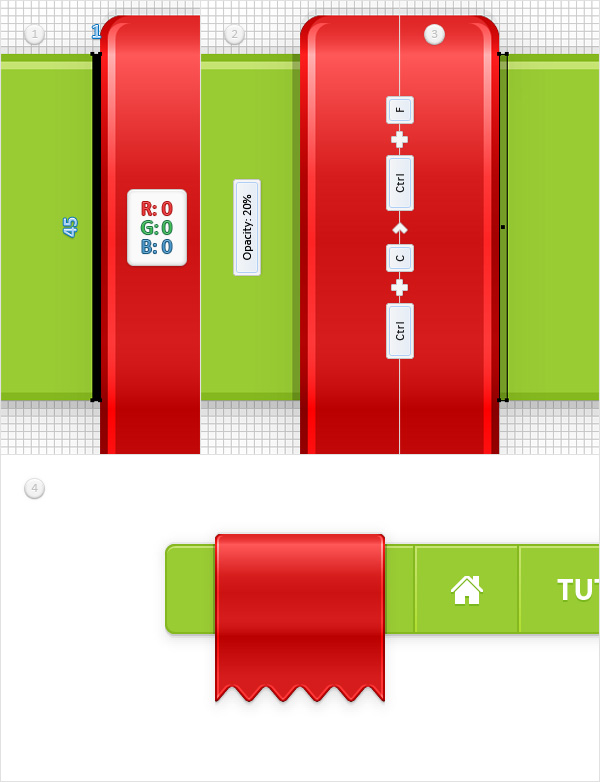
Enable the Grid (View > Show Grid) and the Snap to Grid (View > Snap to Grid). Using the Rectangle Tool (M), create a 1 x 45px shape, set the fill color at black and place it as shown in the first image. Make sure that this new shape is selected, go to the Transparency panel and lower its Opacity to 20%. Duplicate (CTRL + C > CTRL + F) this thin rectangle, select the copy, drag it to the right and place it as shown in the third image. In the end, things should look like in the fourth image.
Step 21
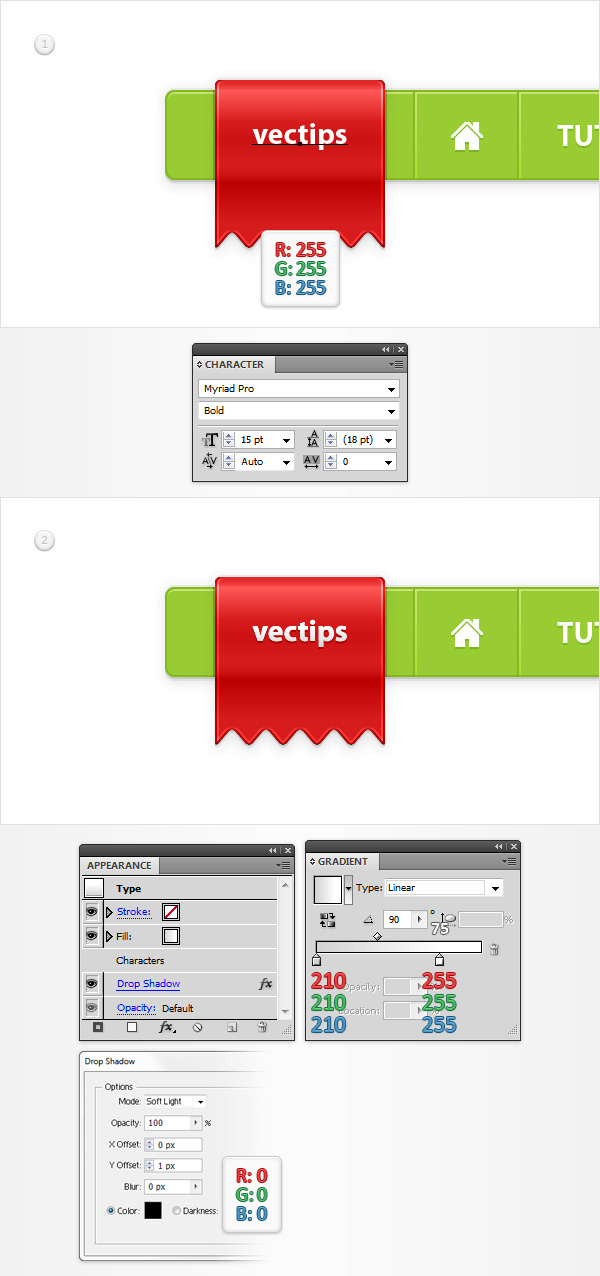
Finally, add the “vectips” piece of text, make it white, place it as shown in the first image and use the attributes shown in the Character panel in the following image. Make sure that this new piece of text stays selected, focus on the Appearance panel and simply hit the Add New Fill button. Select this new fill, add the linear gradient shown below and go to Effect > Stylize > Drop Shadow. Enter the attributes shown in the following image and click OK.
And We’re Done!
I hope you’ve enjoyed this tutorial and can apply these techniques in your future projects.


Awesome tutorial, I learned a lot from it. Thanks!
Awesome!
i like your tutorial can i be your friend and know more tutorial you have made. any social media that i can follow you