

I like illustrating characters, icons, and other highly representative illustrations. I do this kind of work the majority of time in Illustrator, so it’s nice to break out and create abstract backgrounds. Abstract backgrounds are easy to create in Illustrator with a couple of simple techniques. Using Gradient Meshes, Steps Blends and Opacity Masks you can quickly create an abstract background.
Notes
This tutorial was created with Illustrator CS3.
Keyboard shortcuts are displayed in orange. ⌘ is displayed for the Command key (mac), with the Ctrl key being the Windows equivalent (not displayed).
Gradient Meshes
This is the technique that I find to produce the quickest results but has great potential for exploration.
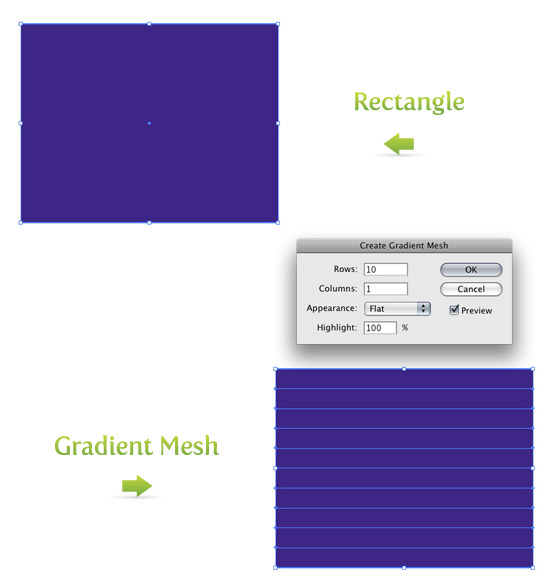
First, draw a rectangle with the Rectangle Tool (m). I start with a deep violet for the color, but use any color you like. Next, go Object > Create Gradient Mesh to bring up the Gradient Mesh dialog. In the dialog, change Rows to 10 and Columns to 1. Press Ok, and now the rectangle has ten rows separated by 11 Mesh Points on the left and right side of the rectangle.
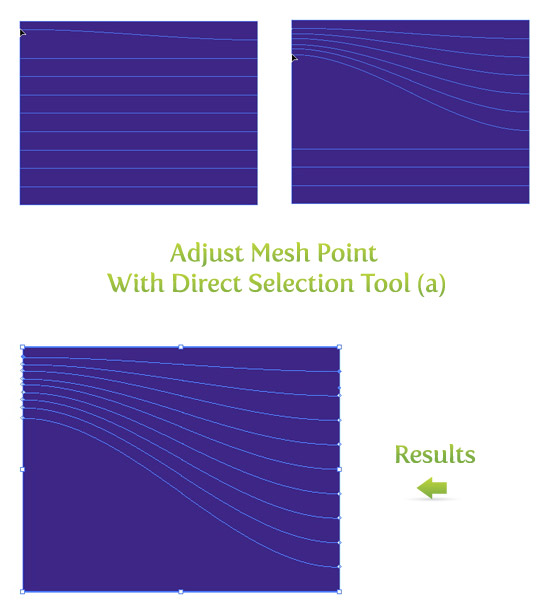
With the Direct Selection Tool (a) you can grab and drag these Mesh Points. Start with the second Mesh Point from the top left. Hold shift, and drag the point up right below the first Mesh Point. When you moved the left Mesh Point, the connected right Mesh Point did not move, creating a curve. Next, do the same for all the other Mesh Points on the left side except the bottom one. Now, You should have something similar the picture below
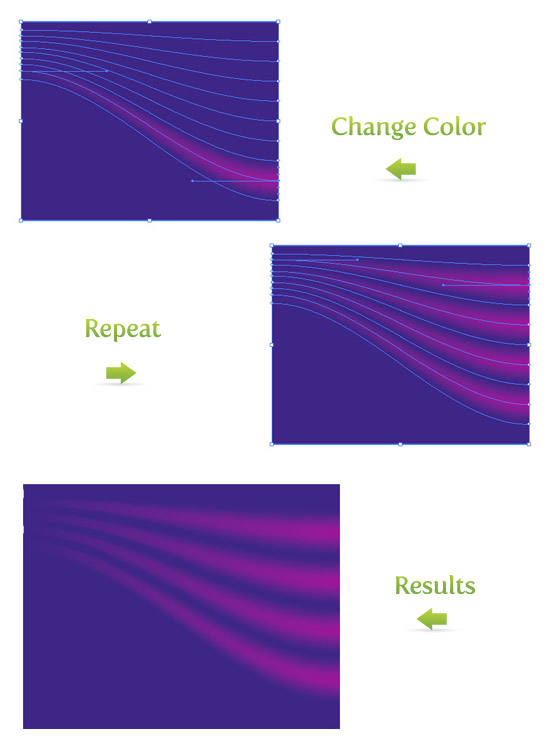
With all these Mesh Points created, we can start added some different colors. With the Direct Selection Tool (a) select the third Mesh Point from the bottom on the right side of the rectangle. With the Mesh Point selected, change the color in the Color Panel. I like using a lighter version of the background color, but again, use whatever color you want. Next, I skip the next Mesh Point above and select the following one. Change the color, and repeat until you filled all the mesh points.
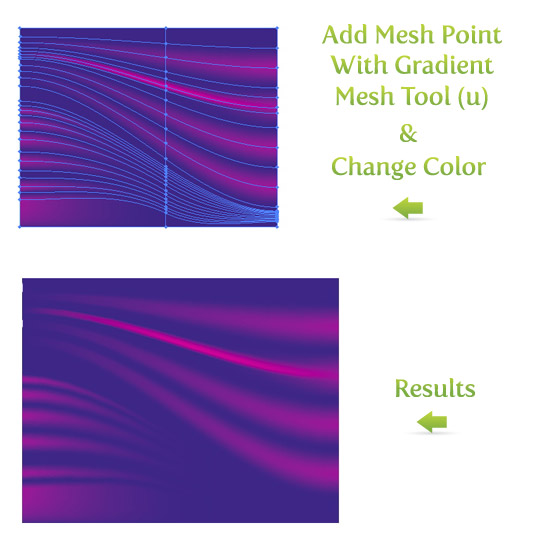
This is the most basic example of using Gradient Meshes. If you want to add more Mesh Points, use the Gradient Mesh Tool (u). With this tool you can add Mesh Points anywhere on the artwork or on any non-compound objects. In the example below, I used the Gradient Mesh Tool (u) and added points on the left side of the rectangle, changed the color, added a point in the middle of one of the lines, and changed that color.
You can easily get lost in moving Mesh Points and changing colors in Gradient Meshes. Play around and see what you get!
Step Blends
Step Blends are another quick way to create an abstract background. You might have used Gradient Blends previously but maybe not Step Blends.
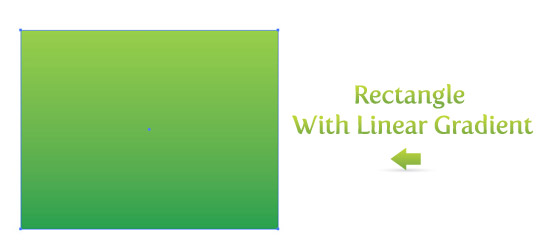
Again, start out with a rectangle, but this time make it a Linear Gradient (>). For the gradient I will use a dark and light green and adjust the gradient with the Gradient Tool (g), so the dark part of the gradient is at the bottom of the rectangle.
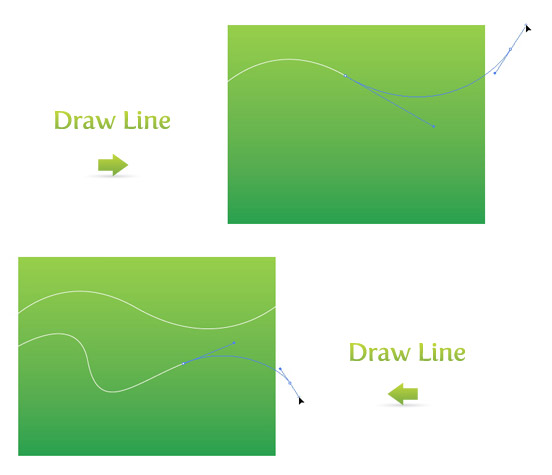
Next, use the Pen Tool (p) to draw a couple of lines. Draw the first line as a simple Bézier curve. Use the Pen Tool (p) to draw the second line, but this time,vary the curves in the line.
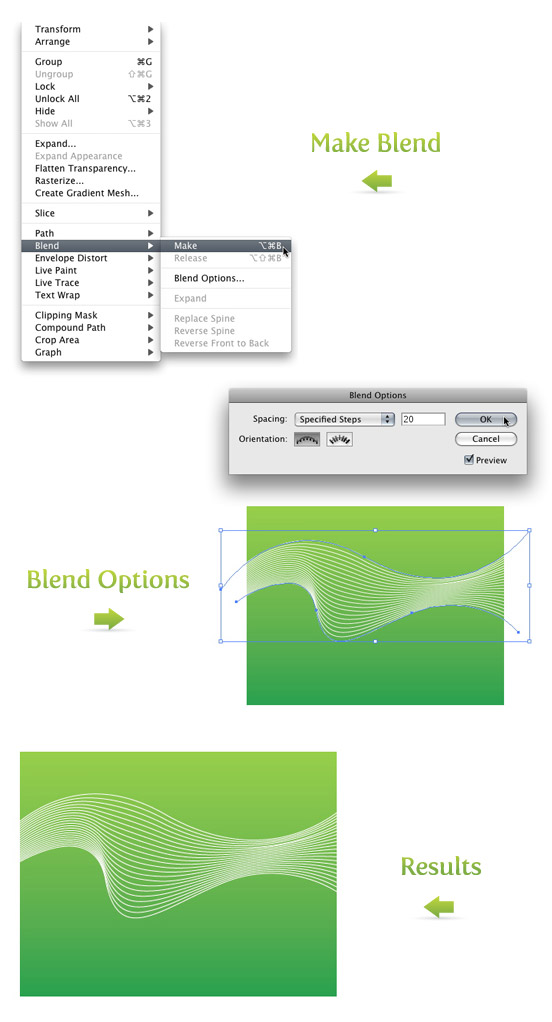
Select both lines and go Object > Blend > Make (⌘ alt/option b) to create a blend. Next go back to Object > Blend Options to bring up the Blend Options dialog. Pick Specified Steps under the Spacing drop-down menu. Depending on how your lines are spaced, pick a number that looks the best. It is a good idea to click Preview so you can see how it will look before you press Ok. You can always go back and change the number of steps if you don’t like how it looks. Just go back to Object > Blend Options to bring up the Blend Options dialog.
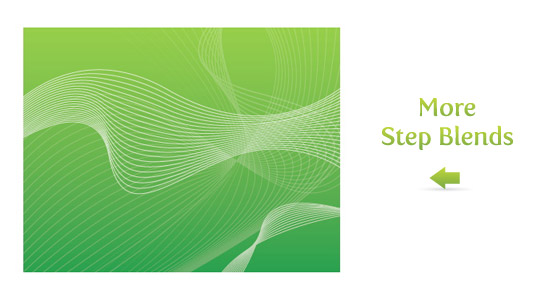
Combine more Step Blends to create different and more abstract results. This is a fun place to experiment with transparencies and different colors.
Opacity Masks
In the previous tutorial Quick Reflections I talked about using Opacity Masks to create reflections. At the bottom of the tutorial I gave an example of experimenting with Opacity Masks. Next, I will talk about creating abstracts with Opacity Masks like in the experiment of the Quick Reflections tutorial.
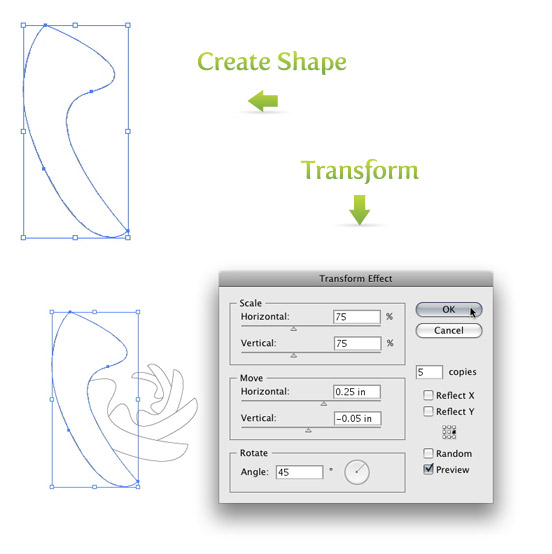
First draw a shape with your tool of choice. I drew a shape quickly with the Pen Tool (p). Next, go Effect > Distort and Transform > Transform to bring up the Transform Effect dialog. Below are the settings I used, but feel free to tweak the setting depending on your shape and how it looks.
- Scale
- Horizontal = 75%
- Vertical = 75%
- Move
- Horizontal =.25 in
- Vertical = -0.5 in
- Rotate
- Angle = 45 degrees
- Copies
- 5 copies
- 9-Point Proxy (the box with nine points above the Random checkbox)
- Check the middle right checkbox on the 9-Point Proxy
The rest of the options can stay the same and press Ok. You can always go back and edit the effect. In the Appearance Panel, you will see Transform in the list when the transformed shape is selected. If you double click Transform, it will bring up the Transform Effect dialog with the current settings, which you can edit. Once you have the effect the way you like, go Object > Expand Appearance. If you don’t expand the effect, the next time you try to rotate it, you might get some undesired results.
With the shape still selected, create a Radial Gradient from the Gradient Panel. Keep the swatches of the gradient the default Black and White and take off the stroke if there is one. Next, draw a rectangle with the Rectangle Tool (m) that encompasses the transformed shapes. Take off the stroke, fill it with a color and send the rectangle to the back (⌘ shift ] ).
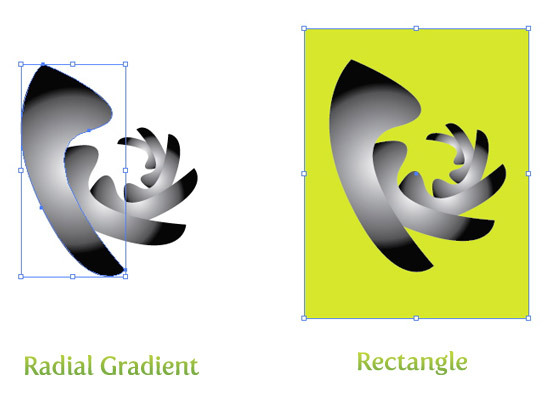
Next, select the rectangle and transformed shapes and select Make Opacity Mask from the pop-up menu of the Transparency Panel. Now you have some abstract art!

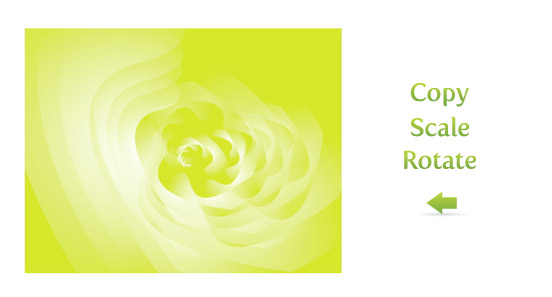
You can stop here if you like or you can take it further. Copy (c) , Paste In Front (f), scale and rotate the artwork to get some different results. In the example below I created a background with a green color, changed the abstract to white, copied and scaled, and rotated a copies of the abstract. If you want to further edit the Opacity Mask refer to the Quick Reflection tutorial.
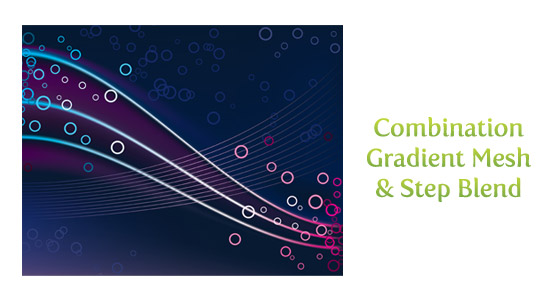
Combine
Combine some of the techniques to get different results. Abstracts are the perfect place to experiment because it is abstract!


Good info. Lucky me I ran across your blog by chance (stumbleupon).
I’ve saved it for later!
Thanks for sharing awesome information
Perfect Blog as i was finding the same.
hi this is bablu . Very usefull link for knowledge
Thank you for this great sharing.
Great Post. Thanks for Sharing such best ideas for gifts
This text is worth everyone as attention. How can I find out more?
Really helpful for me. Thanks for sharing it.
Thank you, its a amazing blog. I have a question, is it possible to create such designs using corel draw as well? or only illustrator is suitable for this?
This is very useful, thanks.
hey, im stuck, it wont let me add colour to the mesh. im sure its something simple but it just wont let me do it. please help. thanks
Amazing tutorial, to create stunning background! Thanks!
This is some nice knowledge from 2008. Got some basic ideas.
Thank you for sharing this amazing blog. I have a question — can we make this with any open-source software like gimp?
Very nice article, i am just a beginner and developing my online bakery shop but i can learn a lot from this post, especially adding colors and backgrounds, thanks for sharing
Got some good ideas thanks for posting
Hi,
it”s really really very helpful, will be in touch to learn many more.
nicely explained,great!!
great tutorial
You’re an extremely useful website; couldn’t make it without ya!
Thanks , but i have a question that can i create some designs with photoshop 7.0
Yes! Finally something about Video Cards.
Thanks for this tutorial. awesome
thanks for that
These are awesome backgrounds, I have ever seen in my life. Thanks for sharing these.
Thanks for sharing wonderful tips.
Great work, Can i use Photoshop for this
nice & informative post.
Hi, Your tut design is very excellent , and your techniques is very new. i will try your technique in our background designs.
awesome thought! I do these kinds of background scenes regularly. You’ve brought up some methods that I have not tried. Well done.
Thank you, its a great read. Just a quick question I have, is it possible to create such designs using adobe photoshop as well? or only illustrator is suitable for this job?
Great tutorial. I once did abstract background like yours in this tutorial. It´s really fun to use the blend tool in Illustrator!
Great tutorial, to create nice background! Thanks!
Great Stuff. Thank you for these tutorials on the gradient mesh and the blend tool. We can create great designs now!
Nice Tutorial
Hello are using WordPress for your blog platform?
I’m new to the blog world but I’m trying to get started
and create my own. Do you need any coding expertise to make your
own blog? Any help would be really appreciated!
Hey there! Would you mind if I share your blog with my zynga
group? There’s a lot of folks that I think would really enjoy your content.
Please let me know. Thanks
I would like to thank you for these tutorials on the gradient mesh and the blend tool. Both have opened my eyes to create artistic and outstanding designs!
thanks a lot, nice tuts.
I am no longer sure the place you are getting your info, but great topic. I needs to spend some time studying much more or understanding more. Thanks for wonderful information I used to be searching for this information for my mission.
I don’t even know the way I stopped up here, however I believed this publish was great. I do not recognise who you are but certainly you are going to a well-known blogger for those who are not already. Cheers!
Most helpful my art works.
Its really nice effects
thanks..
thanks for the tutorial, this looks amazing, can this be done in Photoshop?
Really very helpful tutorial. I do lot of practice & created more effects. Thank you very much for such turorials.
If you print this professionally, will you get banding on those gradients or is this just for web?
Thank you very much for sharing this knowledge! I really appreciate your help,
greetings from Serbia!
I can’t color more than one gradient mesh line
i like your work amazing
I did it but how do I save it to wallpaper format?
Wonderful, fast and effective tutorial. By far the best I have come across in terms of crispiness!! Thanks. Can we have more please??
thx for the great tutorial
Great tutorials. I believe that every illustrator beginner stars with these abstract backgrounds 🙂
abstract art have share some of its unique beauty when it comes to art. i like abstract art because it is mysterious :~”
the thing that is best about abstract art is that it takes the imagination of the viewer to make sense of it ~
Thank you this great sharing.
i love u
Wow! Thanks for the excellent tips. Going to apply to my website.
chakkare umma.
Thanks
Hey Ryan, your tutes are so well put together! Very generous of you to share your knowledge. This tute is particularly awesome…THANKS!
How is it that you get the pink lines (on the left side) to have an opacity… mine stick out really bad…
Very nice tut for a n00b like me, many thx, cheers.
I absoulutely appreciate you showing me how to do this very Interesting!
Very cool color combos cant wait to try this.
It has been GREAT help to me.Thanks a lot……
Many thanx !
Simply awesome
Nice tutorial.. it help me.. thank you..
Excellent tutorial. Quick, easy to follow, effective, and lots of room for experimentation. Helped me turn out a last-minute project in very short order. Keep up the good work!
great tutorial. in response to one of the questions raised. if you want to apply color after adjusting the gradient mesh, only select point with direct selection, and make sure in your sidebar that the fill instead of the stroke box is on top. (do that by clicking on the fill icon.)
Thank you so much for this tuts. I learned a bunch. 🙂
you made my day!
thanks a lot!
😀
how wonder full …… really hanks ihave no words this
Great tutorial! I am just learning Illustrator and these are some very handy tools to know.
great tut!! easy to understand and to follow!! thx alot!
greetz from austria
sorry no need for help’ i found what i missed and actually you should out it in the tut –
the REALEASE of the mesh, which then makes it possible to change the color of the different mesh points.
Thanks For the TUTORIAL- GREAT ONE FOR LEARNING!!!
Rype thanks for the Tut,
one thing i couldn’t do is color the mesh point after the change color phase.
could you figure this out for me??
thanks dear you r did good job, it nice i’ll try it best luck
Thanks for this. really lovely.
many thanks for this cool tut
🙂
The tutorial was great help.. Neat and simple…
thanks
OMG, wow…nice tutorial for blend.. 😮
great tutorial
Niks,
Not sure. I will have to try it out.
I consider that beside Your site there is future!
Hey can u make those backgrounds with pictures and then add effects 2 them???
hey! its great im proud to find this site! lova ya!
thx,
dotacje unijne from pl
Thanks ! Great blog for Designer
wow, this site is really great.
this mesh tool tutorial was the first one i have ever made in illustrator.
but i had a few problems concerning the tools usage.
i can’t adjust the mesh points with the direct selection tool. i have to use the mesh tool. additionally i cannot hold the shift bar while moving the mesh point. then it automatically snaps to a point fixed in the grid. but i don’t know how to change it in the preferences. it’s not the option “snap to grid” etc.
thank you so much for this tutorial.
muchas gracias, Ive been trying to find out about lines and opacity mask y this is the best tut I found.
This is very nice to see. Thank you
it’s so beautiful and detail background,
that’s good tut for me, thank you very much.
Brenda,
It is Fertigo a free font!
http://www.josbuivenga.demon.nl/fertigo.html
Hi, i just want to know which typeface r u using in the buttons and labels of your page. I like it very much.
It is Nice Tut!. Really Useful for the best result. Thanks Very Much
thanks for these! just discovered the site – bookmarked! cheers
just starting out with illustrator and this is great.
thanks very much
wow, very great tutorial! I like it a lot. Many thanks!
Another useful tutorial. Thanks for sharing!
Zach,
Make sure you are moving the Point with the Direct Selection tool. It sounds like you still have the Mesh Tool selected, that would create more points. Let me know if that worked.
When i try to move the mesh while holding the shift key it does not move the mesh. It only creates more mesh points in the middle of the line
realy nice./
i just wanted to know how i could color in or do a gradient over my 20 blendes white lines like u did on the final image where the white lines are now a mix of *lightblue-white-with pink”
WOW!!!! This is exactly what I was looking for!!!! EXCELENTEEEEEE!!! justo lo que necesitaba… saludos
hey!!! its a gr8 tutorial.
when i was trying to do i am kind a stuck in colors mesh wont let me add colors in it. can anybody please tell me how to sort this thng.
Thanks, this was really really useful!
Really cool tips !
thanks for sharing such a nice tutorial.
Great tutorial, great way to make use of the gradient mesh tool! :o)
really nice one ;o) this is just perfect site!
Well done! These are very helpful tips. I’ve subscribed in RSS.
Also, if you have a moment, check out my blog: http://www.willsherwood.com. I’d like your opinion.
Will
When you have a point selected with the Direct Selection Tool it won’t let you change? What happens? Just nothing?
Hi!
I’ve being trying to do the color thing but I have the same problem!
I’ve selected the mesh point and change the color of the line and the rectangle and do nothing.
hey, im stuck, it wont let me add colour to the mesh. im sure its something simple but it just wont let me do it. please help. thanks
Jess
You have to install Adobe Illustrator. You can learn more at their website http://www.adobe.com/products/illustrator/. Let me know if that helps.
Hey, that’s very interessting but how do i get this. Do i have to install it or something ?
Thanks! it’s very nice and useful! I will try them!
Wow… nice tut! I do these types of backgrounds on a regular basis. You’ve raised some techniques that I have not tried. Bravo.