

Now that summer is in full swing in the Northern Hemisphere, and what better way to say farewell to the season than with faceted summer banner vector designs filled with sunshine, rainstorms, and rainbows! With the super trendy faceted texture, we’ve got the makings for some fantastic stickers, web banners, and the beginnings of logotypes.
Tutorial Details
- Program: Adobe Illustrator CS5-CC
- Difficulty: Beginner
- Topics Covered: Shape Building, Warp Tools, Creating a Custom Texture
- Estimated Completion Time: 30 Minutes
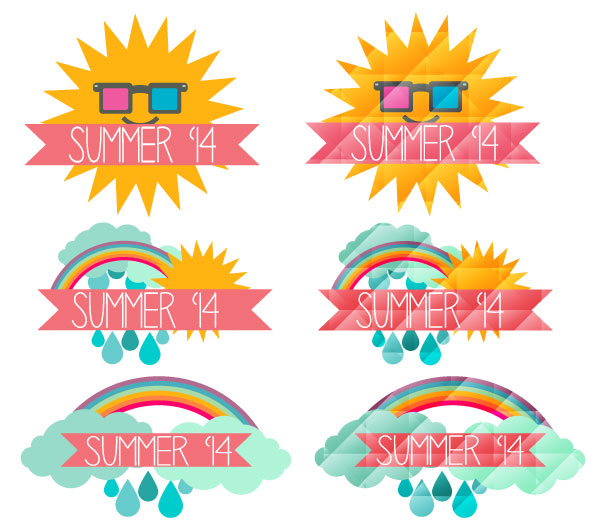
Final Image
Step 1
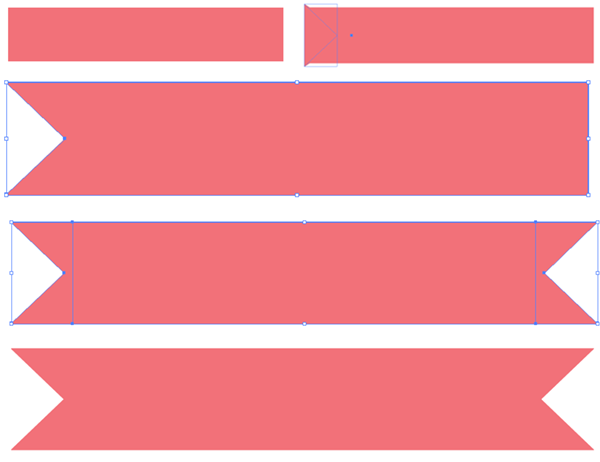
Each of the faceted summer banner designs begin with the same banner. Using the Rectangle Tool (M), draw a narrow, horizontal rectangle in light coral. Use the Pen Tool (P) or the Polygon Tool in order to draw a triangle that intersects with both corners on the left of the rectangle. Select both objects and hit Minus Front in the Pathfinder panel. Repeat on the other side in order to complete your ribbon banner.
Step 2
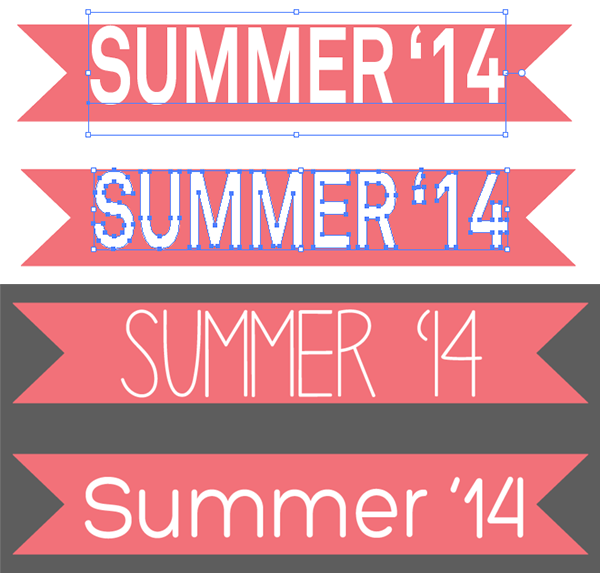
The text for these summer banner vectors is fairly simple: Summer ’14. I played with three sans-serif fonts: Akkurat Pro, Penelope Anne, and Hero. Whatever font you choose for your banner, do not forget to Expand your text under Object .
Step 3
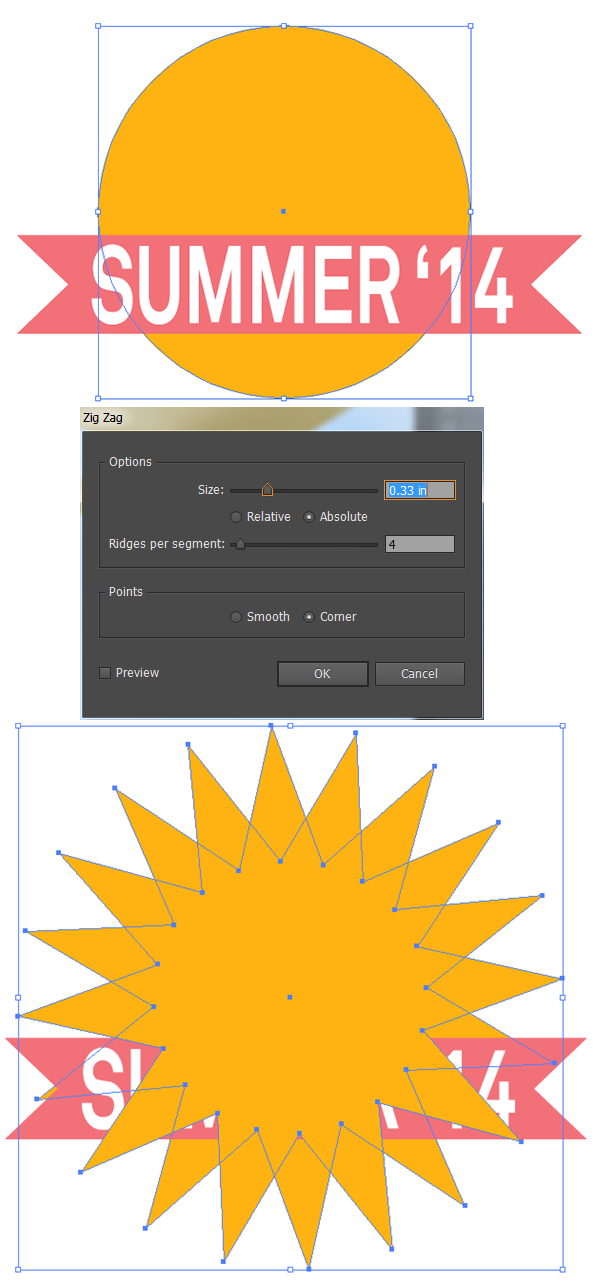
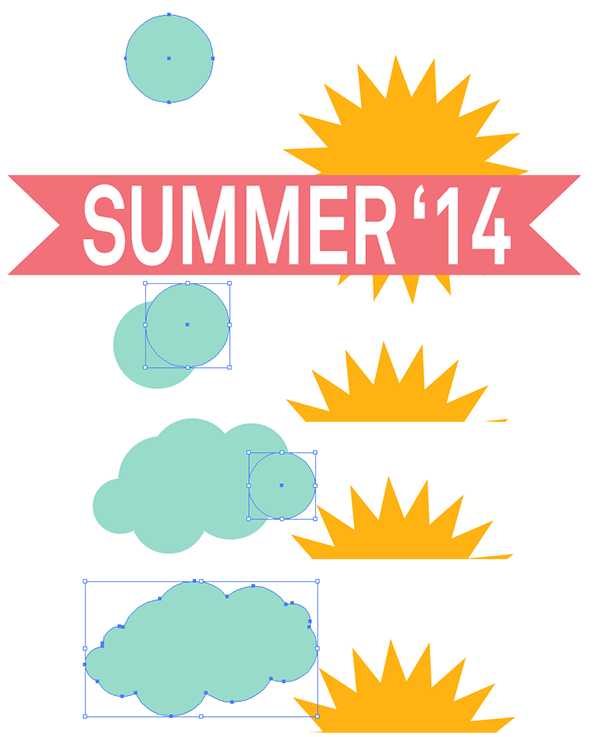
For the sun that appears in two of the summer banner vectors, start with a circle drawn with the Ellipse Tool (L) in a bright yellow. Under Effect > Distort & Transform > Zig Zag, enter 0.33in, or so, with 4 ridges per segment and hit OK. Expand under Object, and Copy (Control-C), Paste (Control-V), and Rotate the copied starburst on top of the first one so you have a bright, golden sun. Group(G) both shapes together and place beneath the banner ribbon in the Layers panel.
Step 4
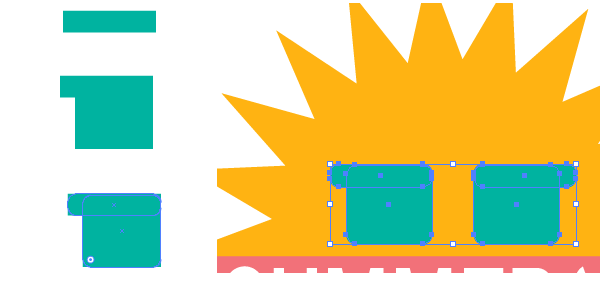
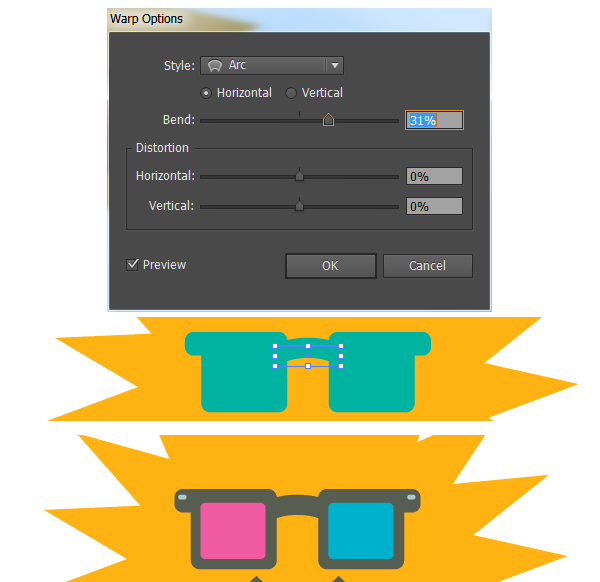
The sunglasses worn by the sun in the first summer banner vector are comprised of rounded rectangles. Draw a narrow, horizontal rectangle for the top of the glasses and a square for the first frame. Align these pieces to the right side (in the Align panel). Use the Direct Selection Tool (A) in order to select the rectangles that make up the left side of the glasses and pull the live corners inward so the rectangles are rounded. alternatively, if you’re not using Adobe Illustrator CC, you can use the Rounded Rectangle Tool from the start, but you will have to specify the corner radii. Repeat for the other side.
Step 5
For the bridge of the glasses, draw a small rectangle between either frame of the glasses and go to Effect > Warp > Arc in order to Bend the rectangle 31% Horizontally. Expand your shape and recolor the glasses frames accordingly. I chose to place pink and blue rounded rectngles in the center of each frame for the lenses and two small gray rectangles on either side of the top of the frames as a Ray-Ban-esque detail. the first banner is complete. Let’s move on to the second and third.
Step 6
I Copied and Pasted the sun, as well as the banner itself, for the second summer banner vector. The sun was scaled down and placed to the right. Using the Ellipse Tool to draw a series of circles, of various sizes, in order to form a cloud. when satisfied with the cloud design, Select all of the circles and Unite in Pathfinder.
Step 7
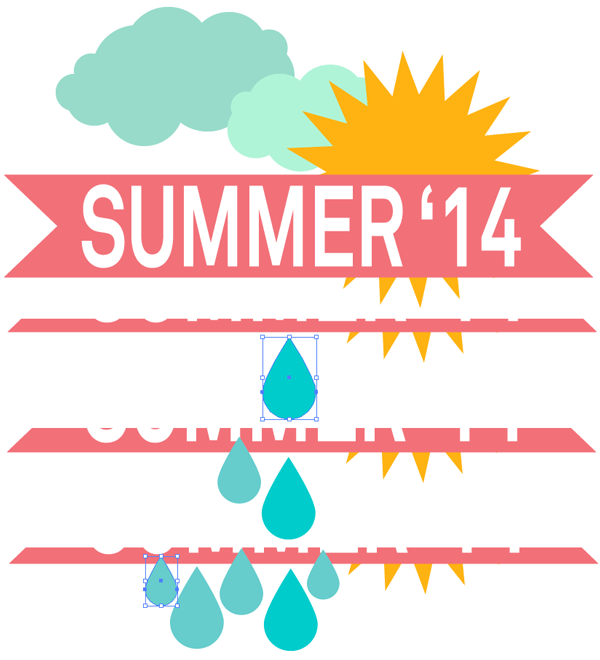
I’ve layered two clouds behind the sun, one darker than the other, in order to create some depth. Next up are raindrops. Draw a circle and pull the top anchorpoint upwards with the Direct Selection Tool. Use the Convert Anchor Point Tool (Shift-C) in order to change the top of the raindrop to a point. Copy, Paste, Scale, and scatter the raindrops around the composition, under the ribbon banner.
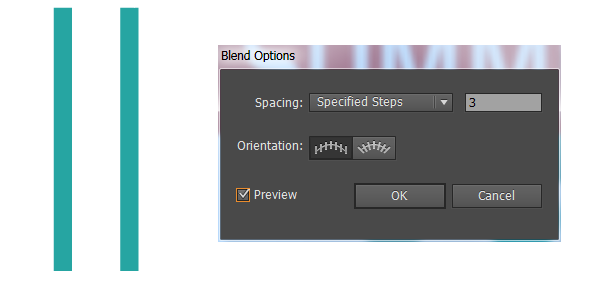
Step 8
For the rainbow, which appears in two of the summer banner vectors, draw two identical, narrow, vertical rectangles. Select both and use the Blend Tool (W) to select both rectangles and apply a blend of 3 – 4 Steps.
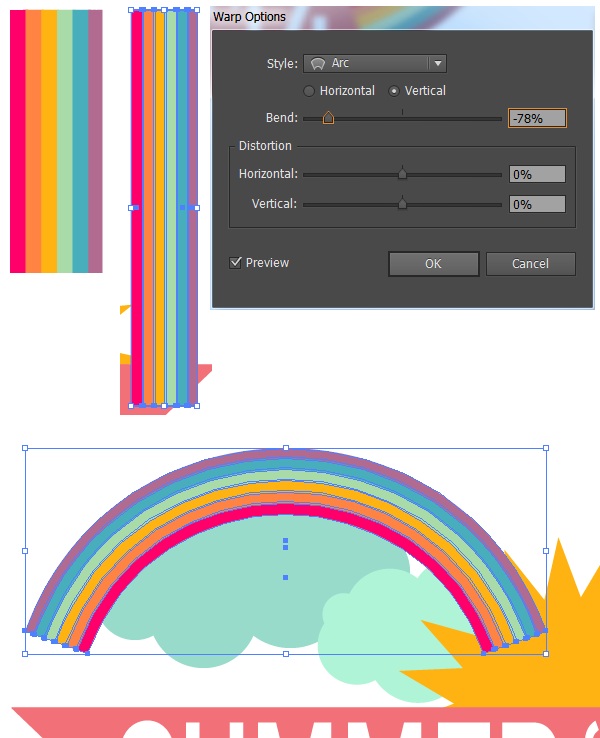
Step 9
Expand the blend and change each rectangle’s color in order to create a rainbow. Group together the rectangles and pull them downward with the Selection tool in order to get a longer group of rainbow shapes. Go to Effect > Warp > Arc and set the Vertical Bend to -78%. This will result in a lovely, arching rainbow. Expand under Object.
Step 10
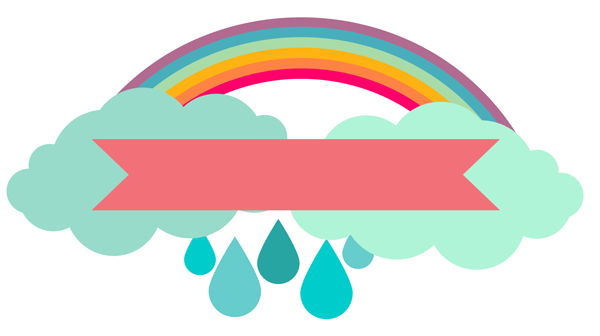
For the third summer banner vector, use the rainbow, clouds, and raindrops from the second and place all of them behind the banner (as done with the other designs).
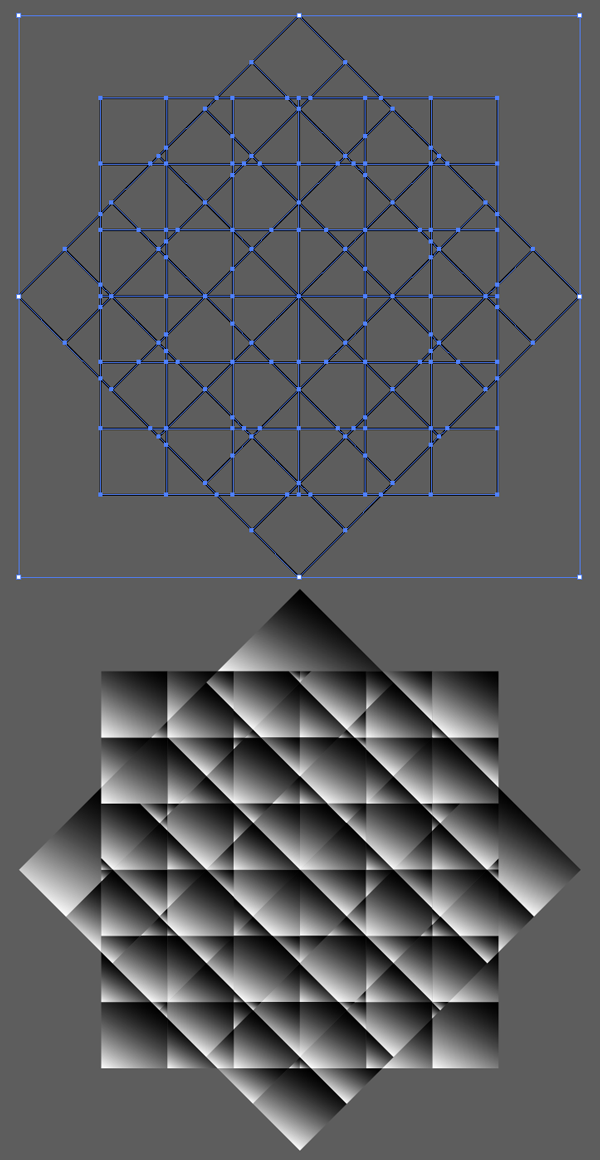
Step 11
In order to create the faceted look seen on half of the summer banner vectors in the final product of this tutorial, use the Rectangular Grid Tool (found under the Line Tool (\) in the toolbar) to draw a square grid that’s six across and six down. Repeat the grid and rotate it so it overlaps the first grid on the diagonal.
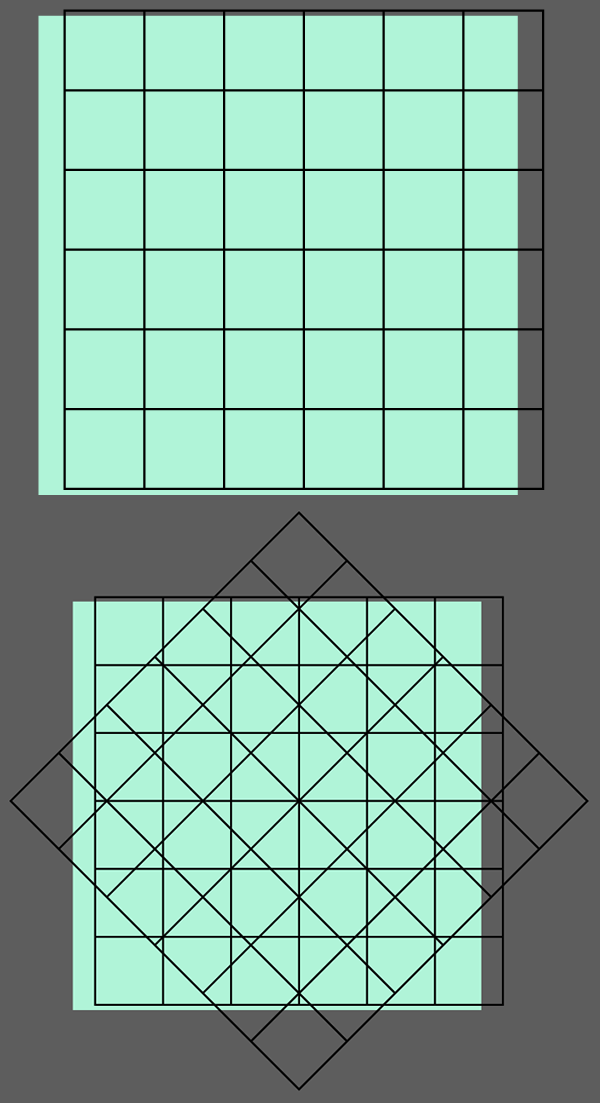
Step 12
Select both grids and hit Divide in the Pathfinder panel. once divided, apply a Linear Gradient going from white to black in the Gradient panel. Adjust the gradient’s angle within the panel carefully, as the faceted look won’t happen if all of the pieces are going in the same dirction.
Step 13
Copy and Paste one of your badge designs and Unite it in Pathfinder. Copy and Paste the gradient grid design from the last two steps and place it beneath the United banner design. Make sure the gradient grids are Grouped together. Select the united shape a the grid group and Make a Clipping Mask (Control-7). Align the newly clipped design over your original banner design and change the Clip Group’s Blend Mode to Overlay in the Transparency panel. Reduce the Clip Group’s Opacity within the Transparency panel as you see fit. Repeat this step on your other banner designs.

Great Job, You’re Done!
Now that you’ve created some banner designs, ready for summer, and learned an easy technique for creating facted designs, take this style into your work elsewhere creating sticker designs, t-shirt graphics, and stock artwork, all ready for your graphics portfolio.
Author: Mary Winkler
Mary works under the brand Acrylicana® designing apparel, jewelry, and illustrating for companies like Disney, Jakks Pacific, Envato, and more. Check out Acrylicana.com for more artwork, tutorials, and more.


I simply wanted to say thanks once more. I am not sure what I would’ve achieved without the ideas discussed by you relating to this industry. Certainly was a very hard situation in my view, nevertheless spending time with this professional tactic you handled the issue took me to leap with gladness. I’m grateful for your work and even hope you realize what a powerful job you are always doing teaching others via your websites. Most probably you haven’t got to know any of us.
I needed to draft you a little note just to say thank you once again for your personal superb information you’ve shared here. It was really incredibly generous of you giving openly exactly what a few individuals might have advertised for an ebook to earn some profit for themselves, most importantly now that you could have tried it in case you wanted. These pointers in addition worked as a easy way to understand that other individuals have the identical keenness similar to my very own to know great deal more regarding this issue. Certainly there are some more enjoyable periods up front for folks who scan through your blog post.
Major thanks for the blog article. Much thanks again. Will read on…
It’s awesome! Thanx very much!
i had this problem too,
i tried to expand , rasterize and to make it a compound path, but still’ cannot make a clipping mask.
Hi there, great guide but im having some problems with making a clipping mask of the two designs (banner, grid), i’m getting an error message saying the top object is too complex etc. and when i do the mask i’m left with just the copy of the banner with no grids or gradient, what may be causing this? I followed every step of the guide. Needles to say I’m very much a beginner.
Hi! Make sure that the object you’re using as a clipping mask doesn’t include gradients. I’m not sure exactly about your error message, as I’ve never encountered it. If you could take some screenshots and post them, that’d help me figure it out with you.