
 Add a touch of luxury to your designs with these shiny golden ribbon banner vectors. Easily create banner vector shapes with warped rectangles and apply a series of gradients to the shapes to get a gilded perfection.
Tutorial Details
- Program: Adobe Illustrator CS5-CC
- Difficulty: Intermediate
- Topics Covered: Shape Building, Warp Tools, Offsetting Paths
- Estimated Completion Time: 30 Minutes
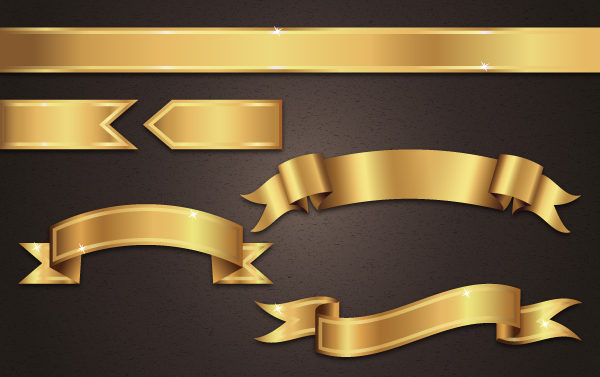
Final Image: Golden Ribbon Banner Vectors
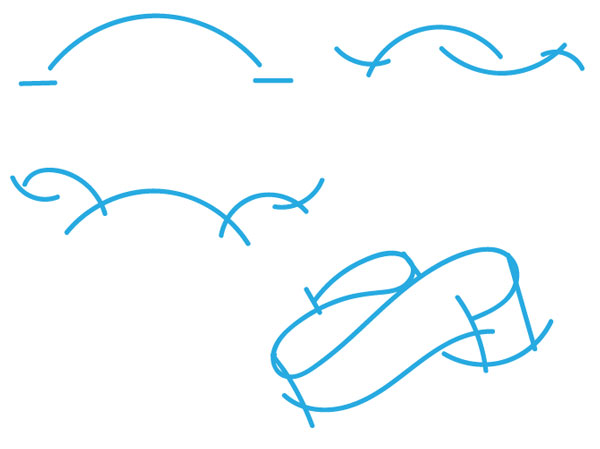
Step 1 for Creating Ribbon Banner Vectors
Let’s start with sketching out the basic shapes used for your ribbon banner vectors. Will they wave like flags, be straight across, fit into each other, or curve in different directions? Use the Paintbrush Tool (B) with a simple round Calligraphic Brush to sketch them out. Group (Control-G) together the designs you like and lock them in the Layers panel (or move them off the Artboard, out of the way).
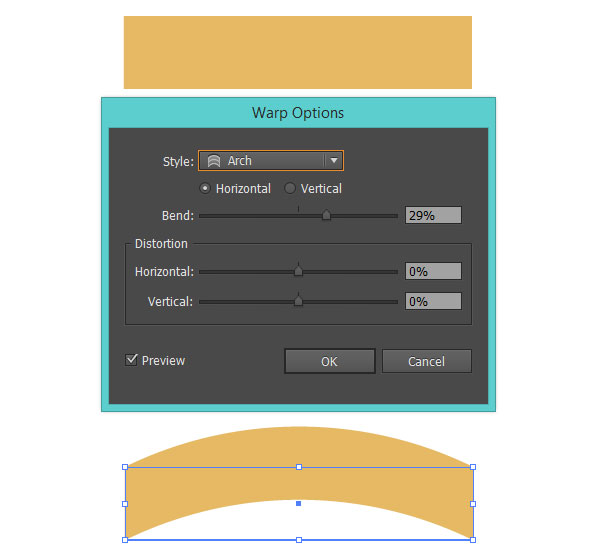
Step 2
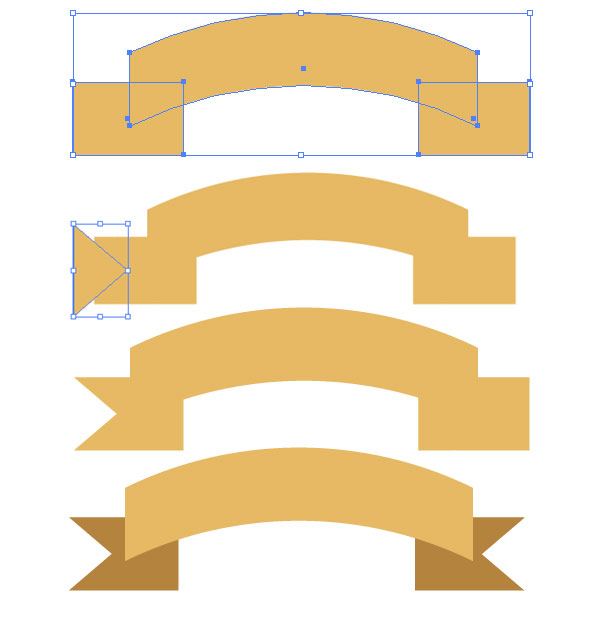
Use the Rectangle Tool (M) to draw a narrow, horizontal rectangle in a light gold color (#e7b964 used here). Select the shape and go to Effect > Warp > Arch and apply a 29% Bend. Expand the warped shape under Object.
Step 3
Draw two small rectangles on either side of the bent ribbon banner vector shape (with the Rectangle Tool). Use the Pen Tool (P) to draw a triangle on either small rectangle. Select a rectangle and its corresponding triangle and Minus Front in the Pathfinder panel. Place these pieces beneath the bent ribbon shape in the Layers panel.
Step 4
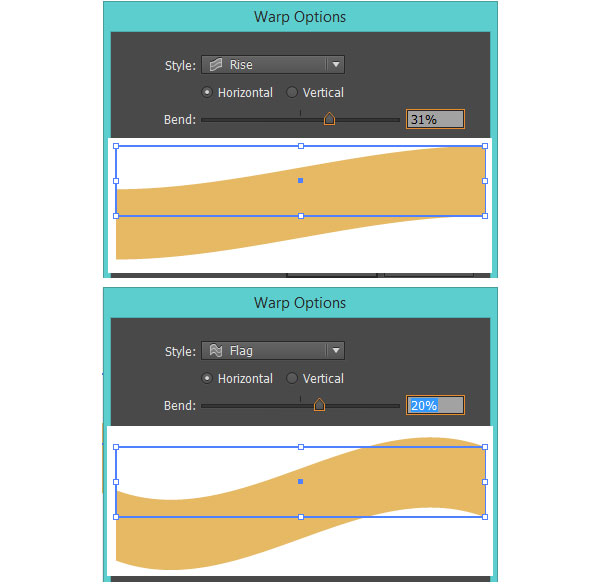
For the next ribbon banner vector shape, draw a narrow horizontal rectangle and apply two warp effects: Rise with a Bend of 31% and Flag with a Bend of 20%.
Step 5
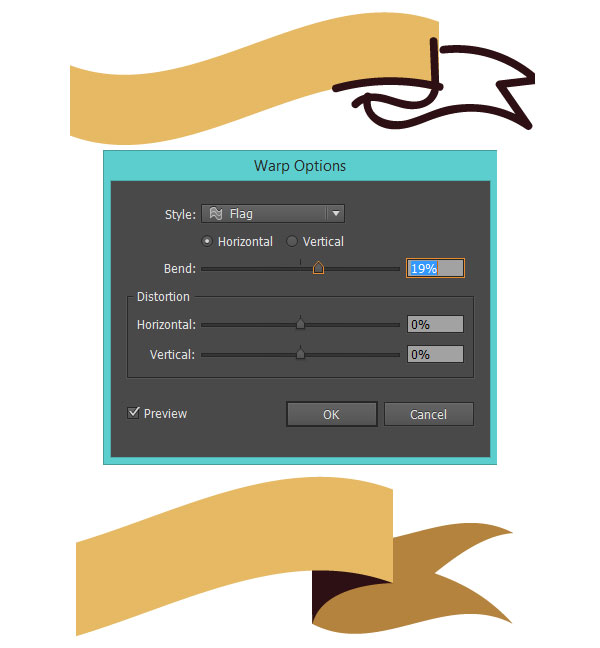
For the ribbon banner vector’s tails, I planned out the design with a quick Paintbrush Tool sketch and traced over it with the Pen Tool. Warp the tails 19% and -19% respectively (or whatever works best with the bend you applied to the rest of the banner. Draw the underside of the folded ribbon with the Pen Tool, keeping in mind the curve of the ribbon and where its edges are.
Step 6
The colors chosen here are just placeholders, since gradients will be applied to all ribbon banner vector components later in the tutorial. This just gives you a shot of how I set up banner designs like these.
Step 7
For a couple simple banner vector designs, draw long, narrow rectangles. Overlap a smaller rectangle with a large triangle (drawn with the Polygon Tool) and hit Divide option in the Pathfinder panel. Delete any extraneous components so you’re left with the two seen below.
Step 8
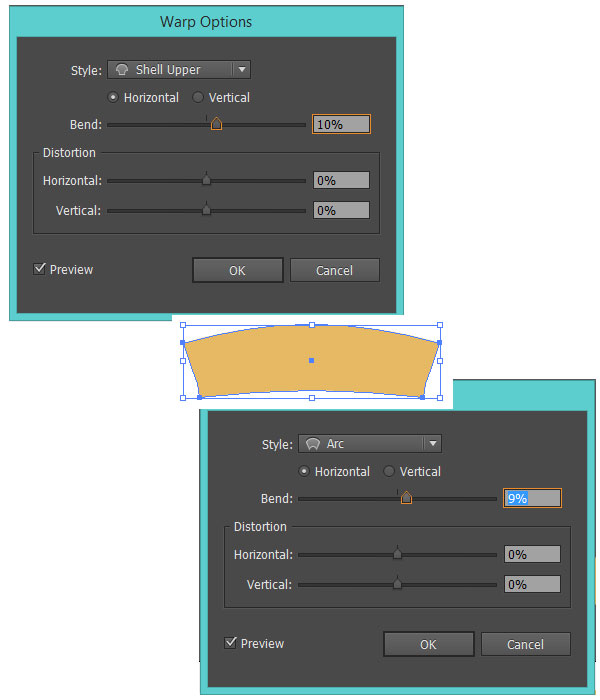
Once again, start with a narrow horizontal rectangle. Apply two Warp effects to it: Shell Upper with a Bend of 10% and an Arc with a Bend of 9%. Expand under Object.
Step 9
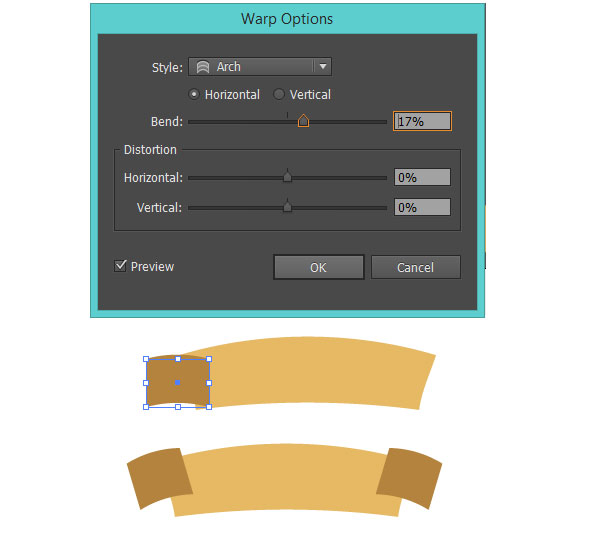
Draw two small rectangles on either side of the newly warped ribbon banner vector. Apply the Arch effect to each with a Bend of 17% and Rotate both shapes outward slightly (see below).
Step 10
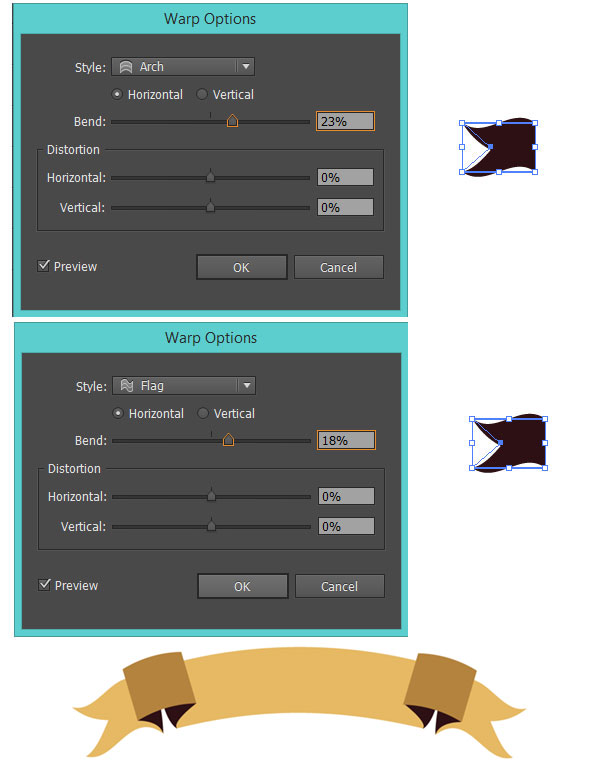
Make two ribbon tails as was done in Step 3. Apply two Warp effects: Arch with a Bend of 23% and Flag with a Bend of 18%. Copy (Control-C) and Paste (Control-V) the ribbon end and Reflect it over a Vertical Axis so it sits nicely on the other side of the banner.
Step 11
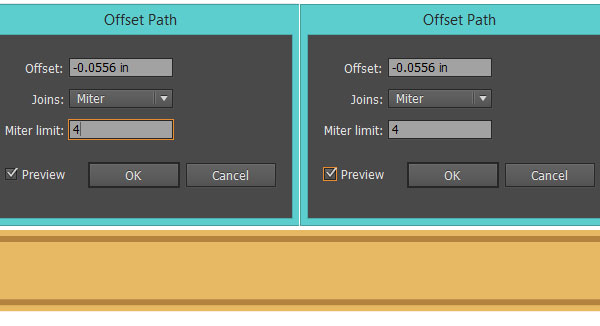
Now that we’ve created our basic ribbon banner vector shapes, let’s get to rendering them. Most of the banner vectors will have multiple layers created by offsetting the paths of each shape. To do so, Select the shape you’re offsetting and go to Object > Path > Offset Path. Offset the shape by -4px and repeat once more on the newly created shape so you have three stacked on top of each other. If you want a thicker or thinner ribbon banner vector shape, adjust your offset amount as needed.
Step 12
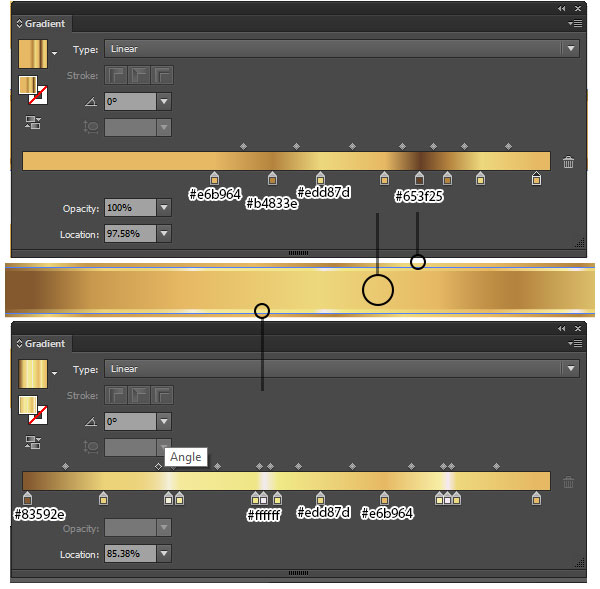
Select the outer and inner rectangles of this first basic banner vector and apply the gradient seen below with the Gradient panel. I wanted to keep the gold tones warm, with #e6b9464 and #b4833e as the main colors, #edd87d as the highlight and #653f25 for core shadows.
For the bright gold strip (the middle rectangle layer), lighten up the gold colors with white (#ffffff) and light yellow (#edd87d. See below for additional gold tones and their placement.
Step 13
The gradients for this wrap-around style ribbon banner vector as the same colors as seen in Step 12, but adjusted differently: less highlights, lighter shadow color, and more buttery yellow overall.
Step 14
As has been done to the other banner vector designs, Offset the paths of each shape twice for a layered ribbon effect. The amount of colors placed in this gradient are less than the other two since it’s a smaller banner and curved, so highlights and shadows will respond directly to the movement of the banner itself (highlights around the center, shadows on the edges and below).
The two shapes below the main ribbon have a simple gradient of #46210e and #dca24e. The other main gradient is the same as those used in Steps 12-13, but #ede57d is the lightest color and the only highlight present in the gradient. Similarly, the bright ribbon strip in the banner design is devoid of white this time around.

Step 15
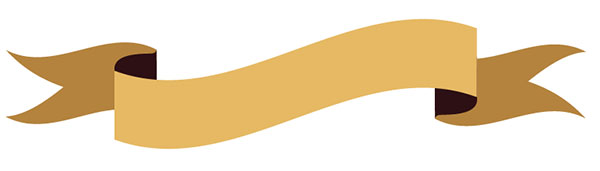
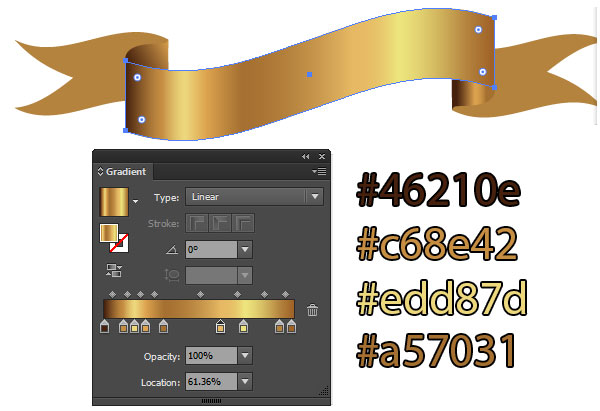
This curving ribbon banner vector has four colors in the gradient, broken down below. The darkest color is placed on the far left with two instances of bright yellow and the rest being warm gold/tan tones. This same gradient is applied, although adjusted for size, to the ribbon tail pieces too.
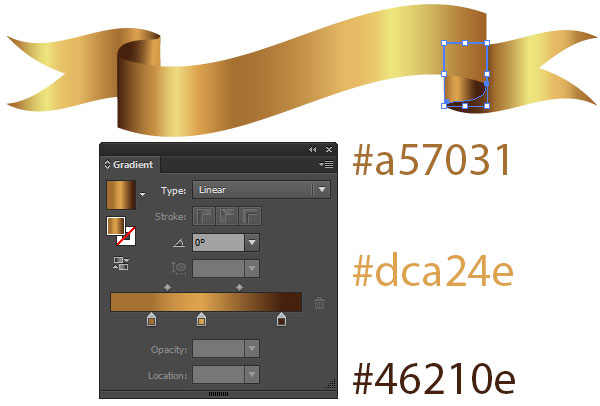
Step 16
The pieces under the ribbon banner vector have a gradient of three colors applied. The darkest color is positioned towards the fold of the top portion of the ribbon while the lightest color is near the fold of the tail pieces. Optionally, you can offset the main ribbon shape and the tails for stripes like the other ribbon designs, or keep this as is for a “dipped in gold” look.
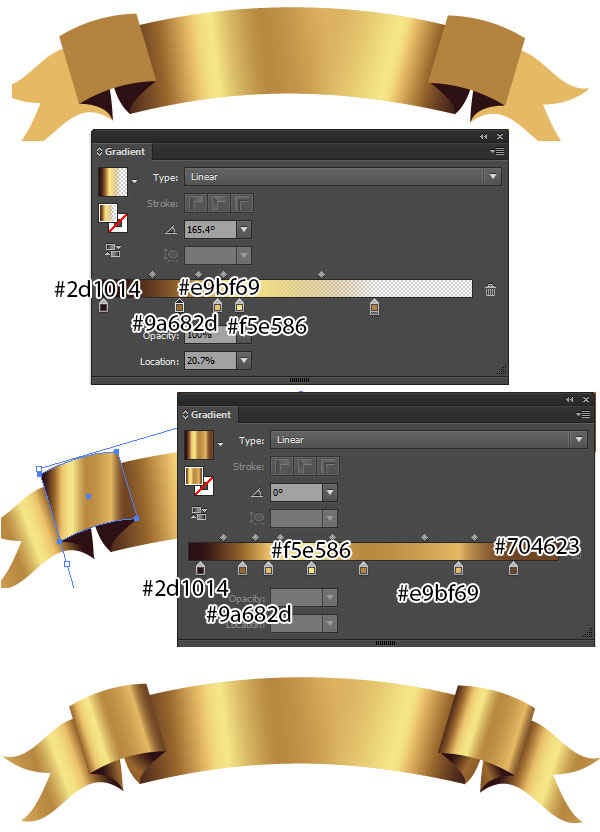
Step 17
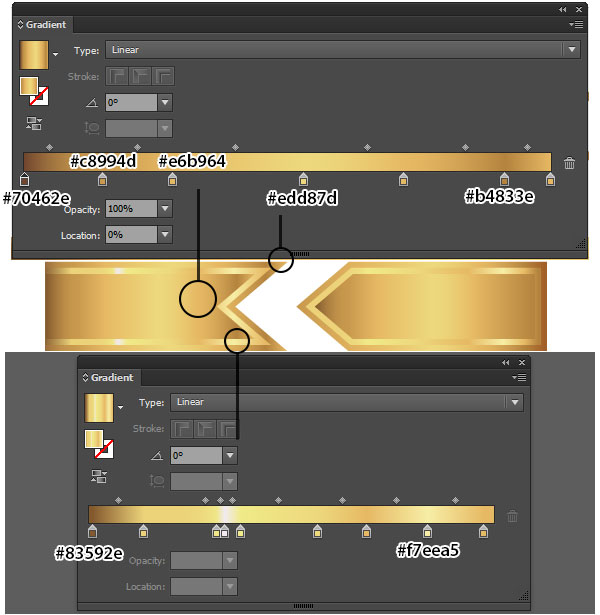
The colors for these pieces are the same as Step 16. It’s important to note here that the main ribbon shape is a flat color (#e7b964) and the gradient shapes placed over top have been Copied and Pasted twice so there’re two angles going towards the center of the banner to accentuate the banner’s curve. The gradients end in #e7b964 at 0% Opacity.
The small curved rectangles forming the top folds of the ribbon banner vector have dramatic brown and gold gradients applied and their angles, adjustable in the Gradient panel, are parallel to the edges of the small curving rectangles.
All That Glitters…
All that glitters is gold, and these ribbon banner vectors surely glitter fantastically. Add sparkle shapes with the Blob Bush Tool (Shift-B) or the Pencil Tool to highlights on your completed banner design. Play with more complex folded ribbon shapes, other metallics, and additional golden graphic designs. Happy creating!
Author: Mary Winkler
Mary works under the brand Acrylicana® designing apparel, jewelry, and illustrating for companies like Disney, Jakks Pacific, Envato, and more. Check out Acrylicana.com for more artwork, tutorials, and more.


Gold and ribbons…..two things that easy, but super complicated and challenging when start from zero. , ….thanks for putting it all together in this tutorial.
Very good.
Tq