 Create colorful, simple line icons from basic shapes to give your content a cool, cartoony vibe! Today’s tutorial will show you how to use Illustrator quickly and effectively for icons and icon sets. Ready for an iconic tutorial? Let’s get started!
Tutorial Details:
- Program: Adobe Illustrator CS5 – CC
- Difficulty: Intermediate
- Topics Covered: Basic Shapes, Arc Tool, Blob Brush Tool
- Estimated Completion Time: 20 Minutes
Final Image: Simple Line Icons

Step 1: Little Line Icons
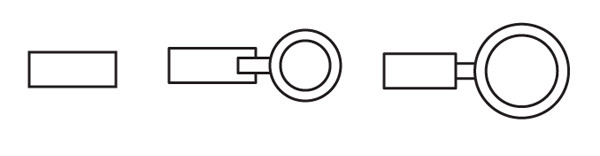
Let’s start these simple line icons with the little search icon! Draw a rectangle with the Rectangle Tool. This will be our magnifier base. Draw two circles with the Ellipse Tool, one inside the other, and a small rectangle to connect the two. Place the smaller rectangle beneath the first and enlarge the circles to the ratios seen below.
Step 2
Choose your fill and stroke colors. Use the Arc Tool to draw arcs stroked in white on the magnifier’s glass and around the magnifying glass itself in the same blue as the inner circle. You can also use the Pen, Pencil, or Blob Brush Tools in order to draw arcs around your icon. Group everything together.

Step 3
I changed my color palette so it’s easily unified with my other icons. Draw arcs, dots, and lines around the icon and a question mark in the center. You can freehand the questionmark or use the Type Tool.

Step 4
To draw the light bulb, start with two ellipses that overlap. Use the Pen Tool to bridge the gap between the sides on the ellipses and create a subtle curve between the two shapes. Unite all four shapes in the Pathfinder panel. Draw a rounded rectangle over the base of the light bulb.

Step 5
The light bulb’s base is made up of two rounded rectangles and an ellipse. Draw the inside of the light bulb with your drawing tool of choice. Use white stroked paths for shiny reflections on the bulb, and draw line segments around the light bulb icon to indicate how bright it is. Group everything together.

Step 6
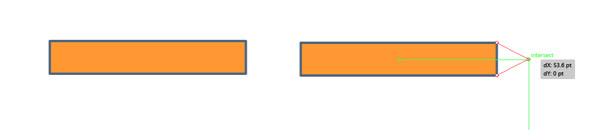
Our final icon is a pencil. Draw a rectangle and use the Pen Tool to add an anchor point in the center of the right side of the rectangle. Use the Direct Selection Tool in order to pull the anchor point outward to the right, creating your basic pencil shape.
Step 7
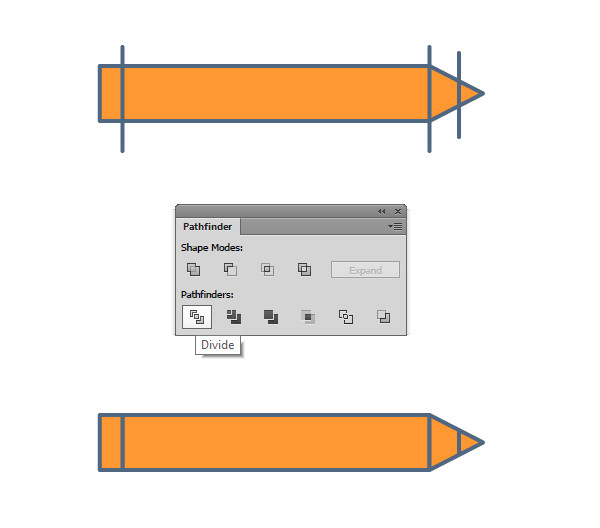
Draw three line segments showing where the eraser, sharped wood, and graphite tip of the pencil would be. Select all four objects and hit Divide in the Pathfinder panel.
Step 8
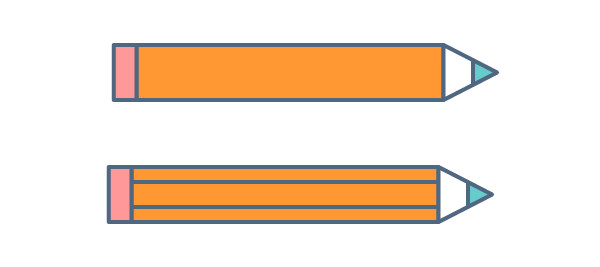
Select each section of your pencil and change the fill color: pink eraser, yellow body, white wood, and blue tip. Draw two horizontal line segments for the facets in the wood pencil.
Step 9
Group together your pencil components and Rotate it 45°. Draw some scribbled lines behind the pencil icon with the drawing tool of your choice. I prefer to use the Blob Brush Tool without pressure being enabled for a simple, even line.

Conclusion: Your Very Own Simple Line Icons
Great work! Create a whole fleet of desktop, mobile, and web icons in this simple and fun style. Share your own versions in the comment section below!
Author: Mary Winkler
Mary works under the brand Acrylicana® designing apparel, jewelry, and illustrating for companies like Disney, Jakks Pacific, Envato, and more. Check out Acrylicana.com for more artwork, tutorials, and more.


Nice titorial, thanks
Thanks for sharing this tutorial. I enjoyed every steps that you wrote. The colour combinations is wonderful
I was almost giving up on the idea of making my own icons. Trying to find the right one just won’t do it. I have a question though, did it take you less than 20 min to make all of the icons showed above? You must be really good.
Very colorful, very simple and very nice. Thanx. Where can I share my result?
You can do so right here 🙂 Or link to your result here (if you’ve uploaded it to instagram or deviantart or wherever).
OK, but I’d like to show my result HERE, just I can’t find how to attach it.