 In the following tutorial you will learn how to create a neat toothpaste text effect in Adobe Illustrator using a pattern brush. For starters you will learn how to setup a simple grid and how to build pixel perfect vector shapes using basic tools and the Pathfinder panel. Moving on you will learn how to use a simple script and how to ease your work using the Shape Builder Tool. Next, you’ll learn how to easily and rename two simple patterns and how to create your own pattern brush. Finally, using your pattern brush along with some subtle Drop Shadow effects you will create your text effect.
Tutorial Details: Toothpaste Text Effect
- Program: Adobe Illustrator CC
- Difficulty: Beginner-Intermediate
- Topics Covered: Basic Tools and Effects, Transform techniques, Patterns and Pattern Brushes
- Estimated Completion Time: 45 minutes
Final Image: Toothpaste Text Effect
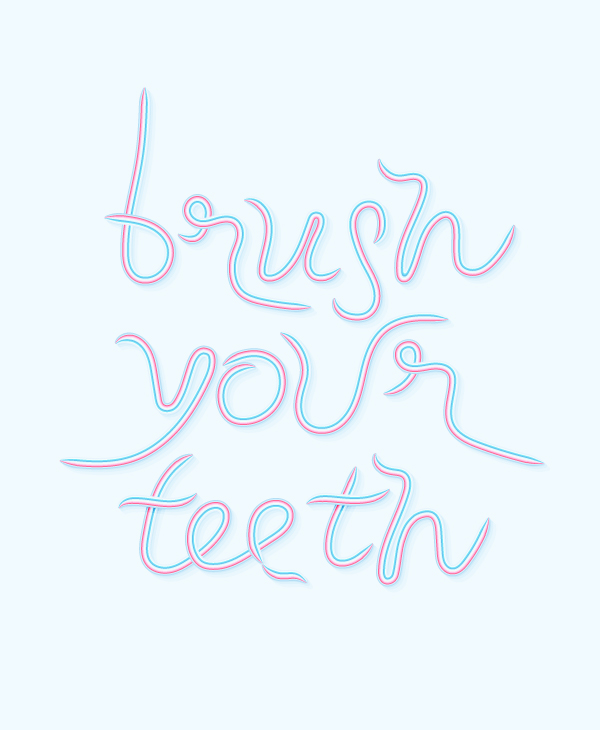
As always, this is the final toothpaste text effect image that we’ll be creating:
Step 1: Toothpaste Text Effect
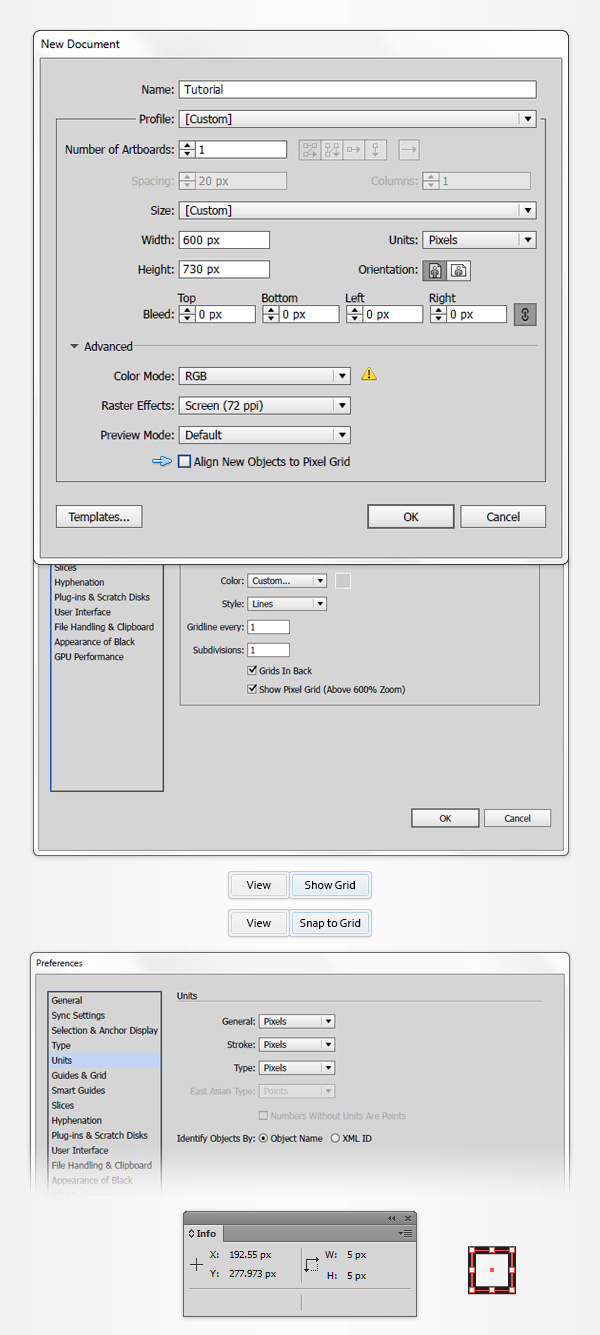
To start our toothpaste text effect tutorial, hit Control + N to create a new document. Select Pixels from the Units drop-down menu, enter 600 in the width box and 730 in the height box and then click the Advanced button. Select RGB, Screen (72ppi) and make sure that the Align New Objects to Pixel Grid box is unchecked before you click OK.
Enable the Grid (View > Show Grid) and the Snap to Grid (View > Snap to Grid). You will need a grid every 1 px, so simply go to Edit > Preferences > Guides > Grid, enter 1 in the Gridline every box and 1 in the Subdivisions box. Try not to get discouraged by all that grid, it will ease your work and keep in mind that you can easily enable or disable it using the Control + “ keyboard shortcut.
You should also open the Info panel (Window > Info) for a live preview with the size and position of your shapes. Do not forget to set the unit of measurement to pixels from Edit > Preferences > Units > General. All these options will significantly increase your work speed.
Step 2
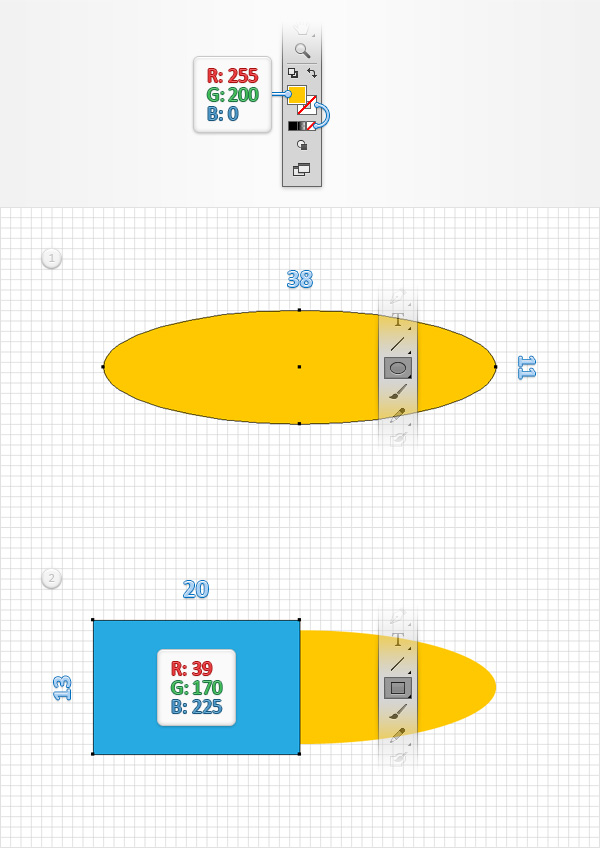
Pick the Ellipse Tool (L) and focus on your Toolbar. Remove the color from the stroke then select the fill and set its color at R=255 G=200 B=0. Move to your artboard and simply create a 38 x 11 px shape – the grid and the the Snap to Grid feature should ease your work. Switch to the Rectangle Tool (M), create a 20 x 13 px shape, fill it with R=39 G=170 B=225 and place it exactly as shown in the second image.
Step 3
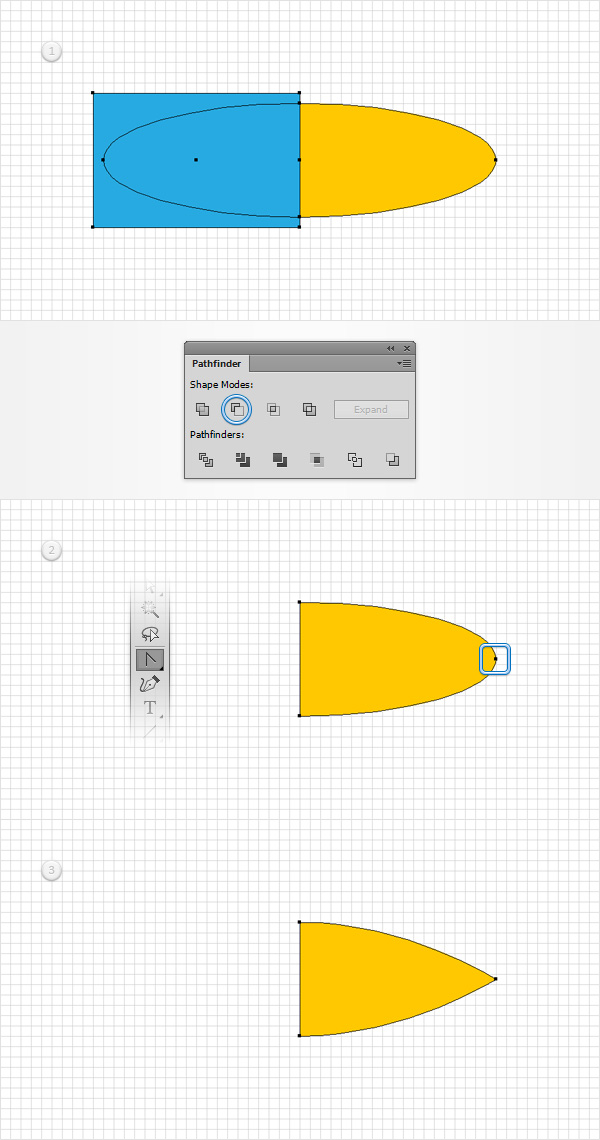
Using the Selection Tool (V), select both shapes made so far, open the Pathfinder panel (Window > Pathfinder) and click the Minus Front button. Make sure that the resulting shape stays selected, switch to the Anchor Point Tool (Shift + C) and simply click on the right anchor point. In the end your yellow shape should look like in the third image.
Step 4
Disable the Snap to Grid (Shift + Control + “) and then go to Edit > Preferences > General and make sure that the Keyboard Increment is set at 1px.
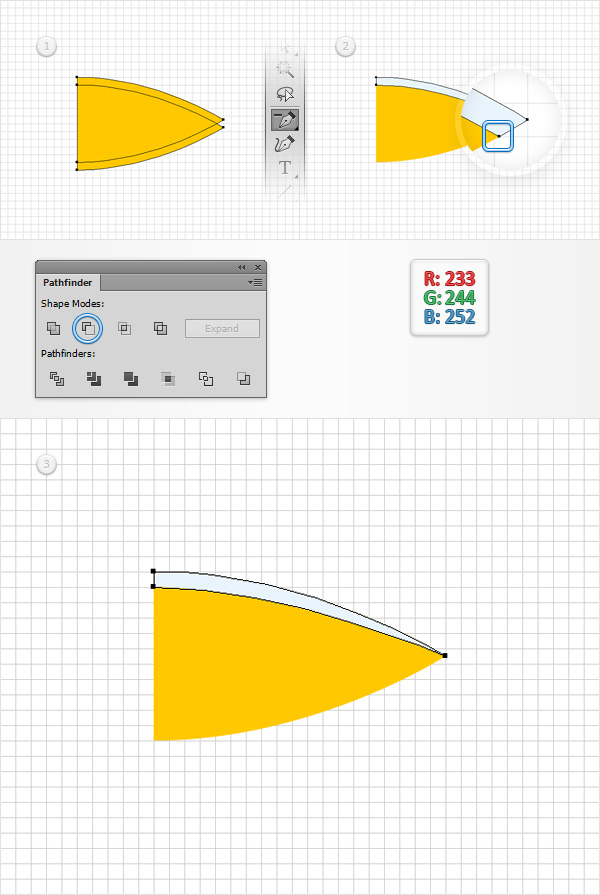
Make sure that your yellow shape is selected and make two copies in front (Control + C > Control + F > Control + F). Select the top copy and move it 1 px down using the down arrow button from your keyboard. Reselect both copies made in this step and click the Minus Front button from the Pathfinder panel. Select the resulting shape and replace the existing fill color with R=233 G=244 B=252. Make sure that this thin, new shape stays selected and focus on its right side. Switch to the Delete Anchor Point Tool (-) and simply click on the anchor points highlighted in the second image ro remove it. In the end your shape should look like in the third image.
Step 5
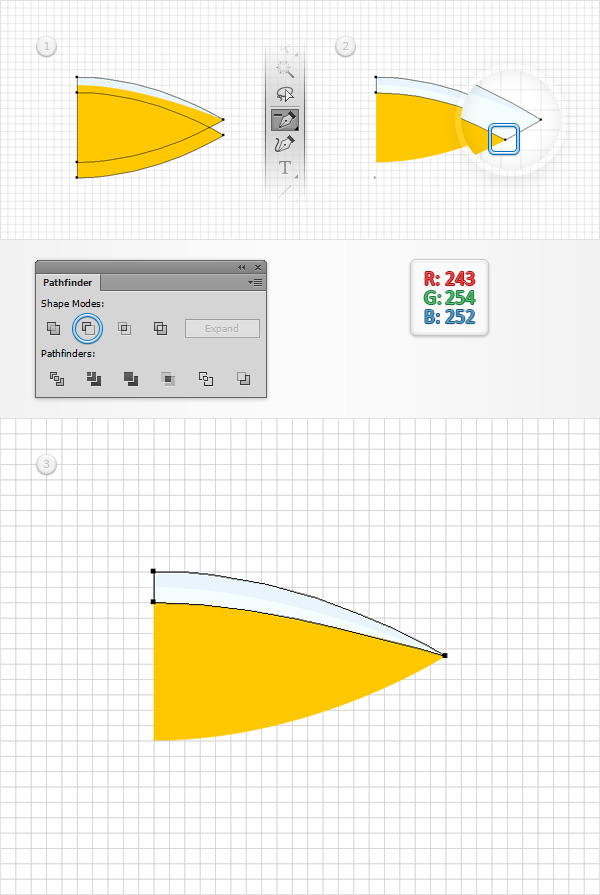
Make sure that your yellow shape is selected and make two copies in front (Control + C > Control + F > Control + F). Select the top copy and move it 2 px down. Reselect both copies made in this step and click the Minus Front button from the Pathfinder panel. Select the resulting shape and replace the existing fill color with R=243 G=254 B=252. Make sure that this new shape stays selected and focus on its right side. Switch to the Delete Anchor Point Tool (-) and remove the anchor point highlighted in the second image.
Step 6
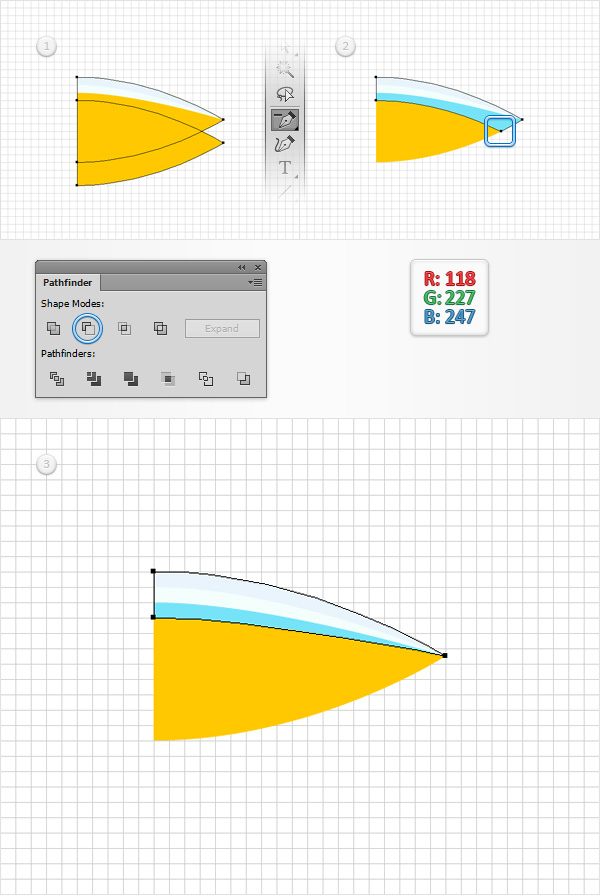
Make sure that your yellow shape is selected and make two copies in front (Control + C > Control + F > Control + F). Select the top copy and move it 3 px down. Reselect both copies made in this step and click the Minus Front button from the Pathfinder panel. Fill the resulting shape with R=118 G=227 B=247, make sure that it stays selected and focus on its right side. Switch to the Delete Anchor Point Tool (-) and remove the anchor point highlighted in the second image.
Step 7
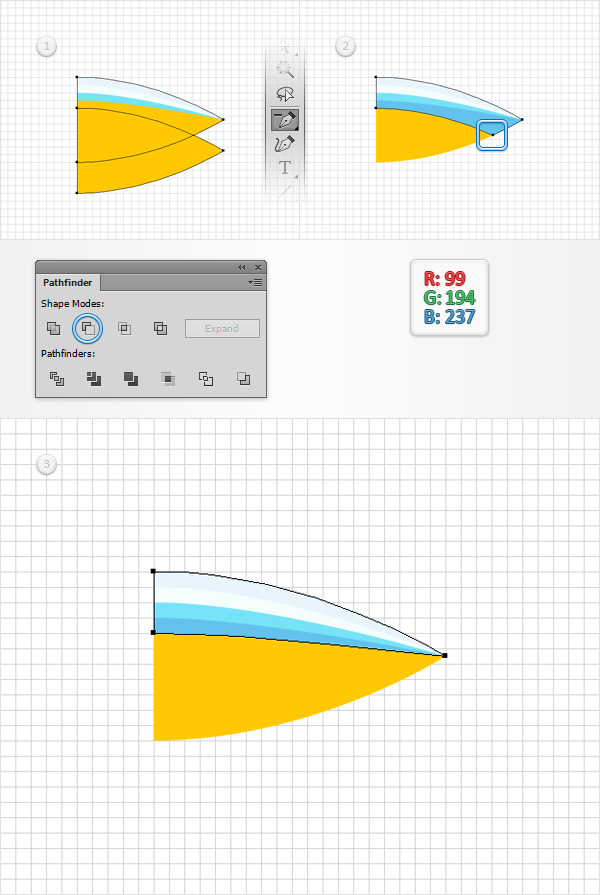
Make sure that your yellow shape is selected and make two copies in front (Control + C > Control + F > Control + F). Select the top copy and move it 4 px down. Reselect both copies made in this step and click the Minus Front button from the Pathfinder panel. Fill the resulting shape with R=99 G=194 B=237, make sure that it stays selected and focus on its right side. Switch to the Delete Anchor Point Tool (-) and remove the anchor point highlighted in the second image.
Step 8
Make sure that your yellow shape is selected and make two copies in front (Control + C > Control + F > Control + F). Select the top copy and move it 5 px down. Reselect both copies made in this step and click the Minus Front button from the Pathfinder panel. Fill the resulting shape with R=220 G=248 B=253, make sure that it stays selected and focus on its right side. Switch to the Delete Anchor Point Tool (-) and remove the anchor point highlighted in the second image.
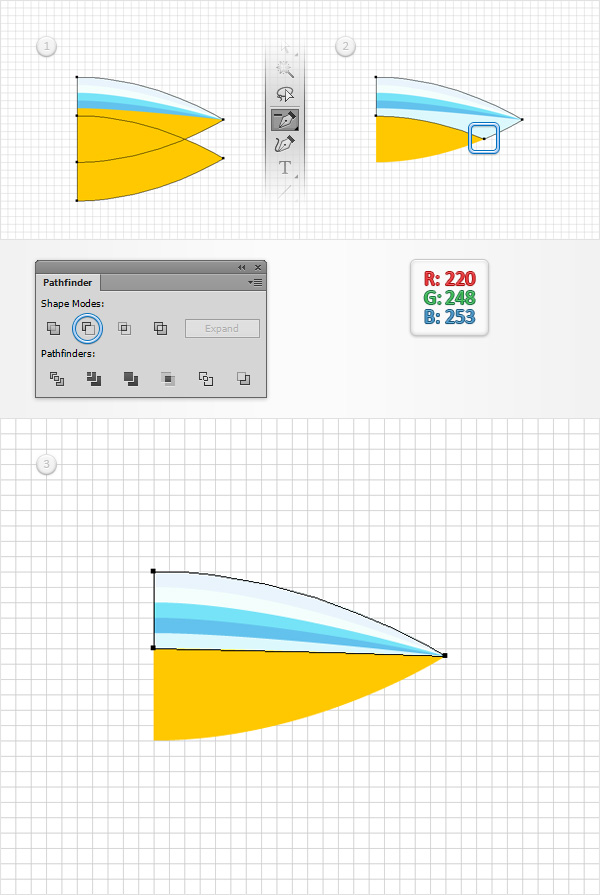
Step 9
Make sure that your yellow shape is selected and make two copies in front (Control + C > Control + F > Control + F). Select the top copy and move it 1 px up. Reselect both copies made in this step and click the Minus Front button from the Pathfinder panel. Fill the resulting shape with R=180 G=222 B=245, make sure that it stays selected and focus on its right side. Switch to the Delete Anchor Point Tool (-) and remove the anchor point highlighted in the second image.
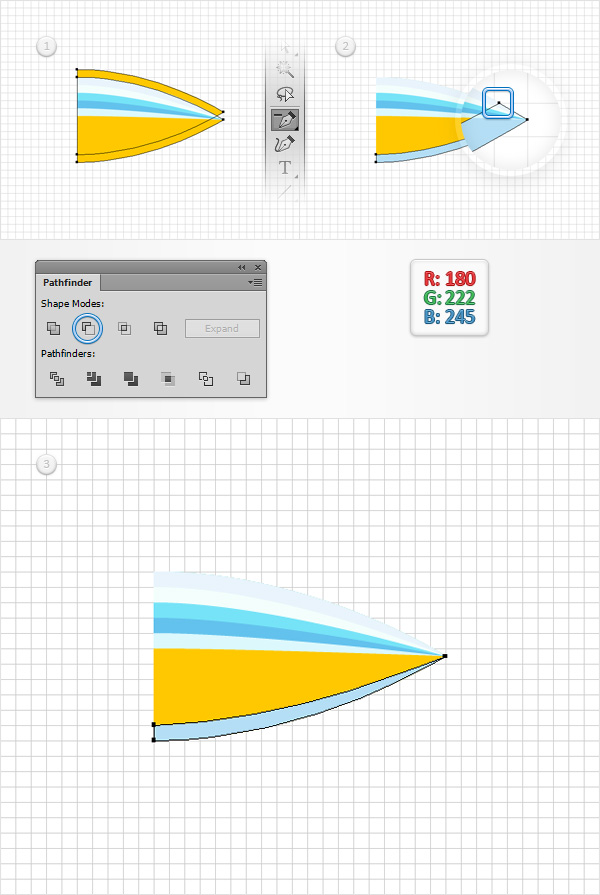
Step 10
Make sure that your yellow shape is selected and make two copies in front (Control + C > Control + F > Control + F). Select the top copy and move it 2 px up. Reselect both copies made in this step and click the Minus Front button from the Pathfinder panel. Fill the resulting shape with R=210 G=240 B=254, make sure that it stays selected and focus on its right side. Switch to the Delete Anchor Point Tool (-) and remove the anchor point highlighted in the second image.
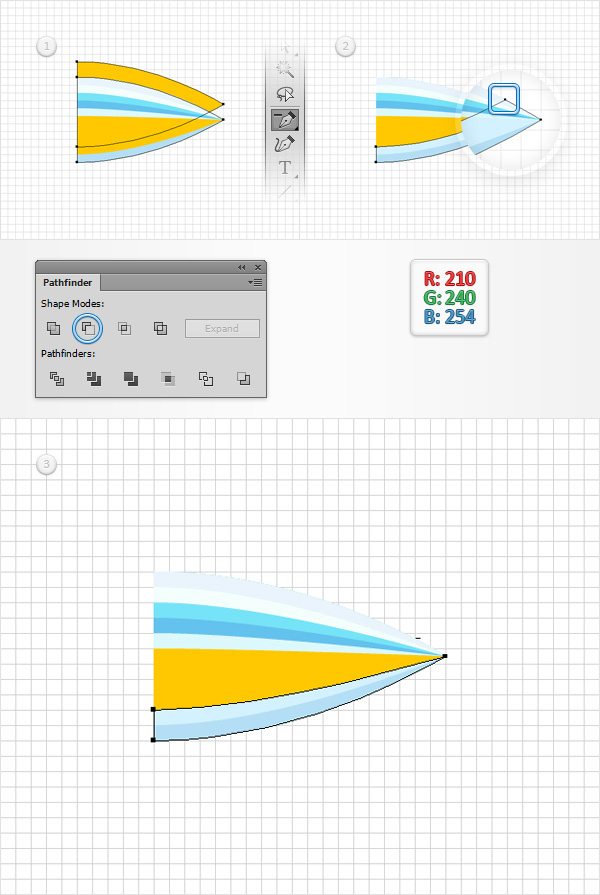
Step 11
Make sure that your yellow shape is selected and make two copies in front (Control + C > Control + F > Control + F). Select the top copy and move it 3 px up. Reselect both copies made in this step and click the Minus Front button from the Pathfinder panel. Fill the resulting shape with R=255 G=105 B=149, make sure that it stays selected and focus on its right side. Switch to the Delete Anchor Point Tool (-) and remove the anchor point highlighted in the second image.
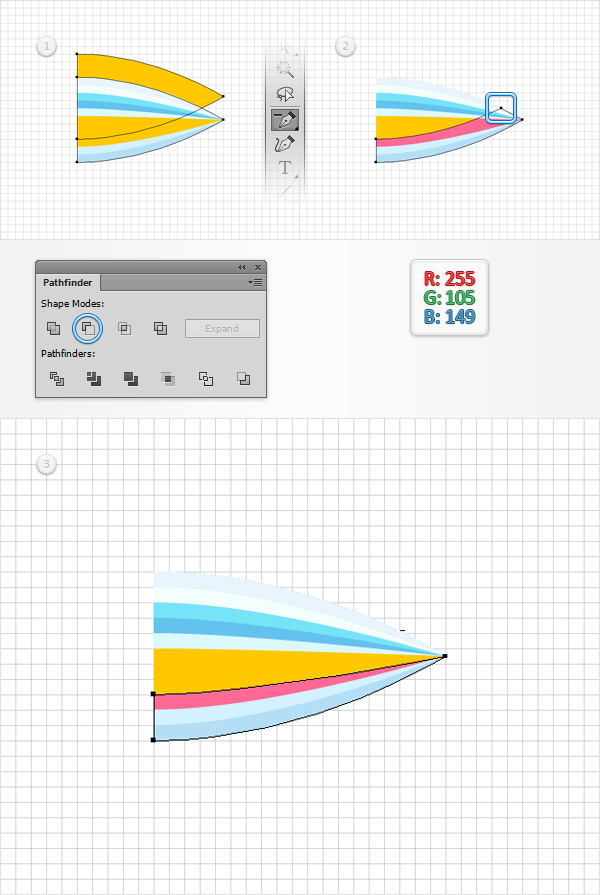
Step 12
Make sure that your yellow shape is selected and make two copies in front (Control + C > Control + F > Control + F). Select the top copy and move it 4 px up. Reselect both copies made in this step and click the Minus Front button from the Pathfinder panel. Fill the resulting shape with R=255 G=178 B=223, make sure that it stays selected and focus on its right side. Switch to the Delete Anchor Point Tool (-) and remove the anchor point highlighted in the second image.

Step 13
Make sure that your yellow shape is selected and make two copies in front (Control + C > Control + F > Control + F). Select the top copy and move it 5 px up. Reselect both copies made in this step and click the Minus Front button from the Pathfinder panel. Fill the resulting shape with R=255 G=226 B=243, make sure that it stays selected and focus on its right side. Switch to the Delete Anchor Point Tool (-) and remove the anchor point highlighted in the second image.
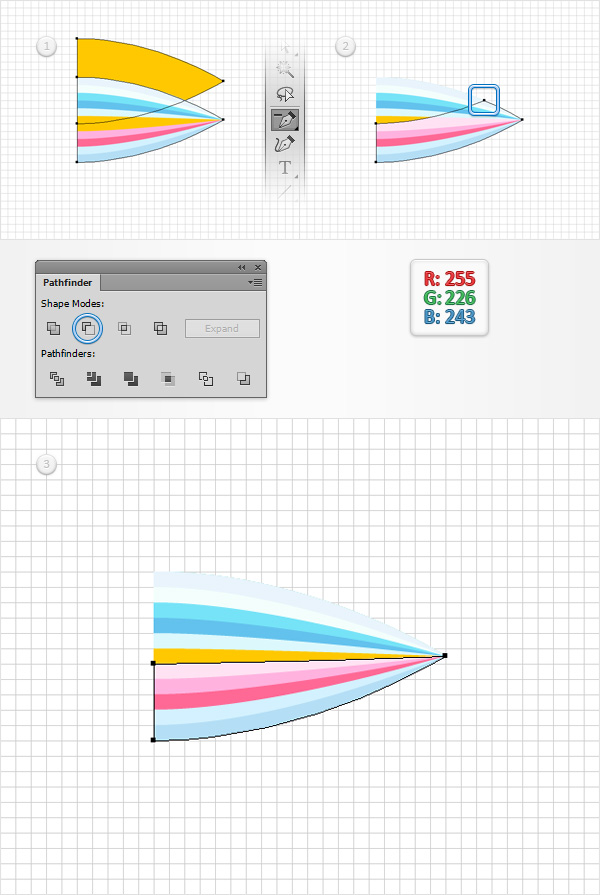
Step 14
Make sure that your yellow shape is selected and replace the existing fill color with R=243 G=254 B=252.
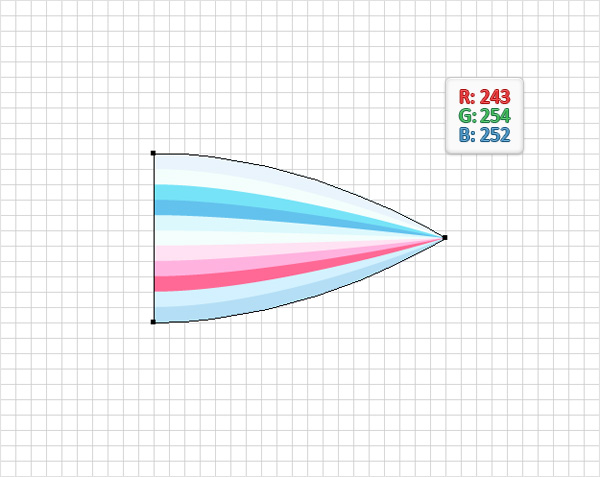
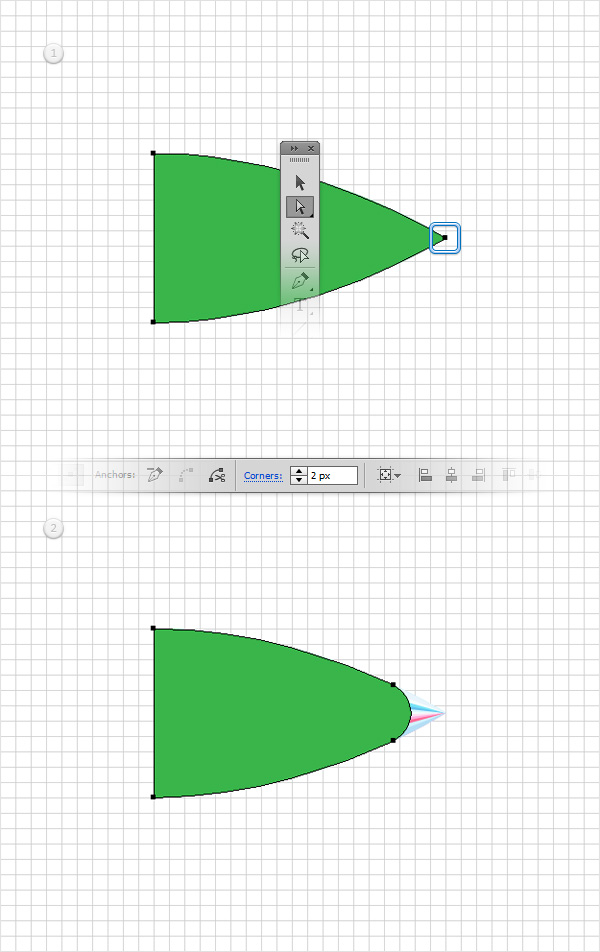
Step 15
Reselect that main shape, make a new copy in front (Control + C > Control + F) and then bring it to front using the Shift + Control + ] keyboard shortcut. Fill this new shape with a random green and then pick the Direct Selection Tool (A). Select the anchor point highlighted in the first image, move to the options bar and simply enter 2 px in that Corners box. In the end your green shape should look like in the second image. The Live Corners feature is only available for CC users. The best solution to replace this effect would be the Round Any Corner script that can found in this article: 20 Free and Useful Adobe Illustrator Scripts. Save it to your hard drive, return to Illustrator and grab the Direct Selection Tool (A). Select that same anchor point and go to File > Scripts > Other Script. Open the Round Any Corner Script, enter a 2 px radius and click OK.
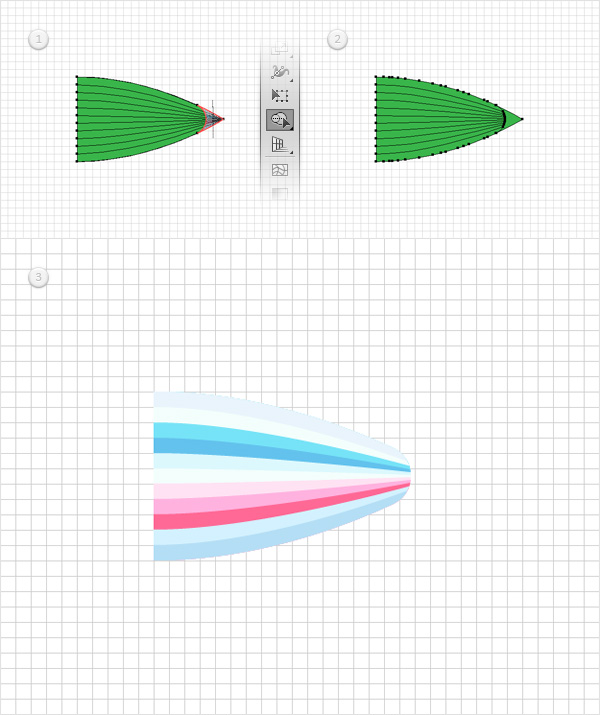
Step 16
Select all the shapes made so far, pick the Shape Builder Tool (Shift + M) and simply draw a like across the tip of your selection as shown in the first image. Delete the resulting green shape and you should end up with the set of shapes shown in the third image.
Step 17
Reselect all the shapes made so far and simply drag them inside the Swatches panel (Window > Swatches) to save them as a pattern. Make sure that this pattern is selected, open the fly-out menu of the Swatches panel and go to Swatch Options to rename your selected pattern. Enter “rightEnd” and then click the OK button.
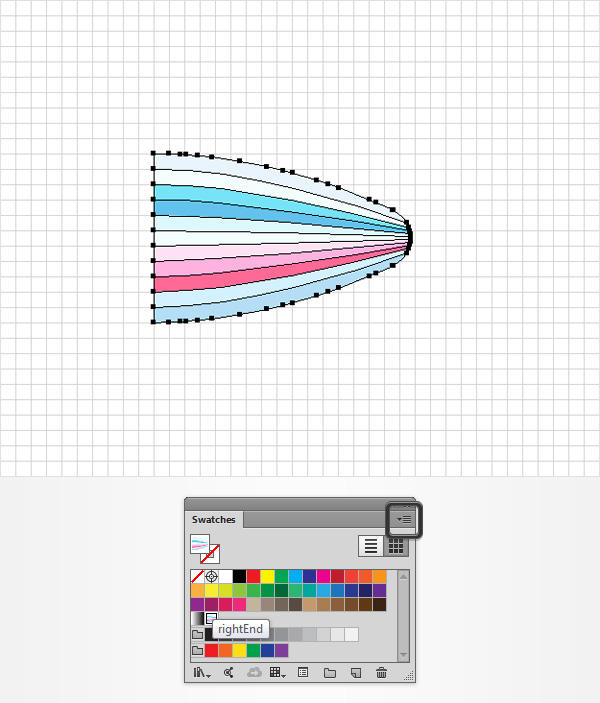
Step 18
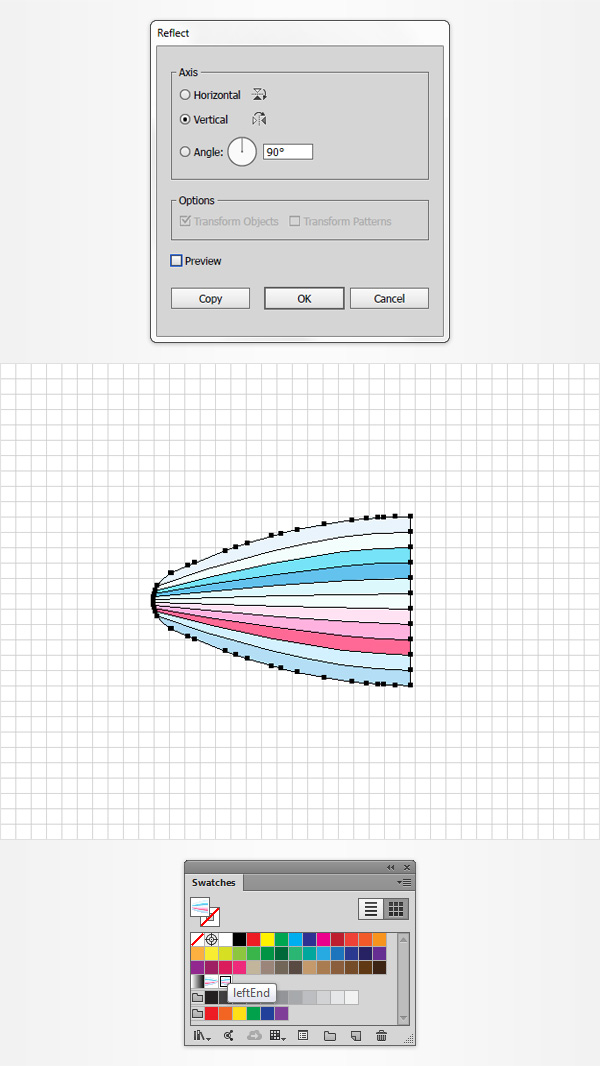
Reselect your set of shapes and go to Object > Transform > Reflect. Check the Vertical box and then click the OK button. This will simply flip your set of shapes as shown in the following image. Make sure that these shapes remain selected and turn them into a second pattern using the simple technique mentioned in the previous step. Once you’re done, rename this new pattern “leftEnd“.
Step 19
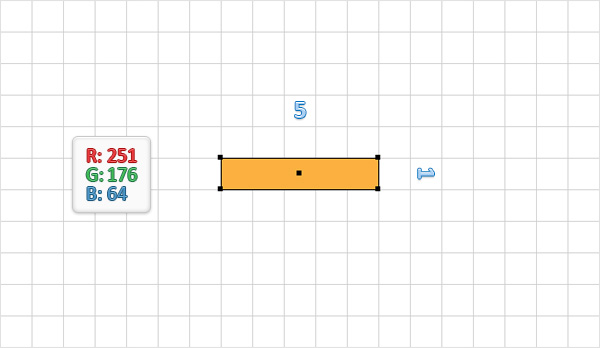
Enable the Snap to Grid (Control + “). Using the Rectangle Tool (M), create a 5 x 1 px shape and fill it with R=251 G=176 B=64.
Step 20
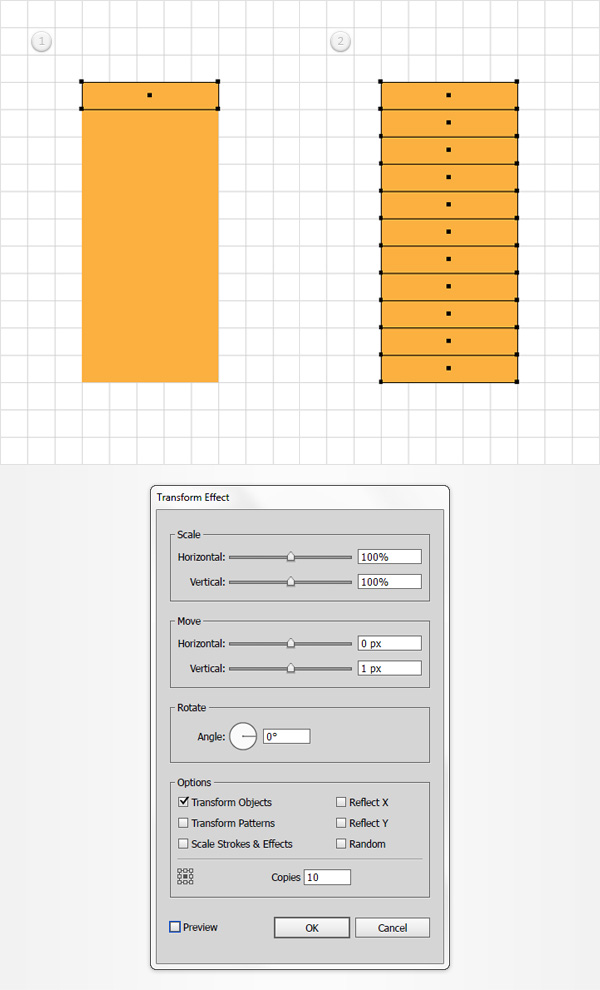
Make sure that your orange rectangle is still selected and go to Effect > Distort & Transform > Transform. Drag the Move-Vertical slider to 1 px, enter 10 in the Copies box, click the OK button and then go to Object > Expand Appearance. Make sure that the resulting group of shapes is selected and Ungroup it using the Shift + Control + G keyboard shortcut.
Step 21
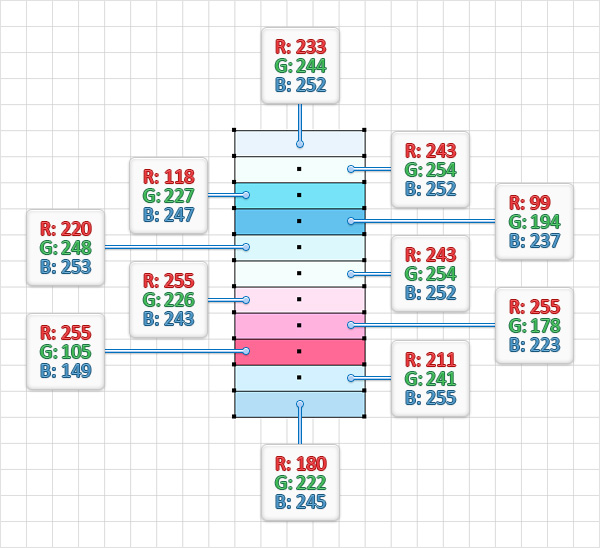
Keep focusing on the column of orange rectangles. Select these shapes one by one and simply replace that orange with the colors pointed in the following image.
Step 22
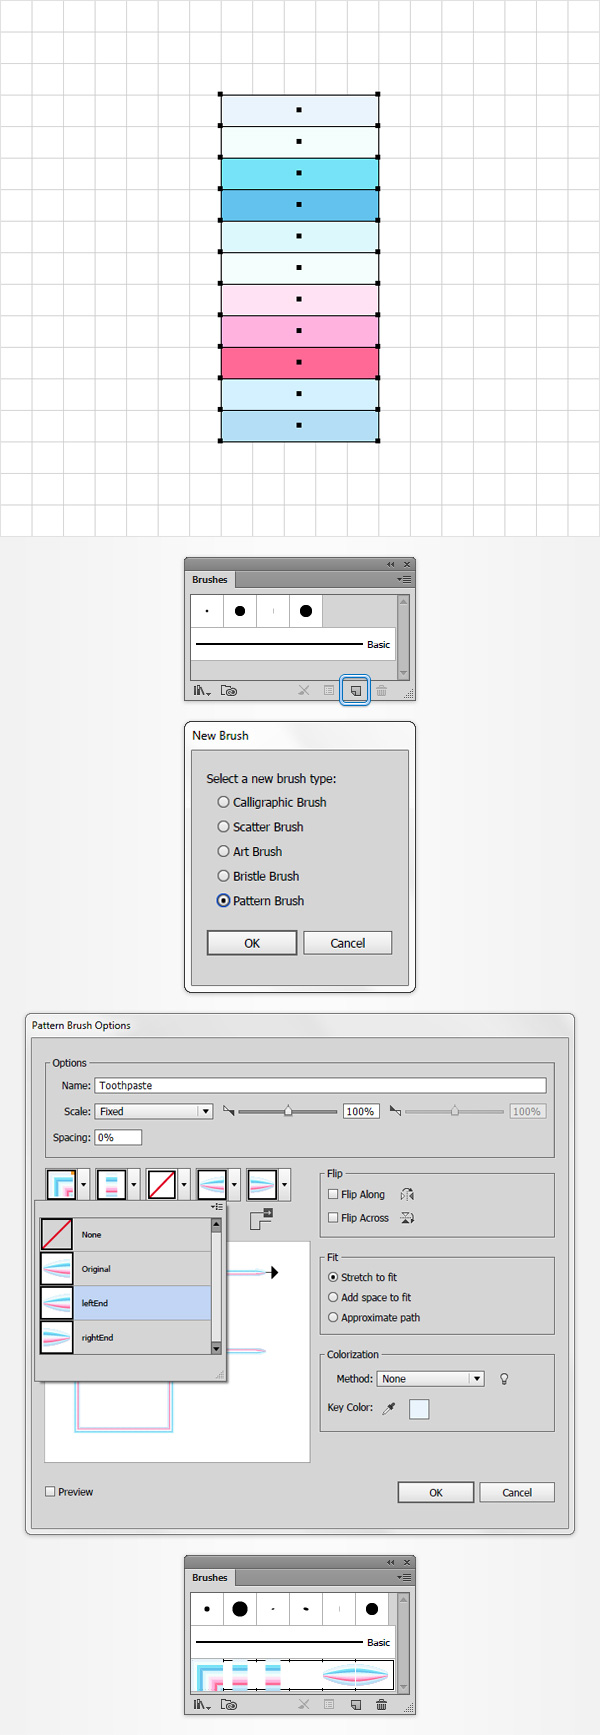
Make sure that your column of rectangles is selected, open the Brushes panel (Window > Brushes) and click the New Brush button. Check the Pattern Brush button and click OK to open the Pattern Brush Options window. Name it “Toothpaste“, make sure that all the attributes are set as shown below and then move to the Tile boxes. Open the Start Tile drop-down window and add the “leftEnd” pattern from that list and then open the End Tile drop-down window and add the “rightEnd” pattern. Finally, click OK and you will find your new toothpaste text effect pattern brush inside the Brushes panel.
Step 23
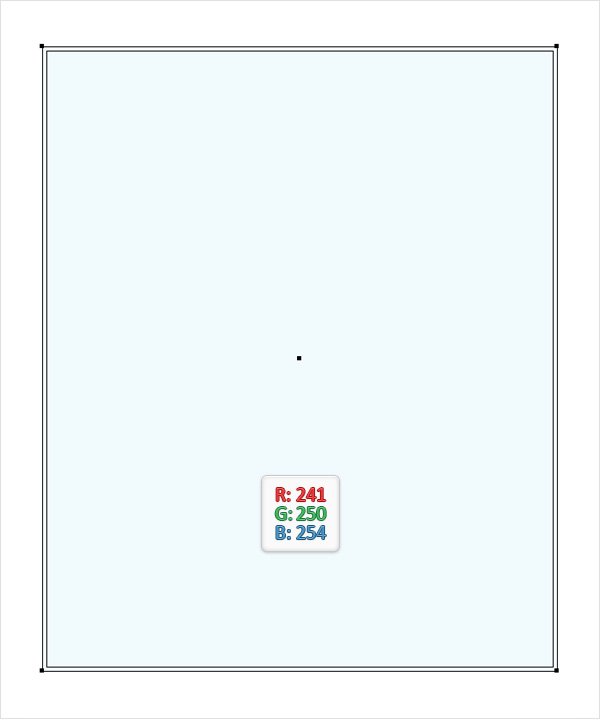
Using the Rectangle Tool (M), create a shape that covers your entire canvas and fill it with R=241 G=250 B=254.
Step 24
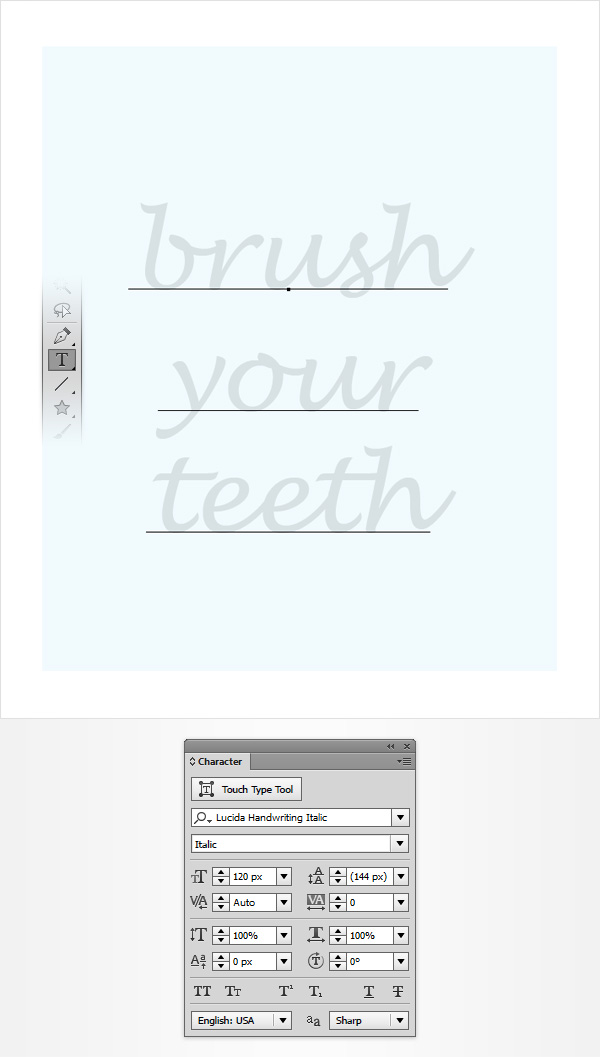
Pick the Type Tool (T), simply click on your artboard and add your grey piece of text. Make sure that it stays selected and open the Character panel (Window > Type > Character).
Use the Lucida Handwriting Italic font and set the size to 120 pt.
Step 25
Using the Brush Tool (B) and one of the default calligraphic brushes from the Brushes panel draw a bunch of paths along your text roughly as shown in the following image.
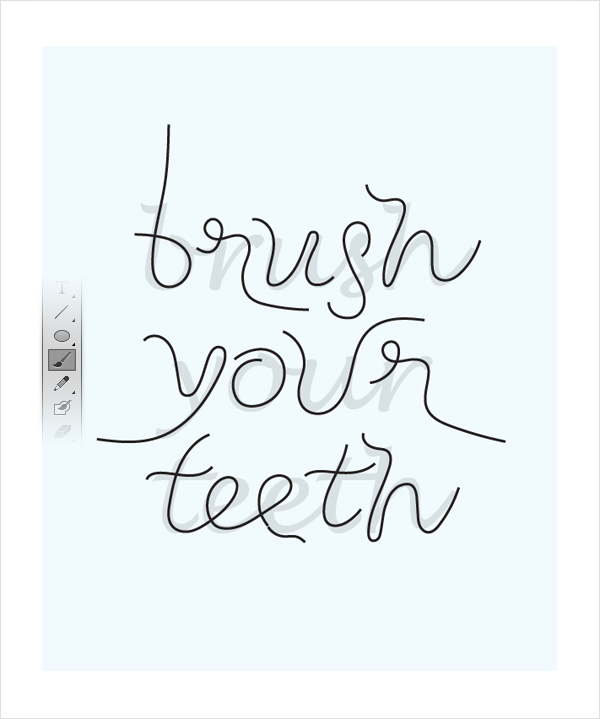
Step 26
Get rid of that piece of text and then select the paths added in the previous and simply add your “Toothpaste” pattern brush.
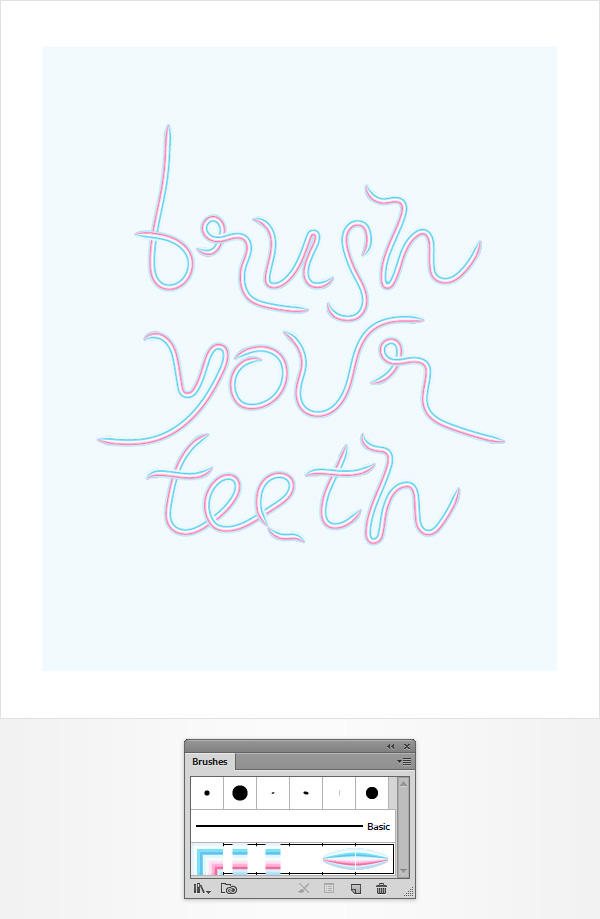
Step 27
Make sure that all the paths that make up your toothpaste text effect are still selected and go to Effect > Stylize > Drop Shadow. Enter the attributes shown in the left window (in the following image), click the OK button and then add the other two Drop Shadow effects shown below.
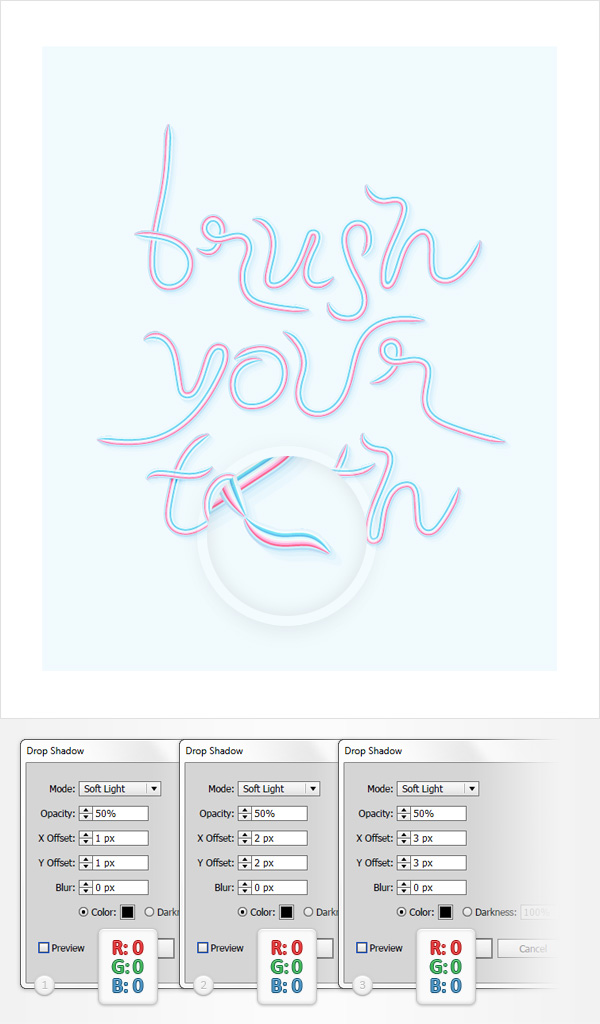


Perfect description! Thank you soo much for sharing!
Very thourough. Thanks for sharing this. I shall have to see if my students can follow these detailed steps to create their own projects.