
In this tutorial, you’ll learn how to create a food-inspired font style entirely from scratch by manipulating shapes with gradients, custom brushes, and various vector and raster effects within the appearance panel. Once you have the first letter, an entire alphabet of donut goodness awaits!
Tutorial Details
- Program: Adobe Illustrator CS6-CC
- Difficulty: Intermediate
- Topics Covered: Appearance Panel, Pencil Tool, Shape Builder Tool
- Estimated Completion Time: 45 Minutes
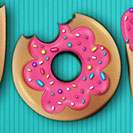
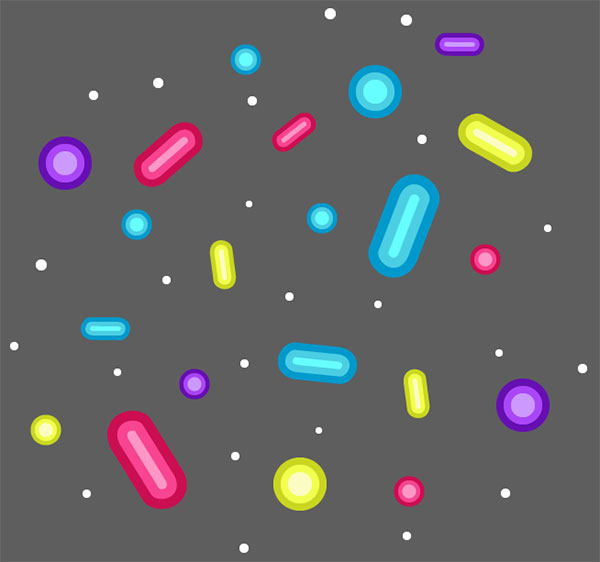
Final Image
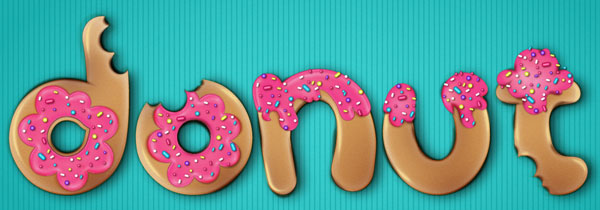
Step 1
In order to begin, I like to set up my background layer first. Create a new document that is longer than it is wide (in this case 8″ x 4″, or so). Use the Rectangle Tool (M) to create a shape larger than the artboard. I chose a light pink for the fill color. Using a darker pink and the Line Segment Tool (\), I drew a line on the left of the artboard, Copied (Control-C) and Pasted (Control-V) it on the right and used the Blend Tool (W), seen below to create a simple striped background at 125 Steps (your step number may vary depending on the width of your line segments, size of your document, and how thin or thick you’d like the stripes to be). Reduce the opacity of the Blend Group in the Transparency panel to 79%, and change its Blend Mode to Soft Light.
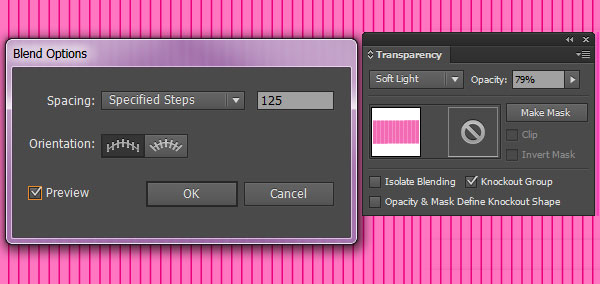
Step 2
Select the rectangle you drew in Step 1, and apply a Radial Gradient using the Gradient Tool (G). The gradient pictured below goes from light pink to dark pink. Whatever your color theme, keep the darker color to the edges of the gradient.
Step 3
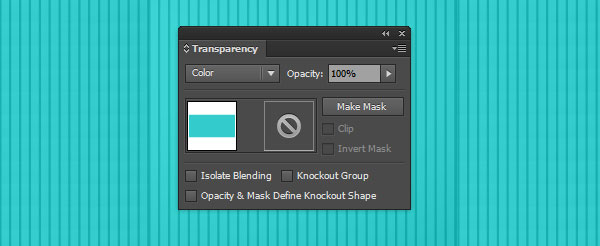
In case you’d like to change your background color quickly, for whatever reason, draw another rectangle over the artboard, set the fill to your chosen color, and the Blend Mode in the Transparency panel to Color.
Step 4
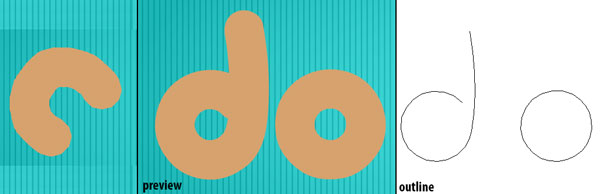
Let’s draw some letters. Use the Pencil Tool (N) and carefully draw simple, rounded letters. If you set the Pencil Tool’s Options’ Fidelity to Smooth your paths will smooth out and be drawn more perfectly. To do so, hit Enter with the Pencil Tool selected and, in the options’ panel that pops up, slide the Fidelity slider all the way to the right. Set the Stroke Weight in the Stroke panel to 12-20 points (something thick, but not so thick that the letter’s details aren’t easily made out). Use a tan, brown, or yellow color for your donut base. Keep your letters rounded by selecting rounded Caps and Corners in the Strokes panel.
Step 5
Draw all of your letters, and align them to the bottom by Selecting your letters and hitting Vertical Align Right (last icon in the top row) in the Align panel. Alternatively, you can arrange with the Selection Tool (V). Expand the stroked paths in Object > Expand so your letters become closed shapes.

Step 6
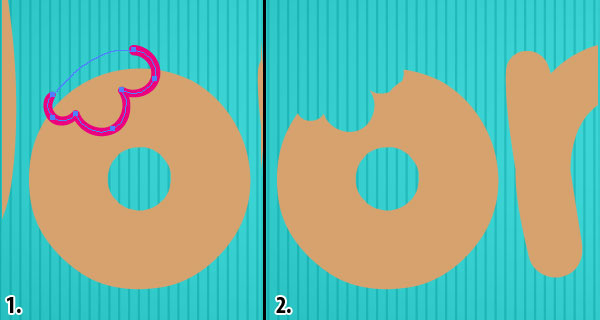
Using the Pencil Tool or Pen Tool (P), draw a scalloped shape overlapping the O, D, and T, and be sure to close the shape. Select both the letter and new shape, and hit Minus Front in the Pathfinder panel. Now you’ve successfully taken a bite out of some of your donut letters.
Step 7
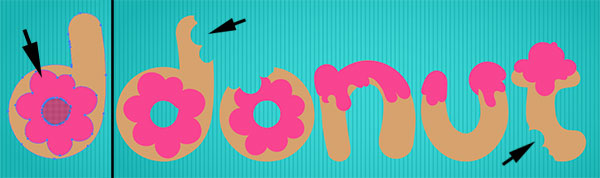
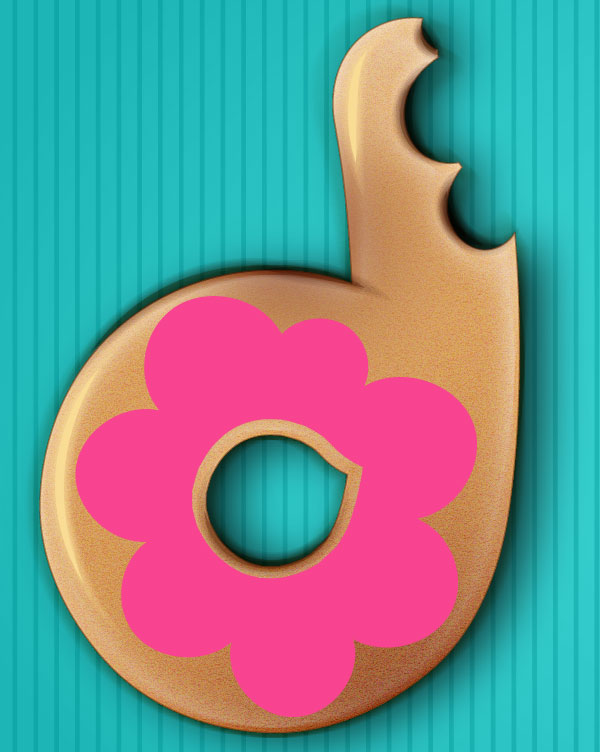
Using a bright color (in this case pink), draw flower-like shapes on rounded letters with hole (O’s, D’s, B’s, P’s, etc) and dripping shapes on the tops of other letters. For the rounded shapes with holes in the center select both the icing shape and the donut letter. Use the Shape Builder Tool (Shift-M) to select the central hole. Deselect both and Delete the central hole. Also note below, the additional bite shapes taken out of other letters during Step 6.
Step 8
Let’s start rendering the first donut letter. Copy and Paste the D and set the Fill to Null and the Stroke to light brown using the Color Palette, and then change the stroke’s weight to 3pt in the Stroke panel. In the Transparency panel, set the Blend Mode to Soft Light.
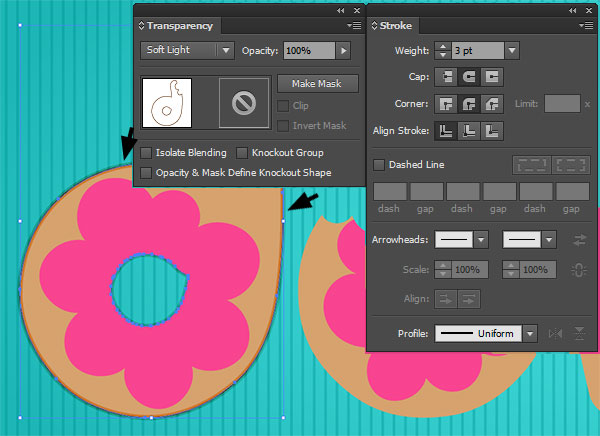
Step 9
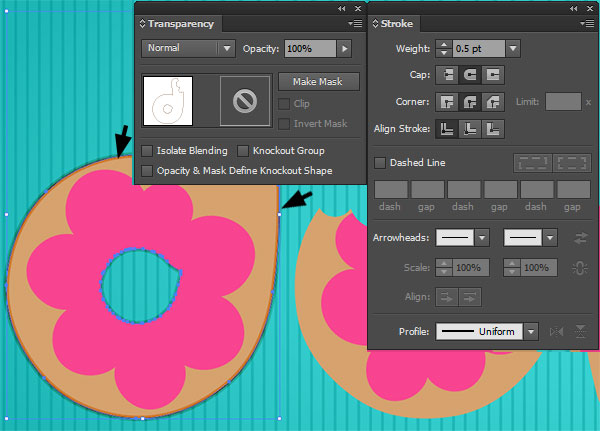
Copy and Paste the D again and set the Fill to Null and the Stroke to the same light brown (something darker than the donut base color in case you’re not using tan) as done in Step 8. Set the stroke’s weight to 0.5pt and keep the Blend Mode at Normal.
Step 10
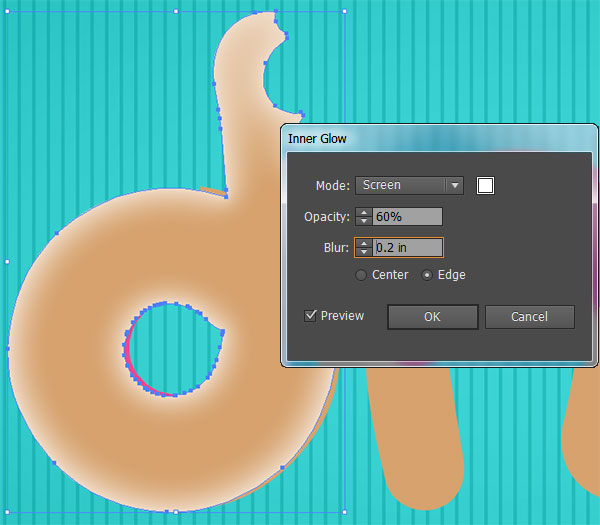
I’ve hidden the icing shape in the Layers panel so we can focus on the cake portion of the donut letters. Select the D, Copy, Paste, and Align it (with the first D), and go to Effect > Stylize > Inner Glow. In the dialog box that pops up, set the Mode to Screen, Opacity to 60%, and Blur to 0.2 in.
Step 11
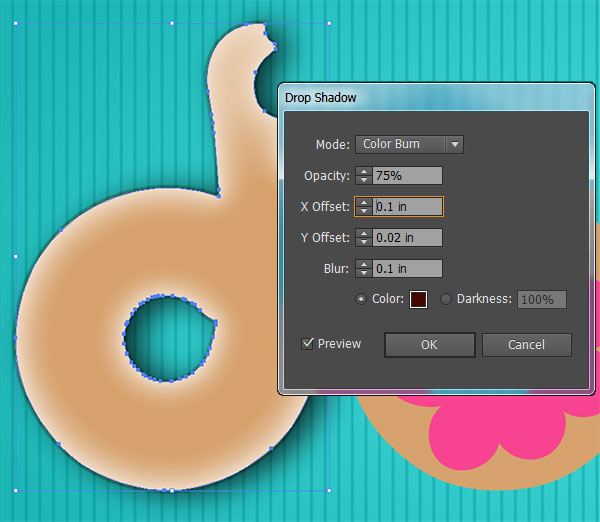
The second effect you’ll add to the shape from Step 10 is a Drop Shadow. Do so by going to Effect > Stylize > Drop Shadow. Set the Mode to Color Burn, Opacity to 75%, X Offset to 0.1 in, Y Offset to 0.02 in, Blur to 0.1 in, and the Color to Brown.
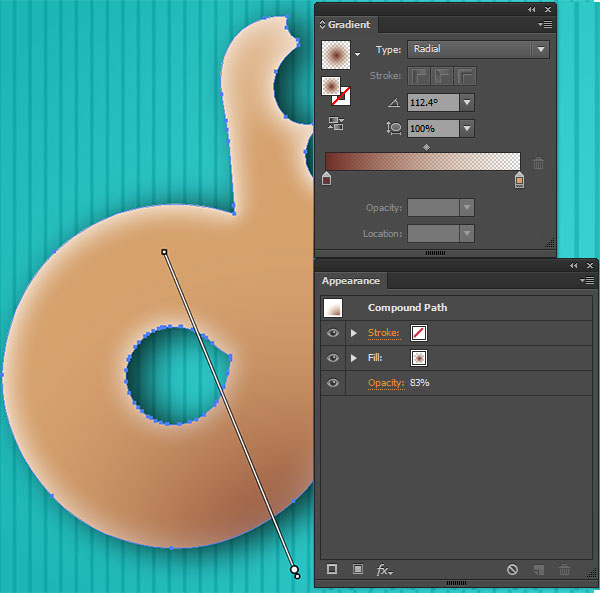
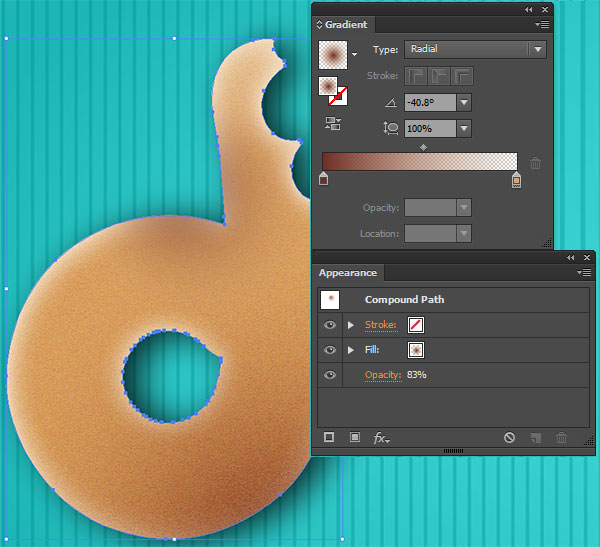
Step 12
Copy and Paste the base D shape again. Using the Gradient Tool, set the fill to a Radial Gradient going from Brown at 100% to Tan at 0%, and place the radial gradient on the lower right of the letter. Reduce the Opacity of the shape to 83% in the Transparency panel.
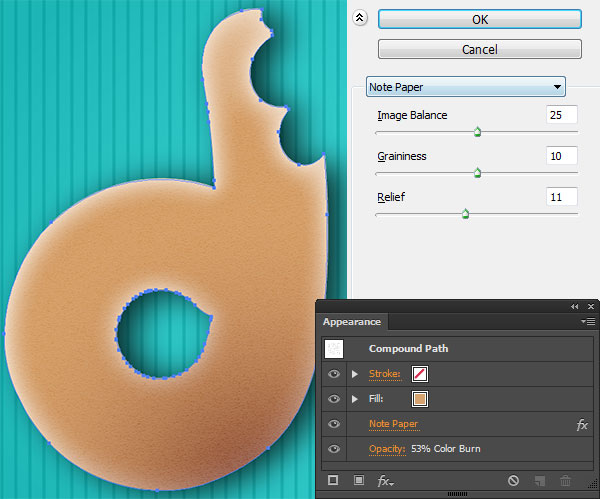
Step 13
Paste the D for a third time (make sure each D is aligned with the base shape), and set the shape’s Blend Mode to Color Burn and Opacity to 53% in the Transparency panel. Go to Effect > Sketch > Note Paper, and apply this effect (seen below) with Image Balance at 25, Graininess at 10, and Relief at 11. The fill color of this shape is tan; it’s the same as the base color of the donut letters.
Step 14
Paste the letter D for a fourth time and set the fill color to a Linear Gradient using the Gradient palette, going from tan to a darker tan color. Set the Opacity to 50% and the Blend Mode to Soft Light in the Transparency panel.
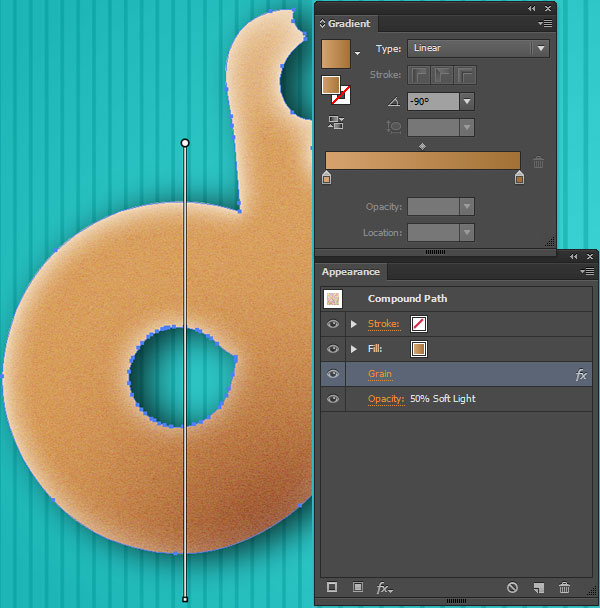
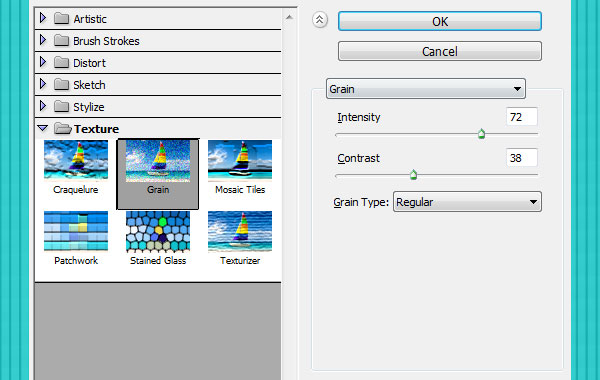
Add a Grain effect by going to Effect > Texture > Grain and setting the Intensity to 72, Contrast to 38, and Grain Type to Regular.
Step 15
Once again (for the fifth time since Step 10), Paste the D and Align it with the rest of the letter’s layered shapes. Then apply a Radial Gradient as the fill color. This gradient is the same as the one from Step 12 but will be placed at the top left of the D.
Step 16
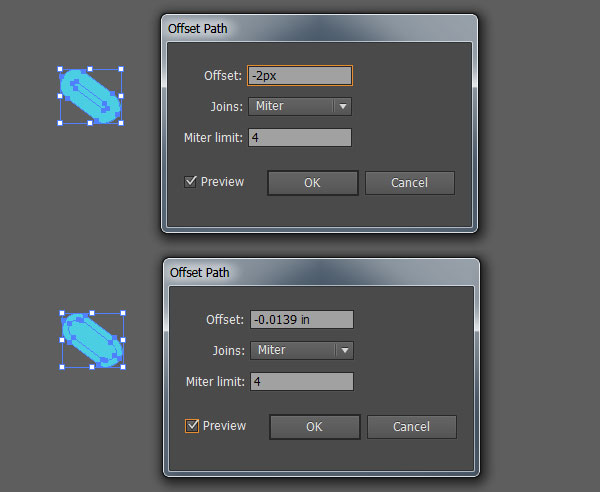
For additional highlight and shadow paths, we’re going to create two custom art brushes. The process for each is the same for each, with the difference between the two being their color only (one is a creamy yellow and the other is brown).
Use the Ellipse Tool (L) to draw a long, thin ellipse. Use the Convert Anchor Point Tool (Shift-C) to bring the two anchor points on either end of the ellipse to points. Select your new shape and go to Object > Path > Offset Path…. Offset the shape by -8px or so (hit preview so you can check out the offset shape) and hit OK. Select the larger of the two shapes and reduce its opacity to 0%. Select both shapes, and with the Blend Tool, create a smooth blend of 6-10 steps.
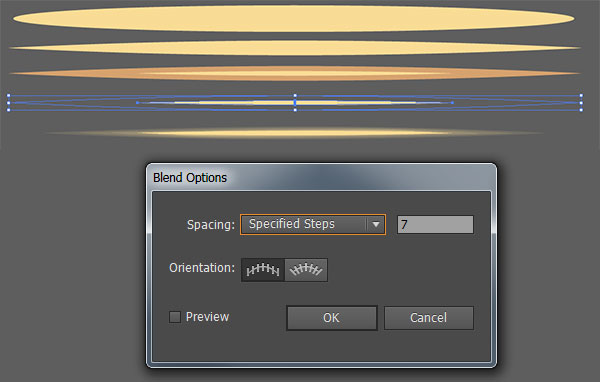
Step 17
In order to create a brush with the blended shape you created in Step 16, go to the Brushes panel and hit New Brush. Select Art Brush and give it a name. I’ve left the settings at their default features (seen below). Make sure your brush’s direction is going to the left though. Hit OK, and you can use your new brush by selecting it in the Brushes panel with the Paintbrush Tool (B).

Step 18
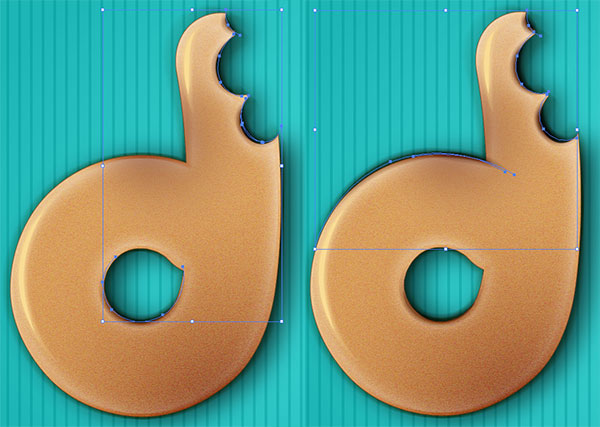
Use the brush made in Steps 16-17 to draw paths (with the Paintbrush Tool) along the left edges of your donut letter.

Step 19
With the alternate brush (same as steps 16-17 but with brown instead of yellow), draw paths around the bottom edges, bite marks, and lower portion of the donut’s center. Group (Control-G) the paths together and set the group’s Blend Mode to Multiply. Group together all of the donut layers (those made in Steps 8-19).
Step 20
Unhide the icing shape in the Layers panel, and lock the donut D group so you don’t accidentally pick up paths or alter the appearance of its objects.
Step 21
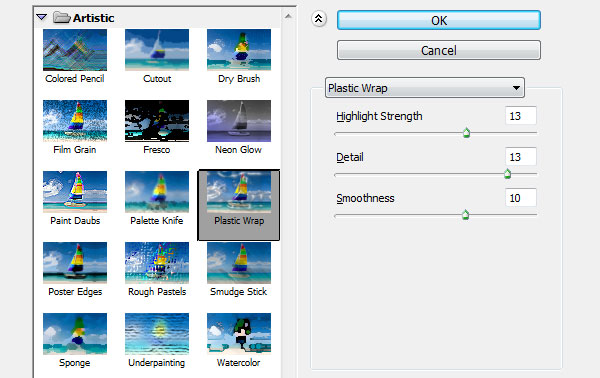
Copy and Paste the icing shape and align both icing pieces on the donut. If you’d like some of the donut to show through the center of the icing’s hole, you can enlarge the path around the hole by selecting it with the Direct Selection Tool (A) and resizing it with the Scale Tool (S) (hold down shift to keep the size ratio). In the Transparency panel, lower the icing shape’s Opacity to 71% and the Blend Mode to Lighten. Apply an Inner Glow effect by going to Effect > Stylize > Inner Glow, with its Mode set to Hard Light, Opacity to 83%, and Blur to 0.1in.

Additionally, apply the Artistic effect Plastic Wrap to this icing shape with the Highlight Strength at 13, Detail at 13, and Smoothness at 13. You may need to adjust these settings according to the icing’s overall shape (a bit of trial and error will be involved by editing effects in the Appearance panel).
Step 22
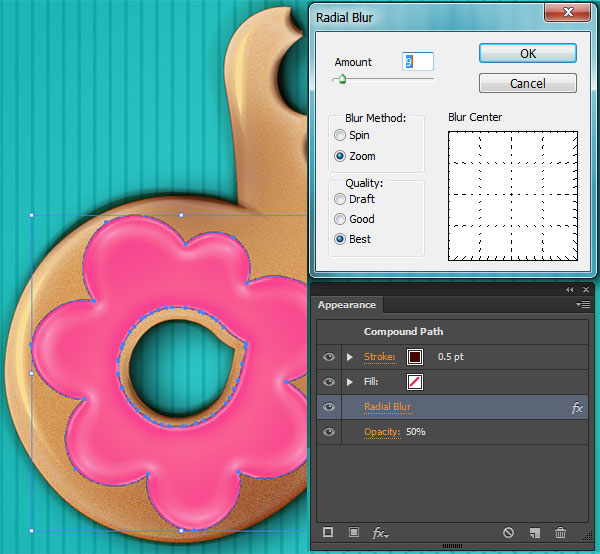
Copy and Paste the icing shape again. Set the Fill color to Null and the Stroke color to Brown at 0.5 pt weight. Apply a Radial Blur with the following settings: Amount is 9, Blur Method is Zoom, and Quality is Best.
Step 23
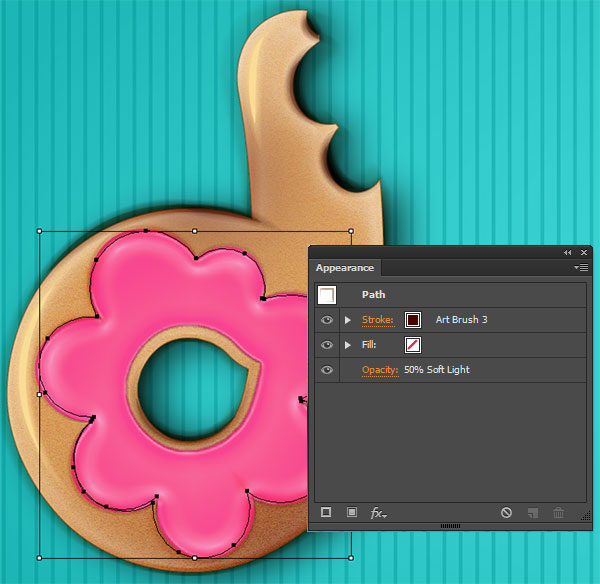
Paste the icing shape again and set the Fill color to Null, Stroke Color to Brown, Stroke Weight to 3pt, and apply the custom art brush created in Steps 16-17. Lower the Opacity to 50% and set the Blending Mode to Soft Light in the Transparency panel.
Step 24
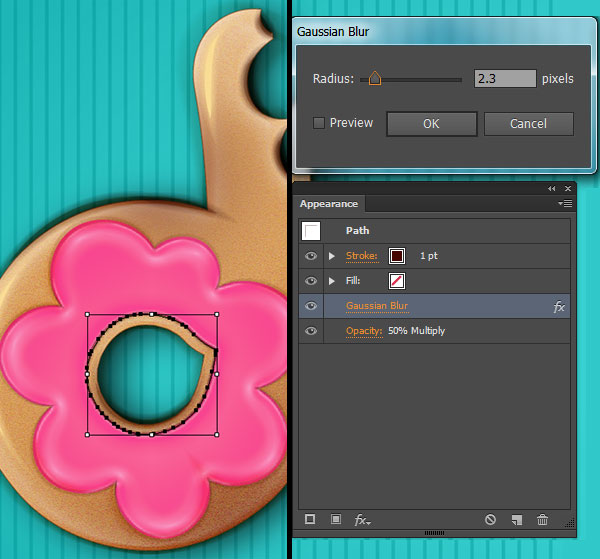
Copy and Paste the interior path of the icing shape. Set the Fill color to Null, Stroke Color to Brown, Stroke Weight to 1pt, Opacity to 50%, Blending Mode to Multiply, and apply a Gaussian Blur with a Radius of 2.3 Pixels. Group together the icing components created in Steps 20-24.
Step 25
Draw a small shape with the Rounded Rectangle Tool. Offset the object’s path to -1px, hit OK, and select the first rounded rectangle again and Offset its path to -2px. Select each shape and apply a different shade of the same color to it. Group these three shapes together.
Step 26
Repeat Step 25 on a circle. Copy, Paste, and Scale these sprinkles so you have an assortment of them in various sizes and angles.
Step 27
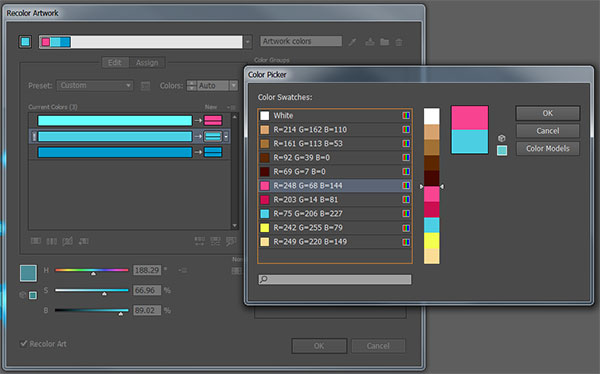
Select one of the sprinkle groups and go to Edit > Edit Colors > Recolor Artwork…
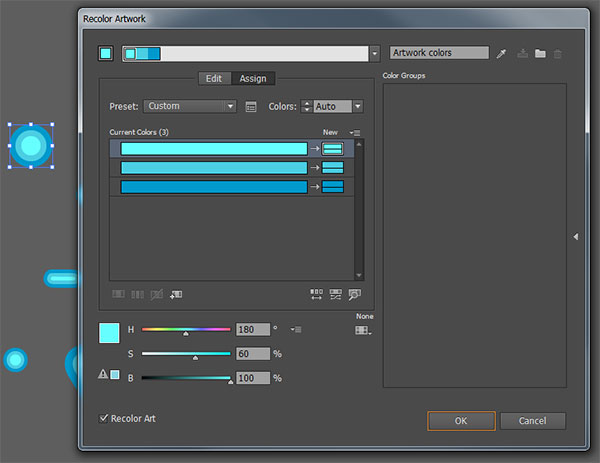
Double click one of the boxes under New to change its color. If you already have your chosen colors set in your Swatches panel, you can make easy work of recoloring the sprinkles by choosing the appropriate swatch. If not, stick to Color Models and choose from the Color Picker.
Change the colors for as many sprinkles as you’d like. Additionally, use the Ellipse Tool to draw small white circles for tiny sprinkles.
Step 28
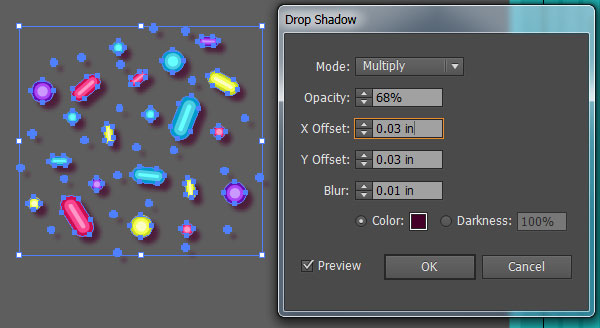
Select all of the sprinkles you’ve drawn and apply a Drop Shadow effect as follows: Mode set to Multiply, Opacity at 68%, X Offset is 0.03 in, Y Offset is 0.03 in, Blur is 0.01 in, and the Color is a dark magenta (since it’ll be on top of pink icing in my text). distribute the sprinkles around the icing as you see fit. Group the sprinkles together.
Step 29
Here’s a view of the donut’s components: Cake, Icing, and Sprinkles. The Cake is covered in Steps 4-6 and Steps 9-19. The Icing is covered in Steps 7-8 and Steps 20-24. The Sprinkles are covered in Steps 25-28. Repeat each of these sections and their series of steps for each letter in your design.

Step 30
Make sure you Group each letter’s components together so your Layers panel is organized. Feel free to step up your design with various colors of icing, different donut flavors and a variety of donut styles. Bon appetite!
Author: Mary Winkler
Mary works under the brand Acrylicana® designing apparel, jewelry, and illustrating for companies like Disney, Jakks Pacific, Envato, and more. Check out Acrylicana.com for more artwork, tutorials, and more.


For step 8 do you copy and past the letter on top of the original letter? or do you format it off to the side?
don’t understand step 6 it’s dont work
This site was… how do I say it? Relevant!! Finally I’ve found something that helped me.
Cheers!