

I have been asked many times how I create some of the glossy button vectors I sell on iStock. Although there are other glossy button vector tutorials out there, this one shows you how to create these buttons without blends and transparencies, and an added bonus – in only four short steps! It is a relatively simply technique that can be applied to many different elements other than buttons. Moreover, using this shiny effect will create a cleaner, more accessible, and consistent file.
Notes: Glossy Button Vector Tutorial
This glossy button vector tutorial was created in Adobe Illustrator CS3. Most, if not all, functions should be available in Illustrator 10 and up. Functions specific to Illustrator CS3 will be noted.
Keyboard shortcuts are displayed in orange. ⌘ is displayed for the Command key (mac), with the Ctrl key being the Windows equivalent (not displayed).
Step 1: Glossy Button Vector
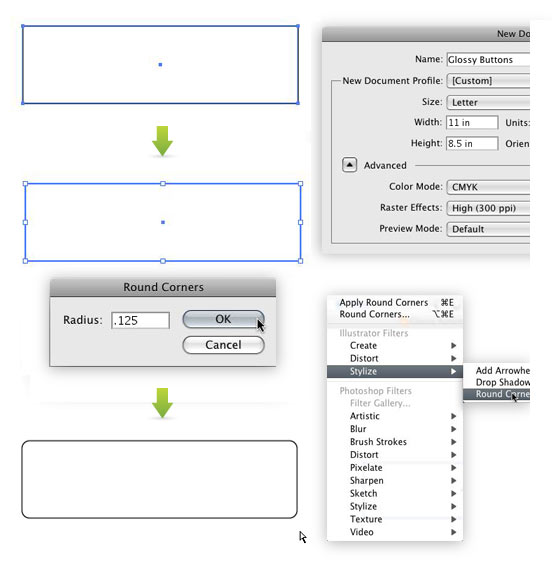
To begin with out glossy button vector tutorial, create a new document in CMYK color mode (color mode can be changed later). Using the Rectangle Tool (m), create a rectangle the size of the button you want. If you want, you can round the corners by going Filters > Stylize > Round Corners and pick an appropriate measurement. I used .125″.
Step 2
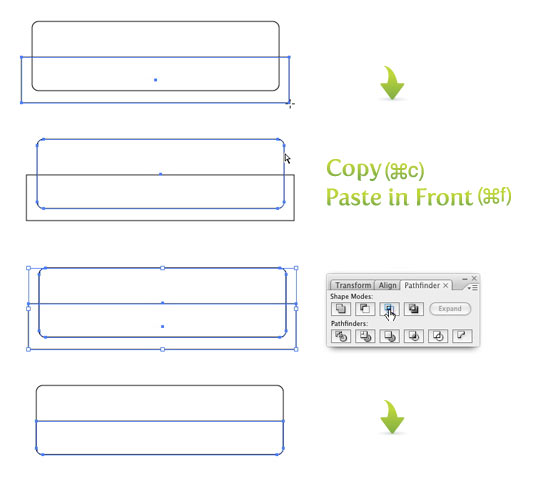
For this step you are going to create the shimmer of the glossy button vector. Take the Rectangle Tool (m) and drawn a rectangle half way down the button shape. Make the new box slightly extend past the button shape to the left, right, and bottom.
You are going to want the shimmer shape to be roughly in the middle of the button. Copy (⌘c) the button shape and Paste in Front (⌘f). Select the shimmer shape,one copy of the button shape and Intersect the shapes. It also helps to expand the shape (the far right button in the Pathfinder Panel).
Step 3
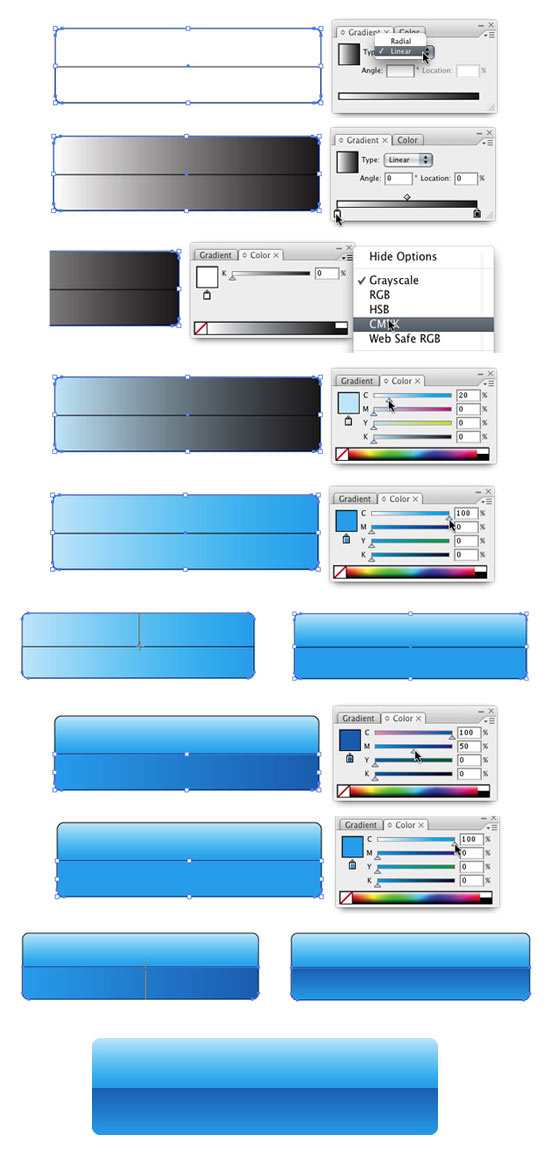
Now it is time to add gradients. Here is where the glossy shiny goodness happens. First make the glossy button vector shape a gradient by selecting Linear in the Gradient Panel. Click on the first swatch in the gradient and change the color in the Color Panel to 20% cyan. You might have to click the options in the top right of the Color Panel to bring up the CMYK sliders. Next, click the other swatch in the Gradient Panel, and make it 100% cyan. With the button shape still selected, use the Gradient Tool (g), click at the top of the button shape and drag till you reach the shimmer shape.
Next, make the shimmer shape a gradient like the button. This time, make the lighter color 100% cyan and the other color 100% cyan and 50% magenta. With the shimmer shape selected, take the Gradient Tool (g), click the bottom of the shimmer shape and drag to the top of the shape.
I use the Color Panel to mix colors, but if you are more comfortable picking colors with the Color Picker, that will work just the same.
Get rid of any borders and you have your button!
Step 4
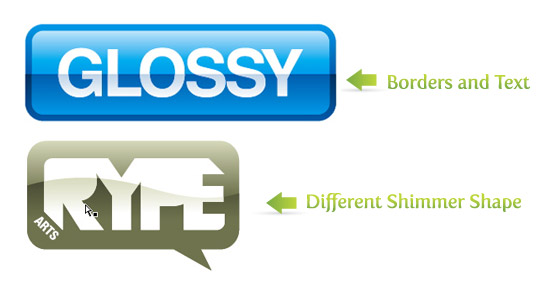
You can embellish the button any way you want. You can add borders, text, icons, or whatever! Look at the examples I provide. You can even add the shimmer to any element you embellish the button with. Just repeat steps 2 and 3 (it its good to change the colors) with the new element. Make sure that the shimmers on each element line up at the top.


I went over this internet site and I believe you have a lot of fantastic info, saved to fav (:.
Steps 1 & 2 are okay but Step 3? Seriously? That’s about eight steps in there…