Already feeling those magic vibes of winter and Christmas? In this tutorial we will learn how to draw a simple and very recognisable character – the Nutcracker and turn it into a stylish postcard that we can use to wish our nearest and dearest a very special and merry holiday! Let’s do it!
Tutorial Details
- Program: Adobe Illustrator CS6 – CC
- Difficulty: Intermediate
- Topics Covered: Shape Building, Designing Brushes, Stroke panel, Spiral Tool, Move Tool
- Estimated Completion Time: 20 minutes
Final Image: Christmas Nutcracker Icon
Step 1
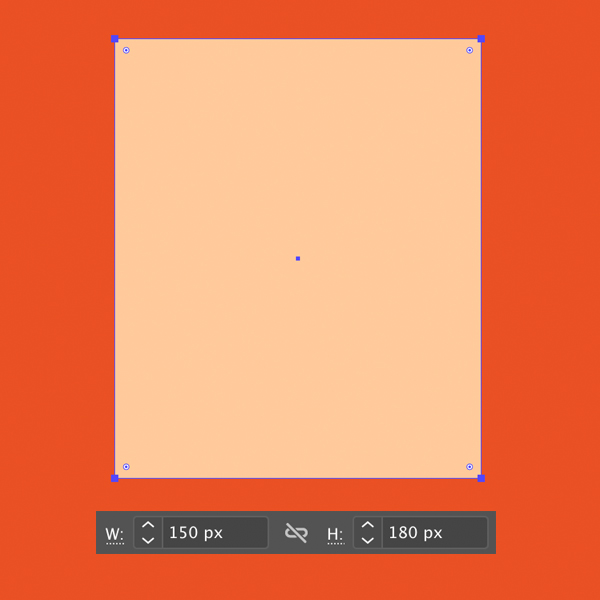
Let’s take the Rectangle Tool (M) and start from the head. Our Christmas Nutcracker Icon will be squarish and stylized. Create a 150 x 180 px beige shape.
Step 2
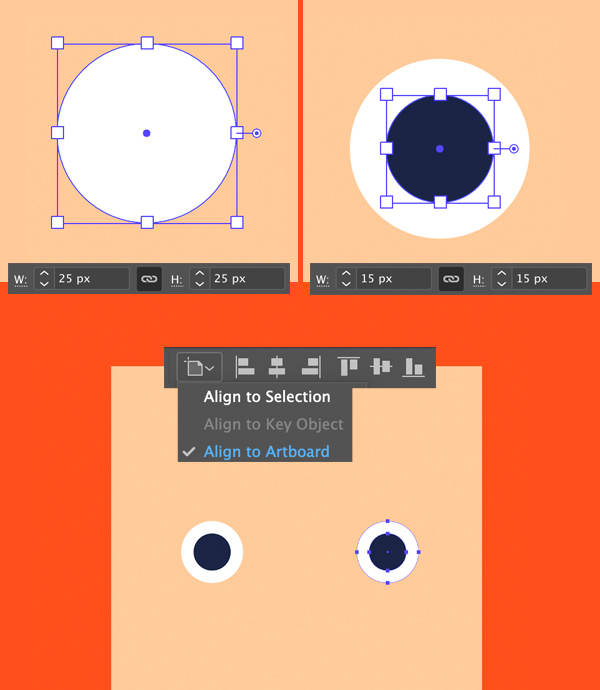
Now take the Ellipse Tool (L), hold down Shift and make a 25 x 25 px white circle for the eyeball.
Copy (Control-C) the created circle and Paste in Front (Control-F). Hold down Alt-Shift and make the copy smaller (15 x 15 px), changing the Fill color to dark-blue for the iris.
Group (Control-G) both elements, hold down Alt-Shift and drag the eye group to the opposite side of the face, creating a copy.
In order to make sure that everything is perfectly aligned, we can select everything (Control-A) and click Horizontal Align Center in the control panel on top or in the Align panel (Window > Align).
Step 3
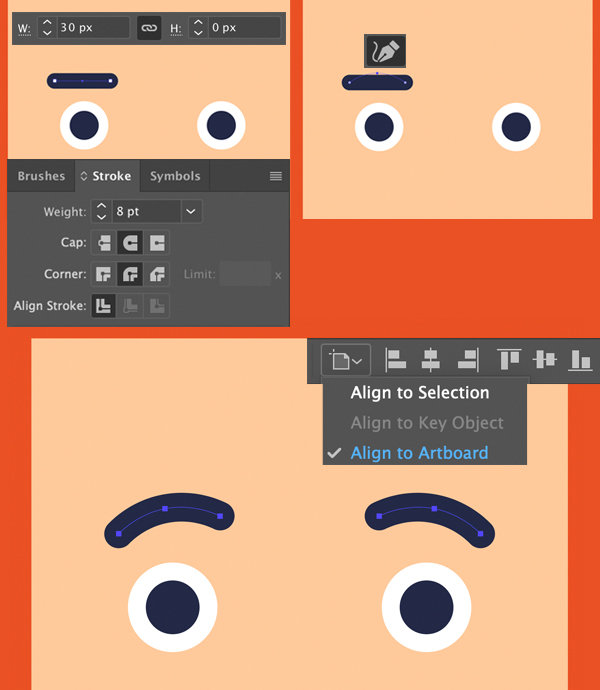
Now let’s add the brows. Use the Pen Tool (P) and hold down Shift to draw a straight 30 px line above the eye. Set it’s Stroke color to dark-blue and make the line thick by setting the Weight to 8 pt, Cap to Round Cap in the Stroke panel (Window > Stroke).
Use the Curvature Tool (Shift-`) to pull the center of the line up, making the brow slightly arched.
Duplicate the brow to the opposite side of the face, either by holding down Alt-Shift and dragging or by using the Reflect Tool (O).
Group both brows and Align them to the center.
Step 4
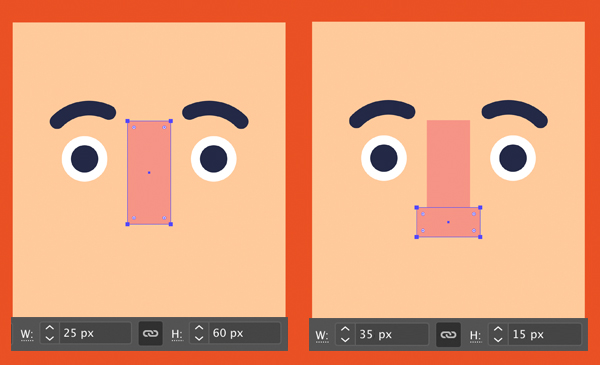
Let’s draw a nose on our Christmas Nutcracker icon. Create a 25 x 60 px pink rectangle with the help of the Rectangle Tool (M). And then add a smaller shape (35 x 15 px) perpendicular to the first one, depicting the bottom part of the nose.
Step 5
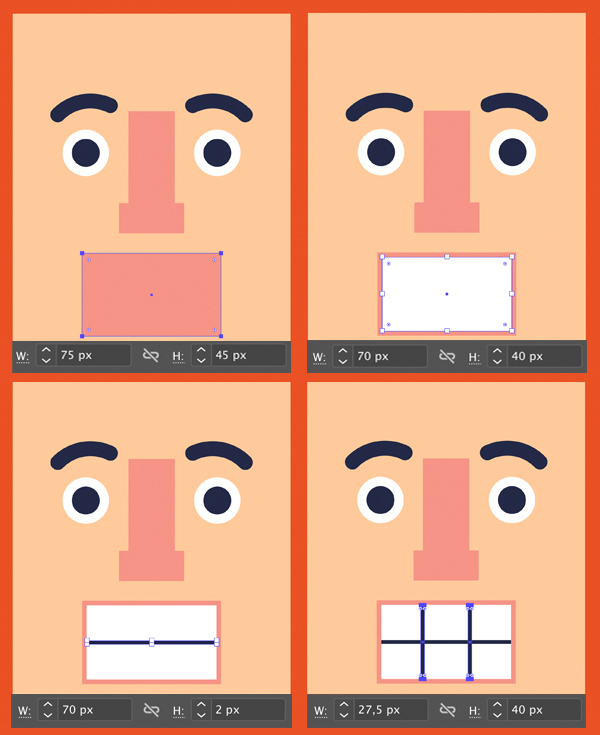
Now we’ll draw a large mouth! Start by making a 75 x 45 px pink rectangle. Copy (Control-C) it and Paste in Front (Control-F) and shrink the copy to 70 x 40 px. Change the Fill color of the smaller shape to white, depicting the teeth.
Add horizontal and vertical dark-blue stripes to separate the teeth, as shown in the image below.
Step 6
Our cute Nutcracker definitely needs some bushy moustache. Let’s add them by creating our own Art Brush!
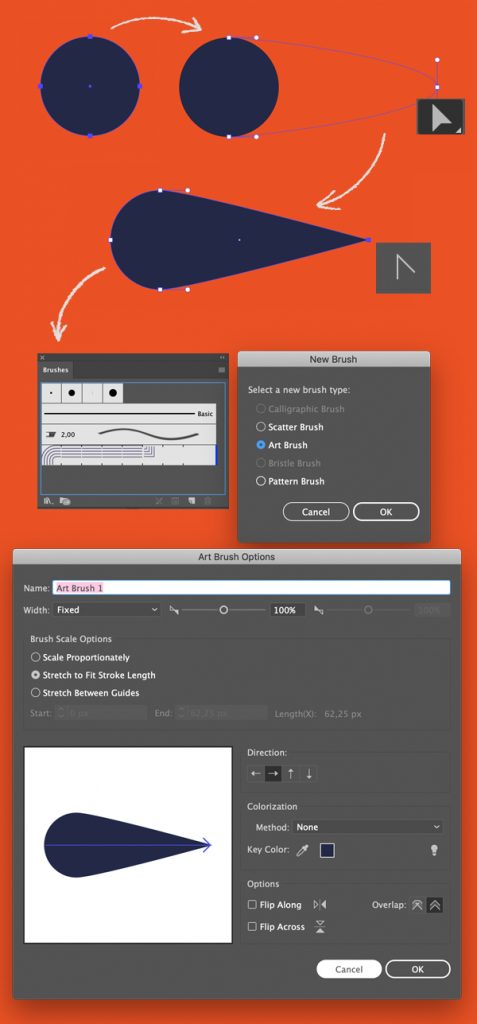
Start by making an even circle with the help of the Ellipse Tool (L). Select its right anchor point with the Direct Selection Tool (A) and drag it further right. Then click this point using the Anchor Point Tool (Shift-C) to convert select anchor point to corner.
Drag and drop the created shape onto the Brushes panel and select Art Brush in the pop-up New Brush window.
Leave all the options as default in the Art Brush Options window and you’re good to go!
By the way, you can always change those options later if you need to by double-clicking your brush in the Brushes panel, simple as that.
Step 7
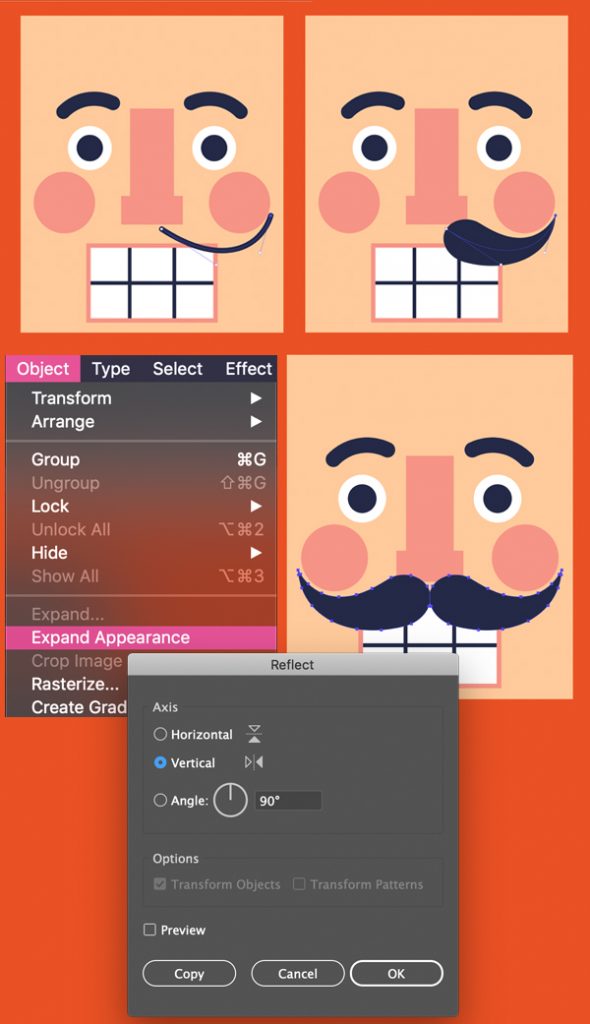
Now let’s draw a curve (with a dark-blue Stroke and no Fill) for the moustache using the Pen Tool (P) or the Arc Tool and click our brush to apply it. You might need to edit the Width of the brush stroke in the Stroke panel or to move the anchor points a bit to find a better position for the Christmas Nutcracker Icon’s mustache.
Once you’re happy with it, go to Object > Expand Appearance to turn the stroke into a shape.
Double-click the Reflect Tool (O) icon in the Tools panel to flip the shape over the Vertical Axis and Copy it.
I’ve also added two pink circles on the cheeks for the blush using the Ellipse Tool (L).
Step 8
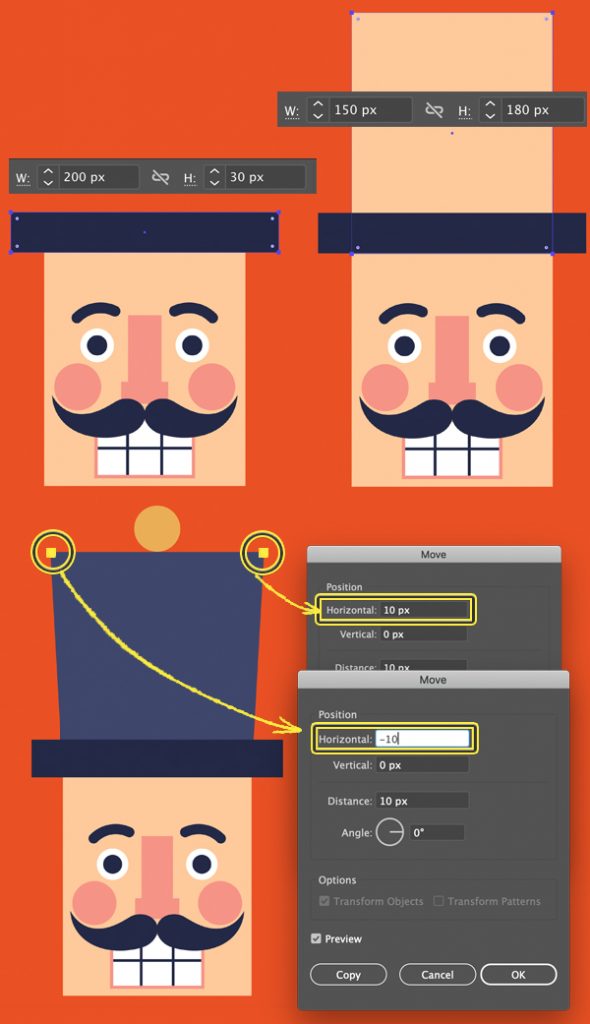
Now that the face is done, let’s add a tall hat! Start by drawing a 200 x 30 px dark-blue rectangle on top of the had.
Then duplicate the head shape and move the copy up, as shown in the image below. Change the fill color from beige to blue.
Select the top left anchor point with the Direct Selection Tool (A) and press Enter to open the Move window. Set the Horizontal value to -10 px, Vertical to 0 px and click OK to move the point 10 px to the left.
Repeat the same for the right anchor point but with the opposite value.
Step 9
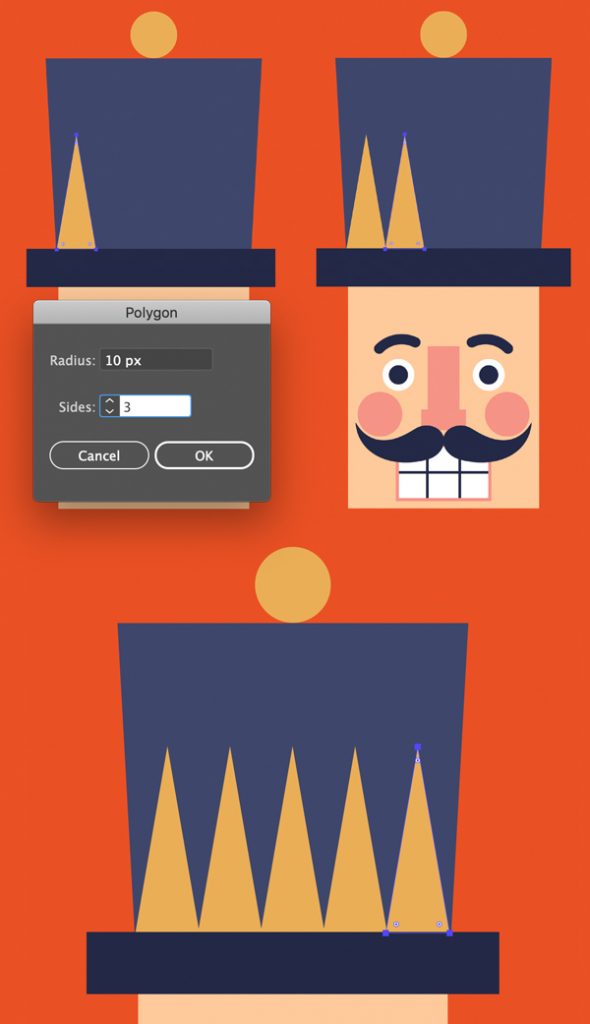
Decorate the top of the hat with a golden sphere.
Then double-click the Polygon Tool (it is located in the same drop-down menu as the Rectangle Tool (M)) and set the Sides value to three to draw a triangle.
Place it at the left edge of the hat, press Alt-Shift and drag the triangle to the right, creating a copy. Press Control-D multiple times to repeat the last action, adding more triangles. If the last triangle doesn’t fit the width of the hat, simply select them all and shrink the group of triangles, making them narrower.
Step 10
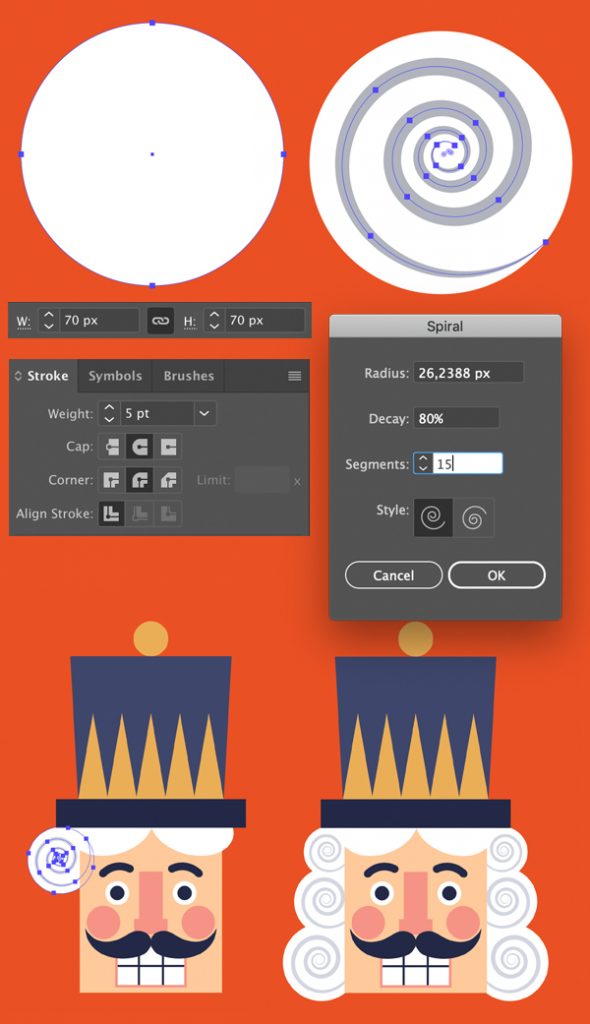
Now we’ll add some curly hair-locks. Start by making a 70 x 70 px white circle.
Take the Spiral Tool (located in the same menu as the Line Segment Tool (\)) and add a grey spiral on top of the sphere. If you double-click the Spiral Tool icon in the Tools panel, you can adjust the number of Segments and other settings.
Group both elements and attach them by the left side of the face. Press Shift-Control-[ to Send to Back, partially hiding the shape beneath the head of the Christmas Nutcracker Icon.
Duplicate the shape and vary the size and position to add more curls by both sides of the face.
I’ve also added two ellipses on the forehead, placing them between the head and the hat shape in the Layers panel.
Step 11
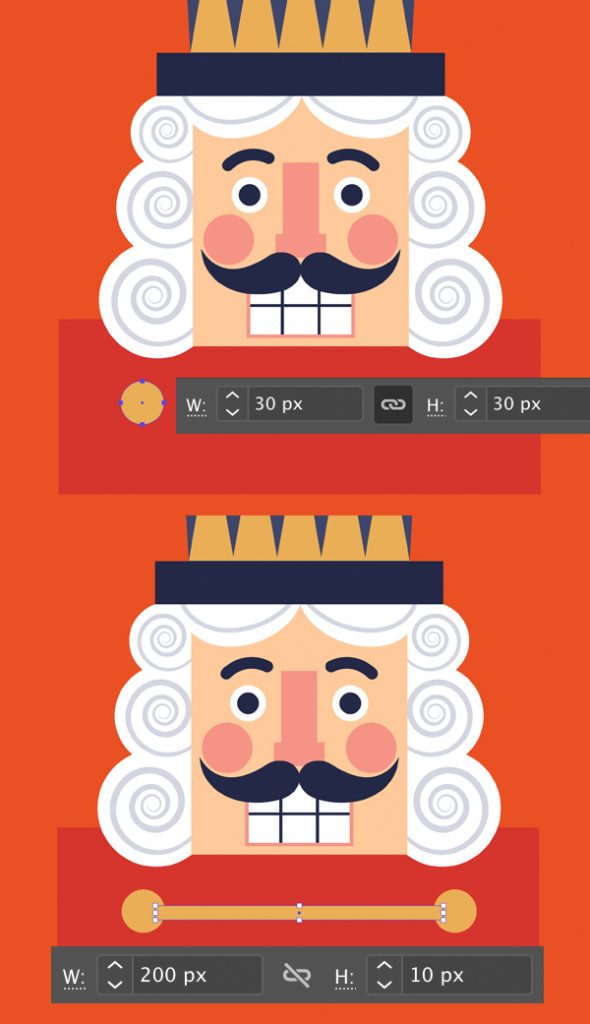
Add a red square for the outfit and let’s decorate it with some simple details.
Draw a 30 x 30 px golden circle for the button. Add another circle on the opposite side and connect those two with a 200 x 10 px golden stripe.
Group all three elements and create a copy, placing it a bit lower.
Step 12
Make the shoulders rounded by selecting the anchor points with the Direct Selection Tool (A) and dragging the circular markers of the Live Corners down.
Find the Star Tool in the same menu of the Tools panel as the Rectangle Tool (M), double-click it and set the Points value to 4.
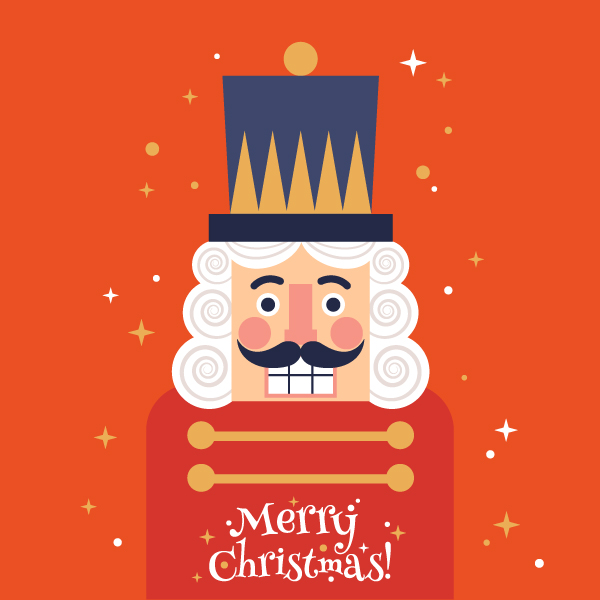
Speckle some starts and circles around the Christmas Nutcracker Icon to add a bit of Christmas magic to our card.
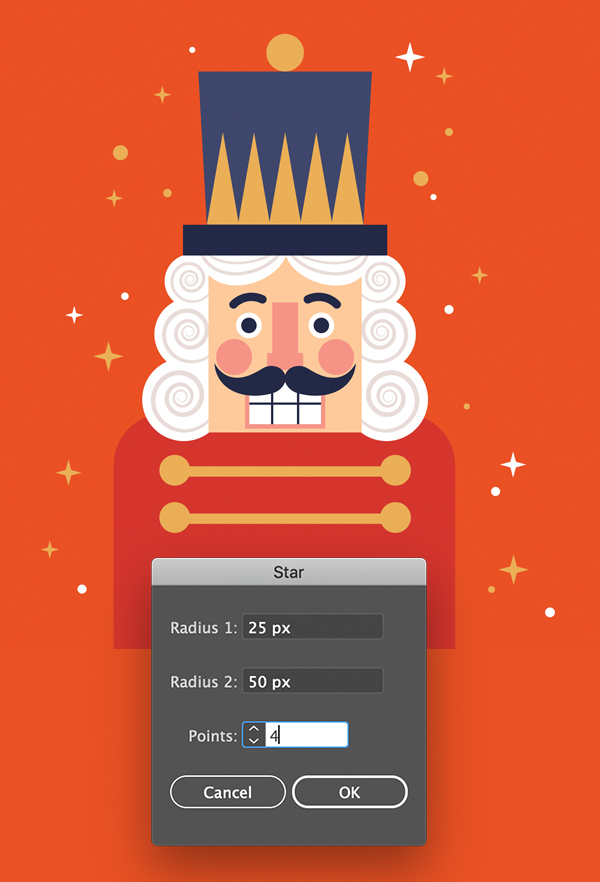
Ho-Ho-Ho! Our Christmas Nutcracker Icon Card is Ready!
Merry Christmas, dear friends! Don’t forget to add your Christmas greetings and wishes in the bottom of the card using some fancy font like Peralta and you’re done!
Happy designing!

Author: Yulia Sokolova
2D/3D artist and tutorial instructor, focusing on character creation, icons, lettering design, and illustrations.


