
 Get warm, stay toasty, it’s cold out there! Play with texture in this knitted text effect tutorial.
Tutorial Details: Knitted Text Effect Tutorial
- Program: Adobe Illustrator CC
- Difficulty: Intermediate
- Topics Covered: Text Effect, Appearance Panel, Graphic Styles
- Estimated Completion Time: 15 Minutes
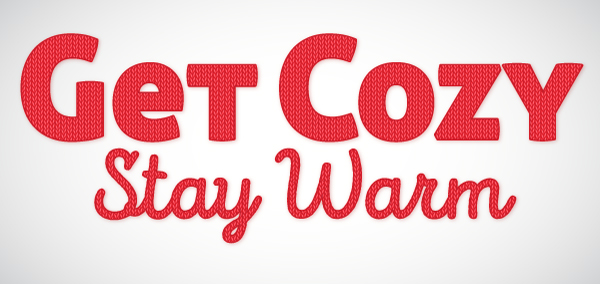
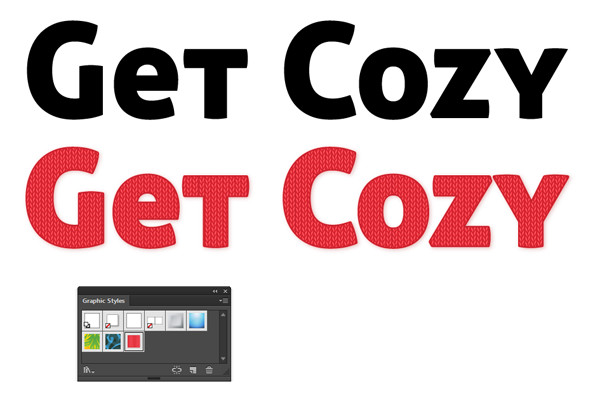
Final Image: Knitted Text Effect Tutorial
Step 1: Knitted Text Effect Tutorial
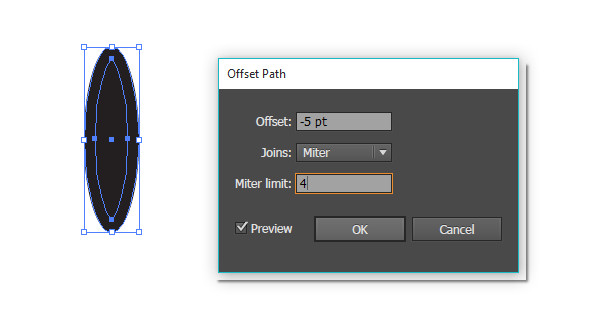
Start with knitted text effect tutorial with a simple, thing ellipse drawn with the Ellipse Tool.

Step 2
Offset the ellipse’s path by going to Object > Path > Offset Path and entering a negative number. My ellipse was a bit larger at the time I drew this, so I entered in -5 pts. The number you enter will depend on the size of your ellipse. Check out the preview to determine what’s right for your document.
Step 3
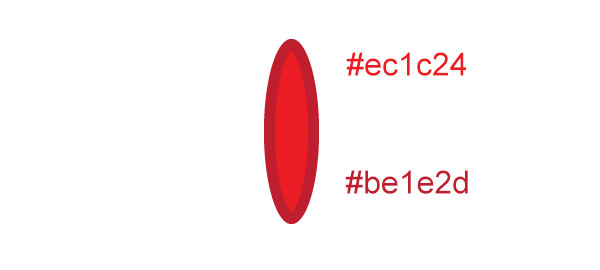
Select each ellipse, now that you have two inside each other, and apply a different shade of the same hue. I opted for red (#ec1c24) and dark red (#be1e2d). Group the two ellipses together.
Step 4
Copy and Paste the ellipse group, rotate, and position them in a subtle V formation.

Step 5
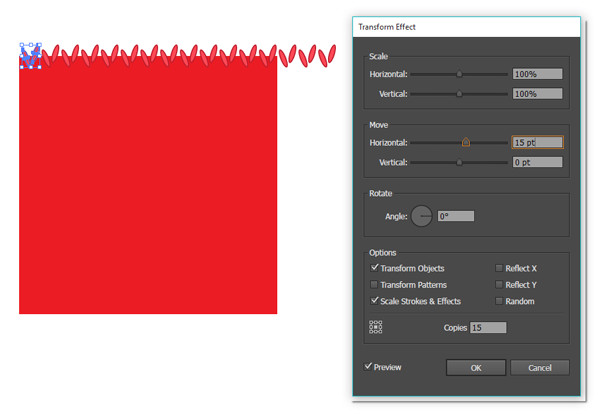
I’ve drawn a large red rectangle over the Artboard, but it’s not necessary at this time. We’ll be filling in shapes, later, in the Appearance panel.
For now, select your two ellipse groups and go to Effect > Transform & Distort > Transform in order to move the V group to the right. Enter 15-20 copies and start sliding the Horizontal Move slider over to the right. Make sure Preview is enabled so you can check out the position of your object copies. They should be close together, but not overlapping.
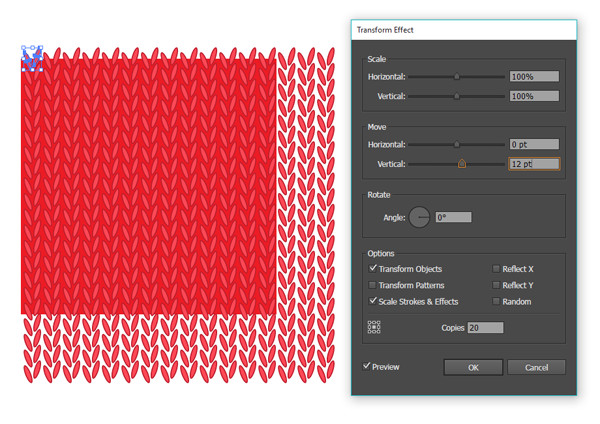
Step 6
Apply a second Transform effect. This time we’re concerned with moving the copies vertically. I opted for 20 copies and moved the Vertical slider to the right 20 pts.
Step 7
Here’s a close up of our knit shapes so far. If you add a couple tiny light red/white ellipses to the centers of the original two ellipse groups, you’ll be adding highlights to the entire move effect. I made sure there were four ellipses in each “stitch” in total. It’s up to you how rendered your knit stitches will look.

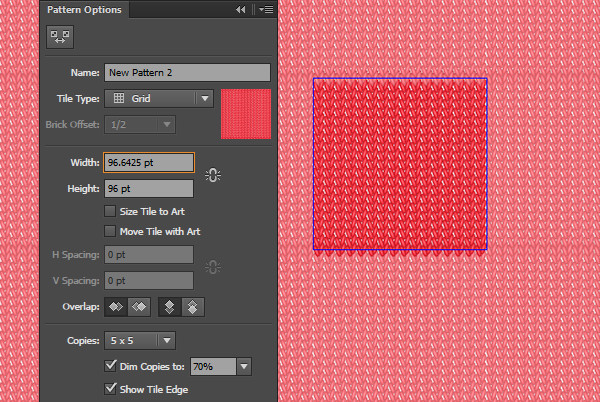
Step 8
Select your stitch group and open the Pattern Options panel (this panel is only available in Illustrator versions CS6 and above). Keep the Tile Type at the default grid. Make sure neither Size Tile to Art nor Move Tile with Art are selected.
To close the gap, make the width match the height to the best of your ability. Adjust the height and width so that the pattern pieces sit next to each other versus overlapping. With this design you should only need to be adjusting the height.
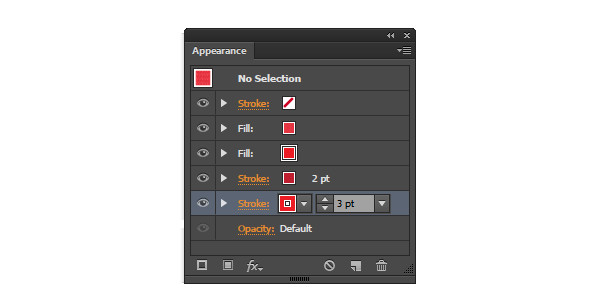
Step 9
Draw a simple shape, like a rectangle. In the Appearance panel, apply the following attributes:
Fill: Knit pattern (you just made this, and will find it in the Swatches panel)
Fill: Red
Stroke: Dark red, 2 pt weight, Rounded Caps and Corners
Stroke: Red, 3 pt weight, Rounded Caps and Corners
Make sure the strokes are beneath the two fills. Next we’ll add a Drop Shadow effect.
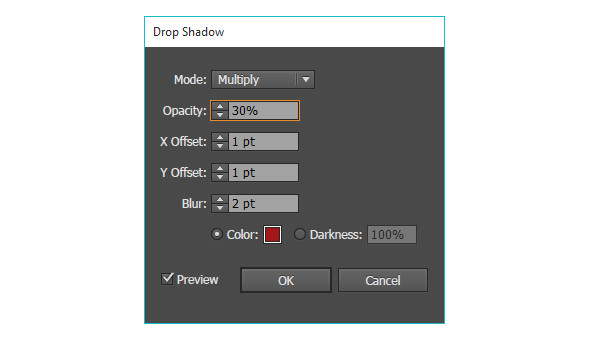
Step 10
In the Appearance panel, go to Effect > Stylize > Drop Shadow, and add a Drop Shadow effect with the following attributes:
Mode: Multiply
Opacity: 30%
X Offset: 1 pt
Y Offset: 1 pt
Blur: 2 pt
Color: Dark Red
Step 11
In the Graphic Styles panel, select the rectangle you applied all of those attributes to in the previous two steps and Create a New Graphic Style with it.
Using the Type Tool and the font of your choice to write out a warm, toasty word like Cozy or Cuddly. Apply your new Graphic Style to your word. Just like that you’ve got perfectly knitted type that you can still edit quickly and easily.
Conclusion: Knitted Text Effect Tutorial
Create some cute text art, add a background, or apply your Graphic Style to other objects and designs. Easily change the colors in your graphic style using the Recolor Artwork panel once you’d applied it to an object (and save recolored styles as a new Graphic Style in the Graphic Style panel).
Share your results in the comment section below and stay toasty all winter long (if you’re experiencing winter, that is)!
Author: Mary Winkler
Mary works under the brand Acrylicana® designing apparel, jewelry, and illustrating for companies like Disney, Jakks Pacific, Envato, and more. Check out Acrylicana.com for more artwork, tutorials, and more.


Muchos Gracias for your blog article. Really looking forward to read more. Awesome.
Hi, Mary, I worked a lot on the pattern. I thought so, It’s perfect, but there are some unneeded lines. If I set the Zoom to 150%, it’s nicer a bit, Well… it’s wrong. How could I make it better?
Hi @gi! Send me a screenshot of what you’re having a problem with. 🙂 I’m unable to help if I can’t see what’s wrong.
Here’s the screenshot. I hope!
http://kepfeltoltes.hu/160109/Keep_Cozy_with_a_Knitted_Text_Effect_www.kepfeltoltes.hu_.jpg
Very nice…
Awesome! Thanks for sharing!