
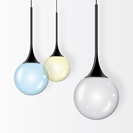
 In this lamp vector tutorial, you will learn how to create a Bubble Lamp Vector by applying a semi-realistic glass texture effect, which you could then transfer to so many other projects. You will learn how to combine the Clipping Mask and the Gaussian Blur in order to create shadows and highlights to your lamp vector illustration, and you will also learn to use the Pathfinder Panel and the Transparency Panel. Let’s begin!
Tutorial Details: Bubble Lamp Vector
- Program: Adobe Illustrator CS5 – CC
- Difficulty: Beginner-Intermediate
- Topics Covered: Gradient Tool, Basic Tools and Effects, Transform techniques, Clipping Mask and the Appearance panel
- Estimated Completion Time: 1 hour
Final Image: Bubble Glass Lamp Vector
This is the final image that we’ll be creating:
Step 1
First thing to do in this glass bubble lamp vector tutorial is open Adobe Illustrator and create a new 600 x 737px document (Ctrl + N). Select CMYK Color Mode, 300 PPI Raster Effects and make sure that Align New Objects to Pixel Grid is unchecked.
Next, go to Edit > Preferences > General and set the Keyboard Increment to 0,5 px.

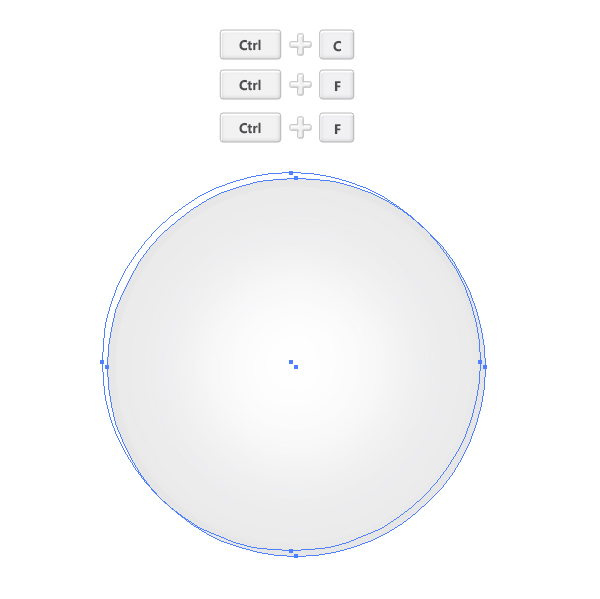
Step 1
Using the Elipse Tool (L) create a 360 x 360px elipse. Fill the shape with black. then from the Transparency Panel lower the Fill Opacity to 10%, then set the Blending Mode to Multiply. Focus on the Appearance Panel (Window > Appearance) and add a new Radial Gradient Fill, then from the Transparency Panel set the Blending Mode to Screen.

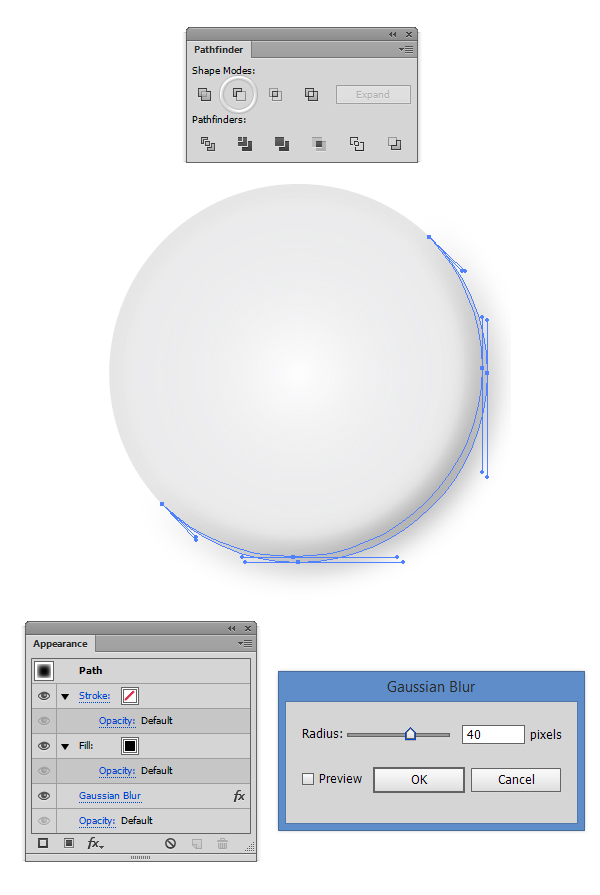
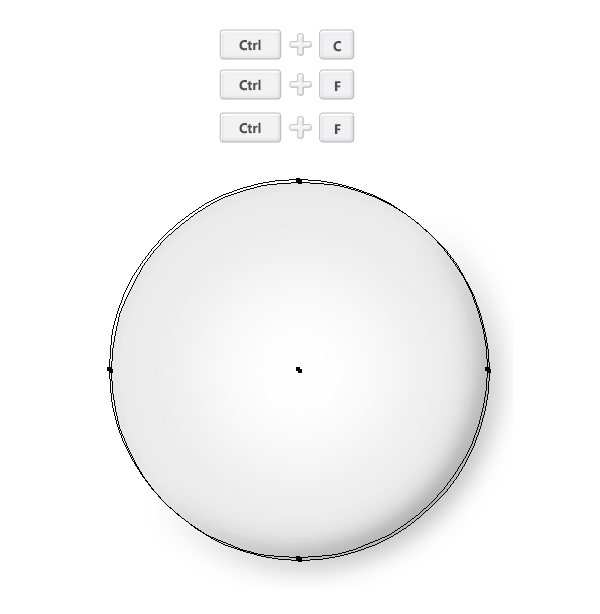
Step 3
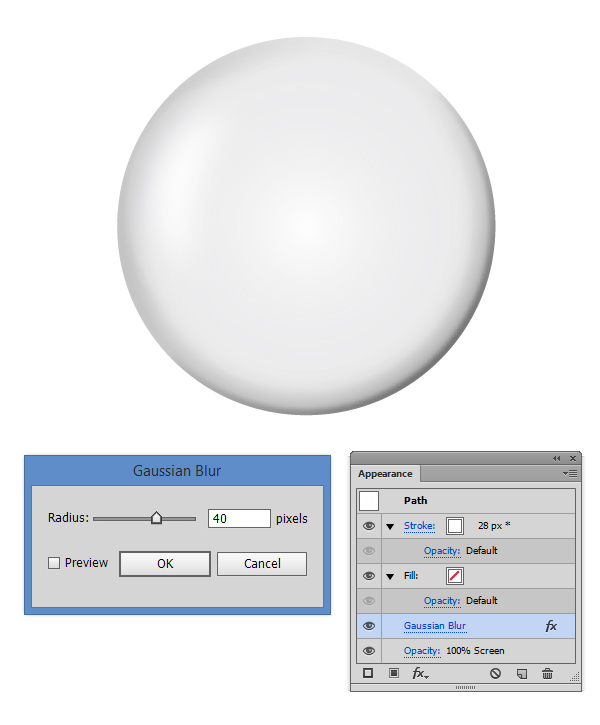
Select the previous shape and make two copies in front of it (Ctrl + C > Ctrl + F > Ctrl + F). Nudge the top shape 3,5px to the left and 3,5px up.
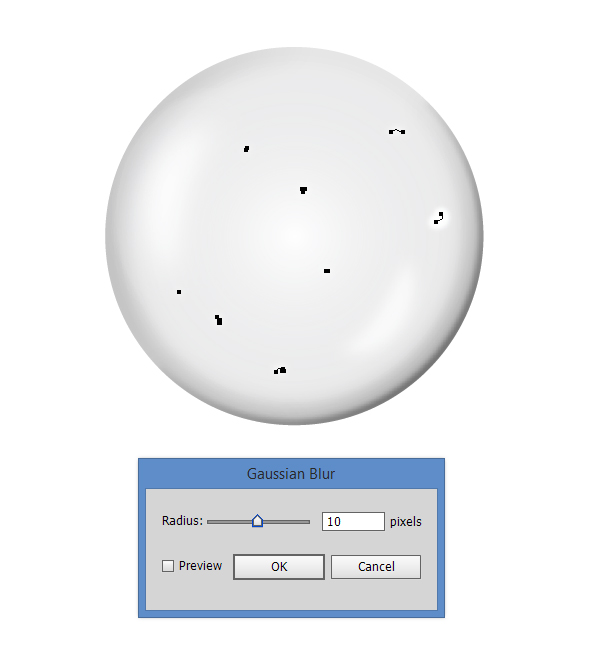
Select both copies and from the Pathfinder Panel (Window > Pathfinder) hit the Minus Front button. Fill the resulting shape with Black, then apply to it a 40px Gaussian Blur (Effect > Blur > Gaussian Blur).
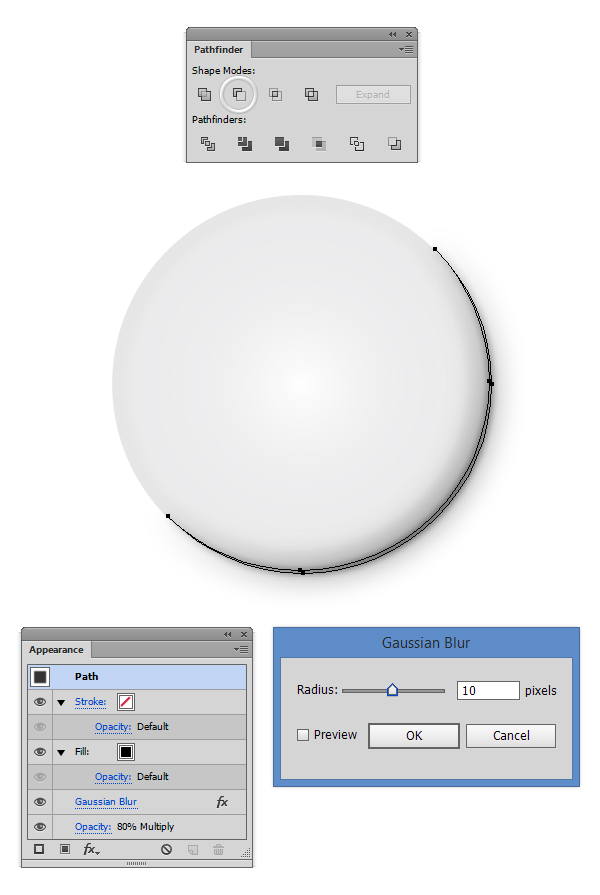
Step 4
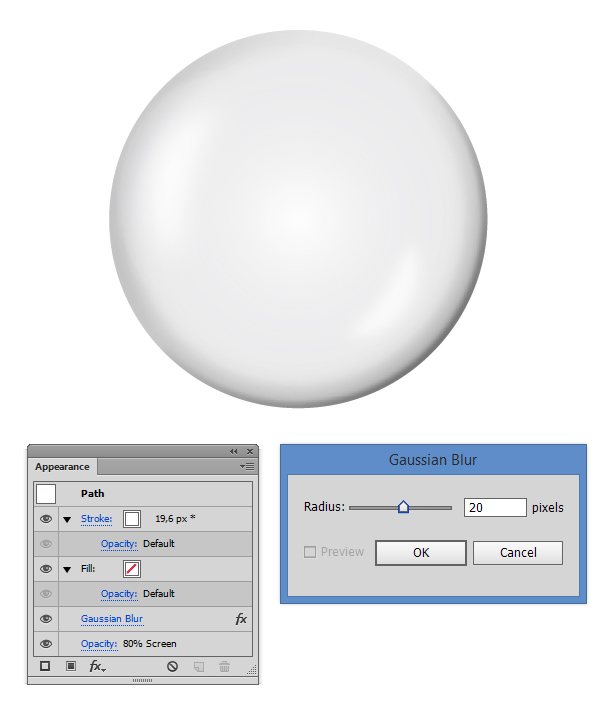
Select again the previous shape (Step 2) and make two copies in front of it (Ctrl + C > Ctrl + F > Ctrl + F). Nudge the top shape 1,5px to the left and 1,5px up.
Select both copies and from the Pathfinder Panel (Window > Pathfinder) hit the Minus Front button. Fill the resulting shape with Black, then apply to it a 10px Gaussian Blur (Effect > Blur > Gaussian Blur). From the Transparancy Panel lower the opacity to 80% and set the Blending Mode to Multiply.
Step 5
Select again the previous shape (Step 2) and make two copies in front of it (Ctrl + C > Ctrl + F > Ctrl + F). Nudge the top shape 3,5px to the right.
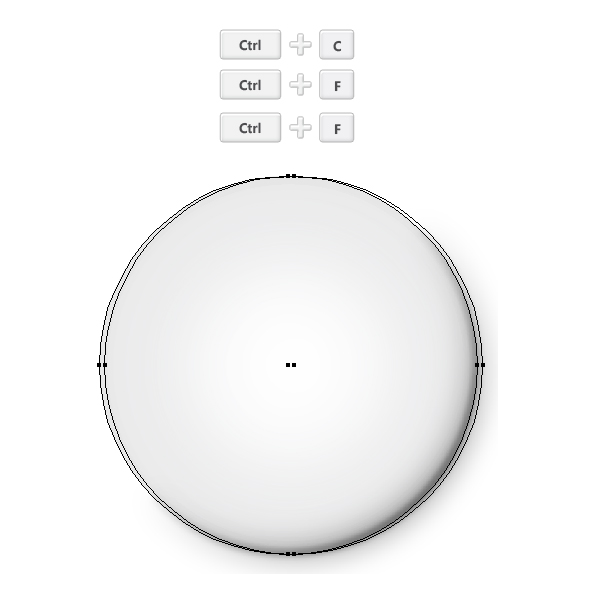
Select both copies and from the Pathfinder Panel (Window > Pathfinder) hit the Minus Front button. Fill the resulting shape with Black, then apply to it a 40px Gaussian Blur (Effect > Blur > Gaussian Blur).
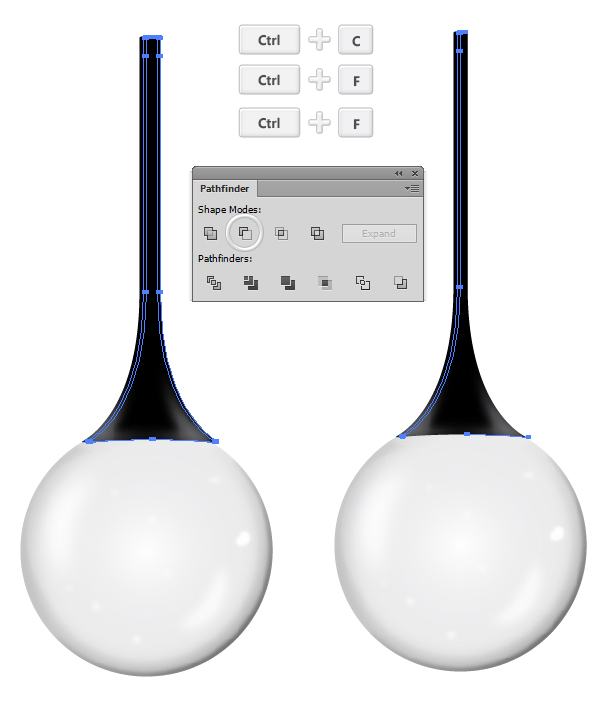
Step 6
Select again the shape from Step 2 and make a copy in front of it (Ctrl + C > Ctrl + F). Now select all shapes and create a Clipping Mask (Object > Clipping Mask > Make).
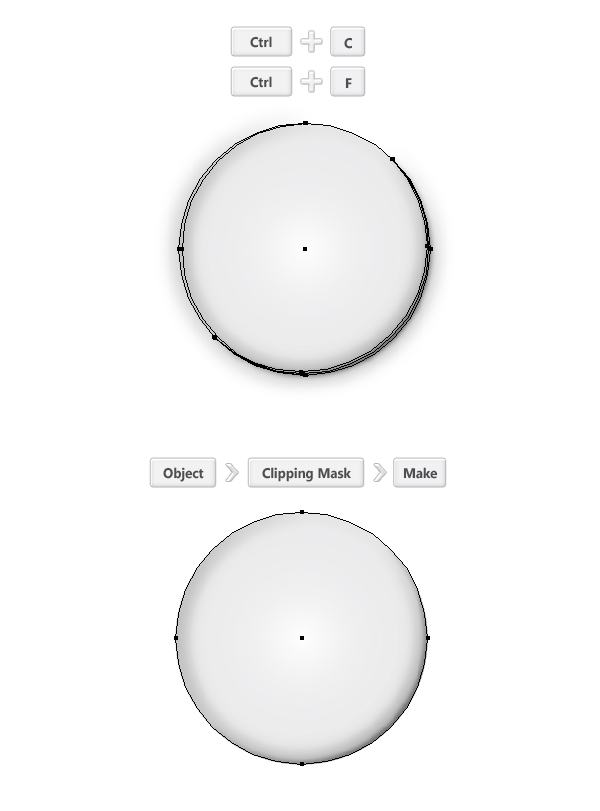
Step 7
Next step in creating our bubble lamp vector is to create a glass effect by making some glares. This will help our lamps look realistic. Using the Pen Tool (P) crate a path similar to the one below. Set the stroke width to 28px and the Variable Width Profile to Width Profile 1.
Select the Path and apply a 40px Gaussian Blur (Effect > Blur > Gaussian Blur), then from the Transparency Panel set the Blending Mode to Screen.
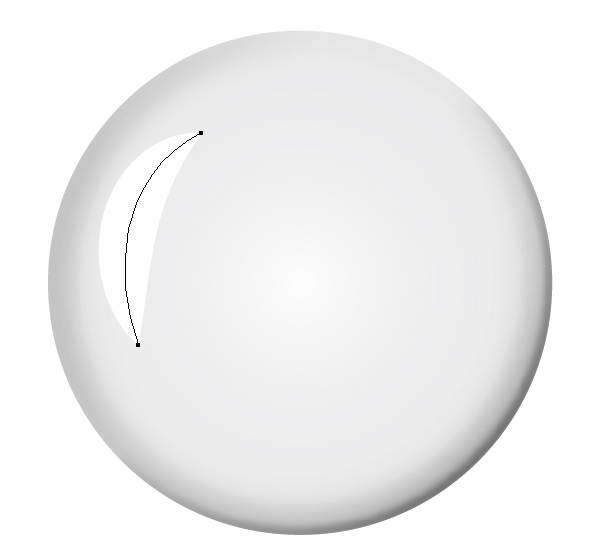
Step 8
Using the Pen Tool (P) crate a path similar to the one below. Set the stroke width to 19px and the Variable Width Profile to Width Profile 1.

Next for creating our lamp vector, select the Path and apply a 20px Gaussian Blur (Effect > Blur > Gaussian Blur), then from the Transparency Panel lower the Opacity to 80%, then set the Blending Mode to Screen.
Step 9
Using the Paintbrush Tool (B), draw some small highlights on the bubble lamp vector. Group them (Ctrl + G) then apply a 10px Gaussian Blur to the grup (Effect > Blur > Gaussian Blur).
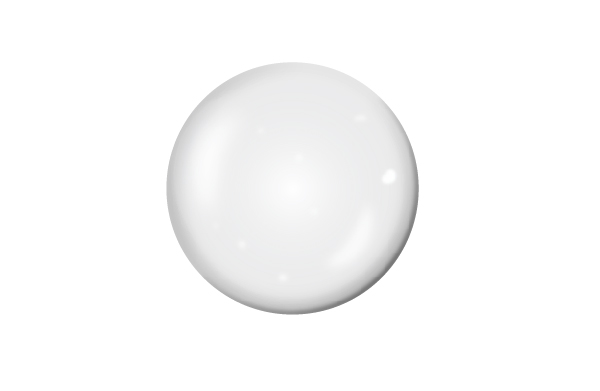
Step 10
This is how your Bubble Lamp vector should look like right now!
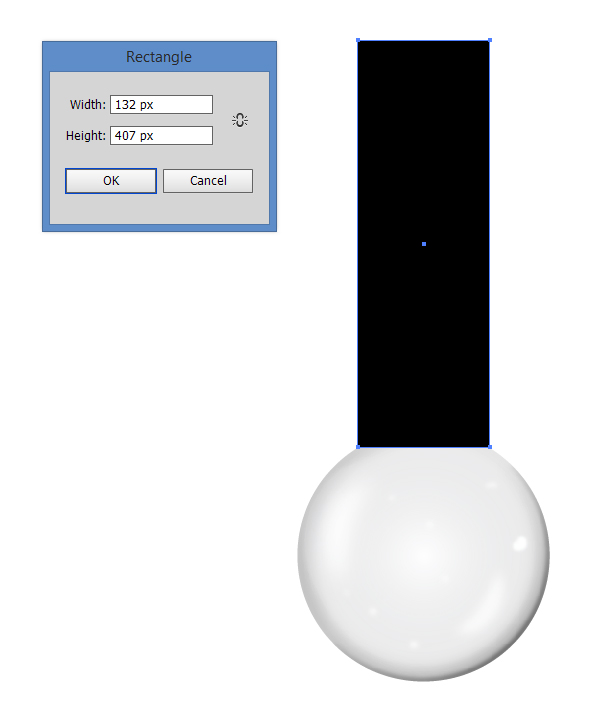
Step 11
Now let’s create the second part of the Bubble Lamp vector. Using the Rectangle Tool (M) crate a 132 x 407px rectangle.
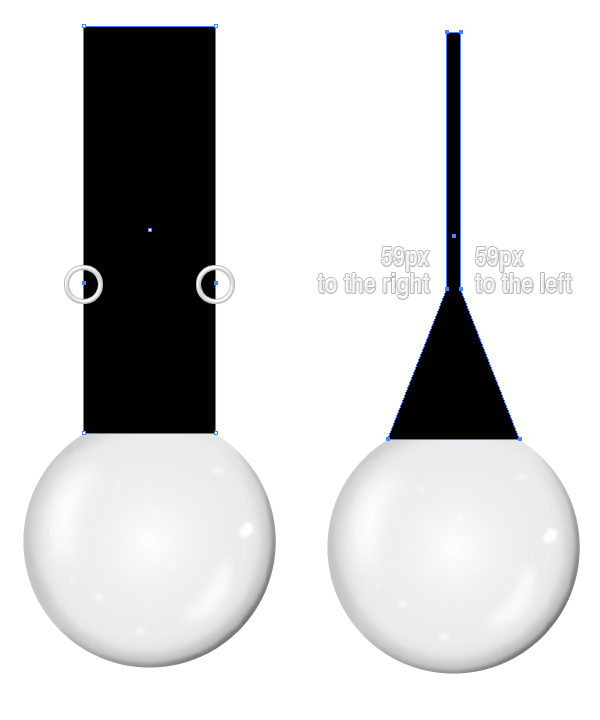
Step 12
Using the Add Anchor Point Tool (+) add two anchor points like in the image below. Using the Direct Selection Tool (A), select and move the left anchor point 59px to the right and the right anchor point 59px to the left.
Step 13
Select again both anchor points, then hit the Convert Selected Anchor Points to Smooth button. With the Direct Selection Tool (A) move the handles like in the image below.
Step 14
Using the Add Anchor Point Tool (+) add an anchor point like in the image below. Using the Direct Selection Tool (A), select and move the anchor point 3px up.

Step 15
Hopefully by now you can see our bubble lamp vector start to take shape. Select again the anchor point, then hit the Convert Selected Anchor Points to Smooth button. With the Direct Selection Tool (A) move the handles like in the image below.

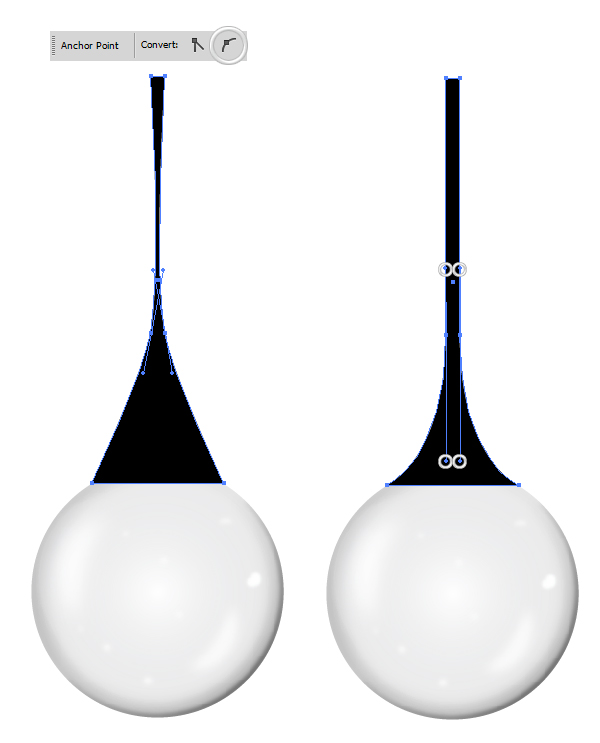
Step 16
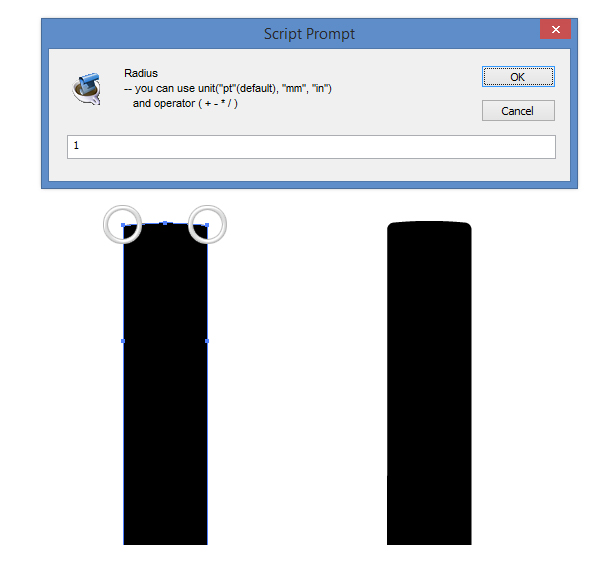
For this step, you’ll need the Round Any Corner script. You can find it in this article 20 Free and Useful Adobe Illustrator Scripts. Save it to your hard drive, return to Illustrator and grab the Direct Selection Tool (A). Select only the anchor point highlighted in the image and go to File > Scripts > Other Script. Open the Round Any Corner script, enter a 3px radius and click OK.

Step 17
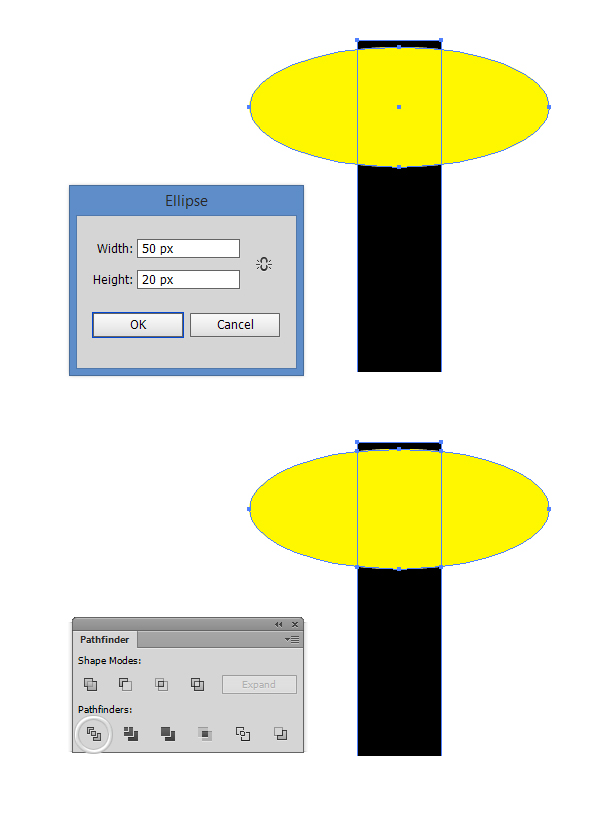
Pick the Elipse Tool (E) and draw a 50 x 20px circle. Select both the black shape and the elipse and hit the Divide Button from the Pathfinder Panel.
Step 18
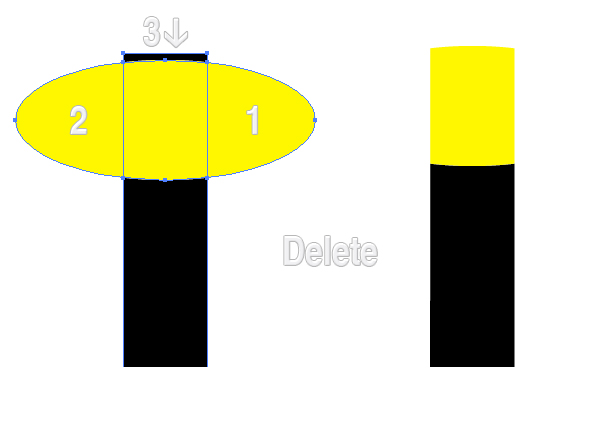
Using the Direct Selection Tool, delete parts tagged with (1), (2) and (3).
Step 19
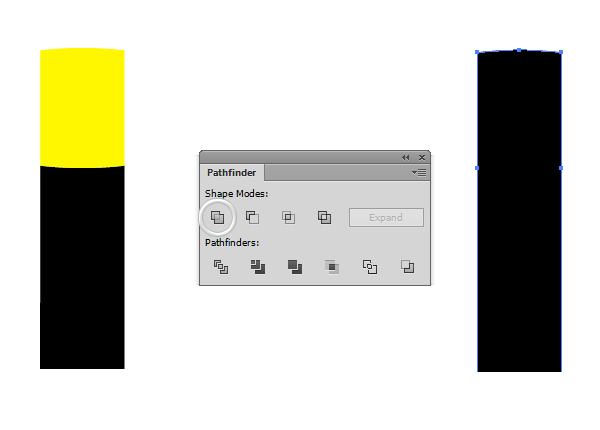
Now unite the remaining two shapes by pressing the Unite button from the Pathfinder Panel.
Step 20
Using again the Round Any Corner Script, select only the anchor point highlighted in the image and go to File > Scripts > Other Script. Open the Round Any Corner script, enter a 1px radius and click OK.
Step 21
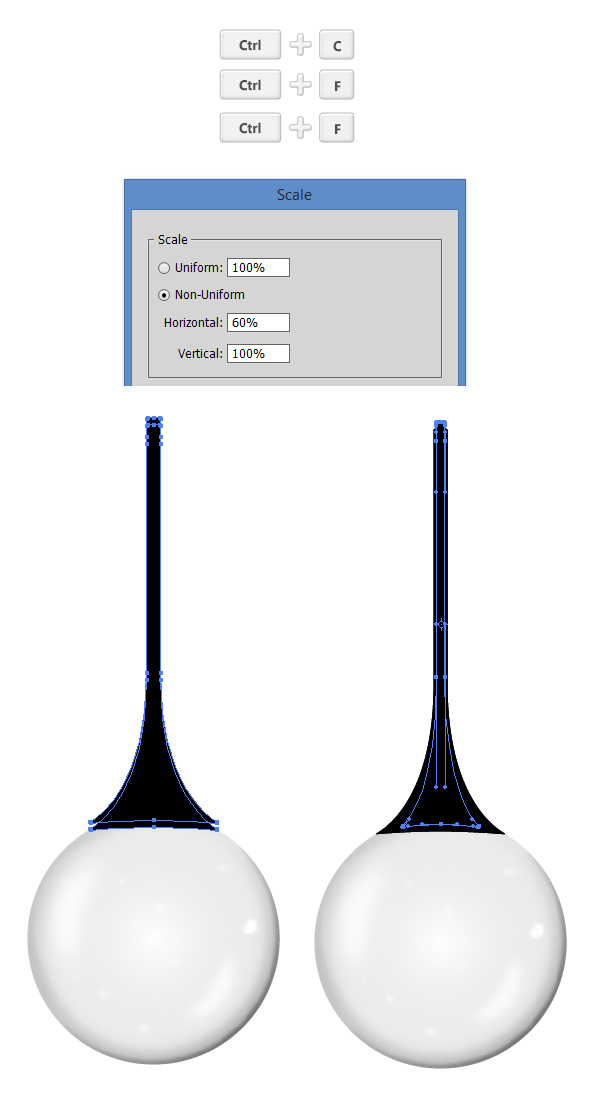
Now let’s create the first highlight on the top of the bubble lamp vector. Pick the shape and make two copies in front of it (Ctrl + C > Ctrl + F > Ctrl + F). Move it 7px up, double click on the Scale Tool (S) from the Toolbox, then enter a value of 60% for the Horizontal Non-Uniform scaling.
Step 22
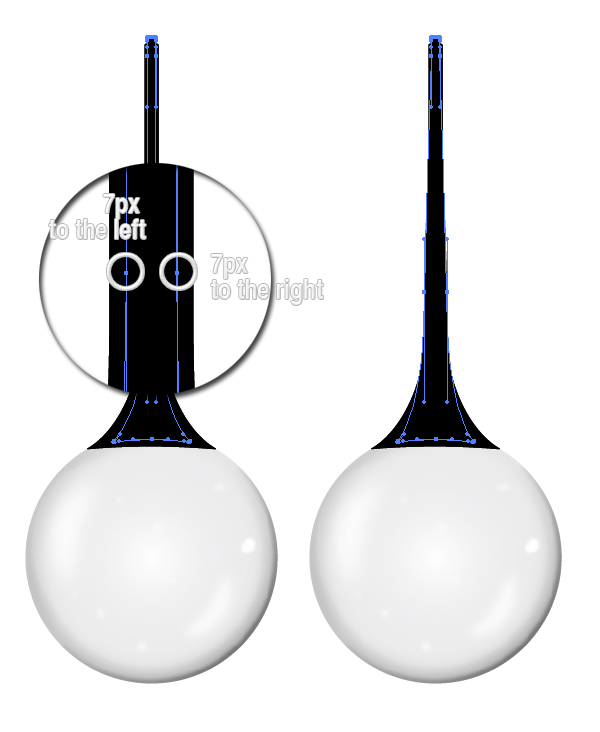
Using the Direct Selection Tool (A), move the left anchor point 7px to the left and the right anchor point 7px to the right.
Step 23
Now select both copies and hit the Minus Front button from the Pathfinder Panel.

Step 24
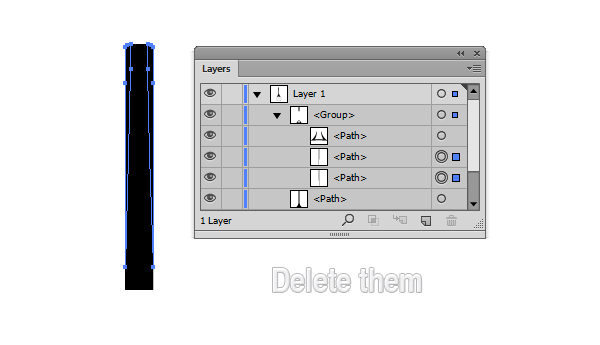
From the Layers Panel (Window > Layers), delete the unnecessary shapes (Del).
Step 25
Fill the shape with a Linear Gradient, then apply a 20px Gaussian Blur (Effect > Blur > Gaussian Blur). Focus on the Transparency Panel and lower the Opacity to 55%, then set the Blending Mode to Screen.

Step 26
Copy and paste in front twice the main shape (Ctrl + C > Ctrl + F > Ctrl + F). Move the first copy 4px to the right then second copy 7px to the right. Select both copies and hit the Minus Front button from the Pathfinder Panel.
Step 27
Fill the resulting shape with White, then add a 10px Gaussian Blur (Effect > Blur > Gaussian Blur). From the Transparency Panel, lower the Opacity to 50%, then set the Blending Mode to Screen.

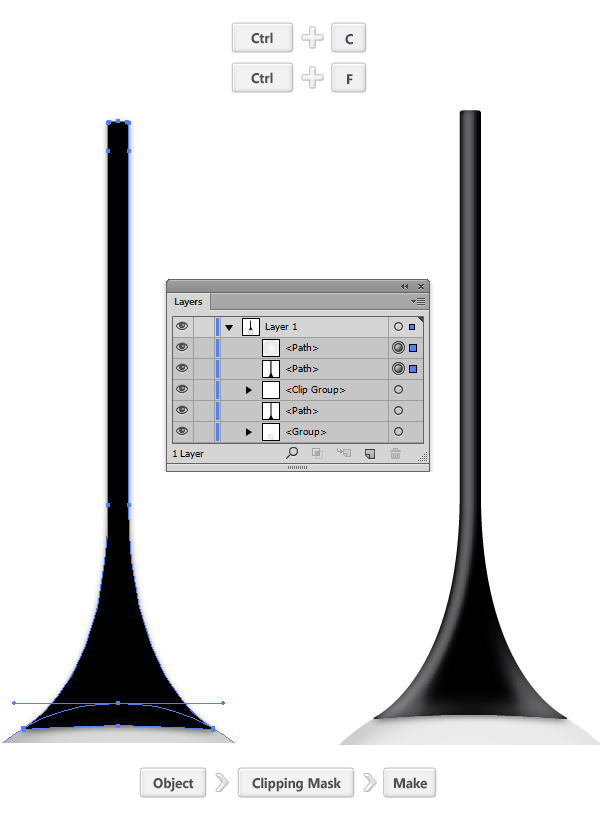
Step 28
Select again the main shape and make a copy in front of it (Ctrl + C > Ctrl + F). Now select the two highlights and the main shape, then create a Clipping Mask (Object > Clipping Mask > Make).
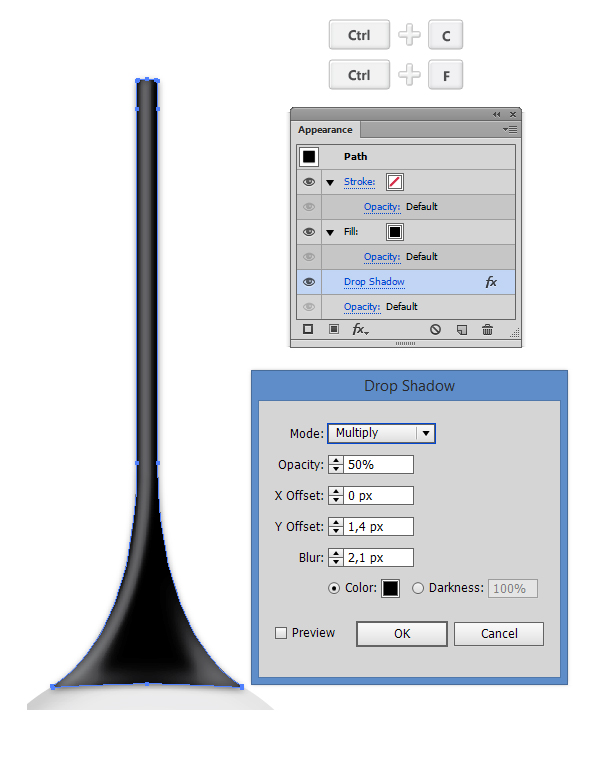
Step 29
Select the main shape once again and apply a Drop Shadow (Effect > Stylize > Drop Shadow) with the same values from the image below.
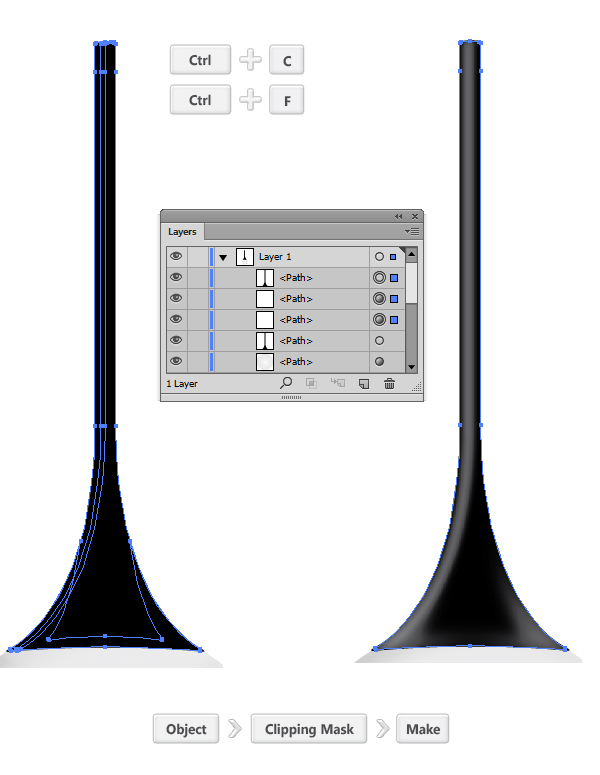
Step 30
Make a copy of the shape from step 2 (Ctrl + C > Ctrl + F), move it in front of the other shapes (Shift + Ctrl + ]), select the copy and the previous shape, then create a Clipping Mask (Object > Clipping Mask > Make).
Step 31
Select again the main shape, make two copies in front of it (Ctrl + C > Ctrl + F > Ctrl + F). Move the top copy 2px up, then select both copies and from the Pathfinder Panel hit the Minus Front button. Fill the resulting shape with a linear Gradient, then set it’s Blending mode to Screen.

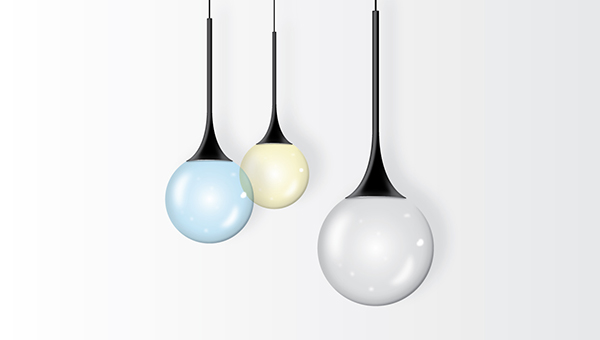
And we’re done! You’ve made your very own Bubble Lamp Vector.
![]()
Author: Andrei Urse
My name is Andrei Urse. I’m a graphic designer from Romania. I love creating logos and complex vector art using Illustrator, but I also use Photoshop and InDesign on a daily basis. You can find all of my work on Behance.


Vielen Dank für das tolle Lampen Tutorial.
Bin blutiger Anfänger und liebe so einfache Tuts um mich
mit dem AI vertraut zu machen.
Awesome post! Keep up the great work!
I visited your web site for the first time and I found that there is so much to learn here, so I have bookmarked your web site. Thanks a lot.
Nice tutorial, I like the way you lay these out… Very clear! Though I haven’t currently got a use for this glass lamp/bulb effect. I will bookmark this and who knows? One day I may need it… Thank you!
Thanks a lot!!
I’m kind of a beginner. These small tips and tricks help me learn more details I can use in Illustrator. Your tutorials are detailed and really helpful. Thanks a whole bunch. Amazing site!
😀
>–(^^,)–<