 In the following tutorial, you will learn how to create a simple price tag icon in Adobe Illustrator. For starters, you will learn how to setup a simple grid, and how to create the main shape using basic tools and vector shape building techniques, along with the Rounded Corners effect. Next, taking full advantage of the Appearance panel and using dashed strokes along with a built-in pattern, you will create the main piece of your price tag icon. Moving on, using basic blending techniques, the Appearance panel, and some subtle Drop Shadow effects, you will learn how to create a tiny rope. Finally, you will learn how to add a simple piece of text, and how to easily edit it using the Character panel.
Tutorial Details
- Program: Adobe Illustrator CS5
- Difficulty: Beginner-Intermediate
- Topics Covered: Basic Tools and Effects, Blending and Masking Techniques, Appearance and Stroke panels
- Estimated Completion Time: 45 minutes
Final Image
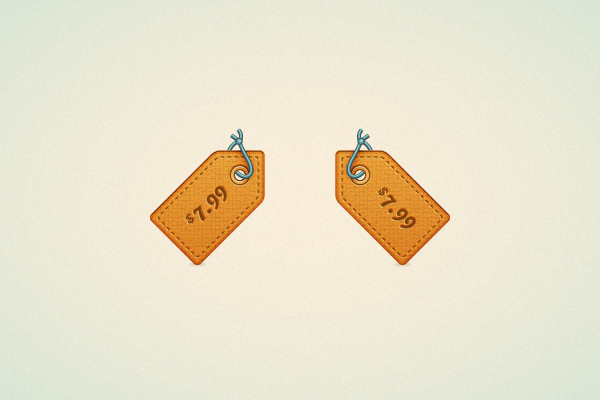
As always, this is the final image that we’ll be creating:
Step 1
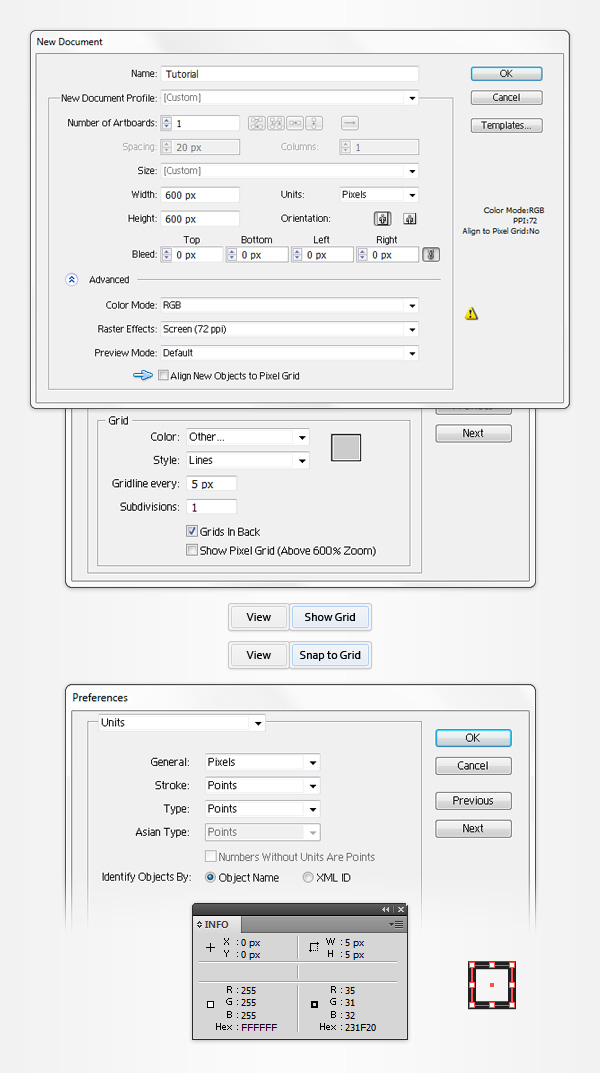
Hit CTRL + N to create a new document. Select Pixels from the Units drop-down menu, enter 600 in the width and height boxes, then click on the Advanced button. Select RGB, Screen (72 ppi) and make sure that the Align New Objects to Pixel Grid box is unchecked before you click OK. Enable the Grid (View > Show Grid) and the Snap to Grid (View > Snap to Grid). For starters you will need a grid every 5px, so simply go to Edit > Preferences > Guides > Grid, enter 5 in the Gridline every box and 1 in the Subdivisions box. You should also open the Info panel (Window > Info) for a live preview with the size and position of your shapes. Do not forget to set the unit of measurement to pixels from Edit > Preferences > Units > General. All these options will significantly increase your work speed.
Step 2
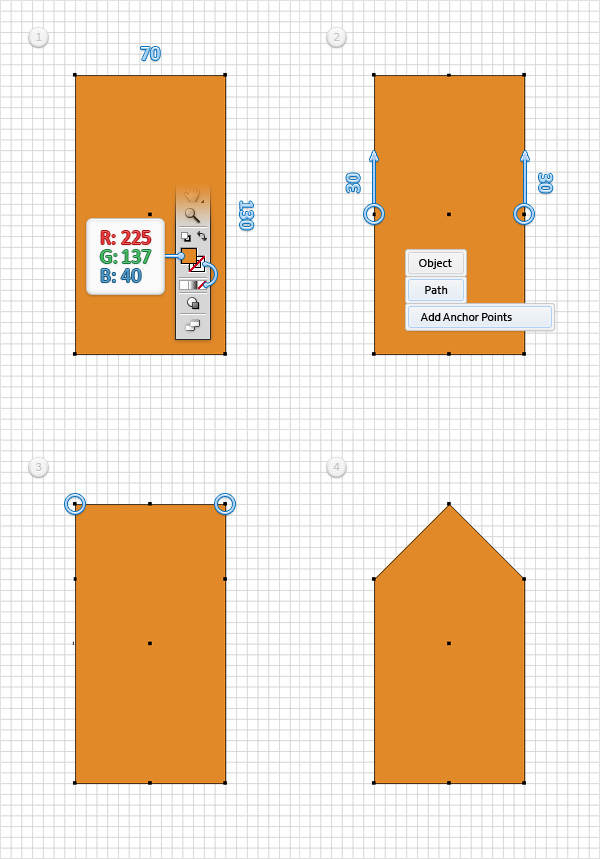
Pick the Rectangle Tool (M) and focus on your Toolbar. Remove the color from the stroke, then select the fill and set its color at R=225 G=137 B=40. Move to your artboard, and simply create a 70 x 130px rectangle. Make sure that your orange rectangle is selected, and go to Object > Path > Add Anchor Points. Grab the Direct Selection Tool (A), select the two anchor points highlighted in the second image and drag them 30px up. Switch to the Delete Anchor Point Tool (-) and simply click on the two anchor points highlighted in the third image to remove them. In the end, things should look like in the fourth image.
Step 3
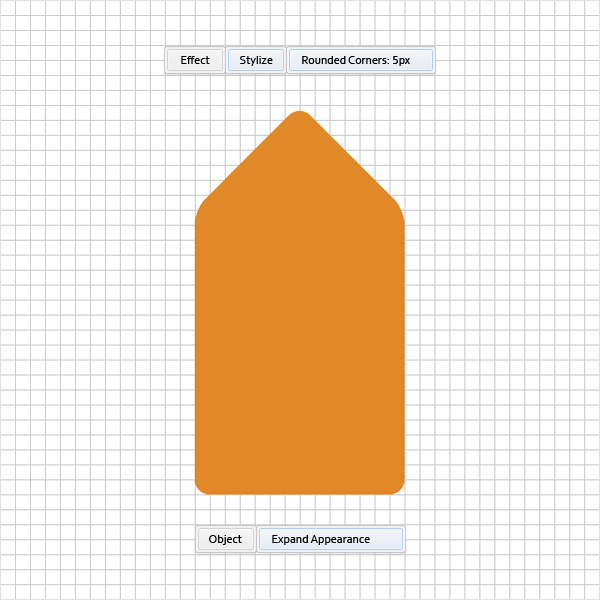
Make sure that your orange shape is still selected and go to Effect > Stylize > Rounded Corners. Enter a 5px radius, click OK and go to Object > Expand Appearance.
Step 4
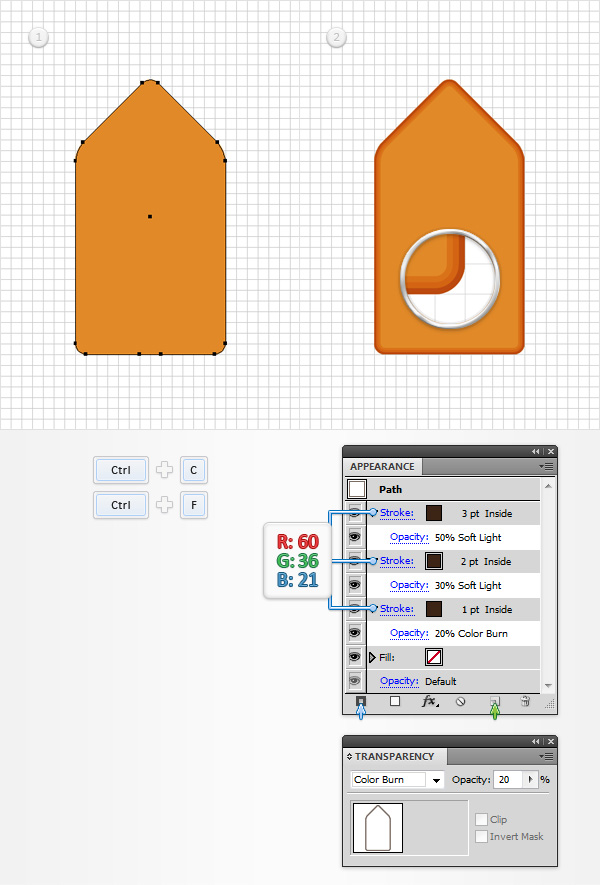
Make sure that your orange shape is still selected and make a copy in front (CTRL + C > CTRL + F). Select this copy and focus on the Appearance panel (Window > Appearance). Remove the color for the fill and select the stroke. Set the color at R=60 G=36 B=21 and the weight at 1pt; Then, using the Stroke panel, align it to inside. Make sure that this stroke stays selected, open Transparency panel (Window > Transparency), change the Blending Mode to Color Burn and lower the Opacity to 20%. Return to the Appearance panel and add a second fill for the shape made in this step using the Add New Stroke button (pointed by the little, blue arrow in the following image). Select it, make sure that the color is set at R=60 G=36 B=21, increase the weight to 2pt and align it to inside as before. Make sure that this second stroke stays selected, move to the Transparency panel, lower the Opacity to 30% and change the Blending Mode to Soft Light. Get back to the Appearance panel, make sure that the top stroke is still selected and duplicate it using the Duplicate Selected Item button (pointed by the little, green arrow in the following image). Select this third stroke and increase the weight to 3pt; then move to the Transparency panel and increase the Opacity to 50%.
Step 5
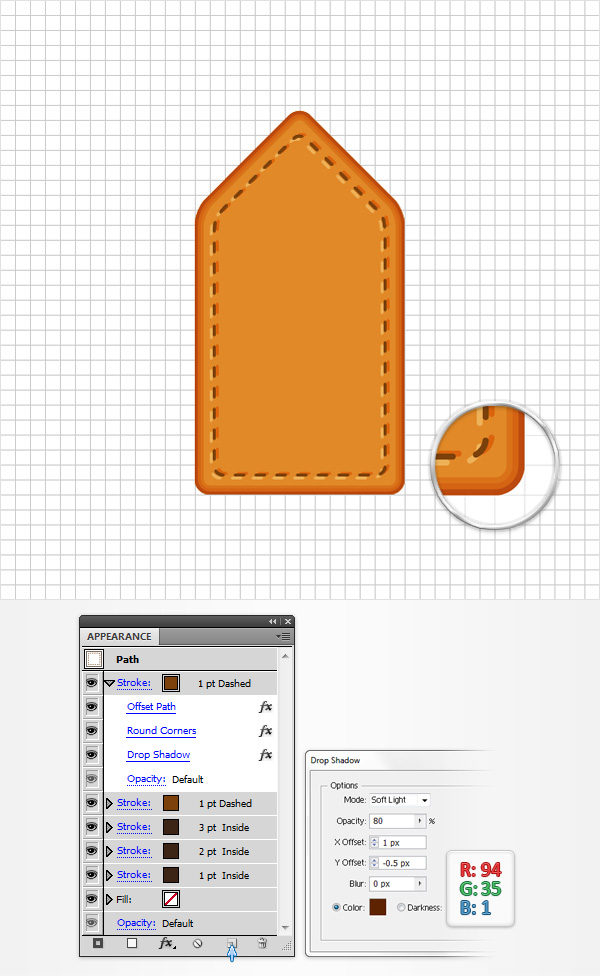
Reselect the shape with multiple strokes, focus on the Appearance panel and add a fourth stroke using that same Add New Stroke button. Select it, set the color at R=124 G=65 B=11 and the weight at 1pt; then go to Effect > Path > Offset Path. Enter a -6.5px offset, click OK and go to Effect > Stylize > Rounded Corners. Enter a 3px radius, click OK and go to Effect > Stylize > Drop Shadow. Enter the properties shown in the following image, click OK and return to the Appearance panel. Make sure that this new stroke stays selected and open the Stroke panel (Window > Stroke). First, click on the Round Cap and Align Dashes to Corners and path ends (pointed by the little, blue arrow in the following image) buttons. Next, check the Dashed Line box and enter 3 in the dash box and 4 in the gap box. In the end, things should look like in the following image.

Step 6
Reselect the shape with multiple strokes, focus on the Appearance panel, select the dashed stroke and simply duplicate it using that same Duplicate Selected Item button. Focus on this new stroke, open the existing Drop Shadow effect, enter the properties shown in the following image and click OK.
Step 7
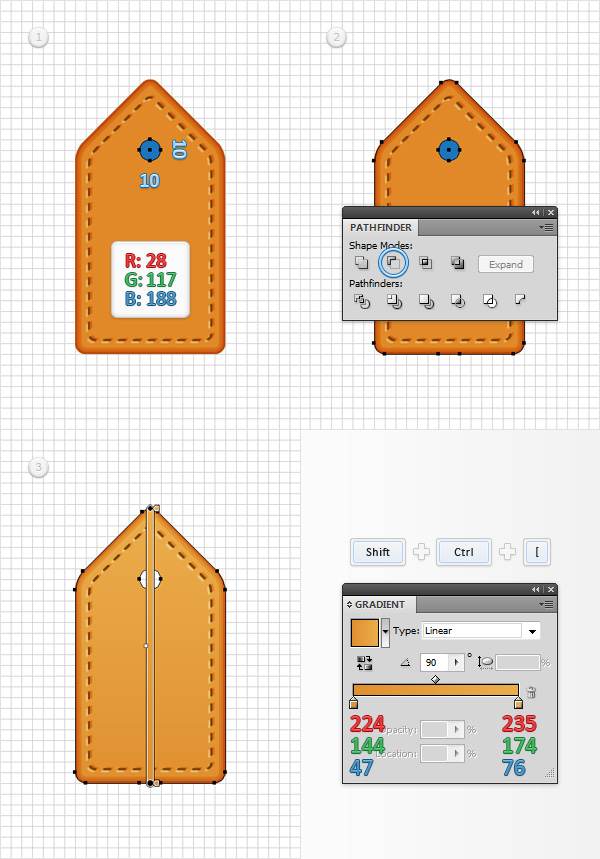
Using the Ellipse Tool (L), create a 10px circle, pick a random color for the fill and place it as shown in the first image. Reselect this tiny circle along with the original orange shape we created, open the Pathfinder panel (Window > Pathfinder) and click the Minus Front button. Make sure that the resulting shape stays selected, send it to back (Shift + CTRL + [ ), open the Gradient panel (Window > Gradient) and simply click on the gradient thumbnail to add the default black to white linear gradient. Keep focusing on your Gradient panel, set the Angle at 90 degrees, then move to the gradient colors. Select the right slider and set the color at R=235 G=174 B=76, then select the left slider and set the color at R=224 G=144 B=47. Move to the Layers panel, double click on the shape made in this step and simply name it “main“.
Step 8
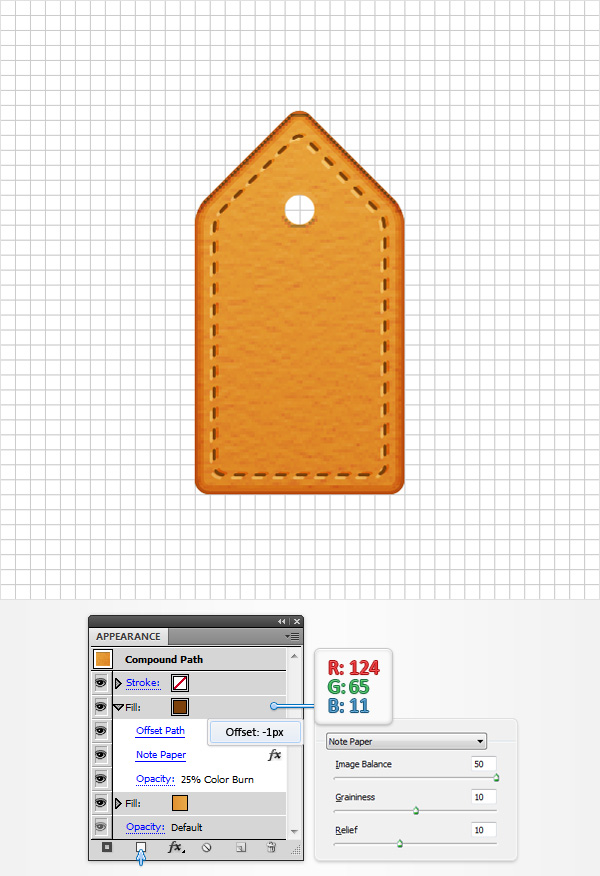
Make sure that your “main” shape is still selected, focus on the Appearance panel and add a second fill using the Add New Fill button (pointed by the little, blue arrow in the following image). Select this new fill, set the color at R=124 G=65 B=11, lower its Opacity to 25%, change the Blending Mode to Color Burn and go to Effect > Path > Offset Path. Enter a -1px offset, click OK and go to Effect > Sketch > Note Paper. Enter the properties shown in the following image and click OK.
Step 9
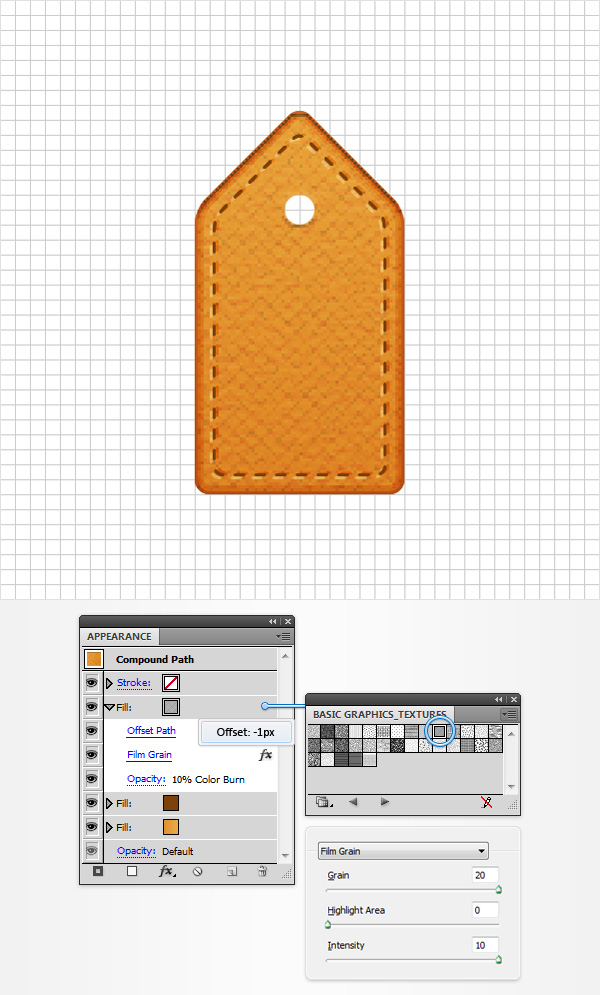
Make sure that your “main” shape is still selected, focus on the Appearance panel and add a third fill using that same Add New Fill button. You will need a built-in pattern for this final fill, so go to the Swatches panel (Window > Swatches), open the fly-out menu and go to Open Swatch Library > Patterns > Basic Graphics > Basic Graphics_Textures. A new window with a set of built-in patterns should open. Make sure that the third fill is still selected and simply add the “Diamond” pattern. Lower its opacity to 10%, change the blending mode to Color Burn and go to Effect > Path > Offset Path. Enter a -1px offset, click OK and go to Effect > Artistic > Film Grain. Enter the properties shown below and click OK.
Step 10
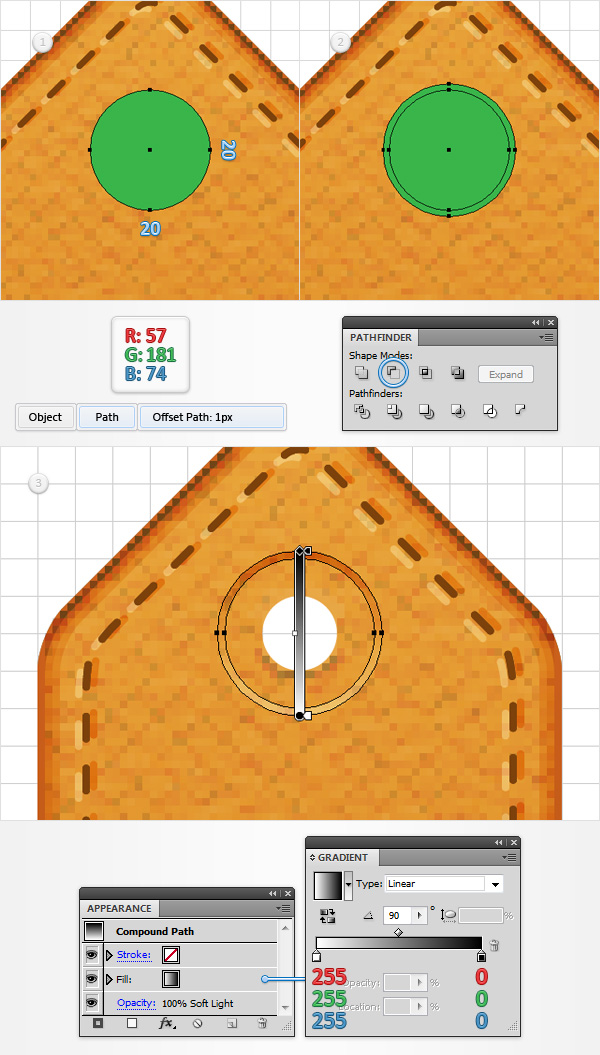
Using the Ellipse Tool (L), create a 20px circle, set the fill color at R=57 G=181 B=74 and place it as shown in the first image. Make sure that this green shape is selected and go to Object > Path > Offset Path. Enter a 1px offset and click OK. Reselect both circles made in this step and click the Minus Front button from the Pathfinder panel. Make sure that the resulting shape stays selected, fill it with the linear gradient shown in the following image and change the Blending Mode to Soft Light.
Step 11
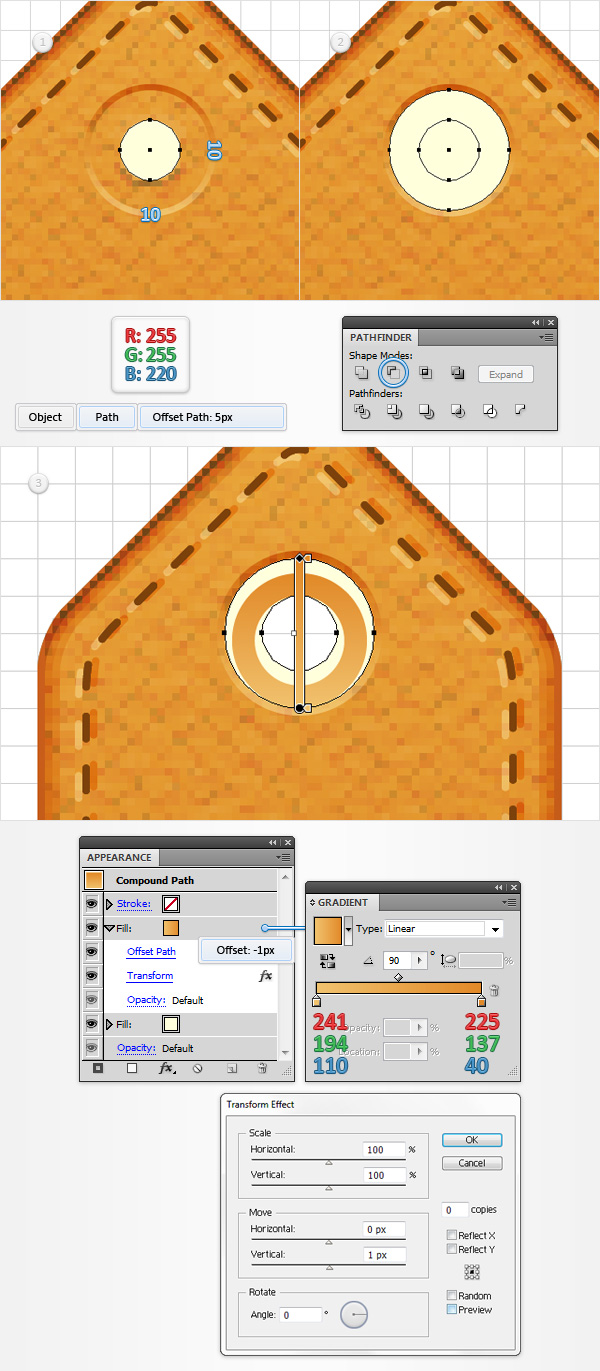
Using the Ellipse Tool (L), create a 10px circle, set the fill color at R=255 G=255 B=220 and place it as shown in the first image. Make sure that this new shape is selected and go to Object > Path > Offset Path. Enter a 5px offset and click OK. Reselect both circles made in this step and click the Minus Front button from the Pathfinder panel. Make sure that the resulting shape stays selected, focus on the Appearance panel and add a second fill. Select it, add the linear gradient shown in the following image and go to Effect > Path > Offset Path. Enter a -1px offset, click OK and go to Effect > Distort & Transform > Transform. Enter the properties shown in the following image and click OK.
Step 12
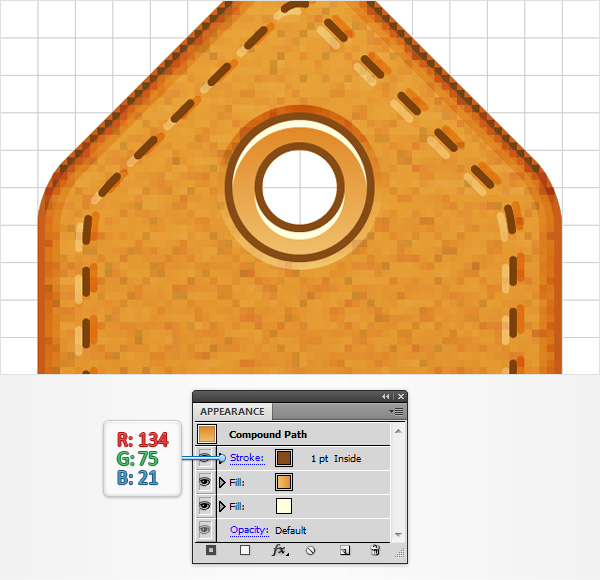
Reselect the shape made in the previous step, focus on the Appearance panel, add a 1pt stroke, align it to inside and set the color at R=134 G=75 B=21.
Step 13
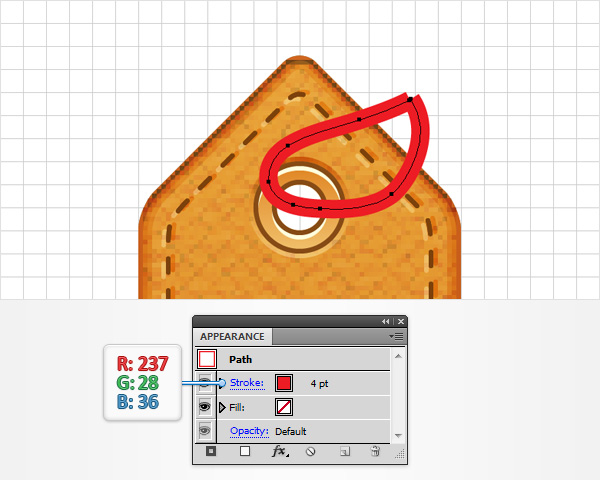
Disable the Snap to Grid (View > Snap to Grid). Pick the Pen Tool (P) and create a simple path roughly as shown in the following image. Add a 4pt stroke for this new path, set its color at R=237 G=28 B=36 and make sure that there is no color set for the fill. Move to the Layers panel, double click on this new path and name it “rope“.
Step 14
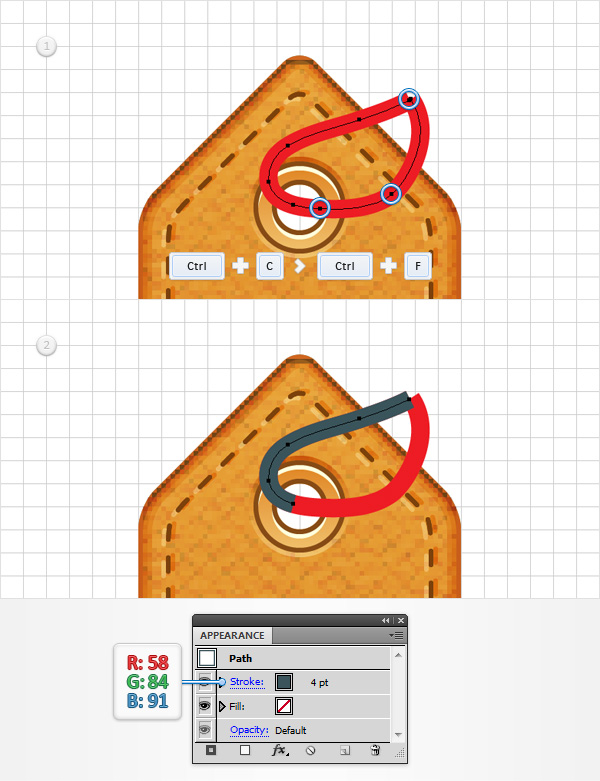
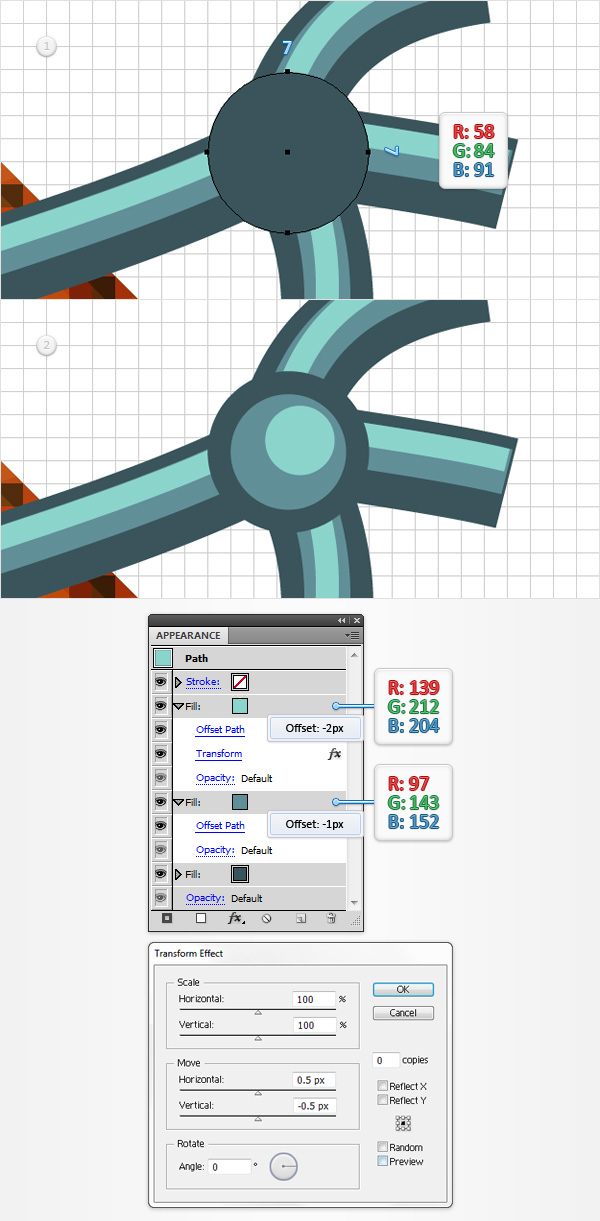
Reselect your red path and make a copy in front (CTRL + C > CTRL + F). Focus on this copy, grab the Direct Selection Tool (A), select the three anchor points highlighted in the first image and simply hit the Delete key from your keyboard. Make sure that the remaining path is selected and replace the red used for the stroke with R=58 G=84 B=91.
Step 15
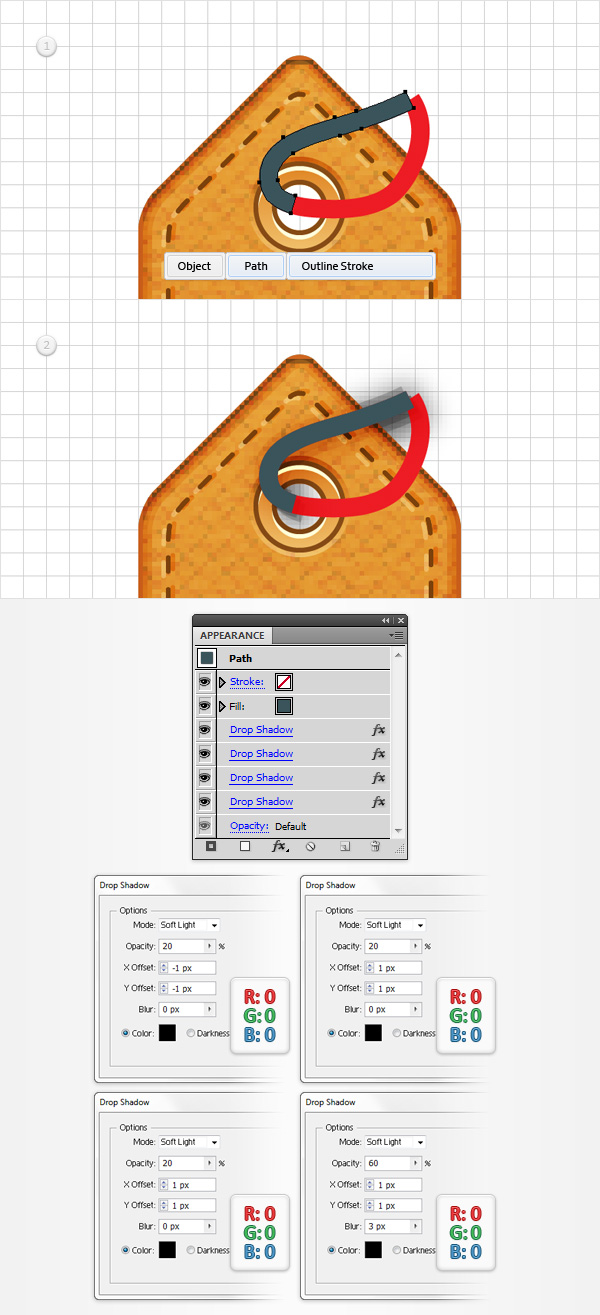
Reselect the dark path made in the previous step and go to Object > Path > Outline Stroke. Select the resulting shape and go to Effect > Stylize > Drop Shadow. Enter the properties shown in the top, left window (in the following image), click OK and go again to Effect > Stylize > Drop Shadow. Repeat these steps for the top, right window, bottom, left window, and one last time for the bottom, right window. Move to the Layers panel, double click on the shape made in this step and name it “ropeShadow“.
Step 16
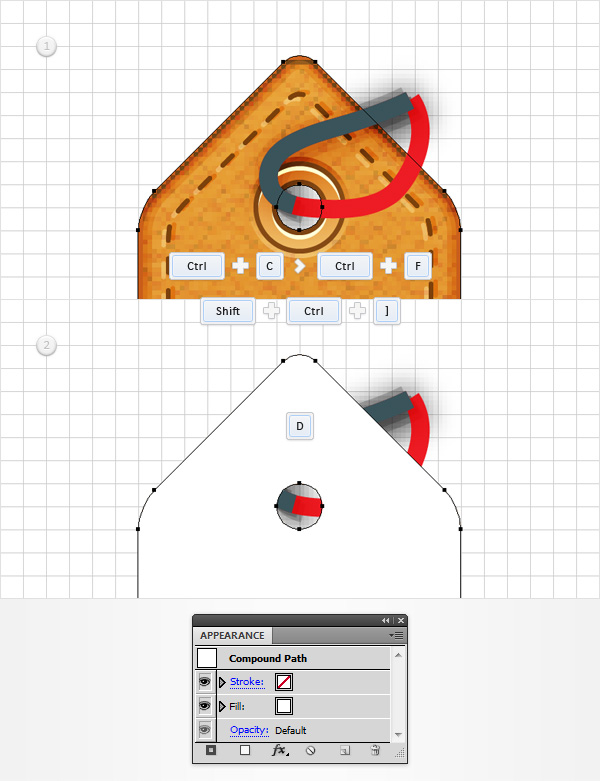
Focus on the Layers panel, select your “main” shape, make a copy in front (CTRL + C > CTRL + F) and bring it to the front (Shift + CTRL + ] ). Make sure that this copy is selected and simply hit the D key from your keyboard to replace the existing Appearance attributes with the default ones (white fill and black stroke). Move to the Appearance panel and simply remove that black stroke.
Step 17
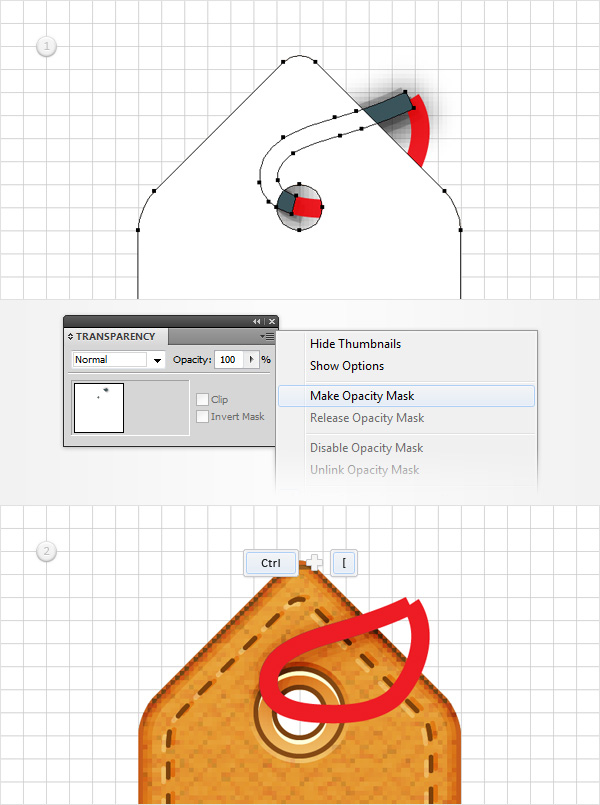
Open the Transparency panel (Window > Transparency). Reselect the shape with multiple Drop Shadow effects along with the white shape, open the fly-out menu of the Transparency panel and simply go to Make Opacity Mask. Make sure that your masked shape is still selected and hit CTRL + [ to send it behind the red path. In the end things should look like in the second image.
Step 18
Reselect your “rope” shape and focus on the Appearance panel. First, select the existing stroke and replace the red with R=58 G=84 B=91. Next, add a second stroke for your path. Select it, set the weight at 2pt and the color at R=97 G=143 B=152 then go to Effect > Distort & Transform > Transform. Enter the properties shown in the right window (in the following image) and click OK. Return to the Appearance panel and add a third fill for your “rope” path. Select it, set the weight at 1pt and the color at R=139 G=212 B=204 then go to Effect > Distort & Transform > Transform. Enter the properties shown in the left window and click OK.

Step 19
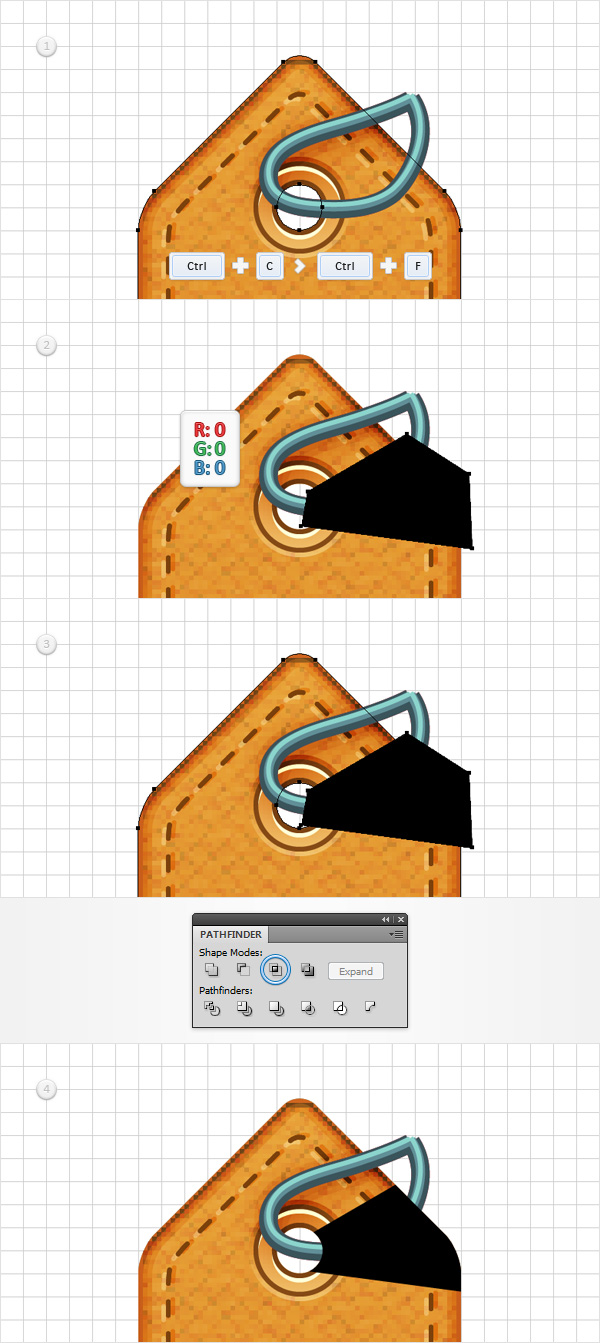
Reselect your “main” shape and make a copy in front (CTRL + C > CTRL + F). Using the Pen Tool (P), create a black polygon roughly as shown in the second image. Make sure that it completely covers the bottom part of the “rope” that goes over the “main” shape. Select this black shape along with the copy made in the beginning of the step and click the Intersect button from the Pathfinder panel.
Step 20
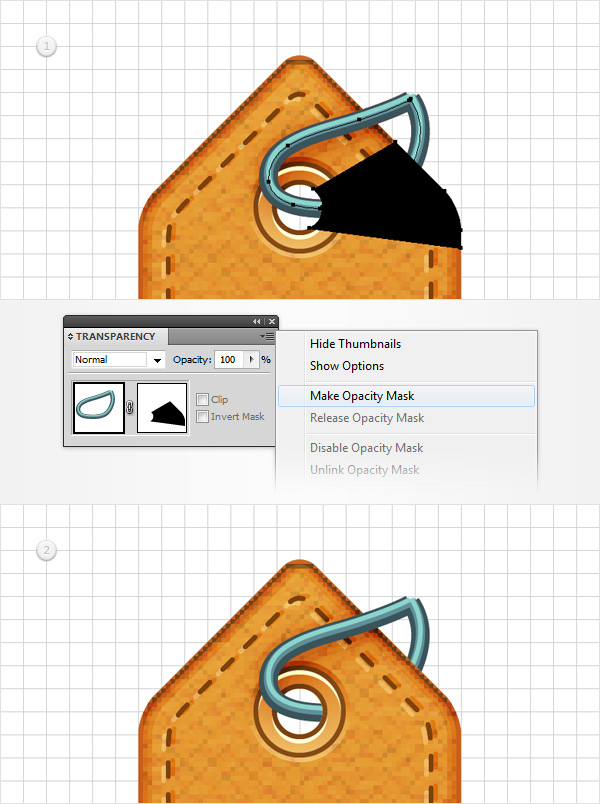
Reselect the black shape made in the previous step along with the “rope” path, open the fly-out menu of the Transparency panel and go to Make Opacity Mask. Uncheck the Clip box then things should look like in the second image.
Step 21
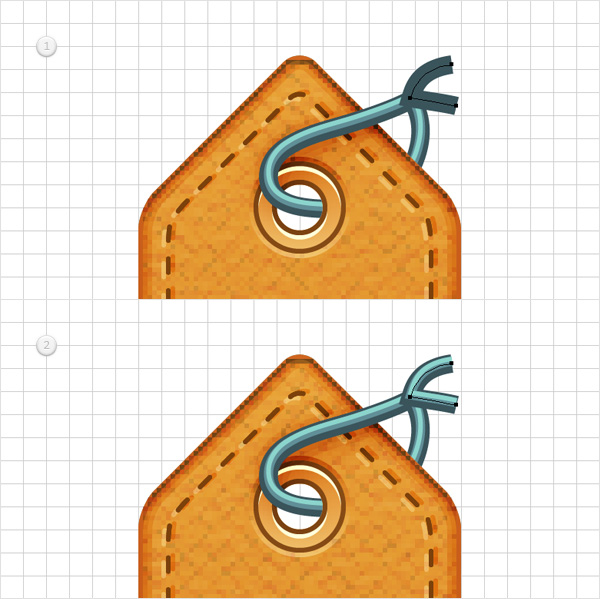
Using the Pen Tool (P), create a tiny path roughly as shown in the first image. Next, you need to copy the properties used for your “rope” path and paste them onto this tiny, new path. Here is how you can easily do it. Go to the Layers panel, focus on the right side and you’ll notice that every shape comes with a little grey circle. It’s called a target icon. Hold Alt, click on the target icon that stands for your “rope” path and simply drag onto the circle that stands for the tiny path made in this step. In the end, things should look like in the following image.
Step 22
Enable the Snap to Grid (View > Snap to Grid). For this step,you will need a grid every 1px, so go to Edit > Preferences > Guides & Grid and enter 1 in the Gridline every box. Using the Ellipse Tool (L), create a 7px circle, set the fill color at R=58 G=84 B=91 and place it as shown in the first image. Make sure that this tiny, new shape stays selected, focus on the Appearance panel and add a second fill. Select it, set the color at R=97 G=143 B=152 and go to Effect > Path > Offset Path. Enter a -1px offset, click OK and return to the Appearance panel. Add a third fill for your shape, select it, set the color at R=139 G=212 B=204 and go to Effect > Path > Offset Path. Enter a -2px offset, click OK and go to Effect > Distort & Transform > Transform. Enter the properties shown in the following image and click OK.
Step 23
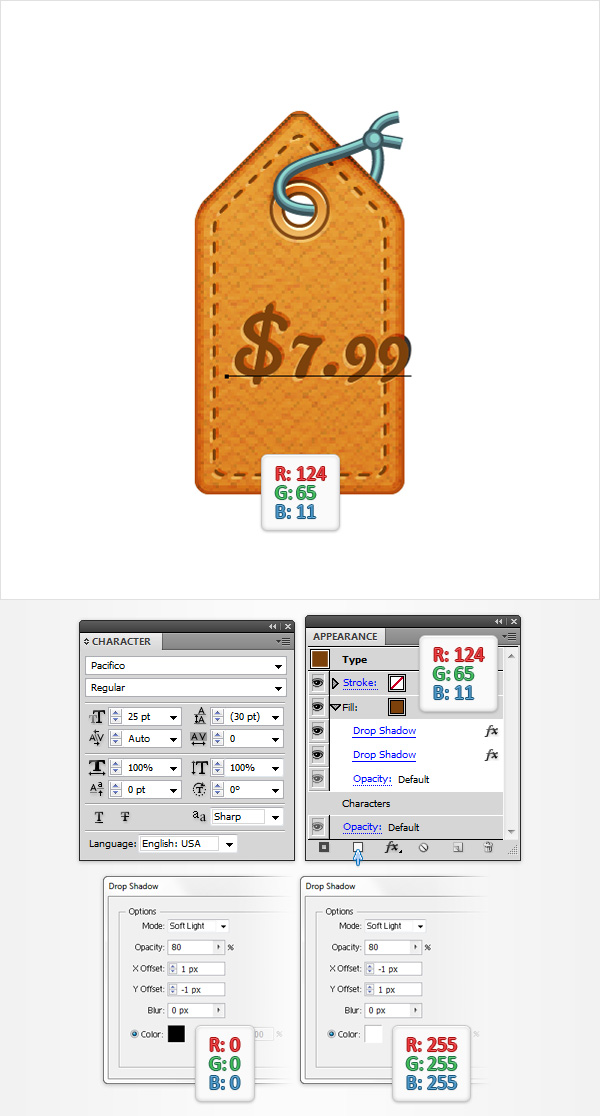
Disable the Grid (View > Hide Grid) and the Snap to Grid (View > Snap to Grid). Grab the Type Tool (T), click on your artboard and add the “$7.99” piece of text. Pick R=124 G=65 B=11 for the color and use the Pacifico font with the size set at 25pt. Make sure that this piece of text stays selected, focus on the Appearance panel and simply click the Add New Fill button. Select this new fill, set the color at R=124 G=65 B=11 and go to Effect > Stylize > Drop Shadow. Enter the properties shown in the left window in the following image, click OK and go again to Effect > Stylize > Drop Shadow. Enter the properties shown in the right window and click OK.
Step 24
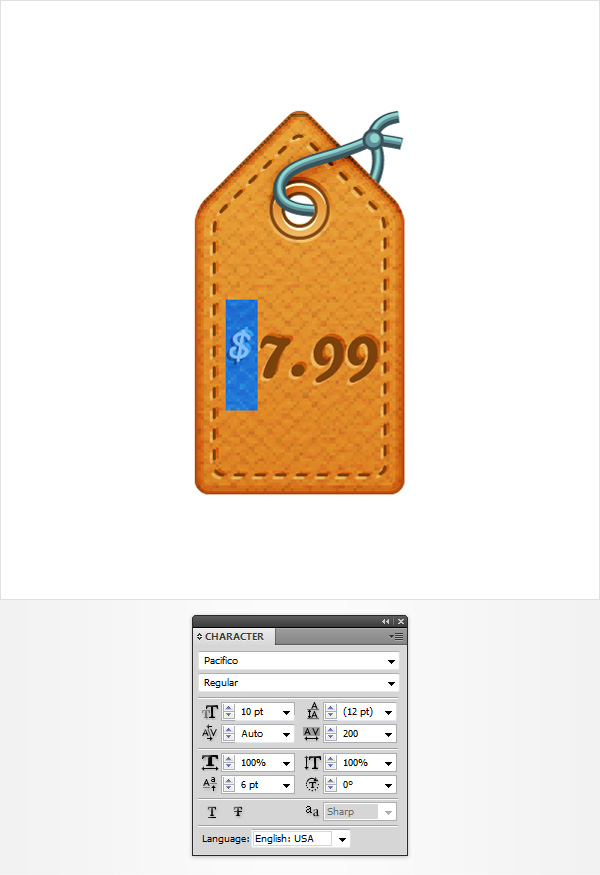
Keep focusing on your piece of text, select only the dollar sign and focus on the Character panel (Window > Type > Character). Set the Leading at 12pt, the Tracking at 200 and the baseline shift at 6pt. Open the fly-out menu of the Character panel and go to Show Options if you can’t see all the options shown in the following image.
Step 25
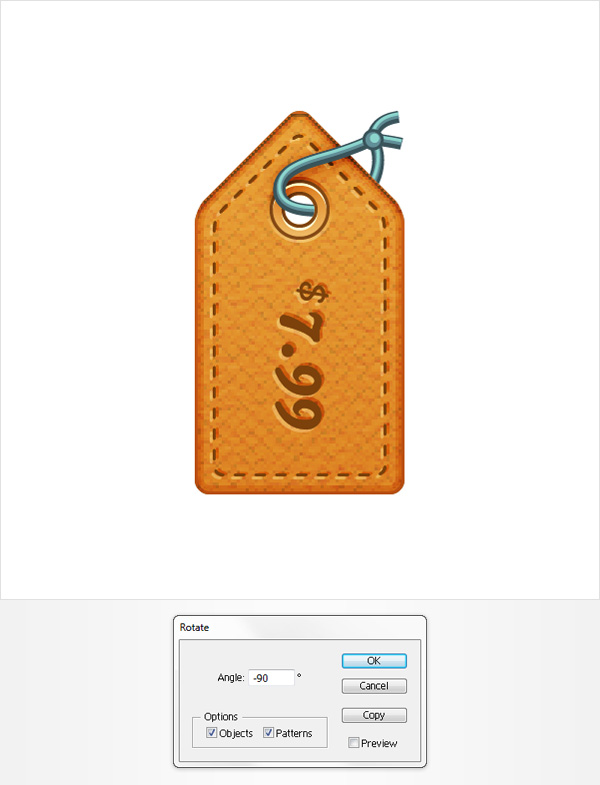
Finally, reselect your piece of text and go to Object > Transform > Rotate. Enter a -90 degrees angle and click OK. Place your piece of text as shown in the following image.
And We’re Done!
I hope you’ve enjoyed this tutorial and can apply these techniques in your future projects.

Author: Andrei Marius
Andrei Marius is a self taught vector artist who is trying to make a living doing something that he likes. He spends most of his time working in Adobe Illustrator, trying to avoid the Pen Tool. You can find most of his vector experiments at this little website dedicate to Illustrator VforVectors.


A lot of thanks for your whole work on this website. My niece loves working on research and it is obvious why. Most of us know all relating to the lively mode you create informative guides by means of this web blog and even encourage contribution from other individuals on that idea then my simple princess is truly discovering a lot. Have fun with the remaining portion of the year. You are performing a wonderful job.
Great, but step 17 explained really bad, I spend more than 30 minutes trying, but nothing is working so far.
can you plz make it in video ??!!!
Thank you it’s very useful, for beginners especially ) But in step 8 – how to achieve colour effect after applying note paper filter? Image becomes grey and I can’t fill it with any colour. Thanks)
I just tested this and it’s working correctly for me. You may want to double check that you have changed the Blending Mode to Color Burn and the opacity to 25% on the new fill. Hope this helps!
Thanks for the great tutorial. i learned a lot.
Nice walk through, love your work, keep ’em coming
Excellent Tut! Thank you!
It’s awesome,great tutorial!
Thnx, i have learnt a lot from this tutorial and all set to follow other tuts.