
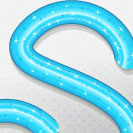
Keep your teeth (err, designs) bright and white with this sparkle toothpaste text effect tutorial! Perfect for advertisement and packaging design needs.
Tutorial Details: Smile! It’s a Sparkle Toothpaste Text Tutorial
- Program: Adobe Illustrator CC
- Difficulty: Intermediate
- Topics Covered: Effects, Custom Brushes, Appearance panel
- Estimated Completion Time: 30 Minutes
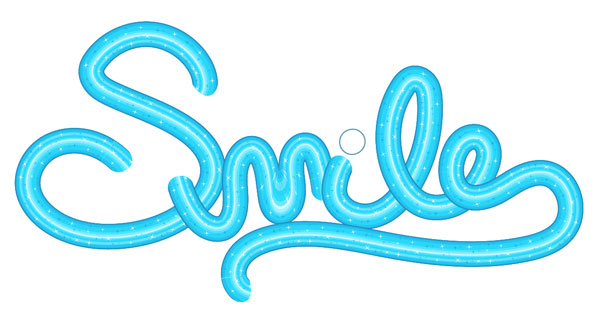
Final Image: Smile! It’s a Sparkle Toothpaste Text Tutorial
Step 1: Smile! It’s a Sparkle Toothpaste Text Tutorial
First off for this sparkle toothpaste text tutorial, we need to create a custom Pattern Brush. In order to do so, we have to build up our toothpaste design, which will be repeated along a brush stroke.
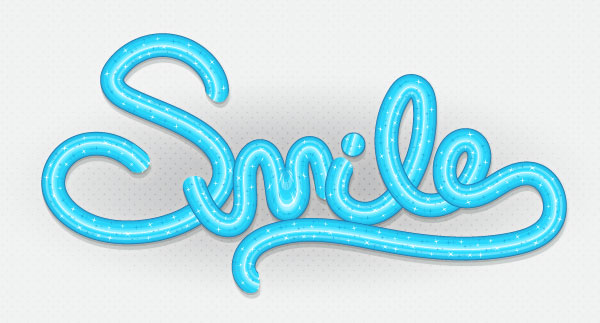
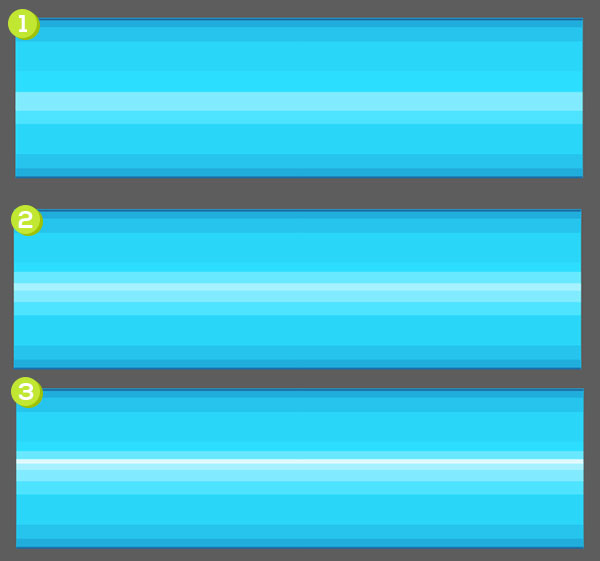
- Start with a rectangle drawn with the Rectangle Tool (M). It’ll need to be the width you want for your final text effect and a length comparable to the ratio seen below. Set the fill color to bright blue.
- Draw two thin rectangles on the top and bottom of the first in a darker hue of blue.
- Repeat, moving inward, with a thicker rectangle that’s a shade of blue between the first two.
Step 2
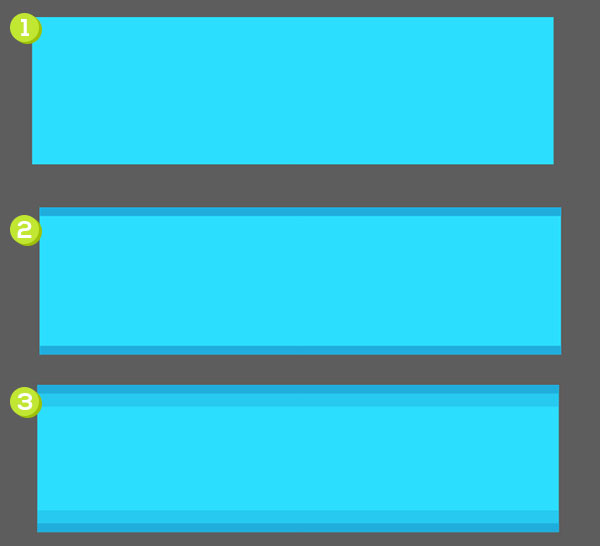
Continue adding different hues of blue to the main rectangle. Their width matches the first rectangle and their heights vary in size.
- The next two rectangles added are slightly darker than the main rectangle and about one third of its thickness each.
- Define the edges of your rectangle with very thin, dark blue rectangles. Use the Align panel to aid in making sure you’re aligning each rectangle properly.
- In the center of the rectangle, draw a thin rectangle in a lighter shade of blue than the base rectangle. Or, set the fill color to white and reduce its Opacity to 20%.
Step 3
The next three steps detail the center rectangles, which are all white and carrying degrees of opacity.
Step 4
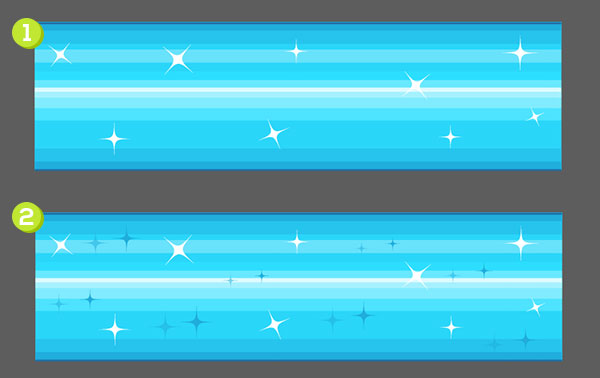
Use the Ellipse Tool (L) to draw white and blue circles of varying sizes over the rectangles. Select all of the circles and go to Effect > Distort & Transform > Picker & Bloat and drag the slider to the pucker side until you get a sparkle shape that you like best.
Expand the shapes under Object and Rotate them as needed. Group (Control-G) all of your components together.
Step 5
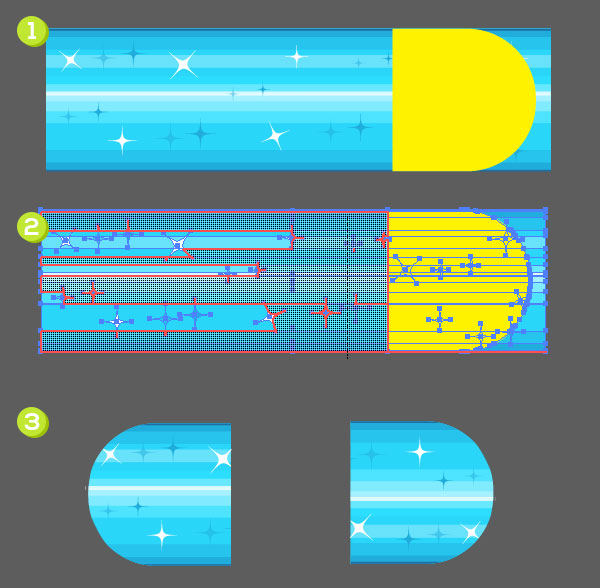
- Use the Rectangle Tool and draw a small square that has the same height as the main rectangle. Round out the right-most corners in the Transform panel.
- Select both the rounded rectangle and the toothpaste group, and use the Shape Builder Tool (Shift-M) to Merge shapes that do not overlap the rounded rectangle.
- Delete merged and non-intersecting shapes from the rounded rectangle so you’re left with a rounded rectangle ofthe toothpaste design. Repeat for the left side.
Step 6
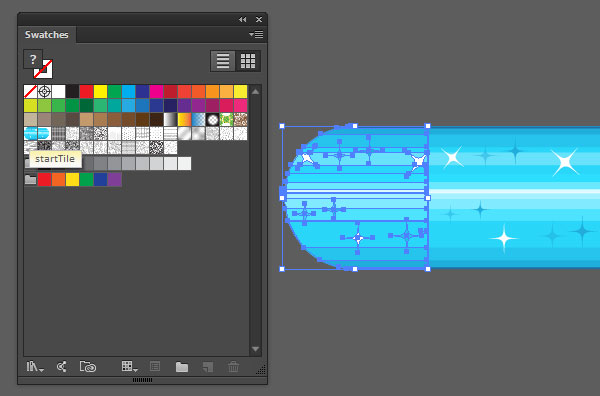
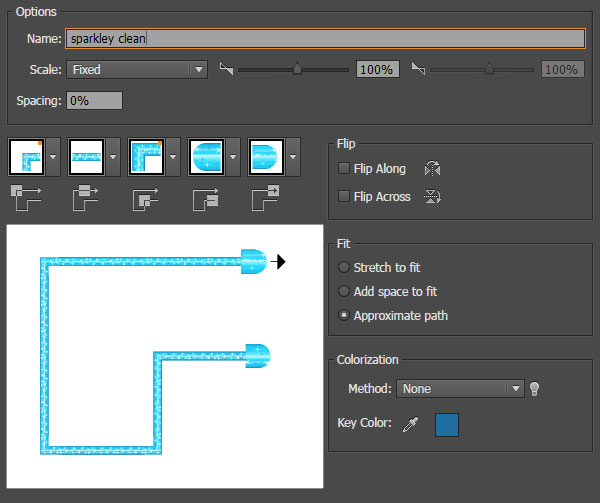
Select the left sparkle toothpaste text end made in the previous step and drag it into your Swatches panel. double-Click on the swatch and rename it startTile. Repeat with the right end and name it endTile.
Step 7
Select the center of the sparkle toothpaste text design created in Steps 1-5 and create a new brush in the Brushes panel. Choose a Pattern Brush and bring up its options. you should be able to select your starting and ending tiles made previously in their corresponding drop-down menus (they will be sized properly when in use, by the way), and can play with some of the automated options for inner and outer corners. Hit OK to save your brush in the Brushes panel.
Step 8
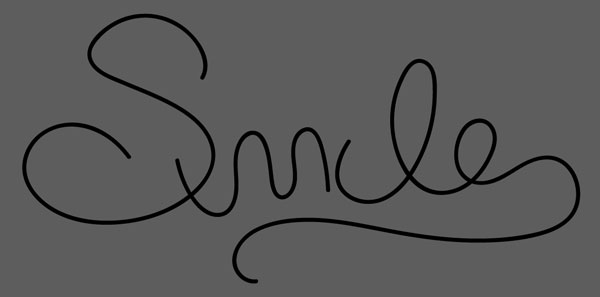
Use the Pencil Tool (N) to carefully draw your word. Notice how it’s quite loopsy, devoid of hard edges, and in a casual script form. This is all done intentionally so the brush remains paste-like.
Step 9
Apply your new brush to your sparkle toothpaste text paths from the Brushes panel.
Step 10
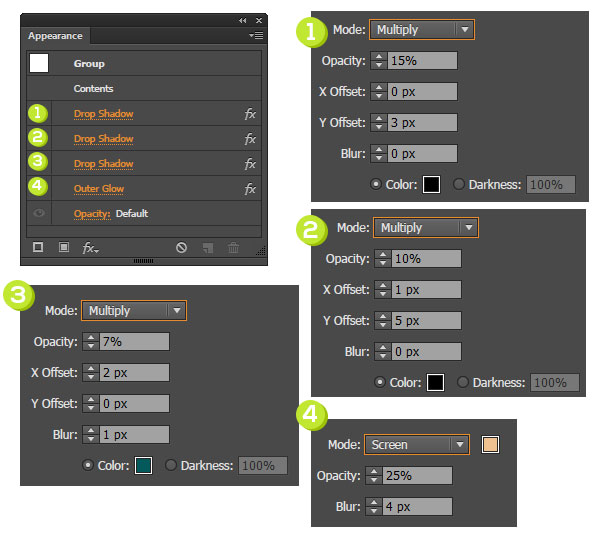
Group together your text paths. In the Appearance panel, apply the following instances of Drop Shadows and Outer Glows in the exact order seen below:
1. Drop Shadow
- Mode: Multiply
- Opacity: 15%
- X Offset: 0 px
- Y Offset: 3 px
- Blur: 0 px
- Color: Black
2. Drop Shadow
- Mode: Multiply
- Opacity: 10%
- X Offset: 1 px
- Y Offset: 5 px
- Blur: 0 px
- Color: Black
3. Drop Shadow
- Mode: Multiply
- Opacity: 7%
- X Offset: 2 px
- Y Offset: 0 px
- Blur: 1 px
- Color: Dark Teal
4. Outer Glow
- Mode: Screen
- Opacity: 25%
- Blur: 4 px
- Color: Peach
Conclusion: Your Very Own Sparkle Toothpaste Text!
Congratulations! You’ve completed your sparkle toothpaste text effect. Why not give your text a background reminiscent of bathroom tile or paper towels to keep the theme going? Further your design by drawing a vector toothpaste tube, toothbrush, and box of floss. Share your result in the comment section below!
Author: Mary Winkler
Mary works under the brand Acrylicana® designing apparel, jewelry, and illustrating for companies like Disney, Jakks Pacific, Envato, and more. Check out Acrylicana.com for more artwork, tutorials, and more.


Hi Mary. Is there a video tutorial of this anywhere? From the looks of it, this is the most realistic toothpaste text effect design that I can find. But I keep getting stuck at step 7. Thank you.