Art Brushes: Stretch Between Guides

Art Brushes: Stretch Between Guides

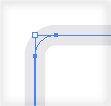
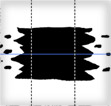
One of my favorite art brush options is Stretch Between Guides. I like using this option to keep the ends of the brush unchanged and just stretch the middle. For me it works similarly to a simple pattern brush, but it’s a lot easier to create. You can set this option in the Art Brush Options by selecting Stretch Between Guides and then setting the guides at the desired position.

Continue reading

Where is My Gradient Annotator?

Gradient Annotator

The Gradient Annotator is an essential part of Illustrator’s Gradient tool (G). That’s why it’s such a pain when it seemingly disappears! I get emails about this all the time so I think it justifies a quick post. If you don’t see your annotator when using the Gradient tool (G) then choose View > Show Gradient Annotator (Command-Option-G/Ctrl-Alt-G). I tend to sometimes turn it off and on by accident when I’m using the keyboard shortcuts for grouping and ungrouping objects.

Organize Script

John Wundes has created another awesome script called Organize. With Organize, you can quickly sort selected items by a given attribute. Items can be sorted on height, width, area, x-axis, y-axis, opacity, and order. The sort direction are small-to-large, large-to-small, and random. It’s a pretty handy script for organizing icon sets, logo comps, and a bunch more. What would you use it for? Go download it now!

Continue reading

Quick Tip: Drawing with Appearances

I love the the Appearance panel and one setting I use a bunch is New Art Has Basic Appearance (Appearance panel pop-up menu).  If selected, you’ll draw with only the current Stroke, Fill, Opacity and other attributes from the last object you drew will be ignored. If this option is not selected (which is how I use it the most), the new art will have the exact same Appearance as your last object. Pretty handy when creating a bunch of object that use the same Appearance attributes.

Continue reading

Did You Know: Default Corner Radius

Did you know you can change Illustrator’s default corner radius for the Rounded Rectangle tool? Simply go to your General Preferences and in the Corner Radius field change the default value. This works great if you are working on a project that requires numerous rounded rectangles with the same corner radius. Don’t worry, you can easily override this value on a per-object basis in the Rounded Rectangle tool dialog box.

Continue reading

Did You Know: One Text Block From Many

Did you know you can combine separate Area text boxes and Point type objects by selecting all of them with the Selection tool, copying them, drawing a new Area text box and pasting? This might seem obvious or basic but it’s a really handy tip if you didn’t know about it. The text will flow into the box in the stacking order in which it had appeared. You also don’t have to worry about selecting other non-text elements because they won’t be pasted.

Continue reading