

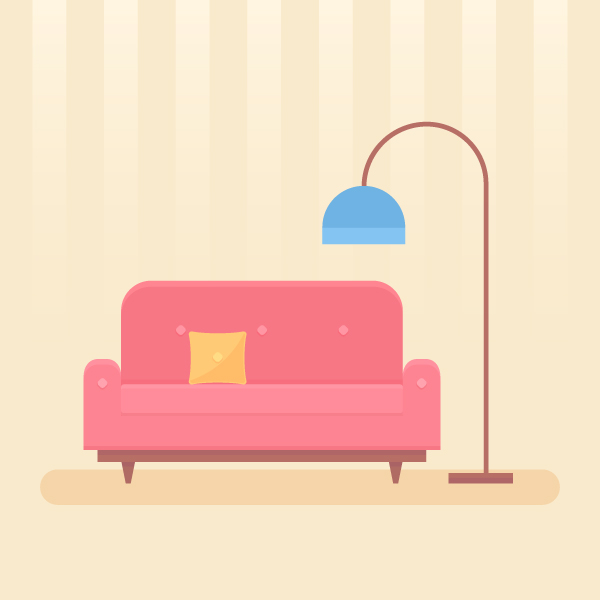
In this tutorial we’ll be designing a cozy interior scene with a sofa and a lamp. For this kind of illustrations in a flat style we’ll be modifying basic geometric shapes with the help of the most useful Adobe Illustrator tools. Such images are widely used in web design and mobile apps as they are simple and easy to perceive. Let’s get started!
Tutorial Details
- Program: Adobe Illustrator CS6 – CC
- Difficulty: Intermediate
- Topics Covered: Pathfinder Panel, Align Panel, Move Tool, Eraser Tool, Effect, Gradient Tool
- Estimated Completion Time: 20 minutes
Final Image: Cozy Interior Scene
Step 1
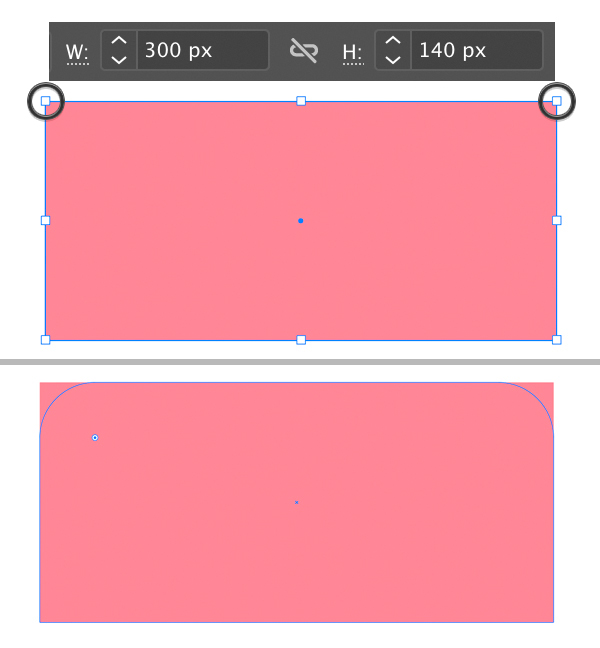
Let’s start with a larger element of the sofa. Take the Rectangle Tool (M) and make a 300 x 140 px pink shape.
Selects its top anchor points with the Direct Selection Tool (A) and make them rounded with the help of the Live Corners by pulling the circle marker next to any corner. You can also use the Corners feature in the control panel on top and enter the desired value manually.
Step 2
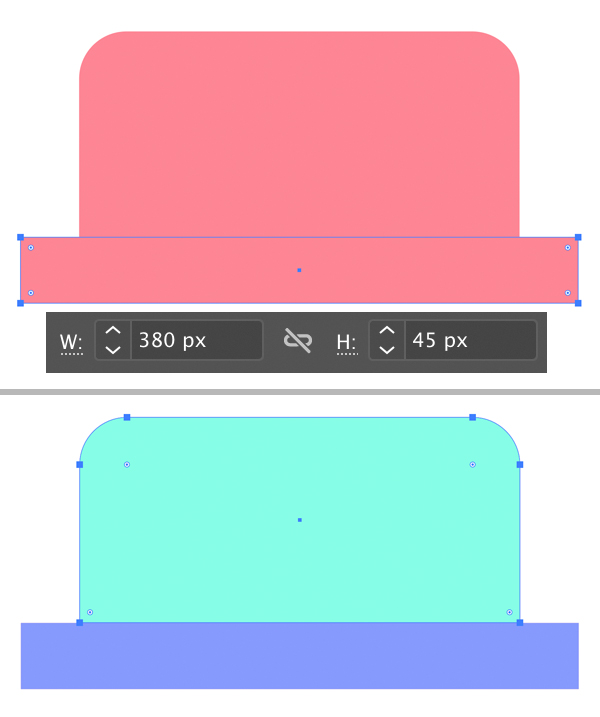
Create another rectangle of 380 x 45 px for the bottom perpendicular part of the sofa and attach it as shown in the image below.
Now we need to Duplicate (Control-C > Control-F) both parts. I’ve filled the copies with fancy color just to show that these are copies, not the initial pink shapes. We will use these copies to create the armrests of the sofa.
Step 3
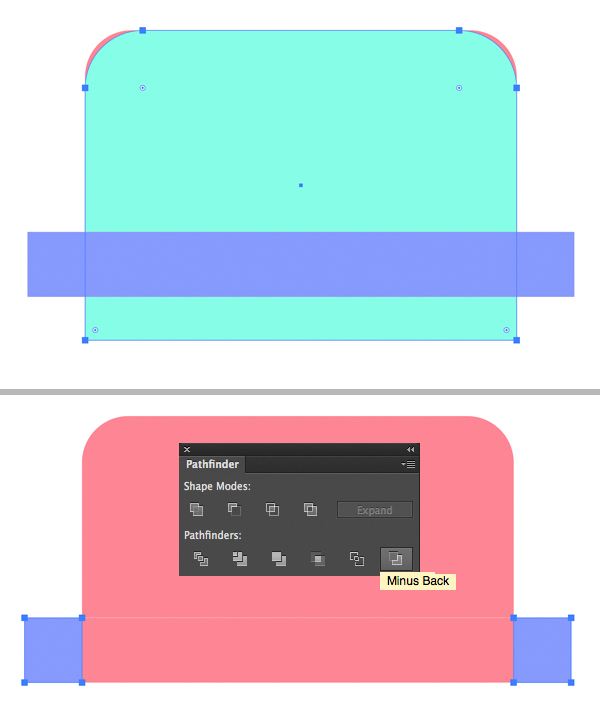
Now extend the larger shape down, so that it overlaps the narrower shape. Keeping both shapes selected, press Minus Back in the Pathfinder panel and – voila! – here we have the armrests.
Step 4
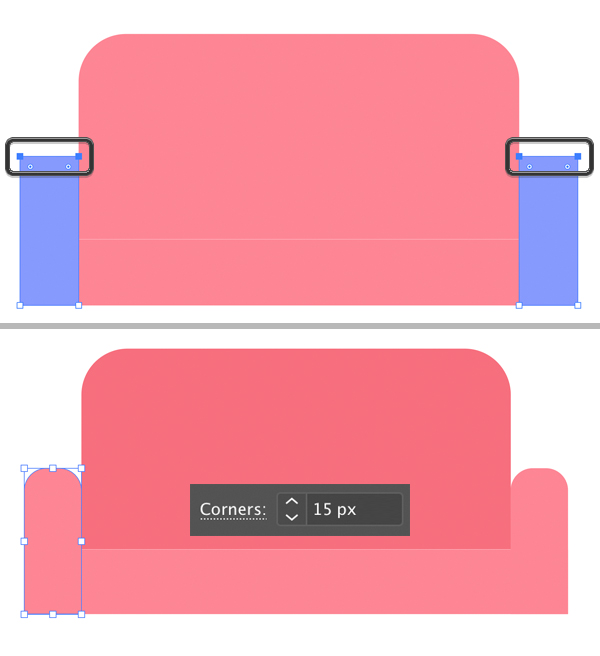
Let’s select the top anchor points of both armrests using the Direct Selection Tool (A) and drag them up to make the shapes taller.
And keeping those points selected and the Direct Selection Tool (A) active, make the upper corners slightly rounded. This time I’ve set the Corners value to 15 px instead of pulling the circle marker.
Step 5
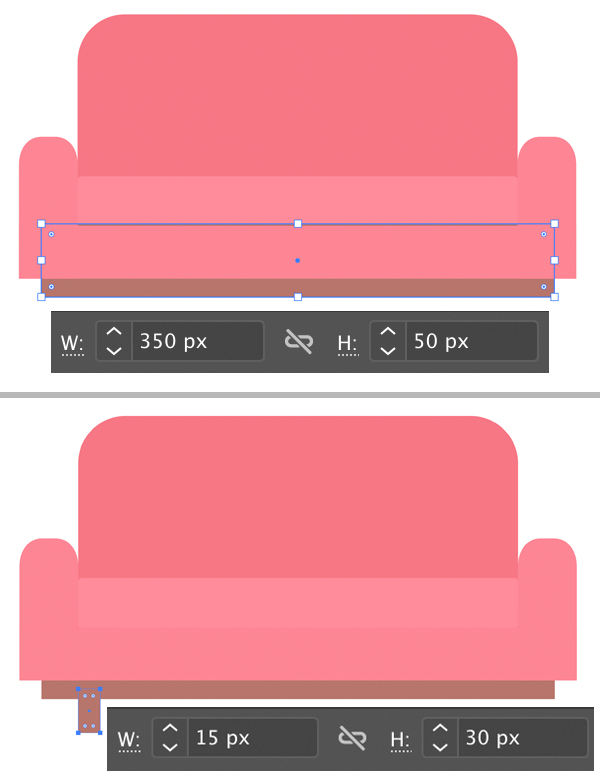
Now we’ll add the wooden base in the very bottom of the sofa. Let’s either copy the pink narrow shape or just create a new rectangle of 350 x 50 px and fill it with brown color. Press Shift-Control-[ to Send to Back.
Create another rectangle for the leg of our sofa and make it small (15 x 30 px). Place it perpendicular to the previous shape, as shown in the image below.
Step 6
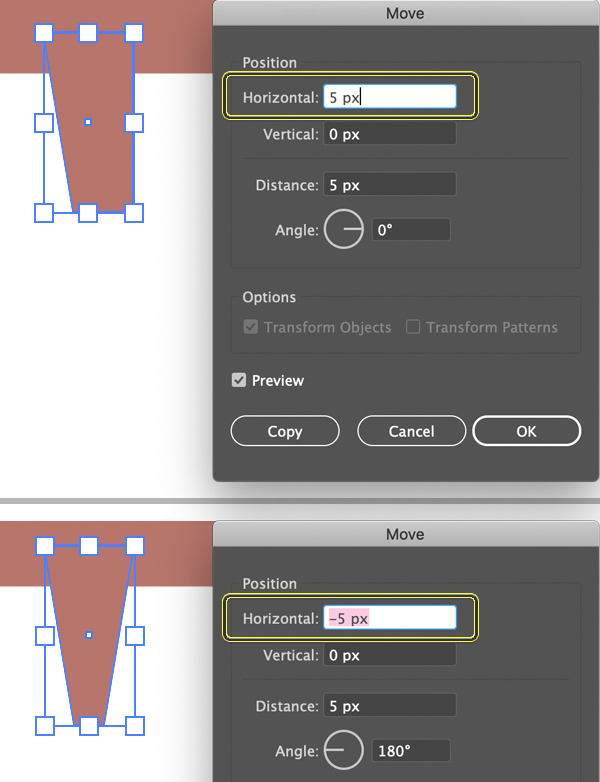
Select the bottom left corner of the leg with the Direct Selection Tool (A) and press Enter to open the Move options window. From here, set the Horizontal value to 5 px, Vertical value to 0 px and click OK.
Repeat the same for the right corner, but this time set the Horizontal value to -5 px to move the point in the opposite direction. This way we’re making the leg narrower in the bottom part to make it look more stylized.
Step 7
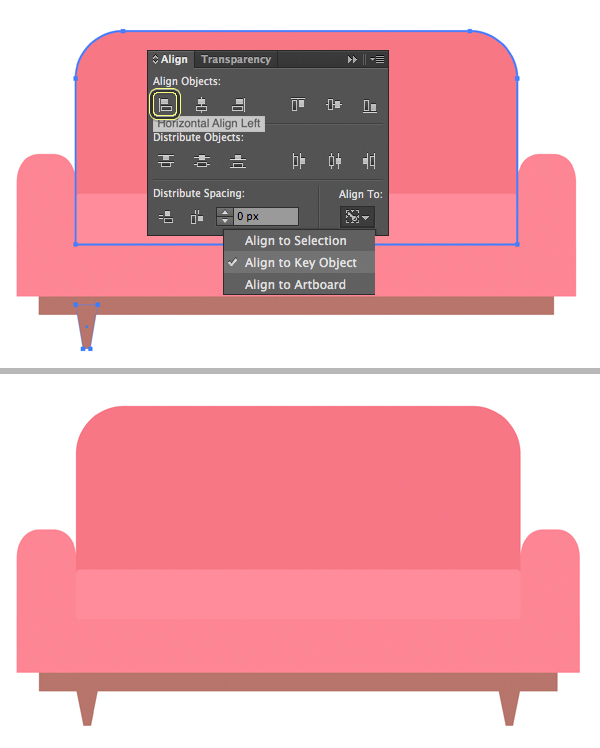
We need to make sure that the leg of the sofa is aligned to the back-rest (the larger piece of the sofa). Let’s select both shapes with the Selection Tool (V) and click the back-rest once again to make it a Key Object (you will notice the selection becomes thicker). Head to the Align panel (Window > Align) and make sure that the Align to Key Object is activated. Finally, click the Horizontal Align Left button – and there you have it! Perfectly aligned.
Duplicate (Control-C > Control-F) the leg and move the copy to the opposite side of the sofa, this time using the Horizontal Align Right function of the Align panel.
Step 8
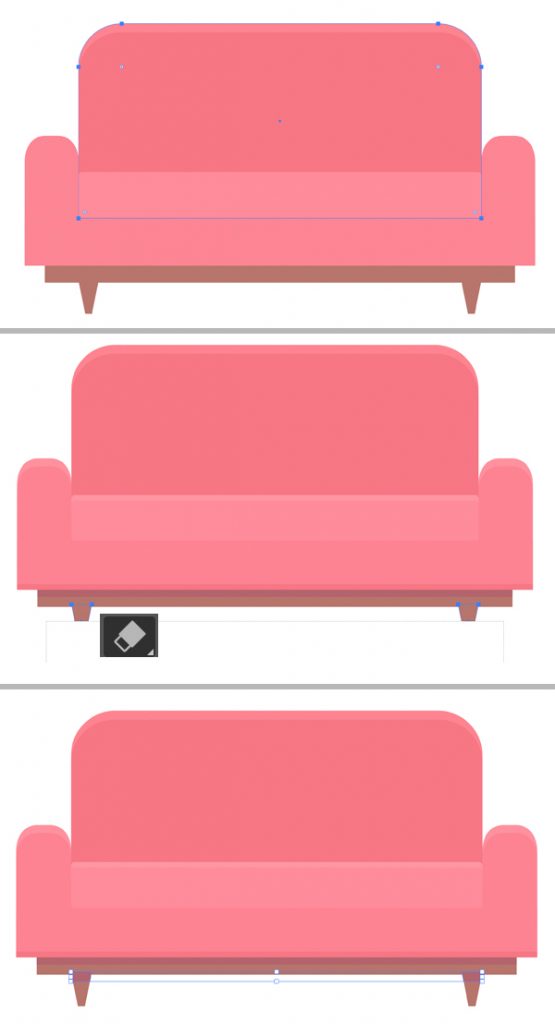
Let’s add some details to our image to make it slightly more dimensional yet preserving the flat style.
Duplicate (Control-C > Control-F) the back-rest and make the front shape slightly shorter (or the back copy slightly taller). Make the color of the taller shape lighter to depict a highlight along the top edge of the sofa.
Use the same method to add highlights and shadows to other parts of the sofa. As for the legs, since they are not perfectly straight, let’s use another method to make the top part slightly darker. Duplicate (Control-C > Control-F) the legs and select the top copies. Take the Eraser Tool (Shift-E), hold down Alt and drag the selection to cover the bottom part of the legs that you want to erase. Fill the remaining elements with a darker color for the shadow.
Step 9
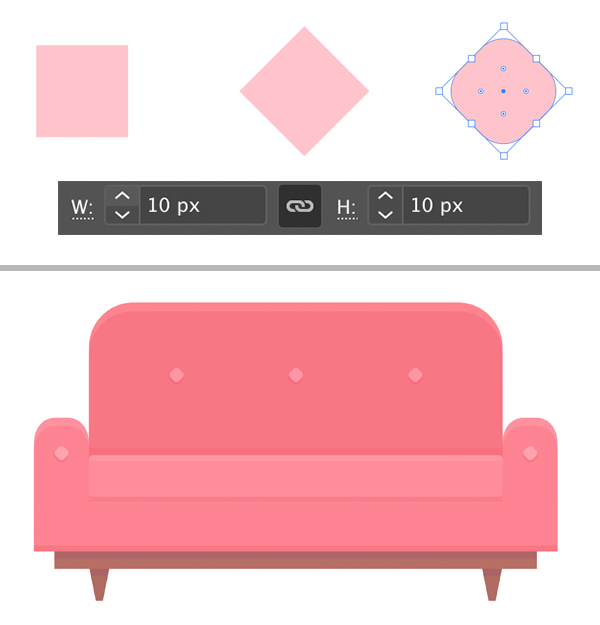
We’re almost down with the sofa! Let’s add some minor decorative details to it. Use the Rectangle Tool (M) and hold down Shift to create a 10 x 10 px small pink square.
Rotate it 45 degrees and make the corners slightly rounded (don’t make them completely round in order not to turn the shape into a circle).
Place the created element on the armrests and the back-rest of the sofa. We can Group (Control-G) these pieces, Copy (Control-C) them and Paste in Back (Control-B). Move the created group of copies down a bit and fill them with a darker pink color to create a shadow casted by the decorative elements.
Now the sofa looks completed! Let’s move on to the next element of our interior scene.
Step 10
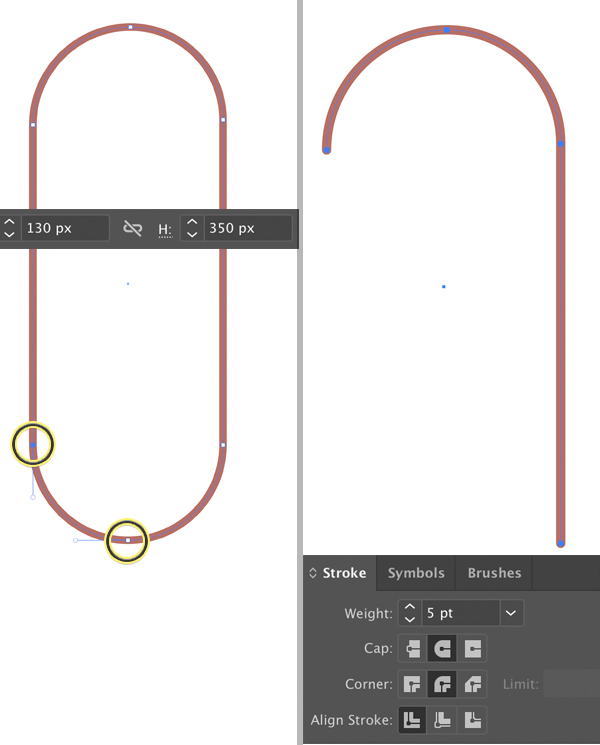
Let’s create a lamp, starting from a 130 x 350 px rectangle with fully rounded corners. Set the Fill color to None and the Stroke color to brown in the Color panel. Open the Stroke panel (Window > Stroke) and set the Weight to 5 pt, Cap to Round Cap.
Select two points in the bottom of the shape with the Direct Selection Tool (A) (I’ve marked those points in the image below) and press the Delete key to remove the parts of the rectangle connected to these points. Now we have this hook shape.
Step 11
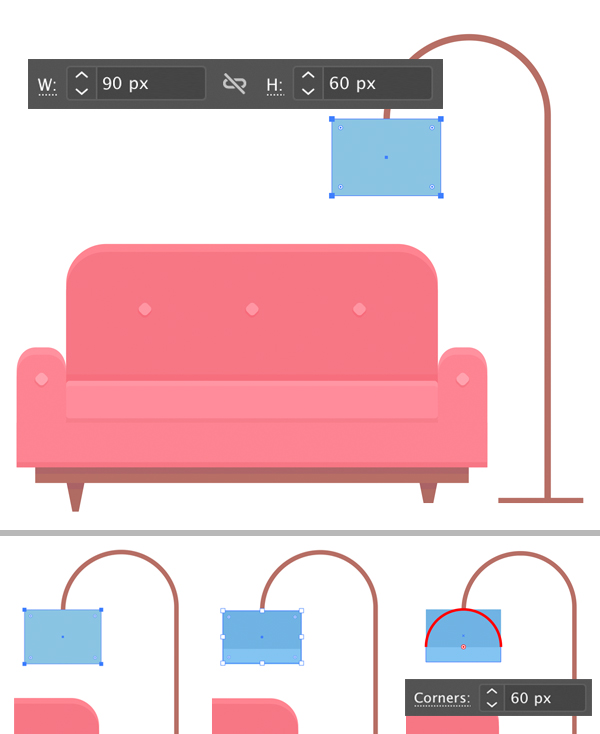
Use the Rectangle Tool (M) to add a narrow shape in the bottom of the hook for the stand of our floor-lamp.
Then let’s use the same tool for the lamp shade. Create a 90 x 60 px blue rectangle and attach it to the hook part.
I’ve duplicated the shape and shortened the rectangle to make a decorative stripe in the bottom part of the lamp shade.
Make the top part of the lamp shade fully rounded with the help of the Direct Selection Tool (A) and Live Corners.
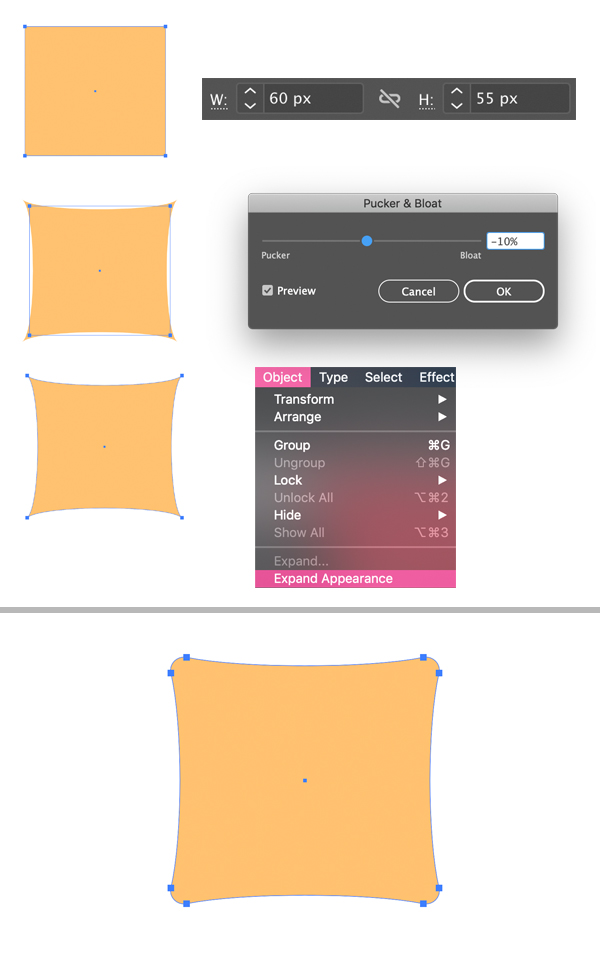
Step 12
Our scene looks almost complete but still lacks one small detail that adds a lot to the coziness of any interior. Let’s draw a small lovely pillow for the sofa!
Start by making a 60 x 55 px yellow rectangle. Keeping the shape selected go to Effect > Distort & Transform > Pucker & Bloat, move the slider to –10% and click OK.
Then Object > Expand Appearance to apply the effect.
Make the corners slightly rounded with the Live Corners feature.
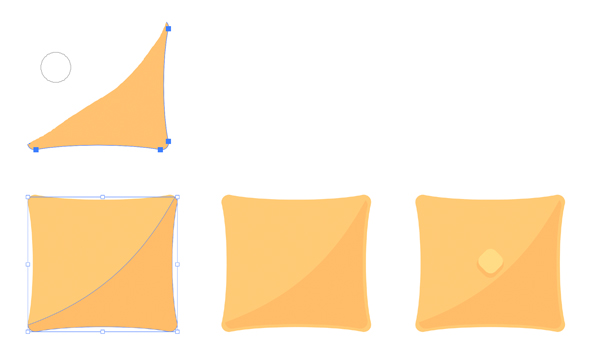
Step 13
Let’s add some tiny details to the pillow. First of all, duplicate the pillow and use the Eraser Tool (Shift-E) to erase the top right half of the copy. Make the remaining copy slightly smaller and fill it with a darker color.
Finish up with the pillow by adding a decoration element in the center (the same as we did for the sofa).
Step 14
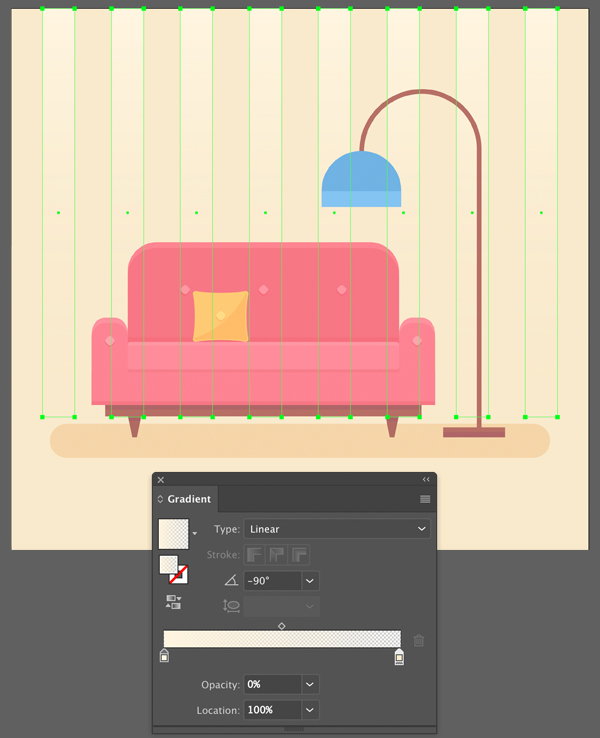
Now we can bring everything together and make the composition look finished by adding a simple shadow on the floor and some stripes to fill the background.
I’ve created one stripe using the Rectangle Tool (M), copied it by holding down Alt-Shift and moving the copy to the side. Finally, I’ve pressed Control-D a few more times to repeat the last action, adding more stripes.
I’ve used the Gradient Tool (G) and the Gradient panel to make the stripes semi-transparent so that they blend nicely with the background. To do this, select lighter colours in the Gradient panel and set the Opacity of one of the tips of the gradient to 0%. Now you can apply a vertical gradient to the stripes by using the Gradient Tool (G) while holding down Shift.
Our Cozy Interior Scene is Finished!
Good work! I hope you’ve enjoyed following these simple steps and discovered something new for your future designs.
Feel free to add more objects to the scene using the techniques that we’ve learned.
Have fun, take care and stay safe!
Author: Yulia Sokolova
2D/3D artist and tutorial instructor, focusing on character creation, icons, lettering design, and illustrations.


I think other web site proprietors should take this website as an model, very clean and fantastic user friendly style and design, as well as the content. You are an expert in this topic!
Thanks so much for providing individuals with remarkably terrific chance to read from this website. It really is very nice plus jam-packed with a good time for me personally and my office acquaintances to search your blog minimum 3 times in 7 days to read through the newest stuff you will have. And of course, I am also usually motivated with all the unbelievable principles served by you. Selected 3 tips in this posting are absolutely the very best I have had.
Major thanks for the blog.Really thank you! Awesome.
I truly appreciate this post. I ave been looking everywhere for this! Thank goodness I found it on Bing. You have made my day! Thx again
Thanks….useful for me.