 In the following tutorial, you will learn how to create a grungy web badge in Adobe Illustrator. For starters you will learn how to setup a simple grid and how to easily center the starting shapes using the Align panel. Next, taking full advantage of the Appearance panel and using some basic masking and vector shape building techniques, you will learn how to create the two main shapes. Moving on, using a built-in art brush and some new masking techniques, you will learn how to add a that grungy effect. Using some Type tools along with several Drop Shadow effects, you will learn how to add the text. Finally, you can learn how to easily recolor your entire web badge.
Tutorial Details
- Program: Adobe Illustrator CS5
- Difficulty: Beginner-Intermediate
- Topics Covered: Basic Tools and Effects, Masking techniques, Type Tools and the Appearance panel
- Estimated Completion Time: 45 minutes
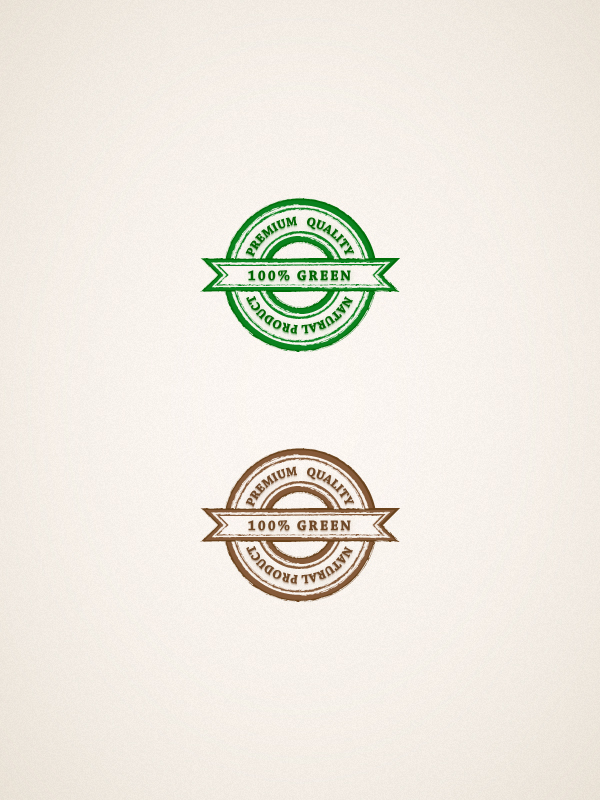
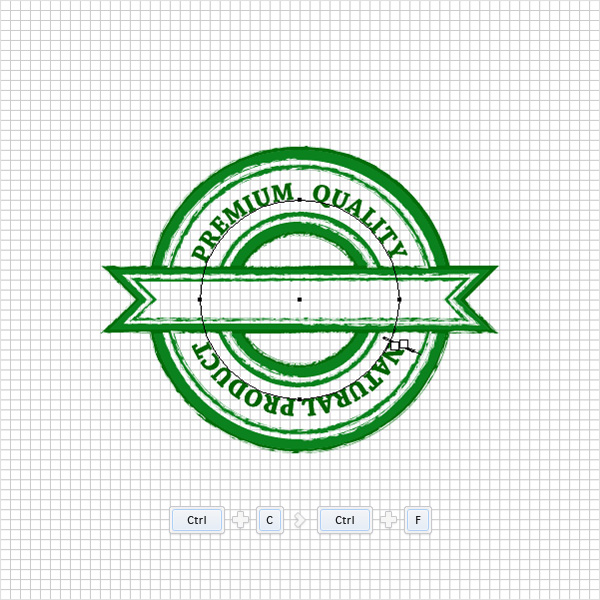
Final Image
As always, this is the final image that we’ll be creating:
Step 1
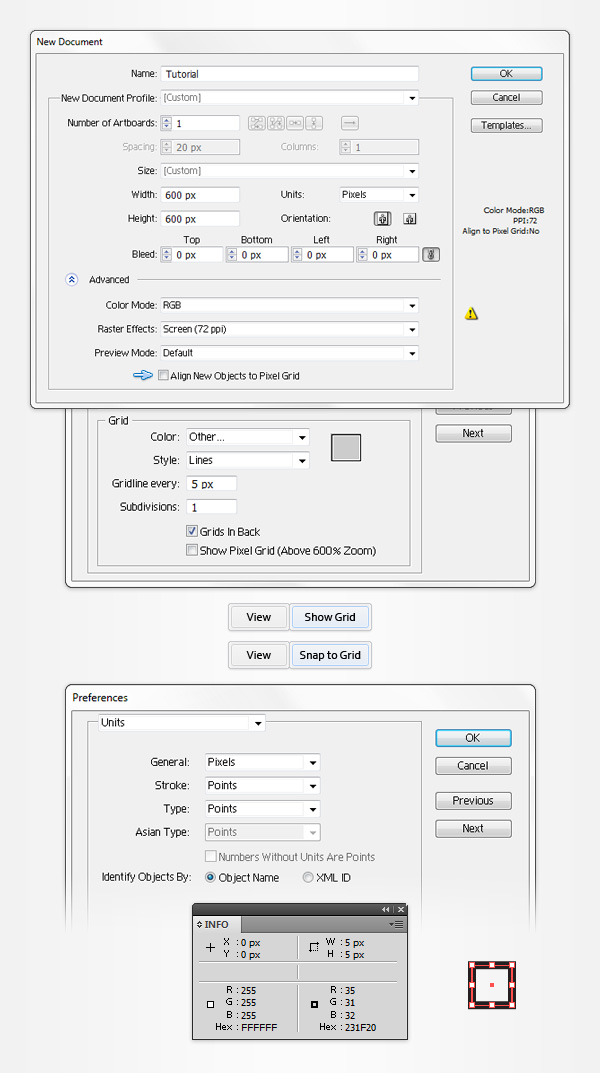
Hit Command + N to create a new document. Enter 600 in the width and height boxes then click on the Advanced button. Select RGB, Screen (72ppi) and make sure that the Align New Objects to Pixel Grid box is unchecked before you click OK. Enable the Grid (View > Show Grid) and the Snap to Grid (View > Snap to Grid). You will need a grid every 5px, so simply go to Edit > Preferences > Guides > Grid, enter 5 in the Gridline every box and 1 in the Subdivisions box. You should also open the Info panel (Window > Info) for a live preview with the size and position of your shapes. Do not forget to set the unit of measurement to pixels from Edit > Preferences > Units > General. All these options will significantly increase your work speed.
Step 2
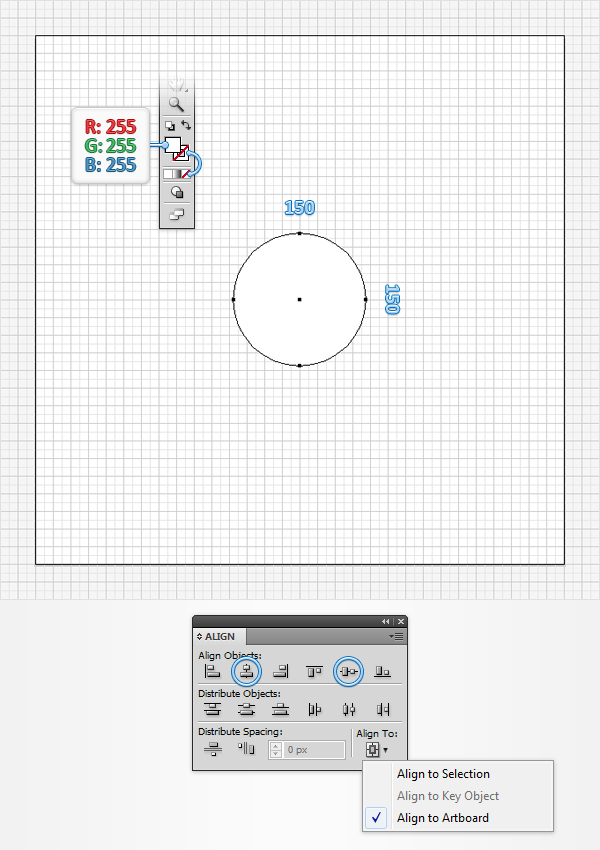
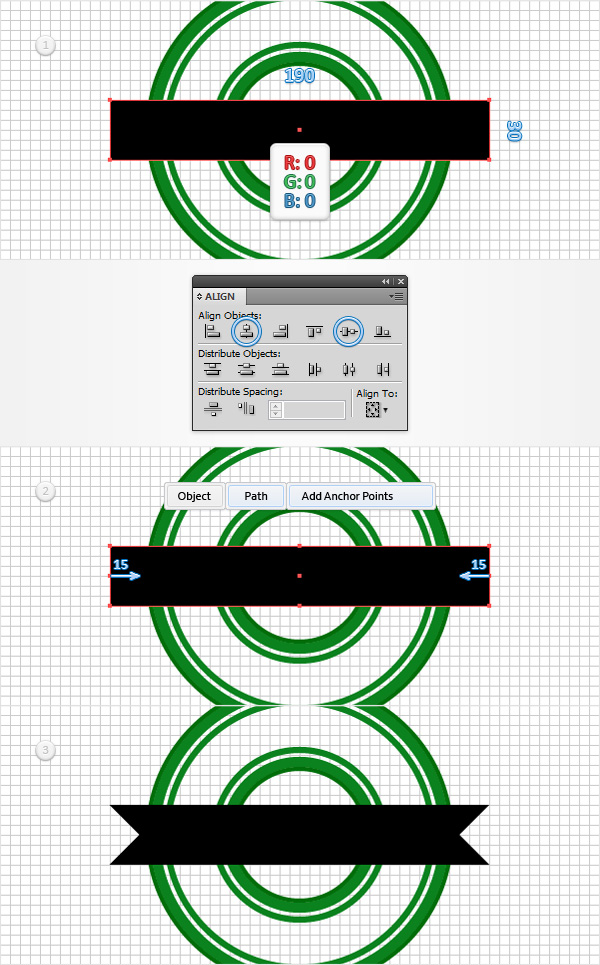
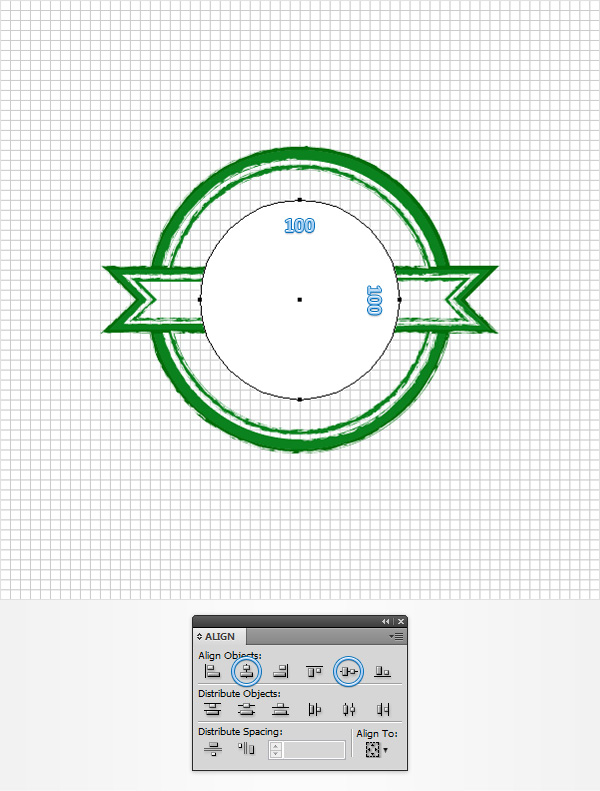
Pick the Ellipse Tool (M) and focus on your Toolbar. Remove the color from the stroke then select the fill and set its color at R=255 G=255 B=255 (white). Move to your Artboard and simply create a 150px circle, the Snap to Grid should ease your work. Next, you need to center this white shape. Select it and open the Align panel (Window > Align). Set the aligning to Artboard then simply click the Horizontal Align Center and Vertical Align Center buttons. In the end, your white circle should be centered as shown in the following image.
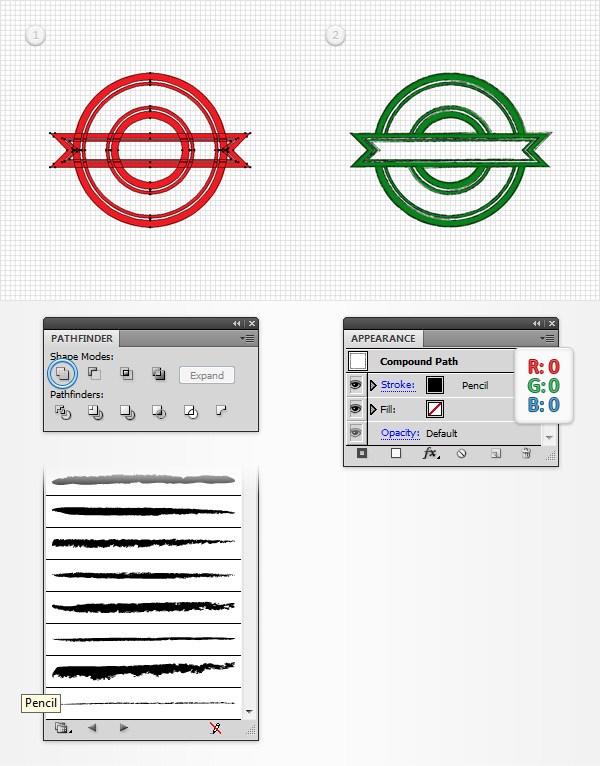
Step 3
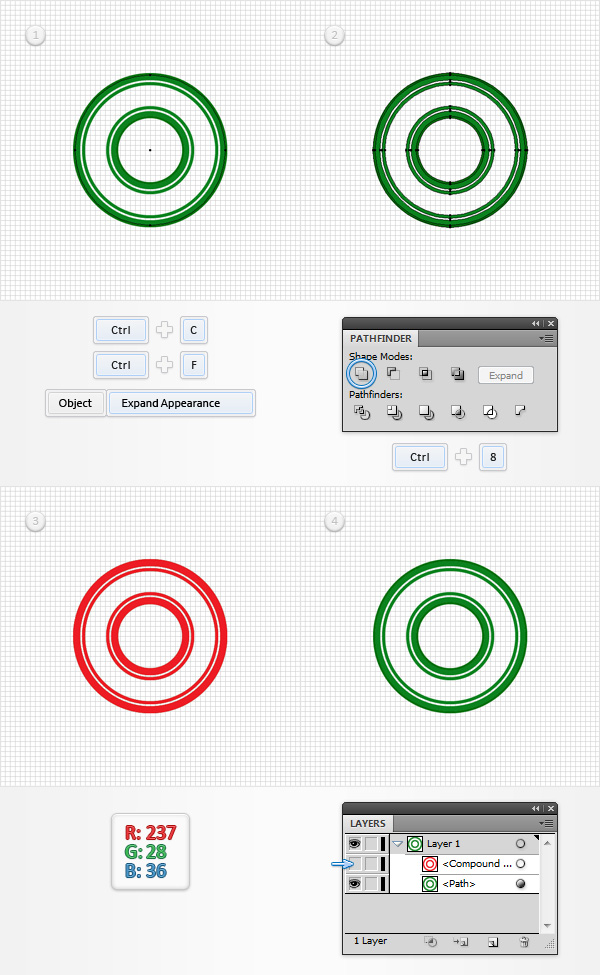
Make sure that your white circle stays selected and focus on the Appearance panel (Window > Appearance). Remove the color from the fill and add a 5pt stroke. Align it to inside, set the color at R=11 G=130 B=30, then add a second stroke using the Add New Stroke button (pointed by the little, blue arrow in the following image). Select this new stroke, make sure that the color is set at R=11 G=130 B=30, set the weight at 3pt, align it to inside and go to Effect > Path > Offset Path. Enter a -7px Offset, click OK and return to the Appearance panel. Add a third stroke for this shape and select it. Again, make sure that the color is set at R=11 G=130 B=30, set the weight at 3pt, align it to inside and go to Effect > Path > Offset Path. Enter a -31px Offset, click OK and get back to the Appearance panel. Add a fourth stroke for this circle and select it. Once again, make sure that the color is set at R=11 G=130 B=30, set the weight at 5pt, align it to inside and go to Effect > Path > Offset Path. Enter a -36px Offset, click OK and focus again on the Appearance panel. Add a fifth stroke and select it. Make it 2pt wide, set the color at R=0 G=110 B=10 and align it to outside. Keep focusing on the Appearance panel, add one final stroke for your circle and select it. Make sure that the color is set at R=0 G=110 B=10, set the weight at 2pt, align it to outside and go to Effect > Path > Offset Path. Enter a -43px Offset and click OK. In the end, things should look like in the following image.

Step 4
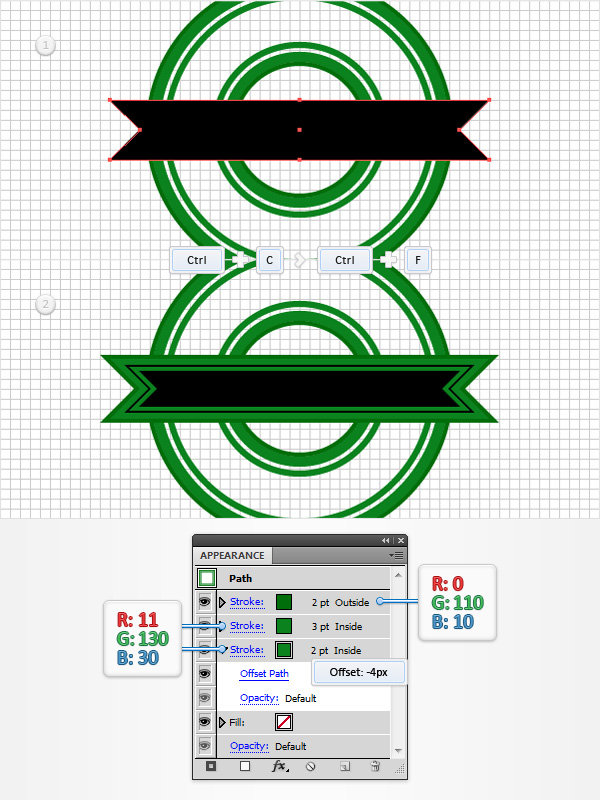
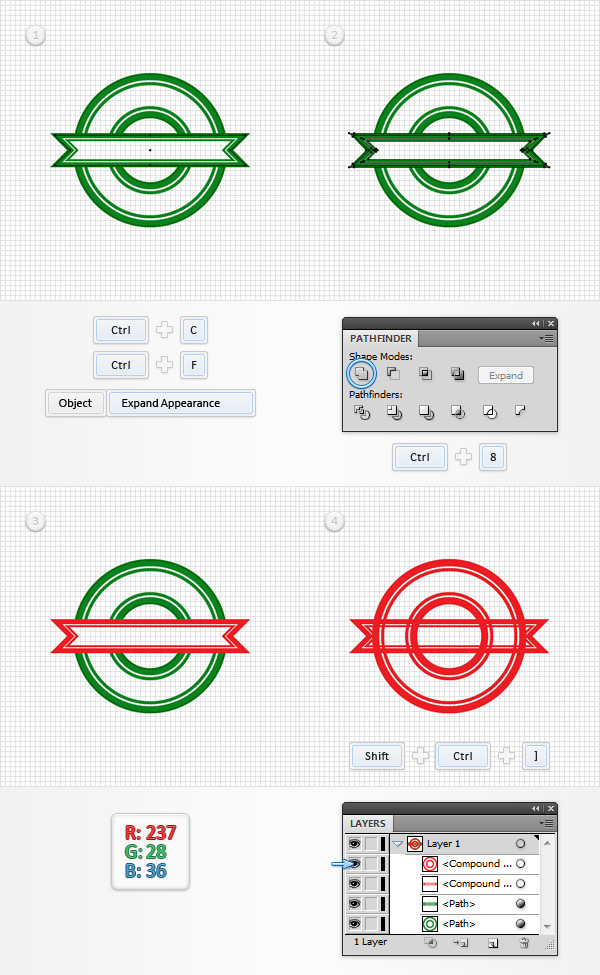
Make sure that your circle is still selected and make a copy in front (CTRL + C > CTRL + F). Select this copy and go to Object > Expand Appearance. Select the resulting group of shapes, open the Pathfinder panel (Window > Pathfinder), click the Unite button then hit CTRL + 8 (or go to Object > Compound Path > Make) to turn the resulting shapes into a simple compound path. Select this new compound path, set the fill color at R=237 G=28 B=36, then move to the Layers panel (Window > Layers) and make it invisible by clicking on that little eye icon.
Step 5
Using the Rectangle Tool (M), create a 190 x 30px shape, fill it with black and and center it using the Horizontal Align Center and Vertical Align Center buttons from the Align panel. Make sure that this black rectangle is selected and go to Object > Path > Add Anchor Points to add four new anchor points. Grab the Direct Selection Tool (A), select the left, new anchor point and drag it 15px to the right. Then select the right, new anchor point and drag it 15px to the left. In the end, your black shape should look like the third web badge image.
Step 6
Make sure that your black banner shape is still selected and make a copy in front (CTRL + C > CTRL + F). Select this copy and focus on the Appearance panel. Remove that black from the fill, add a 2pt stroke and select it. Set the color at R=11 G=130 B=30, align it to inside and go to Effect > Path > Offset Path. Enter a -4px Offset, click OK and return to the Appearance panel. Add a second stroke for this shape and select it. Make sure that the color is set at R=11 G=130 B=30, set the weight at 3pt and align it to inside. Keep focusing on the Appearance panel, add a third stroke and select it. Set the color at R=0 G=110 B=10, make it 2pt wide and align it to outside.
Step 7
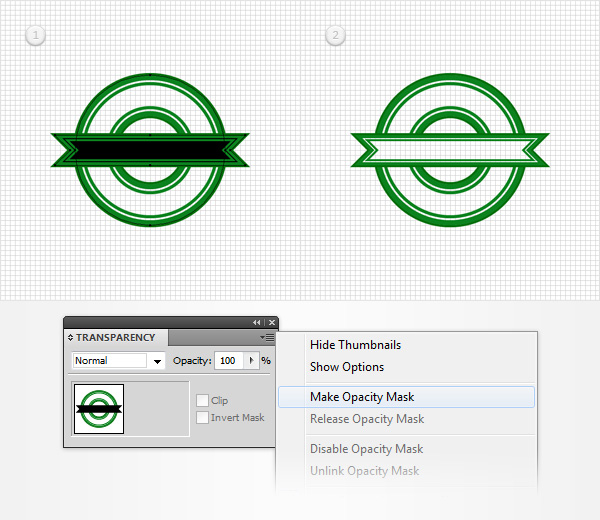
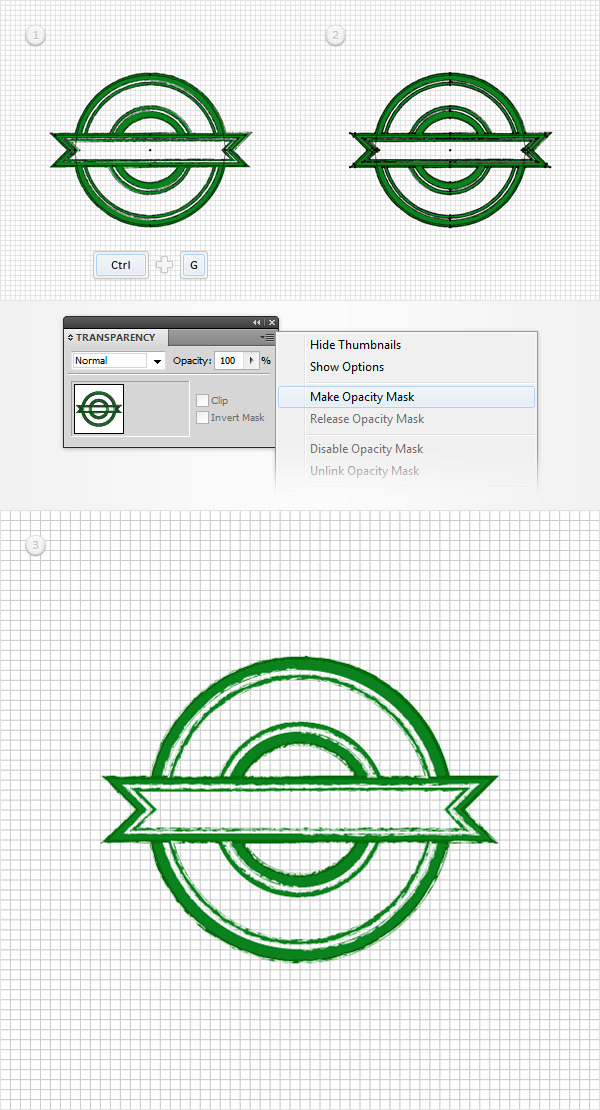
Select the remaining black shape along with the circle, open the fly-out menu of the Transparency panel (Window > Transparency) and go to Make Opacity Mask. Keep focusing on the Transparency panel and uncheck that Clip box. In the end, your masked circle should look like the second web badge image.
Step 8
Reselect that irregular polygon shape and make a copy in front (CTRL + C > CTRL + F). Select this copy and go to Object > Expand Appearance. Make sure that the resulting group of shapes is selected, click the Unite button from the Pathfinder panel then hit CTRL + 8 (or go to Object > Compound Path > Make). Fill this new compound path with R=237 G=28 B=36 and move to the Layers panel (Window > Layers). Turn on the visibility for the other red compound path, select it and bring it to front (Shift + CTRL + ] ).
Step 9
Reselect both red compound paths and click the Unite button from the Pathfinder panel. You will need a build in art brush for this new compound path. Open the Brushes panel (Window > Brushes), open the fly-out menu and go to Open Brush Library > Artistic > Artistic_ChalkCharcoalPencil. Take a look inside this new panel and find the Pencil art brush. Reselect your red compound path and focus on the Appearance panel. Remove the color from the fill then select the stroke, add that Pencil brush and set its color to black.
Step 10
Reselect the two shapes with the green strokes and Group them (CTRL + G). Select this new group along with the compound path made in the previous step, open the fly-out menu of the Transparency panel and go to Make Opacity Mask. Don’t forget to uncheck the Clip box. In the end, your masked group should look like the following web badge image.
Step 11
Using the Ellipse Tool (M), create a 100px circle, fill it with a random color and center it using the Horizontal Align Center and Vertical Align Center buttons from the Align panel.
Step 12
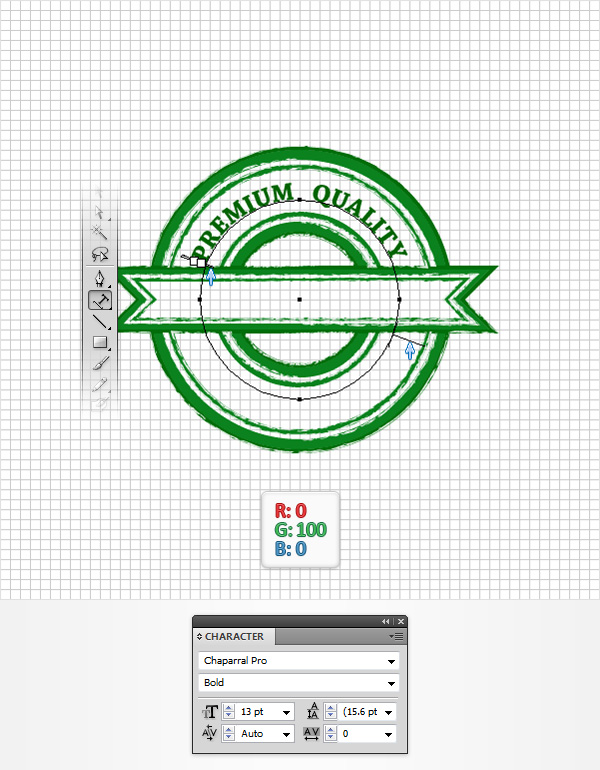
Pick the Type on a Path Tool, then simply click on the edge of the circle made in the previous step and add the “PREMIUM QUALITY” piece of text. Use the Chaparral Pro font, set the style at bold, the size at 13pt and the color at R=0 G=100 B=0. Grab the Selection Tool (V) (or the Direct Selection Tool (A)) and simply drag those perpendicular lines (pointed by the little, blue arrows in the following image) to rotate your text.
Step 13
Duplicate the piece of text added in the previous step (CTRL + C > CTRL + F). Rotate it as shown in the following image and simply replace the existing text with “NATURAL PRODUCT“.
Step 14
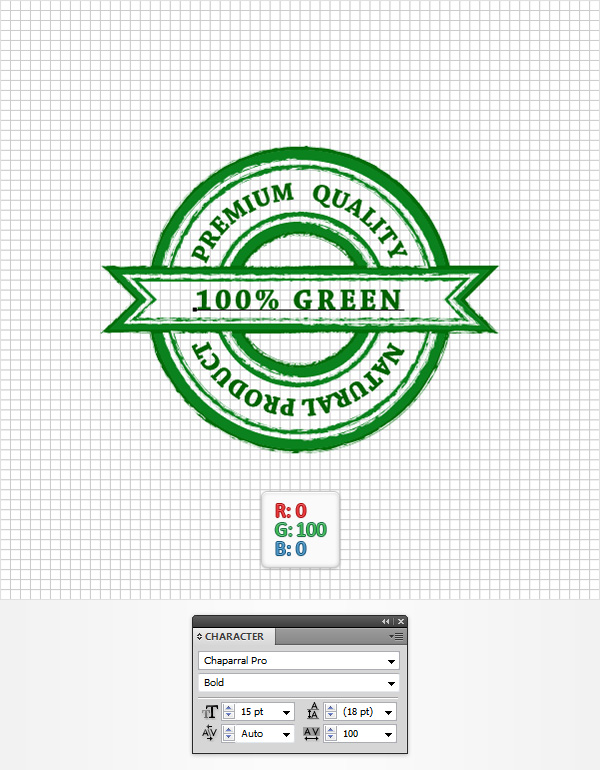
Using the Type Tool (T), add the “100% GREEN” piece of text and place it as shown in the following web badge image. Use the Chaparral Pro font, make it bold, set the size at 15pt and the tracking at 100 then make sure that the color is set at R=0 G=100 B=0.
Step 15
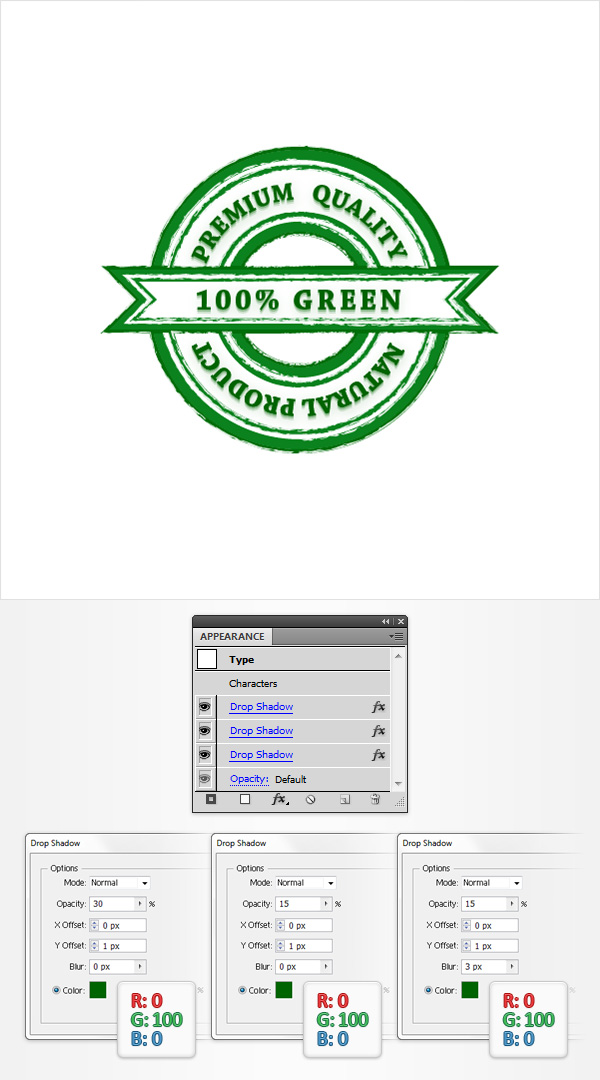
Disable the Grid (View > Hide Grid) and the Snap to Grid (View > Snap to Grid). Select all three pieces of text and go to Effect > Stylize > Drop Shadow. Enter the properties shown in the left window (in the following image), click OK and go again to Effect > Stylize > Drop Shadow. Enter the properties shown in the middle window (in the following web badge image), click OK and go once again to Effect > Stylize > Drop Shadow. Enter the properties shown in the right window and click OK. In the end things, should look like in the following image.
Step 16
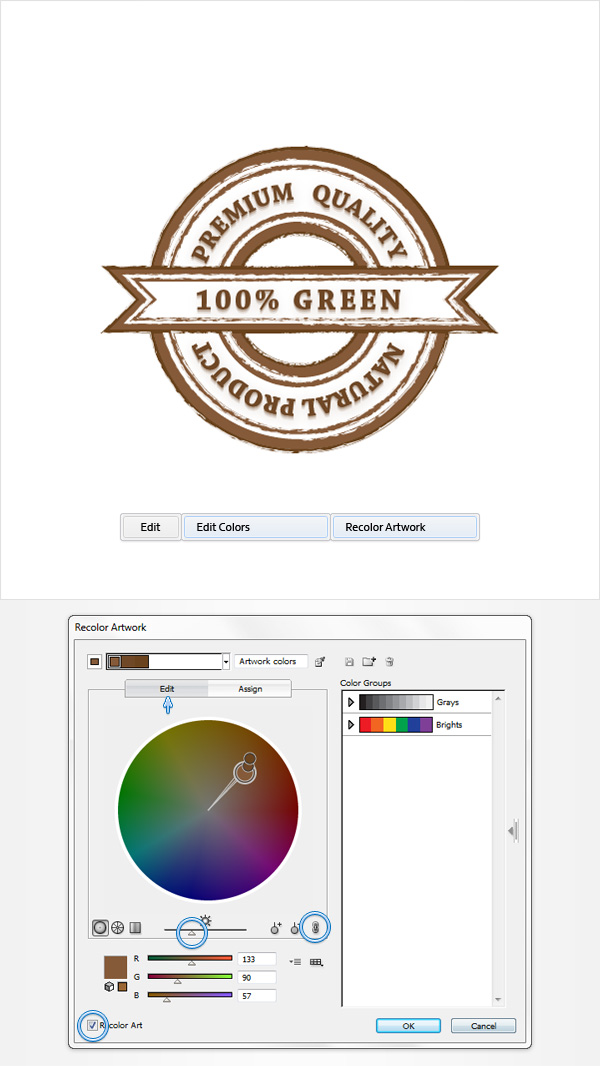
Finally, here’s how you can easily recolor the entire web badge. Select all the stuff that you made so far and go to Edit > Edit Colors > Recolor Artwork. Go to the Edit section, make sure that the Recolor Artwork box and the Link harmony colors button are checked, then simply play with the Brightness slider and the color handles. There are countless possibilities for your grungy web badge.
And We’re Done!
I hope you’ve enjoyed this tutorial and can apply these techniques in your future projects.

Author:Andrei Marius
Andrei Marius is a self taught vector artist who is trying to make a living doing something that he likes. He spends most of his time working in Adobe Illustrator, trying to avoid the Pen Tool. You can find most of his vector experiments at this little website dedicate to Illustrator VforVectors.


Hi! I’ve been reading your site for a long time
now and finally got the bravery to go ahead and give you a
shout out from Porter Texas! Just wanted to tell you keep up the excellent work!
Hi
thanks for the tuts also I’m having some difficulties in step 9 when I need to unite the two compound red shapes. The result of this union isn’t the same as yours…I don’t get why, in your case, the inside of the polygone is blank and not fill with circles parts…
This happens to me too. I don’t know how to make it right. Somone who can explain?
Hi,
I also had some troubles substracting the two red figures. So I made them again following the steps for the green one. In the end everything worked fine and I love how easily I can change the color. Thanks for this tutorial.
At the bottom of my following blog-page you can see my result: http://maifraeulein.wordpress.com/about/
Just started trying this and am running into a problem with Step 4 where I get a fill in the inner part (rather than keeping the individual lines) when I expand appearance. Any idea what I am doing wrong?
Hi Leslie! Be sure you’re selecting the circle prior to going to Object > Expand Appearance. Then, focus on the Appearance panel to make sure that you have no color set for the fill.
The steps given are great but is there any one that does this professionally I could buy to do it for our site called http://www.upscalestripper.com . We would love to offer this with someones help. Cheers!
That was probably one of the most difficult and complicated tutorials I’ve ever encountered. Selecting the irregular polygon and trying to make a copy and turn it red didn’t work. After a certain point I could no longer align anything. This turned out to be a huge exercise in frustration!
What steps are you having trouble from?
Here is my version of this tutorial. Thx.
http://imageshack.com/scaled/large/819/fo39.jpg
wow..thanks for the great tut ^_^