 This is the second edition in a two-part series on how to Create a Wacom Bamboo Tablet and Pen. In case you missed it, here’s part I of this series where we learned how to make the Wacom tablet in this illustration.
In part II, you will learn how to create a realistic Wacom Bamboo Tablet Pen in Adobe Illustrator. You will find out how to add shadows and highlights to your Wacom Tablet Pen using different Blending Modes, how to use the Round Any Corner Script and Gradient Mesh. Let’s begin!
Tutorial Details
- Program: Adobe Illustrator CS5 – CC
- Difficulty: Beginner-Intermediate
- Topics Covered: Gradient Tool, Basic Tools and Effects, Transform techniques and the Appearance panel, Scripts, Patterns, Gradient Mesh.
- Estimated Completion Time: 1 hour
Final Image
This is the final image that we’ll be creating at the end of Part II: 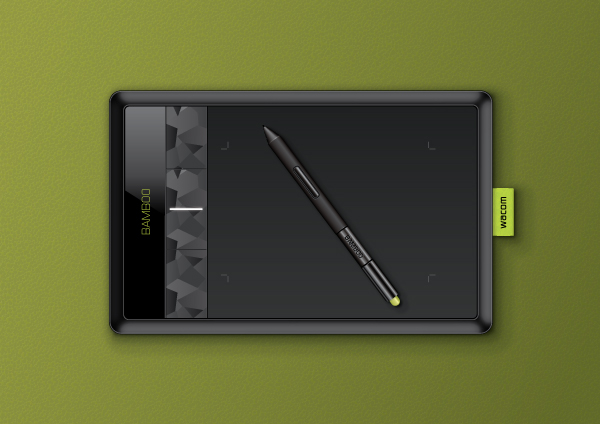
Step 1
Open Adobe Illustrator and create a new document (Ctrl + N). Select CMYK Color Mode, 300 PPI Raster Effects and make sure that Align New Objects to Pixel Grid is unchecked.
Next, go to Edit > Preferences > General and set the Keyboard Increment to 1px. 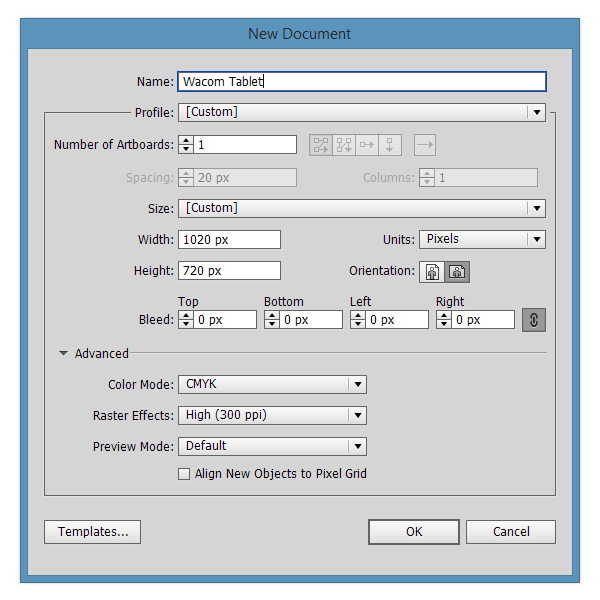
Step 2
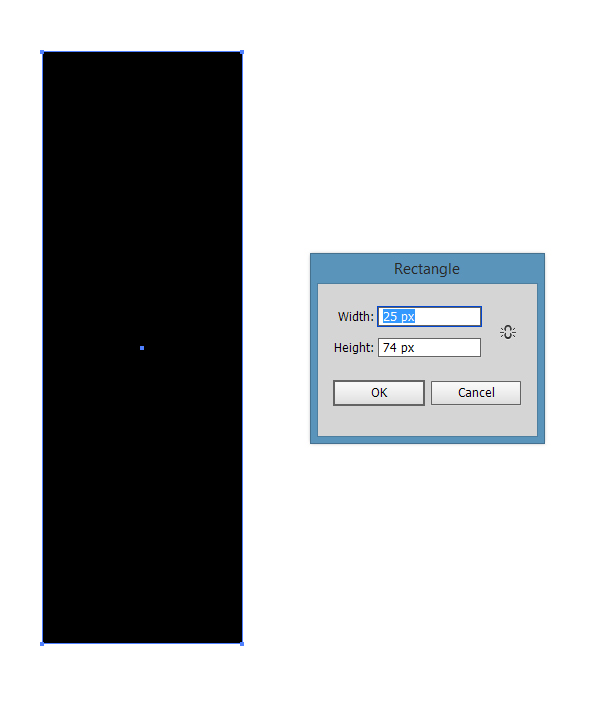
Pick the Rectangle Tool (M) and draw a 25 x 74px rectangle.
Step 3
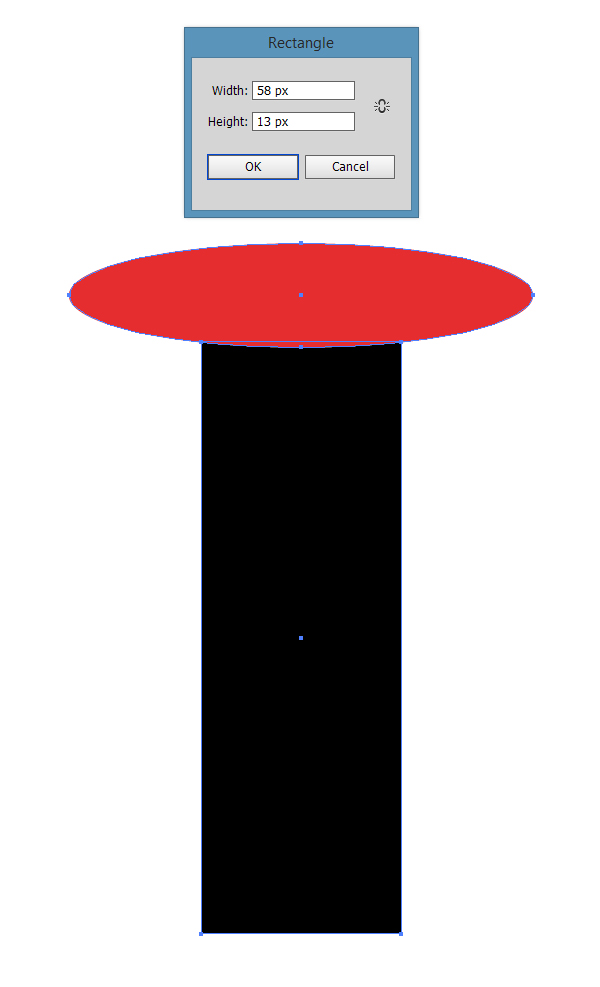
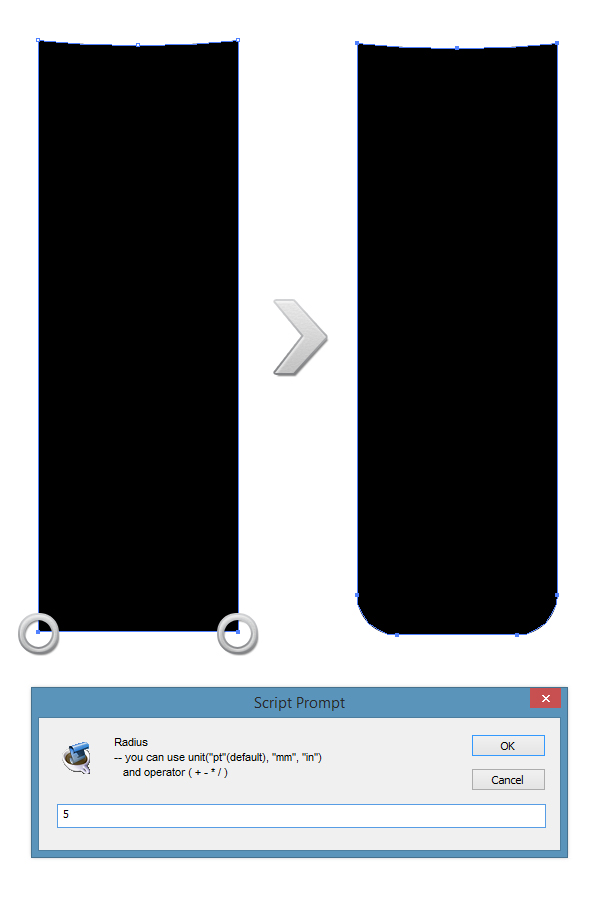
Pick the Elipse Tool (L) and draw a 58 x 13px elipse and align it as in the image below.
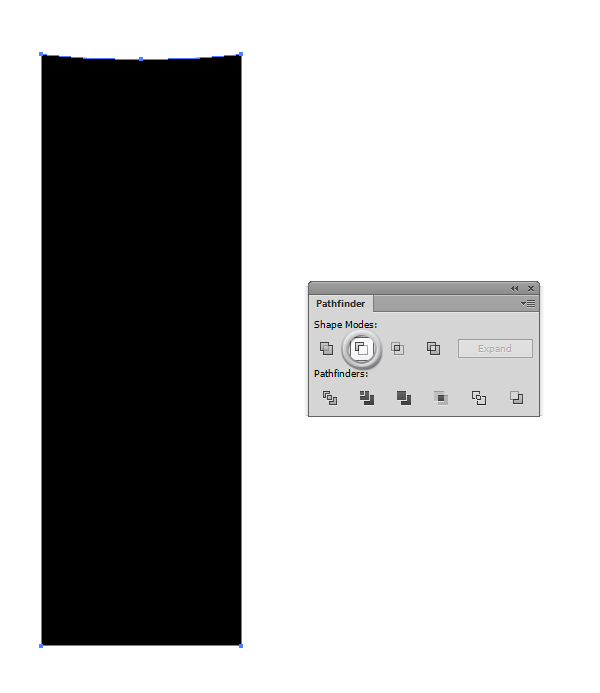
Now select both the rectangle and the elipse and from the Pathfinder Panel (Window > Pathfinder) hit the Minus Front button.
Step 4
For this step, you’ll need the Round Any Corner script. You can find it in this article 20 Free and Useful Adobe Illustrator Scripts. Save it to your hard drive, return to Illustrator and grab the Direct Selection Tool (A). Select only the anchor point highlighted in the image and go to File > Scripts > Other Script. Open the Round Any Corner script, enter a 5px radius and click OK.
Step 5
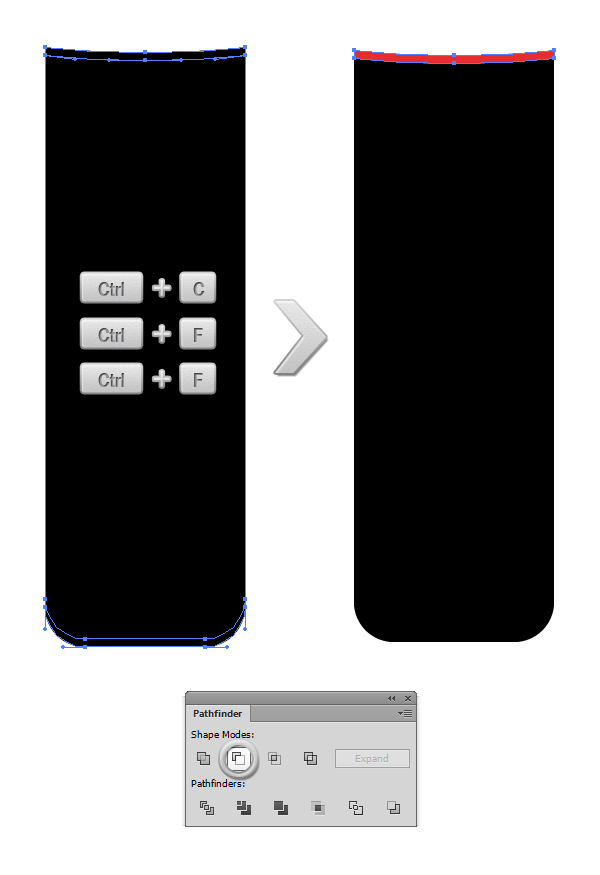
Select the initial shape and make two copies in front of it (Ctrl + C > Ctrl + F > Ctrl + F). Select the shape that is on top of the others, and with your keyboard arrows, move it 1px down. Select both copies and click the Minus Front button from the Pathfinder Panel (Window > Pathfinder).
Step 6
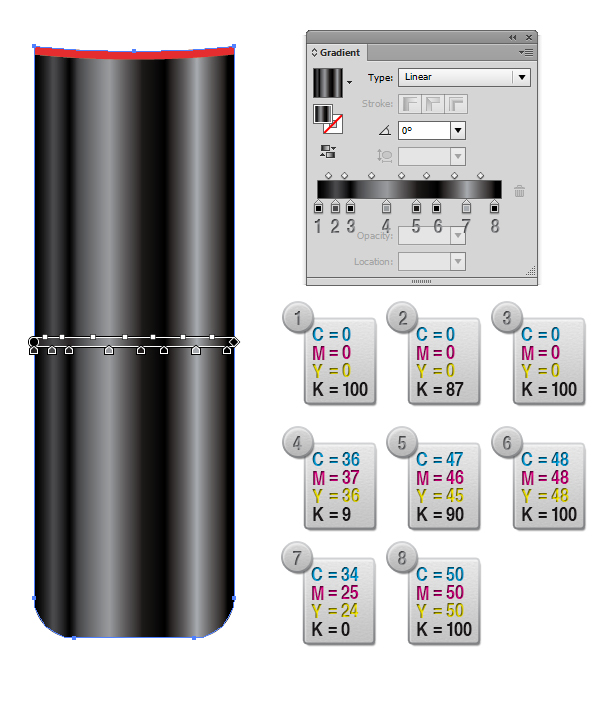
Select the big shape and fill it with a multicolor linear Gradient (Window > Gradient).
Step 7
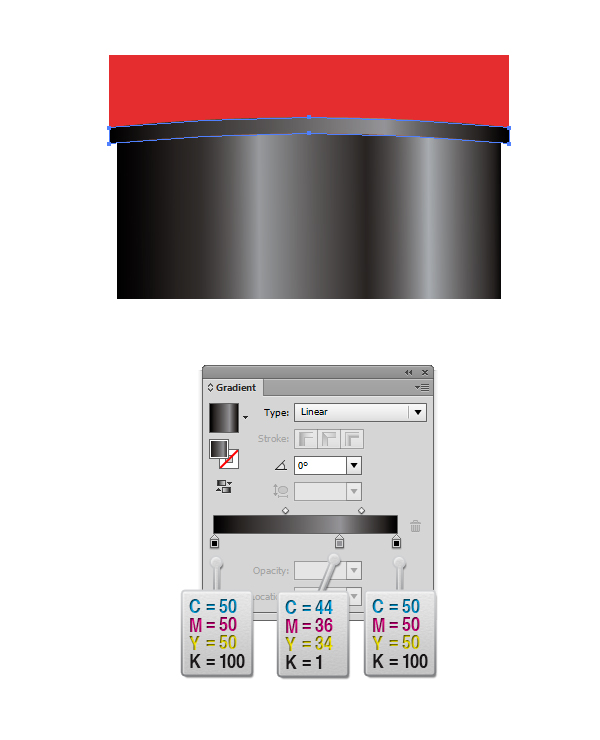
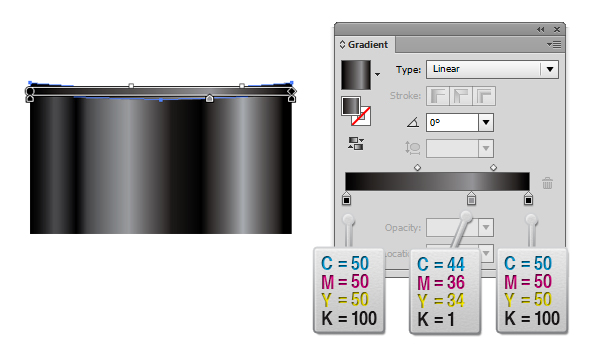
Now select the small shape and fill it with a three colors linear Gradient (Window > Gradient).
Step 8
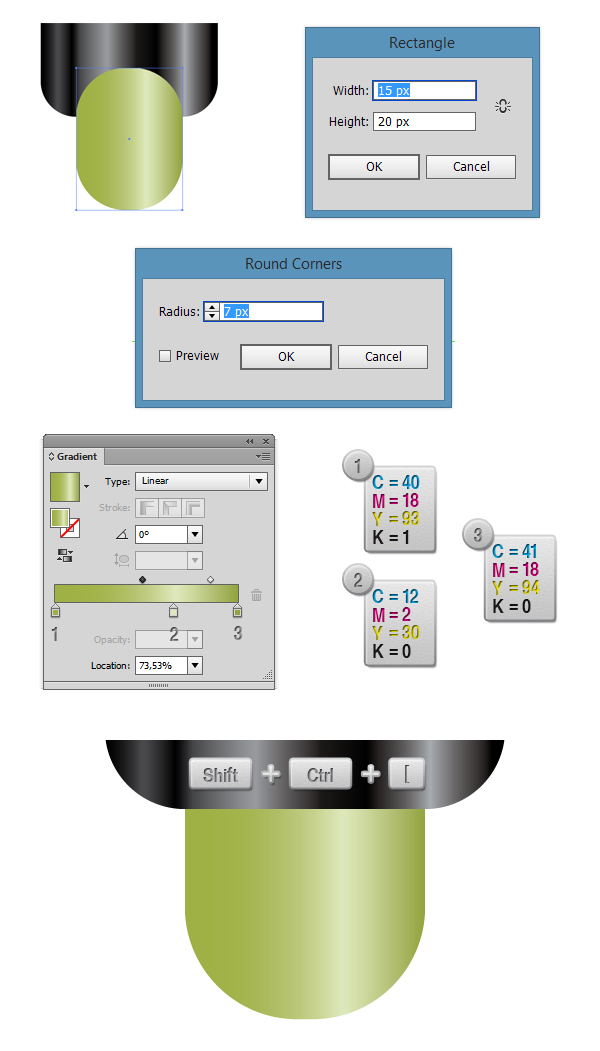
Now let’s draw the eraser. Pick the Rectangle Tool (M) and draw a 15 x 20px rectangle. Go to Effects > Stylize > Round Corners and enter a value of 7px in the dialog box. Fill the shape with a three colors linear Gradient (Window > Gradient) and then with the shape still selected hit Shift + Ctrl + [ in order to move the shape to the back behind the big rectangle.
Step 9
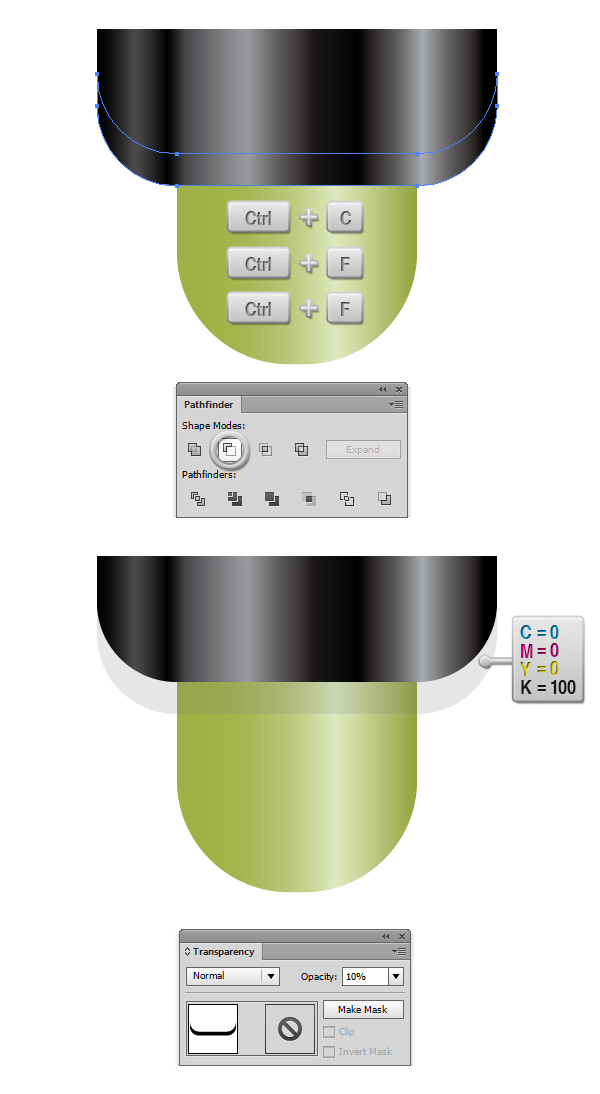
Select the big shape and make two copies in front of it (Ctrl + C > Ctrl + F> Ctrl + F). Select the first copy (the one in the middle) and move it 1px down. Now select both copies, and from the Pathfinder Panel, hit the Minus Front button. Fill the resulting shape with Black (C=0 M=0 Y=0 K=100), and from the Transparency Panel (Window > Transparency), lower the opacity to 10%. This shape represents the shade for the eraser.
Step 10
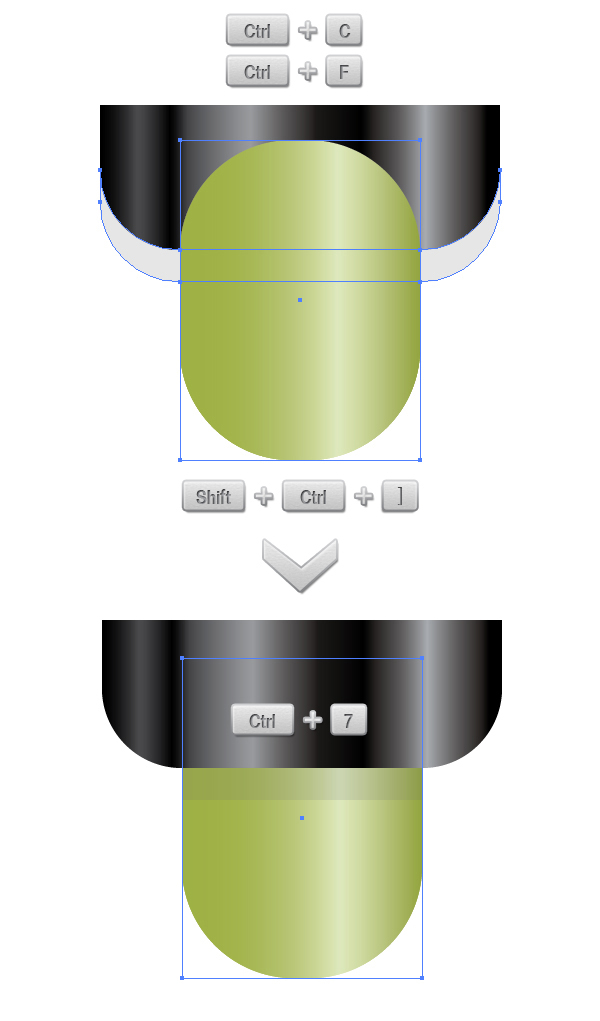
Select the eraser, and make a copy in front of it (Ctrl + C > Ctrl + F). Select the copy, and move it on top (Shift + Ctrl + ]). Then with the top copy and the shape we created at step 9 (the shade) selected, go to Object > Clipping Mask > Make (Ctrl + 7) in order to make a clipping mask.
Step 11
Pick the Rectangle Tool (M) and draw a 24 x 75px shape. Fill the shape with a multicolor linear Gradient (Window > Gradient). 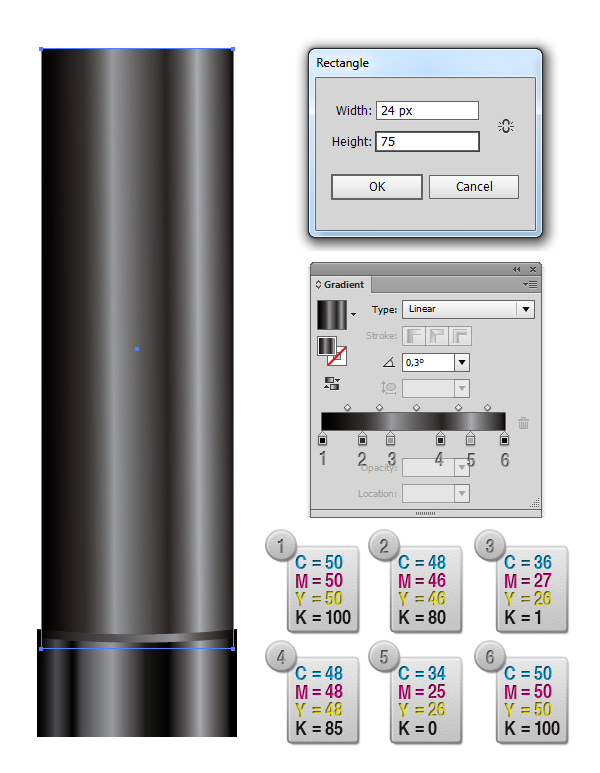
Step 12
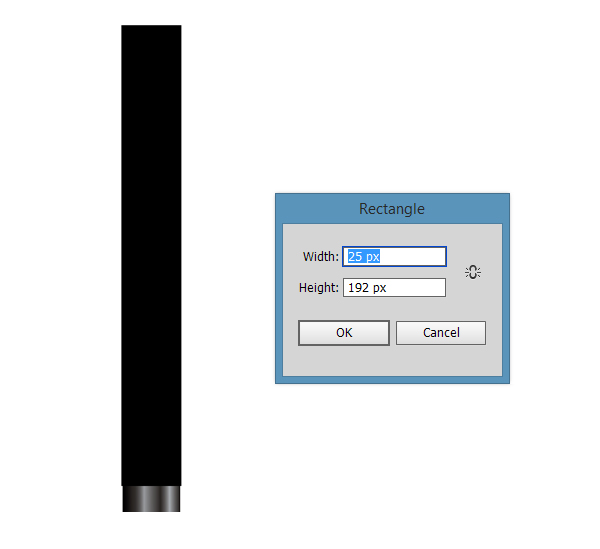
Pick the Rectangle Tool (M) and create a 25 x 192px rectangle.
Pick the Elipse Tool (L) and draw a 58 x 13px circle. Select both the elipse and the shape we’ve created previously, and hit the Minus Front button from the Pathfinder Panel.
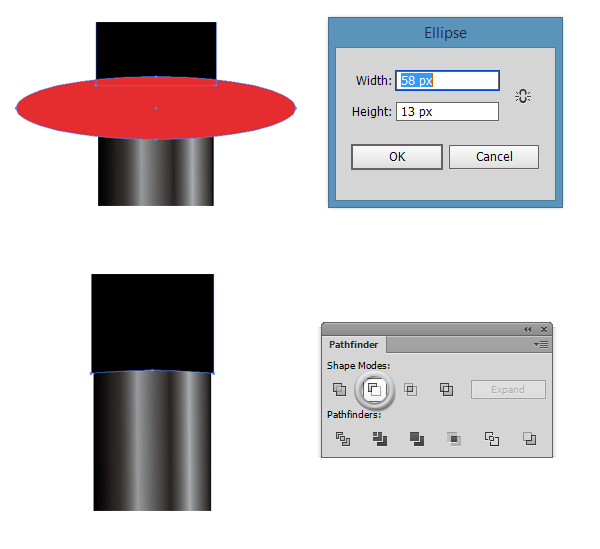
Step 13
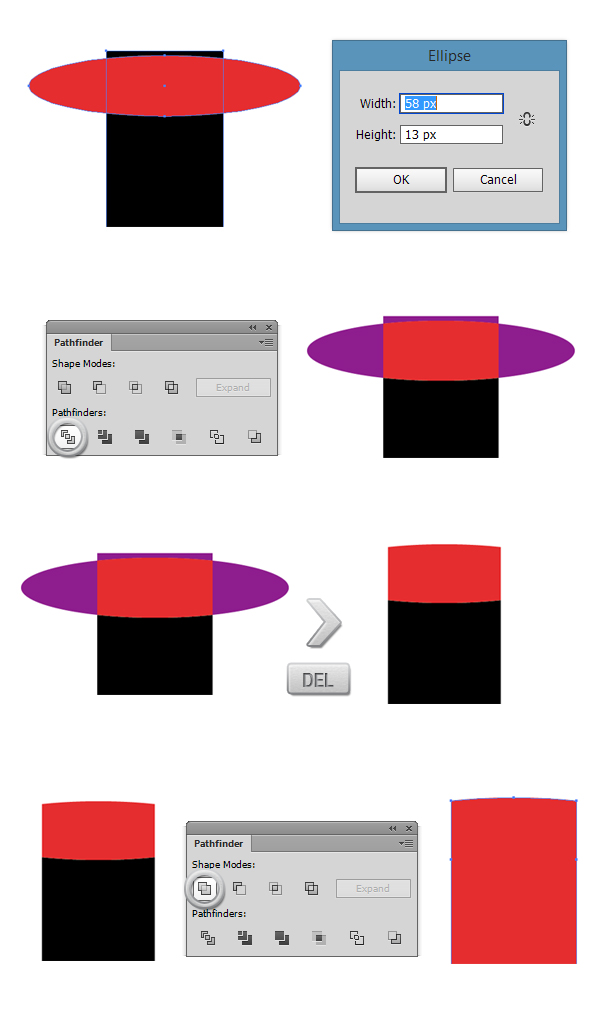
Pick again the Elipse Tool (L) and draw a 58 x 13px circle. Select both the elipse and the black shape again, but now hit the Divide button from the Pathfinder Panel. Delete (Del) the blue shapes from the image below. Now select the Red and Black shapes and from the Pathfinder Panel, and hit the Unite button.
Step 14
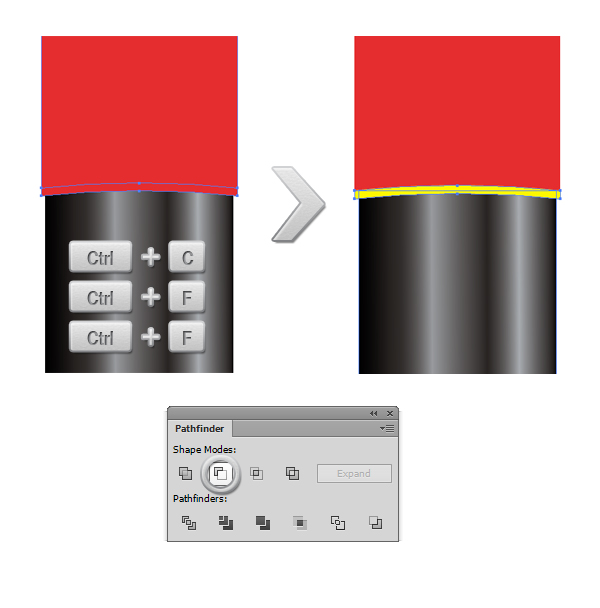
Select the shape and make two copies in front of it (Ctrl + C > Ctrl + F > Ctrl + F). Select the copy that is on top and move it 1px up. Now select both copies, and looking at the the Pathfinder Panel, hit the Minus front button.
Step 15
Fill the resulting shape with a three colors linear Gradient (Window > Gradient).
Step 16
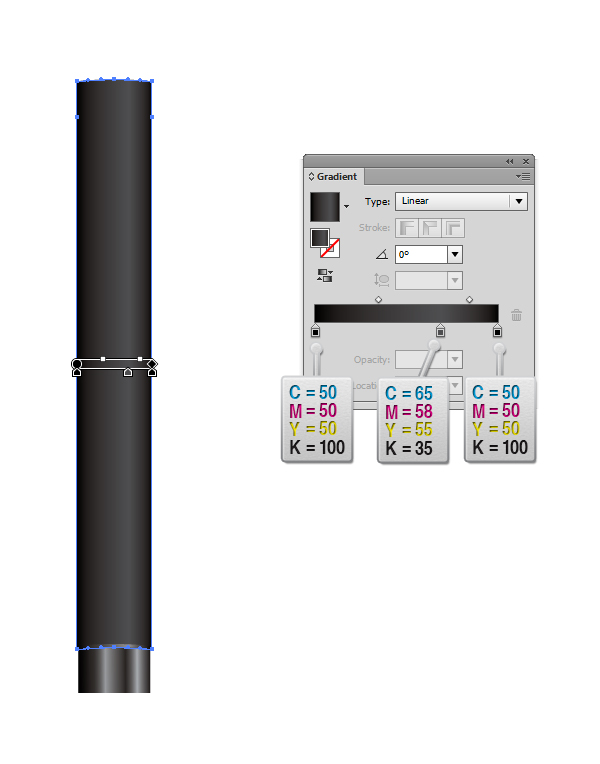
Select the shape we’ve created at step 12, and fill it with a three colors linear Gradient (Window > Gradient).
Step 17
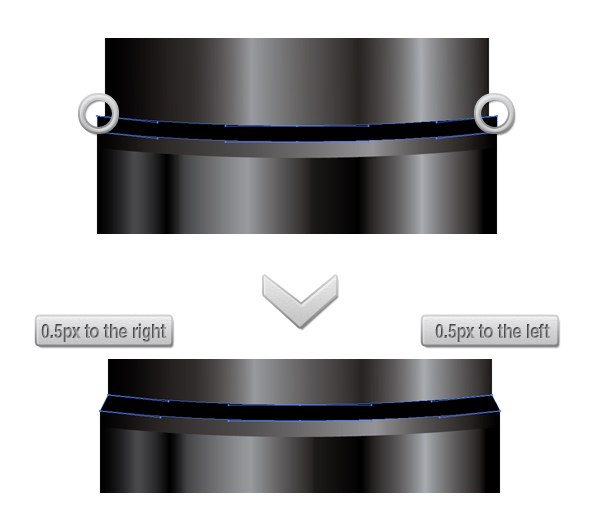
Select the shape we’ve create at Step 5 and go to Window > Effects > Drop Shadow, then enter the same values as in the image below.
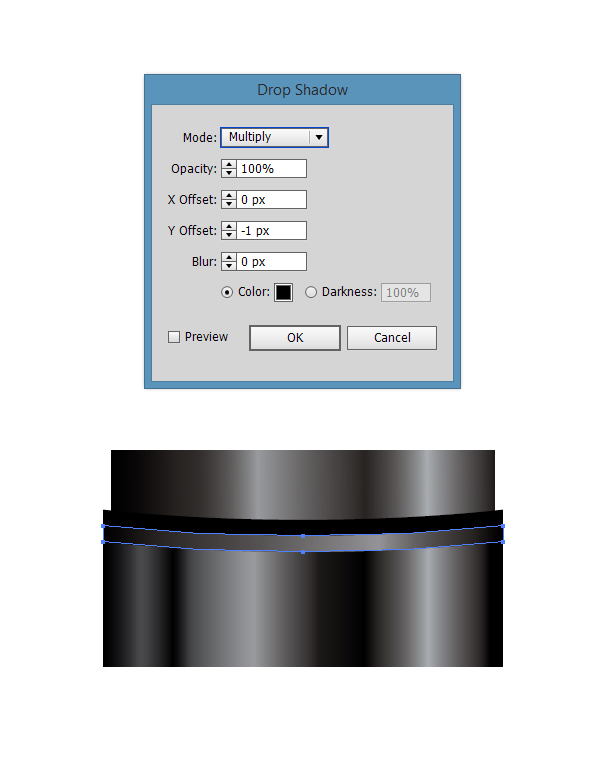
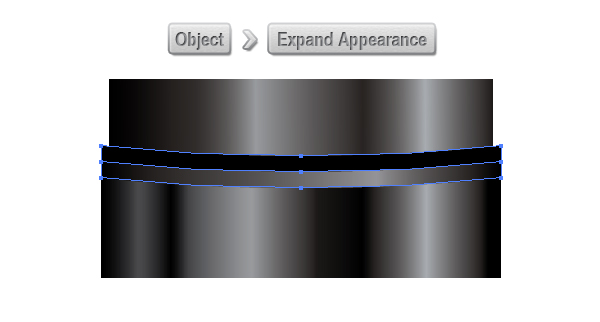
With the shape still selected go to Object > Expand Appearance in order to transform the drop shadow into a normal shape.
With the White arrow Tool (A), select the right anchor point highlighted in the image below, and move it 0.5px to the left. Now select the left anchor point highlighted in the image below and move it 0.5px to the right.
Step 18
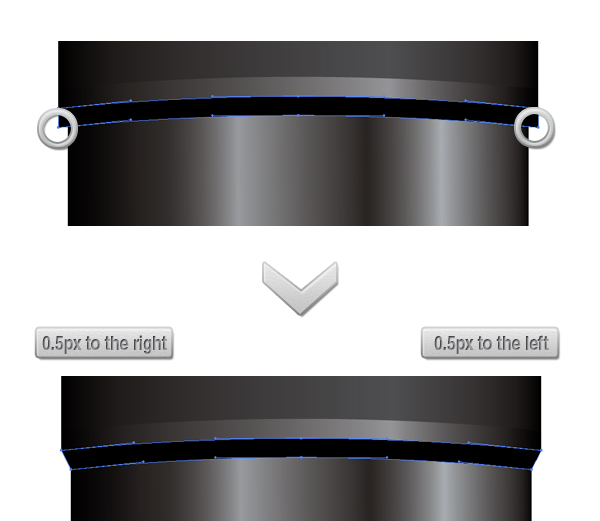
Select the shape we’ve create in Step 14 and go to Window > Effects > Drop Shadow; then enter the same values as in the image below .
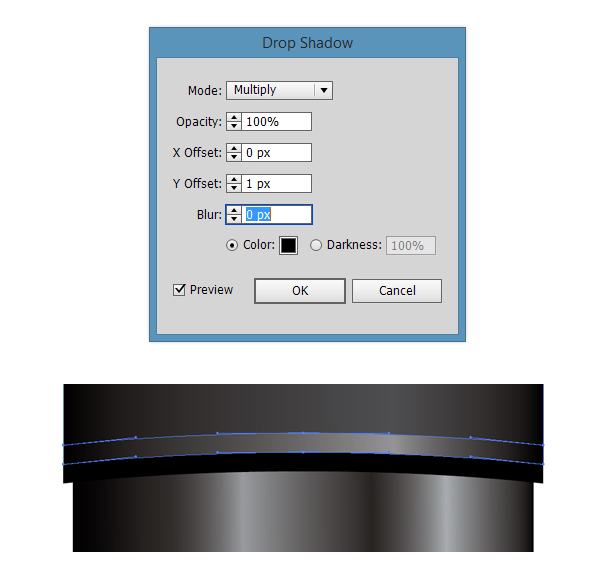
With the shape still selected go to Object > Expand Appearance in order to transform the drop shadow into a normal shape.
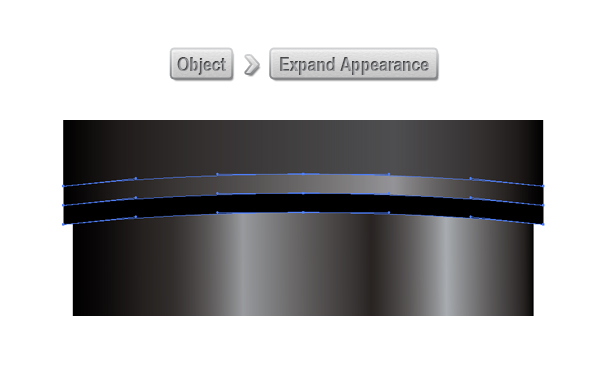
With the White arrow Tool (A), select the right anchor point highlighted in the image below and move it 0.5px to the left. Now select the left anchor point highlighted in the image below, and move it 0.5px to the right.
Step 19
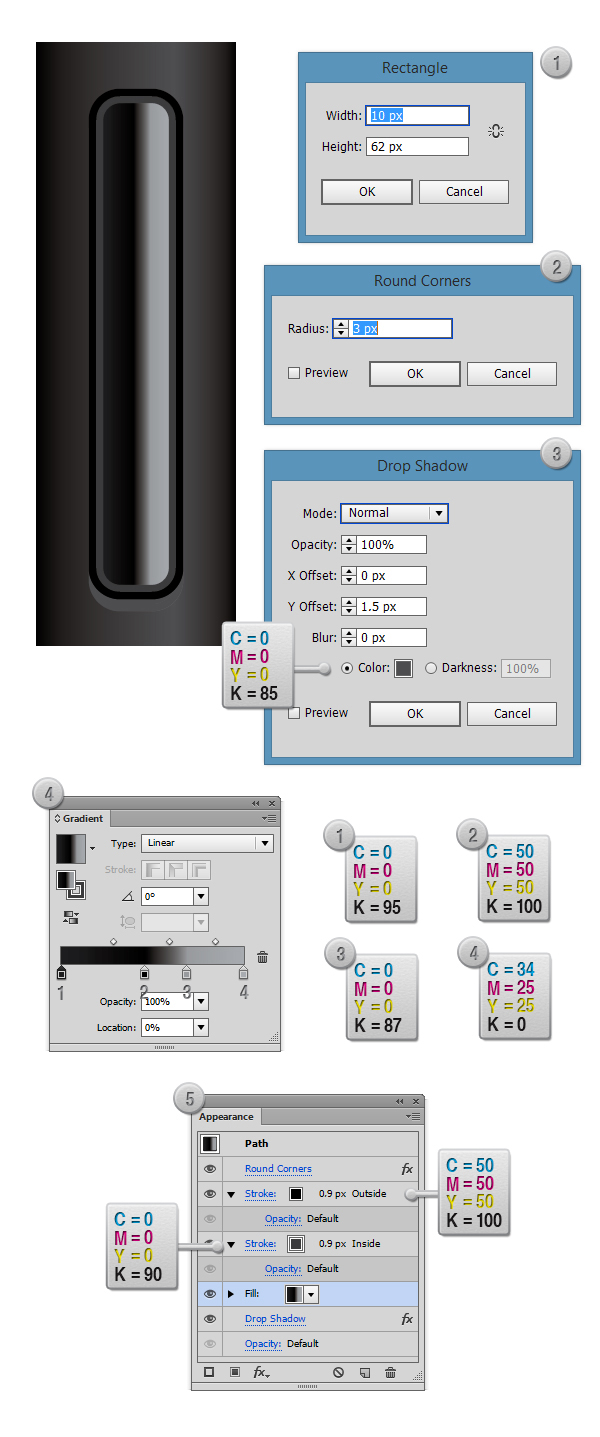
Now let’s draw the button from the pen. Pick the Rectangle Tool (M) and draw a 10 x 62px rectangle. Go to Effects > Stylize > Round Corners and enter a 3px value into the dialog box. With the shape still selected to to Effects > Stylize > Drop Shadow; then enter the same values as in the image below. Fill the shape with a multicolor linear Gradient (Window > Gradient), then from the Appearance Panel (Window > Appearance) add a 0.9px Black stroke (C=50 M=50 Y=50 K=100). Next align it to outside from the Stroke Panel (Window > Stroke). Add a new stroke by clicking on the lower left square in the Appearance panel, and set the color to C=0 M=0 Y=0 K=90. Then, from the Stroke Panel (Window > Stroke), select Align Stroke to Inside.
Step 20
Pick the Rectangle Tool (M) and draw a 25 x 28px rectangle. 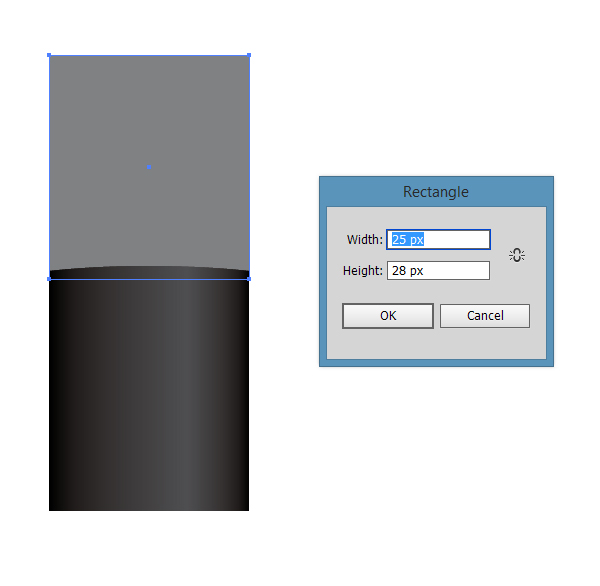
Step 21
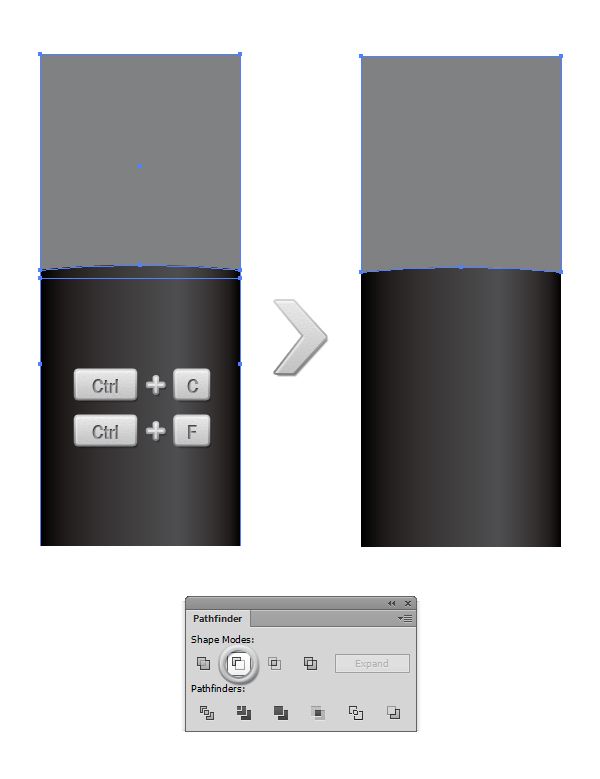
Select the shape we’ve created at Step 12 and make a copy in front of it (Ctrl + C > Ctrl + F). Select both the copy and the shape we’ve created at step 20, then hit the Minus Front button from the Pathfinder Panel.
Step 22
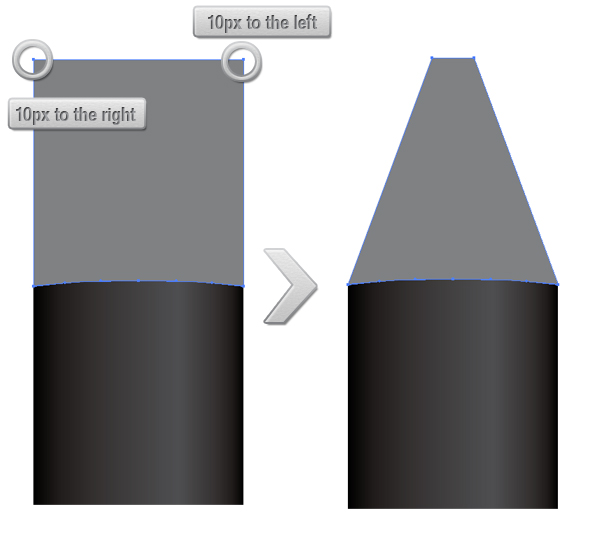
With the White arrow Tool (A), select the right anchor point highlighted in the image below, and move it 10px to the left. Now select the left anchor point highlighted in the image below, and move it 10px to the right.
Step 23
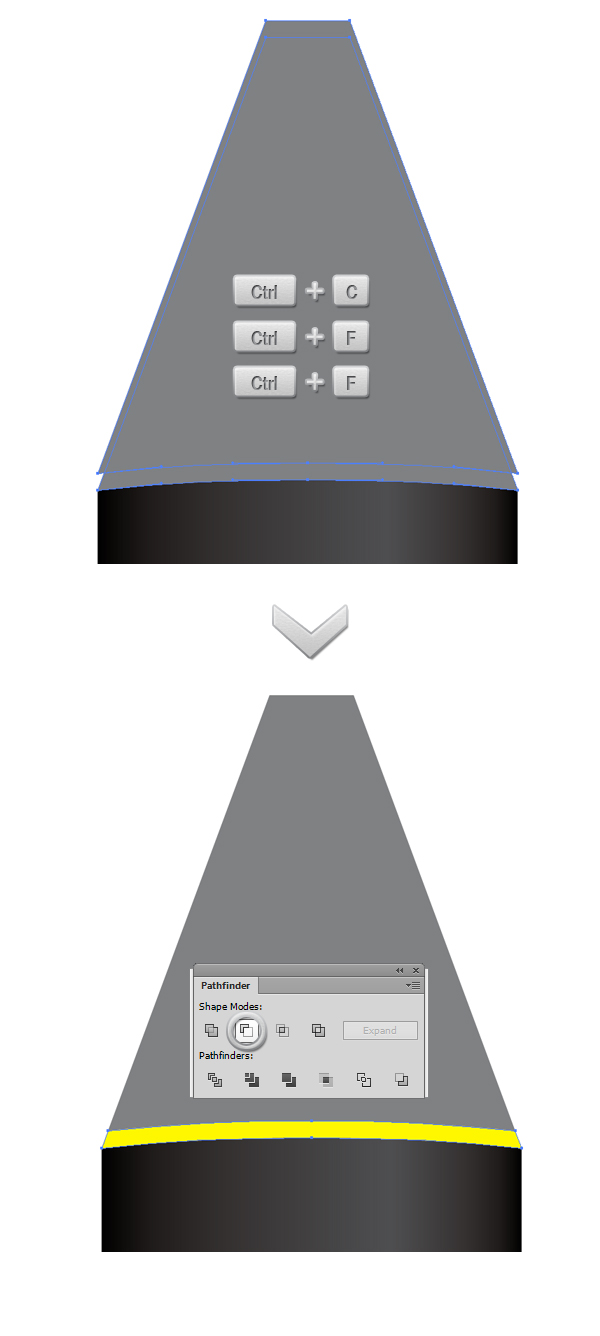
Select the shape and make two copies in front of it (Ctrl + C > Ctrl + F > Ctrl + F). Select the copy that is on top and move it 1px up. Now select both copies and from the Pathfinder Panel hit the Minus front button.
Step 24
Fill the resulting shape with a three colors linear Gradient (Window > Gradient).
Step 25
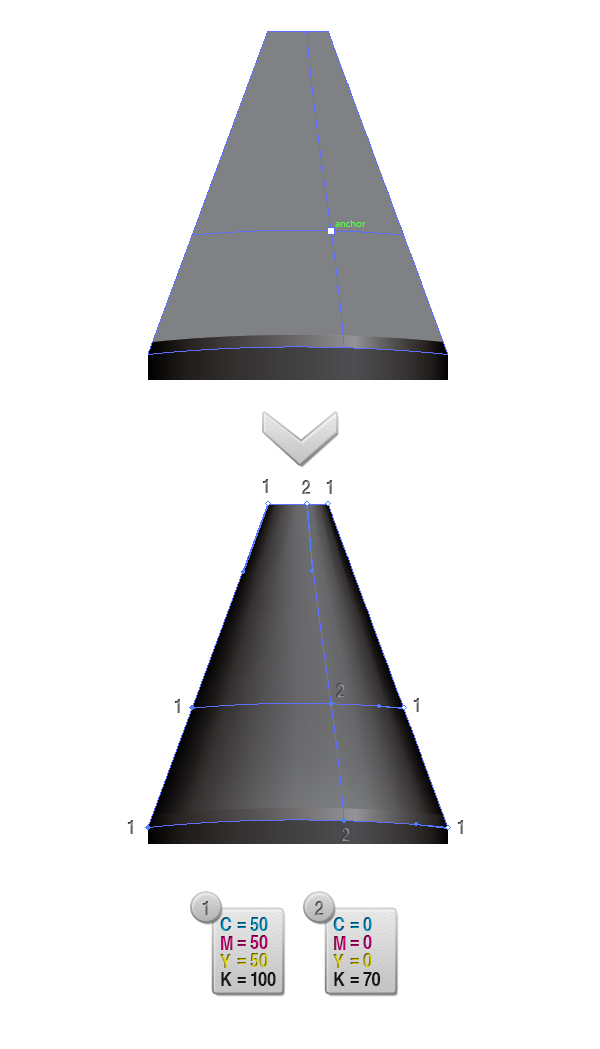
Pick the Mesh Tool (U), and click on the shape in order to transform in to a Gradient Mesh. With the White Arrow Tool (A), select the anchor points labeled with “1” in the image below and fill them with Black (C=50 M=50 Y=50 K=100). Now select the anchor points labeled with “2” in the image below and fill them with C=0 M=0 Y=0 K=70.
Step 26
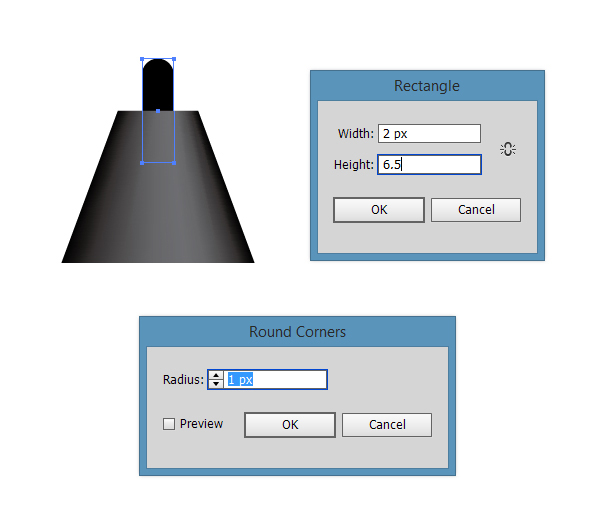
With the Rectangle Tool (M), draw a 2 x 6.5px rectangle, then go to Effects > Stylize > Round Corners and enter a value of 1px into the dialog box. Fill the shape with Black (C=0 M=0 Y=0 K=0).
Step 27
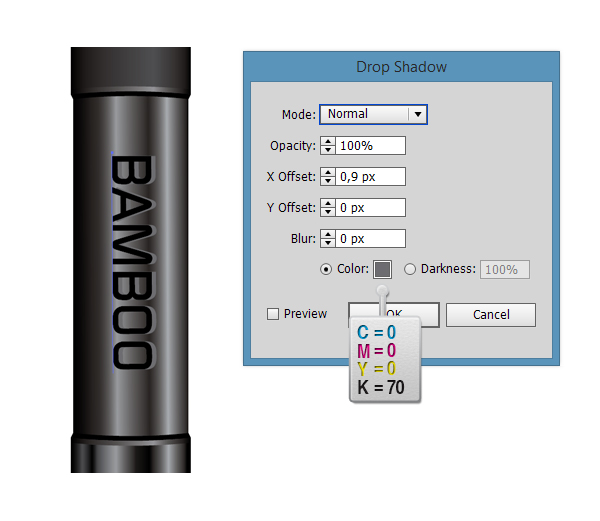
Pick the Type Tool (T) and write the word BAMBOO as you see in the image below. Set the font to Continuum Medium (free font download here), the size to 12 px and the color to C=0 M=0 Y=0 K=100. With the text selected, use the Rotate Tool (R) to rotate the type -90 degrees. With the type still selected, go to Effects > Stylize > Drop Shadow and add the same values as in the image below.
And we’re done! End of part two!
Author: Andrei Urse
My name is Andrei Urse. I’m a graphic designer from Romania. I love creating logos and complex vector art using Illustrator, but I also use Photoshop and InDesign on a daily basis. You can find all of my work on Behance.

