

In this Chalkboard Text Vector tutorial, I’ll show you how to create a chalkboard vector effect with some gradients, a bristle brush, and some freebies from Vector Mill! This chalkboard text vector effect tutorial is relatively simple and can be applied to many other Illustrator projects. Use this effect for logo creation, back to school backgrounds, or even menu and invitation designs.
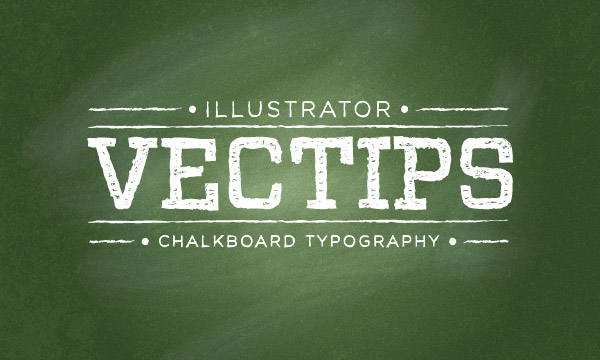
Final Image: Chalkboard Text Vector Effect
Below is the final chalkboard text vector we will be shooting for.
Tutorial Details: Chalkboard Text Vector Effect
- Program: Adobe Illustrator CS5 – CC
- Difficulty: Beginner / Intermediate
- Topics Covered: Grain Effect, Bristle Brush, Brushes
- Estimated Completion Time: 15-20 minutes
- Required Files: Vector-Mill-Sample.ai (compatibility CS4-CS5)
Step 1: Chalkboard Text Vector Effect
To start out this chalkboard text vector tutorial, create a new document and create a rectangle with the Rectangle tool (M). This will be our chalkboard vector background.
SFill the new rectangle with a radial gradient, change the first color stop in the gradient to a green color, and the second color stop to a darker green color.Step 2
hap
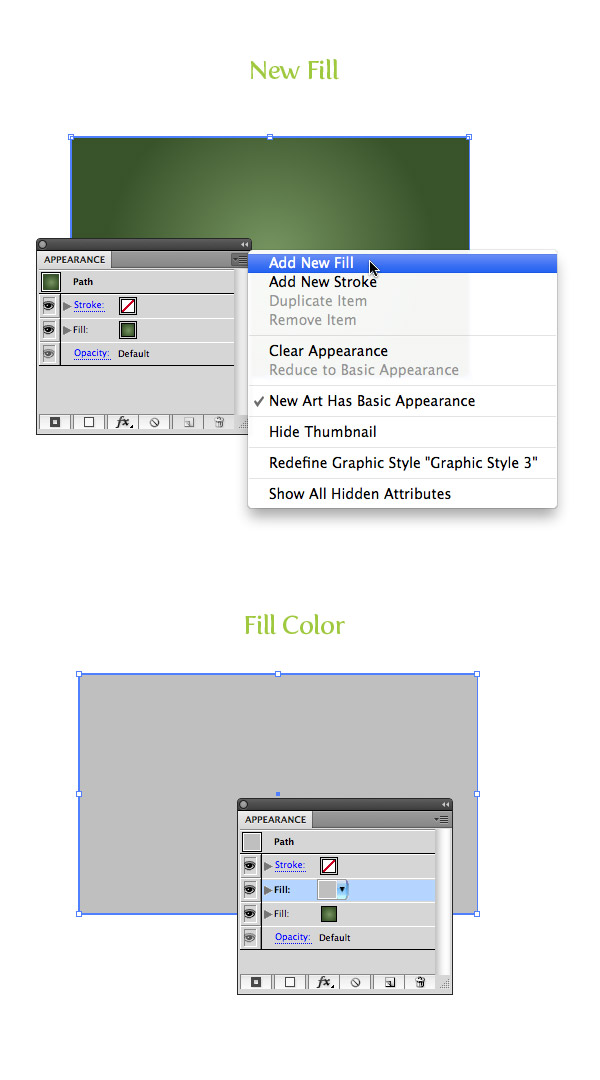
Step 3
With the rectangle still selected, open the pop-up menu of the Appearance panel, and choose Add New Fill. Fill the new item with a light gray.
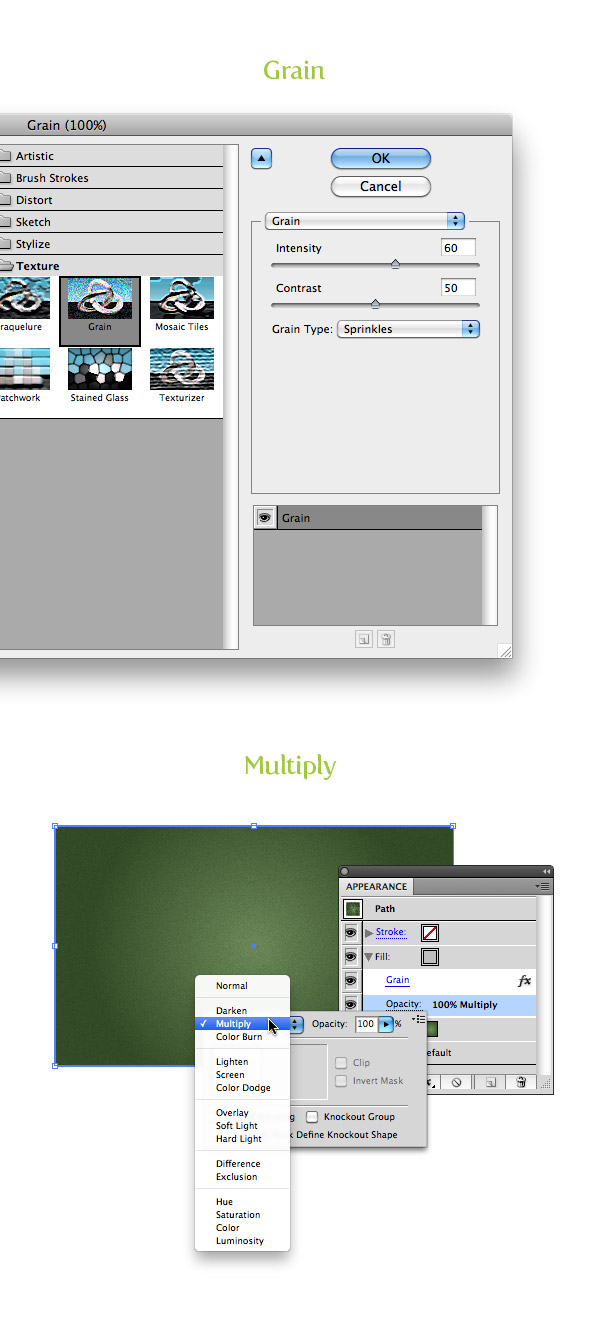
Step 4
With the new gray fill item selected in the Appearance panel, go Effect > Texture > Grain. In the Grain dialog, change the Intensity to 60, the Contrast to 50, and the Grain type to Sprinkles. Next, expand the gray fill item in the Appearance panel, click the Opacity item, and change the Blending mode to Multiply.
If you are a vector purest, I suggest finding Seamless Grain Textures here!
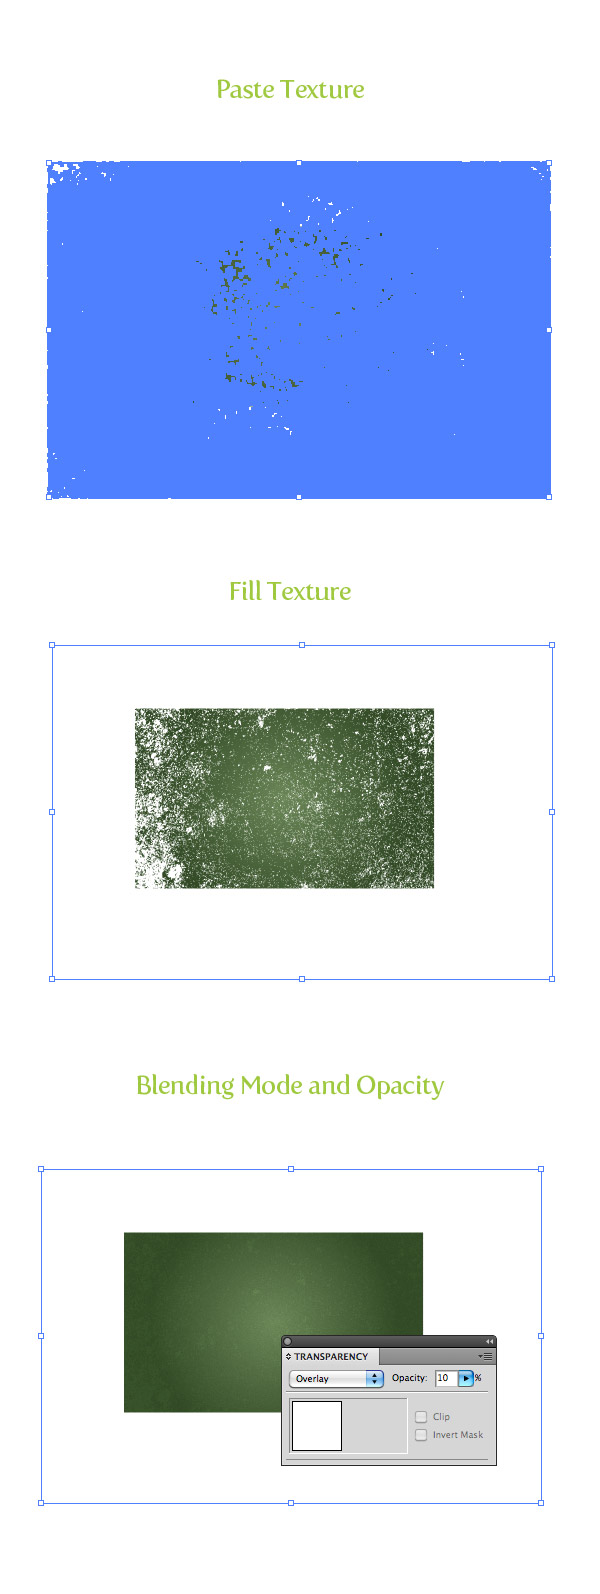
Step 5
For this step, you need to download the Vector-Mill-Sample.ai file. You can easily find Concrete Textures on Vecteezy. Open the file, Copy (Command + C) the big concrete texture, and Paste (Command + V) it over your green gradient. Fill the texture with white, set the Blending mode to Overlay and set the Opacity to 10 from the Transparency panel.
Step 6
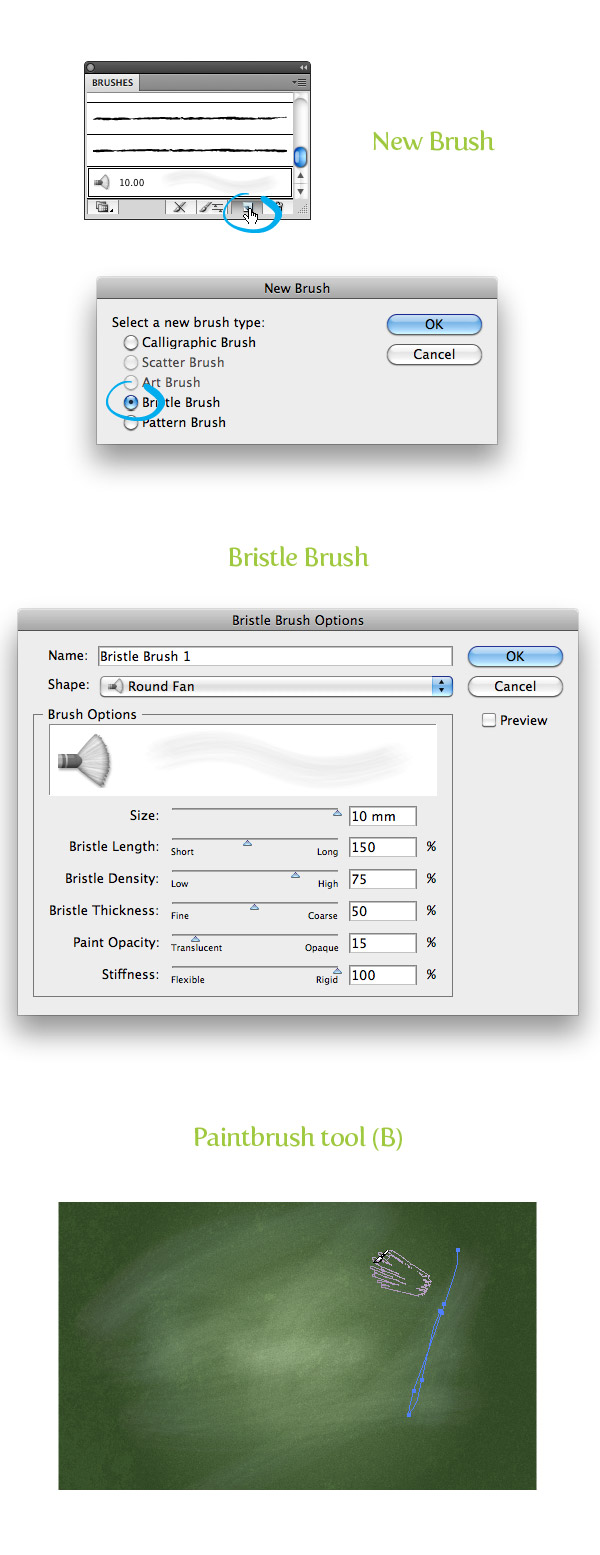
We are almost done with the background texture for our chalkboard text vector, but let’s add a little more depth with a Bristle Brush. If you are on something other than Adobe Illustrator CS5 or above, you won’t be able to follow this step like in the tutorial. As an alternative, you can use some of the watercolor art brushes I created.
If you have CS5 or something newer, start by pressing the New Brush button at the bottom of the Brush panel and choose New Bristle Brush from the dialog. In the Bristle Brush Options dialog, make these changes:
- Type = Round Fan
- Size = 10 mm
- Bristle Length = 150
- Bristle Density = 75
- Bristle Thickness = 50
- Paint Opacity = 15
- Stiffness = 100
Once you have these settings, select your Paintbrush tool (B) and draw some erratic overlapping paths on the chalkboard vector. That should do it for the background. Now onto the chalkboard text vector!
Step 7
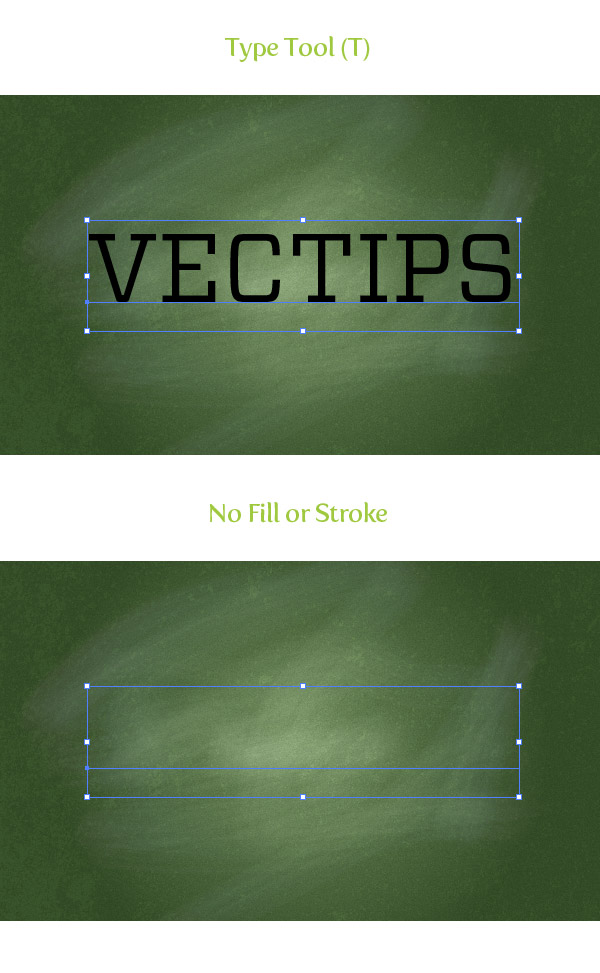
With the Type tool (T), type out some text and choose a font. I’m using Vitesse Book for my text, but you can use whatever. After you have your text, remove the fill and stroke color. This makes it easier to use Appearance panel for the following steps.
Step 8
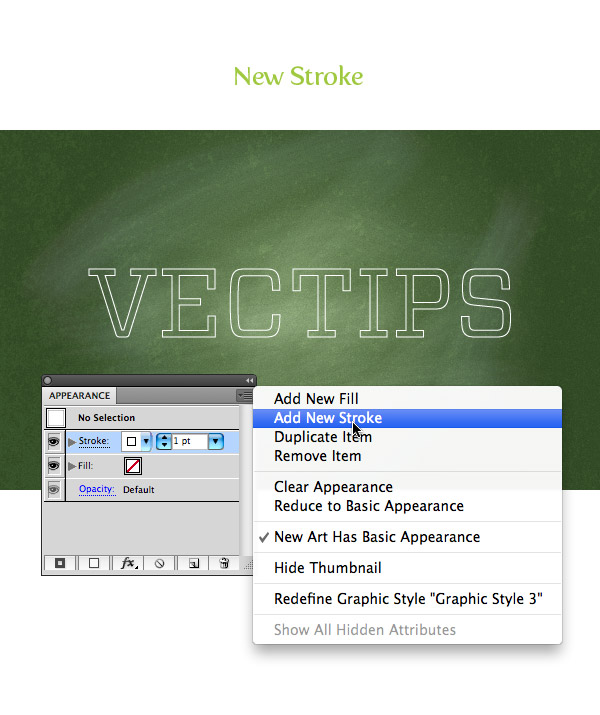
From the pop-up menu of the Appearance panel, choose Add New Stroke and change the stroke color to white.
Step 9
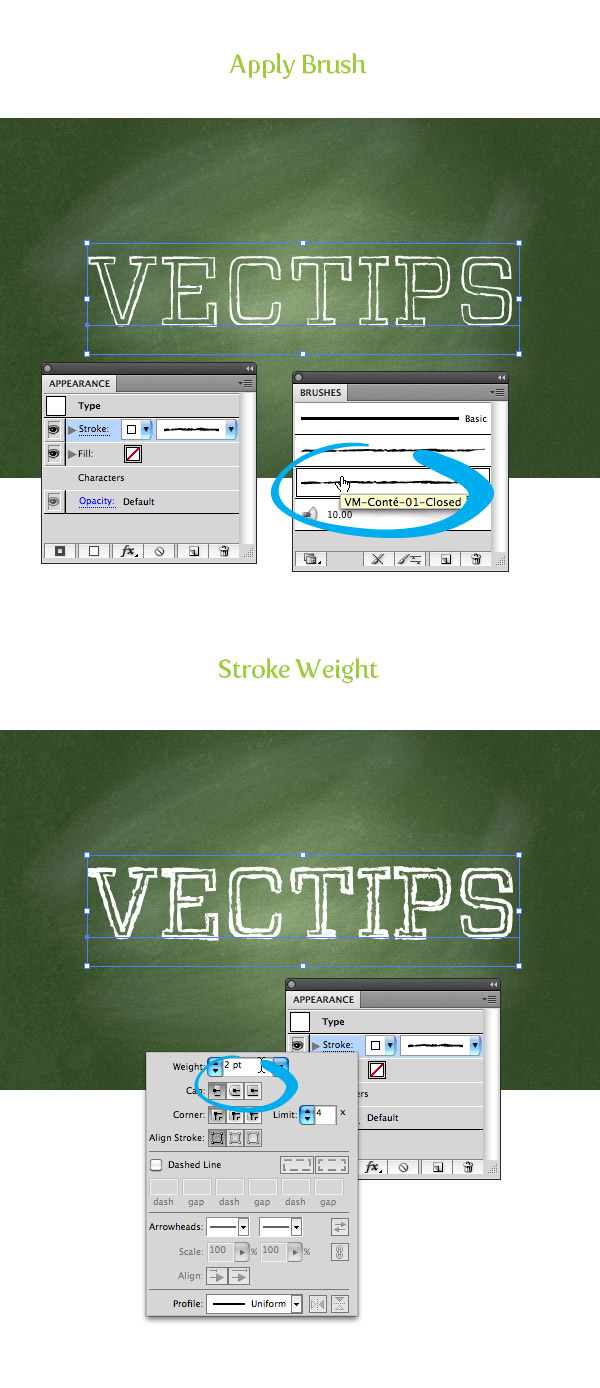
Now hop over to the Vector-Mill-Sample.ai file again and select the brushes. These brushes are part of the March Crate’s Conté Crayon Brush set. Copy both brushes and paste them into your document. They now should be available in the Brushes panel. With your new white stroke item selected, choose the VM-Conté-01-Closed brush. To make it look a little thicker, change the stroke weight to 2 pt.
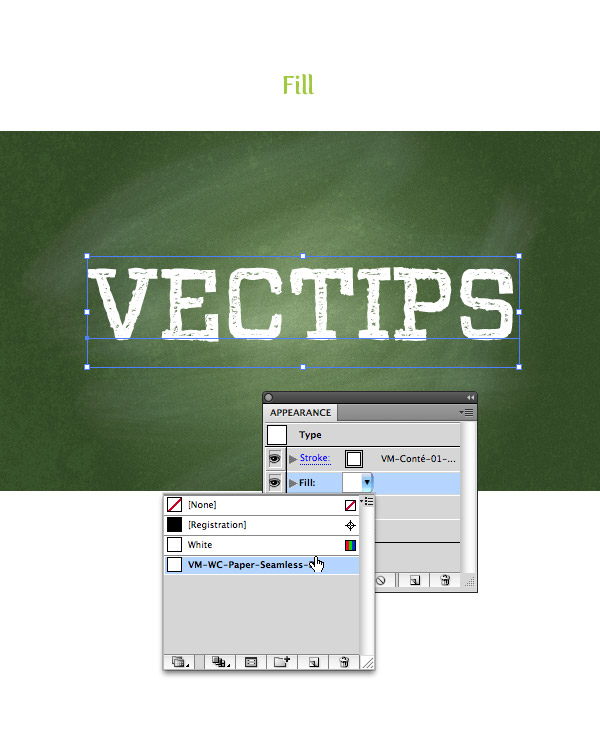
Step 10
For the fill of the text on this chalkboard text vector, we need the last freebie in the Vector-Mill-Sample.ai file. This one is from the March Crate and is part of a Seamless Watercolor Paper Texture set. Copy the rectangle filled with the pattern from the freebie document to your document. Note: the rectangle has a couple of fills associated with it just so you can see the seamless pattern. The pattern swatch will automatically copy into your Swatches panel once you paste the rectangle shape into your document. So right after you copy it into your doc, you can delete it.
With your text selected, choose the VM-WC-Paper-Seamless-Rev-White pattern swatch for the empty fill item in the Appearance panel.
Final Image: Chalkboard Text Vector Effect
That is pretty much it for this chalkboard text vector! Pretty easy, right? You can add more text, strokes, and other elements to your chalkboard vector like I did in the final image. I created the lines with the Line Tool (\), applied the VM-Conté-01-Open brush to them, and adjusted the stroke weight for the other text.
Follow the ideas in this tutorial and apply the techniques to your next project. We’d love to see what you come up with! Leave your work in the comments below!


So in this tutorial, we will try to create stylish ornament typography and then apply a chalkboard effect using Adobe Illustrator, Photoshop and some vector ornaments. The whole process is simple but time-consuming, so I would take at least 3 hours to recreate this design.