 Create a quick and trendy office vector scene with simple line icons. We’ll go through each piece, step by step in no time flat!
Tutorial Details: Illustrate an Office Vector in 15 Minutes!
- Program: Adobe Illustrator CS6 – CC
- Difficulty: Intermediate
- Topics Covered: Design Theory, Shape Building, Compositional Skills
- Estimated Completion Time: 15 Minutes
Final Image: Line Icon Office Scene

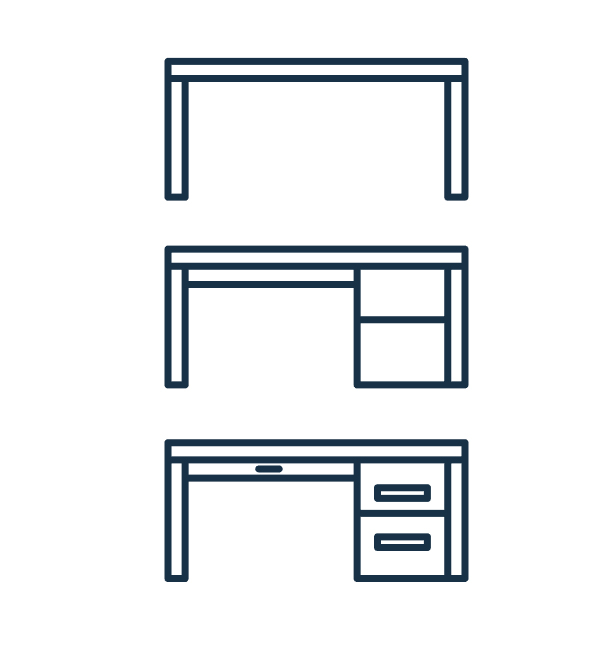
Step 1
Let’s start with a simple desk for your office vector. Using only the Rectangle Tool (M), draw three narrow rectangles to build a table. Add two rectangles for draws on the right side and a long, narrow rectangle under the desk for a panel. Little rounded rectangles make good handles on each panel.
Step 2
Add a computer monitor on top of the desk with one large rectangle for the screen itself. Two smaller rectangles stacked on top of each other form the monitor stand. Add a smaller rectangle on the monitor to define the bevel and you can also add a little rectangle or rounded rectangle on the desk for a book, mouse, or even a coffee cup. Group (Control-G) everything together.

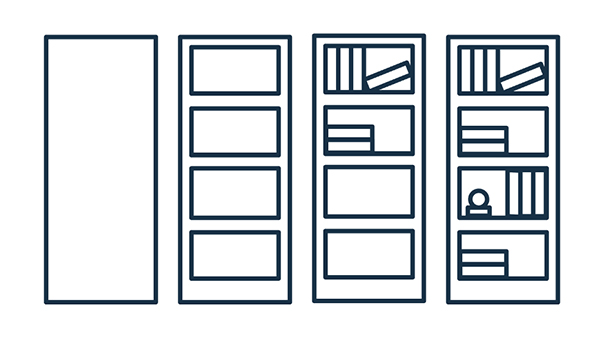
Step 3
Bookcases are simple another set of rectangles! Draw a large rectangle for the entire piece of furniture. Then, add four identical rectangles, spaced evenly, for the shelves themselves. Fill in each shelf with small rectangles. Make things easy for yourself and use the same size for each book. Stack or lean “books” together to fill up space.
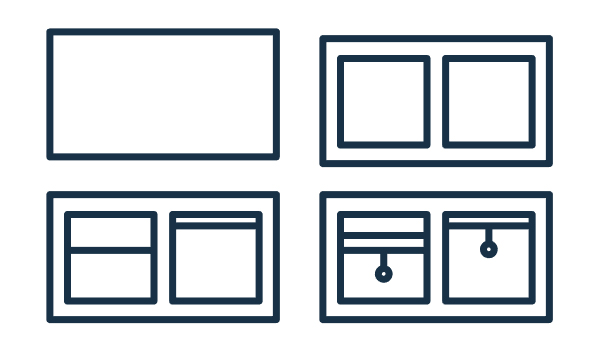
Step 4
Offices need windows (unless you want to work in a cave). Draw a horizontal rectangle to create the window pane. Add two squares for each window. Use the Line Segment Tool (/) to draw horizontal lines in each square to define the window shades. Then, add a couple small lines and circles (drawn with the Ellipse Tool (L)) for the strings on the shades. Group everything together.
Step 5
How about a potted plant for your office? Draw three rectangles and arrange them as you see below. Using Live Corners, pull the top edge of the top two rectangle inward to round them out. Repeat with the bottom edge of the bottom rectangle. Add two horizontal rectangles to the top and bottom edge of the pot to complete your cactus group.

Step 6
Arrange your office furniture. Make sure items that are on the floor are aligned to their bottom edges and items that are tall or on the wall (like the window) align to their top edges. Create as many little office or furniture scenes as you’d like with rectangles and circles!

Conclusion
Finally, fill in each object with your color of choice and marvel at your tiny line icon office. Share with us in the comment section below!
Author: Mary Winkler
Mary works under the brand Acrylicana® and has illustrated and designed for companies like Disney, Jakks Pacific, Jada Toys, Envato, and more. Check out Acrylicana.com for artwork, tutorials, and more. Follow Acrylicana on Instagram, Facebook, and Twitter!


