 In today’s tutorial, we’re going to start breathing in the holiday spirit by learning how to create a Christmas ornament icon using the most basic shapes and tools that Illustrator has to offer.
So, assuming you’ve already poured yourself a hot cup of cocoa, let’s jump straight into it!
Tutorial Details: Christmas Ornament Icon
- Program: Adobe Illustrator CS6 – CC 2018
- Difficulty: Beginner
- Topics Covered: Design Theory, Compositional Construction, Shape Alignment, Grid Positioning
- Estimated Completion Time: 30 Minutes
Final Image: Christmas Ornament Icon

Step 1
As always, we’re going to kick things off by setting up a New Document by going over to File > New (or using the Control-N keyboard shortcut), which we will adjust as follows:
- Number of Artboards: 1
- Width: 128 px
- Height: 128 px
- Units: Pixels
And from the Advanced tab:
- Color Mode: RGB
- Raster Effects: Screen (72ppi)
- Preview Mode: Default
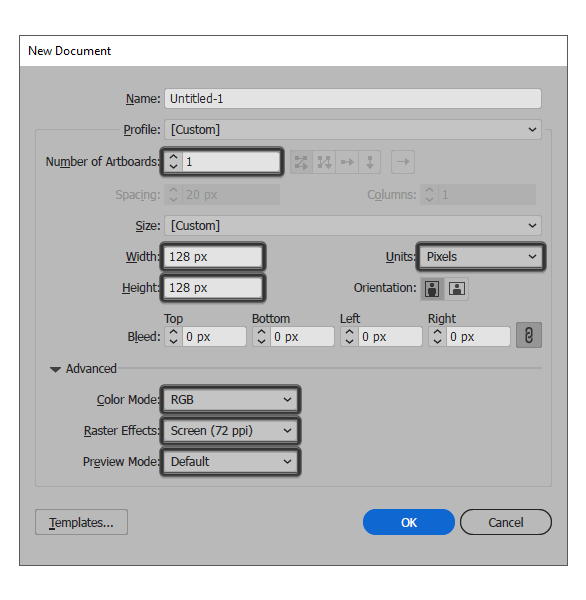
Quick tip: most of the indicated settings can be automatically triggered if you set the document’s Profile to Web, the only one that you’ll have to manually adjust being the Artboard’s Size (Width x Height).
Step 2
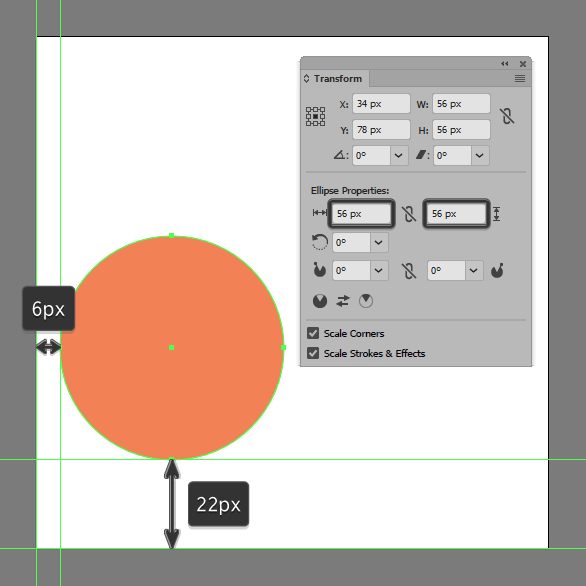
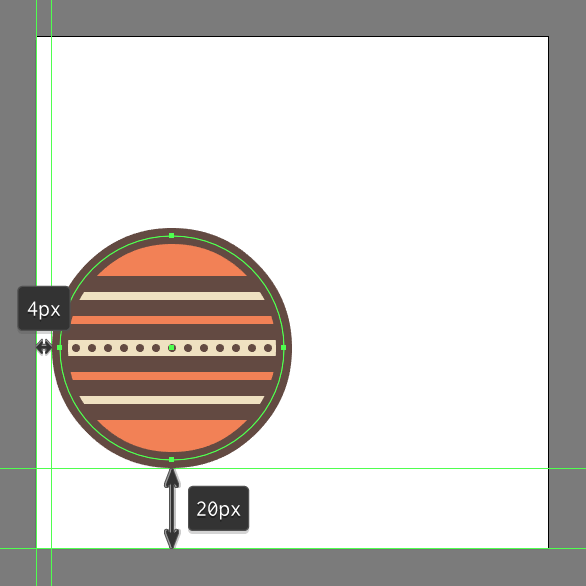
Start working on the icon, by creating the main shape for the left ornament using a 56 x 56 px circle, which we will color using #F28255, and then position at a distance of 6 px from the Artboard’s left edge, and 22 px from its bottom one.
Step 3
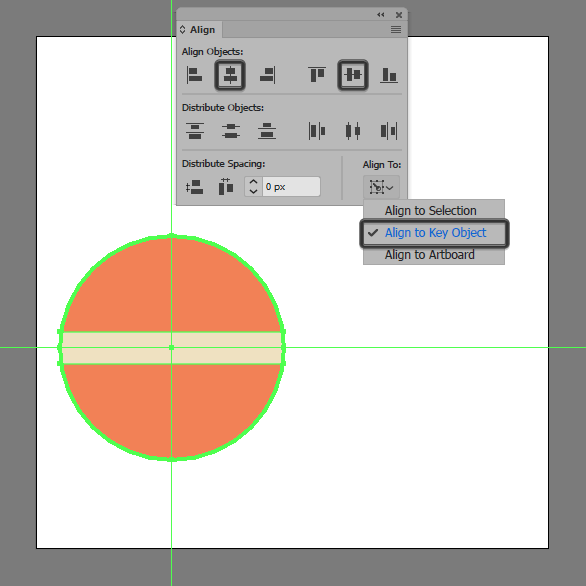
Add the center decorative strip using a 56 x 8 px rectangle, which we will color using #EFE2C2 and then center align to the larger circle.
Step 4
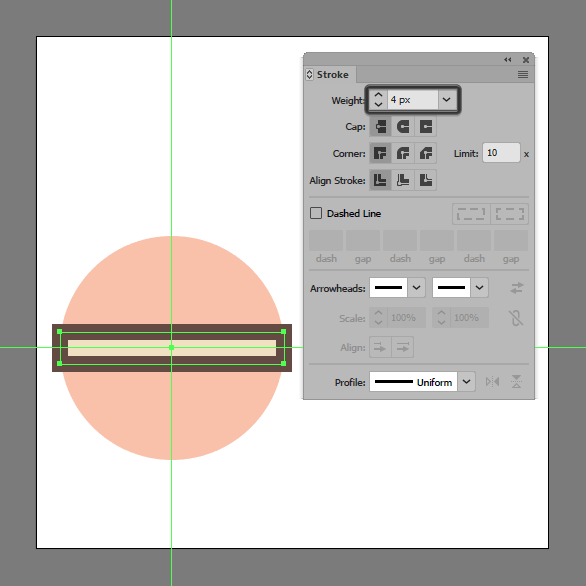
Give the shape that we’ve just created an outline using the Stroke method, by creating a copy of it (Control-C) which we will paste in front (Control-F) and then adjust by first changing its color to #634940. Then, flip its Fill with its Stroke (Shift-X) setting its Weight to 4 px. Before we move on, make sure you select both shapes and group them together using the Control-G keyboard shortcut.
Step 5
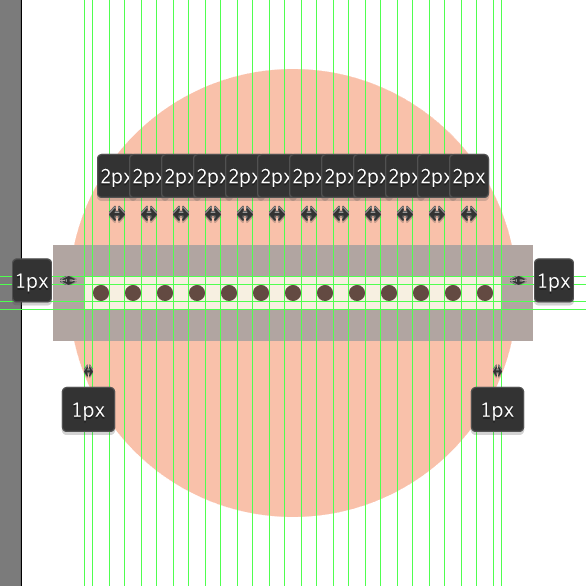
Add the decorative elements using thirteen 2 x 2 px circles (#634940) horizontally distanced at 2 px from one another, which we will group (Control-G) and then center align to the current section. Once you have them in place, don’t forget to select and group both the circles and the strip together using the Control-G keyboard shortcut.
Step 6
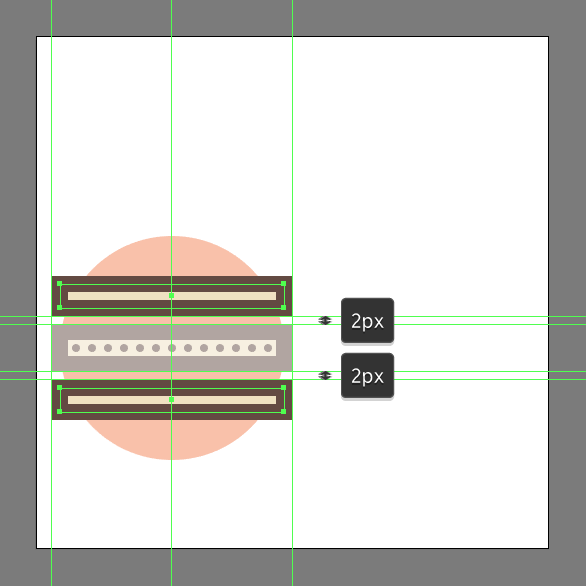
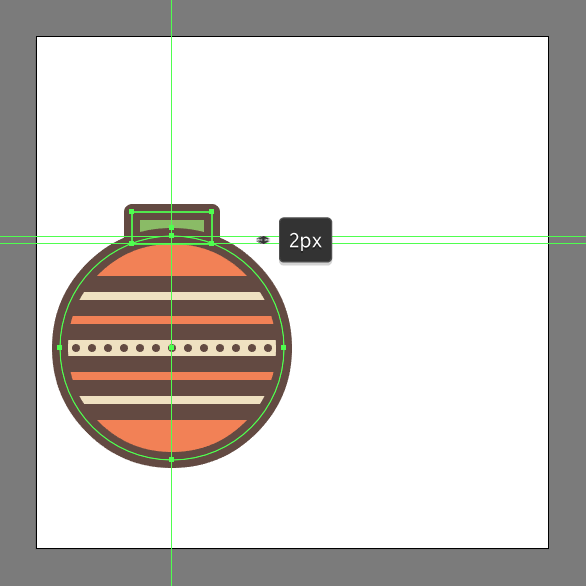
Add the top and bottom strips using two 56 x 6 px rectangles (#EFE2C2) with a 4 px thick outline (#634940), individually grouping (Control-G) and positioning them as seen in the reference image.
Step 7
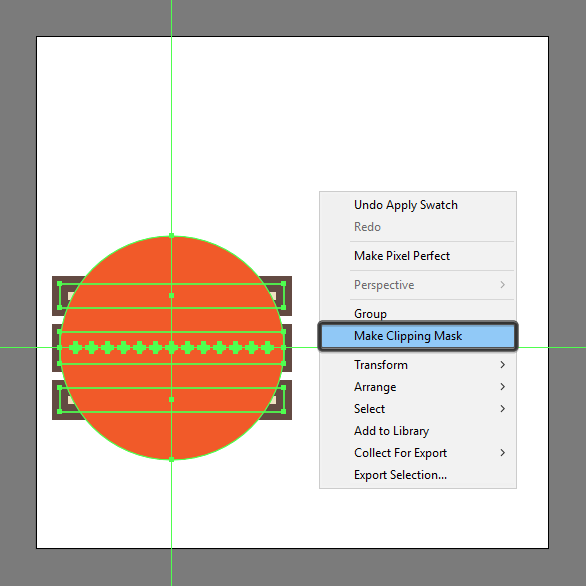
Select and group (Control-G) the three decorative strips together, masking them afterwards using a copy (Control-C) of the underlying circle (highlighted with red), which we will paste in front (Control-F) and then with all of them selected right click > Make Clipping Mask.
Step 8
Give the ornament 4 px thick outline (#634940) using the Stroke method, selecting and grouping (Control-G) all its composing shapes before moving on to the next step.
Step 9
Start working on the cap by creating a 20 x 8 px rectangle (#8BBC66) with a 4 px thick outline (#634940), which we will group (Control-G) and then position on top of the ornament, making sure to position it underneath (right click > Arrange > Send to Back).
Step 10
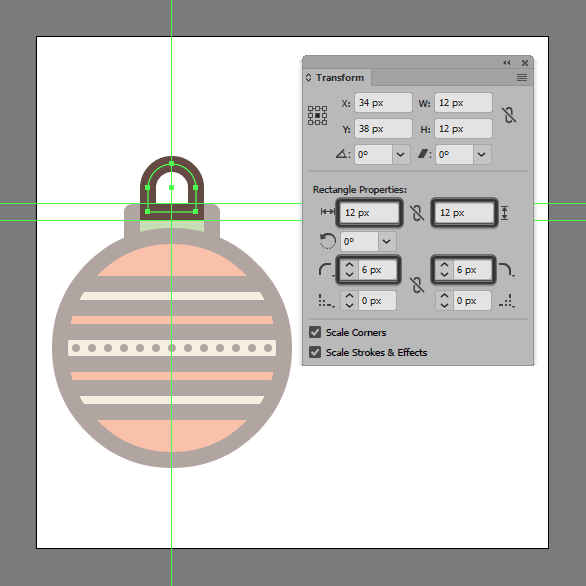
Add the little ring segment using a 12 x 12 px square with a 4 px thick Stroke (#634940), which we will adjust by setting the Radius of its top corners to 6 px from within the Transform panel’s Rectangle Properties. Position the resulting shape on top of the cap, selecting and grouping the two together afterwards using the Control-G keyboard shortcut.
Step 11
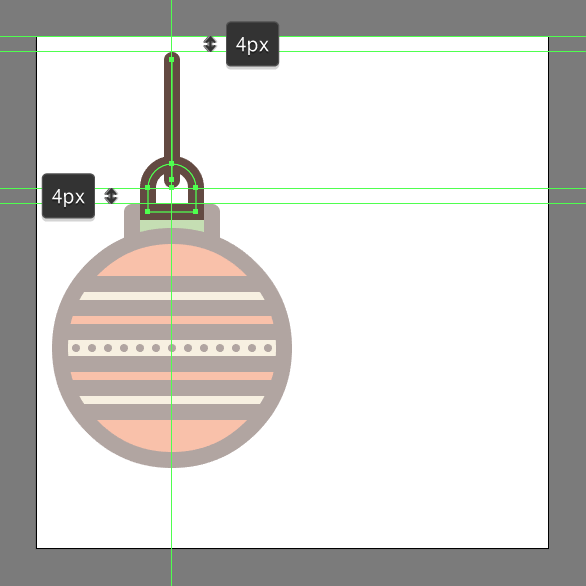
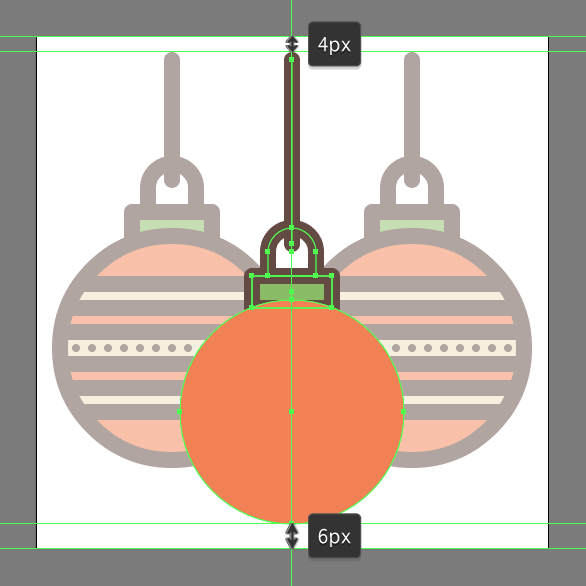
Add the string segment using a 30 px tall 4 px thick Stroke line (#634940) with a Round Cap, which we will center align to the previous section, positioning it at a distance of 4 px from the Artboard’s top edge. Take your time, and once you’re done select and group (Control-G) all of the current ornament’s composing sections before moving on to the next one.
Step 12
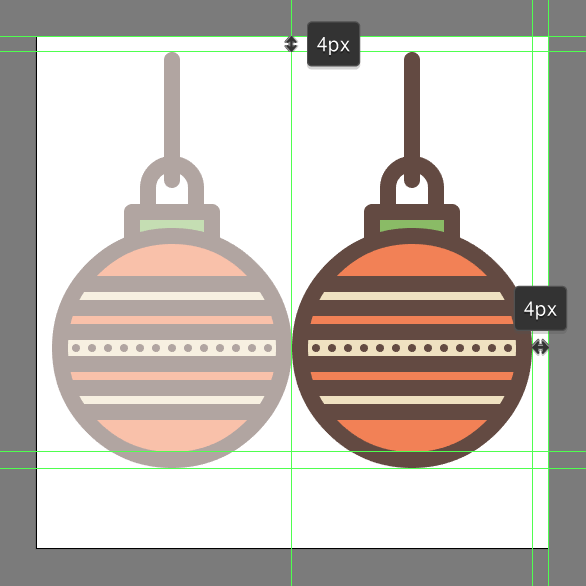
Create the right Christmas ornament, using a copy (Control-C > Control-F) of the one that we’ve just finished working on, which we will position onto the opposite side of the Artboard.
Step 13
Add the middle ornament using another copy (Control-F) of the left one, which we will position at a distance of 6 px from the Artboard’s bottom edge, making sure to ungroup and remove some of its details, adjusting the length of its string as seen in the reference image.
Step 14
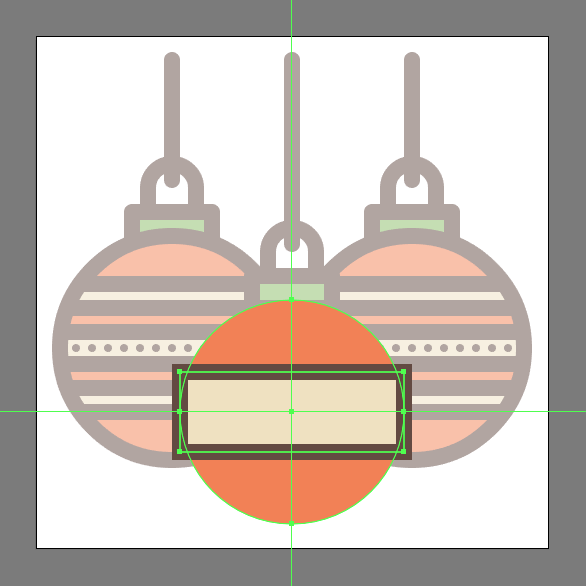
Start working on the decorative strip by creating a 56 x 20 px rectangle (#EFE2C2) with a 4 px thick outline (#634940) , which we will group (Control-G) and then center align to the larger circle.
Step 15
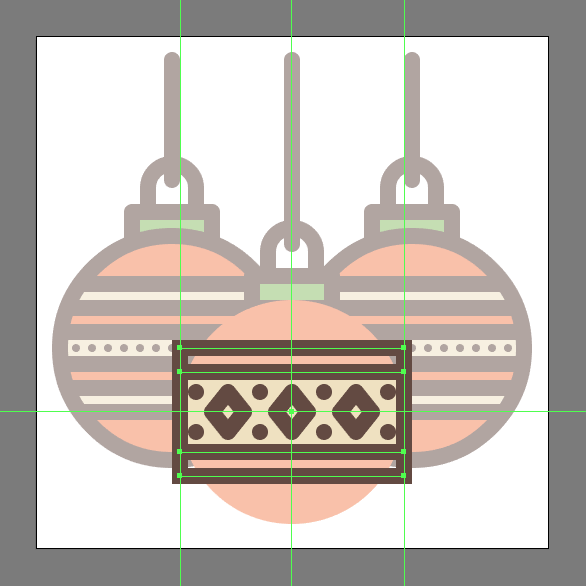
Add the little decorative elements using eight 4 x 4 px circles (#634940) and three diamond shaped Stroke (#634940) with a Round Join, which we will position as seen in the reference image. Take your time, and once you’re done select and group all of them together using the Control-G keyboard shortcut.

Step 16
Create the outer decorative lines using a 56 x 32 px rectangle with a 4 px thick Stroke (#634940) which we will center align to the larger strip, making sure to select and group (Control-G) all of the current section’s composing shapes before moving on to the next step.
Step 17
Finish off the ornament and with it the project itself, by masking the shapes that we’ve just grouped and then giving the ball a 4 px thick outline (#634940), making sure to select and group (Control-G) all of its composing sections together, doing the same for the entire icon afterwards.
![]()
Great Job!
There you have it folks, a nice an easy step-by-step tutorial on how to create your very own digital ornaments using nothing more than some basic geometric shapes and tools.
I really hope you had fun working on this project, and most importantly learned something new and useful during the process.
That being said, I wish each and every one of you a warm and cozy Christmas besides your loved ones.

Author: Andrei Ștefan
Just another coffee addict / pixel grinder, creating colorful projects one pixel at a time.


I visited a lot of website but I believe this one holds something extra in it in it
Wow! This could be one particular of the most beneficial blogs We ave ever arrive across on this subject. Basically Magnificent. I am also an expert in this topic so I can understand your effort.
Just what I was searching for, thanks for posting. If you can imagine it,You can achieve it.If you can dream it,You can become it. by William Arthur Ward.