 If you like playing video games as much as I do, well today’s your lucky day since we’re going to take a look behind the process of creating our very own vector controller using nothing more than some basic geometric shapes and tools.
That being said, grab a sip of that fresh brewed coffee and let’s get started!
Tutorial Details: Game Controller Icon
Program: Adobe Illustrator CS6 – CC 2018
Difficulty: Beginner
Topics Covered: Design Theory, Compositional Construction, Shape Alignment, Grid Positioning
Estimated Completion Time: 30 Minutes
Final Image: Game Controller Icon

Step 1
Assuming you’ve already have the software up and running, let’s kick things off by setting up a New Document by going over to File > New (or using the Control-N keyboard shortcut), which we will adjust as follows:
- Number of Artboards: 1
- Width: 128 px
- Height: 128 px
- Units: Pixels
And from the Advanced tab:
- Color Mode: RGB
- Raster Effects: Screen (72ppi)
- Preview Mode: Default
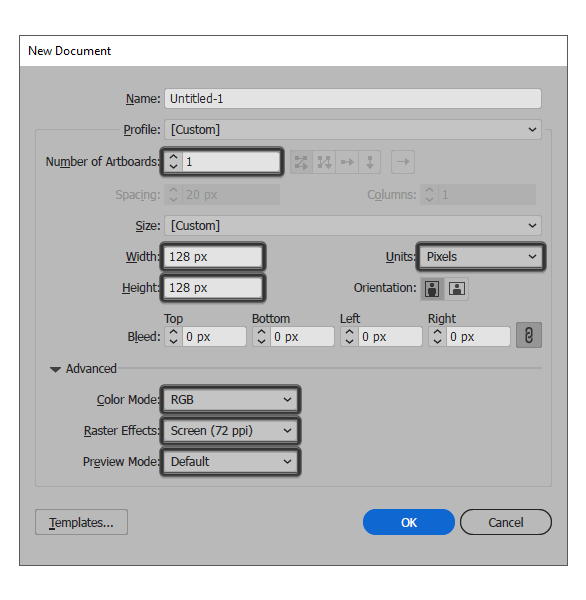
Quick tip: most of the indicated settings can be automatically triggered if you set the document’s Profile to Web, the only one that you’ll have to manually adjust being the Artboard’s Size (Width x Height).
Step 2
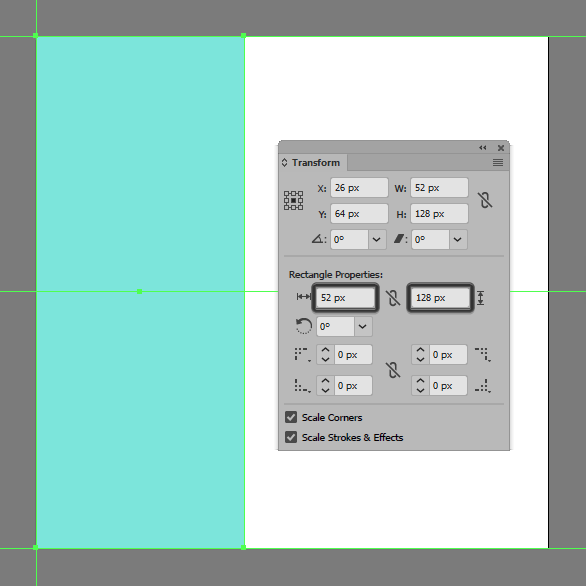
Start working on the colorful background, by creating its left section using a 52 x 128 px rectangle, which we will color using #7DE6DC, and then align to the Artboard’s left edge as seen in the reference image.
Step 3
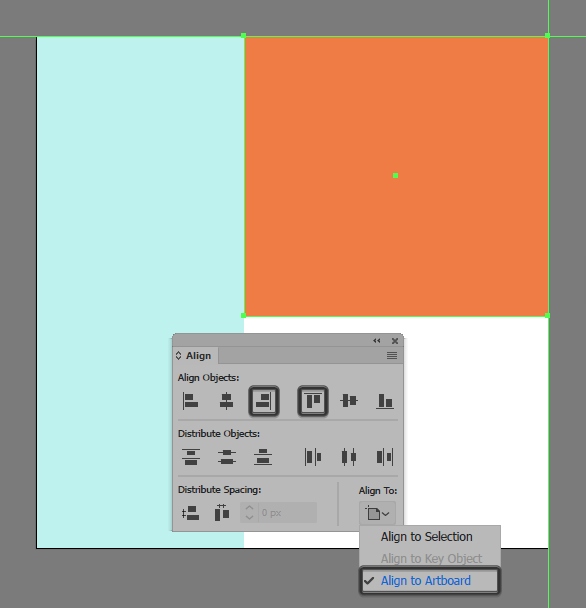
Add the background’s top section using a 76 x 70 px rectangle, which we will color using #EF7D43, and then align to the Artboard’s top-right corner.
Step 4
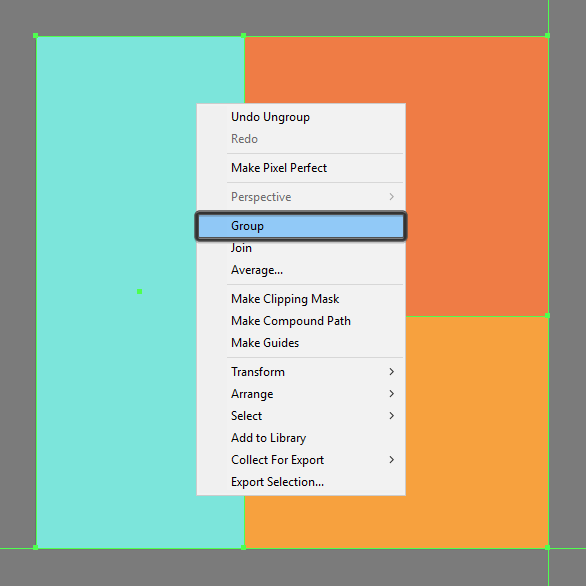
Create another 76 x 58 px rectangle, which we will color using #F7A23C and then position onto the Artboard’s bottom-right corner, selecting and grouping all three shapes together afterwards using the Control-G keyboard shortcut.
Step 5
Mask the shapes that we’ve just grouped, by positioning a 120 x 120 px circle (highlighted with red) on top of them, and then simply select them all and right click > Make Clipping Mask.
![]()
Step 6
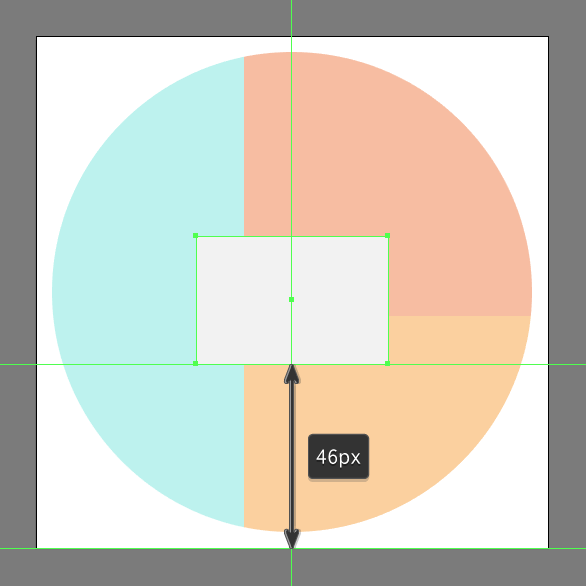
Start working on the actual controller, by creating its main body using a 48 x 32 px rectangle which we will color using #F2F2F2, and then center align to the underlying Artboard, at a distance of 46 px from its bottom edge.
Step 7
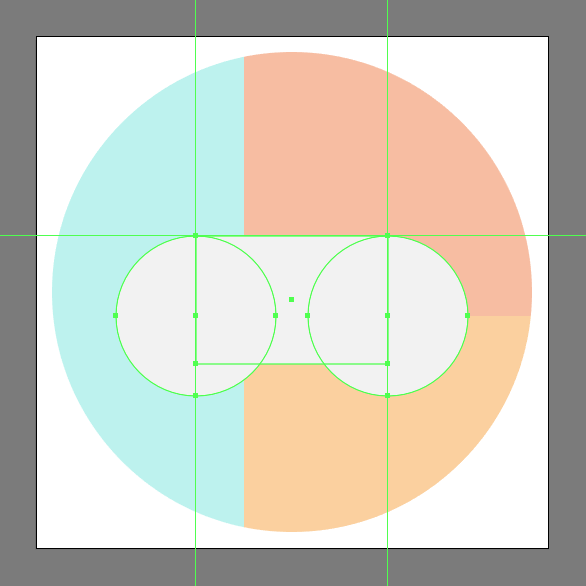
Add the device’s circular sections using two 40 x 40 px circles (#F2F2F2), which we will position onto the previously created shape as seen in the reference image.
Step 8
Select all three shapes and then use Pathfinder’s Make Compound Shape option to make them behave as a single larger object.
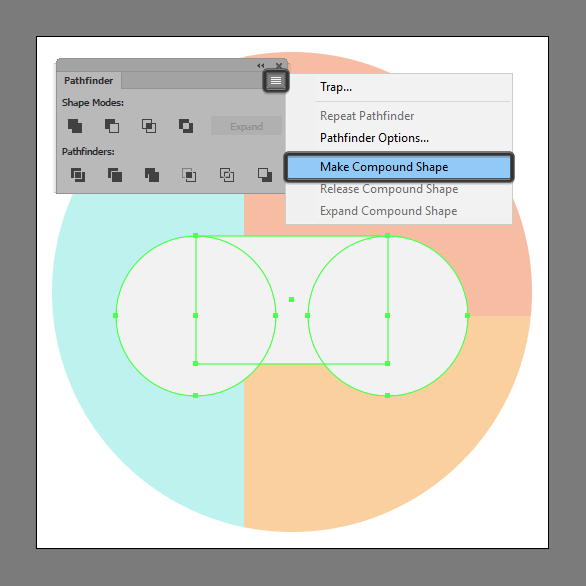
Quick tip: if you’re wondering why we didn’t used Pathfinder’s Unite Shape Mode instead, well that’s because it would have broken our pixel perfect workflow, since the resulting anchor points would have snapped off of the Pixel Grid.
Step 9
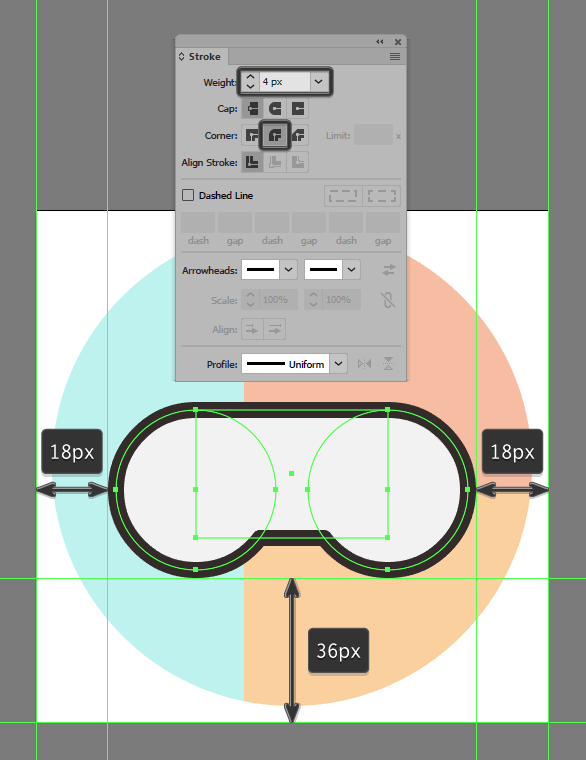
Give the resulting shape an outline using the Stroke method, by creating a copy of it (Control-C) which we will paste in front (Control-F) and then adjust by first changing its color to #302724. Then, flip its Fill with its Stroke (Shift-X) setting its Weight to 4 px with a Round Join. Before we move on, make sure you select both shapes and group them together using the Control-G keyboard shortcut.
Step 10
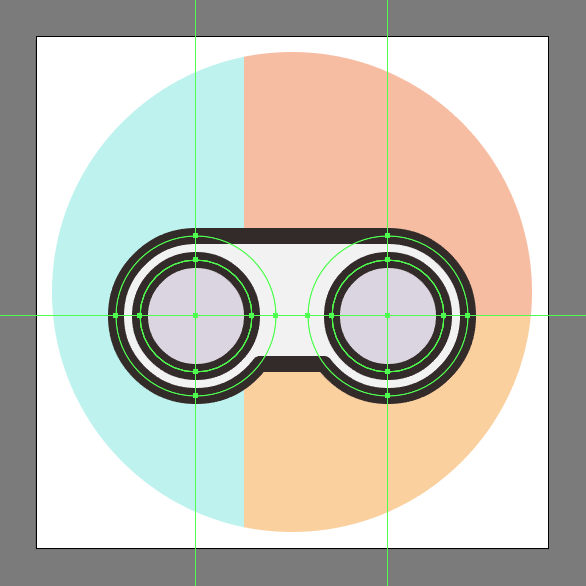
Create the controller’s front circular sections using two 28 x 28 px circles (#DCD5E2) with a 4 px thick outline (#302724), which we will individually group (Control-G) and then position as seen in the reference image.
Step 11
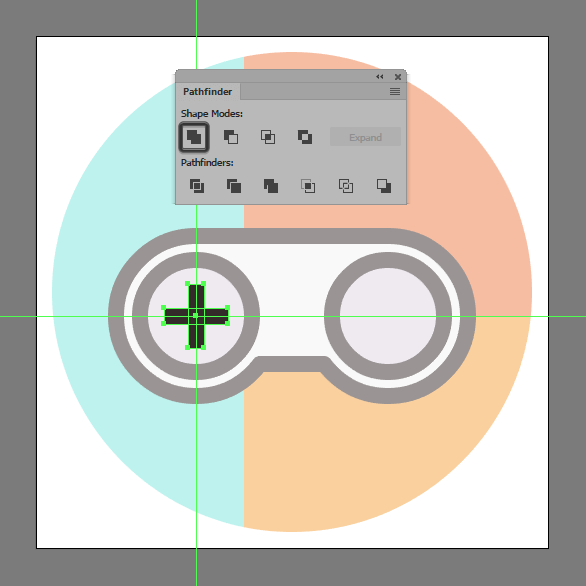
Start working on the d-pad button, by creating a 4 x 16 px rectangle (#302724) on top of which we will add a wider 16 x 4 px one (#302724). Unite the two into a single larger shape using Pathfinder’s Unite Shape Mode, aligning the resulting shape to the controller’s left circular section.
Step 12
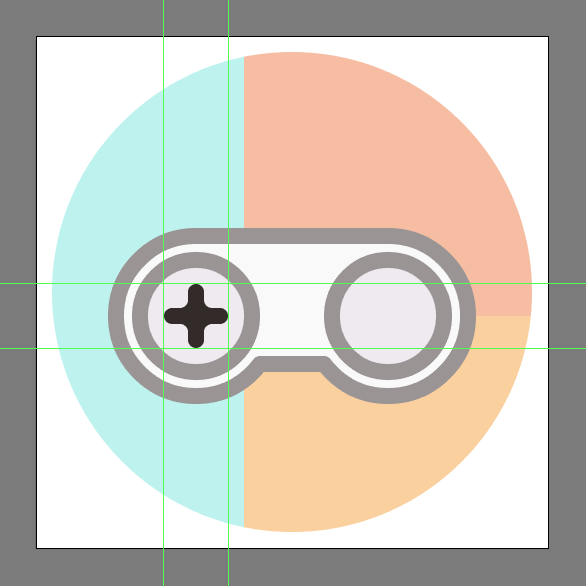
Continue adjusting the button, by individually selecting and setting the Radius of its inner and outer corners to 2 px using the Live Corners function. Once you’re done, select the resulting shape and the underlying circular section and group (Control-G) them together before moving on to the next step.
Step 13
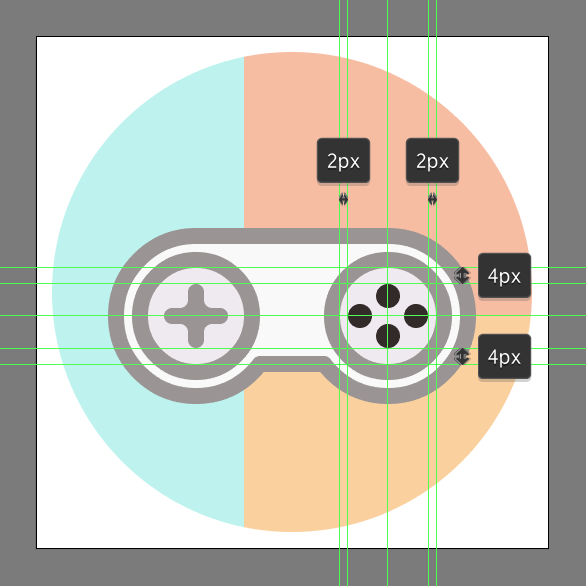
Add the round buttons using four 6 x 6 px circles, which we will color using #302724, and then position as seen in the reference image, making sure to select and group (Control-G) them and the larger underlying circular section once you’re done.
Step 14
Create the center buttons using two 8 x 4 px rounded rectangles (#302724) with a 2 px Corner Radius which we will vertically stack at 4 px from one another, grouping (Control-G) and then center aligning them to the larger body’s center section.
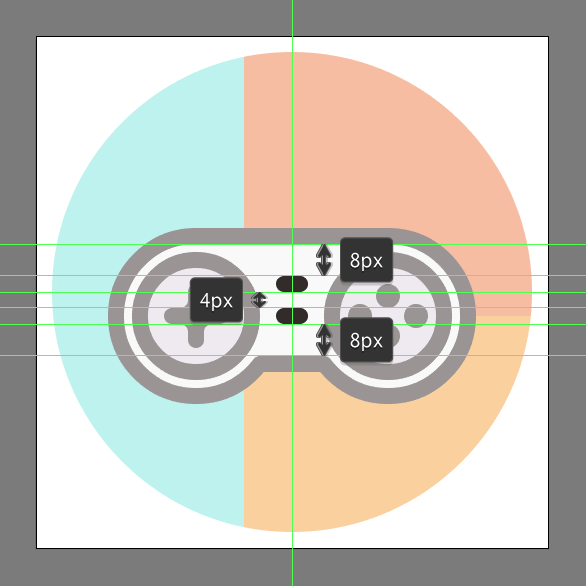
Step 15
Add the front bumpers using two 20 x 10 px rectangles (#302724), which we will adjust by setting the Radius of their inner-top corners to 2 px and their outer ones to 8 px. Position the resulting shapes underneath the controller’s main body (right click > Arrange > Send Backward), selecting and grouping (Control-G) all its composing shapes together afterwards.
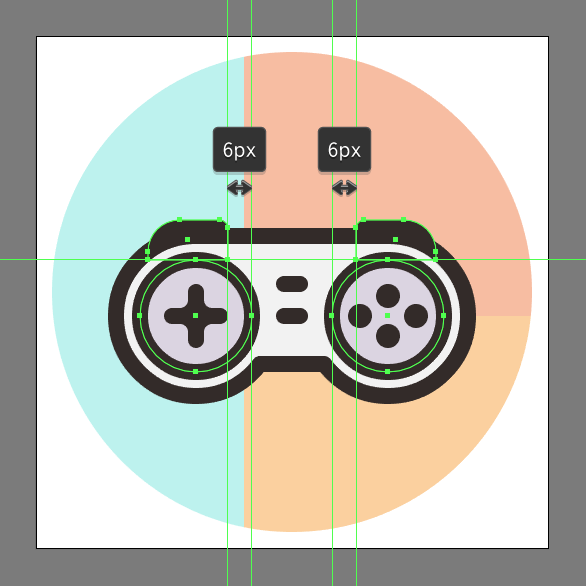
Step 16
Create the subtle shadow casted by the controller using a copy (Control-C > Control-F) of its main body’s fill shapes, which we will color using black (#000000), and then position underneath (right click > Send Backward), making sure to push them about 4 px to the bottom.
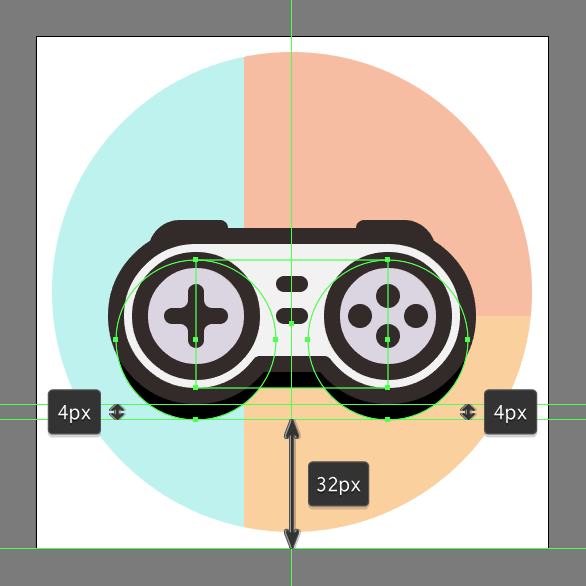
Step 17
Adjust the shadow, by setting its Blending Mode to Soft Light from within the Transparency panel.
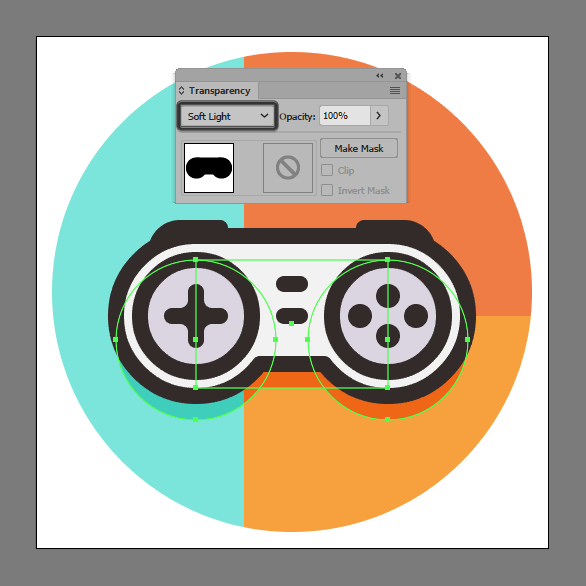
Step 18
Finish off the controller and with it the icon itself, by adding the little cable section which we will create using a 50 px tall 4 px thick Stroke line (#302724), which we will position inside of the masked background by double clicking on it in order to enter Isolation Mode. Once you’re done, press Escape to exit the mask and then select and group (Control-G) all of the icon’s composing shapes before hitting that save button.
![]()
Great Job!
With the help of a few shapes and a couple of clicks here and there, we’ve managed to put together a nice little icon that can be used within any future project.
That being said, I hope you’ve managed to keep up with each and every step, and most importantly learned something new and useful along the way.

Author: Andrei Ștefan
Just another coffee addict / pixel grinder, creating colorful projects one pixel at a time.


Thanks <3
when i saved as .svg the chord was not showing, and the shadow was still black, looks the way it should inside of illustrator though, any ideas?
Enjoyed this very much!