

In this tutorial I’ll show you how to create a chalkboard vector with some gradients, a bristle brush, and some freebies from Vector Mill! The tutorial is relatively simple and can be applied to many other Illustrator projects.
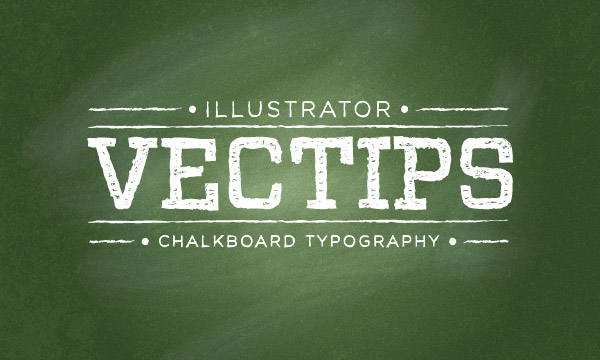
Final Image
Below is the final chalkboard vector we will be shooting for.
Tutorial Details
- Program: Adobe Illustrator CS5
- Difficulty: Beginner / Intermediate
- Topics Covered: Grain Effect, Bristle Brush, Brushes
- Estimated Completion Time: 15-20 minutes
- Required Files: Vector-Mill-Sample.ai (compatibility CS4-CS5)
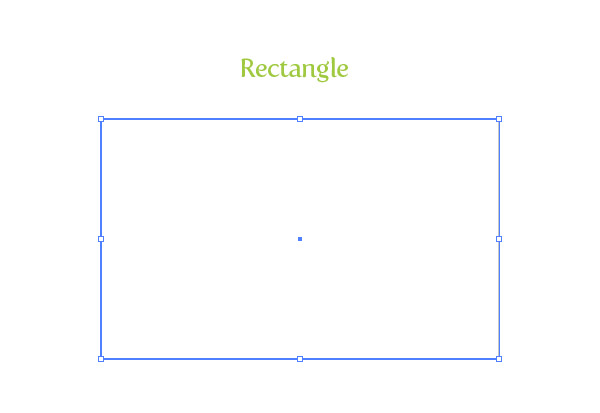
Step 1
Create a new document and create a rectangle with the Rectangle tool (M). This will be our chalkboard vector background.
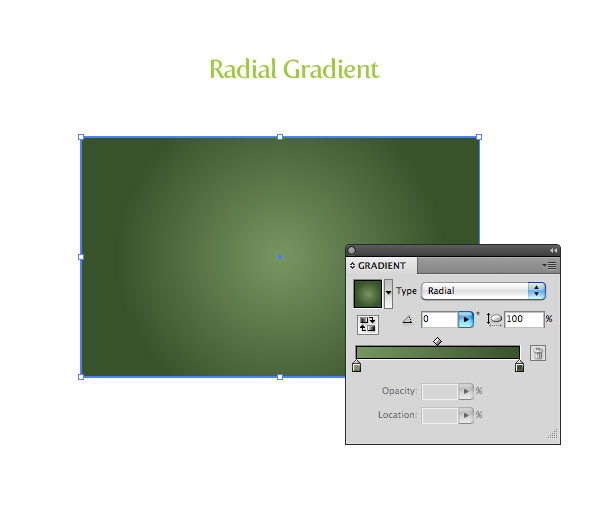
Step 2
Fill the new rectangle with a radial gradient, change the first color stop in the gradient to a green color, and the second color stop to a darker green color.
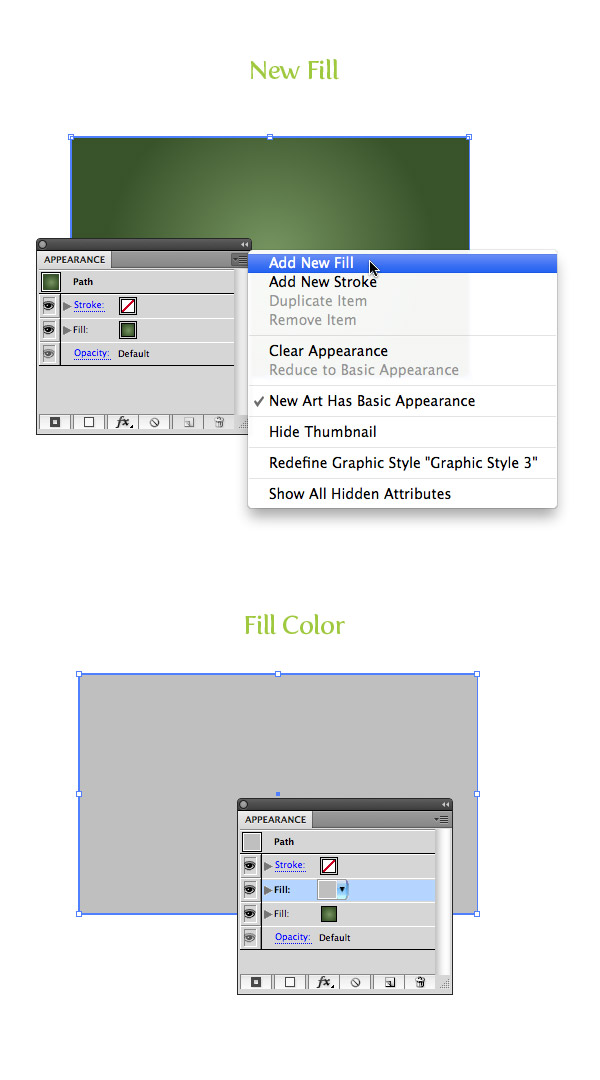
Step 3
With the rectangle still selected, open the pop-up menu of the Appearance panel, and choose Add New Fill. Fill the new item with a light gray.
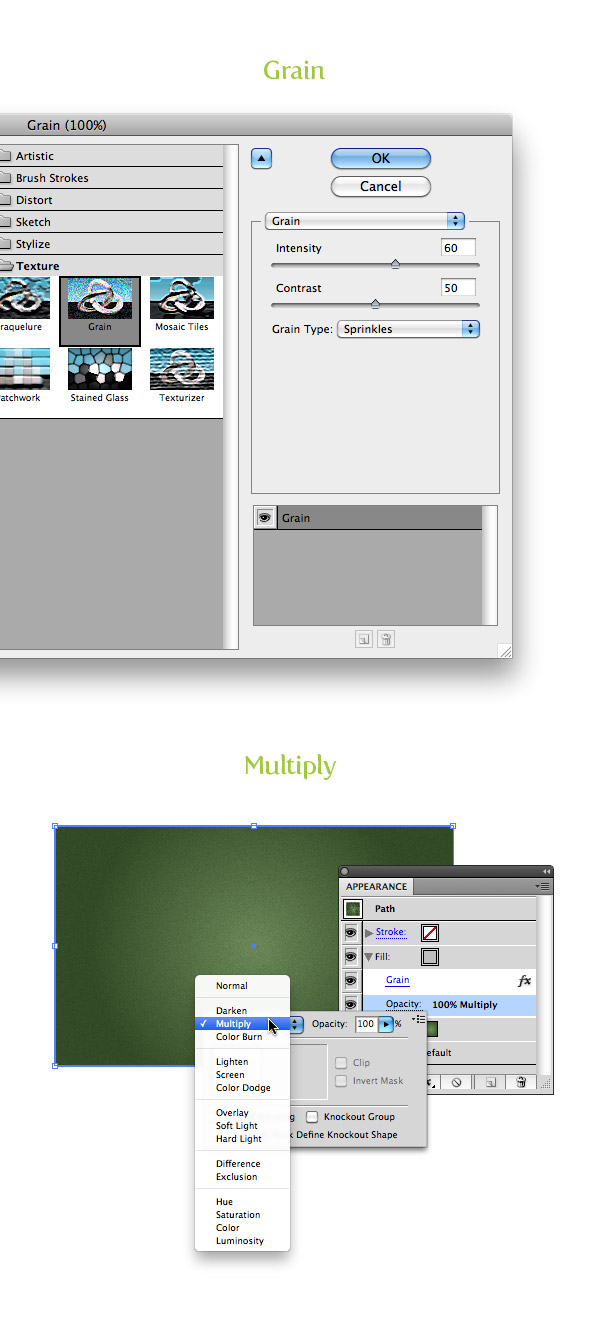
Step 4
With the new gray fill item selected in the Appearance panel, go Effect > Texture > Grain. In the Grain dialog, change the Intensity to 60, the Contrast to 50, and the Grain type to Sprinkles. Next, expand the gray fill item in the Appearance panel, click the Opacity item, and change the Blending mode to Multiply.
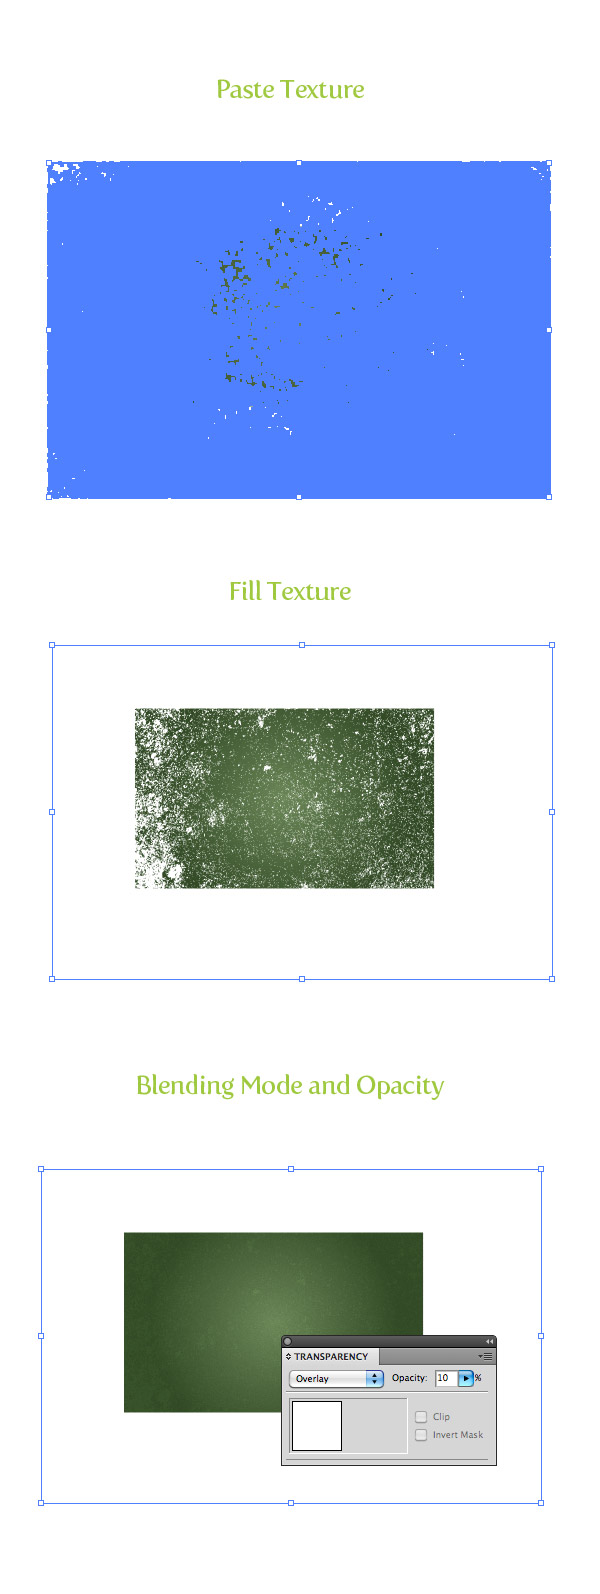
Step 5
For this step, you need to download the Vector-Mill-Sample.ai file. Open the file, Copy (Command + C) the big concrete texture, and Paste (Command + V) it over your green gradient. Fill the texture with white, set the Blending mode to Overlay and set the Opacity to 10 from the Transparency panel.
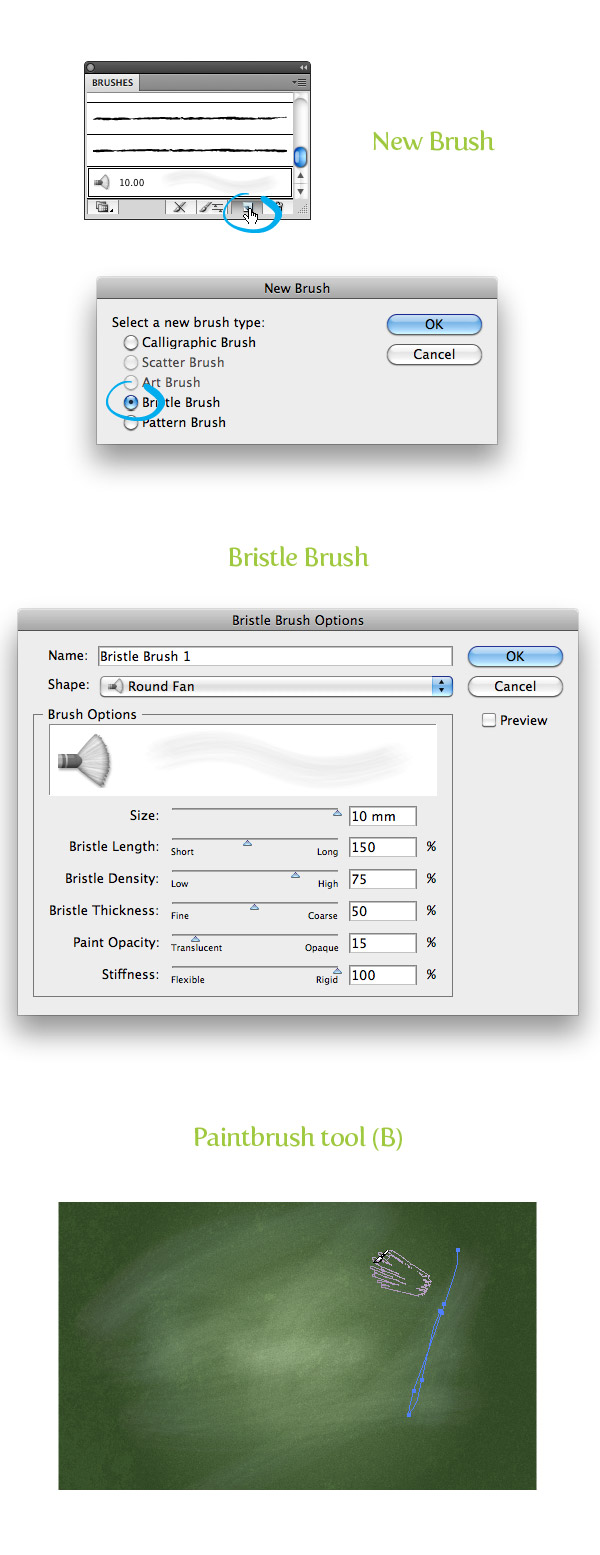
Step 6
We are almost done with the chalkboard vector background texture, but let’s add a little more depth with a Bristle Brush. If you are still not on CS5 you won’t be able to create this step like in the tutorial. As an alternative, you can use some of the watercolor art brushes I created a while back.
If you have CS5, start by pressing the New Brush button at the bottom of the Brush panel and choose New Bristle Brush from the dialog. In the Bristle Brush Options dialog, make these changes:
- Type = Round Fan
- Size = 10 mm
- Bristle Length = 150
- Bristle Density = 75
- Bristle Thickness = 50
- Paint Opacity = 15
- Stiffness = 100
Once you have these settings, select your Paintbrush tool (B) and draw some erratic overlapping paths on the chalkboard vector. That should do it for the background. Now onto the text!
Step 7
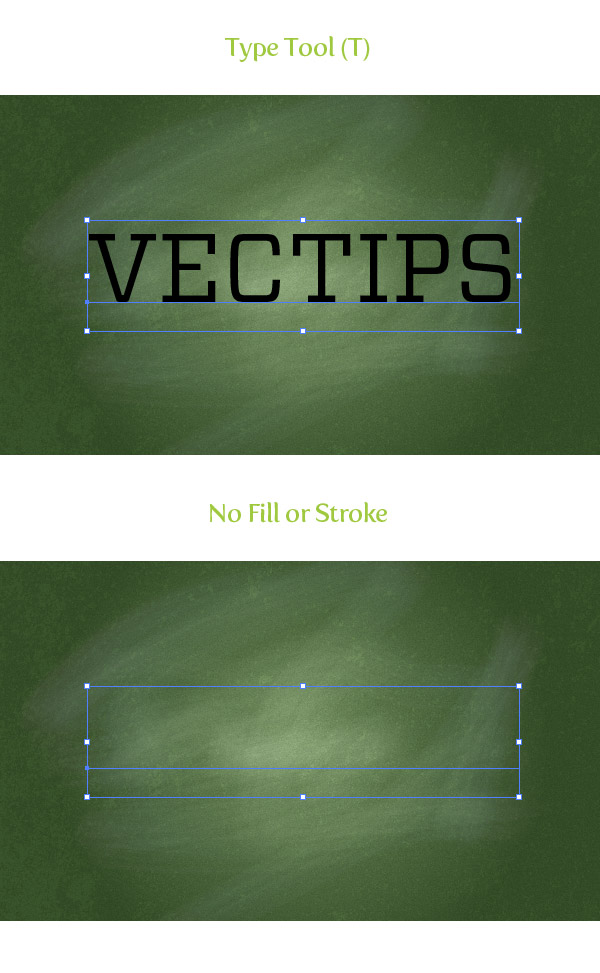
With the Type tool (T), type out some text and choose a font. I’m using Vitesse Book for my text, but you can use whatever. After you have your text, remove the fill and stroke color. This makes it easier to use Appearance panel for the following steps.
Step 8
From the pop-up menu of the Appearance panel, choose Add New Stroke and change the stroke color to white.
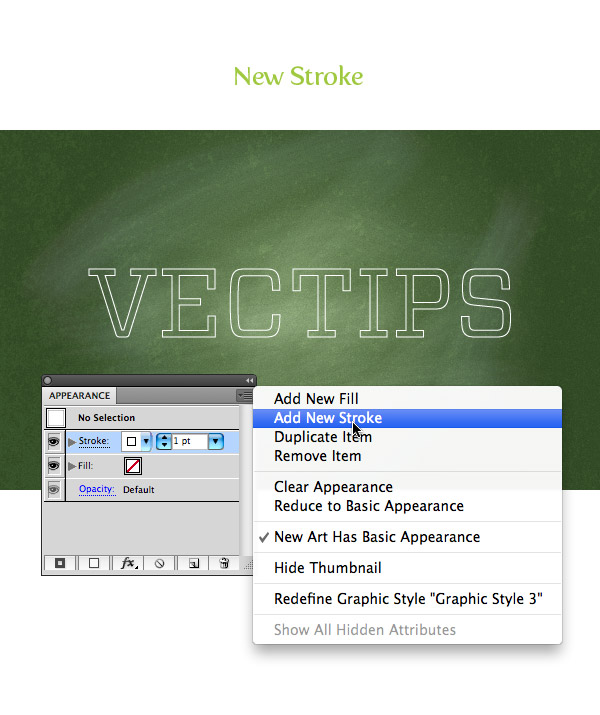
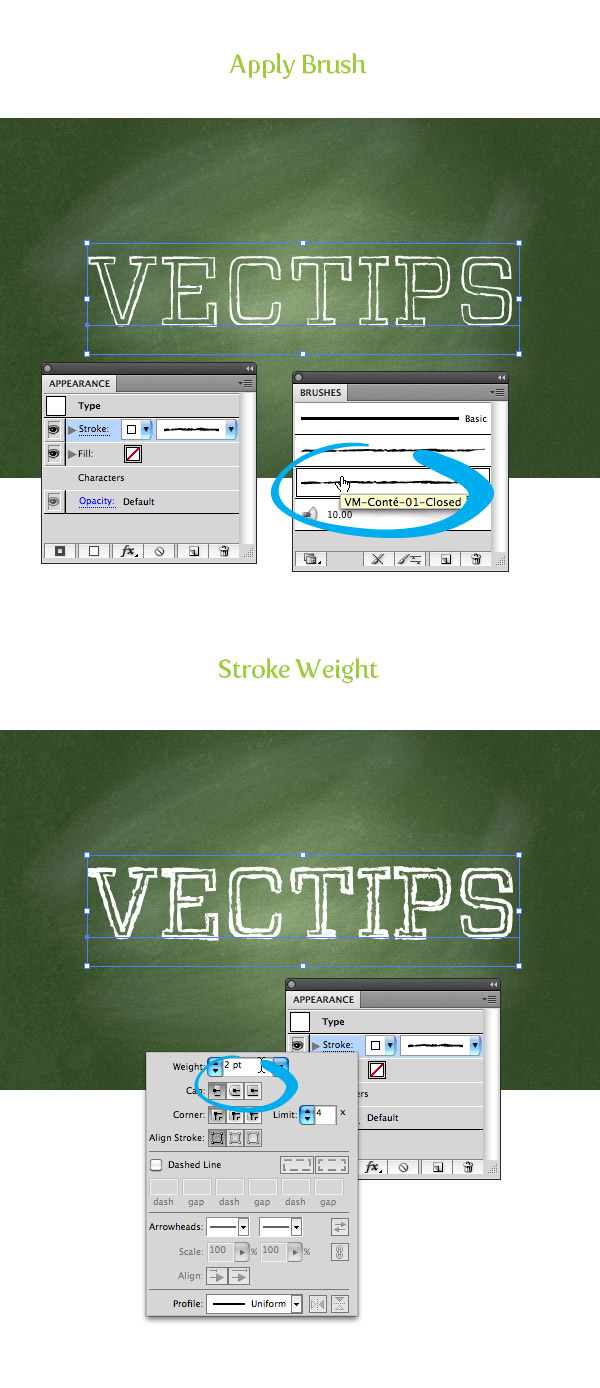
Step 9
Now hop over to the Vector-Mill-Sample.ai file again and select the brushes. Copy both brushes and paste them into your document. They now should be available in the Brushes panel. With your new white stroke item selected, choose the VM-Conté-01-Closed brush. To make it look a little thicker, change the stroke weight to 2 pt.
Step 10
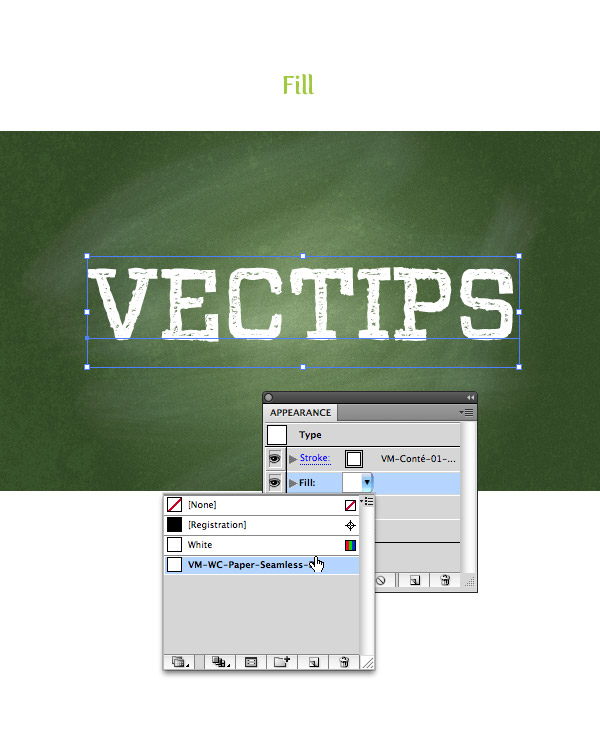
For the fill of the text on this chalkboard vector, we need the last freebie in the Vector-Mill-Sample.ai file. Copy the rectangle filled with the pattern from the freebie document to your document. Note: the rectangle has a couple of fills associated with it just so you can see the seamless pattern. The pattern swatch will automatically copy into your Swatches panel once you paste the rectangle shape into your document. So right after you copy it into your doc, you can delete it.
With your text selected, choose the VM-WC-Paper-Seamless-Rev-White pattern swatch for the empty fill item in the Appearance panel.
Final Image
That is pretty much it for this chalkboard vector! Pretty easy, right? You can add more text, strokes, and other elements to your chalkboard vector like I did in the final image. I created the lines with the Line Tool (\), applied the VM-Conté-01-Open brush to them, and adjusted the stroke weight for the other text.


This is a topic that’s near to my heart… Best wishes! Where are your contact details though?
Good post. I learn something new and challenging on blogs I stumbleupon on a daily basis. It’s always exciting to read content from other writers and use something from their sites.
This blog was… how do you say it? Relevant!! Finally I’ve found something that helped me. Kudos!
Nice guide , it’ll help a lot in building appropriate content
Wow! that was a really dope tutorial. Thank you for helping me out 🙂
Great and an informative article!
Excellent Explained
Really awesome tut i must say! Please keep them dope articles coming!
Excellent article! Nice way to explain and present the content!
Thank you . Easy instructions.
Great tutorial! Thank you 🙂
I followed the tutorial and was able to successfully make the background i wanted. However when I go to save as a PNG file or JPEG it will only save as a transparent white rectangle. Any advice on what I am doing wrong? I checked the layers and the seem in order. Clearly I am a novice at this.
Looks great, but didnt get very far. The vector mills sample is so heavy. Illustrator froze. My macbook pro is only 1 year old and really fast with anything I do. Any tips?
I am create header text for newspaper, thanks for creating easy steps tutorial..
wonderful! thanks so much 🙂
Thanks so much for this simple and easy to understand tutorial!!! I’m making a Christmas printable with a chalkboard for the backdrop. Thanks!!!
Easy to follow. Definitely one of the best ai tutorials I’ve done! The freebie package was really nice and not a scary download. Thank you for sharing!
Is there anyway to create a new, or change the colour of the stroke and fill that you created, if for example I wanted a blackboard with several colours of chalk on it?
Thanks for any advise
lettering effect worked out great, thanks!
Turned out great! Text remains editable. Saved the valuable brushes and fill pattern.
Wow, this article is good, my younger sister is analyzing these things, so I am going to convey to her.
Once you’ve tried this, I’m sure you’ll realise that although it looks pretty cool, you could go to your local hardware store, buy some chalkboard paint, paint a wall in your house/apartment (or even just a big piece of wood you can put aside), and experiment with the REAL THING. Nothing beats the old-school approach. It’ll look better, 10 times out of 10.
Is there a link that works for the file? I’d really love to finish with this tut!
Awesome! thanks, great tutorial, and the freebie file was an amazing help.
This is a great tutorial, one can create many awsome things out of it. Thank you very much.
I think everything posted made a bunch of sense. But, what about this?
suppose you were to create a awesome post title?
I mean, I don’t want to tell you how to run your website, but what if you added a post title
to possibly get people’s attention? I mean Create a
Chalkboard Type Treatment | Vectips is kinda boring. You ought
to glance at Yahoo’s front page and note how they
create news titles to get people to click. You might add a video
or a pic or two to grab readers interested about
everything’ve got to say. In my opinion, it would make your posts
a little livelier.
Thanks for that recommendation! We’ll certainly take that into consideration for titles of our future tutorials.
Great tutorial, thanks!
Need to explain how to apply the brushes to the stroke of the text. This tutorial is pointless without instructions for each step. You got lazy and decided to skip over it.
I’m stuck in Step 5. I don;t know how to perform the blending mode action. I m using AI CS5 and I’m trying to create a chalkboard background at 11″ x 17″ for my magazine (cover spread).
I like. It worked great for me and I like how easy you made it to grab the brushes and fill by copying from the .ai sample. Thx.
Cool Tutorial
Plz also tell me about the chapter wise tutorial on Illustrator
thx
This is the second time I have been unable to finish tutorials from this website and I not going to bother next time. Either there is not enough information between steps or in this case completely different end products.
The brush effect is not even the same and the grain like effect is pixelated as hell. I just shut down it and didn’t bother proceeding any further. That’s half an hour I won’t get back again.
Camtasia studio man!!!!!!!!!!!!! Get it!
Thanks so much for this great tutorial. Steps 8-10 didn’t go exactly the same but I was able to get it to work out fine. Now I have a great chalkboard!
Thanks SOOOOO much!
Great.
This was a great tutorial! Thanks!!!
I am new to Illustrator…
On step 5, how exactly do you fill the texture to white? I have managed to execute all of the steps up until this point.
what a ride, from crash through crappy outline messing, to troubles with the pattern fill, till it all matches together … that great feeling that you’ve learned something i’ve wanted to learn for a long time ! thx ; )
nice tutorial! thank you mate!
This was awesome! It was great all the way up until the end, I couldn’t import the pattern to apply to the text fill. Great stuff, though- thanks for sharing!
Excelente!Thank you for sharing! I learn a lot from here!
What if I need the white chalk to be red?
Thanks! I learn a lot from here!
Fried my graphics card and deleted what I was working on. DO NOT ATTEMPT.
How do you change the colour of the gradient?
Yes I would also like to hear this , how can we change colour of gradient ? And this is nice content
Thank you for sharing~~This is great!
Joss…
Simple n Perfect
that appearance panel bit blew my mind! i didnt know you can simply reference a file as a fill. hot stuff.
Very useful! But link http://v.ecti.ps/6tSc is broken, can you give a new one?
Thanks a lot
This is a great tutorial; thanks! The file size is quite large when it’s all completed. Does anyone know of a good strategy to reduce the file size?
greatly done. nice. love it. thanks kuya Ryan=)
Thank you for a great tutorial. It is very inspiring and well explained! Good job!
Awesome lesson.
A bit difficult, but manageable….
Thanks Ryan, another great tute. That bristle brush effect is just amazing!
Ended up coming out perfectly, thanks!
Beautiful! Thanks so much!
Nice tutorial, it’s just what I needed. Thanks man ! 🙂
WOW… i love this tut! very nice outcome dude!
Very good!
Thanks a lot for this great tutorial!
I like this tutorial. The chalkboard text styling, make me have a feel like back to school study.
I have problem with step 6. Since I’m using CS3, so need to download water colour artbrush. But when I fill white colour, the brush will turn invisible. So it’s impossible for me to get the same result as in Step 6: Paintbrush tool (B). Any idea?
I have the same problem!
This is awesome!!!
This is great! so creative, the use of every tool aiming a great result. I think the use of the brush was very cleaver!
The Vector-Mill-Sample.ai file link is no longer working. Is it not available anymore?
It seems that the link to the free ai is broken. Can you supply a new one please?
This is awesome! It looks as though the link to the sample files is dead, and it’d be really awesome to give your tools a try. Thanks!
Thanks for the great tutorials! Your website has some of my favorite tutorials. Would you consider making a tutorial on how to create a logo in the style of the “vector mill” logo that you have? You know- the old world style effect that your logo has? It’s so neat! And I’m sure others like it too!
Great tutorials as usual, The vectormill sample crashes Illustrator though.
Yikes! Which sample was it and what version of Illustrator are you on?
Happens to me to! For me it was the Vector Mill sample that you linked in step 5. I have Illustrator CS6 version 16.0.0
Nice tutorial. It will surely help in logo designing. 🙂
i couldn’t finish it..
Me either. I had trouble applying the conte brush to the stroke.
Very nice tutorial. It sure will come in handy.
Excelente! Felicitaciones
Great Tut Ryan. I’ve never messed too much with custom brushes in Illustrator. This inspires me to do so. Awesome chalkboard background that doesn’t look “vectory” at all…smooth and photoshop-like with scalability. Nice work.