
In this tutorial I will show you how to create a cute creature from a sketch. This tutorial uses custom brushes, the Paintbrush tool, Pen tool, and the Live Paint Bucket tool. Even if your not a huge fan of the cuteness, you can use these techniques for other illustrations, logos, and vector elements.
Final Image
Below is the final image we will be working towards.

Tutorial Details
Program: Adobe Illustrator CS4
Difficulty: Intermediate
Topics Covered: Custom Brushes, Paintbrush Tool, Live Paint Bucket tool
Estimated Completion Time: 1-1.5 hours
Step 1
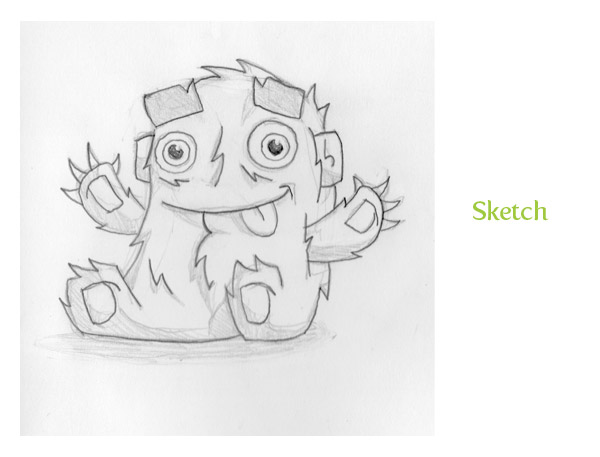
Create a sketch with traditional media or in a design application like Photoshop. Once created, scan in the image and save it on your computer.
Step 2
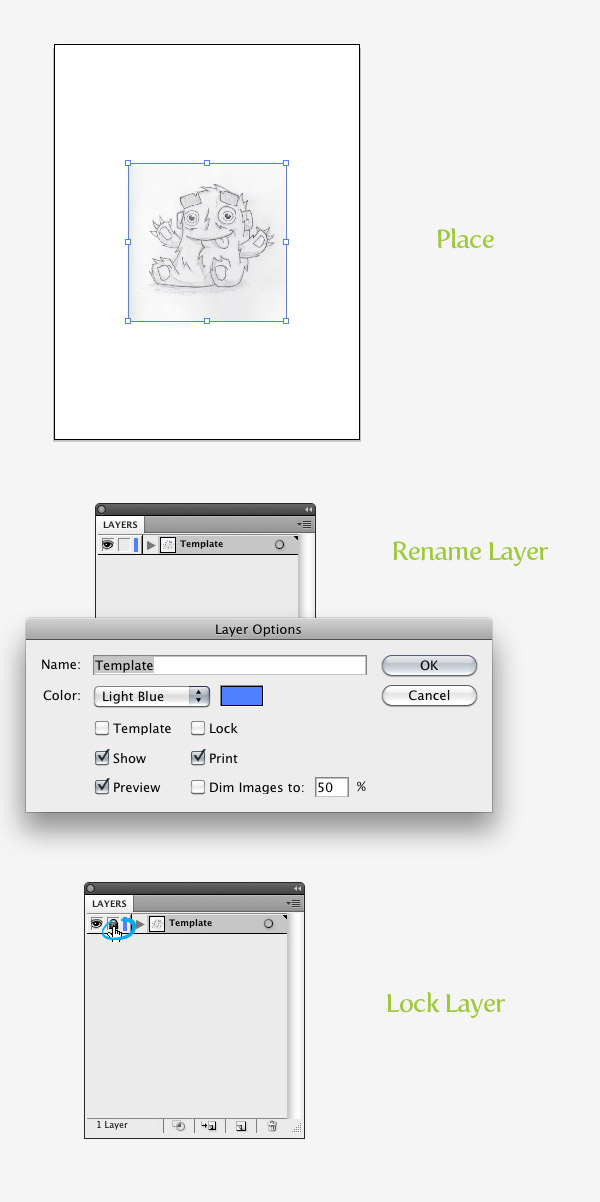
In Illustrator, create a new document, go File > Place, find your image, and place it on your document. From the Layers panel, rename the current layer by double-clicking on layer and typing “Template”. Next, press the Lock icon for the “Template” layer from the Layers panel.
Step 3
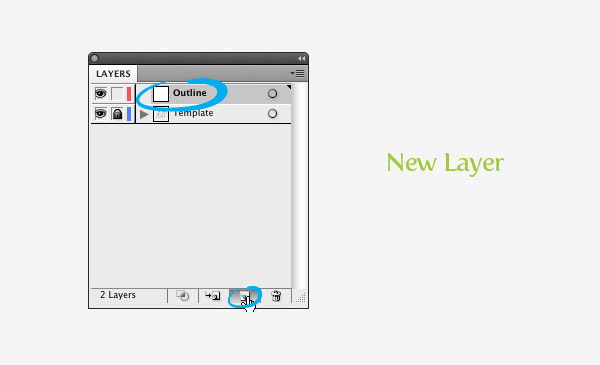
Press the Create New Layer button from the Layers panel and rename it “Outline”.
Step 4
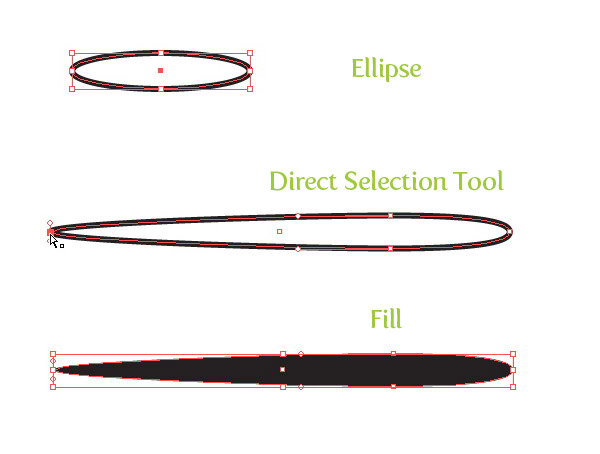
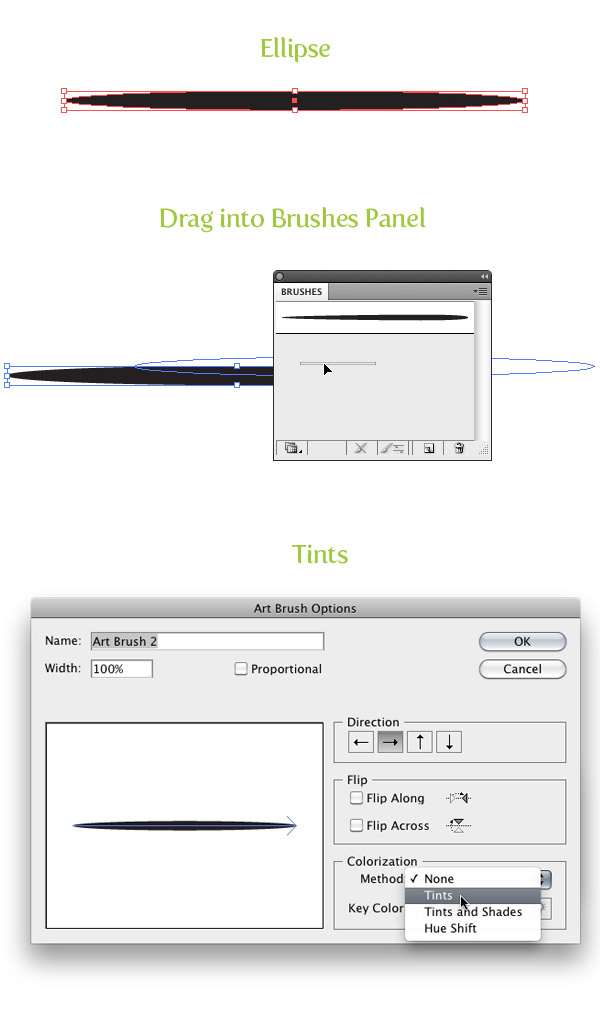
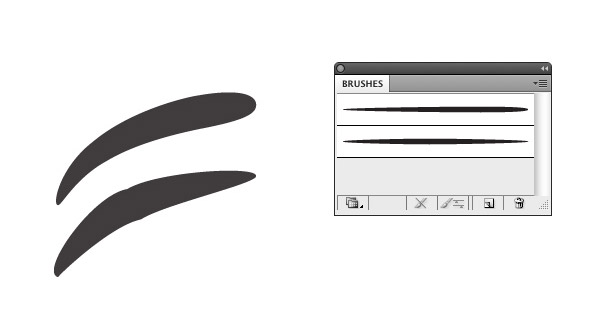
For the outline of the creature we are going to create two custom Art Brushes. For the first one, use the Ellipse tool (L) and create a oblong ellipse. With the Direct Selection tool (A) grab the left anchor point and drag it to left, doubling its width. Next, take off any stroke and fill it with black.
Step 5
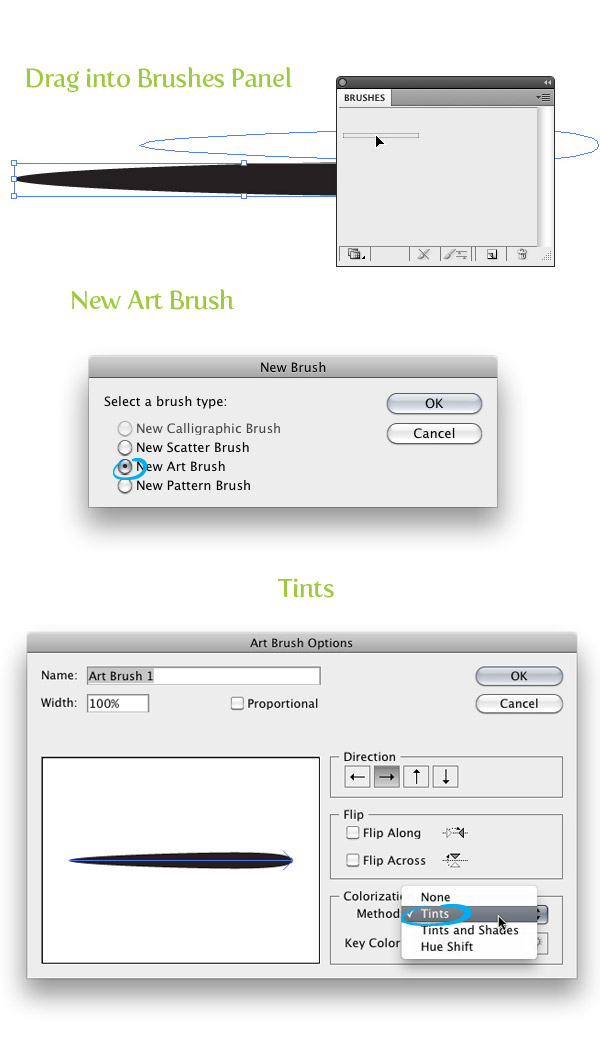
Drag the new ellipse shape into the Brushes panel and choose New Art Brush from the New Brush dialog. With the Art Brush Options dialog open, keep the default options except change the Method to Tints from the Colorization Method drop-down menu.
Step 6
For the second custom brush, create a very narrow ellipse and fill it with black. Like in the previous step, create a new Art Brush and set the Colorization Method to Tints.
Step 7
Now that we have our two custom brushes, we can start tracing the sketch, But before we start, there are some tips you should be aware of.
Paintbrush tool or Pen tool
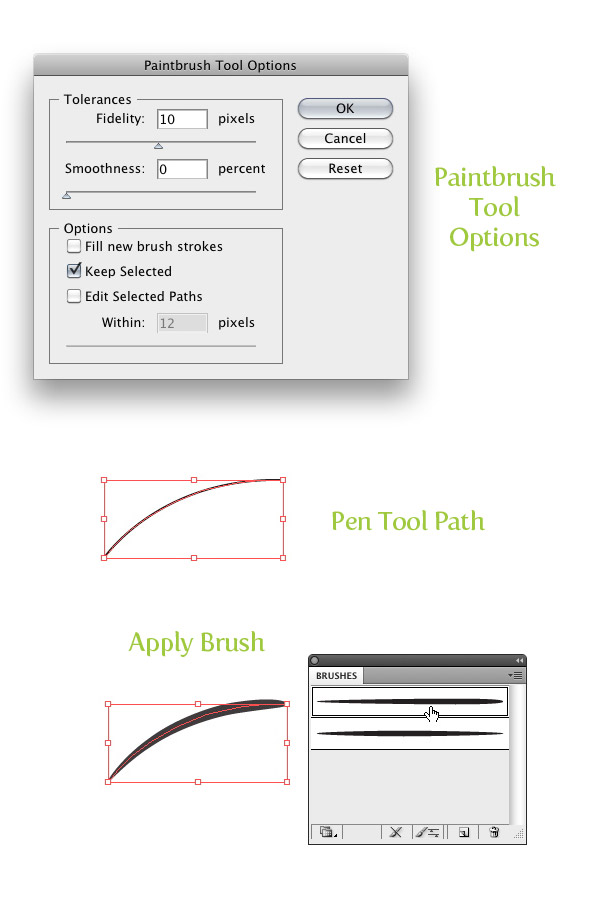
You can use the Pen tool (P) or Paintbrush tool (B) to create the paths that you will apply the custom brushes to. I prefer to use the Paintbrush tool (B) because it is quick and your selected custom brush is automatically applied to the path. If you are going to use the Paintbrush tool (B), it is a good idea to set some of the Paintbrush tool’s (B) options. To do this, double-click on the Paintbrush tool (B) from the Tools panel. When the Paintbrush Tool Options dialog opens, change the Fidelity to 10. This creates a smooth line with using the Paintbrush tool (B). If you are going to use the Pen tool (P), simply selected your created path and select the desired brush from the Brushes panel.
Avoid Paths with Sharp Angles
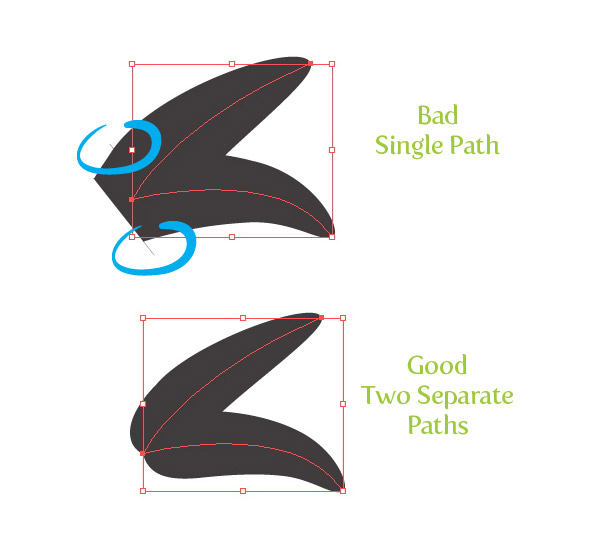
When creating stroked paths with the custom brushes I try to stay away from creating paths with angle less then 90 degrees. As you can see in the example below, Illustrator tends to add weird remnants in angled paths. To get around this I use two different paths each with minimal anchor points. Curvier paths are usually alright.
Use Stroke Weight
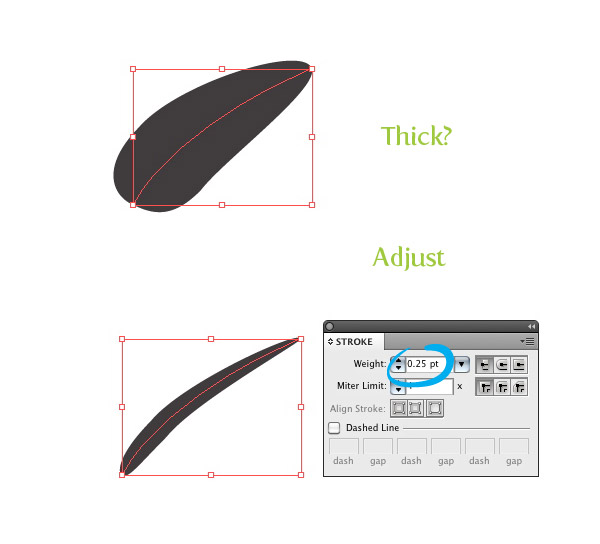
If the brush you apply is too thick, you can adjust the Stroke Weight form the Stroke panel.
Alternate Brushes
Use the different brushes we created to add line variance in the trace. I use the first brush when I want a stroke thicker at one end compared to the other.
Change Direction of Brush
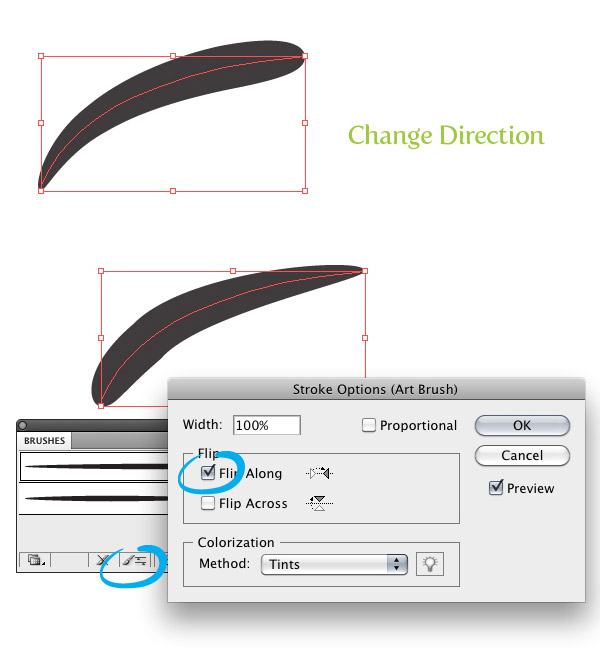
To change the direction of the brush stroke, select your stroke and press the Brush Options button at the bottom of the Brushes panel. In the Stroke Options dialog, you can check the Flip Along or Flip Across check-box until you reach the desired direction. This works great for the first brush we created. Depending on the path, you might need to switch the direction so the thick or thin part of the stroke is on the desired side of the path.
Step 8
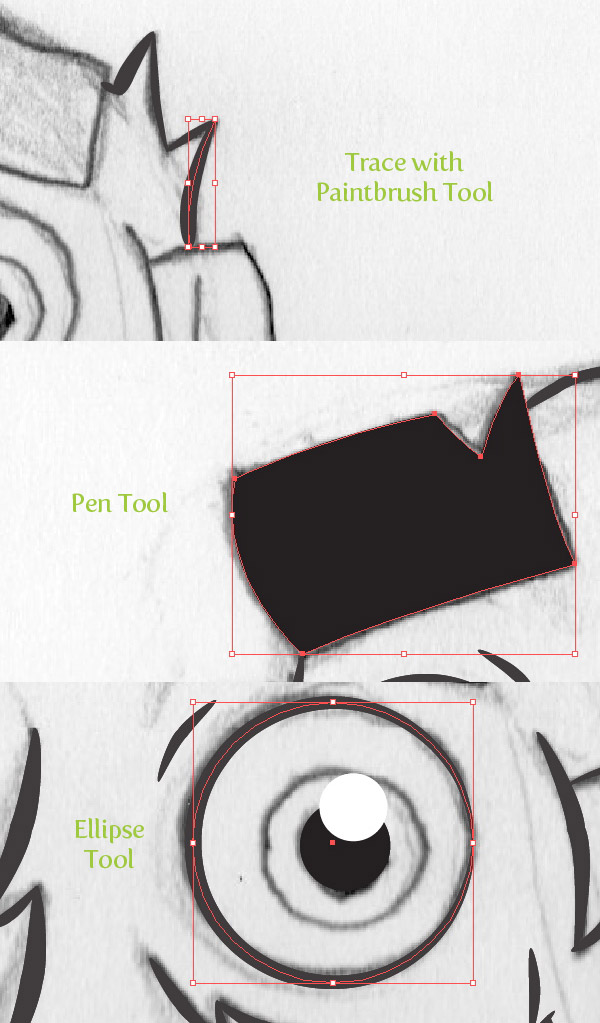
With the Paintbrush tool (B) or Pen tool (P) start tracing your sketch making sure you are in the “Outline”layer and you are thinking about the tips in the step above. For the shapes that will be filled black, use the Pen tool (P) to create the shape. You can also use the Ellipse tool (L) or Rectangle (M) for any shapes like the eyes of the creature.
Step 9
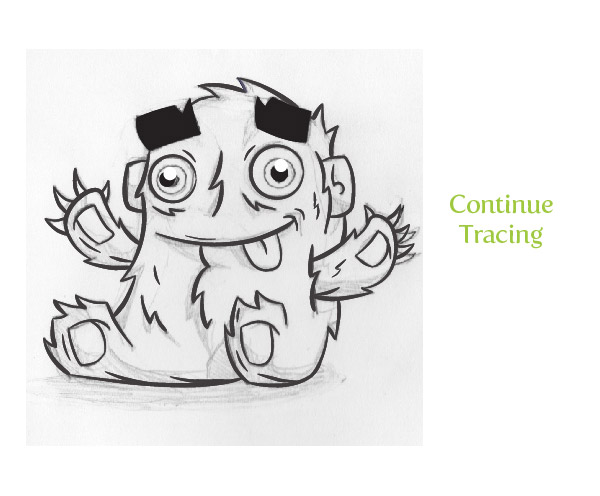
Finish outlining all the dominate lines and shapes of the sketch.
Step 10
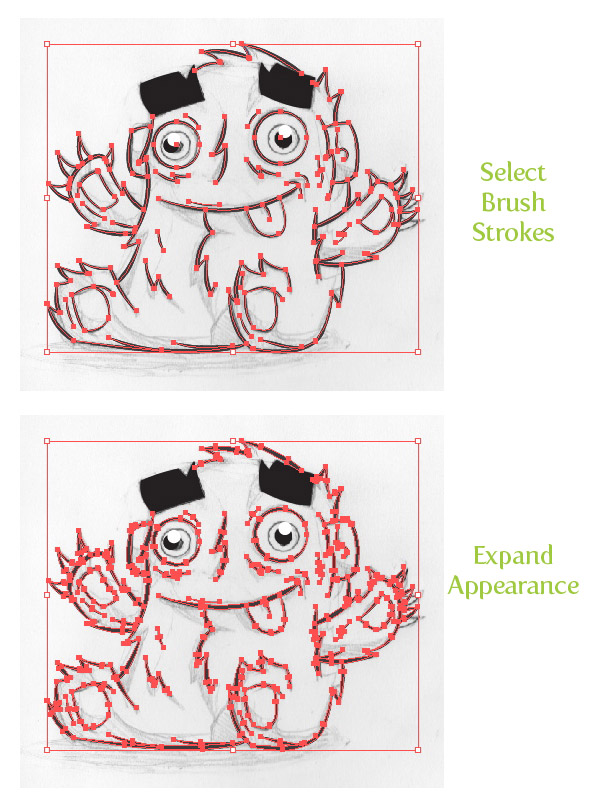
Select all the brush strokes by going Select > Object > Brushed Strokes and the go Object >Expand Appearance.
Step 11
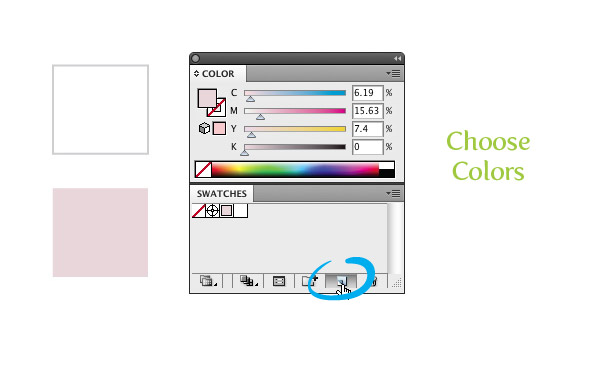
Now that we are done creating the outlines for the character we can start coloring the illustration with the Live Paint Bucket (K). First select a set of main colors for the creature. I chose pink and white. You can create these colors by mixing them in the Color panel and pressing the New Swatch button in the Swatches panel.
Step 12
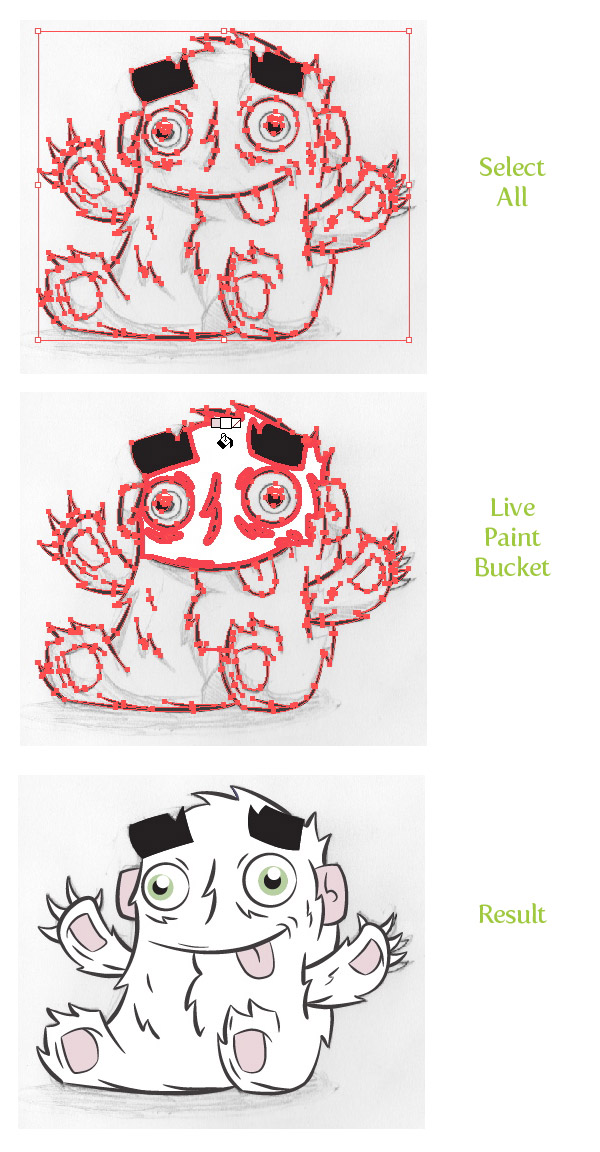
Select all your artwork and choose the Live Paint Bucket (K) from the Tools panel. This will automatically convert the artwork into a Live Paint Group. With the Live Paint Bucket, hover over the open spaces you want to fill. Use the arrows keys to cycle through the colors you want to fill the spaces with. When you cycle to the desired swatch, click in the desired open area to fill it.
Step 13
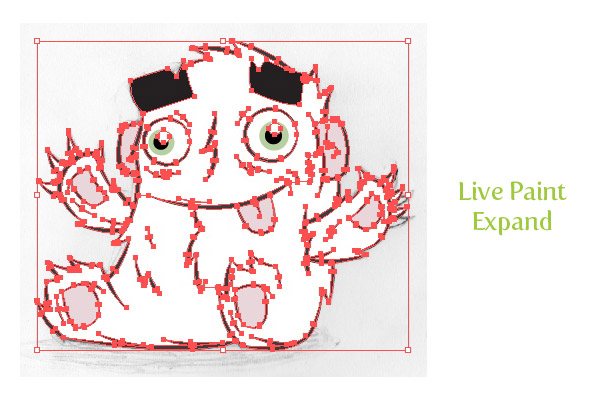
Select the Live Paint group and go Object > Live Paint > Expand.
Step 14
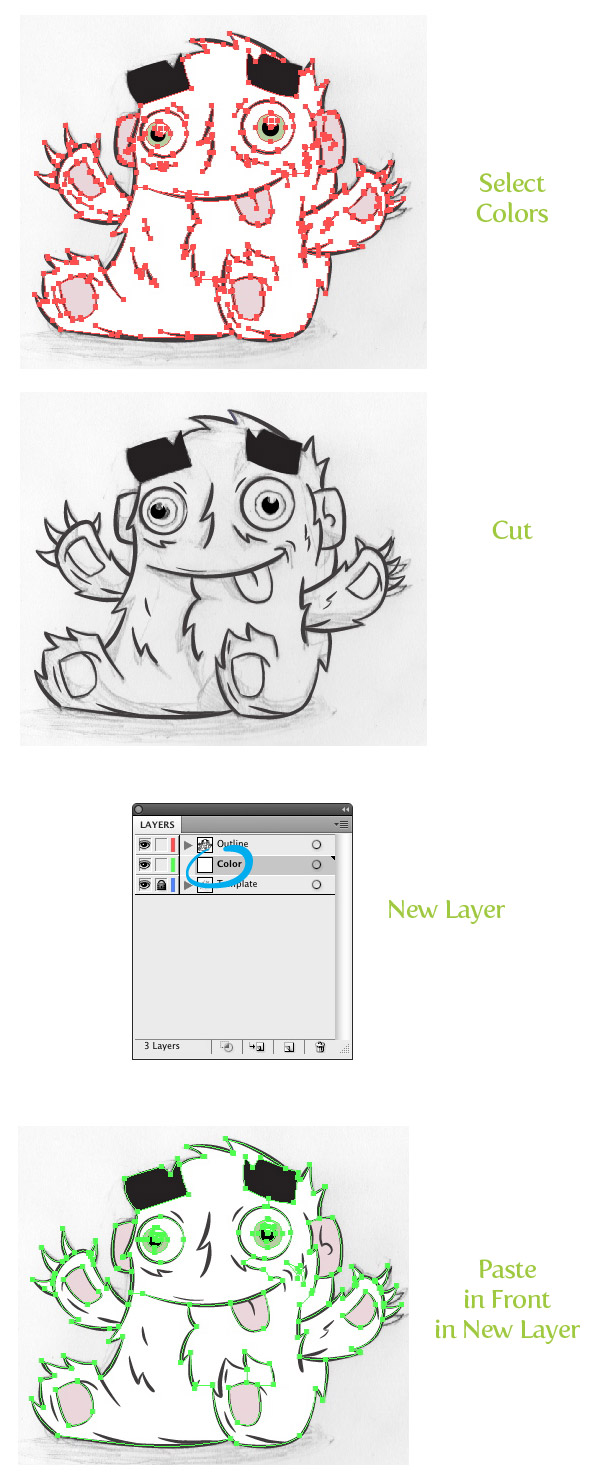
Now that the Live Paint Group is expanded, use the Magic Wand tool (Y), hold down the Shift Key, and select all the colors in the artwork. Once selected, Cut (Command + X) the shapes. Create a new layer from the Layers panel, label it “Color”, place the new layer below the “Outline” layer and Paste in Front (Command + F) the colored shapes.
Step 15
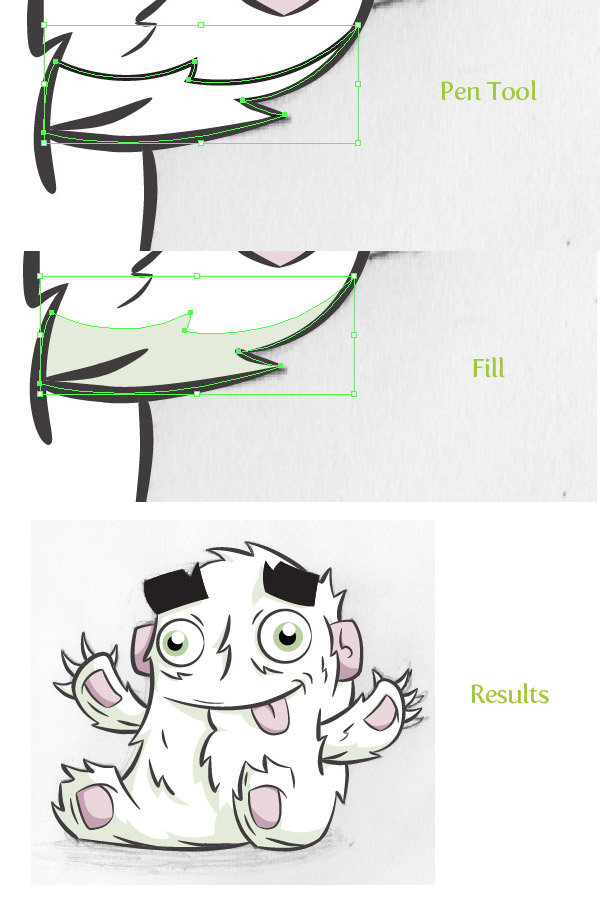
The creature is looking pretty good, but let’s add some shadows to give it more depth. With the Pen tool (P), create shadow shapes in the “Color” layer. Fill the shadow shapes with darker colors than your original colors. Continue until you have created all the shadow shapes.
Step 16
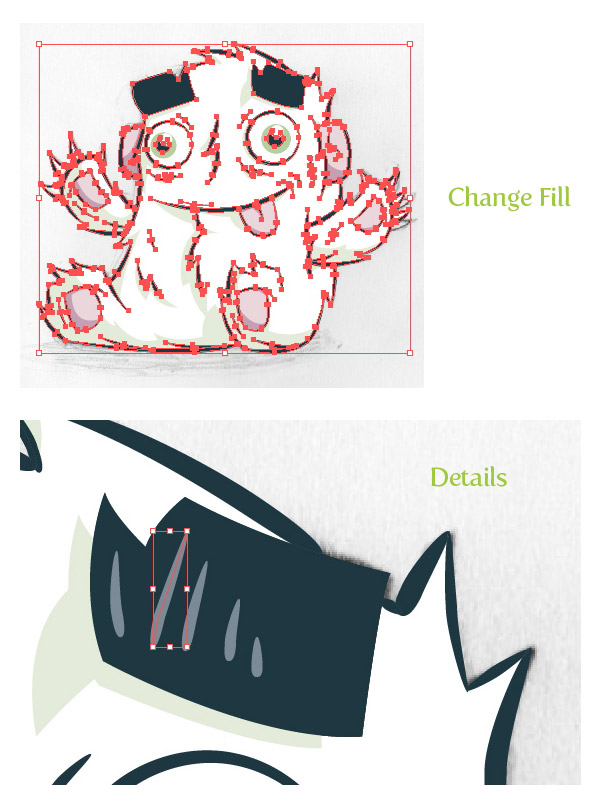
To make the colors a little more vibrant, change the fill color of the outlines in the “Outline” layer. I also used one of my custom brushes to add more detail to the eyebrows. This is a good point to touch up or add any more detail you think the illustration is lacking.
Step 17
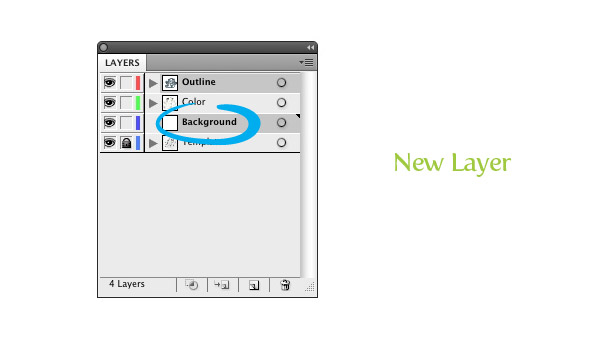
We are almost done, but to make the illustration really pop, let’s put it on a colored background. Create a new layer from the Layers panel, label it “Background”, and place it above the Template layer and below the “Outline” and “Color” layers.
Step 18
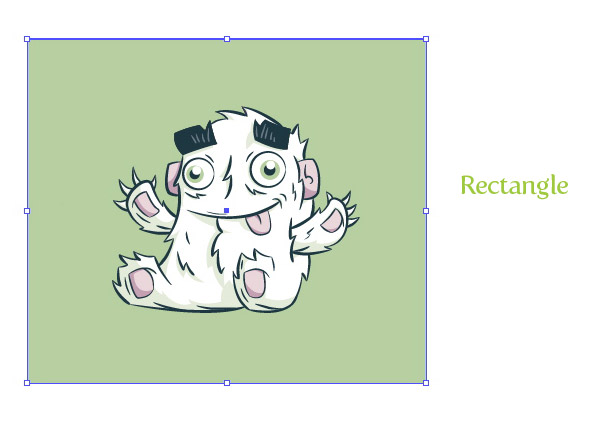
With the Rectangle tool (M), create a rectangle, and fill it with a color.
Step 19
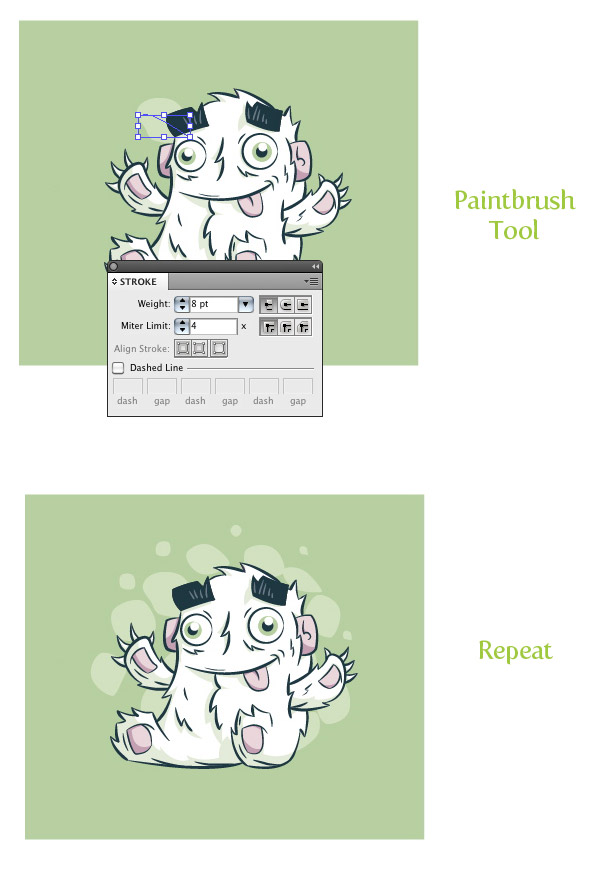
We can also add some depth to the background by creating some bigger brush strokes. Use the Paintbrush tool (B), select a color slightly lighter than your background, set stroke weight very high (around 8 pt depending on the size of your artwork), and create a brush stroke. Create about 15 more brush stroke and mix up the Stroke Weight for some of them.
Step 20
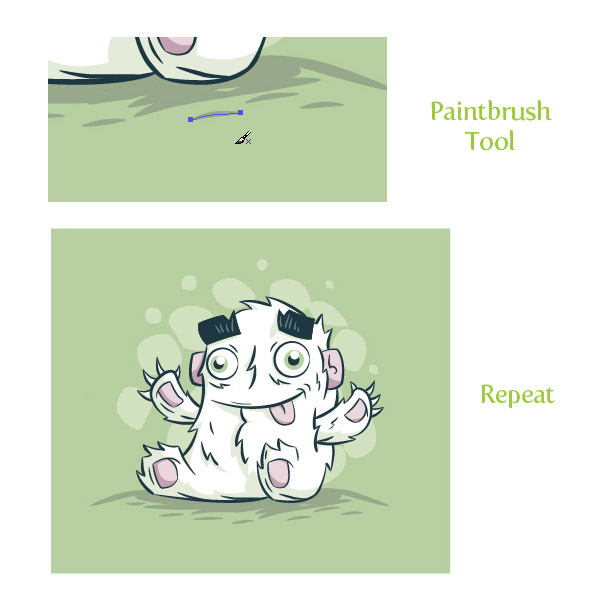
For the finishing touches create some shadows below the creature with the Paintbrush tool (B) and a darker color than your background. All done!
Final Image
Below is the final image again. These techniques work really great on other illustrations and vector artwork especially for t-shirt designs.




Hi there, just became alert to your blog through Google, and found that it’s truly informative. I’m gonna watch out for brussels. I’ll be grateful if you continue this in future. Lots of people will be benefited from your writing. Cheers!
After looking at a handful of the articles on your web page, I truly appreciate your technique of writing a blog. I saved it to my bookmark webpage list and will be checking back soon. Please check out my website too and tell me how you feel.
Nice post. I learn something totally new and challenging on blogs I stumbleupon on a daily basis. It’s always helpful to read through articles from other writers and practice something from other web sites.
Great article. I’m dealing with many of these issues as well..
Hi there, I discovered your web site by means of Google even as searching for a related subject, your site got here up, it seems good. I have bookmarked it in my google bookmarks.
It’s difficult to find knowledgeable people for this topic, but you seem like you know what you’re talking about! Thanks
Greetings! Very useful advice within this post! It’s the little changes which will make the most significant changes. Thanks a lot for sharing!
Greetings from Colorado! I’m bored at work so I decided to check out your website on my iphone during lunch break. I enjoy the knowledge you provide here and can’t wait to take a look when I get home. I’m surprised at how quick your blog loaded on my phone .. I’m not even using WIFI, just 3G .. Anyways, very good blog!
Hello! I simply would like to offer you a big thumbs up for your excellent information you have here on this post. I’ll be returning to your website for more soon.
I was able to find good information from your blog articles.
I do believe all the ideas you’ve offered on your post. They are very convincing and will definitely work. Nonetheless, the posts are too brief for beginners. Could you please prolong them a little from subsequent time? Thanks for the post.
A fascinating discussion is definitely worth comment. I do believe that you should publish more on this issue, it might not be a taboo subject but generally folks don’t discuss these topics. To the next! Best wishes!!
Pretty section of content. I just stumbled upon your weblog and in accession capital to assert that I get in fact enjoyed account your blog posts. Anyway I’ll be subscribing to your augment and even I achievement you access consistently quickly.
What’s up colleagues, how is all, and what you want to say on the topic of this piece of writing,
in my view its truly awesome designed for me.
cool design
Wow! Just loved it! Now I can design my own. Lovely Tutorial so much happy that I learned the Brush Making also! 🙂
REally helpful lession!!!! Thank you very much!!!!
Thanks for this details and simple tut, looking forward for more.
Greetings from Ohio! I’m bored to tears at work so I decided
to browse your site on my iphone during lunch break. I love
the information you present here and can’t wait to take a look when I get home.
I’m shocked at how quick your blog loaded on my cell phone ..
I’m not even using WIFI, just 3G .. Anyways, good site!
I love what you guys are up too. This kind of clever work and coverage!
Keep up the awesome works guys I’ve incorporated you guys
to blogroll.
Oh my goodness! Incredible article dude! Thanks, However I am going through issues with your RSS.
I don’t understand why I cannot subscribe to it.
Is there anyone else getting the same RSS problems?
Anybody who knows the solution can you kindly respond?
Thanks!!
casino deposit bonus [Ward]
Sorry for your troubles. Can you provide some additional info? Which application were you attempting to sign up through (e.g. DesignFloat, Digg, etc)? Or if you prefer, you can sign up for our email newsletter from any pages on our site: http://cl.ly/image/202v2g2o2s1B
Hey there, You have performed a fantastic job. I will certainly digg it and in my view suggest to my friends. I am sure they will be benefited from this website.
Hi there! Do you know if they make any plugins to assist
with Search Engine Optimization? I’m trying to get my blog to rank for some targeted keywords but I’m
not seeing very good gains. If you know of any please share.
Cheers!
We only claimed to be an expert on vectors but will post your question for the SEO experts out there to chime in on.
Helpful info. Fortunate me I discovered your site by chance, and I’m stunned why this accident did not took place earlier! I bookmarked it.
please check
http://zoeksa.deviantart.com/art/110411-self-teaching-368118086?q=gallery%3Azoeksa&qo=1
http://zoeksa.deviantart.com/art/110411-self-teaching-2-368119502?q=gallery%3Azoeksa&qo=0
Thanks for this tutorial, I made a little creature of my own. Check it out!
http://reginefab.blogspot.com/2013/02/procrastination-creature-illustrator.html
i keep getting lost on step 14. i cant figure out how to just select the live paint. i followed the instructions and for some reason it doesnt work
nice. I’m going to do this next time.
Thanks for the tutorial! Illustrator has always been pretty daunting to me (and I just preferred Photoshop) but suddenly I’m in a position where I want to create a new website design with this style of artwork so Illustrator and this tutorial are both perfect for the job. I’ll give it a go when I get my new installation of Illustrator and hopefully I won’t crash and burn 😛
hi.i can not good espick and wrighting english but Thank you for sharing your tips with us! i need your tutoriall ……..
I loved this tut, and the puffy creature. Thank you :*
very thankful, thank you so much for sharing, cery talented congrats 😀
Awesome tutorial. I am learning a lot. Thank you
i really learned a lot from this one. im gonna do more! illustrator is fun!
I love this site so much. Thank you for sharing your tips with us!
cool
Excelente tutorial 🙂
me ha servido de mucho
Illustrators live trace tool works pretty damn well too, cuts that work to a fraction.
Thanks Ryan, I had just finished nailing down a photoshop brush so your tutorial came along at the right moment.
Hey Rype! Sorry for my noobish question, i’m new with using illustrator
I’m stuck at step 14, having trouble with putting colors into the colors layer, after doing paste in front(with the colors layer selected) the colors pasted back to outline layer.
I’m using cs5.
i’m stuck with your tutorial and it would be nice if you will try to help me.
Try locking the Outline layer and making sure you select the color layer. This happens to me sometimes as well.
Thanks for this tutorial!
I was asking how to do something like that with my little drawings and now i know!
Great site!
I enjoyed vectips.com in my Work and Home!
Here is my work:
http://img299.imageshack.us/img299/9876/cute01.png
thanks for this very good tutoriial
i am so thankful there are talented people willing to share with others how to do this stuff! THANK YOU
It’s so cute, went drawing my own character i hope it is just as well :S
Nice! I’ve enjoyed doing this tut!
Thanks!
Thats really cool thanks
I learned a lot. Thanks!
aaaaaaaa! so neat! perfect!
Very nice indeed. I’ll do that:)
Hey Ryan, whenever I try use the live paint over my brushes it destroys the live effects and stroke quality. When trying to follow along with the tutorial, the live paint tool makes the strokes like a pencil line. I’ve tried using the pen tool and then applying a brush to it and then live painting it but no luck. I figured it’s because I haven’t ‘expanded’ it from the “objects->live paint->expand” but it doesn’t allow me to. Help?
Using Ai CS3
That is weird. You have to Expand the Appearance of any stroke will Brushes applied to them. I have had trouble if I had a mixture of paths with Brushed strokes regular stroke paths when trying to expand them. I try to expand the brush strokes ans other stroked paths separately. Maybe that will help?
hi Ryan, in the step 7 i want to know where or how open the Paintbrush Tool Options? please!!! I searched, I searched and could not find … 🙁
You simply double-click on the Paintbrush Tool in the Tools panel.
nice work.Its really awesome
web designer
http://www.scrapsforever.com
Hi Ryan! I got stuck on step 12 while trying to use the live bucket tool. It seem to not want to color in the object but it color in the stroke instead as if the strokes were the object. I assume this was from selecting ‘expand appearance’. Maybe I’m not tracing my picture right or have missed a step, but how do I get the live bucket color in the actual object instead of the stroke? Sorry if this is a silly question, I hope you can help me out though.
Thanks! =)
Fionna
The steps about making your own brush (especially #7) were extremely helpful! I can immediately apply it to a map I’m making for a friend’s wedding.
Thanks for this tutorial!
I was asking how to do something like that with my little drawings and now i know! ^^
But it is a little complicated and so long, it should take me several hours to do that…
I have avoided using illustrator for years because it was so overwhelming and confusing for me. I’ve been reading your tutorials for a few months now and make it a daily routine for me to go step by step with your tutorials. I love them, keep up the awesome work.
i’ve always been curious about creating your own brushes in illustrator – this is a great and seemingly simple tutorial, thanks! my only question is why re-draw the lines with the brush/pen tool when you can just scan a drawing in and live trace it? what are the benefits to this and the drawbacks to live trace? thanks!
For me, it just depends on what style I am going for. If I wanted the illustration to look a little more hand-drawn with not-so perfect lines, I would use Live Trace. For this illustration, I wanted more clean and crisp lines. I could really refine the sketch so the trace line quality would be close to the brushes, but for me this takes to long. It really comes down to your workflow and style.
AAwww live trace is SO GROSS. You cannot capture the beauty of your sketch by clicking a button. Seriously, put in the work and you’ll end up with A) a more editable file, B) a cleaner file with fewer anchor points and handles shooting off at freaky angles and C) most importantly if you have any artistic pride… a much better looking result.
Any numbnuts can hit livetrace bro.
Nice! I’m a big fan of vector brushes, but need to start playing around with Live Paint.
this is really cute, thanks!
The illustration is simply awesome and the tutorial easy to understand.
Congrats & thanks a lot for this!
Really like the result Ryan! Another great tutorial – thanks
cute indeed!
🙂
I always liked ur tutrial selection
Very Good and detailed tut..
thanks for sharing
Good tutorial that covers some important areas. A lot of the brushed look could be obtained with the blob brush tool, which feels more like you’re drawing in photoshop. Also I try to avoid live paint, and always fill in color with the pen tool in a layer beneath the locked outline layer.
super cool! thanks.
Awesome fun. I will try this tomorrow. Thanks!