 Lately, I have been working on some children illustrations, creating some über cute creatures. In the following easy tutorial, I’ll show you how to create a cute panda bear face icon all from ellipses (well, actually there is one rectangle for the background). The great part about this tutorial, is that you can easily apply the techniques to other icons, illustrations, logos, or other projects.
Notes
This tutorial was created with Adobe Illustrator CS4, but you should be able to create the tutorial in other Illustrator CS versions.
Final Image
Below is what the illustration will look like when we are done.

Step 1
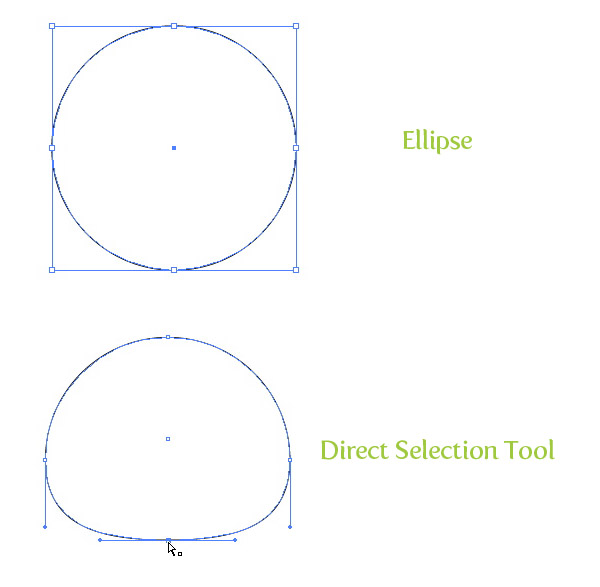
First, create an ellipse with the Ellipse tool (L). Next, with the Direct Selection tool (A), select the bottom anchor point of the ellipse and drag it up about one fourth the way up the ellipse.
Step 2
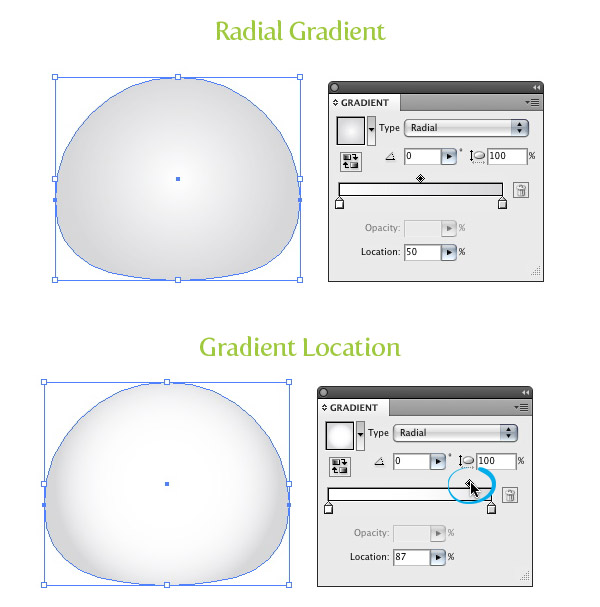
With the ellipse selected, create a radial gradient from the gradient panel. Make the first Color Stop in the radial gradient white and the second Color Stop a light grey. Within the gradient panel, click on the Midpoint Indicator on the Gradient Slider and move it right, closer to the light gray swatch, making the white area of the gradient bigger.
Step 3
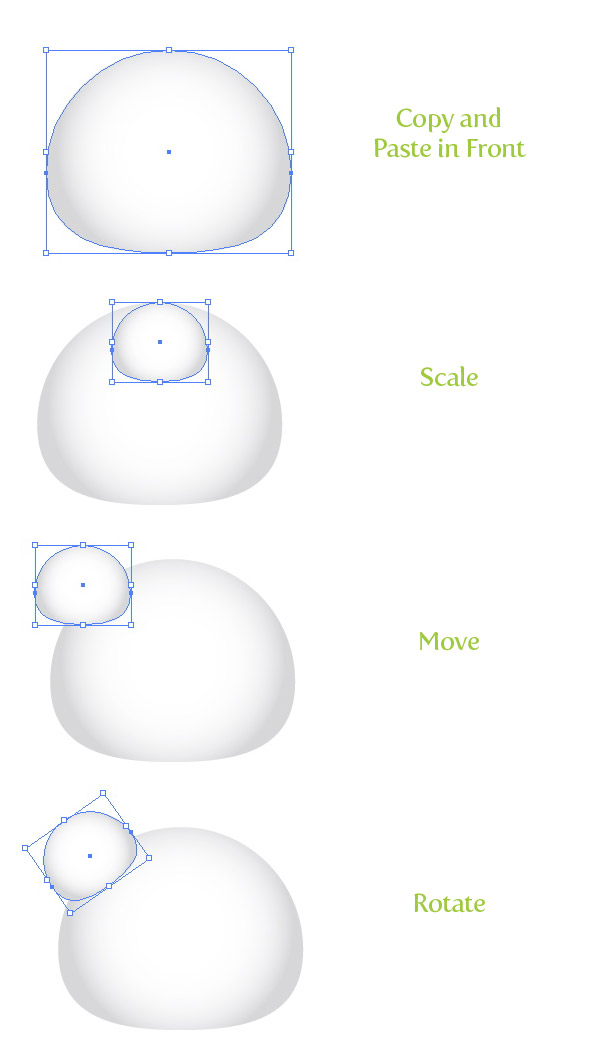
Copy (Command + C) the ellipse and Paste in Front (Command + F). Next, scale down the copied ellipse to a third of it’s original size with the Selection tool (V). Still using the Selection tool (V), move the copy up to the top left side of the original ellipse and rotate the copy about 20 degrees to the left. This will be the first ear shape.
Step 4
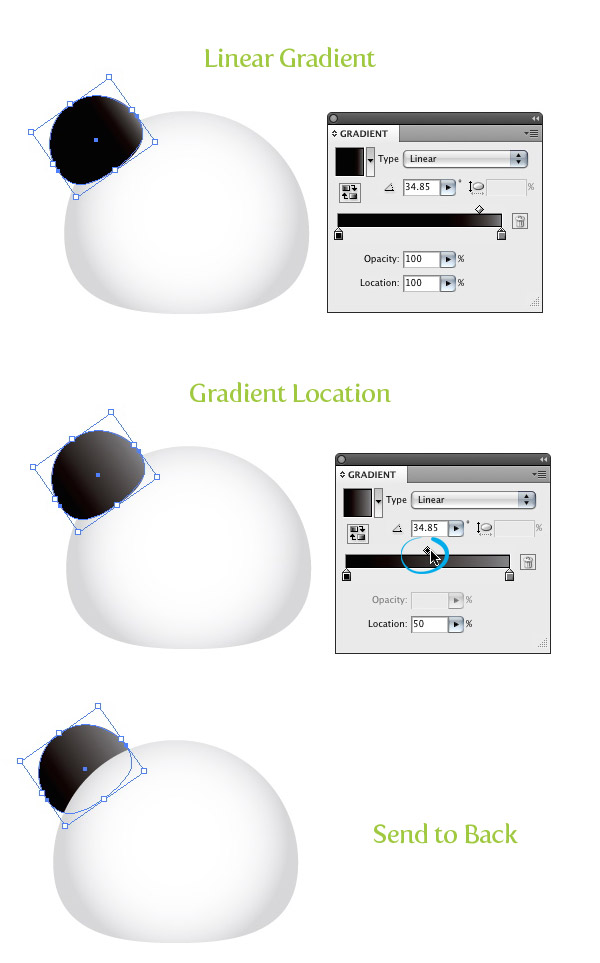
Select the ear shape and change the gradient to a Linear Gradient from the Gradient panel. Change the first Color Stop to black and the second Color Stop to a dark grey color. Move the Midpoint Indicator on the Gradient Slider to mid-point of the two swatches. Next, send the copied ellipse to the back by choosing Object > Arrange > Send to Back (Command + Shift + [ ).
Step 5
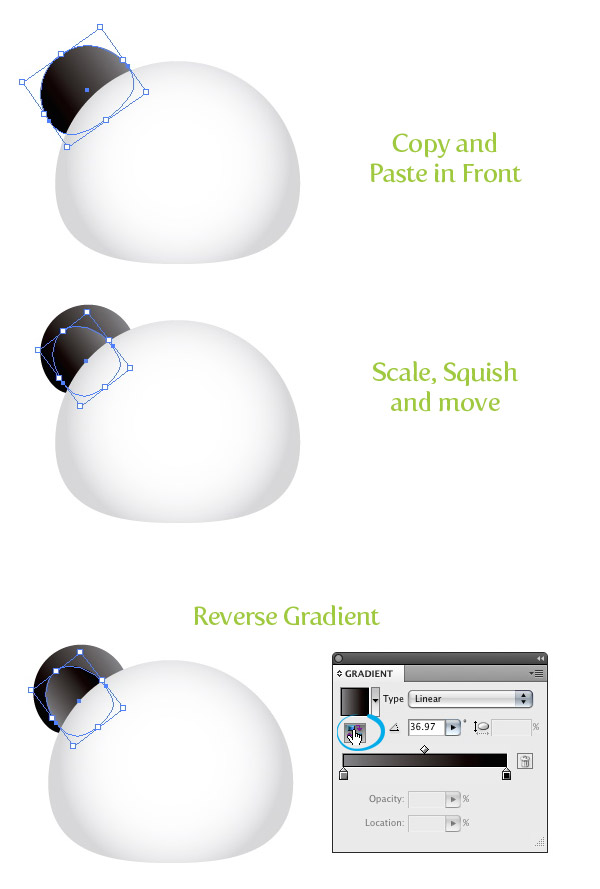
Select the ear shape, Copy (Command + C), and Paste in Front (Command + F). With the Selection tool (V) scale the copy down slightly, squish it horizontally, and place to the lower left side of the first ear shape. Next, press the Reverse Gradient icon in the Gradient panel.
Step 6
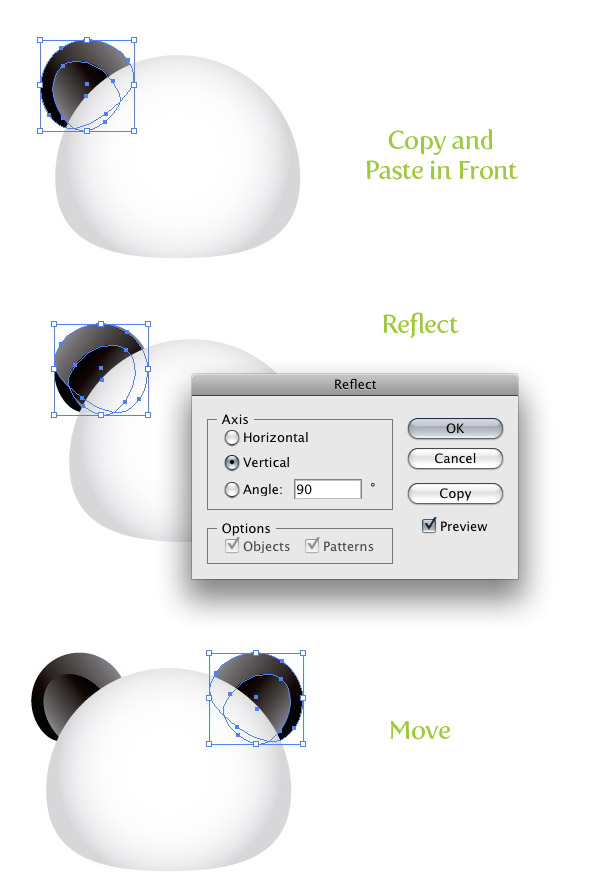
Select both ear shapes, Copy (Command + C), and Paste in Front (Command + F). With the copies still selected, go Object > Transform > Reflect and chose Vertical from the Reflect dialog. Next, move the copied ear shapes over to the right side of the face shape.
Step 7
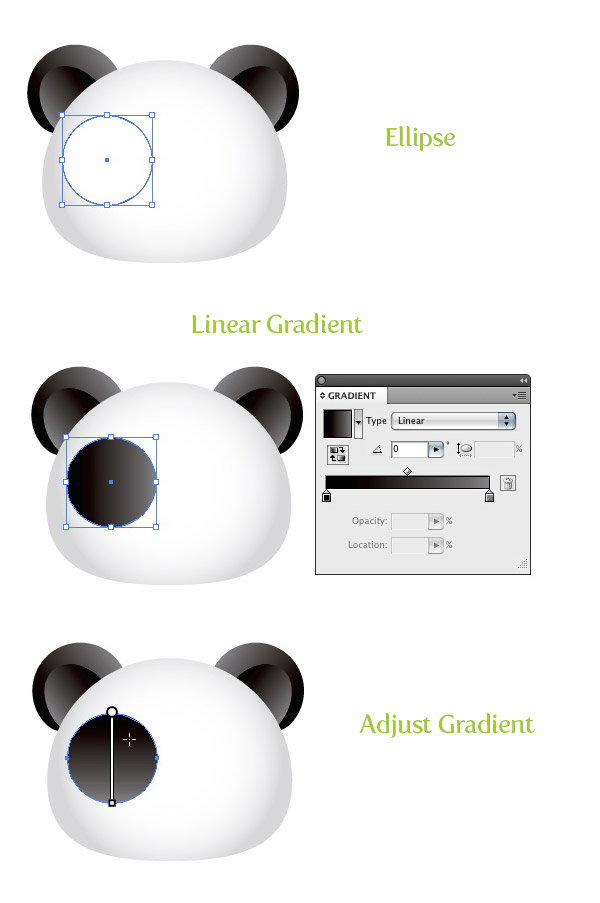
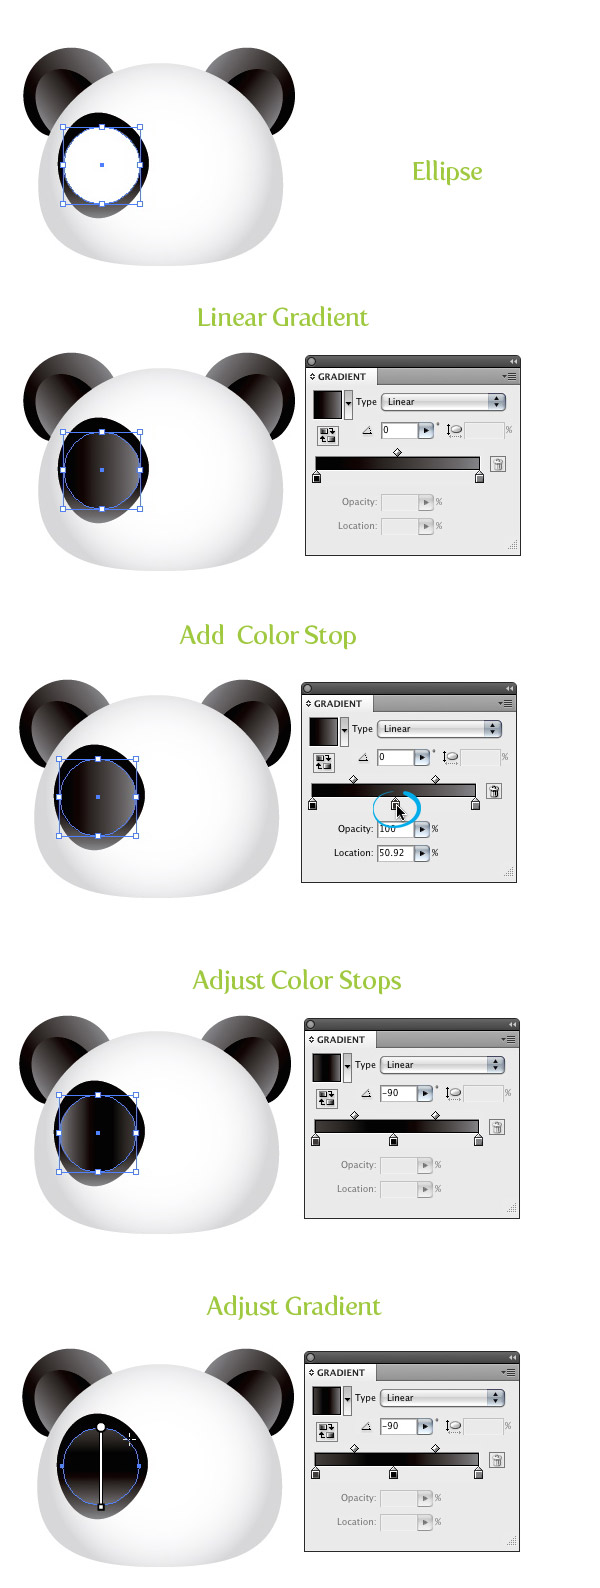
Create an ellipse over the panda face where you want the eyes to go. Fill the ellipse with the same linear gradient as the first ear shape. With the Gradient tool (G), click on the top of the ellipse and drag down, making the darker part of the gradient appear at the top of the ellipse.
Step 8
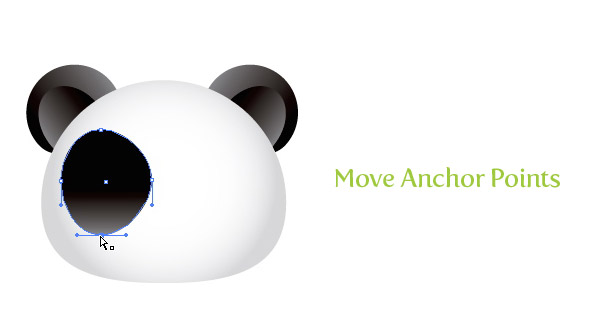
Use the Direct Selection tool (A) and move the bottom anchor point down and slightly to the left. Next move the the top anchor point slightly to the left.
Step 9
Within the first eye shape, draw another ellipse and fill it with a linear gradient. For this gradient we are going to need three Color Stops in the gradient. To add a Color Stop to the gradient slider, simply click right below the gradient slider in-between the first two swatches. Change the first Color Stop to a dark grey, the second Color Stop to black, and the third Color Stop to a grey color. Use the Gradient tool (G) and adjust the gradient by click at the top of the shape and dragging to the bottom.
Step 10
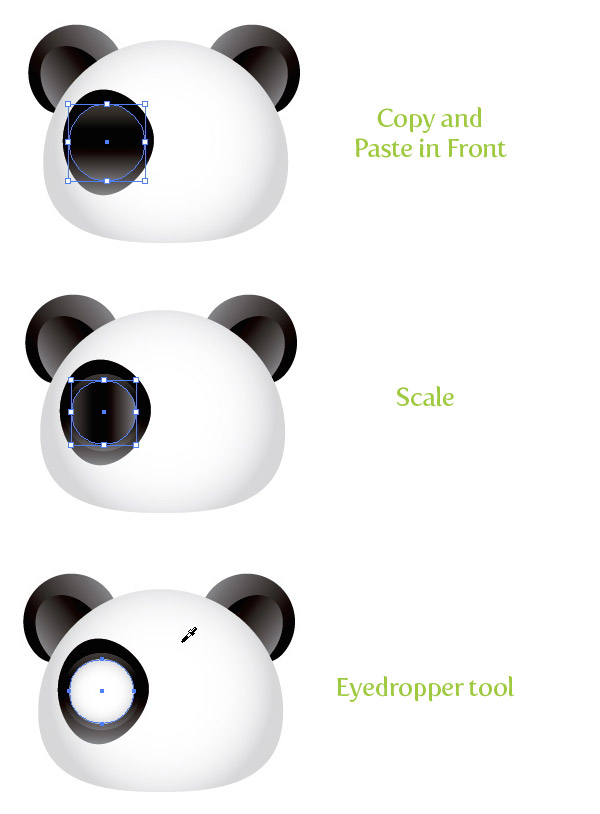
Copy (Command + C) the newest ellipse and Paste in Front (Command + F). With the Selection tool (V) scale the ellipse down slightly so you can still see the three Color Stop gradient ellipse behind it. Next, use the Eyedropper tool (I) and sample the original white radial gradient from the panda face.
Step 11
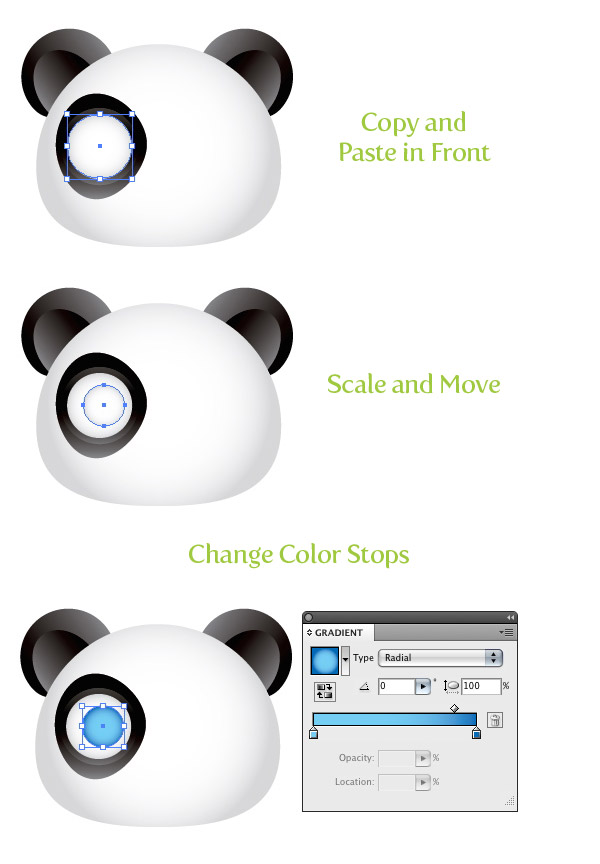
Copy (Command + C) the white eye ellipse and Paste in Front (Command + F). Scale the it down and move it the right slightly. Next, change the first Color Stop in the gradient to a dark cyan color and the second Color Stop to a cyan color.
Step 12
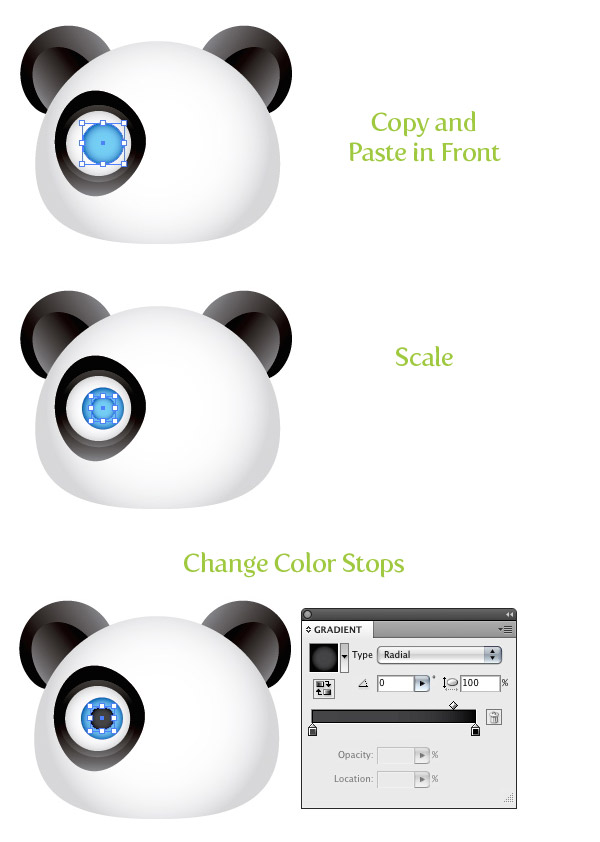
Copy (Command + C) the cyan ellipse and Paste in Front (Command + F). Scale it down and change the first Color Stop to black and the second Color Stop to a dark grey color.
Step 13
Draw three white ellipses over the eyes shapes to create some highlights.
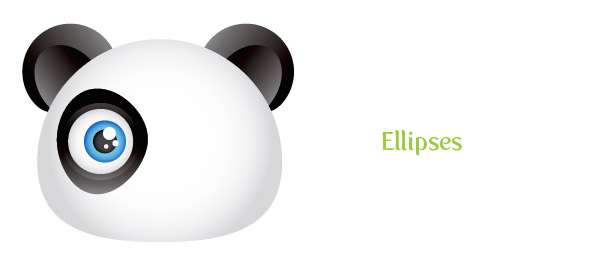
Step 14
Copy (Command + C) all the eye shapes and Paste in Front (Command + F). Next, go Object > Transform > Reflect, select the Vertical radial button, and press OK. Move the copied shapes to the right.
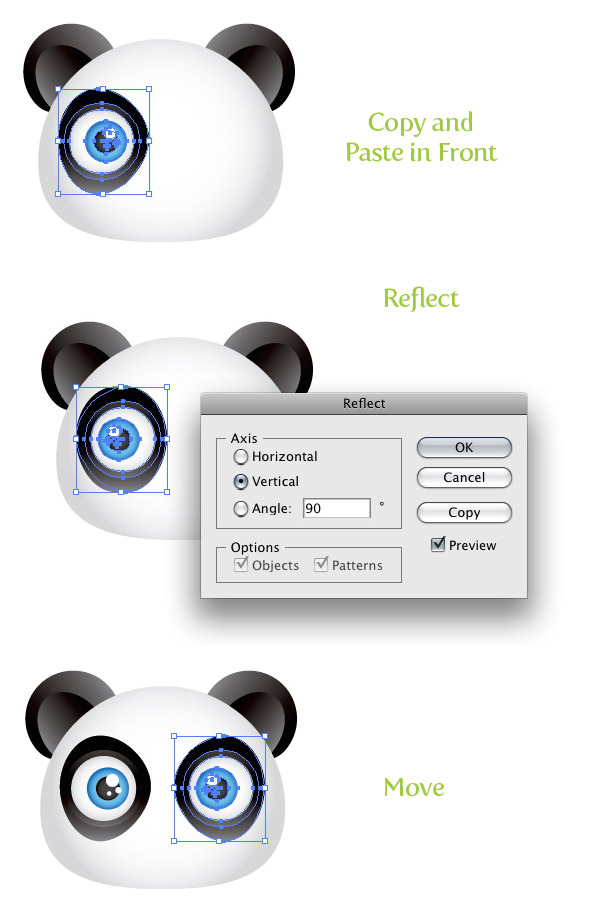
Step 15
Draw an oblong ellipse in-between and towards the bottom of the eyes. Use the Eyedropper tool (I) and sample the gradient of the inner ear shape.
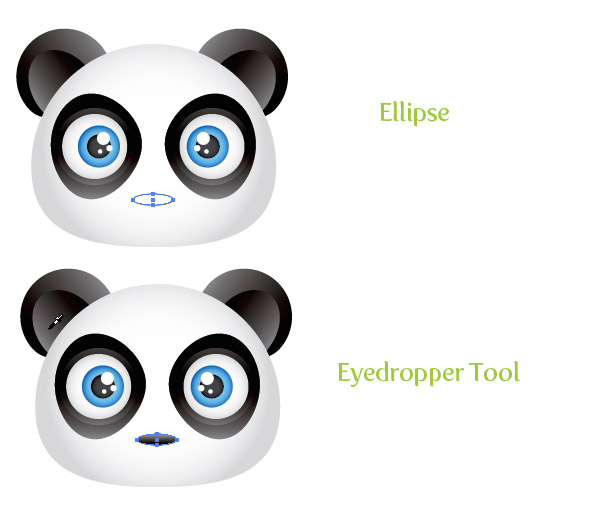
Step 16
With the new nose ellipse selected, go Effect > Warp > Arc. In the Warp dialog change the Bend to -40% and press OK.
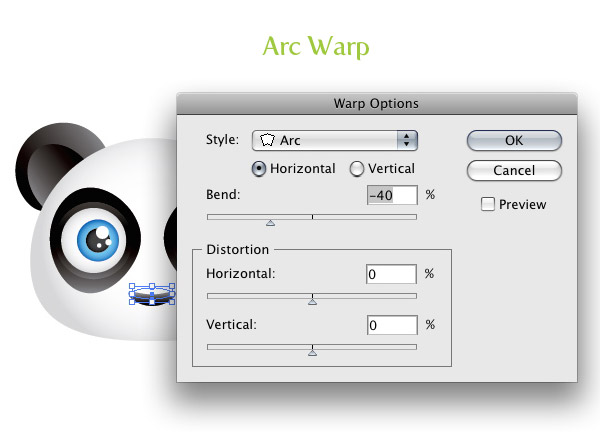
Step 17
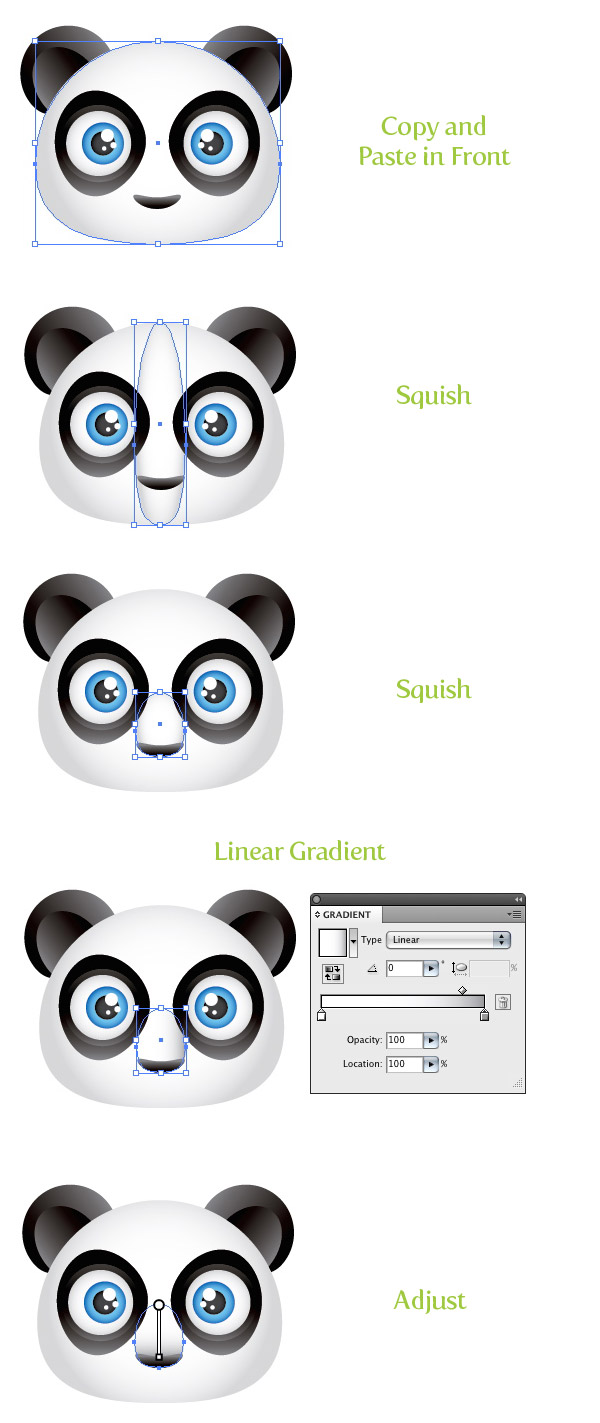
Copy (Command + C) the main white panda shape and Paste in Front (Command + F). Squish the copied shape horizontally to the width of the nose shape. Next squish the copy vertically. Change the gradient of the copy to a linear gradient and make the last Color Stop on the slider and darker grey. Next, adjust the gradient so the lighter part of the gradient is at the top of the shape.
Step 18
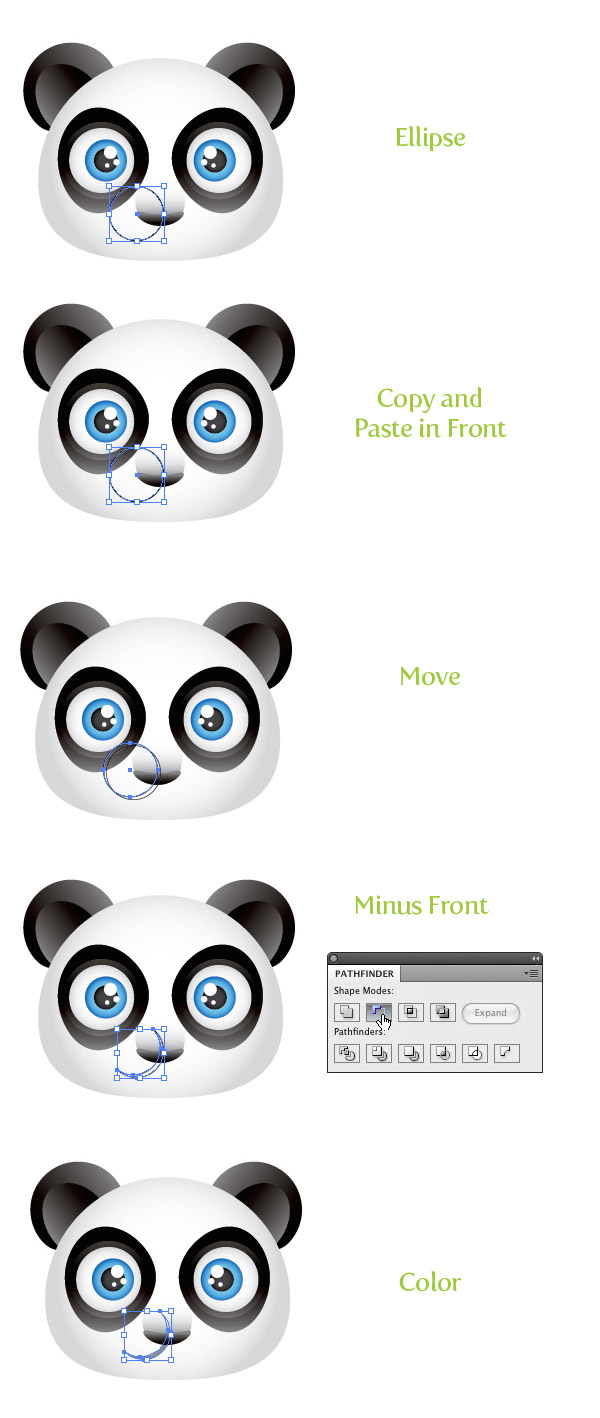
Draw an ellipse with the right anchor point roughly in the middle of the nose shape. Copy (Command + C) the ellipse and Paste in Front(Command + F). Move the copy up and to the left slightly. Select both ellipses and press the Minus Front button in the Pathfinder panel and change the color of the shape to a grey color.
Step 19
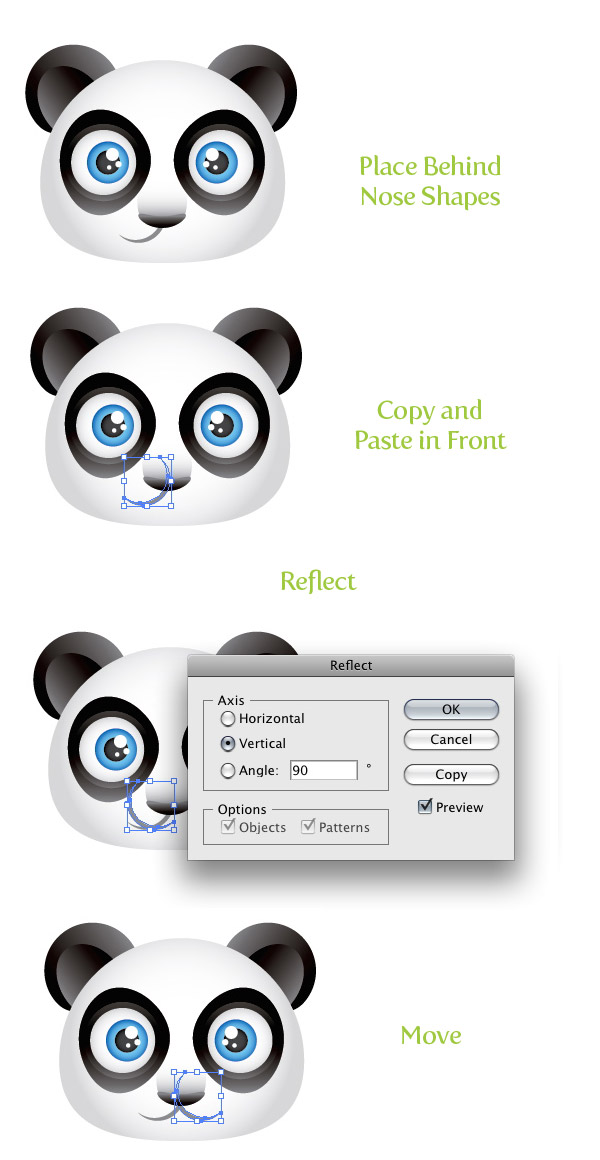
Select the mouth shape and go Object > Arrange > Send Backward (Command + [). Do this a couple of times until the mouth shape is behind both nose shapes. Next, Copy (Command + C) the mouth shape and Paste in Front (Command + F). With the mouth shape selected, go Object > Transform > Reflect, select the Vertical radial button, and press OK. Move the copied shape to the right, creating the other side of the mouth.
Step 20
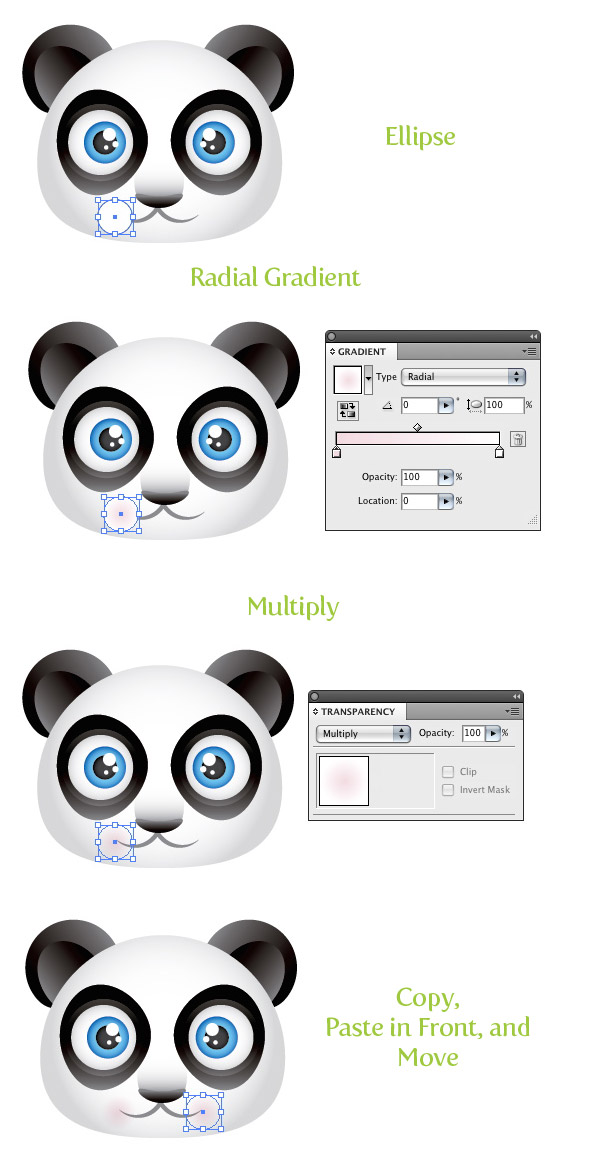
Create an ellipse close to the end of the left mouth shape. Fill the ellipse with a radial gradient, with the first Color Stop a light pink color and the second Color Stop white. Next, set the Blending Mode to Multiply from the Transparency panel. Copy (Command + C) the pink ellipse, Paste in Front (Command + F), and move to the other side of the mouth.
Step 21
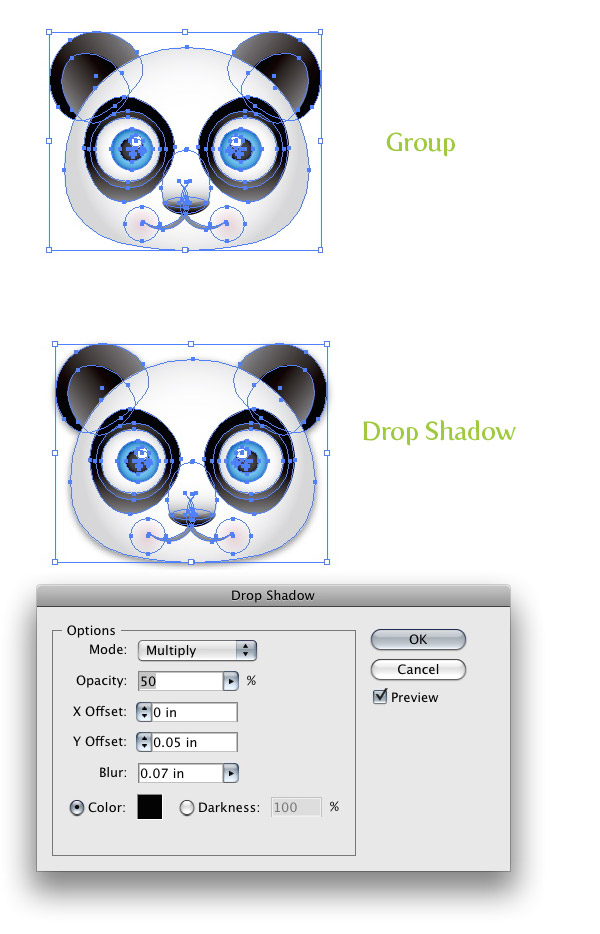
Select the all the shapes in the panda face and go Object > Group. With the group selected, go Effect > Stylize > Drop Shadow. With the Drop Shadow dialog open, change the Opacity to 50, the X Offset to 0, the Y Offset to .05 in, the Blur to .07 in, and press OK.
Step 22
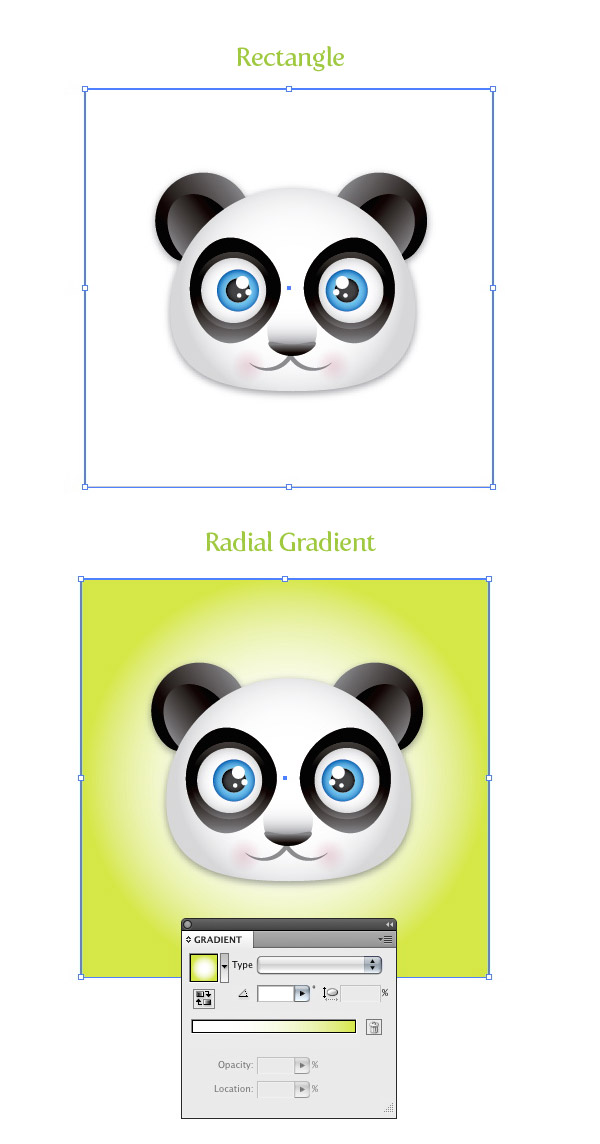
Create a rectangle bigger than the panda face and fill it with a radial gradient. Make the first Color Stop white, and choose a different color for the second Color Stop.
Final Image
All done! Wasn’t that easy? This tutorial is a good example of how some simple shapes can create a compelling illustration. Moreover, you can easily apply these techniques to other illustrations, logos, and projects!


I just couldn’t go away your web site before suggesting that I actually enjoyed the standard info a person supply in your guests? Is going to be again frequently in order to inspect new posts
Do you remember Finding Nemo movie? If yes, you will love to create this cute clownfish in Illustrator using basic shapes.
Create a rectangle bigger than the panda face and fill it with a radial gradient. Make the first Color Stop white, and choose a different color for the second Color Stop.
Whoa! This blog looks exactly like my old one!
It’s on a entirely different topic but it has pretty much
the same layout and design. Great choice of colors!
love this site
your writing really helped me I know what steps to take.
I’m not that much of a online reader to be honest but your sites really nice, keep it up! I’ll go ahead and bookmark your website to come back in the future. All the best
Hmm is anyone else having problems with the pictures on this blog loading? I’m trying to figure out if its a problem on my end or if it’s the blog. Any feedback would be greatly appreciated.
Normally I do not learn post on blogs, but I wish to say that this write-up very forced me to take a look at and do so! Your writing taste has been surprised me. Thanks, quite nice article.
Good day! Do you know if they make any plugins to safeguard against hackers?
I’m kinda paranoid about losing everything I’ve worked hard on. Any
recommendations?
Appreciating the time and energy you put into your blog and in depth information you offer. It’s good to come across a blog every once in a while that isn’t the same outdated rehashed material. Wonderful read! I’ve bookmarked your site and I’m adding your RSS feeds to my Google account.
Nice weblog right here! Additionally your website so much up very fast! What host are you the use of? Can I get your affiliate link on your host? I wish my website loaded up as fast as yours lol
Thanks for the sensible critique. Me and my neighbor were just preparing to do a little research on this. We got a grab a book from our area library but I think I learned more from this post. I’m very glad to see such excellent information being shared freely out there.
Yeah, I thought about that after writing the steps, then I just got lazy and didn’t put it in. Still, thanks for the suggestion!
This helped me a lot, because it made it easier for me to do projects that I had pending and it didn’t work out.
Loving the info on this website , you have done outstanding job on the articles.
Nice panda icon tutorial
Great work and wonderful designs. Very informative tutorial I’ve ever found.
1HlAbg I reckon something truly special in this web site.
wow
Thank you for some other informative website. Where else could I get
that kind of info written in such a perfect manner? I’ve a venture that I’m just now working on, and I have been on the
look out for such information.
It is accessible on Android and iOS platforms.
Thank you for another informative web site. The place
else may just I get that kind of information written in such an ideal method?
I’ve a challenge that I am simply now running on, and I’ve been at
the glance out for such information.
What’s up to every one, the contents present at this site are
in fact remarkable for people experience, well, keep up the
nice work fellows.
Thanks for sharing! Bless you.
Great tutorial!
Thanks!
Great tutorial.
Thanks!
i love tutorial
Thanks for great tutorial.
I record video for this tutorial.
https://www.youtube.com/watch?v=TPWSBAYSpvc
I make video for this tutorial. hope it can help you!
https://www.youtube.com/watch?v=TPWSBAYSpvc
Wonderful items from you, man. I’ve remember your stuff previous
to and you’re just extremely magnificent.
I really like what you have obtained right here,
really like what you are saying and the way during which you are saying it.
You make it entertaining and you continue to care for to
keep it smart. I can not wait to learn much more
from you. That is actually a great website.
That was great, perfectly explained! Thank you so much!
First thanks for this tutorial.
I’m using CS6 in Windows and I’m on step 18. When I select both ellipses I go to “Effect” -> “Pathfinder”, there is no “Minus Front” selection only “Minus Back”. If I try “Minus Back” I get an error stating “Pathfinder effects should usually be applied to groups, layers or type objects. This may not have any effect on the current selection.”
Nothing seems to change with the two ellipses. I can color one grey and one white and it sort of works but you can see the white in front of the panda’s face.
Any help would be appreciated.
Really nice tutorial for beginners… really appreciate it
Awesome tutorial! Thanks so much. Its nice when a tutorial actually is as clear as this one was. Doesn’t happen often.
i like da panda he is a swag master yo. thnx fo da tutorial it was swaggalicious. peace out home slice
When someone writes an post he/she keeps the plan of a
user in his/her brain that how a user can know it.
Therefore that’s why this post is amazing. Thanks!
Hi i am kavin, its my first time to commenting anywhere,
when i read this article i thought i could also create comment due to this sensible piece of writing.
Inspiring quest there. What occurred after? Take
care!
Greetings! This is my first visit to your blog! We are a team of volunteers and starting a new project in
a community in the same niche. Your blog provided us valuable information
to work on. You have done a extraordinary job!
My brother recommended I would possibly like this web site.
He was once totally right. This post truly made my day.
You can not believe just how a lot time I had spent for this information!
Thanks!
whoah this weblog is fantastic i love studying your articles.
Stay up the great work! You already know, a lot of individuals are searching
around for this info, you could help them greatly.
I need to to thank you for this wonderful read!
! I absolutely loved every bit of it. I have you book-marked to check out new things
you post…
Awesome Tutorial!!!!! Thanks for this!
Heya just wanted to give you a quick heads up
and let you know a few of the pictures aren’t loading correctly. I’m
not sure why but I think its a linking issue. I’ve tried it in two different browsers and both show the same outcome.
i like this tutorials.thanks
Best wishes!
Great tutorial….
Im a beginner … and this is the easiest which I had…
Thank you…..
from Sri Lanka
I love it!!!♥_♥ i only take off the rosy cheeks.
This is a really great tutorial for beginners, i Learnt a lot of new things and jeesh! I felt so proud that i finally created something that looked like what i saw in all those design sites, Thanks! 🙂
Great tutorial ! Thanks !
Easy sna cute. Thanks for sharing
i posted the link on my design blog. http://www.visualover.com.
Thanks again for the post
Great tutorial, posted a link on my blog, Thanks!
Thanks for a great tutorial
thanks for a great tutorial my panda looks so cute i’m definily gonna come back here for more tips thanks i luv this website i’m gonna be back tomorrow
Thanx! that was a wonderful tutorial 🙂
Great tutorial, thank you.
Today I’ve stumbled on to your Panda used in an iPad application:
http://itunes.apple.com/us/app/animal-card-10-hd/id371194675?mt=8
very nice post keep up the good work buddy
Awww! So cute it makes me want to run it over with a truck.
Couldn’t find a way to comment, only reply….
Anyway, thanks for the great tutorial. It is really appreciated. I was able to make my first Illustrator item 🙂
thanks for your education
That panda is so simply incredible! Check our outcome here:
http://www.edgaras.com/pictures/panda.png
We Love Vectips! 🙂
Wow! Great tutorial – very easy to follow and made me feel I can really illustrate. Thanks!
Excellent post, thank you.
Really cute Panda Bear face icon, and very easy to follow tutorial, Thanks!
Merci pour ce tuto.
C’est mon premier sur Illustrator et sa donne vraiment envi !
nice, thanks a lot!
keep up the good work..
a very basic helpful tutorial for all the begineers
regards
Great Post !
I enjoyed reading it…
| Web Design | Web Development | WebProject |
great tutorial.
So cute. Thanks for tutorial. LT
waaaaaaaaw amazing
Aw, it looks so cute 🙂 And so simple to create apparently. Thanks for this tutorial.
This is SO useful! I followed this instruction and made my FIRST illustrator panda! Thank you SO much!
Cool Tutorial.
If u interested, u can make your own panda in 3D as well.
Check this out:
http://www.zakkaimport.com
Panda Babes: Do It Yourself (DIY): Art and Crafts: Perfect educational product for families and schools: 360 Joint Design: DIY Mess Free: Kids Friendly Design: No Glue, No Cutting, No extra tools require to assemble: Perfect Panda Gift
Thank you very much!! XD
very good.thanks
thanks for the share! it’s really cute ^__^
______________________________
get your website optimized at Quintema
hola luli
Thank you very much for the tutorial. This is the first tutorial I tried as I started learning illustrator now, and I can’t believe that I made that! This is just because of you.. Thanks again!
thank you master,
I am looking for that as it. now I find it
Great tutorial! Thanks a lot!
Fixed URL: http://mrpander.com/marvin-und-der-panda/
Hey I just wanna thank you.
That’s my endresult shown on a very cool blog in germany –> http://mrpander.com/nichts-ist-schoner-als-ein-kompliment-fur-seine-arbeit/
good and acceptable
thank you very much, i had a lot of fun making the panda, very detailed tutorial 🙂 just great
It’s perfectly easy! I like pandas too much! Thanks for the tutorial!
wow thanku very much for beautiful tutorial i loved it..good work…I want to know how to use blend tools & mesh tools illustrator for gradient or good effects. please do reply..
thanku
it is soooo cute!!i luv to learn how to do it!!!Thanks for sharing it!!!
Tutorial muito bom, Obrigado
Resultado: http://i47.tinypic.com/14uf7k5.jpg
Thanks man, this resulted in my first vector ever. Just diving into Illustrator and I started with your tutorial 🙂
http://joelfolio.com/uploads/evilp.jpg
Very cool tutorial, thanks!
KOOL!!!! i made it wooooooooooooooooooooooooo!!
Very good tutorial. Only one constructive critique, namely the reflection in the panda’s eyes shouldn’t be mirrored. Light refelected from the eyes cannot be symetrical. Other then that, it looks great 🙂
Cheers,
Aka
Great! Great tutorial!
I’m new in illustrator and this tut. is very great to learn the basic of shapes,degrades… Thanks! I’ve do a Panda Bear with body and bamboo but using your desing of face. Thanks again!
Haha looks at the Beijing Olympic 2008 mascot
Great Tutorial !
Really good steps and very easy.
Another great tutorial! Thanks.
I just noticed, in step 20, is there any particular reason for setting the blush to multiply?
I saved the the finished thing as SVG and noticed that the edges of the blush were white instead of blending in properly as in Illustrator. So I just changed the opacity of the white stop to 0% and changed the opacity of the pink one accordingly and that seemed to have fixed the problem.
I used multiply to blend in the blush, but changing the gradient opacity works just as well. Thanks for sharing!
Thanks!! very good ! 🙂
Cool panda. Just did the tut myself, easy to follow and a nice result 🙂
hi there this is such a cool website aint it
yeah sure is
really great job you done here with best way of training.
I am ensure that you have done a dificult work and rich imagination.
It’s useful for me.Thank you!
You have the most user-friendly tutorials out there. Keep up the good work!
just great, thanks a lot, I’ve learned so much with your tutorial !!
wow great tutorial…….
Rype tutorials and works are always good and rocks….
thanks for this tutorial….. 🙂
Made me a honeybee using your tutorial. Check it out: http://screencast.com/t/BADbQ1VzN
Thanks for sharing your technique!
Erik
Oh and to the person that quit after step 5, there were a lot of things I was unclear on throughout the tutorial but realized it was my own fault for not reading his instructions better.
Thanks!! You have made me want to learn Illustrator!! 🙂 Heck, this panda took me a good 2 hours to do (I am definately a beginner!) but it was fun! 🙂
I did not find this tutorial easy at all, as a complete beginner I thought you should have explained each step’s commands more, as a result, Not having a clue what I had to do, I quit not long after step 5…
Hi DJ!
Maybe you can attend an Illus class (with a person) once, then practice along tutorials.
Much appreciation to this detailed guide.
Pat
I enjoyed your tutorial. I have an attempt but I have room to improve believe me http://windsorillustrations.blogspot.com/
Great tut, thanks for sharing! 😀
Thanxs for show how to create this pretty panda bear!!!
it was very easy for me!
thanxs again!
nice tuto!
^_^
amazing tut thanks for the great detail!!!
kialo.co.cc – Fantastic!
cool… refference
Very cool tutorial!!
Thanks
Hi! great tutorial, very helpful, but I can´t customize the gradients settings, I put it on Radial (step 4) and doesn´t look like the tutorial image. and 2) Reverse gradiente doesn´t works in Illustrator CS or yes?
ahh! thank you so much, i just created my first vector ever using this tutorial, it was ALOT easier then i thought!
–Leah
Nice tutorial! I’m going to see about repurposing some of the techniques for a little illustration I’m doing. If I have any success at all I’ll send you the results. 🙂
I repurposed this tutorial in a first attempt to make some stylized “characters” for my family blog. I think it turned out great, even if I don’t end up using them in the end… the lesson was well worth it!
Just thought you’d like to know that the lesson wasn’t lost on me. 🙂 (as noted in the blog post, though… whoops on not using the right monitor for the job!)
http://blog.monkey-house.ca/2009/whos-that-cute-redhead/
thanks a lot showing each simpel step of the character design. Many tutorials usually don’t have all the details, so its super to see ypu explaining each little step – keep up the great style 😉
Easy enough! Thanks for the detailed description!
What a cute panda 😀 ! . thanks for useful tut.
nice panda I like..
Very nice tutorial…nicely put together.
Niice — great tutorial.
Thank you for the tutorial but my question to you is that I do believe that the panda is not actually a bear; to call it a panda bear would be wrong. I do understand that the giant Chine’s panda bear has recently been re-classified as a bear but I’m not sure that this tutorial picture is of a giant panda.
Many thanks
Ah, but it’s still correct English to call it a “Panda Bear”, just as it is a “Flying Squirrel” instead of a “Sort-of-Gliding Squirrel”. It’s just one of those funny things. 😉
Thanks Panda very cute
Cool
10x I really like the lessons here in this site =,]
Great Tut!
Can i just asked why you chose to reverse the lighting reflections in the eyes… wouldn’t these be the same in both eyes? I know i’m being a bit picky as it’s an illustration and the realism isn’t really an issue but you’ve clearly gone to a lot of effort with the gradients to give the impression of shading and light and the reflections would be a part of that no?
That aside though, excellent tut. Love the detail! Thanks.
Yeah, I thought about that after writing the steps, then I just got lazy and didn’t put it in. Still, thanks for the suggestion!
Having the assymetrical highlights to the inside of each eye ball actually makes the light look like it is right above and in front of the panda. It adds innocence in the eyes. Only if the light source were to the left or right would the reflections in the eyes be symmetrical. Thanks for the tuts –an art teacher
Rype’s Panda has a squint 😛
Realism does not matter, as long as I can learn clearly about gradient.
Question: How to attach a picture in the ‘Reader’ box?
Thanks.
Nice!
Nice one! Thanks for sharing!
Ahahah..!
It so cute! 😛
Really good tut.
What a fun tutorial. Thanks Ryan!
http://twitter.com/Colorburned
Nice, but panda is not bear! 😀
So cute 🙂 Thanks for tutorial 😉
Yeah, great tutorial!! 🙂
Nice tutorial. Is the panda inspired by the Zoom-eyed creatures? http://turbomilk.com/downloads/zoom_eyed/
I’ve seen Zoom-Eyed Creatures before and they are awesome!
The panda wasn’t initially inspired by them, but they probably crept up in my subconscious when creating it.
The panda came from some children illustration that I have been doing lately.
Great tutorial. Really love the panda. Thanks! Its amazing what one little shape can do.