 In the following tutorial, you will learn how to create a simple web ribbon vector in Adobe Illustrator. For starters you will learn how to set up a simple grid and how to create the main shapes using basic tools and vector shape building techniques. Next using subtle linear and radial gradients along with some simple blending techniques, you will learn how to add shading and highlights for your ribbon. Finally using some simple Warp effects, we’ll add a little dynamism for the final ribbon.
Tutorial Details
- Program: Adobe Illustrator CS5
- Difficulty: Beginner-Intermediate
- Topics Covered: Basic Tools and Effects, Transform techniques and the Appearance panel
- Estimated Completion Time: 45 minutes
Final Image
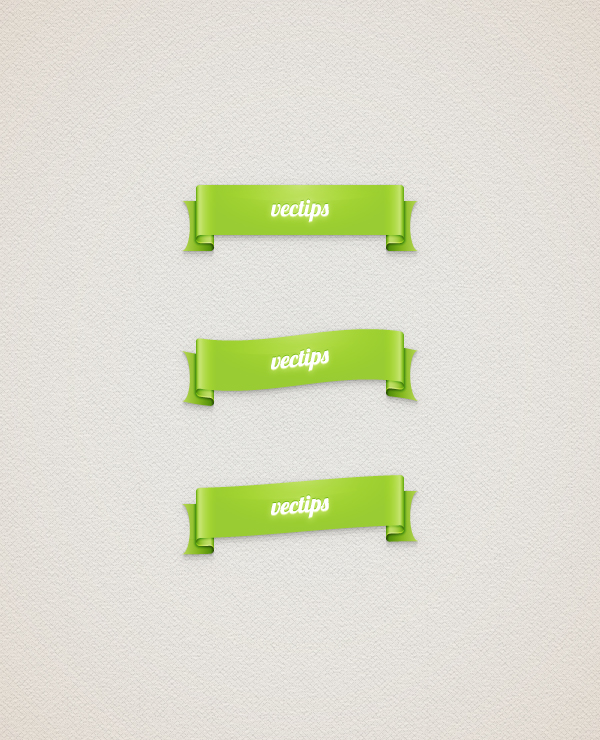
As always, this is the final image that we’ll be creating:
Step 1
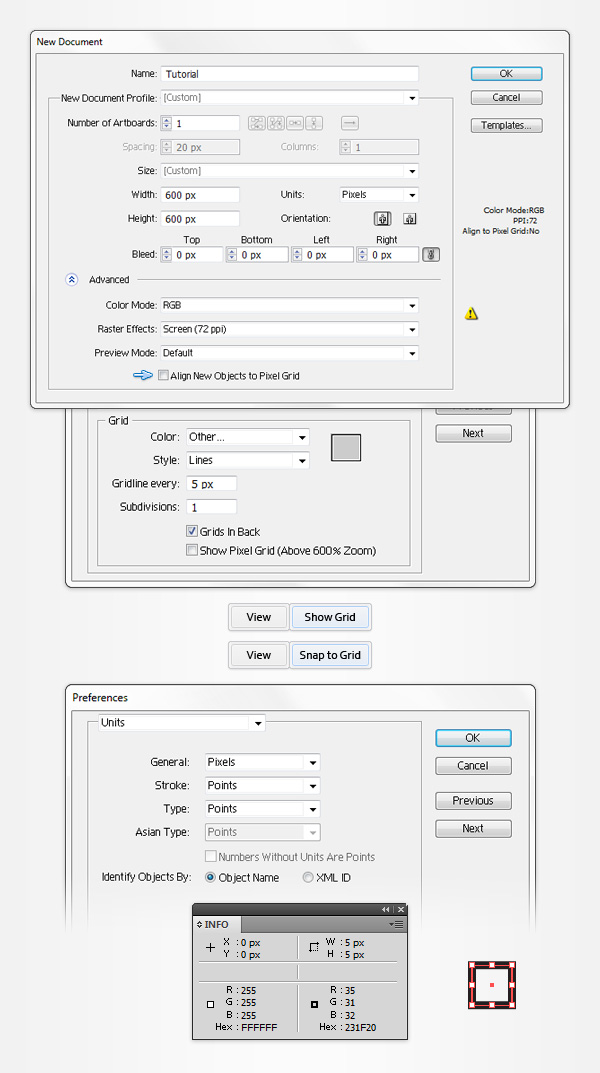
Hit Command + N to create a new document. Select Pixels from the Units drop-down menu, enter 600 in the width and height boxes then click on the Advanced button. Select RGB, Screen (72ppi) and make sure that the Align New Objects to Pixel Grid box is unchecked before you click OK. Enable the Grid (View > Show Grid) and the Snap to Grid (View > Snap to Grid). For starters you will need a grid every 5px, so simply go to Edit > Preferences > Guides > Grid, enter 5 in the Gridline every box and 1 in the Subdivisions box. You should also open the Info panel (Window > Info) for a live preview with the size and position of your shapes. Do not forget to set the unit of measurement to pixels from Edit > Preferences > Units > General. All these options will significantly increase your work speed.
Step 2
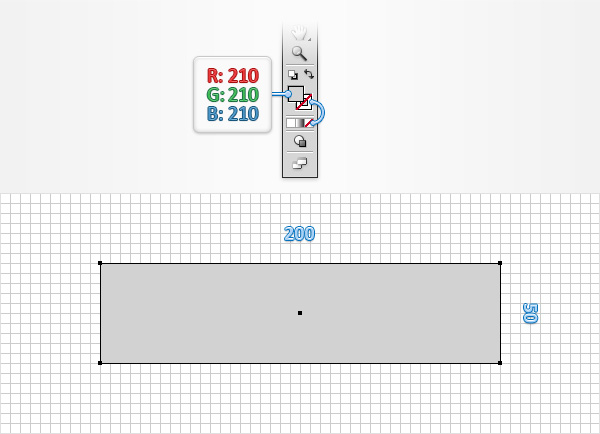
Pick the Rectangle Tool (M) and focus on your Toolbar. Remove the color from the stroke then select the fill and set its color at R=210 G=210 B=210. Move to your Artboard and simply create a 200 x 50px rectangle. The Snap to Grid should ease your work.
Step 3
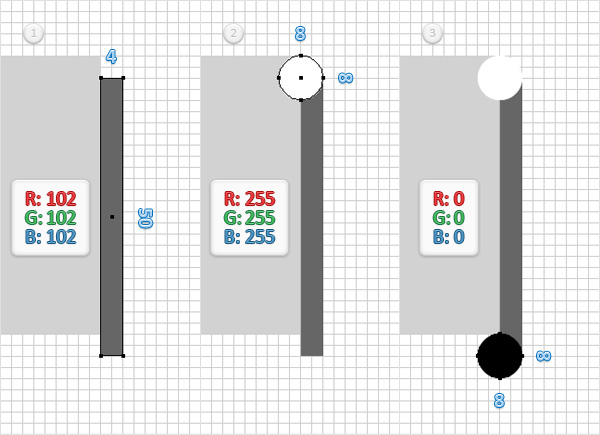
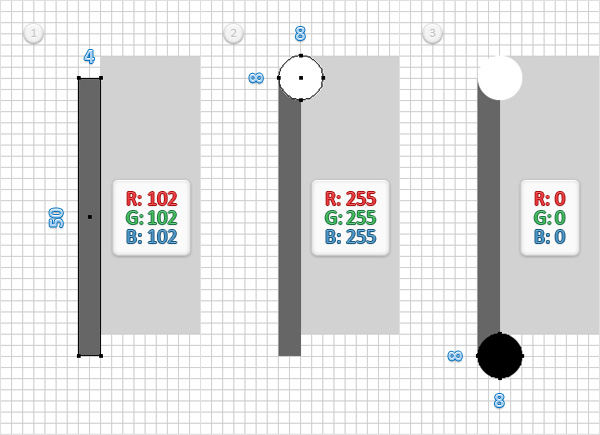
For the following steps you will need a grid every 2px, so go to Edit > Preferences > Guides & Grid and enter 2 in the Gridline every box. Focus on the right side of the existing rectangle. Make sure that the Rectangle Tool (M) is still active, set the fill color at R=102 G=102 B=102, create a 4 x 50px rectangle and place it as shown in the first image. Switch to the Ellipse Tool (L), set the fill color at white, create an 8px circle and place it as shown in the second image. Set the fill color at black, make sure that the Ellipse Tool (L) is still active, create a second 8px circle and place it as shown in the third image.
Step 4
Focus on the left side of the main, grey rectangle. Grab the Rectangle Tool (M), set the fill color at R=102 G=102 B=102, create a 4 x 50px rectangle and place it as shown in the first image. Switch to the Ellipse Tool (L), set the fill color at white, create an 8px circle and place it as shown in the second image. Set the fill color at black, make sure that the Ellipse Tool (L) is still active, create a second 8px circle and place it as shown in the third image.
Step 5
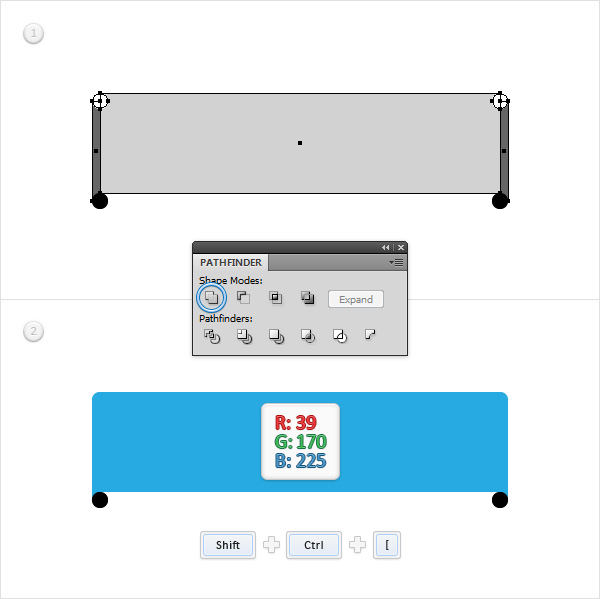
Select both white circles along with the three rectangles, open the Pathfinder panel (Window > Pathfinder) and click the Unite button. Make sure that the resulting shape is selected, send it to back (Shift + CTRL + [ ) and set the fill color at R=39 G=170 B=225.
Step 6
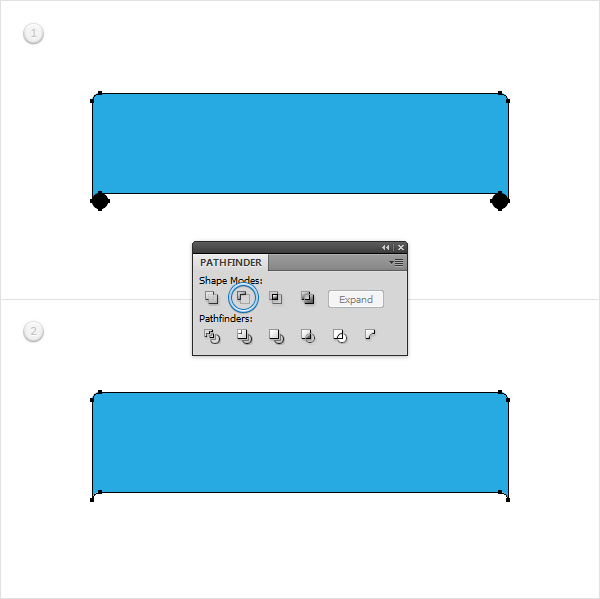
Reselect that blue shape along with the black circles and click the Minus Front button from the Pathfinder panel. In the end, your blue shape should look like in the second image.
Step 7
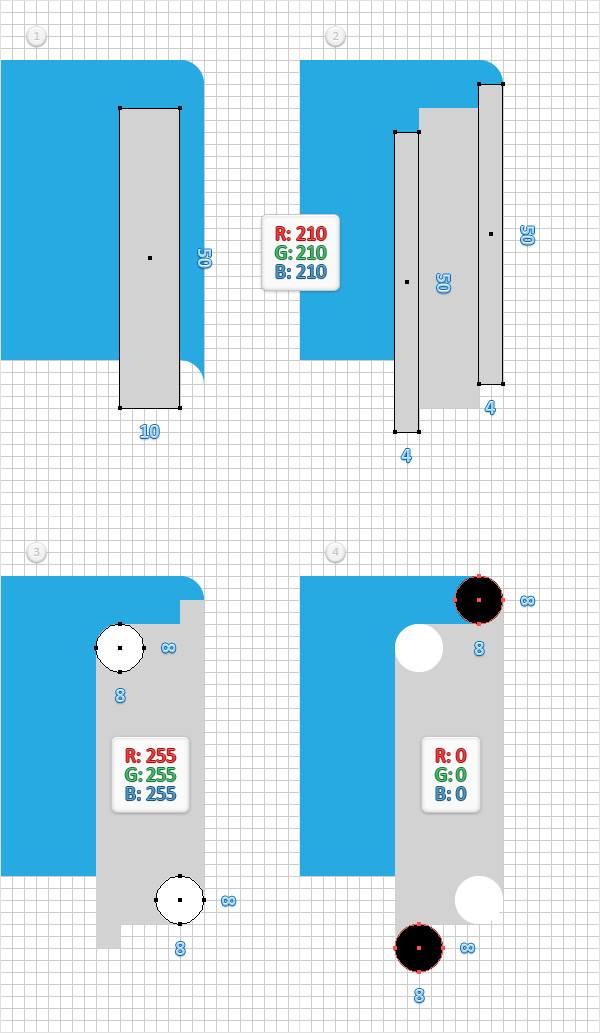
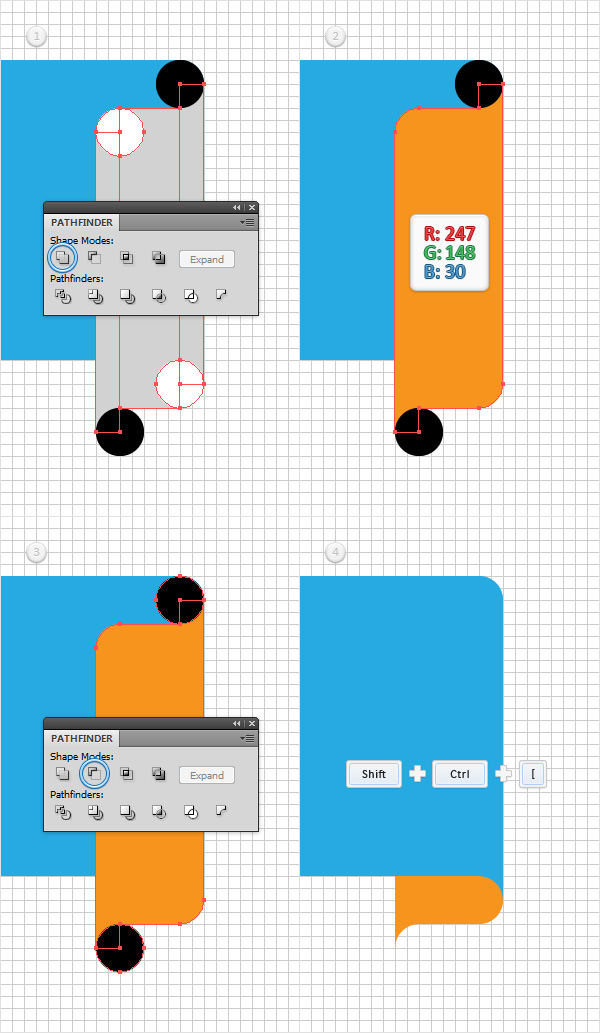
Focus on the right side of your blue shape and set the fill color at R=210 G=210 B=210. Using the Rectangle Tool (M), create a 10 x 50px rectangle and place it as shown in the first image. Continue with the Rectangle Tool (M), create two, 4 x 50px rectangles and place them as shown in the second image. For the next shapes, set the fill color white, switch to the Ellipse Tool (L), create two, 8px circles and place them as shown in the third image. Set the fill color at black, make sure that the Ellipse Tool (L) is still active, create another two, 8px circles and place them as shown in the fourth image.
Step 8
Select both white circles along with the three, grey rectangles and click the Unite button from the Pathfinder panel. Fill the resulting shape with R=247 G=148 B=30. Select this orange shape along with the black circles and click the Minus Front button from the Pathfinder panel. Make sure that the resulting shape is selected and send it to back (Shift + CTRL + [ ).
Step 9
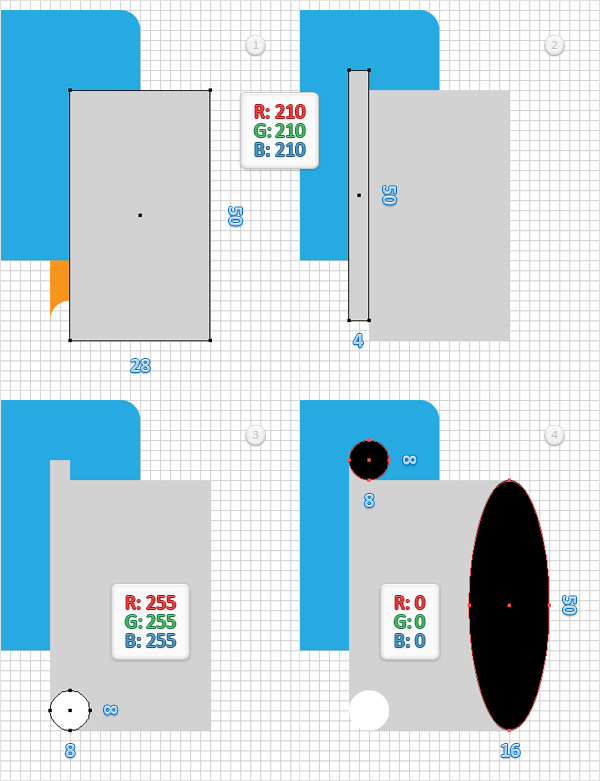
Keep focusing on the right side of your blue shape. Set the fill color at R=210 G=210 B=210, and using the Rectangle Tool (M), create a 28 x 50px rectangle and place it as shown in the first image. Continue with the Rectangle Tool (M), create a 4 x 50px rectangle and place them as shown in the second image. Set the fill color white, switch to the Ellipse Tool (L), create an 8px circle and place it as shown in the third image. Set the fill color at black, make sure that the Ellipse Tool (L) is still active, create a new 8px circle and a 16 x 50px shape, then place them as shown in the fourth image.
Step 10
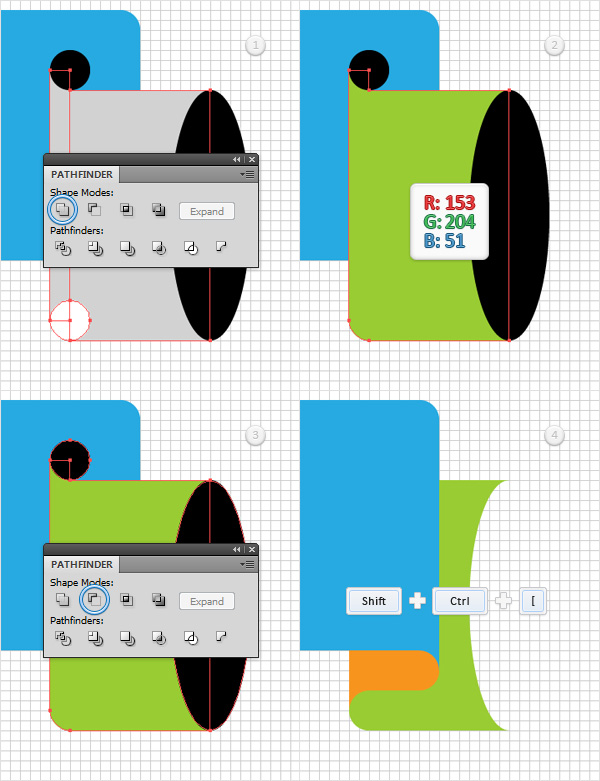
Select both grey rectangles along with the white circle and click the Unite button from the Pathfinder panel. Fill the resulting shape with R=153 G=204 B=51. Select this green shape along with the black shapes and click the Minus Front button from the Pathfinder panel. Make sure that the resulting shape is selected and send it to the back (Shift + CTRL + [ ).
Step 11
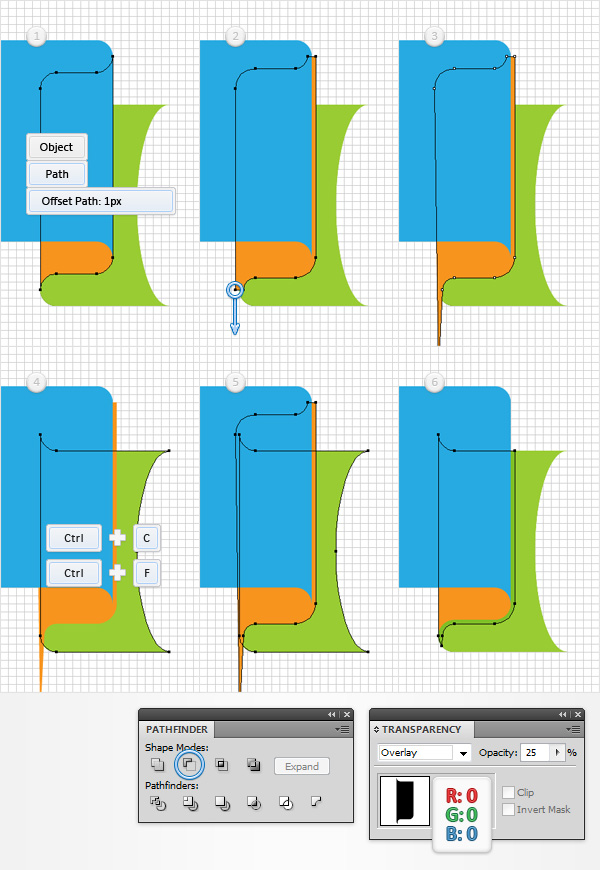
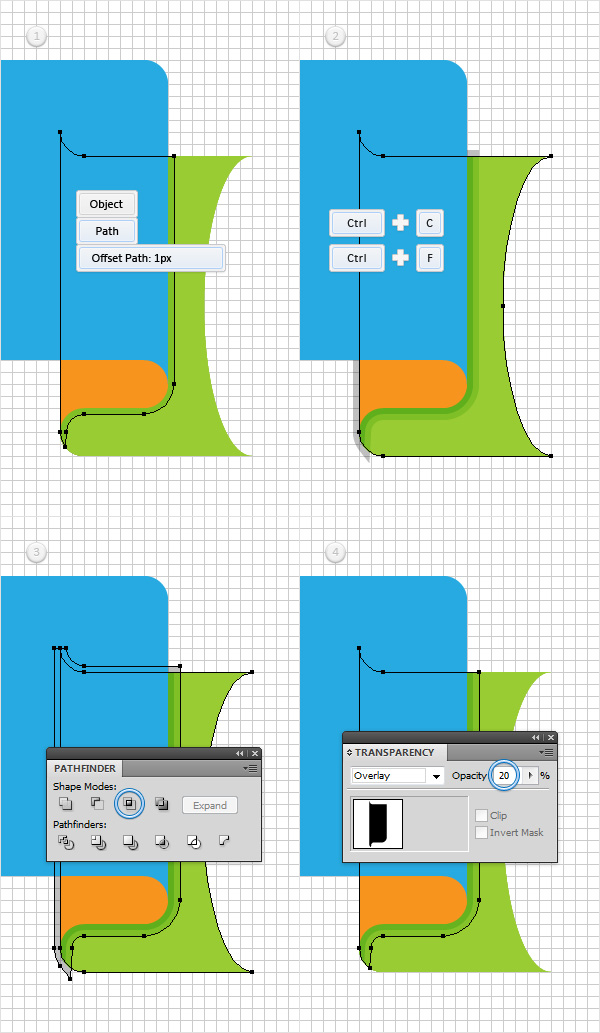
Select the orange shape and go to Object > Path > Offset Path. Enter a 1px Offset and click OK. Focus on the bottom side of the resulting shape and switch to the Direct Selection Tool (A). Select the left anchor point (highlighted in the second image) and simply drag it several pixels down as shown in the third image. Select the green shape and make a copy in front (CTRL + C > CTRL + F). Select this copy along with the other shape made in this step and click the Intersect button from the Pathfinder panel. Fill the resulting shape with black, make sure that it stays selected and open the Transparency panel (Window > Transparency). Change the Blending Mode to Overlay and lower its Opacity to 25%.
Step 12
Reselect the black shape made in the previous step and go to Object > Path > Offset Path. Enter a 1px Offset and click OK. Select the green shape and make a copy in front (CTRL + C > CTRL + F). Select this copy along with the other shape made in this step and click the Intersect button from the Pathfinder panel. Select the resulting shape and lower its Opacity to 20%.
Step 13
Reselect the black shape made in the previous step and go to Object > Path > Offset Path. Enter a 1px Offset and click OK. Select the green shape and make a copy in front (CTRL + C > CTRL + F). Select this copy along with the other shape made in this step and click the Intersect button from the Pathfinder panel. Select the resulting shape and lower its Opacity to 10%.

Step 14
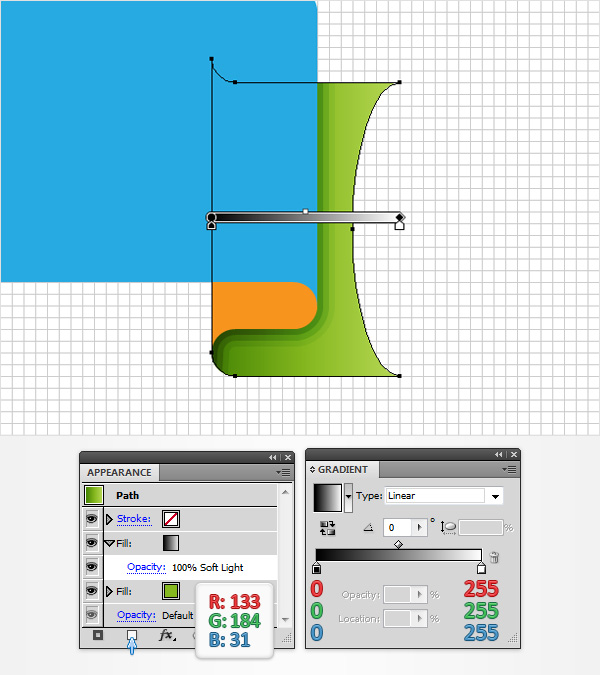
Select the green shape and open the Appearance panel. Select the existing fill and set the color at R=133 G=184 B=31. Make sure that your green shape stays selected, keep focusing on the Appearance panel and add a second fill using the Add New Fill button (pointed by the little, blue arrow in the following image). Select this new fill, open the Gradient panel (Window > Gradient) and simply click on the gradient thumbnail to add the default black to white linear gradient. Keep focusing on your Gradient panel and click the Reverse Gradient button. Get back to the Appearance panel, make sure that the second fill is still selected and change its Blending Mode to Soft Light.
Step 15
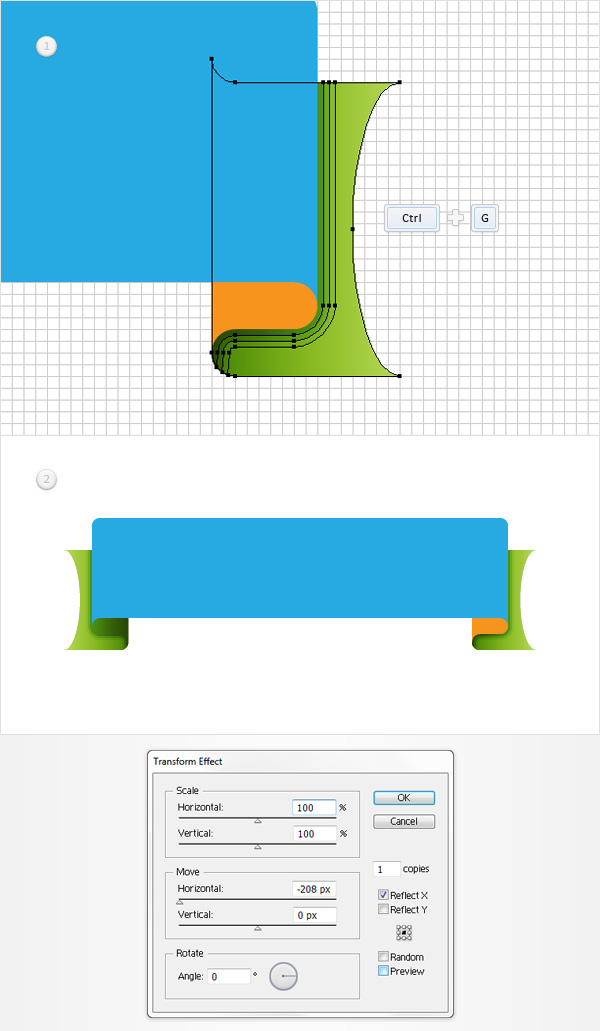
Reselect the green shape along with the three, black shapes and Group them (CTRL + G). Make sure that this new group stays selected, send it to back (Shift + CTRL + [ ) and go to Effect > Distort & Transform > Transform. Check the “X” box, enter “1” in the copies box then focus on the Move section. Drag the Horizontal slider at –208px and click OK. In the end, things should look like in the second image.
Step 16
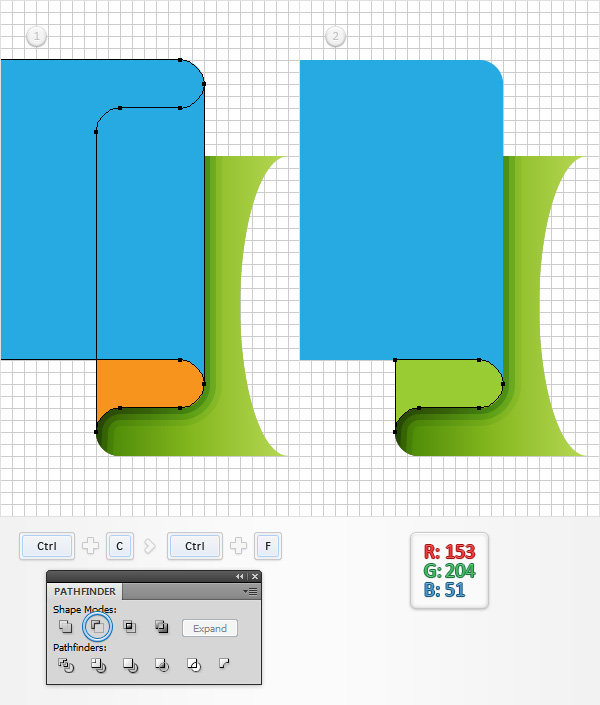
Duplicate (CTRL+ C > CTRL + F) your blue and orange shapes. Make sure that both copies are selected and click the Minus Front button from the Pathfinder panel. Select the resulting shape and set the fill color at R=153 G=204 B=51.
Step 17
Disable the Snap to Grid (View > Snap to Grid) then go to Edit > Preferences > General and make sure that the Keyboard Increment is set at 1px. Reselect the tiny, green shape made in the previous step and make two copies in front (CTRL + C > CTRL + F > CTRL + F). Select the top copy and move it 1px up using the up arrow from your keyboard. Reselect both copies and click the Minus Front button from the Pathfinder panel. Fill the resulting shape with white, lower its Opacity to 40% and change the Blending Mode to Overlay.

Step 18
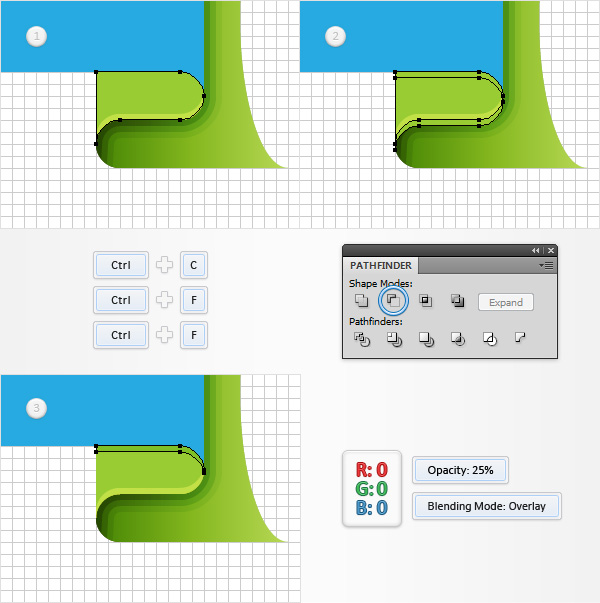
Reselect that tiny, green shape and make two copies in front (CTRL + C > CTRL + F > CTRL + F). Select the top copy and move it 1px down using the down arrow from your keyboard. Reselect both copies and click the Minus Front button from the Pathfinder panel. Fill the resulting shape with black, lower its Opacity to 25% and change the Blending Mode to Overlay.
Step 19
Reselect that tiny, green shape and make two copies in front (CTRL + C > CTRL + F > CTRL + F). Select the top copy and move it 2px down. Reselect both copies and click the Minus Front button from the Pathfinder panel. Fill the resulting shape with black, lower its Opacity to 20% and change the Blending Mode to Overlay.

Step 20
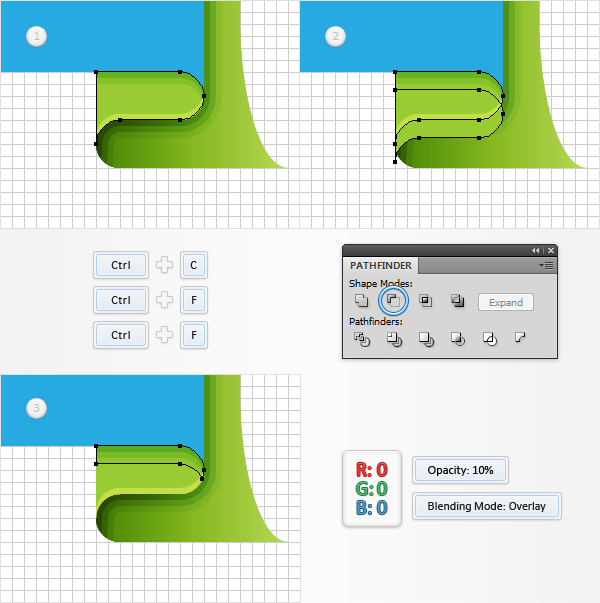
Reselect that tiny, green shape and make two copies in front (CTRL + C > CTRL + F > CTRL + F). Select the top copy and move it 3px down. Reseelct both copies and click the Minus Front button from the Pathfinder panel. Fill the resulting shape with black, lower its Opacity to 10% and change the Blending Mode to Overlay.
Step 21
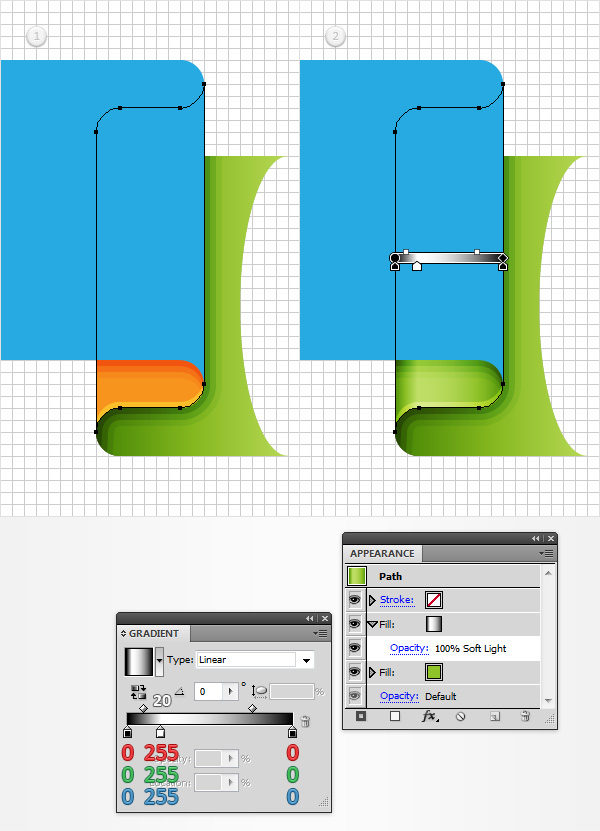
Reselect the original tiny, green shape and simply hit the Delete key from your keyboard to remove it. Select the orange shape that’s now visible and focus on the Appearance panel. Select the existing fill and replace the existing color with R=143 G=194 B=41. Keep focusing on the Appearance panel and add a second fill using that same Add New Fill button. Select this new fill, change its Blending Mode to Soft Light and add the linear gradient shown in the following image. Keep in mind that the white number from the Gradient image stands for Location percentage. This means that you need to select that new gradient slider and enter “20” in the Location box. You can easily add a new gradient slider for your gradient by clicking on the gradient bar.
Step 22
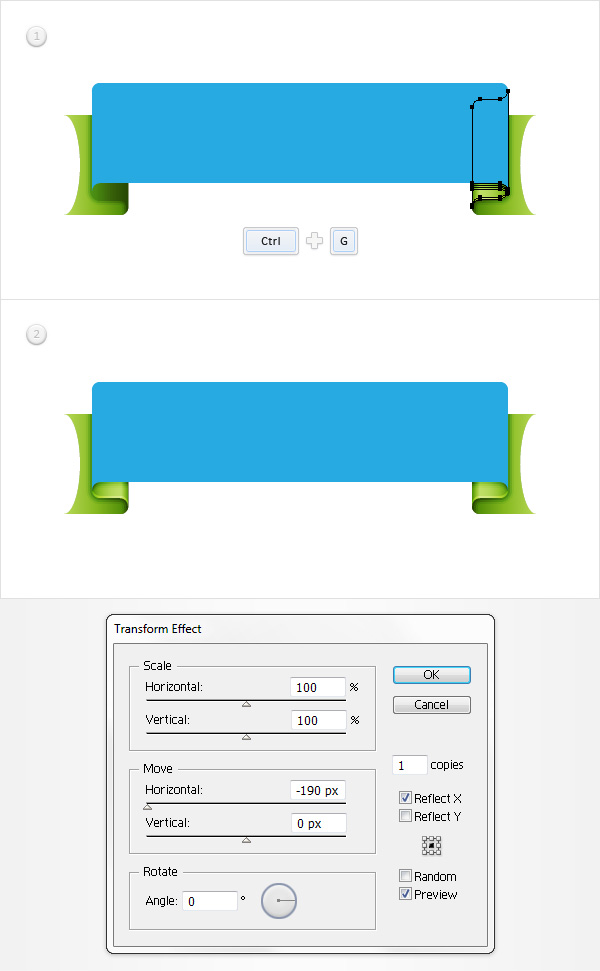
Reselect the green shape edited in the previous step along with the thin, white shape and the three, black shapes–then Group them (CTRL + G). Move to the Layers panel and simply drag this new group below your blue shape. Make sure that this new group is still selected and go to Effect > Distort & Transform > Transform. Enter the properties shown in the following image and click OK.
Step 23
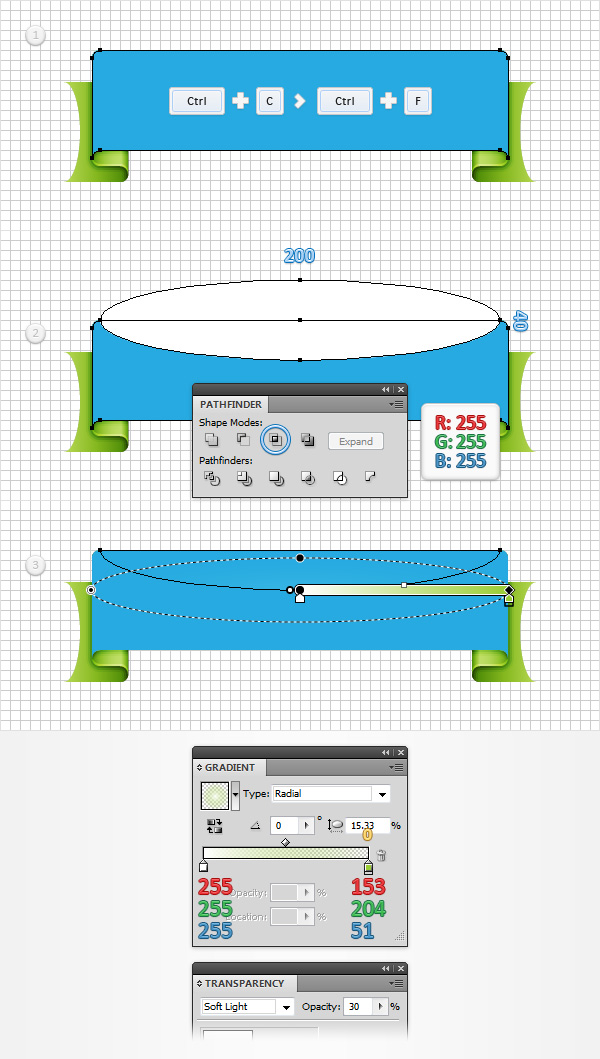
Return to “gridline every 5px “, so simply go to Edit > Preferences > Guides & Grid and enter 5 in the Gridline every box. Enable the Snap to Grid (View > Snap to Grid). Select your blue shape and make a copy in front (CTRL + C > CTRL + F). Using the Ellipse Tool (L), create a 200 x 40px shape and place it as shown in the second image. Select this squeezed circle along with the copy made in the beginning of the step and click the Intersect button from the Pathfinder panel. Select the resulting shape, fill it with the radial gradient shown below, change the Blending Mode to Soft Light and lower its Opacity to 30%. (The yellow zero from the Gradient image below stands for Opacity percentage. Again, this means that you need to select that gradient slider and enter “0” in that Opacity box from the Gradient panel.) Make sure that this new shape stays selected, grab the Gradient Tool (G), focus on your artboard and squeeze that radial gradient as shown in the following image.
Step 24
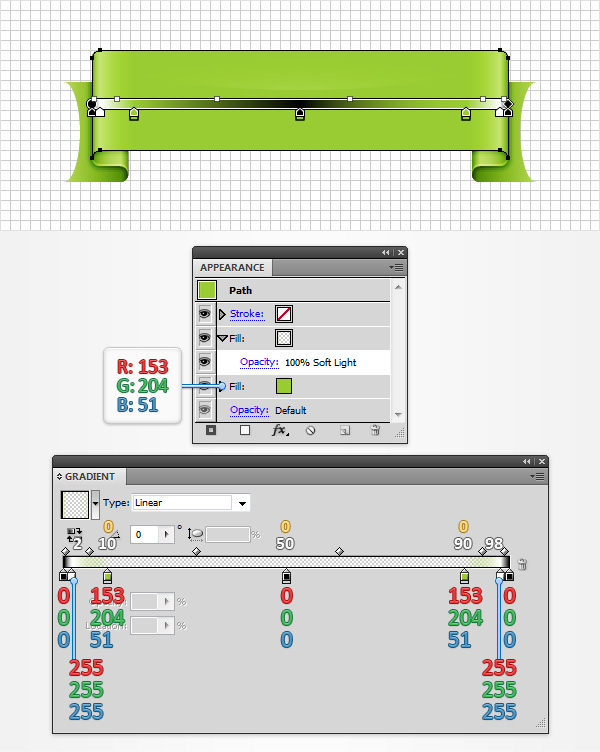
Select the blue shape and focus on the Appearance panel. Select the existing fill and set the color at R=153 G=204 B=51. Keep focusing on the Appearance panel and add a second fill using that same Add New Fill button. Select this new fill, change its Blending Mode to Soft Light and add the linear gradient shown in the following image. Don’t forget that the white numbers stands for Location percentage while the yellow zeros stand for Opacity percentage.
Step 25
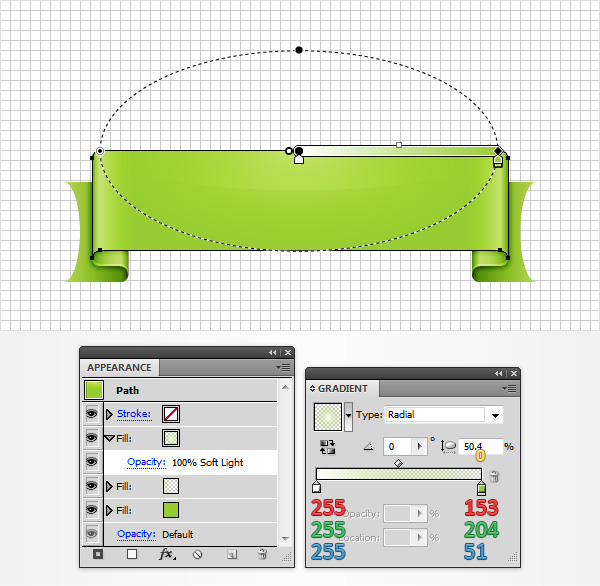
Reselect the shape edited in the previous step and add a third fill using that same Add New Fill button. Select this new fill, change its Blending Mode to Soft Light and add the radial gradient shown below. Make sure that this new fill stays selected, switch to the Gradient Tool (G) and squeeze that radial gradient as shown in the following image.
Step 26
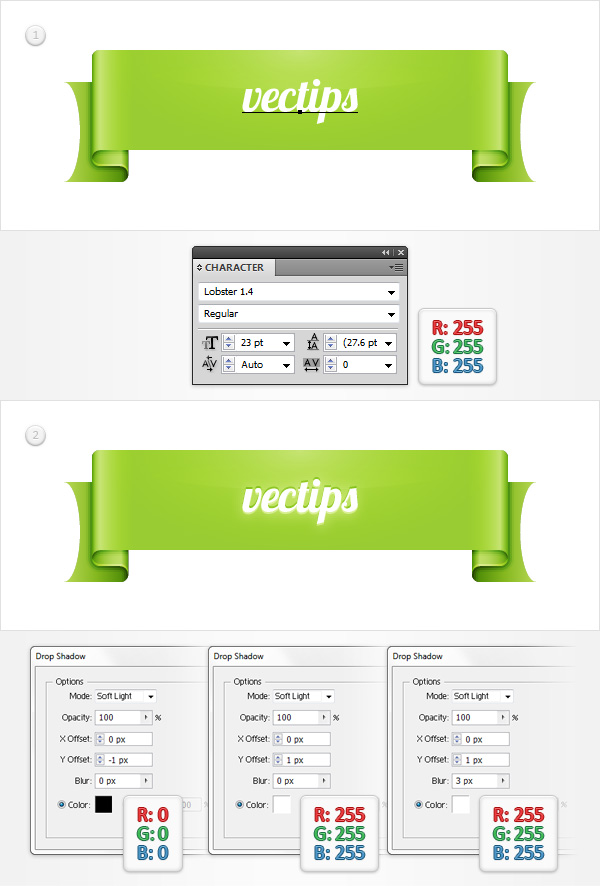
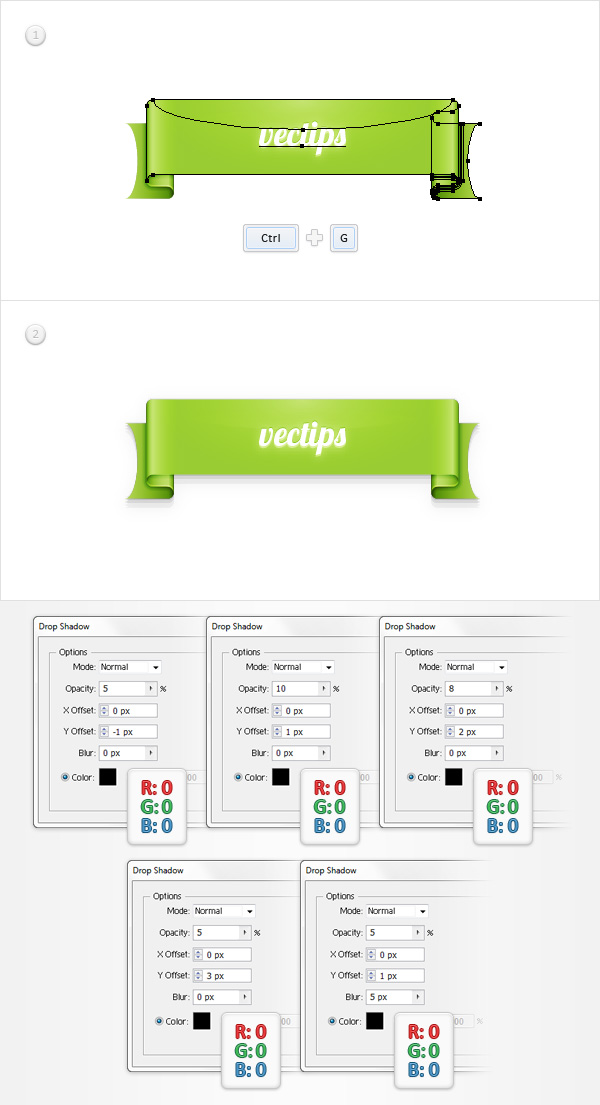
Disable the Grid (View > Hide Grid) and the Snap to Grid (View > Snap to Grid). Using the Type Tool (T), add a white piece of text. A good script font to use is Lobster font with the size set at 23pt. Make sure that your piece of text stays selected and go to Effect > Stylize > Drop Shadow. Enter the properties shown in the left window in the following image, click OK. Add 2 additional drop shadows to the text using the same instructions as before (Effect > Stylize > Drop Shadow) and enter the properties shown in the the 2 following images.
Step 27
Reselect that piece of text along with the rest of the shapes that make up your ribbon and Group them (CTRL + G). Make sure that this new group is selected and add the five Drop Shadow effects (Effect > Stylize > Drop Shadow) shown in the following image.
Step 28
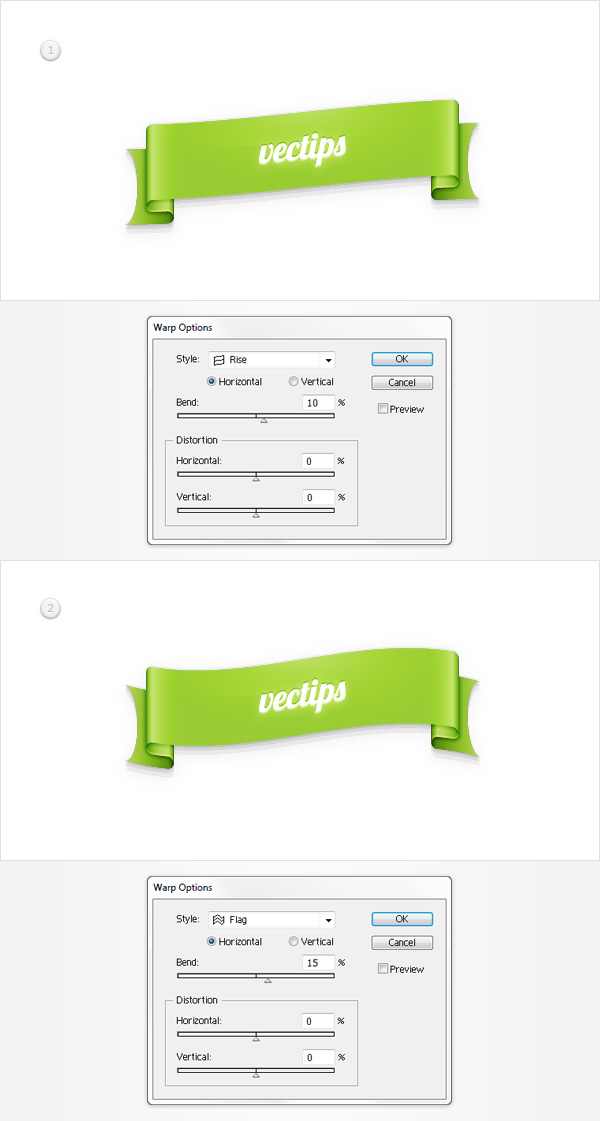
Finally, if you wish to have a slanted ribbon, you can do so by adding a simple Warp effect for your ribbon. Simply reselect the group made in the previous step and go to Effect > Warp > Rise (or Effect > Warp > Flag). Enter the properties shown in the following image and click OK. Feel free to try other Warp effects.
And We’re Done!
I hope you’ve enjoyed this tutorial and can apply these techniques in your future projects.


Thank you very much..its a very useful documents foe beginners like me. but i have problem in step no 11.
i have to select only orange shape but the other parts which is hide it also selected. please any one help me in the selection process.
how i can select only orange shape like show in picture.
really helpful! appreciate for sharing such clear and precise tut.
I’m stuck on Step 16 too (using Illustrator CC for Mac). “Make sure that both copies are selected” presumably means both the original blue and orange shape + the copy which has just been added. I have selected these (tried both the ordinary selection and the direct selection tools) but when I click the Minus Front pathfinder button I get the same message others have mentioned: “The filter produced no results. Please select two overlapping paths.” Help!
I have a problem with step 16: “Duplicate (CTRL+ C > CTRL + F) your blue and orange shapes. Make sure that both copies are selected and click the Minus Front button from the Pathfinder panel. Select the resulting shape and set the fill color at R=153 G=204 B=51.”
I did all that and it seems that the “small green shape” from step 17 isn’t small. Or, rather, it has a straight line added and I dunno what’s going on. I think I must’ve probably done something wrong or in haste in one of the previous steps, but I can’t quite trace as to what and when. I just took the thing and erased it, I know it’s not the most subtle way to do it but… Anyway, here’s what has transpired:
http://imageshack.com/a/img547/8617/59hy.jpg
Thanks for any kind of hint!
That’s exactly the correct shape you should’ve received… so now you can proceed to Step 17 to add drop shadows and other effects to this shape. Great job!
I got this website from my pal who shared with me concerning this website and now this time I
am visiting this web site and reading very informative
posts at this place.
Ok, apparently I needed to use the direct selection tool (which I tried a hundred times I thought!) but it worked this time. Thanks for the great tutorial!
Great! Glad you enjoyed the tutorial and that you were able to get the shapes intersected.
why steps 11 can’t use intersect
It sounds like you’re having trouble with intersecting the shapes in Step 11. Is this correct? If so, can you tell us what version you’re using and what your file does when attempting to intersect the shapes?
I’m having trouble with intersecting the shapes as well. After I copied the green shape in front, the prompt says “The filter produced no results. Please select two overlapping paths.” I am using the most updated version of Ai. What am I doing wrong?!
Have a missing in step 11. In that five picture. You should choose “Intersect button” in Pathfinder. It is in third position, not in second position. That image checked wrong. You could see again.
Thank you for your tut.
I’m a beginner, and this help me so much. : )
Hey, thanks so much for the tutorial.
I do have a problem, when I finished the ribbon and grouped everything together, I try making it bigger, but the left fold of the ribbon seems to not be apart of it and separates itself.
Do you know what I can do?
Love this! Thank you so much 🙂
The only problem is I get lost on Step 11. I’m so confused.
“Select the green shape and make a copy in front (CTRL + C > CTRL + F). Select this copy along with the other shape made in this step and click the Intersect button from the Pathfinder panel. Fill the resulting shape with black, make sure that it stays selected and open the Transparency panel (Window > Transparency). Change the Blending Mode to Overlay and lower its Opacity to 25%.”
I copied the green shape in front and selected the copy and the orange shape to intersect but it only makes one shape, unlike yours where it has “2” with the orange a bit higher up and then the shadow behind. What?
Oh wait. Never mind… GEEZ I spent 30 minutes on trying to see what the heck happened. I guess when I selected the green shape I used the direct selection instead of the direct selection tool. I think that was the problem. thanks 🙂
I mean I used the direct selection instead of the selection tool– you know what? I’m not drunk—it’s late, sue me >.<
Haha