 In the following Halloween lantern vector tutorial you will learn how to create a paper bag lantern vector illustration in Adobe Illustrator. For starters you will learn how to set up a simple grid and create the main shape using basic vector shapes. You will learn how to add shading and highlights using the Pathfinder panel and some simple blending techniques. Using built-in brushes and raster effects along with some basic masking techniques, you will learn how to add subtle textures. Add some glowing spookiness and you’ll have the perfect Halloween lantern vector for the month of scares.
Tutorial Details: Halloween Lantern Vector
- Program: Adobe Illustrator CC
- Difficulty: Beginner-Intermediate
- Topics Covered: Basic Tools and Effects, Masking, Blending and Trasnform techniques
- Estimated Completion Time: 1 hour
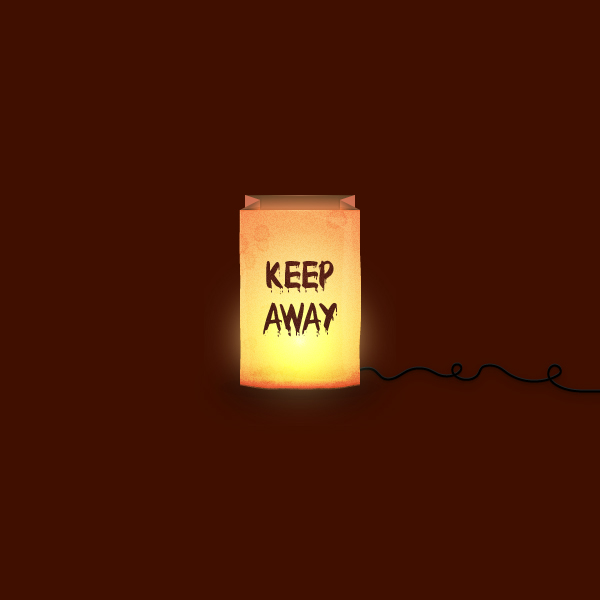
Final Image: Halloween Lantern Vector
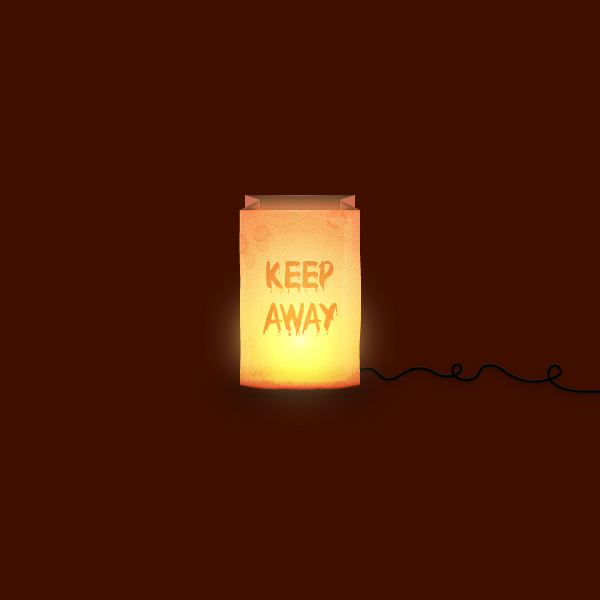
As always, this is the final Halloween lantern vector that we’ll be creating:
Step 1: Halloween Lantern Vector
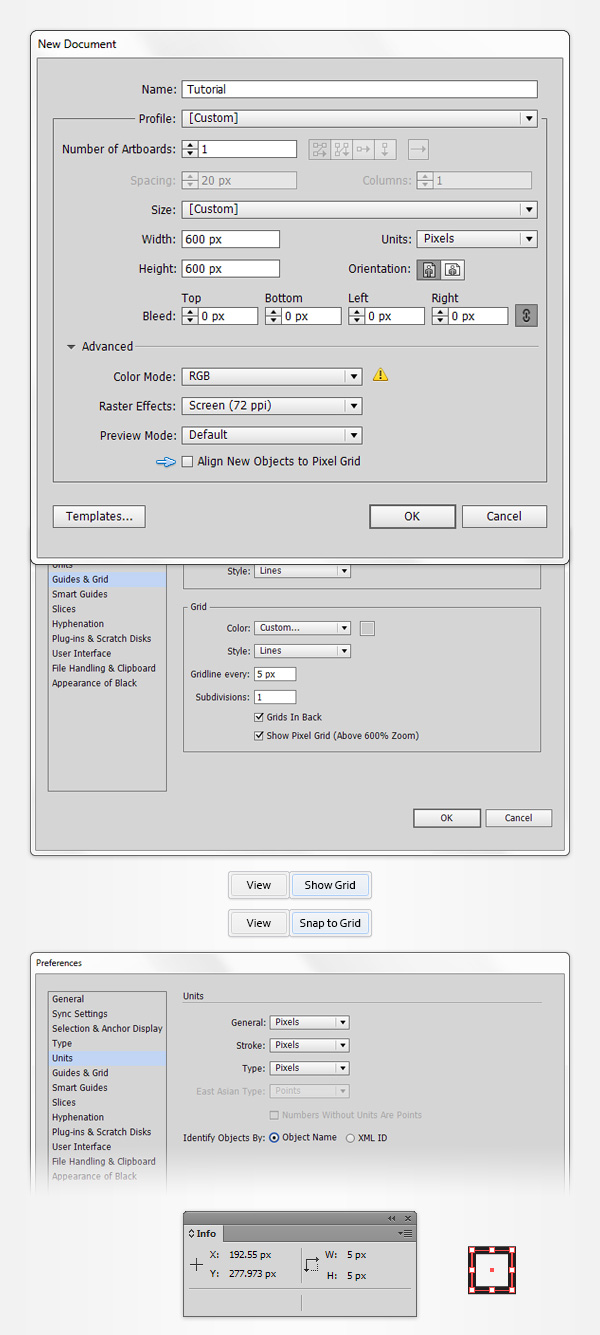
Hit Control + N to create a new document to begin this Halloween lantern vector tutorial. Select Pixels from the Units drop-down menu, enter 600 in the width and height boxes then click on the Advanced button. Select RGB, Screen (72ppi) and make sure that the Align New Objects to Pixel Grid box is unchecked before you click OK. Enable the Grid (View > Show Grid) and the Snap to Grid (View > Snap to Grid). For starters you will need a grid every 5px, so simply go to Edit > Preferences > Guides > Grid, enter 5 in the Gridline every box and 1 in the Subdivisions box. Try not to get discouraged by all that grid, it will ease your work and keep in mind that you can easily enable or disable it using the Control + ‘ keyboard shortcut. You should also open the Info panel (Window > Info) for a live preview with the size and position of your shapes. Do not forget to set the unit of measurement to pixels from Edit > Preferences > Units > General. All these options will significantly increase your work speed.
Step 2
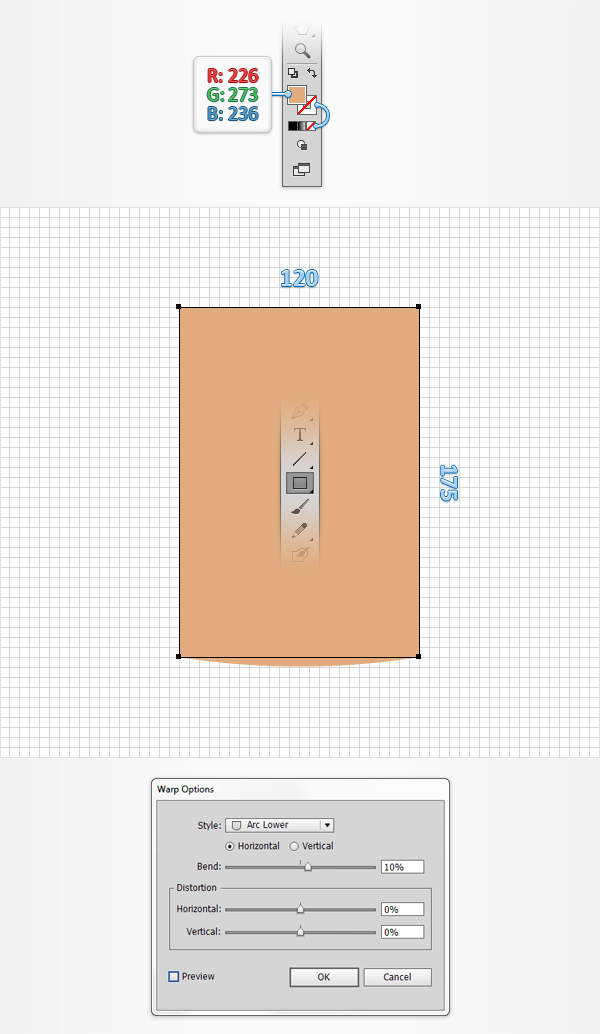
Pick the Rectangle Tool (M) and focus on your Toolbar. Remove the color from the stroke then select the fill and set its color at R=226 G=147 B=150. Move to your artboard and simply create a 120 x 175px rectangle, the Snap to Grid will ease your work. Make sure that this rectangle stays selected and go to Effect > Warp > Arc Lower. Enter the properties shown in the following image, click OK and go to Object > Expand Appearance.
Step 3
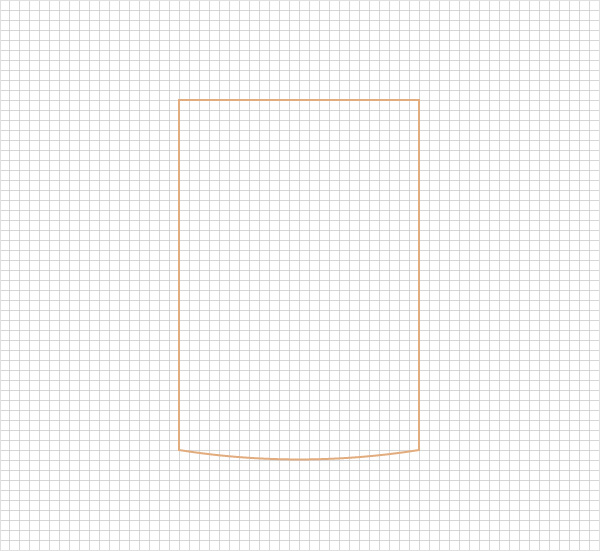
Make sure that your shape is still selected and simply hit Shift + X to transfer the existing color attributes from fill to stroke. In the end things should look like in the following image.
Step 4
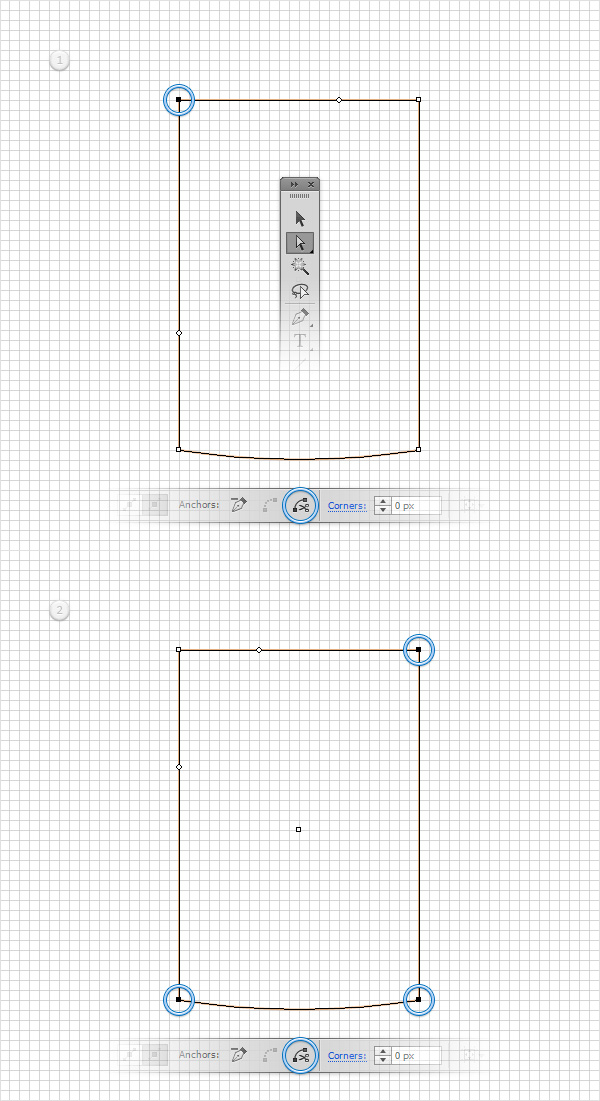
Grab the Direct Selection Tool (A) and focus on the top side of your Halloween lantern vector shape. Select the left anchor point, move to the top bar and simply click that Cut path at selected anchor point button. Using that same tool select the other three anchor points that make up the corners of your your shape, return to the top bar and click again that Cut path at selected anchor point button. Move to the Layers panel, open the existing layer and you should find four paths that make up the sides of your shape.
Step 5
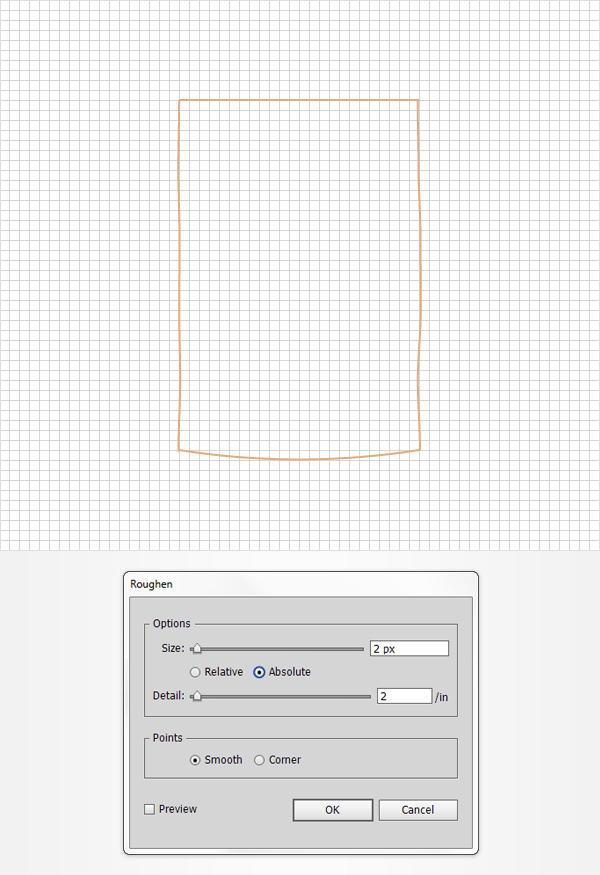
Select the two paths that make up the vertical sides of your Halloween lantern vector shape and go to Effect > Distort & Transform > Roughen. Enter the attributes shown in the following image and click OK.
Step 6
Select the path that make up the bottom side of your shape and go again to Effect > Distort & Transform > Roughen. Enter the attributes shown in the following image and click OK.

Step 7
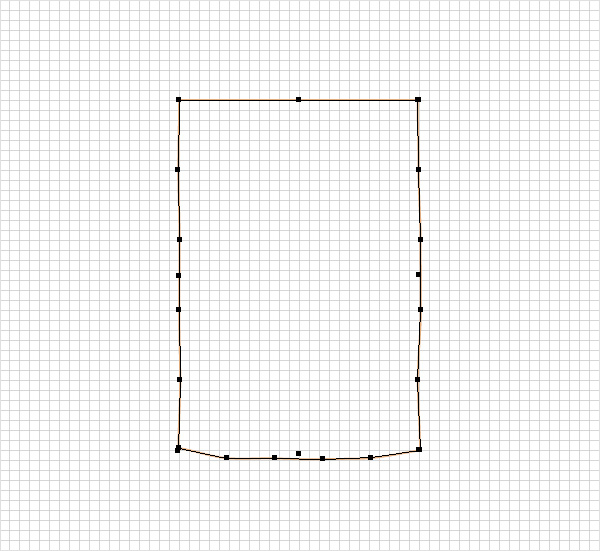
Reselect both vertical sides along with the bottom side and go to Object > Expand Appearance.
Step 8
Grab the Direct Selection Tool (A) and focus on the bottom, left corner of the existing paths. Simply select the two anchor points (one by one) and move them a little so that they snap to the closest grid. Once it’s done, select both anchor point and simply hit Control + J to connect them. Focus on the other three corners and repeat this technique. In the end you should have a closed path.
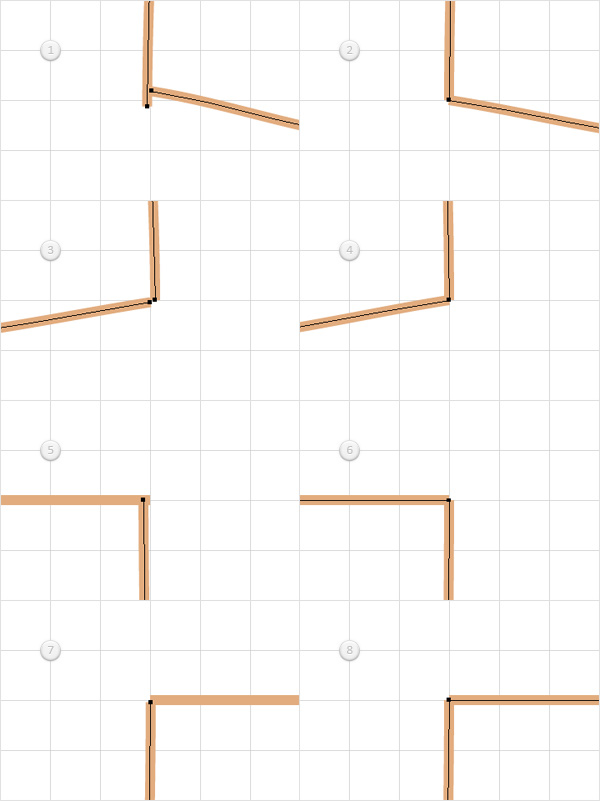
Step 9
Make sure that your Halloween lantern vector shape is selected and hit again the Shift + X keyboard shortcut to transfer the color attributes from stroke to fill. Move to the Layers panel, simply double click on the name of your shape and rename it “frontSide“.
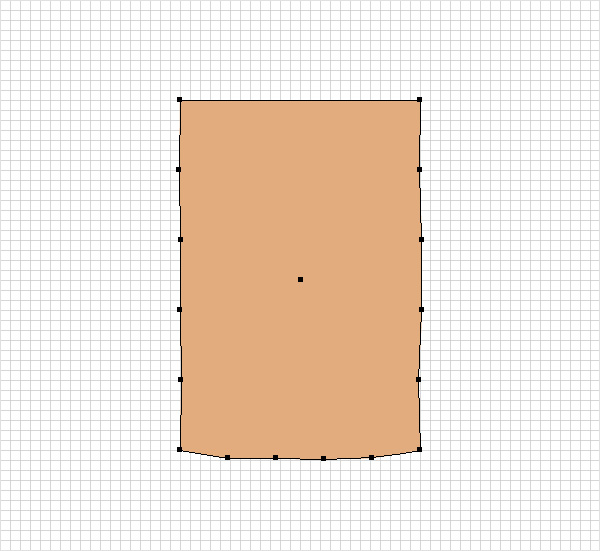
Step 10
Disable the Snap to Grid (Shift + Control + ‘) then go to Edit > Preferences >
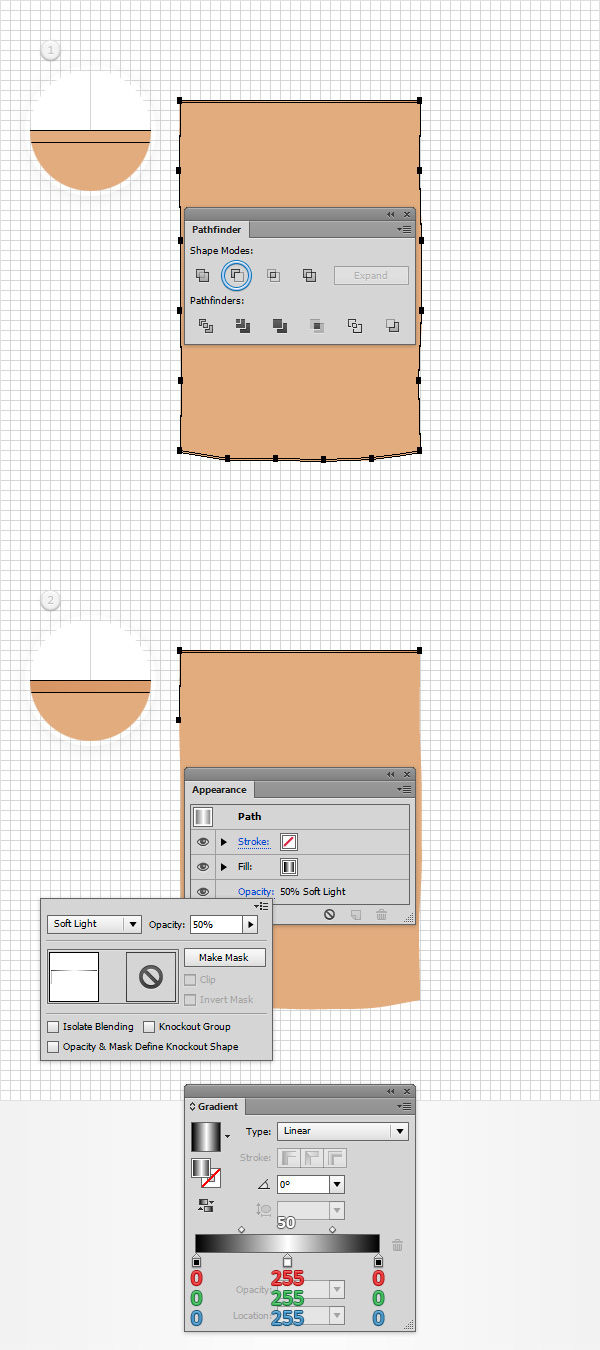
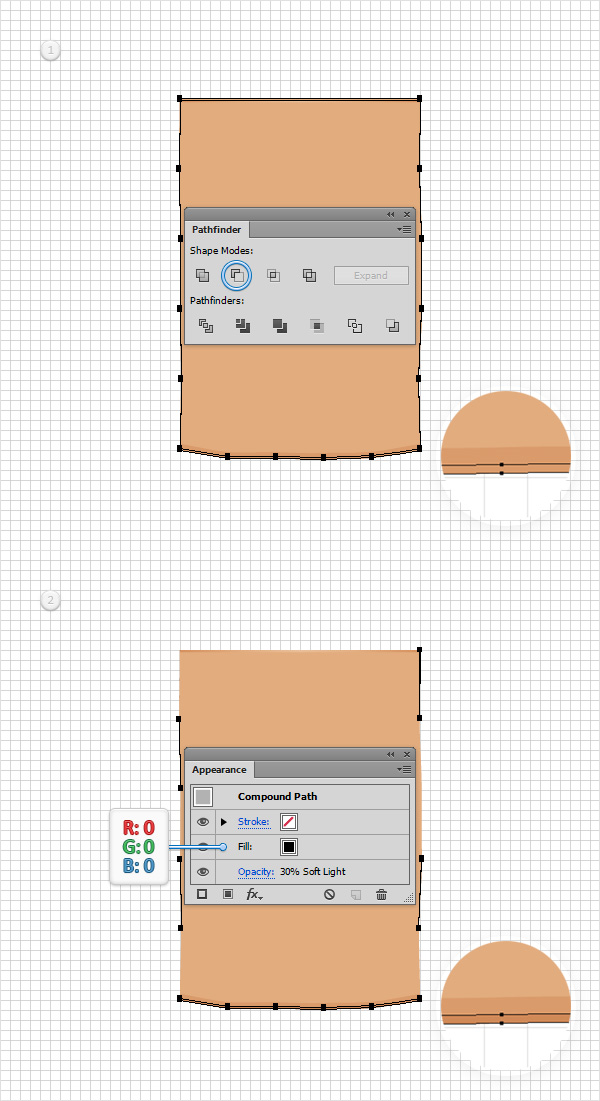
General and make sure that the Keyboard Increment is set at 1px. Make sure that your “frontSide” shape is selected and make two copies in front (Control + C > Control + F > Control + F). Select the top copy and move it 1px down using the down arrow button from your keyboard. Reselect both copies made in this step, open the Pathfinder panel (Window > Pathfinder) and click the Minus Front button. Make sure that the resulting group of shapes is selected and simply hit Control + 8 (or go to Object > Compound Path > Make) to turn it into a compound path. Select this new compound path, open the Gradient panel (Window > Gradient) and simply click on the gradient thumbnail to add the default black to white linear gradient. Keep focusing on the Gradient panel, set the Angle at 0 degrees then move to the gradient colors. Select the right slider and make sure that the color is set at black (R=0 G=0 B=0) then select the left slider and set its color at black. Focus on the gradient bar and simply click on it to add a new gradient slider. Select this new slider, set its color at white (R=255 G=255 B=255), focus on the Location box and set it at 50%. Keep in mind that the white numbers from the Gradient panel stand for Location percentage. Make sure that the compound path made in this step is still selected, focus on the Appearance panel (Window > Appearance) and simply click on that “Opacity” piece of text to open the Transparency fly-out menu. Lower the Opacity to 50% and change the Blending Mode to Soft Light.
Step 11
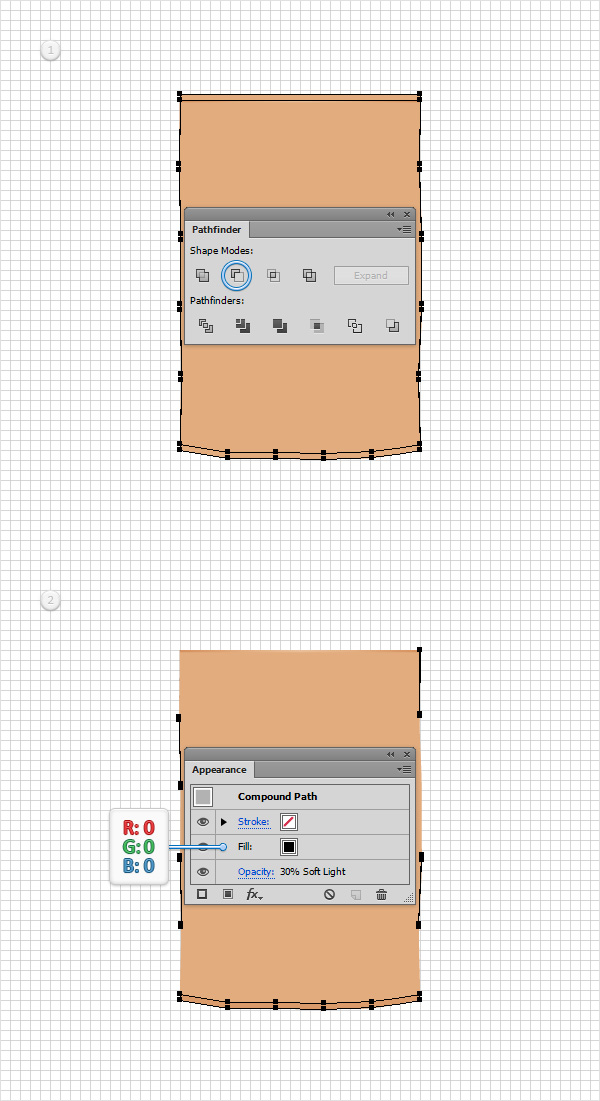
Make sure that your “frontSide” shape is selected and make two copies in front (Control + C > Control + F > Control + F). Select the top copy and move it 3px up using the up arrow button from your keyboard. Reselect both copies made in this step click the Minus Front button from the Pathfinder panel. Turn the resulting group of shapes into a new compound path (Control + 8), make sure that it stays selected and focus on the Appearance panel. Set the fill color at black then lower the Opacity to 30% and change the Blending Mode to Soft Light.
Step 12
Make sure that your “frontSide” of the Halloween lantern vector shape is selected and make two copies in front (Control + C > Control + F > Control + F). Select the top copy and move it 1px up using the up arrow button from your keyboard. Reselect both copies made in this step click the Minus Front button from the Pathfinder panel. Turn the resulting group of shapes into a new compound path (Control + 8), make sure that it stays selected and focus on the Appearance panel. Set the fill color at black then lower the Opacity to 30% and change the Blending Mode to Soft Light.
Step 13
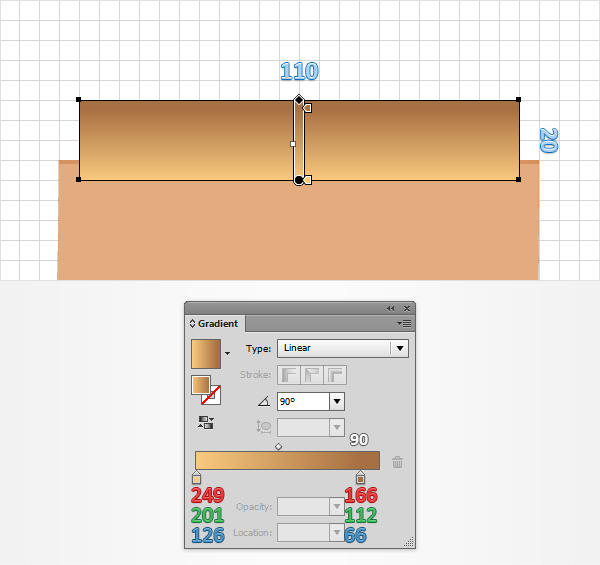
Enable the Snap to Grid (Control – ‘). Using the Rectangle Tool (M), create a 110 x 20px shape, fill it with the linear gradient shown below and place it as shown in the following image. Don’t forget that the white number from the Gradient image stands for Location percentage.
Step 14
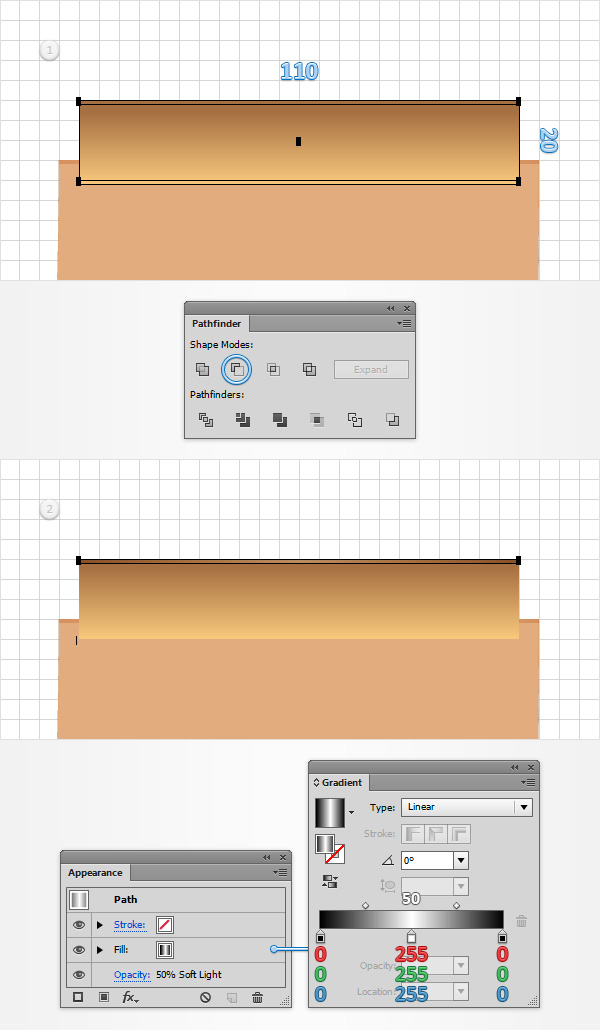
Disable the Snap to Grid (Control – ‘), make sure that your rectangle is selected and create two copies in front (Control + C > Control + F > Control + F). Select the top copy and move it 1px down. Reselect both copies made in this tep and click the Minus Front button from the Pathfinder panel. Fill the resulting shape with the linear gradient shown below, lower its Opacity to 50% and change the Blending Mode to Soft Light.
Step 15
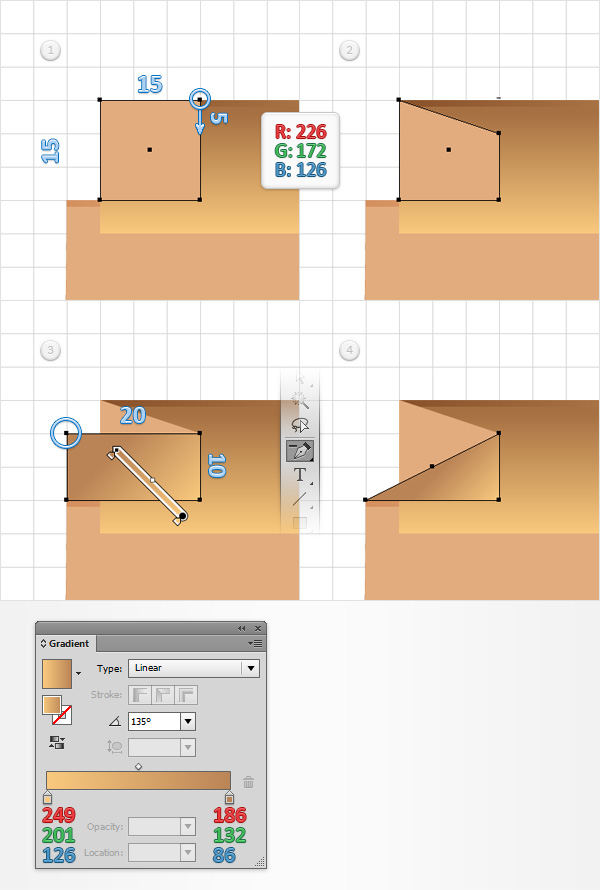
Enable the Snap to Grid (Control – ‘). Using the Rectangle Tool (M), create a 15px square, set the fill color at R=226 G=172 B=126 and place it as shown in the first image. Switch to the Direct Selection Tool (A) and focus on the right side of this new shape. Select the top anchor point and simply drag it 5px down. Once again, the grid and the Snap to Grid feature will ease your work. Reselect the Rectangle Tool (M), create a 20 x 10px shape, fill it with the linear gradient shown below then place it as shown in the third image. Keep focusing on this new rectangle, grab the Delete Anchor Point Tool (-) and simply click on the top, left anchor point to get rid of it. You will end up with a simple triangle as shown in the fourth image.
Step 16
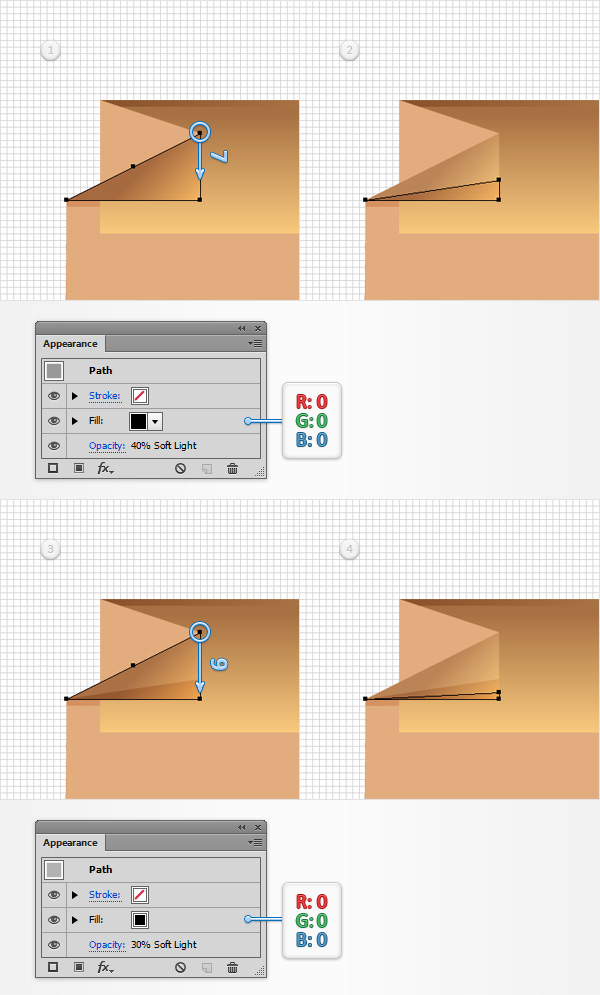
For this step you will need a grid every 1px, so go to Edit > Preferences > Guides & Grid and enter 1 in the Gridline every box. Select the triangle made in the previous step and make a copy in front (Control + C > Control + F). Switch to the Direct Selection Tool (A), focus on the right side of this newly created copy, select the top anchor point and simply drag it 7px down. Make sure that your copy is still selected and focus on the Appearance panel. Replace the existing linear gradient with a simple black, lower its Opacity to 40% and change the Blending Mode to Soft Light. Reselect the triangle made in the previous step and make a new copy in front (Control + C > Control + F). Switch to the Direct Selection Tool (A), focus on the right side of this new copy, select the top anchor point and this time drag it 9px down. Make sure that this second copy stays selected and focus on the Appearance panel. Replace the existing linear gradient with a simple black, lower its Opacity to 30% and change the Blending Mode to Soft Light.
Step 17
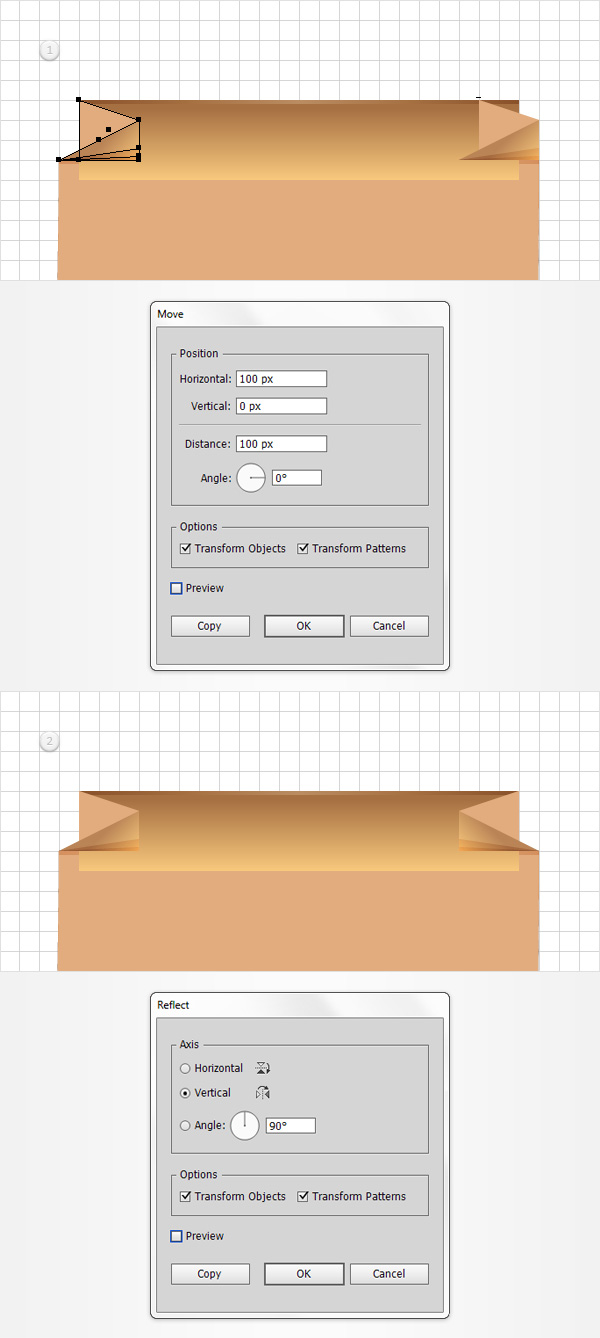
Return to gridline every 5px, so simply go to Edit > Preferences > Guides & Grid and enter 5 in the Gridline every box. Reselect the four shapes highlighted in the first image and go to Object > Transform > Move. Enter the properties shown in the following image and click the Copy button. Make sure that the newly created set of shapes stays selected and go to Object > Transform > Reflect. Enter the properties shown in the following image and click OK. In the end things should look like in the second image.
Step 18
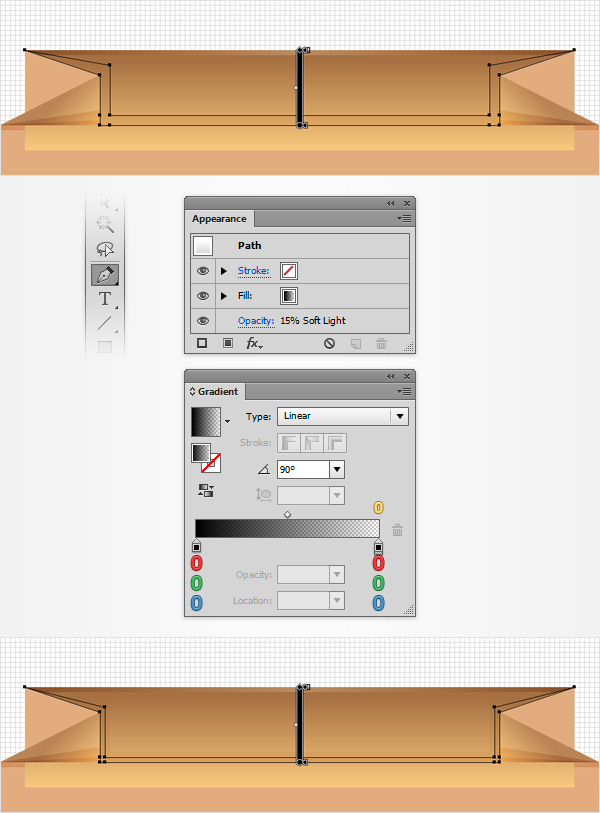
Using the Pen Tool (P), create the shape shown in the first image. Once again, the grid and the Snap to Grid feature will come in handy. Fill this new shape with the linear gradient shown below, lower its Opacity to 15% and change the Blending Mode to Soft Light. The yellow zero from the Gradient image stands for Opacity percentage which simply means that you need to select that gradient slider, focus on the Opacity box (from the Gradient panel) and set it at 0%. Make sure that the Pen Tool (P) is still active, create a second shape as shown in the second image and apply the same Appearance attributes used for the previous step.
Step 19
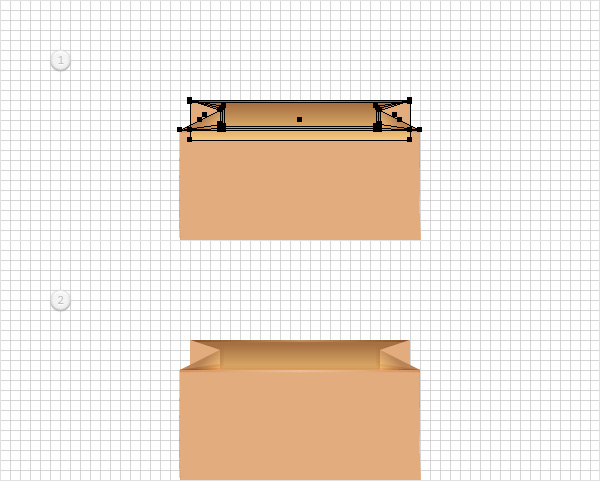
Select all the shapes highlighted in the first image and simply hit Control + G to Group them. Make sure that this new group is selected and send it to back using the Shift + Control + [ keyboard shortcut.
Step 20
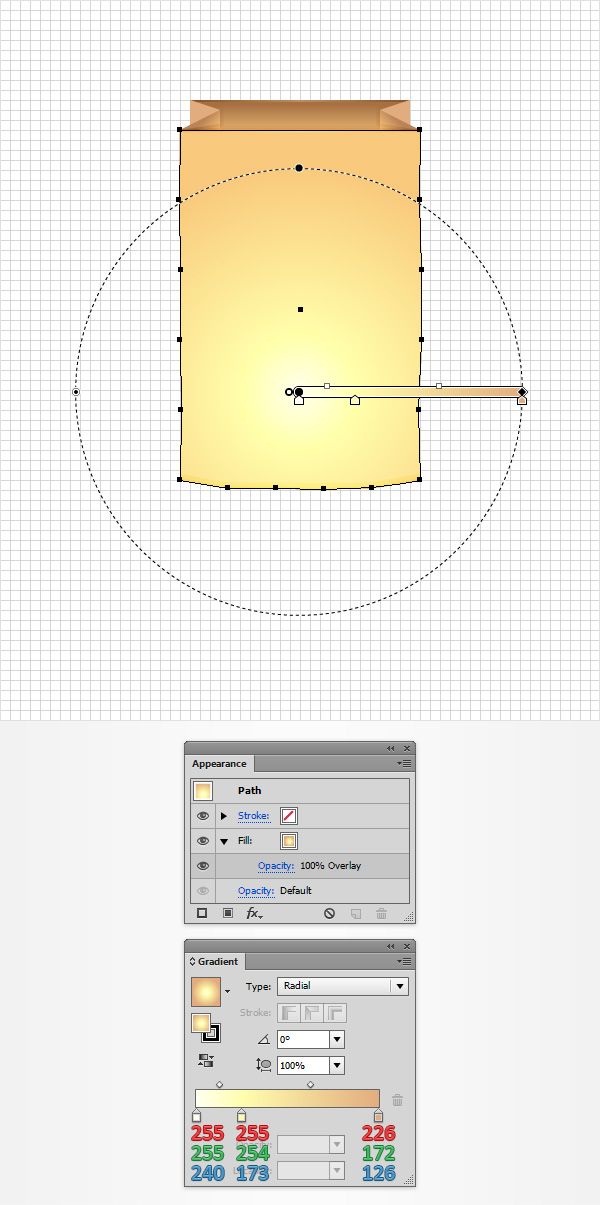
Reselect your “frontSide” shape and make a copy in front (Control + C > Control + F). Move to the Layers panel and simply rename this new shape “frontSideTexture“. Make sure that it stays selected and focus on the Appearance panel. Select the existing fill, change its Blending Mode to Overlay and replace the existing color with the radial gradient shown in the following image. Focus on your artboard and use the Gradient Tool (T) to strecth this gradient as shown in the following image.
Step 21
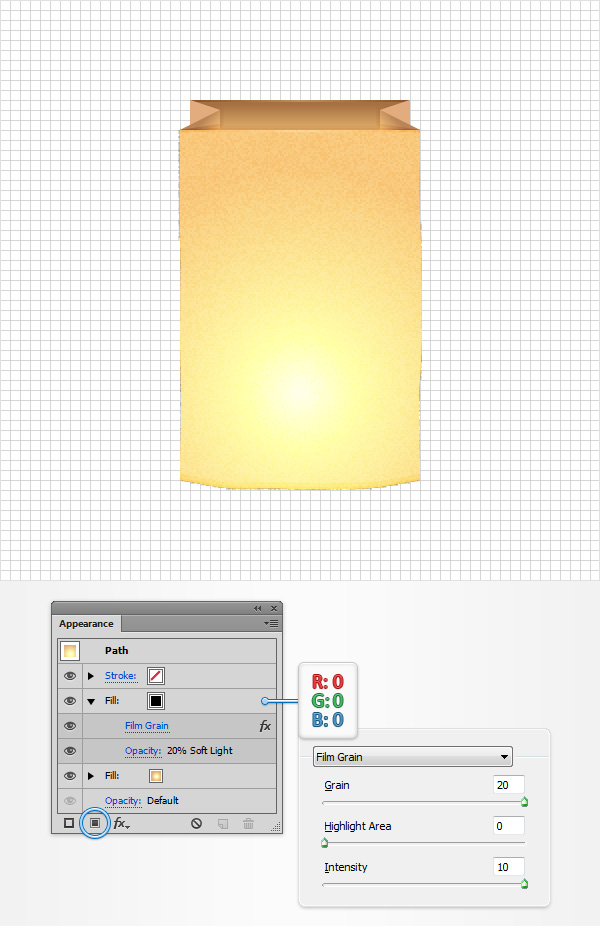
Make sure that your “frontSideTexture” shape stays selected, focus on the Appearance panel and add a second fill using the Add New Fill button. Select this new fill, make it black, lower its Opacity to 20% and change the Blending Mode to Soft Light then go to Effect > Artistic > Film Grain. Enter the properties shown in the following image and click OK.
Step 22
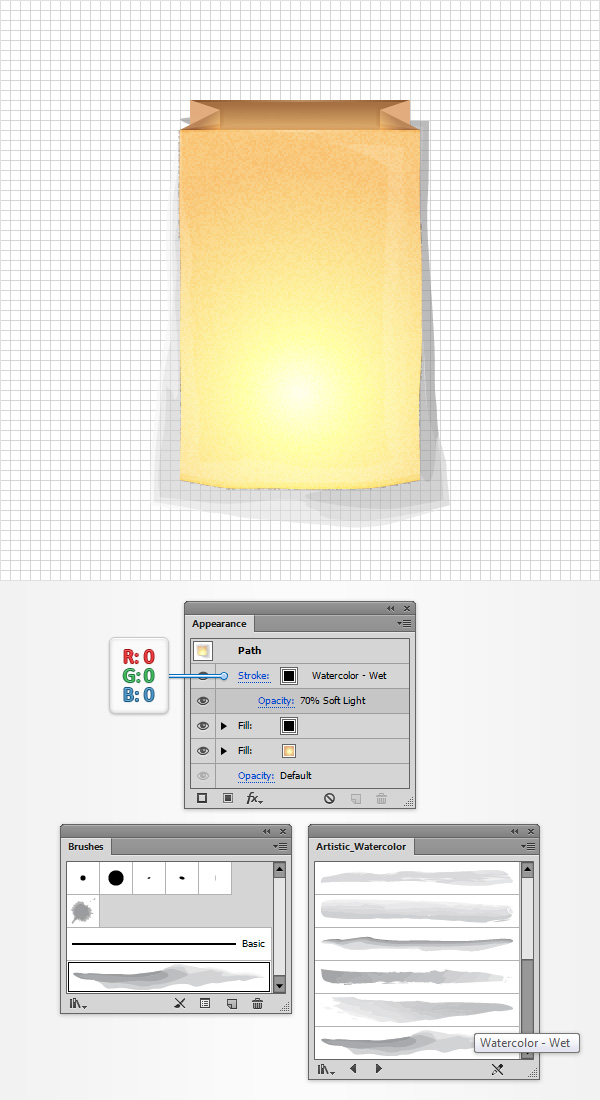
Open the Brushes panel (Window > Brushes). Open the fly-out menu of the Brushes panel, go to Open Brush Library > Artistic > Artistic_Watercolor and a new window with a bunch of art brushes will open. Make sure that your “frontSideTexture” of the Halloween lantern vector shape stays selected, focus on the Appearance panel and select the existing stroke. Make it black, add the Watercolor – Wet art brush then lower its Opacity to 70% and change the Blending Mode to Soft Light.
Step 23
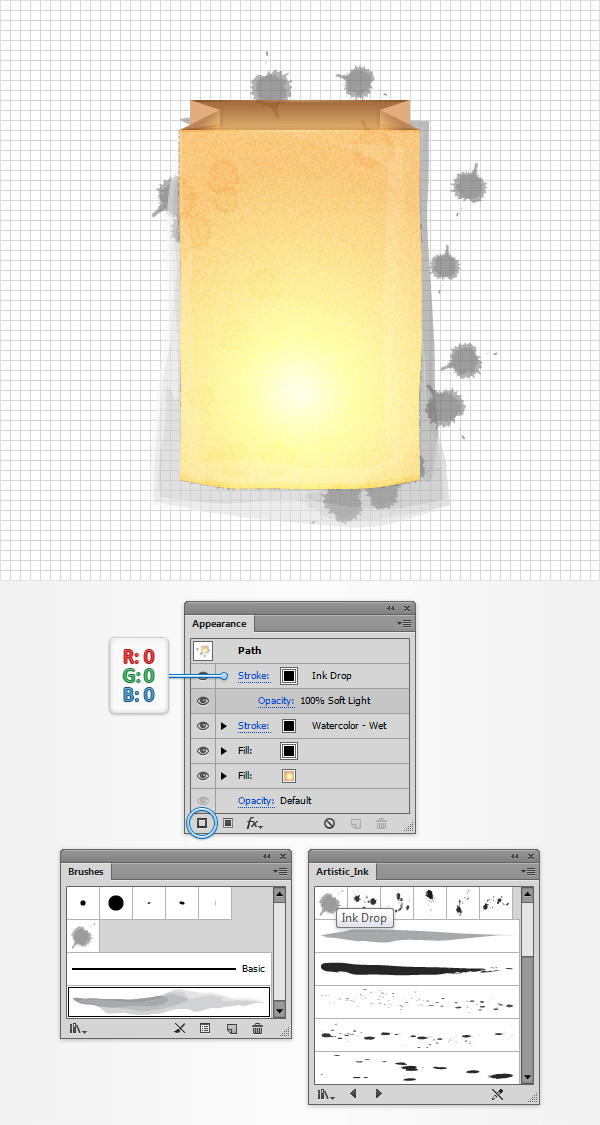
Focus on the bottom side of that panel with the set of art brushes and click the left arrow button until you get the to the Artistic_Ink section. Make sure that your “frontSideTexture” shape stays selected, focus on the Appearance panel and add a second stroke using the Add New Stroke button. Select this new stroke, change it Blending Mode to Soft Light, make sure that the color is set at black then add the Ink Drop scatter brush.
Step 24
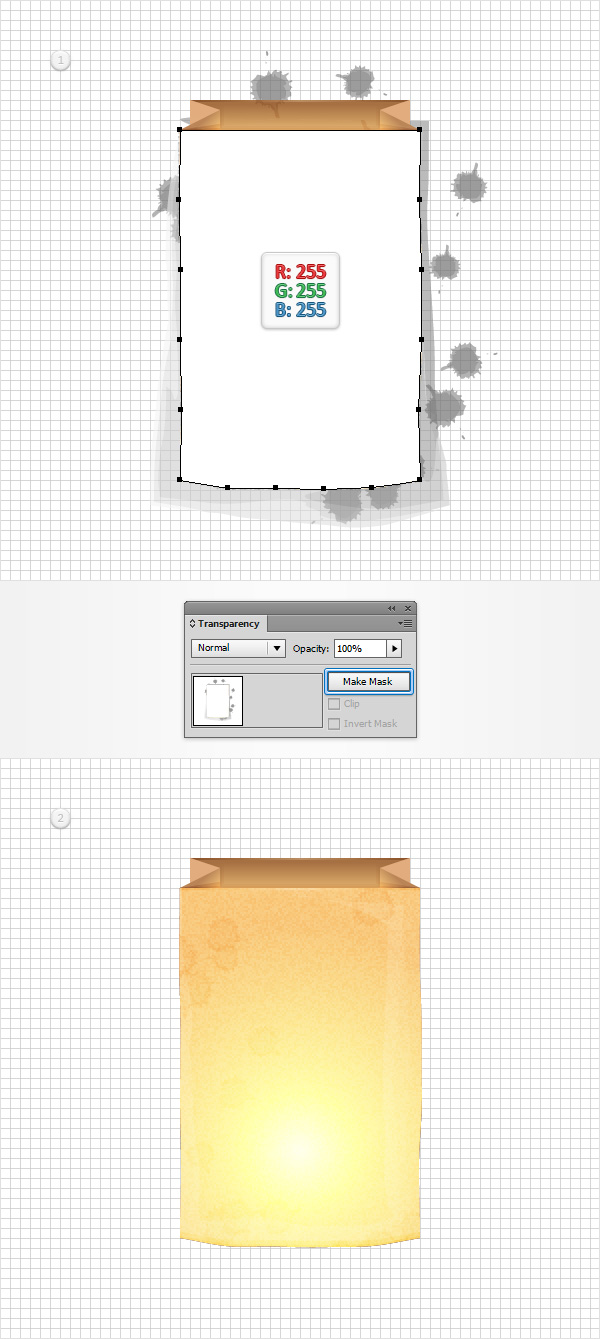
Focus on the Layers panel, select your “frontSide” shape, make a copy in front and bring it to front (Shift + Control + ] ). Make sure that this new shape is selected and replace the existing fill color with a simple white. Reselect this white shape along with your “frontSideTexture” shape, open the Transparency panel (Window > Transparency) and simply click the Make Mask button. If you’re not an Illustrator CC user you need to open the fly-out menu of the Transparency panel and click the Make Opacity Mask command.
Step 25
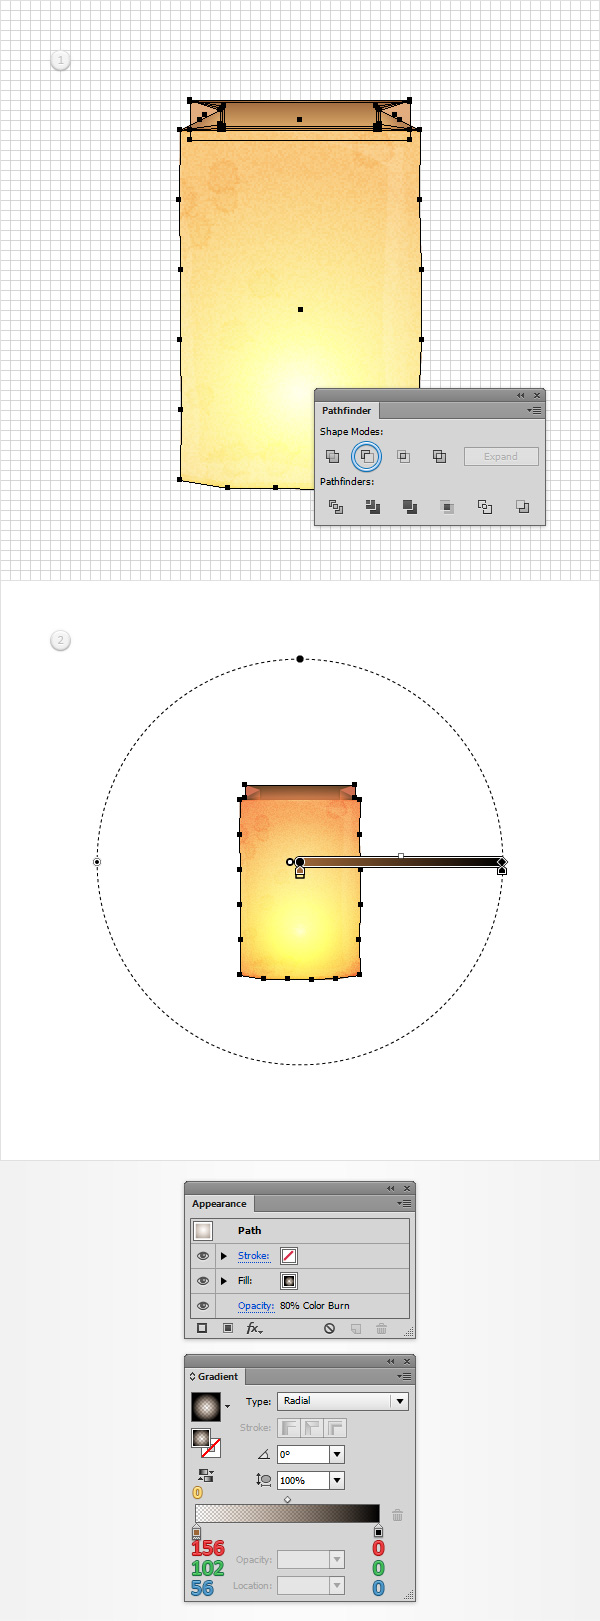
Reselect all the shapes made so far and duplicate them (Control + C > Control + F). Make sure that all these copies are selected and simply click the Unite button from the Pathfinder panel. Fill the resulting shape with the radial gradient shown in the following image then lower its Opacity to 80% and change the Blending Mode to Color Burn.
Step 26
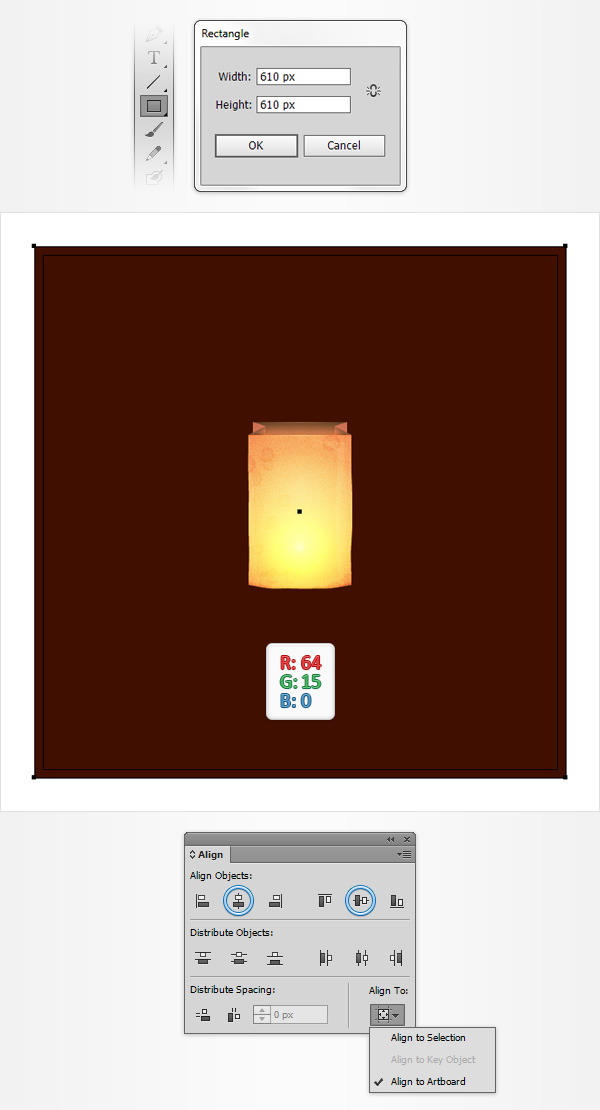
Pick the Rectangle Tool (M) and simply click on your artboard to open the Rectangle window. Enter 610 in the Width and Height boxes then click the OK button. Fill the resulting shape with R=64 G=15 B=0, send it to back (Shift + Control + [ ) then move to the Layers panel and rename it “Background“.
Next, you will need to center this square, so open the Align panel (Window > Align). Set the aligning to Artboard (open the fly out menu and go to Show Options if you can’t see the Align To section as shown in the following image), make sure that your shape is selected then simply click the Horizontal Align Center and Vertical Align Center buttons. In the end your square should cover the entire artboard as shown in the following image.
Step 27
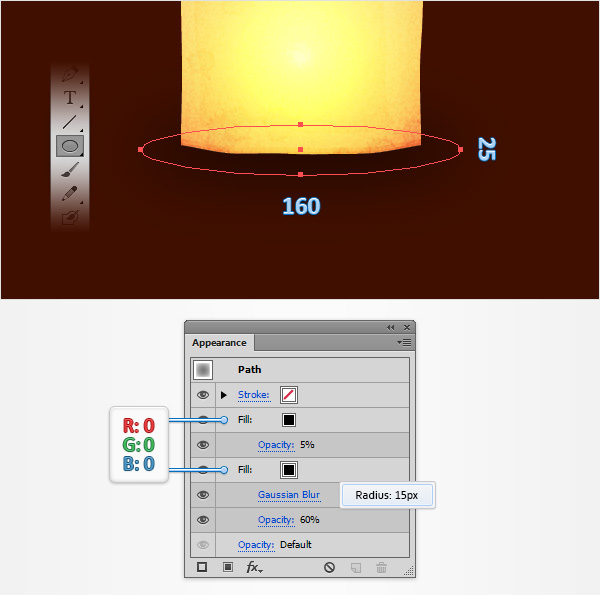
Using the Ellipse Tool (L), create a 160 x 25px shape, set the fill color at black and place it as shown in the following image. Make sure that this squeezed circle stays selected and focus on the Appearance panel. Select the existing fill, lower its Opacity to 60% and go to Effect > Blur > Gaussian Blur. Enter a 15px Radius, click OK and return to the Appearance panel. Add a second fill, make sure that the color is set at black and lower its Opacity to 5%. Move to the Layers panel, select the shape made in this step and drag it in the bottom of the Layers panel, right above your “Background” square.
Step 28
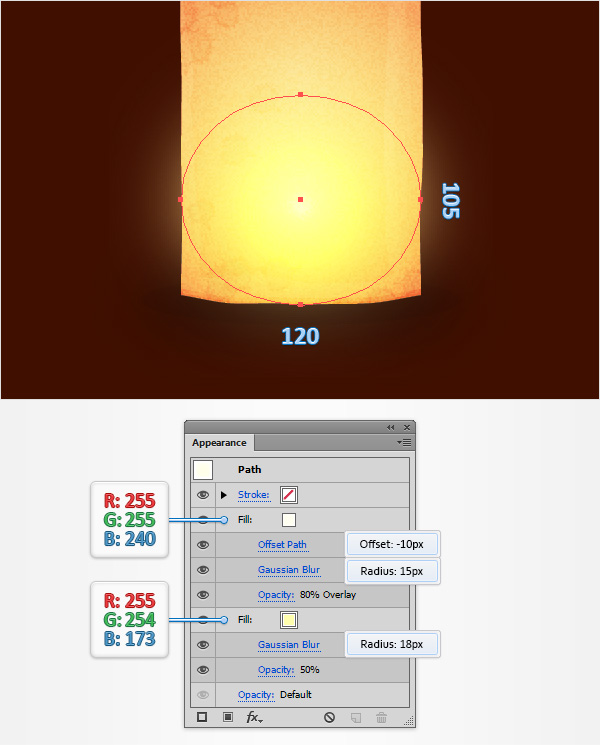
Using the Ellipse Tool (L), create a 120 x 105px shape, set the fill color at R=255 G=254 B=173 and place it as shown in the following image. Make sure that this new shape stays selected and focus on the Appearance panel. Select the existing fill, lower its Opacity to 50% and go to Effect > Blur > Gaussian Blur. Enter an 18px Radius, click OK and return to the Appearance panel. Add a second fill, set the color at R=255 G=154 B=173, lower its Opacity to 80%, change the Blending Mode to Overlay and then go to Effect > Path > Offset Path. Enter a -10px Offset, click OK and go to Effect > Blur > Gaussian Blur. Enter a 15px Radius and click OK. Move to the Layers panel, select the shape made in this step and drag it in the bottom of the Layers panel, right about your “Background” square.
Step 29
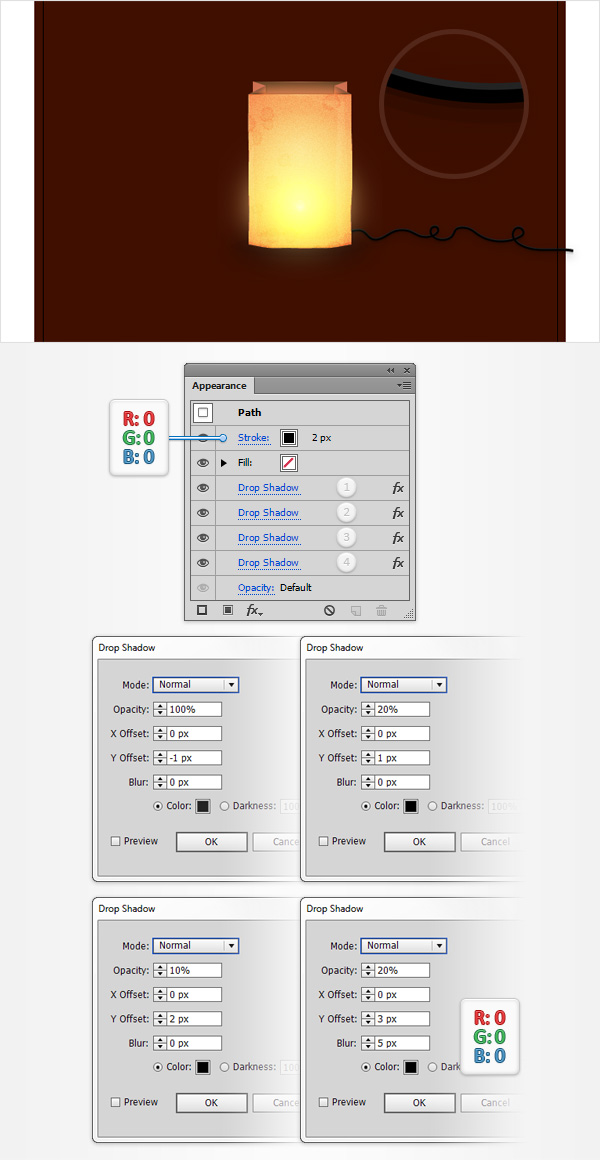
Using the Pen Tool (P) (or the Brush Tool (B)), create a curly path as shown in the following image. Select it and focus on the Appearance panel. Make sure that there’s no color set for the fill then select the stroke. Make it black, set the Weight at 2px and go to Effect > Stylize > Drop Shadow. This will be the power cord for your Halloween lantern vector. Enter the properties shown in the top, left window (in the following image), click OK then add the other three Drop Shadow effects shown in the following image.
Step 30
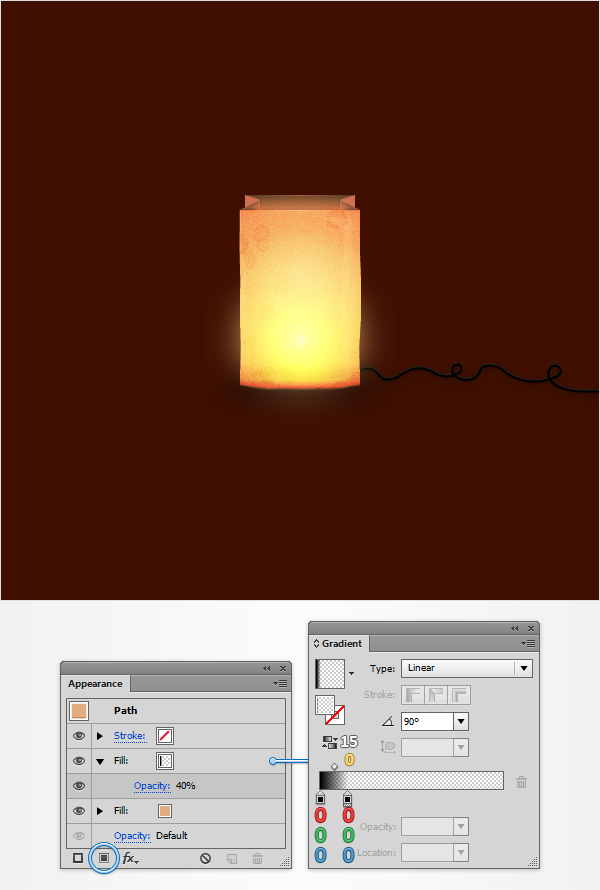
Focus on the Layers panel, reselect your “frontSide” shape adn focus on the Appearance panel. Add a second fill, lower its Opacity to 40% and use the linear gradient shown in the following image. Don’t forget that the white numbers from the Gradient image stand for Location percentage while the yellow ones stand for Opacity percentage.
Step 31
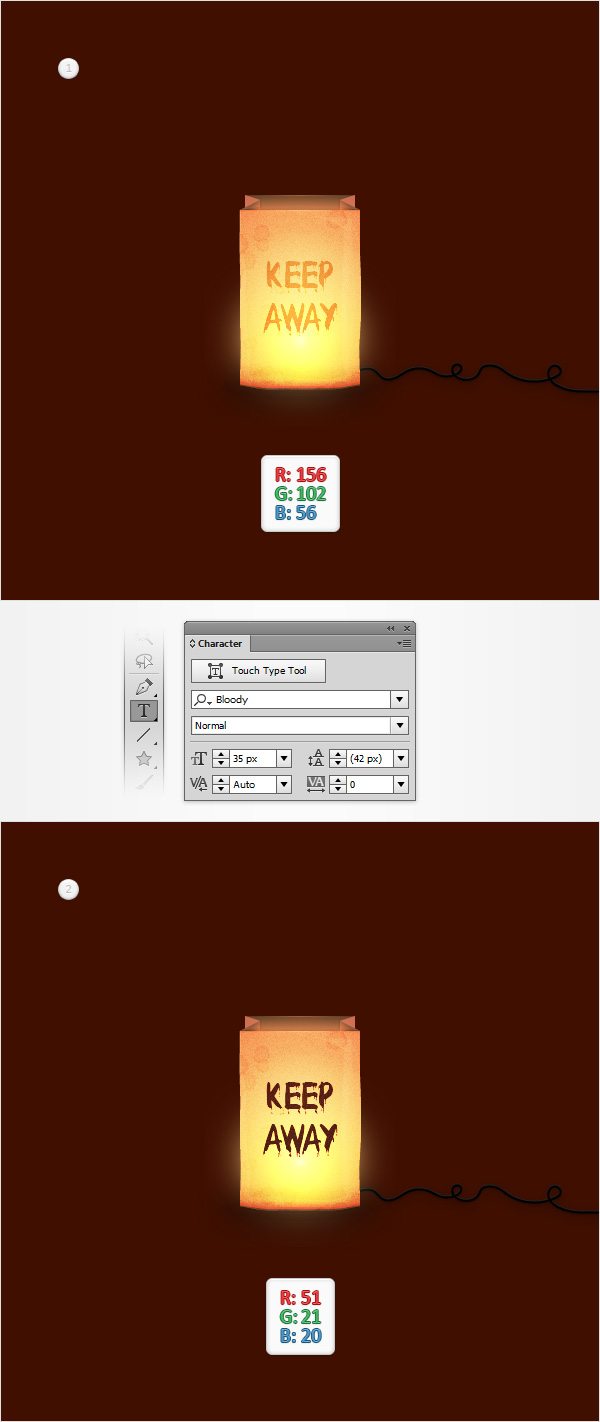
Finally, grab the Type Tool (T), simply click on your artboard and add the piece of text. Use the Bloody font with the size set at 35px and the color at R=156 G=102 B=56. Focus on the Layers panel and drag your piece of text below the “frontSideTexture” shape. Try R=51 G=21 B=20 for the text color if you want it to be less subtle.
And We’re Done!
I hope you’ve enjoyed this Halloween lantern vector tutorial and can apply these techniques in your future projects.



Thanks so much for giving everyone a very memorable possiblity to read in detail from this blog. It is often so excellent and packed with a great time for me and my office peers to search your website no less than three times in 7 days to study the fresh things you have got. And definitely, I am just certainly fascinated for the perfect tips served by you. Some 2 points in this posting are unquestionably the best I’ve ever had.
Thank you for your blog article. Thanks Again. Want more.
Amazing Illustrator tutorial, we have featured it here : http://theneodesign.com/best-illustrator-tutorials-october-2014/