

I’m sure a bunch of you have seen this technique before in other blogs or are already aware of adding gradients to text, but it is worth mentioning for those that don’t know this technique. Moreover, I found that adding an extra step to this known technique, enables you add transparent gradients to text in Illustrator CS4 while still keeping the text editable!
The Problem: Adding Gradients to Text
There are only a couple easy steps to this technique. In Illustrator, you can’t apply a gradient to text the way you normally add gradients to other objects. You can Outline the text and then add a gradient, but then you can’t edit the text later. No need to worry, there is an easy way to add gradients to text and keep them editable.
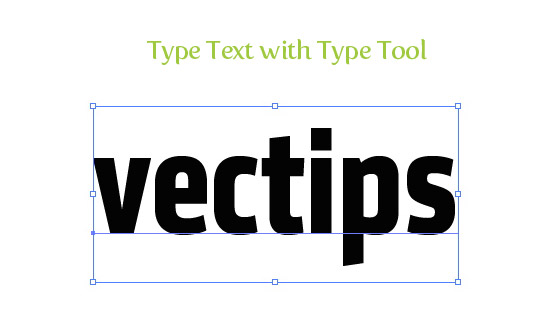
Step 1
Create some text with the Type tool, with the font of your choosing. I am using my favorite font of the moment, Klavika Bold Condensed.
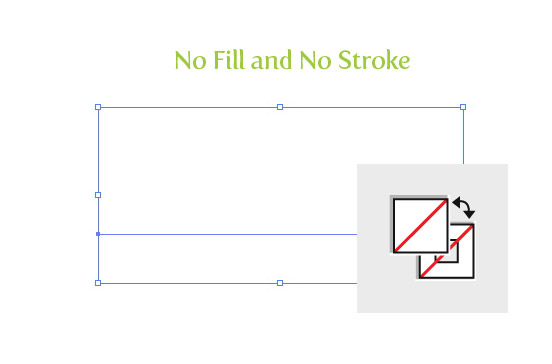
Step 2
Set the fill and stroke of your text to none. If you don’t this, after you have applied the gradient in the following steps, you will sometimes see the original text color peeking out on the text edges. Moreover, setting the fill and stroke to none, will make transparent gradients in Illustrator CS4 look correct. If you don’t set the fill to none initially, the color of the original text will show through your transparent gradient, not the object or color below the transparent gradient text.
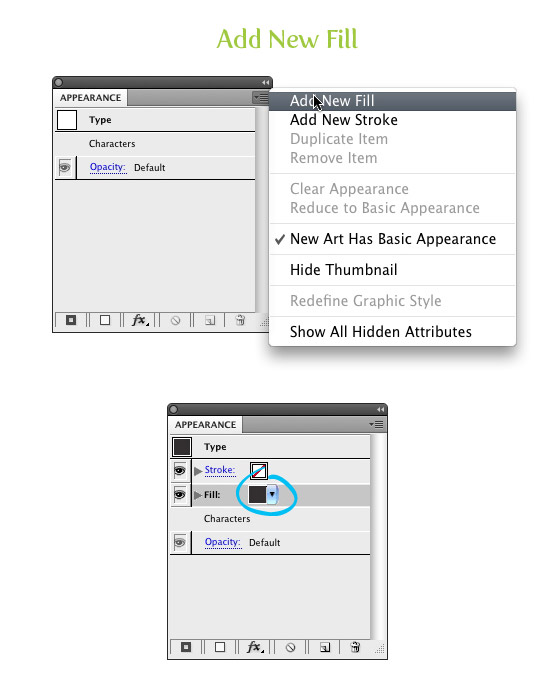
Step 3
Select the text with the Selection tool, open the Appearance panel menu (top left menu button) in the Appearance panel and choose New Fill.
Step 4
Now apply a gradient to text and your done! This has never been so easy.
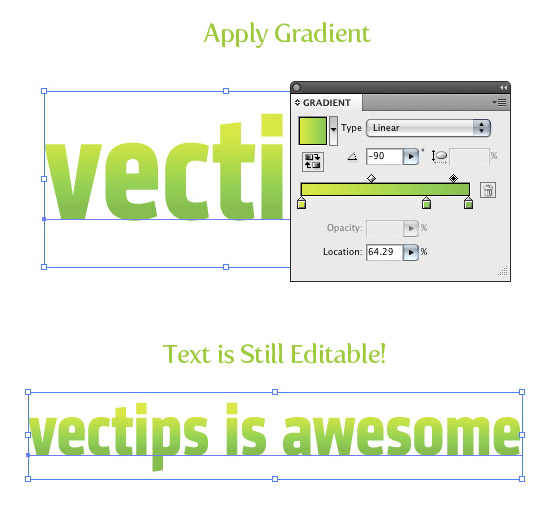
Experiment: Adding Gradients to Text
Below is an experiment using this technique for the transparent gradient text.


Hey There. I discovered your blog the usage of msn. That is an extremely smartly written article. I will make sure to bookmark it and return to read extra of your helpful information. Thank you for the post. I will certainly return.
Major thankies for the article.Really thank you! Much obliged.
I wish to point out my love for your kindness supporting persons that must have help on that subject matter. Your special commitment to getting the message all-around became quite good and have surely allowed many people like me to attain their goals. Your own helpful instruction can mean a lot to me and even further to my office workers. Best wishes; from each one of us.
This is boss! Thanks so much. I’m using CS6 right now and I’ve been using the masking method by drawing boxes with gradients for so long! Ended up looking this up because I couldn’t add a drop shadow with that method
Thank you for such an amazing article. it is very informative!
Amazing article, thanks for sharing such great information with us.
Short, precise and to the point. Thank you for this tutorial.
Nice example. Thanks
Thanks for the help it was Awesome my only problem is my selection triangle next to the fill color isn’t there
I gasped at how east it was! Thank you, amazing 🙂
thanks, easy to understand. One question – when i warp the text the gradient doesnt remain it differs from letter to letter. i need the same colour line in the middle of all the letters bending with text. I need the gradient to be locked in place and move with text. Help please
I’ve seen these instructions posted on several sites and tutorials. However, when I get to the step to “Add New Fill” in the Appearance window, “Add New Fill” is disabled. Any idea of a preset or default setting I need to change? This is driving me nuts!
Thanks for the tutorial.
Simple & Easy. Really help. 🙂
Dude! THANK YOU!!
cool man, awesome
Thnsks man
Thank you !
Hello,
Thanks for the tutorial, it’s very usefull. I only have a problem. When I put the fill and stroke on none and I go to appearance, my option “add new fill” is blanc (I can’t select it). Do you know why I can’t use it? I’ve tried different types, but with all types I can’t add a new fill.
Kind regards,
Lianne
Thanks, its help a lot
Thanks, it was useful
Awesome tutorials. TQ.
Great Tutorial. Thanks! Is it possible to apply 2 different gradients within the same text box. Or a gradient and a color? For example, if I have a paragraph, and want to make 1 word in the middle a gold gradient?
Hi Jon, while it’s possible to add 2 colors to the same text box, it’s not possible to add 2 gradients to the same text box or a gradient and a color. You’ll need to separate the text into 2 separate text boxes to apply the 2 differing effects.
thank you very much……………………………
This is awesome, thank you!!!
Everything is very open with a clear clarification
of the issues. It was truly informative. Your site is
very helpful. Thank you for sharing!
Feel free to visit my page – Steam Wallet Hack 2013
Thank you, thank you, thank you! Adobe online help was USELESS!
THANK YOUUUUU ! – God BLESS YOU!
Thanks for the help in text gradients
Thank you I love you for this <3
Thanx mate! Good stuff…
Greets,
Chewie
Thank you very much.
Bless you! You have just saved me so much time! Much gratitude xxx
Great Tuts. Really… 🙂
Doesn’t work in Adobe 6
You are right, you can’t use this method with cs6 instead create a style with the gradient you need, apply it to your text and there you go. The text is still editable.
Hope that helps…
Perfect, just what I was looking for and took seconds!!! I usually do everything in Photoshop because I don’t normally need vector art. Thanks very much!
Hi. I’m new to Illustrator CS4 and I can add the gradient, per your instructions but, I can’t change the gradient colour from black (except for “Desert Sunset” or “Copper Radial”). I’d appreciate it if you can tell me how to get a gradient from the colour palette. Thank you so much.
@Penelope Select your text using the black pointer and you can see the gradient settings. On the gradient slider, double click (PC) on each tiny colour square to open up your colour pallet. Select the colour you want for each one. Done.
Just want to say
Thank you very much for this great technique.
Great and simple tutorial. Thanks!
very use full
Thanks! Great tutorial, really useful! Keep going!
Great vector text tutorial.
Thanks I needed this!
Your website is great! Thank you for your good tutorials. Could you also publish a tutorial for creating effective circular gradient below the gradient text? Thank you so much!
Just brilliant, Ta! After an hour of trying to find why it’s not easy to add graduation to text, and finding some weird solutions, THIS is just great! You’ve pout it simply and strait forward! Ace tip!
Awesome tip!
useful trick. i will use it anytime.
excellent tip!
really cool tut, any chance that you’ll make one on the circles? those look incredible!!
thank you
Many thanks for this tutorial! Having the text editable is a great time saver for me.
Procurei e muito até encontrar seu blog, inclusive este foi o único tutorial que deu certo. Muito obrigado.
Thanks! Just what I was looking for.
This is a great technique to have on hand, thanks a bunch. I’ll be sure to use this often.
I’ve been trying to create a super happy octopus on vector.tutplus.com, but I got stuck in step 6. I’ve followed the instruction. however, every time I tried to intersect the shape of the mouth & teeth, all the shapes are gone, except half the teeth.Help
Try Grouping the teeth shape and if you are using CS4 hold down Alt/Option when you press the Intersect button. Let em know if that helps.
Hi Rype, I still don’t know how to use intersect very well in CS4. So what I did was copying the original shape and add it to another shape. After I intersect it, I drag it back to the original shape :)) sounds dumb.
awesome tutorial!
and I agree with Akkin! Please give us a tut showing how to do those circles!
I wish I would of know this tip a long time ago! AWESOME, Thanks!!
Nice tut!
Plz create a tutorial on how to make that circles in background!
Yes! I love those circles at the end!
This is a great tip! Thanks much!
Honestly I been spending like 2 months trying to fight this technique out. Thank you so much for this tutorial. This has ended on quest in my books.
Another similar way of adding gradients to text is to apply a gradient to a shape, save it as a style and apply the style to the type/text.
@Darkspell
Welcome!
I’m a new reader of your blog & I must say that it’s awesome, I get along fine with Photoshop and InDesign but Illustrator always gave me a hard time, but now it’s all gonna change, thank’s to you !!! 😉
Keep on rockin’ !
Nice Tut, even nicer example. The example itself could be another great
tut.
Wow! I didn’t know that. Good man.
Thanks for the tip! So easy & useful!
Cool tip, all we need now are gradients on strokes. Pretty please, Adobe?
You can create something that has the same effect as a stroke by putting multiple fills on the text and using the offset path effect.
Hey Lensco,
Here’s a sneak peek at what’s coming up in Adobe Illustrator CS6 – http://tv.adobe.com/watch/adobe-design-center/adobe-illustrator-cs6-sneak-peek-gradients-on-strokes/.
Regards,
David
Excellent Rype! I have wondered why it wasn’t possible without outlining the text!
Thanks a bunch Rype – this i valuable