
As these chunky style buttons get more popular I find clients requesting them more and more. If you are getting the same requests or just want to learn how to create them, you’ll be happy to know it is pretty easy. With heavy use of the Appearance panel, this tut is similar to others I have written. Like in the previous tutorials, it is easy to make a graphic style and apply the effects to other elements!
Tutorial Details
- Program : Adobe Illustrator CS5 (You should be able to create this tutorial in CS4 but some of the tutorial images might look different.)
- Difficulty: Beginner /Intermediate
- Topics Covered: Appearance Panel, Gradients
- Estimated Completion Time: 15-20
Final Image
Below is the final button we will be working towards.

Step 1
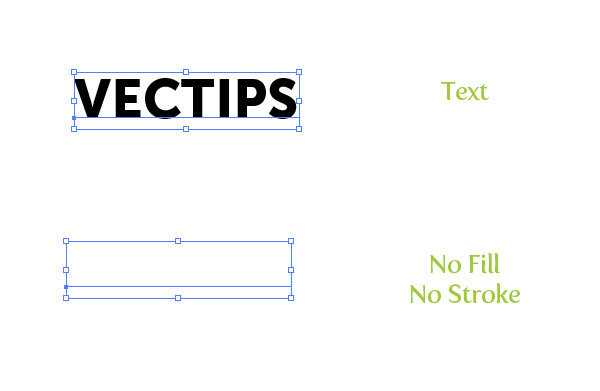
First, create some text with the Text tool (T). I used Museo Sans 900 at 18 pt. Take off any stroke or fill from the text.
Step 2
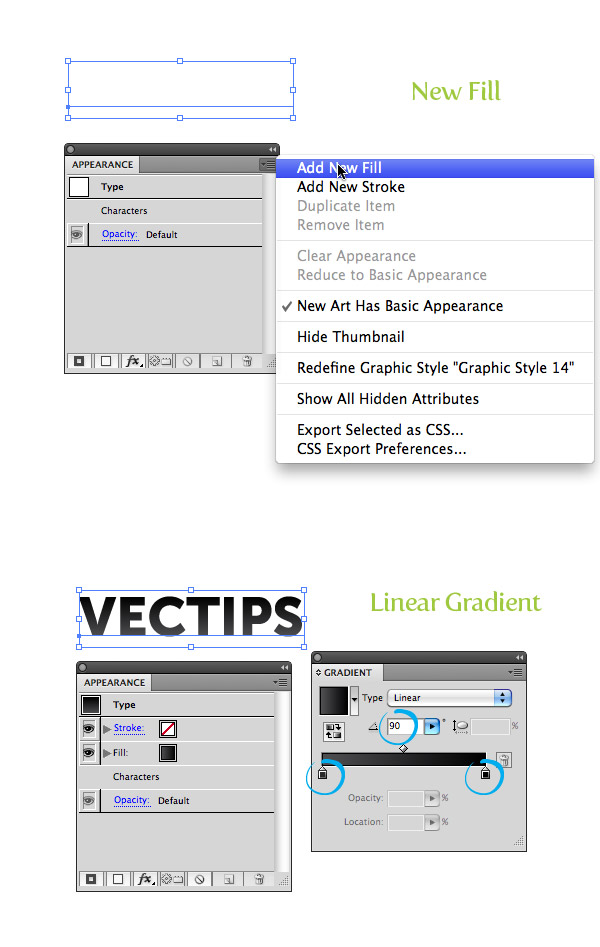
Select your text, open the Appearance panel, and from the pop-up menu of the panel choose New Fill. Select the new fill item in the Appearance panel and fill it with a linear gradient. Change the first color stop in the gradient to a dark gray, change the second color stop to black, and set the Angle to 90.
Step 3
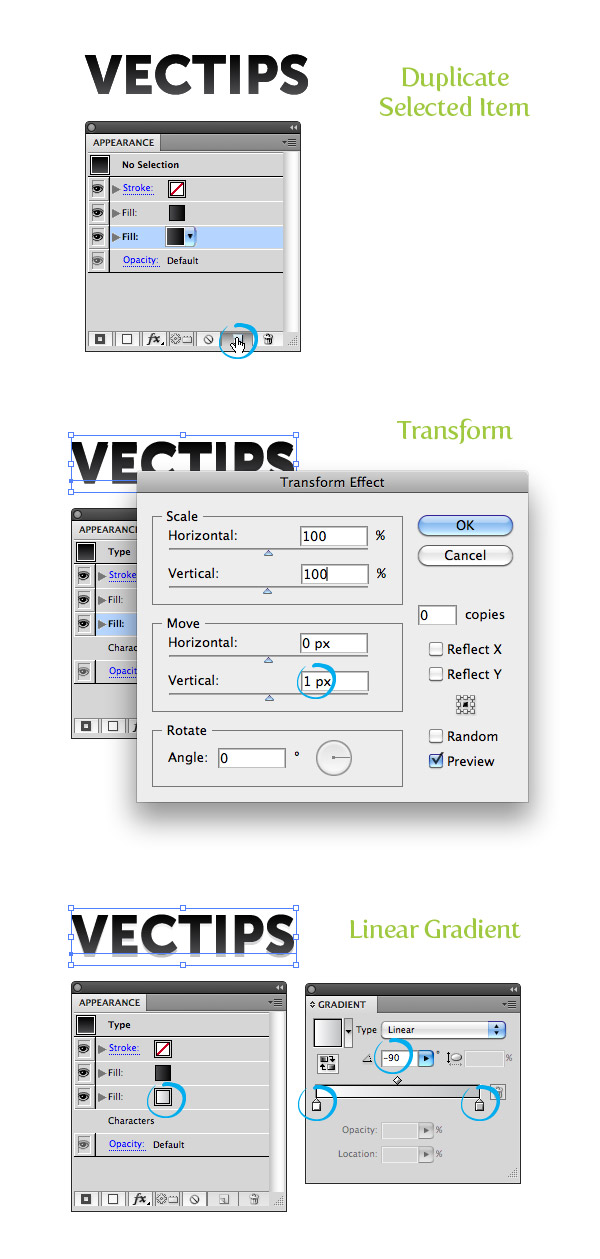
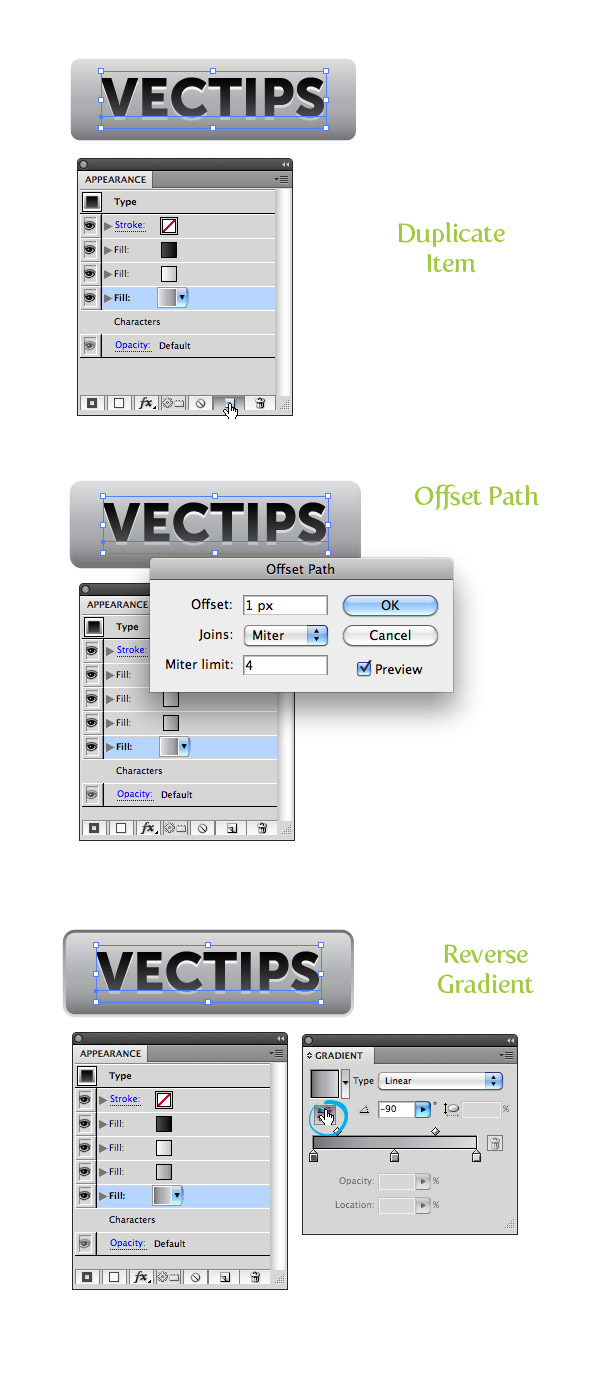
Select the gradient fill item in the Appearance panel and press the Duplicate Selected Item button at the bottom of the panel. Select the bottom duplicate in the list and go Effects > Distort & Transform > Transform. In the Transform dialog, change the Vertical Move to 1 px (-1px if working in CS4). Change the first color stop of the duplicate linear gradient to white, the second to a light gray, and change the angle to -90.
Step 4
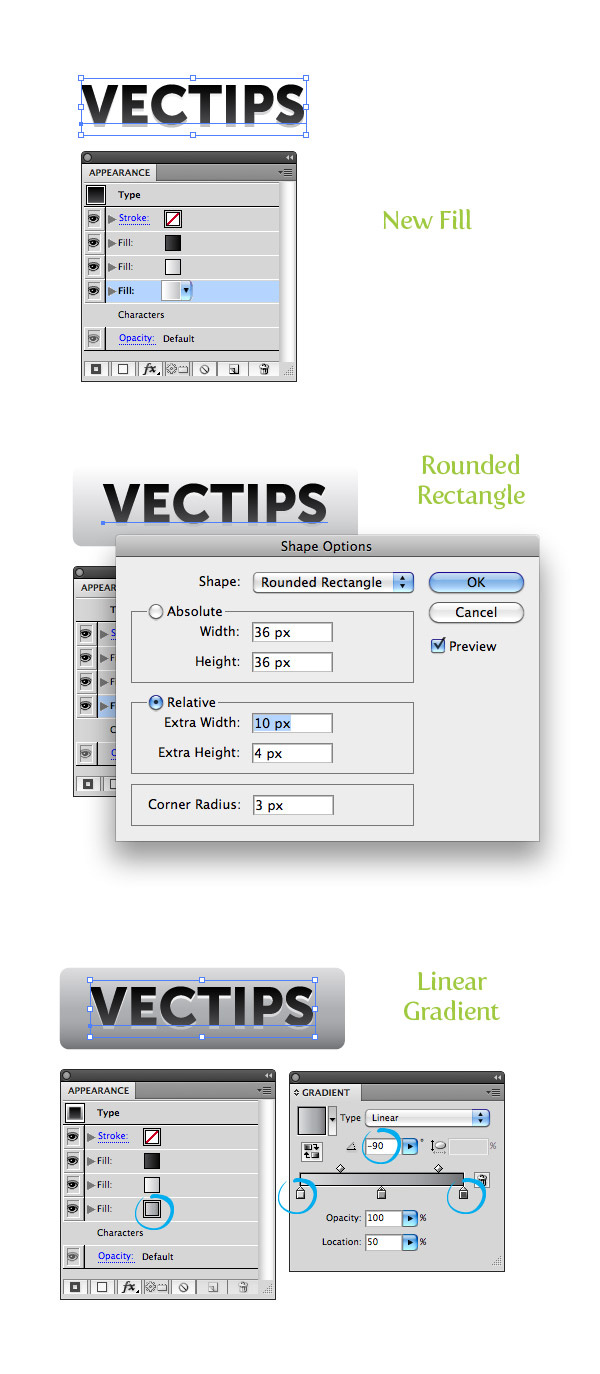
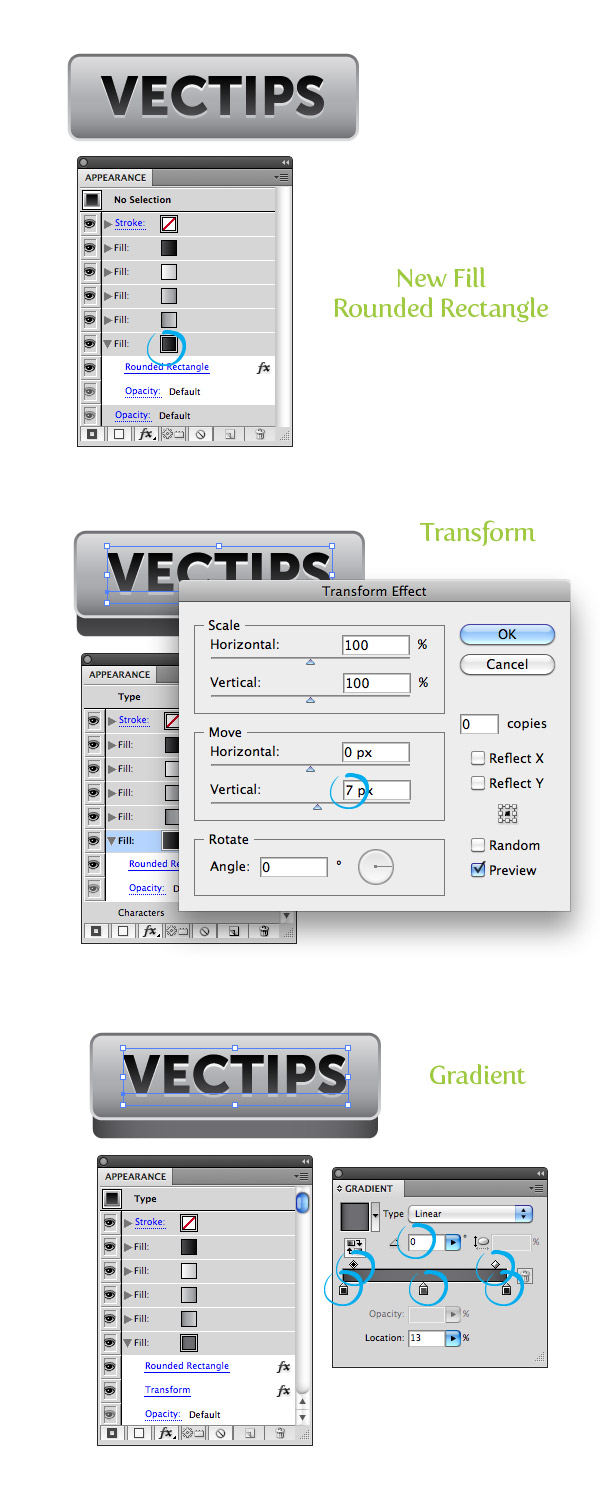
Create a New Fill from the Appearance panel like early in the tutorial and drag the fill item below all other fills. With the new fill selected, go Effects > Convert to Shape > Rounded Rectangle. In the Shape Option dialog, select Relative, change the Extra Width to 10 px, change the Extra Height to 4 px, and change the Corner Radius to 3 px. For the linear gradient fill, add another color stop to the gradient by clicking just below the Gradient Slider in the Gradient panel. Change the first color stop to a light gray, the second to a gray color, and the third to a dark gray, and set the Angle to -90.
Step 5
Select the last fill item in the Appearance panel and press the Duplicate Selected Item button. Make sure you have the last fill in the list and go Effects > Path > Offset. In the Offset dialog change the Offset to 1 px. From the Gradient Panel press the Reverse Gradient button.
Step 6
Create a New Fill, drag it below all other fills, and convert it to Rounded Rectangle with the same dimensions as in Step 4. With the new fill item selected, go Effects > Distort & Transform > Transform. In the Transform dialog, change the Vertical Move the 7 px (-7 px for CS4). Change the linear to have three colors stops and change the first to a dark gray, the second to a gray color, and the last one a dark gray. Move the individual Middlepoints between each of the color stops closer to the darker gray color stops and set the Angle to 0.
Step 7
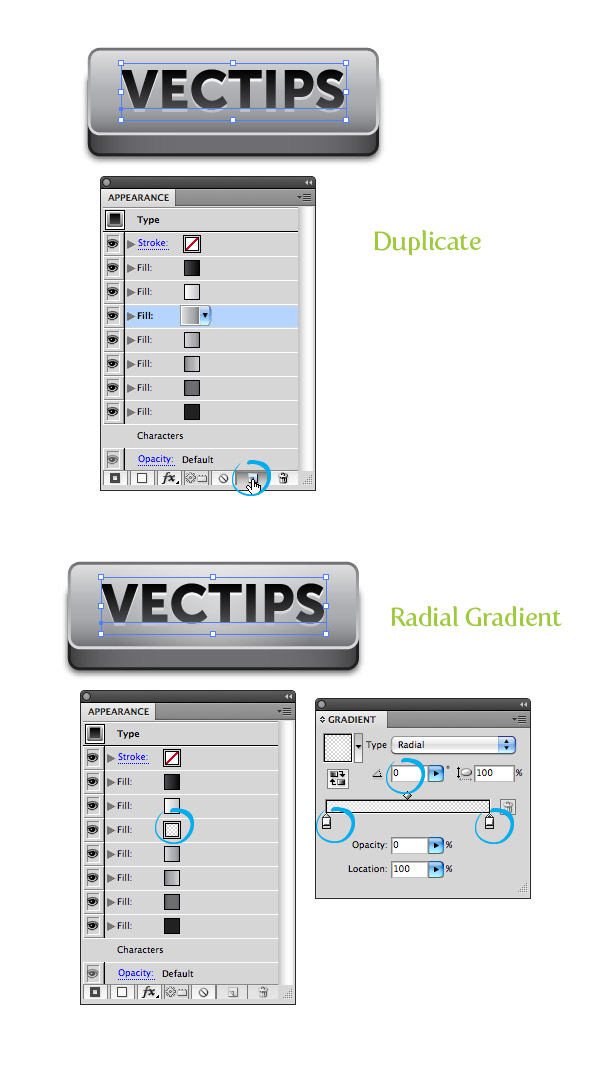
Duplicate the last fill, make sure the last item is selected, and go Effects > Path > Offset. In the Offset dialog change the Offset to 1 px. Next, change the fill to dark gray. With the item still selected go Effects > Stylize > Drop Shadow. In the Drop Shadow dialog, change the Opacity to 60, the X Offset to 0, the Y Offset to 1 px, and the Blur to 1 px.

Step 8
It’s looks pretty good, but we can add just a little more depth with a radial gradient. Duplicate you third fill item, select to topmost copy, and fill it with a radial gradient. Change both color stops to white, change the first color stop’s Opacity to 56 and the second color stop to 0.
Step 9
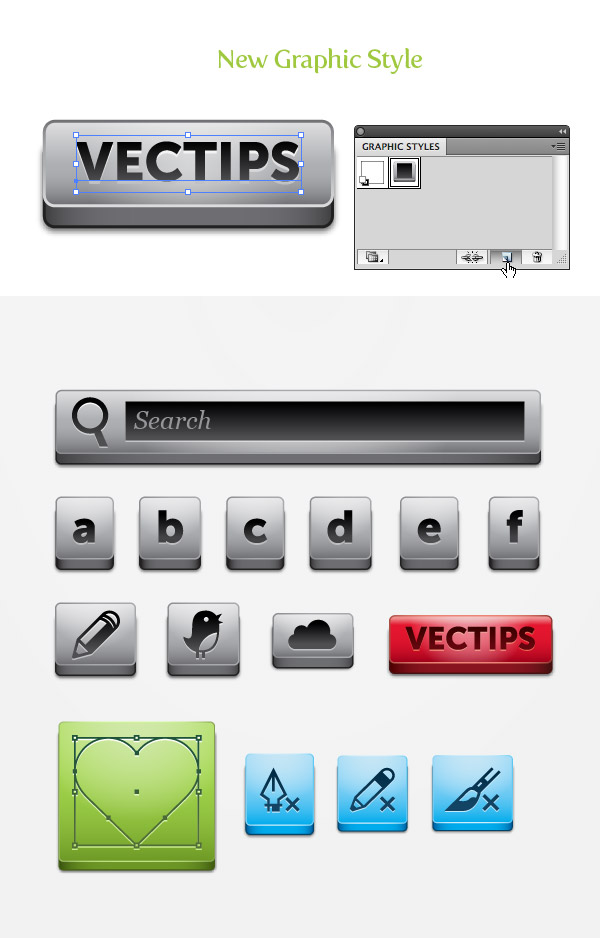
Now that we are done, we can create a Graphic Style so we can apply it other elements. Simply select your text and press the New Graphic Style button in the Graphic Style panel. Now you can apply your button style to other text and vector objects! Try changing the colors for fun.


I have learned about it and know the difficulty, your information is complete and thanks for sharing
Positive! Thanks for the tip, Ry!
very fun tutorial & easy.
thanks for your articles
I am always searching for quality posts & articles & this is what I found here, I hope you will be adding more
Wow! I used to make each button by hand. Now I don’t have to! Why didn’t I think of using graphic styles before!!!! I’m going to make some new “Chunky Buttons” for my site right now! Thanks!
Really great! Thanks so much
Very good tutorial. Keep it up!
Thank you for this tutorial 🙂
Thank you. It´s really useful
Thank you, I might use this technique for my game 🙂
That’s amazing. I learned a lot of new possibilities just by following this step by step.
Thanks Ryan!! Ur the man! best tutorial ever especially the graphic style!
amazing tutorial and a very nice technique… thanks for sharing this.. 🙂
Nice post and tutor… awesome,thank you
I can’t find the “Reverse Gradient” button in the gradient panel of Adobe illustrator CS3. Is it available in CS3 version?
I love your style! non time consuming and great results. Loving the appearance panel stuff, it’s great!!!!!!!! thank you very much 🙂
Is there a quick way to change the colors of the graphic style? I’m using CS3 …
Can I get the same result with Illustrator CS3? I see that all this tuts are made on Ai CS4/5 :/
You won’t be able to change the opacity in the gradient with CS3, but I think you can do just about everything else. It might be harder because the Appearance panel is not as polished in CS3 as it is in CS4-5.
Thank you! I`ll try to do it in CS3 :/
Wicked Tutorial, great looking button and really nice techinque. Really easy to follow. will be using these in my next work. thanks
awesome tuts!
thx for sharing.
Helps a lot Ryan. Appreciate the tutorial!
Thank you! Really shows how effective graphic styles can be! 🙂
Lovely tut Ryan great thanks!