 In the following tutorial, you will learn how to create a wire pattern brush and how to use it to create a nice USB vector text effect in Adobe Illustrator. For starters, you will learn how to set up a simple grid and how to create a bunch of pixel perfect shapes using basic tools and effects. Using basic blending and vector shape building techniques along with some simple Transform effects, you will learn how to create the usb connector. Finally, you will learn how to turn all these shapes into a simple pattern brush and how to create the USB vector text effect.
Tutorial Details
- Program: Adobe Illustrator CC
- Difficulty: Beginner-Intermediate
- Topics Covered: Basic Tools and Effects, Pattern Brush
- Estimated Completion Time: 45 minutes
Final Image
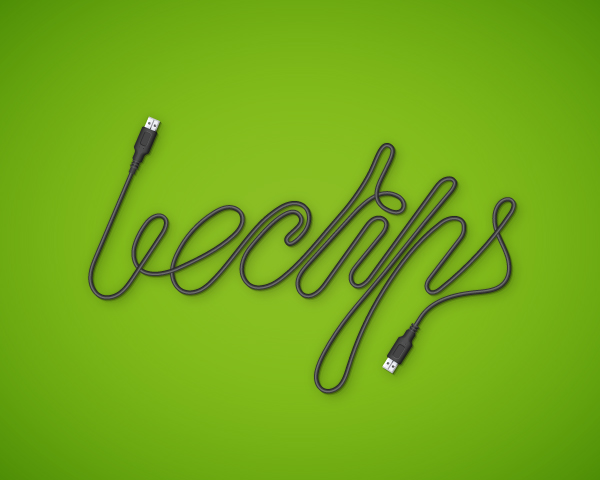
As always, this is the final image using the USB vector text effect:
Step 1
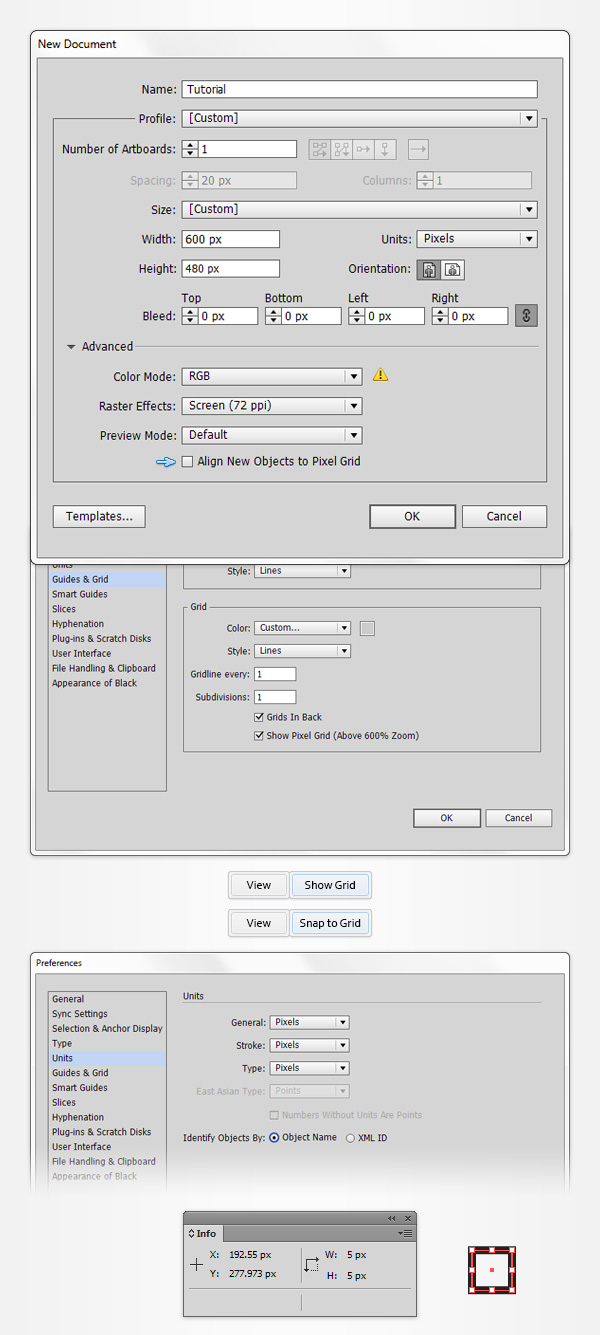
Hit CTRL + N to create a new document. Select Pixels from the Units drop-down menu, enter 600 in the width box and 480 in the height box, then click on the Advanced button. Select RGB, Screen (72ppi) and make sure that the Align New Objects to Pixel Grid box is unchecked before you click OK. Enable the Grid (View > Show Grid) and the Snap to Grid (View > Snap to Grid). You will need a grid every 1px, so simply go to Edit > Preferences > Guides > Grid, enter 1 in the Gridline every box and 1 in the Subdivisions box. You should also open the Info panel (Window > Info) for a live preview with the size and position of your shapes. Do not forget to set the unit of measurement to pixels from Edit > Preferences > Units > General. All these options will significantly increase your work speed.
Step 2
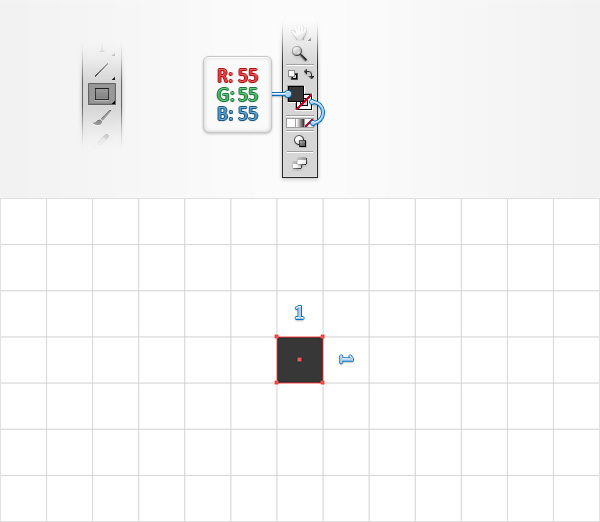
Pick the Rectangle Tool (M) and focus on your Toolbar. Remove the color from the stroke, then select the fill and set its color at R=55 G=55 B=55. Move to your artboard and simply create a 1px square.
Step 3
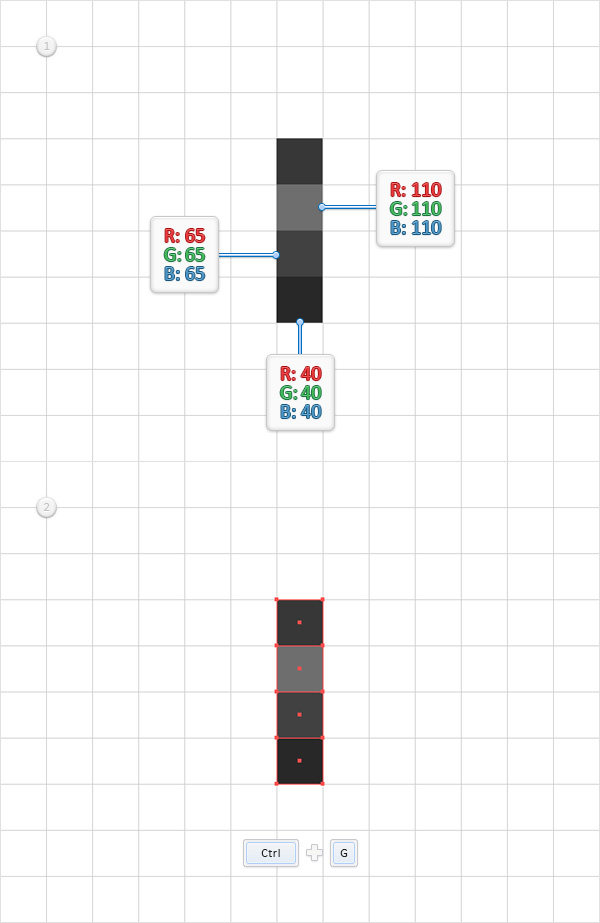
Make sure that the Rectangle Tool (M) is still active, create three additional 1px squares, and place them as shown in the following image, using the fill colors shown below. Select all four shapes created so far, and simply hit CTRL + G to Group them.
Step 4
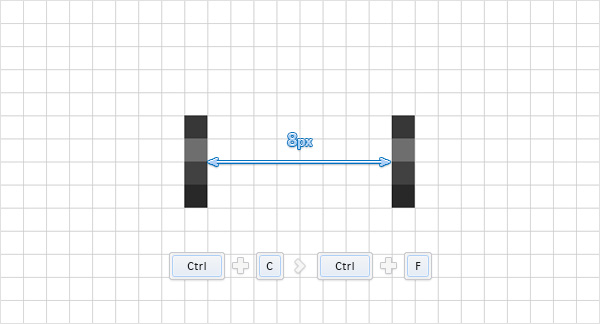
Make sure that your group of squares is still selected, and make a copy in front (CTRL + C > CTRL + F). Select this group copy, and move it 9px to the right.
Step 5
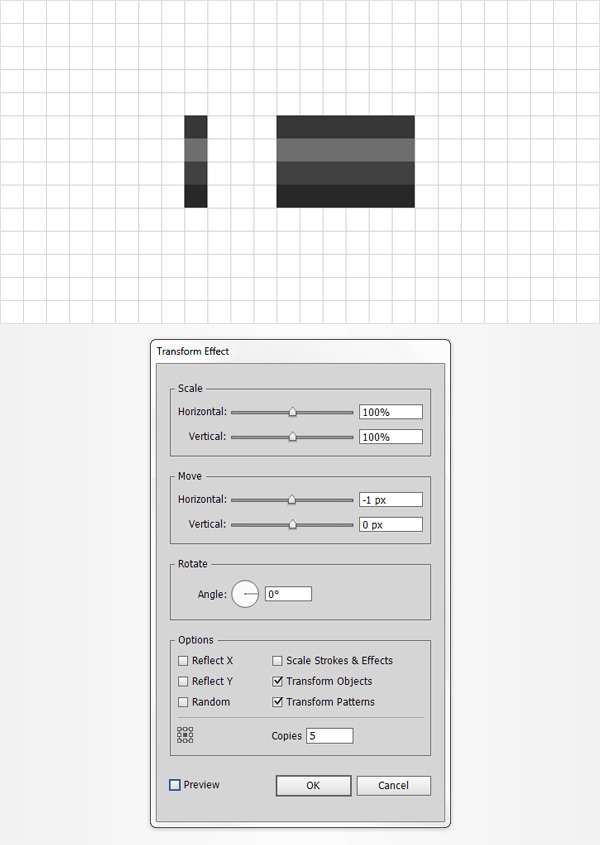
Reselect the group copy made in the previous step, and go to Effect > Distort & Transform > Transform. Enter 5 in the Copies box and drag the Move-Horizontal slider at –1px; then click OK. In the end, things should look like in the following image.
Step 6
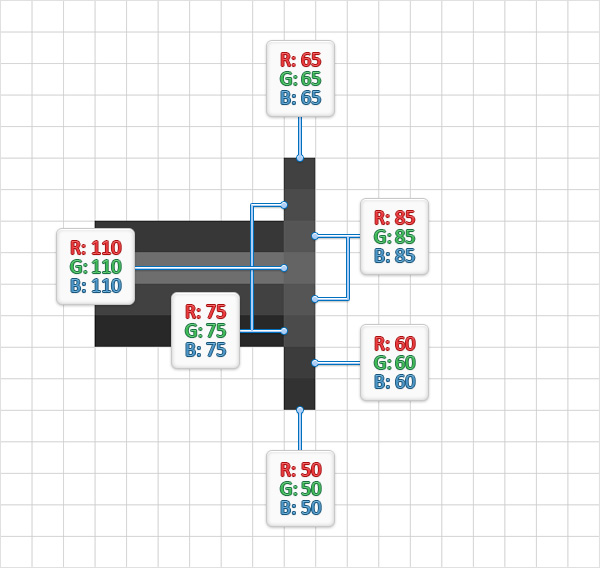
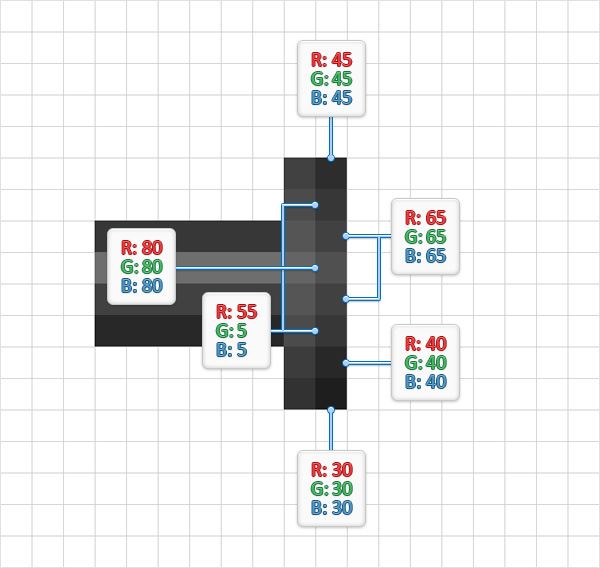
Using the Rectangle Tool (M), create eight, 1px squares. Place these new shapes as shown in the following image, and use the fill colors shown below.
Step 7
Reselect the eight squares made in the previous step and duplicate them (CTRL + C > CTRL + F). Drag these copies 1px to the right, then simply replace the existing fill colors with the ones shown in the following image. This is the base of the USB Insert for your vector text effect.
Step 8
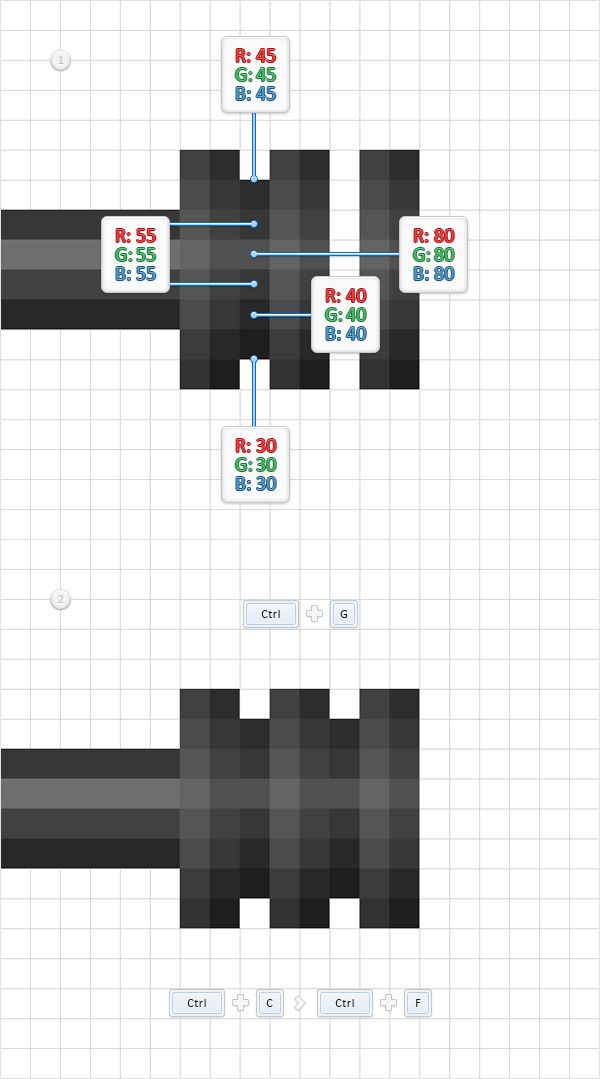
Reselect the two columns of squares made in the last two steps and Group them (CTRL + G). Make sure that this new group stays selected, and go to Effect > Distort & Transform > Transform. Enter 2 in the Copies box and drag the Move-Horizontal slider to 3px, then click OK. In the end, things should look like in the following image.
rUsing the Rectangle Tool (M), create six, 1px squares. Place these new shapes as shown in the following image, and use the fill colors shown below. Make sure that all the shapes made in this step are selected, and Group them (CTRL + G). Duplicate this new group (CTRL + C > CTRL + F). Select the copy and simply drag it 3px to the right as shown in the second image.Step 9
Step 10
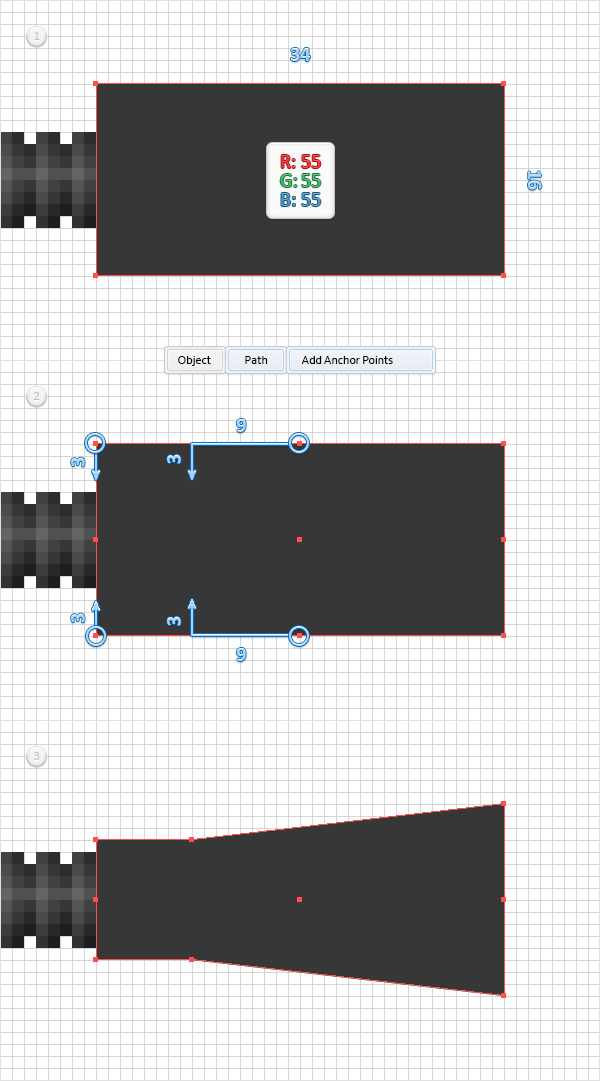
Using the Rectangle Tool (M), create a 34 x 16px shape, set the fill color at R=55 G=55 B=55, and place it as shown in the first image. Make sure that this new shape stays selected, and go to Object > Path > Add Anchor Points. Switch to the Direct Selection Tool (A), select the middle, top anchor point, and drag it 3px down and 9px to the left. Move to the middle, bottom anchor point and drag it 3px up and 9px to the left. Move to the left side, select the top anchor point and drag it 3px down, then select the bottom anchor point and drag it 3px up. In the end, things should look like in the third image. Move to the Layers panel (Window > Layers), simply double click on the shape made in this step and name it “main“.
Step 11
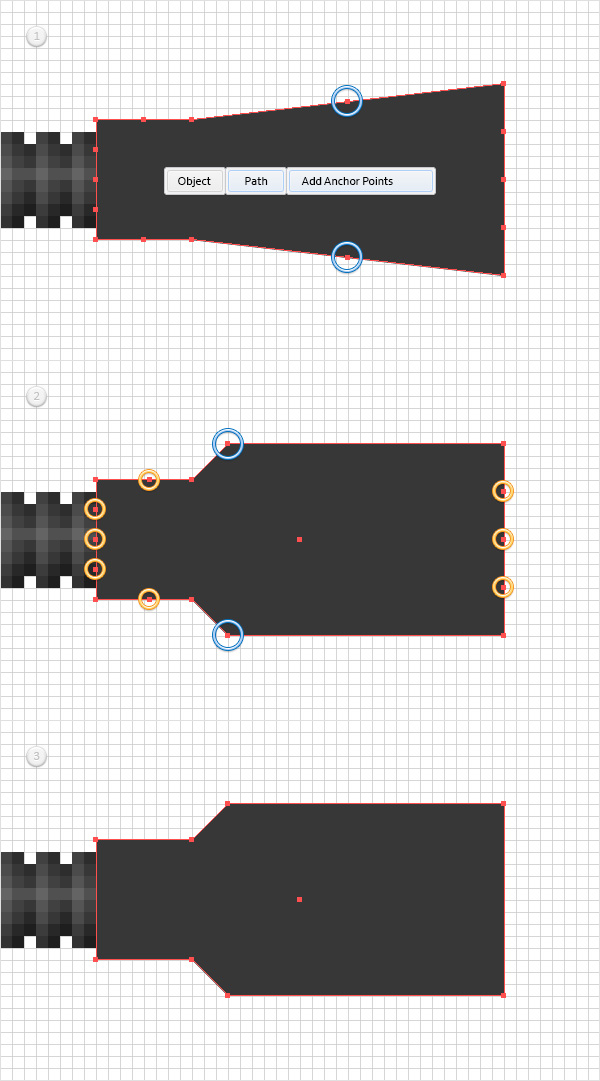
Reselect your “main” shape and go to Object > Path > Add Anchor Points. Using the Direct Selection Tool (A), select the two anchor points highlighted in the first image and drag them as shown in the second image. Switch to the Delete Anchor Point Tool (-), and simply click on the eight anchor point highlighted by the yellow circles to remove them. In the end, your “main” shape should look like in the third image.
Step 12
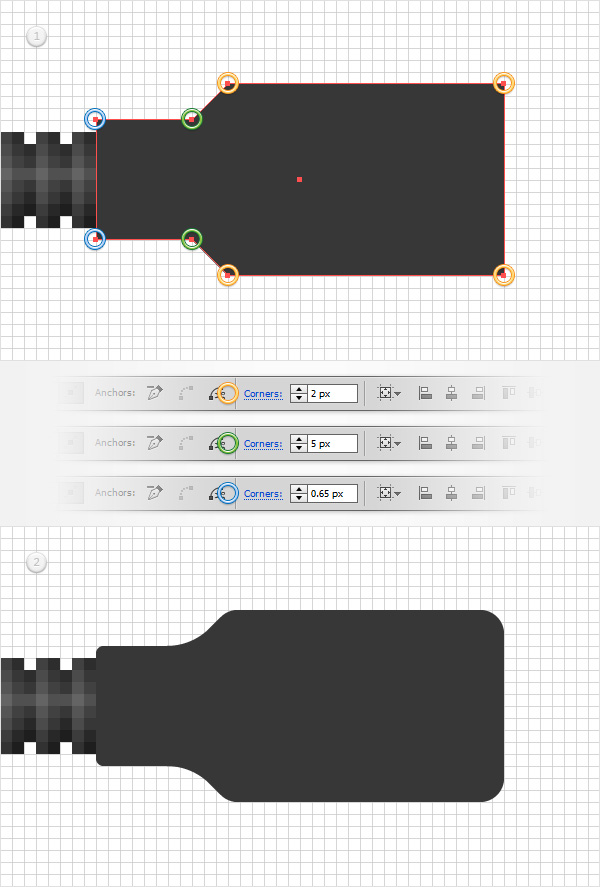
Next, we’ll round the corners of our USB. Keep focusing on your “main” shape and make sure that the Direct Selection Tool (A) is still active. Select the four anchor points highlighted by the yellow circles in the following image, move to the top bar and simply enter 2 in the Corners box. Select the two anchor points highlighted by the green circles in the following image, move to the top bar and simply enter 5 in the Corners box. Select the two anchor points highlighted by the blue circles in the following image, move to the top bar and enter 0.65 in the Corners box. In the end, your “main” shape should look like in the second image.
Step 13
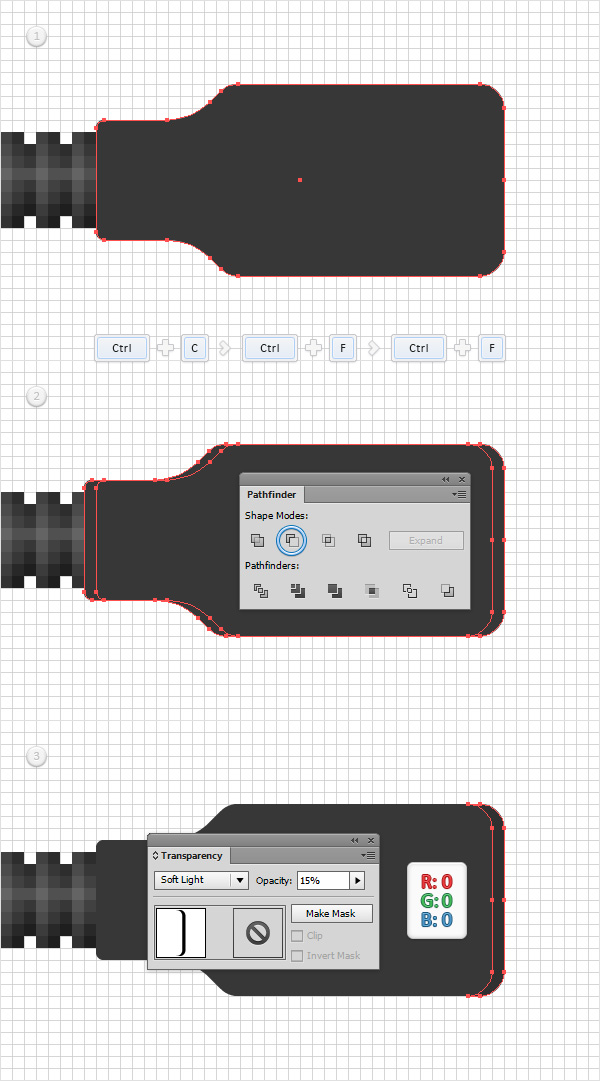
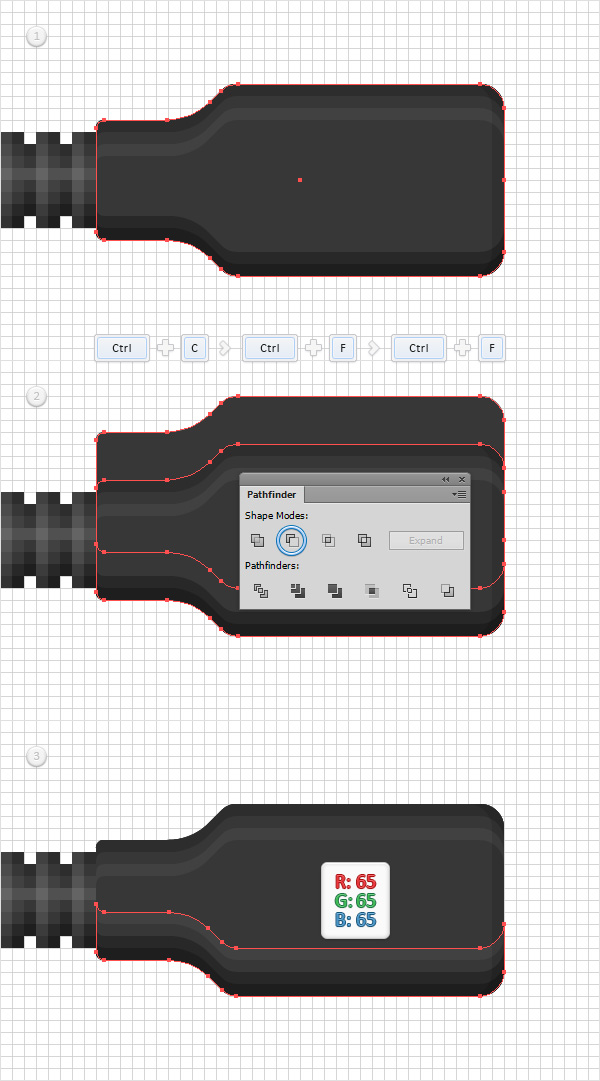
Disable the Snap to Grid (View > Snap to Grid), then go to Edit > Preferences > General and make sure that the Keyboard Increment is set at 1px. Reselect your “main” shape and make two copies in front (CTRL + C > CTRL + F > CTRL + F). Select the top copy and move it 1px to the left using the left arrow button from your keyboard. Reselect both copies made in this step, open the Pathfinder panel (Window > Pathfinder) and click the Minus Front button. Fill the resulting shape with black (R=0 G=0 B=0), then open the Transparency panel (Window > Transparency), lower the Opacity to 15% and change the Blending Mode to Soft Light.
Step 14
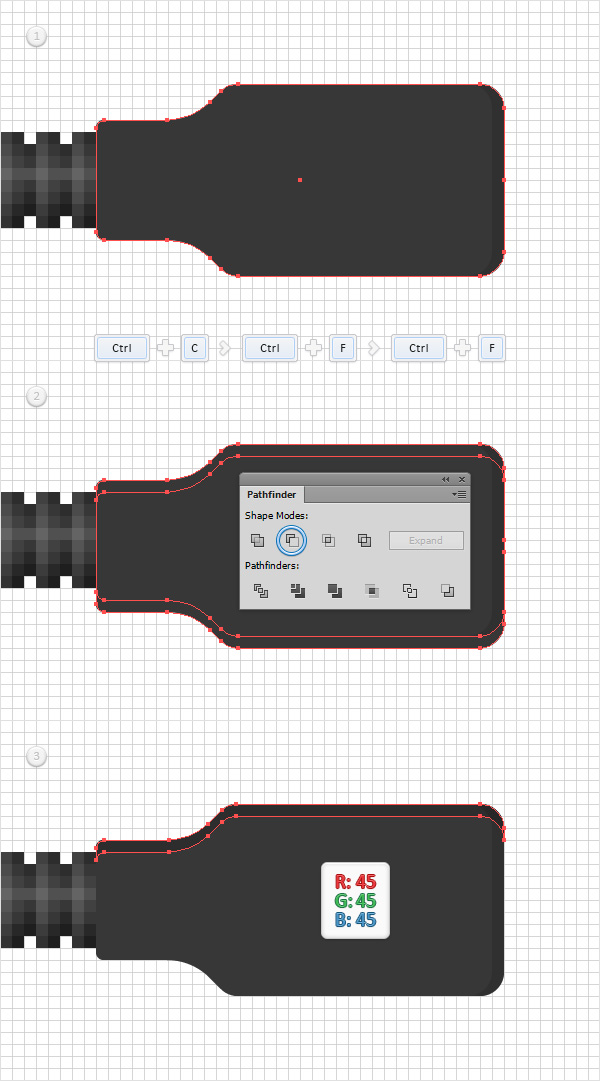
Reselect your “main” shape and make two copies in front (CTRL + C > CTRL + F > CTRL + F). Select the top copy and move it 1px down using the down arrow button from your keyboard. Reselect both copies made in this step, and click the Minus Front button from the Pathfinder panel. Make sure that the resulting shape is selected, and set the fill color at R=45 G=45 B=45.
Step 15
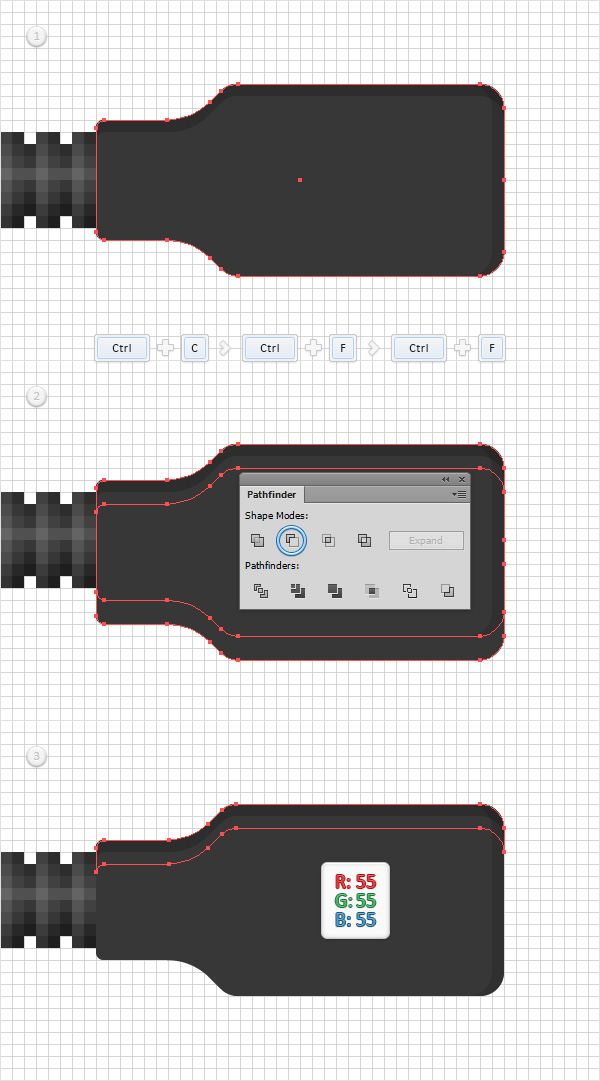
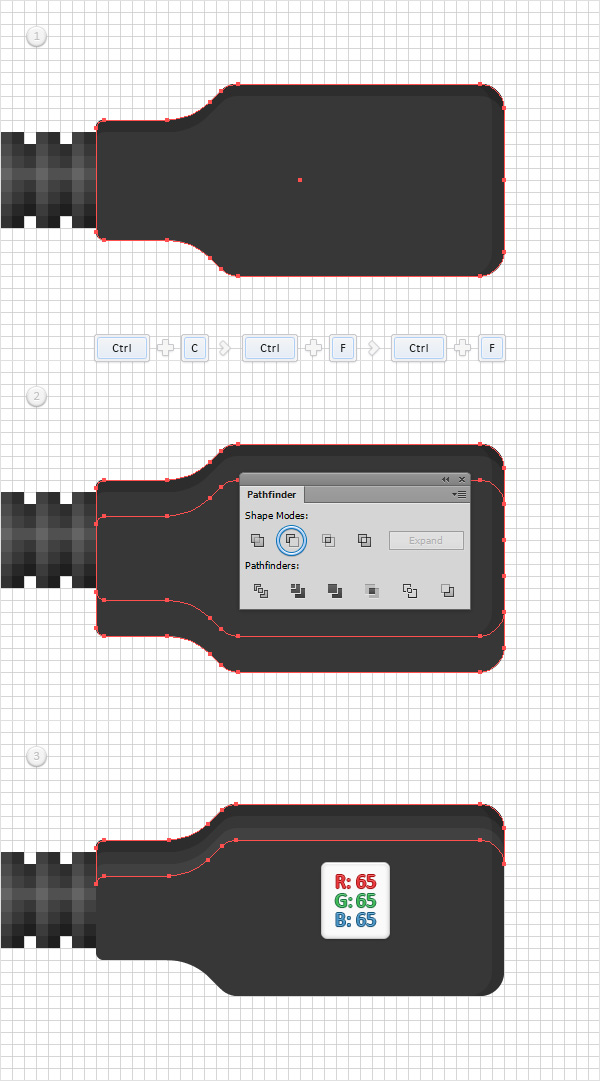
Reselect your “main” shape and make two copies in front (CTRL + C > CTRL + F > CTRL + F). Select the top copy and move it 2px down using the down arrow button from your keyboard. Reselect both copies made in this step and click the Minus Front button from the Pathfinder panel.
Step 16
Reselect your “main” shape and make two copies in front (CTRL + C > CTRL + F > CTRL + F). Select the top copy and move it 3px down using the down arrow button from your keyboard. Reselect both copies made in this step, and click the Minus Front button from the Pathfinder panel. Make sure that the resulting shape is selected, and set the fill color at R=65 G=65 B=65.
Step 17
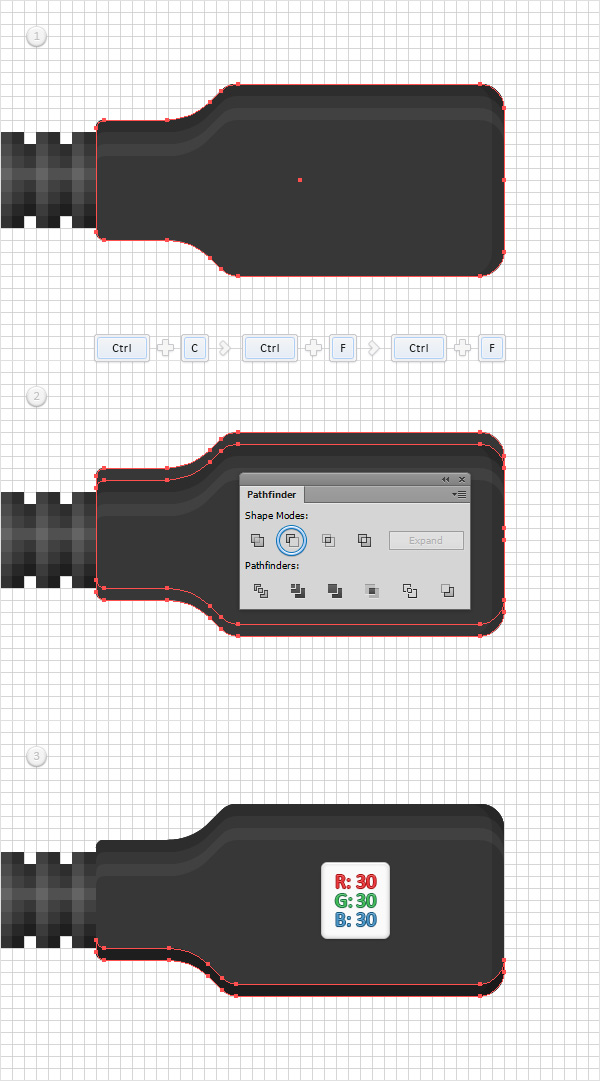
Reselect your “main” shape, and make two copies in front (CTRL + C > CTRL + F > CTRL + F). Select the top copy, and move it 1px up using the up arrow button from your keyboard. Reselect both copies made in this step, and click the Minus Front button from the Pathfinder panel. Make sure that the resulting shape is selected, and set the fill color at R=30 G=30 B=30.
Step 18
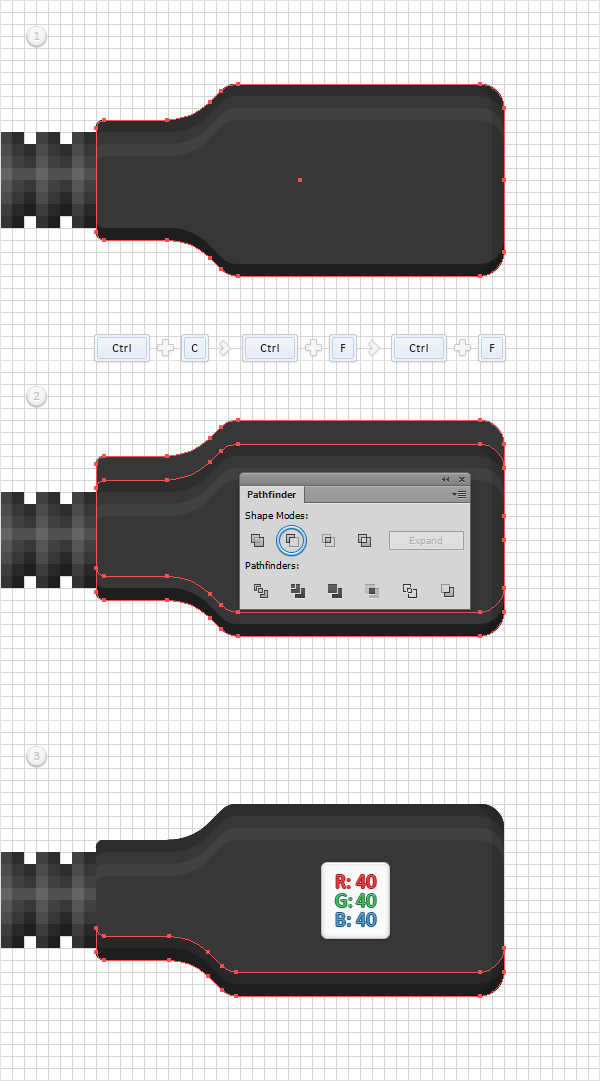
Reselect your “main” shape and make two copies in front (CTRL + C > CTRL + F > CTRL + F). Select the top copy, and move it 2px up using the up arrow button from your keyboard. Reselect both copies made in this step, and click the Minus Front button from the Pathfinder panel. Make sure that the resulting shape is selected, and set the fill color at R=40 G=40 B=40.
Step 19
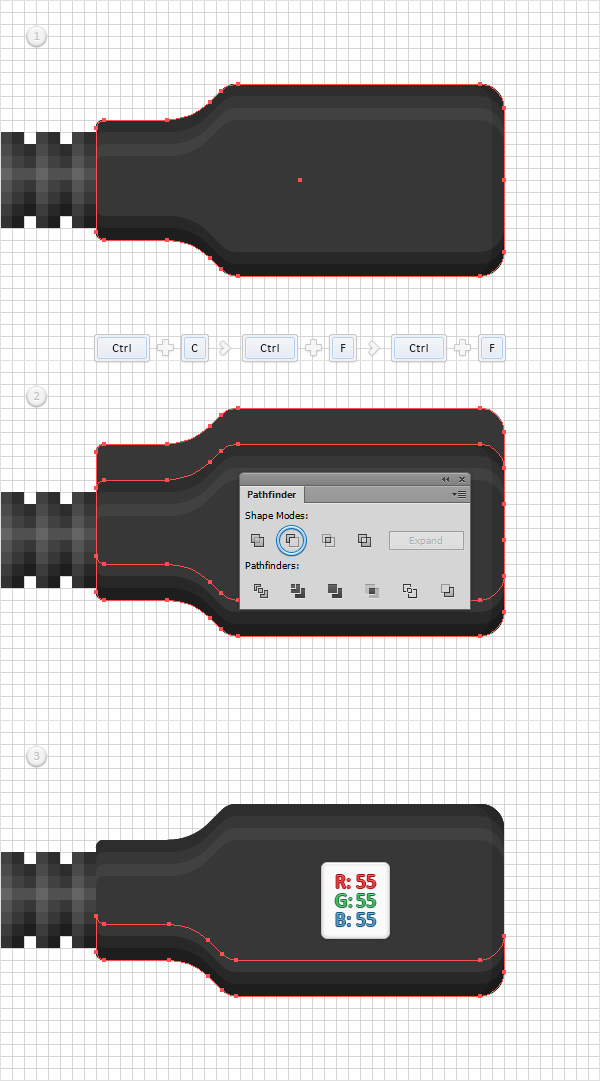
Reselect your “main” shape, and make two copies in front (CTRL + C > CTRL + F > CTRL + F). Select the top copy, and move it 3px up using the up arrow button from your keyboard. Reselect both copies made in this step, and click the Minus Front button from the Pathfinder panel.
Step 20
Reselect your “main” shape, and make two copies in front (CTRL + C > CTRL + F > CTRL + F). Select the top copy, and move it 4px up using the up arrow button from your keyboard. Reselect both copies made in this step, and click the Minus Front button from the Pathfinder panel. Make sure that the resulting shape is selected, and set the fill color at R=65 G=65 B=65.
Step 21
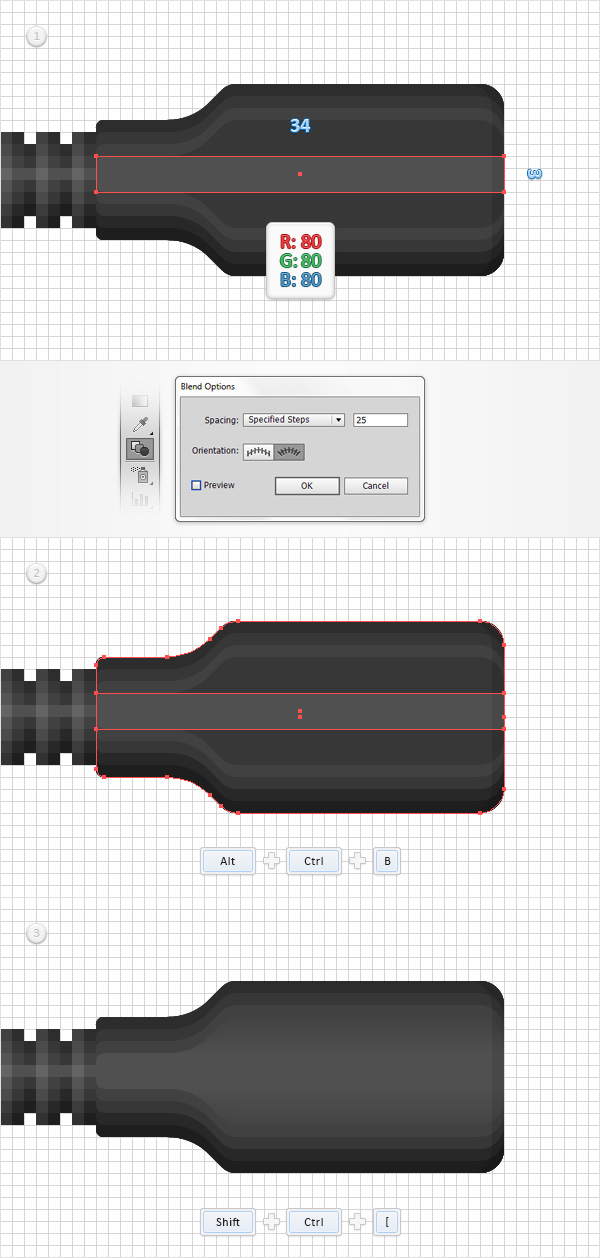
Enable the Snap to Grid (View > Snap to Grid). Using the Rectangle Tool (M), create a 34 x 3px shape, set the fill color at R=80 G=80 B=80 and place it as shown in the first image. Focus on your Toolbar, and double click on the Blend Tool. Select Specified Steps from the Spacing drop-down menu, simply enter 25 in the white box, then click OK. Reselect the rectangle made in this step along with your “main” shape and simply hit Alt + CTRL + B to create a simple blend. Make sure that your blend is selected, and send it to back (Shift + CTRL + [ ).
Step 22
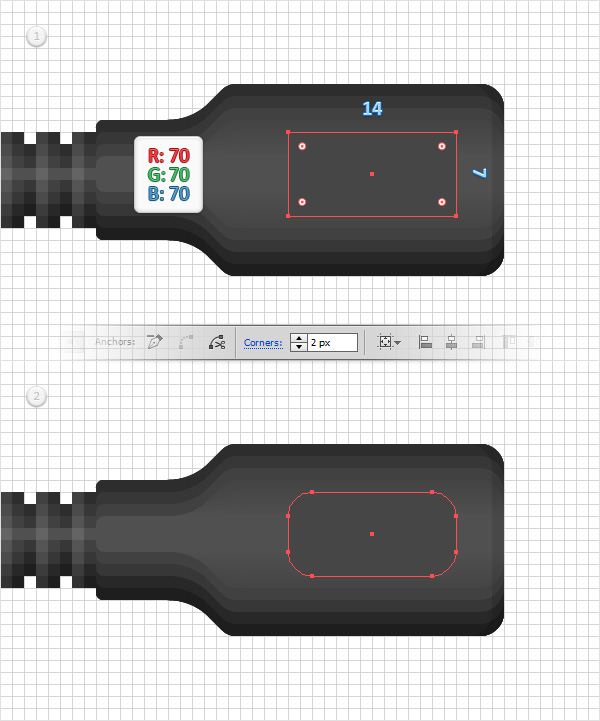
Using the Rectangle Tool (M), create a 14 x 7px shape, set the fill color at R=70 G=70 B=70, and place it as shown in the first image. Switch to the Direct Selection Tool (A), select the four anchor points that make up this new rectangle, move to the top bar, and simply enter 2 in the Corners box. In the end, your rounded rectangle should look like in the second image.
Step 23
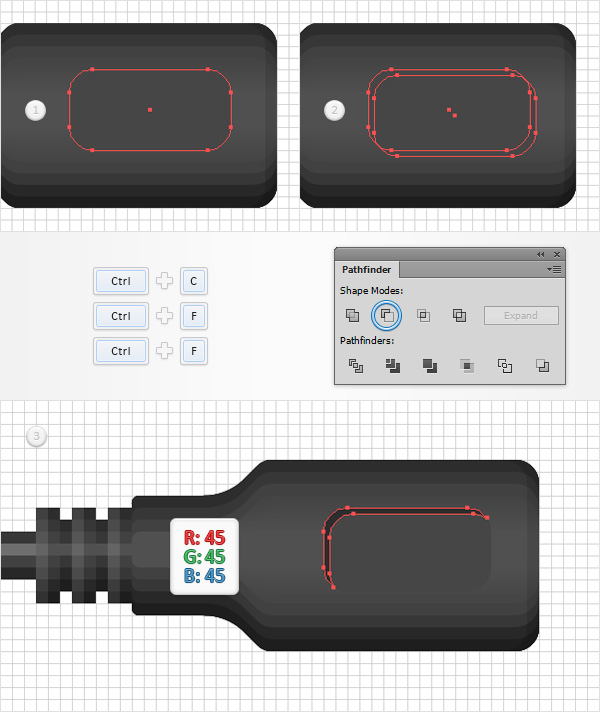
Disable the Snap to Grid (View > Snap to Grid), then go to Edit > Preferences > General and set the Keyboard Increment at 0.5px. Reselect the rounded rectangle made in the previous step, and make two copies in front (CTRL + C > CTRL + F > CTRL + F). Select the top copy, and move it 0.5px down and 0.5px to the right using the arrow buttons from your keyboard. Reselect both copies made in this step, and click the Minus Front button from the Pathfinder panel. Fill the resulting shape with R=45 G=45 B=45.
Step 24
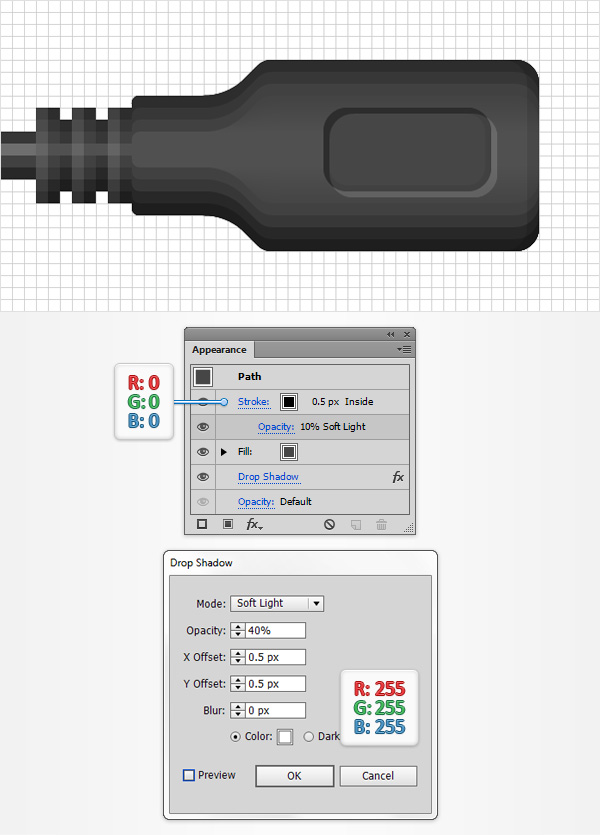
Reselect your 14 x 7px rounded rectangle, and go to Effect > Stylize > Drop Shadow. Enter the properties shown in the following image, and click OK. Make sure that your rounded rectangle stays selected, and open the Appearance panel (Window > Appearance). Add a 0.5pt stroke, set the color at black, lower its Opacity to 10%, and change the Blending Mode to Soft Light. Make sure that the stroke stays selected, open the Stroke panel (Window > Stroke), and simply check the Align Stroke to Inside button.
Step 25
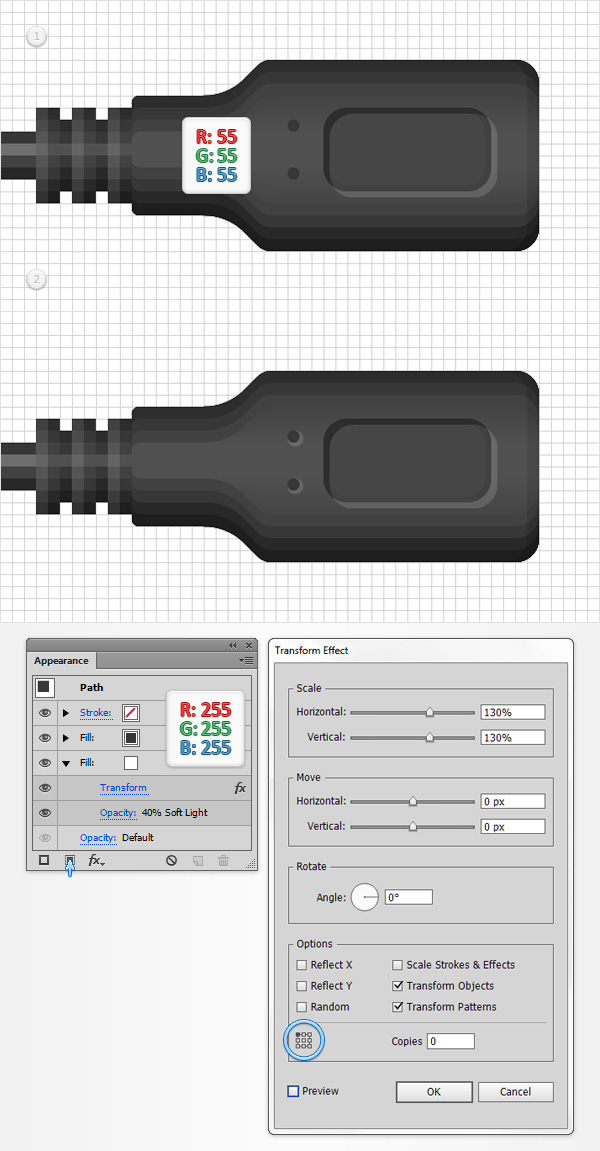
Enable the Snap to Grid (View > Snap to Grid). Using the Ellipse Tool (L), create two, 1px circles, set their fill color at R=55 G=55 B=55, and place them as shown in the first image. Make sure that both shapes remain selected, focus on the Appearance panel, and add a second fill using the Add New Fill button (pointed by the little, blue arrow in the following image). Keep focusing on the Appearance panel, select the bottom fill, set the color at white, lower its Opacity to 40%, and change the Blending Mode to Soft Light. Then go to Effect > Distort & Transform > Transform. Enter the properties shown in the following image, make sure that you check the top, left reference point, and then click OK.
Step 26
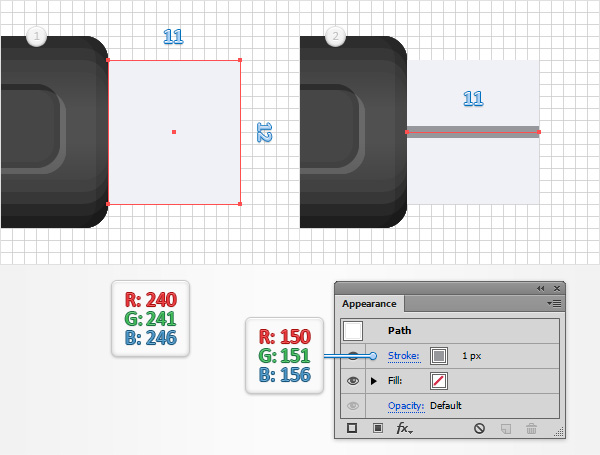
Using the Rectangle Tool (M), create an 11 x 12px shape, set the fill color at R=240 G=241 B=246, and place it as shown in the first image. Switch to the Pen Tool (P) and create an 11px, horizontal path. Place it as shown in the second image, and add a 1px stroke with the color set at R=150 G=151 B=156.
Step 27
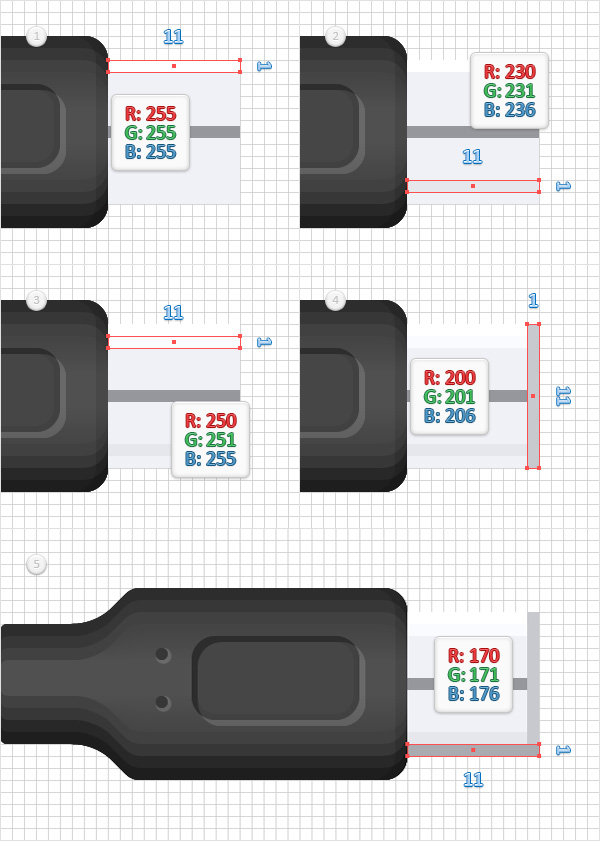
Using the Rectangle Tool (M), create an 11 x 1px shape, set the fill color at white (R=255 G=255 B=255) and place it as shown in the first image. Using the same tool, create a second 11 x 1px shape, set the fill color at R=230 G=231 B=236, and place it as shown in the second image. Create a third 11 x 1px shape, set the fill color at R=250 G=251 B=255 and place it as shown in the third image. Create a 1 x 11px shape, set the fill color at R=200 G=201 B=206, and place it as shown in the fourth image. Finally, create a new 11 x 1px shape, set the fill color at R=170 G=171 B=176, and place it as shown in the fifth image.
Step 28
Using the Rectangle Tool (M), create a 2 x 12px shape and a 1 x 11px rectangle, and place them as shown in the following images. Fill both shapes with black, lower the Opacity to 50%, and change the Blending Mode to Soft Light.

Step 29
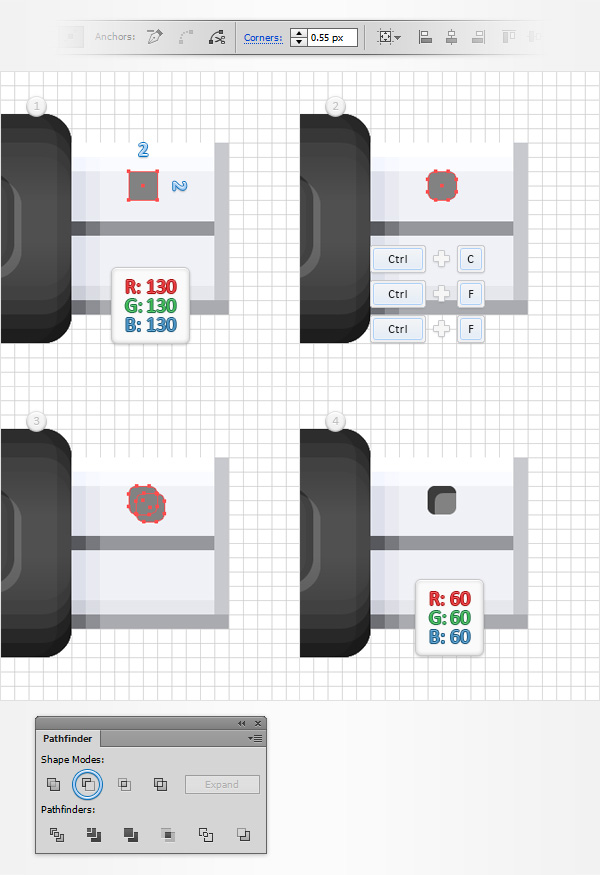
Using the Rectangle Tool (M), create a 2px square, set the fill color at R=130 G=130 B=130, and place it as shown in the first image. Switch to the Direct Selection Tool (A), select the four anchor points that make up this tiny shape, move to the top bar, and simply enter 0.55 in the Corners box. In the end, your rounded rectangle should look like in the second image. Reselect it, make two copies in front (CTRL + C > CTRL + F > CTRL + F) and disable the Snap to Grid (View > Snap to Grid). Select the top copy, and move it 0.5px dow and 0.5px to the right. Reselect both copies, and click the Minus Front button from the Pathfinder panel. Fill the resulting shape with R=60 G=60 B=60.
Step 30
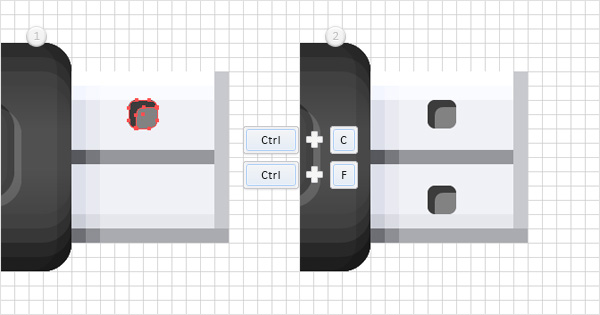
Enable the Snap to Grid (View > Snap to Grid). Reselect the two shapes made in the previous step and duplicate them (CTRL + C > CTRL + F). Select those copies, and simply drag them several pixels down as shown in the following image to complete the USB insert for your vector text effect.
Step 31
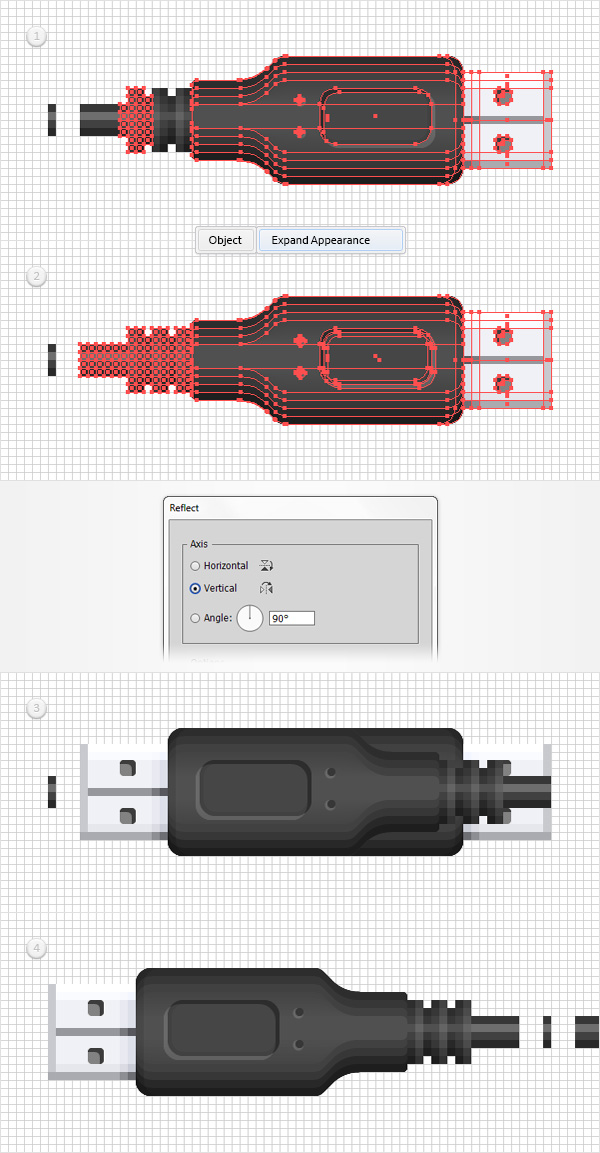
Select all the shapes highlighted in the first image and go to Object > Expand Apperance. Then hit CTRL + G to Group them. Make sure that this new group is selected, and go to Object > Transform > Reflect. Check the Vertical box, and click the Copy button. Select the newly created group, and simply drag it to the left as shown in the fourth image.
Step 32
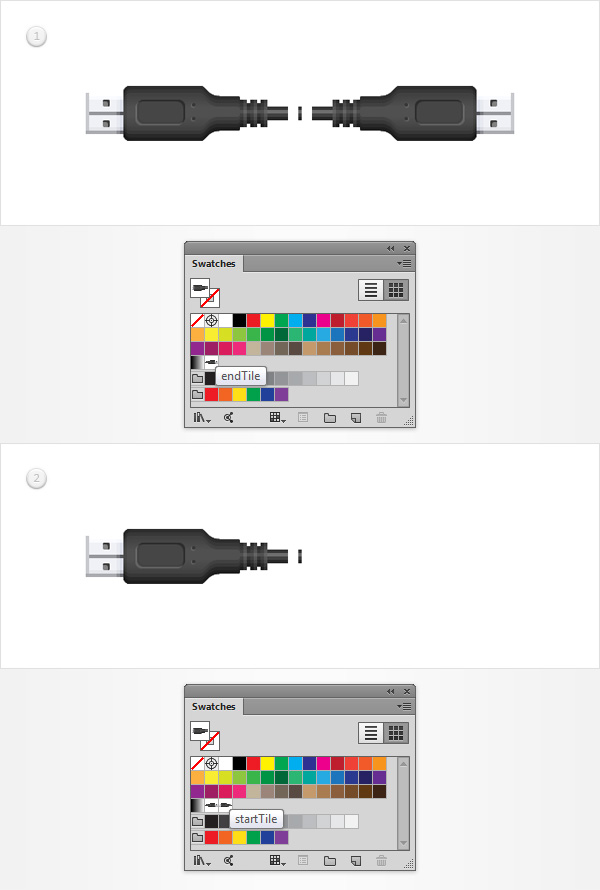
Select your right group of shapes and simply drag it inside the Swatches panel (Window > Swatches) to save it as a pattern. Once you can see it in the Swatches panel, you can remove that group of shapes from your artboard. Return to the Swatches panel, double click on your pattern and name it “endTile“. Select the left group of shapes, and turn it your second pattern. Name it “startTile“, then simply remove the group of shapes that you used to create this second USB pattern for your vector text effect.
Step 33
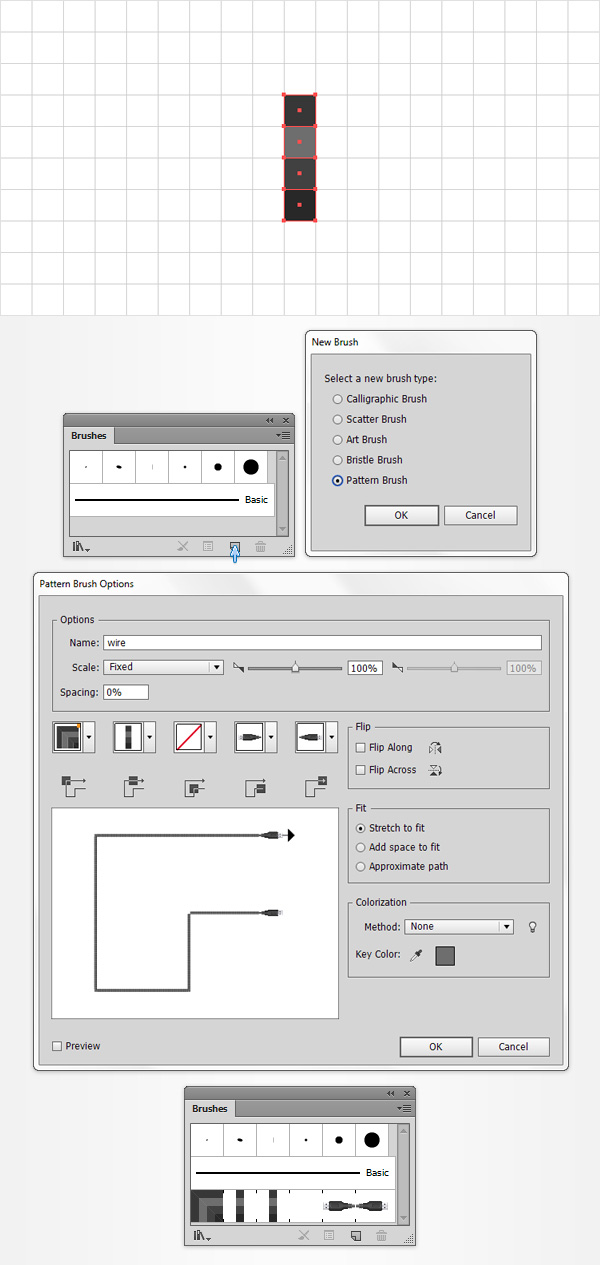
Focus on your artboard, select the remaining group of shapes, open the Brushes panel (Window > Brushes), and click the New Brush button (pointed by the little, blue arrow in the following image). Check the Pattern Brush box, then click OK to open the Pattern Brush Options window. Enter “wire” in the Name box, then move down to the Tile boxes. Open the Start Tile drop down window, and add the “startTile” pattern from the list. Then open the End Tile drop down window, and add the “endTile” pattern. Finally, click OK and you should find your new pattern brush inside the Brushes panel. Once you can see it, simply remove the group of shapes that you used to create it.
Step 34
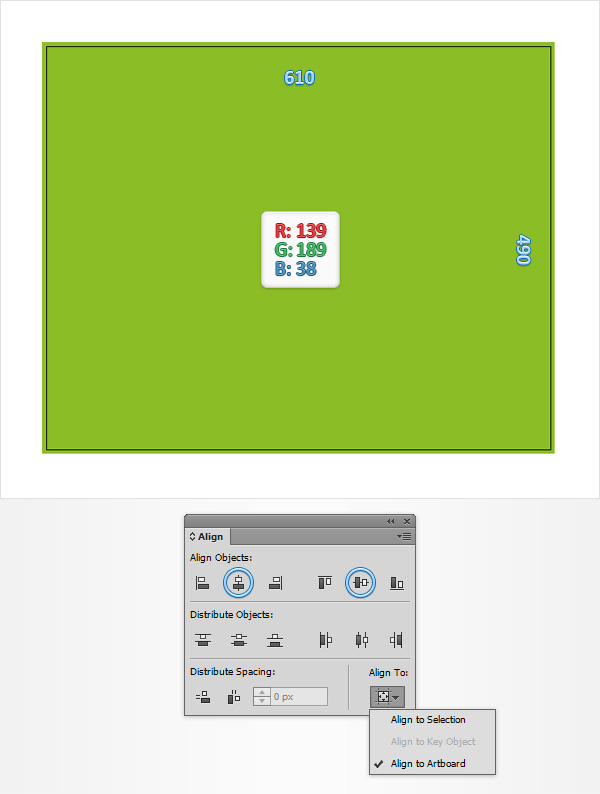
Disable the Grid (View > Hide Grid) and the Snap to Grid (View > Snap to Grid). Pick the Rectangle Tool (M), and simply click on your artboard to open the Rectangle window. Enter 610 in the Width box and 490 in the Height box; then click OK. Fill this new shape with R=139 8 G=189 B=38. Next, you need to center this rectangle, so open the Align panel (Window > Align). Set the aligning to Artboard (open the fly out menu and go to Show Options if you can’t see the Align To section as shown in the following image). Then simply click the Horizontal Align Center and Vertical Align Center buttons. In the end, your rectangle should cover the entire artboard.
Step 35
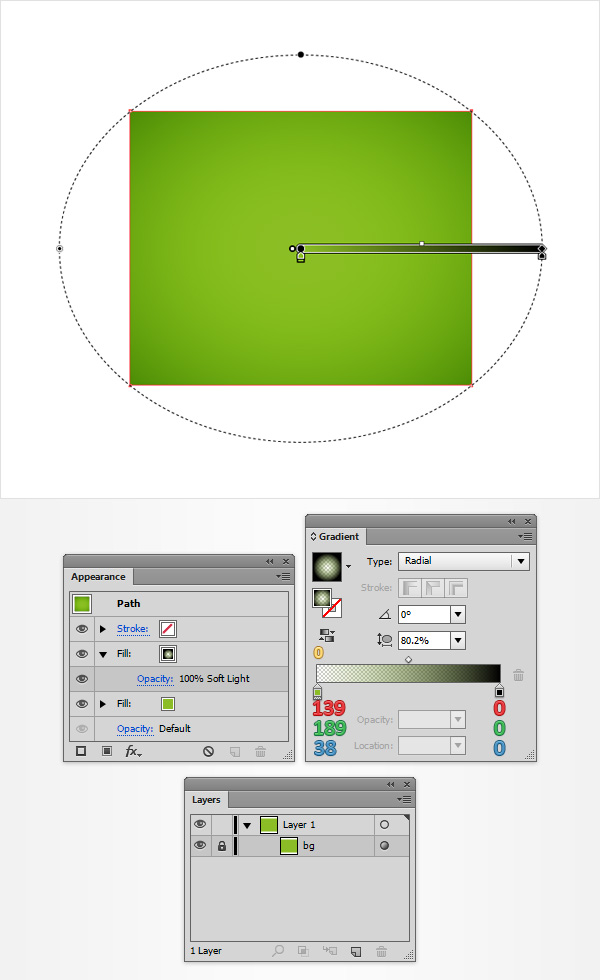
Make sure that your green rectangle is still selected, focus on the Appearance panel, and add a second fill using that same Add New Fill button. Select this new fill, open the Gradient panel (Window > Gradient), and simply click on the gradient thumbnail to add the default black to white linear gradient. Keep focusing on your Gradient panel, select Radial from the Type drop-down menu, then move to the gradient colors. Select the right slider and set the color at black; then select the left slider, set the color at R=139 G=189 B=38 and lower its Opacity to 0%. Make sure that the second fill stays selected, grab the Gradient Tool (G), focus on your artboard and stretch that gradient as shown in the following image. Return to the Appearance panel, reselect the fill added in this step, and change its Blending Mode to Soft Light. Move to the Layers panel, double click on your green rectangle, name it “bg“, then simply lock it. This is the background for your final USB vector text effect image.
Step 36
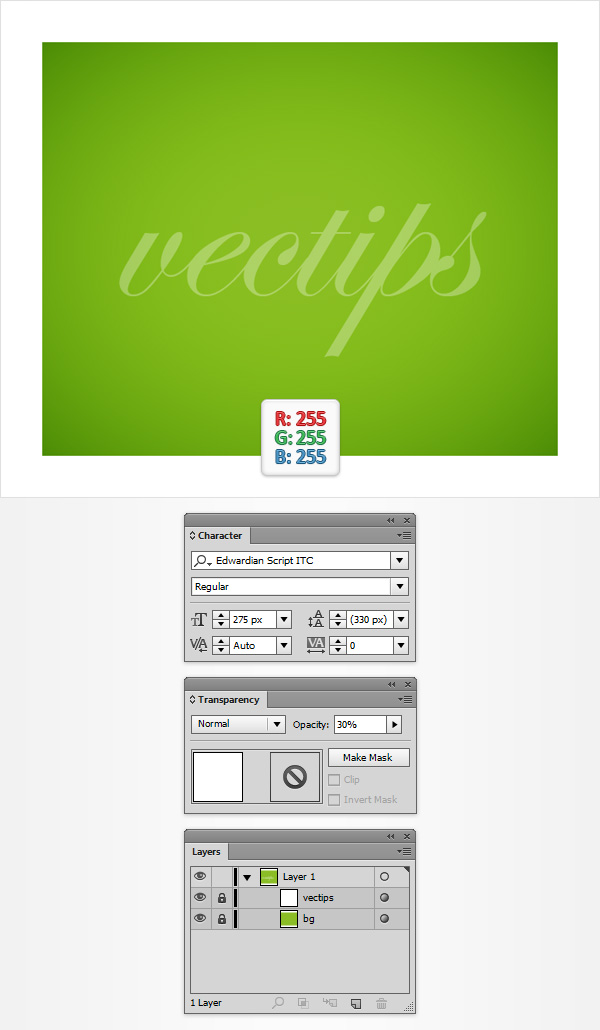
Pick the Type Tool (T), click on your artboard and add your white piece of text as a stencil for your USB vector text effect. Make sure that it stays selected, and open the Character panel (Window > Type > Character). Select the Edwardian Script ITC font, then set the size at 275pt. Lower the Opacity of your text to 30%, then move to the Layers panel and simply lock it to make sure that you won’t accidentally select/move it.
Step 37
Now the more challenging path. Using the Pen Tool (P) or the Brush Tool (B) (or if you happen to own a tablet), draw a smooth path along your text as shown in the following image. Try to use the text in the back as a rough reference. For starters, use a simple, black stroke for your path. Once you feel that it looks good enough, replace the black stroke with your “wire” pattern brush for your vector text effect. Move to the Layers panel, double click on the path made in this step, and simply name it “WIRE“.
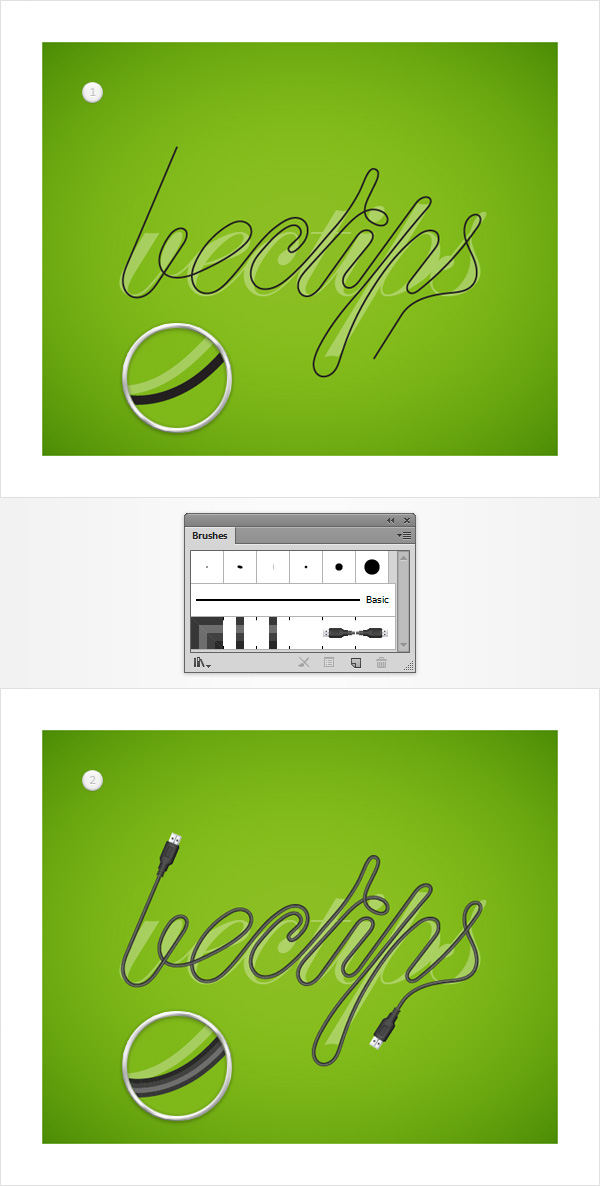
Step 38
Get grid of that locked piece of text. Reselect your “WIRE” path and simply add the five Drop Shadow effects (Effect > Stylize > Drop Shadow) shown in the following USB vector text effect image.
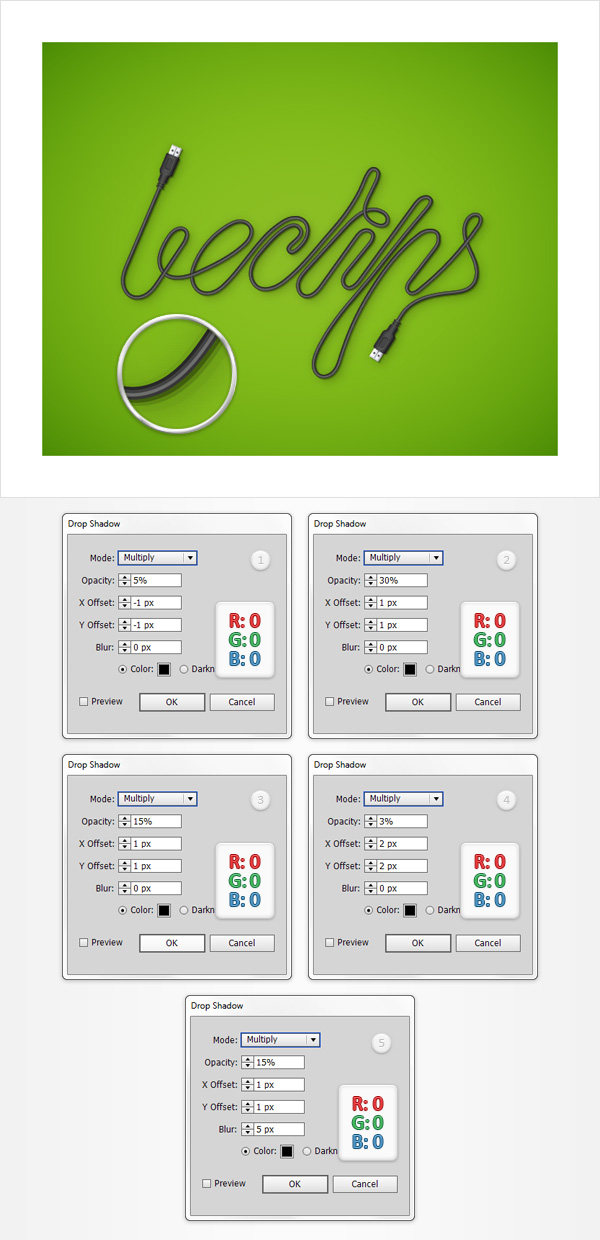
And We’re Done! Final USB Vector Test Effect Image!
I hope you’ve enjoyed this tutorial and can apply these techniques in your future projects.


Helpful information. Fortunate me I discovered your web site unintentionally, and I am stunned why this coincidence didn’t happened earlier! I bookmarked it.
A motivating discussion is worth comment. I do think that you need to
publish more on this issue, it may not be a taboo subject but generally people do not discuss such
topics. To the next! Many thanks!!
Thanks for sharing its very informative for me
nice blog.!!congrats!
I really loved theses tips! Thank you for help me!!
Hi,
Very good tip.
I already made it but the connection of the line with the start and the end it’s not right, and I don’t know why because they have the same size
Very good work.
Br
You will learn how to create a wire pattern brush and how to use it to create a nice USB vector text effect in Adobe Illustrator. For starters, you will learn how to set up a simple grid and how to create a bunch of pixel-perfect shapes using basic tools and effects.
How to make step 12 in CS6?
very helpfull tutorial… Thanks.
Hey Admin I Can’t See [Find] The Corner Box Which You Have Used In Step 12
Hi there guys, love your tips, but I need some help. I’m stuck at step 12. I’m having the same problem as Naithan. My guess is that i’m using Illustrator CS6 not CC version. Where can I find a corners box? Stylize/Round corners won’t work with elected anchor points, it rounds every corner of an object.
For round corners do :
Effect > Stylize > Round Corners…
Im having troubles with step 12… there is no corner box for me?
Hmm is anyone else encountering problems with the images on this blog loading?
I’m
trying to figure out if its a problem on my end or if it’s the blog.
Any
feedback would be greatly appreciated.
We’re sorry you’re having trouble with the images loading on our site. Are you still having these issues now?
Just desire to say your article is as astonishing.
The clarity in your post is just great and i can assume you are an expert on this subject.
Well with your permission let me to grab your feed to keep updated
with forthcoming post. Thanks a million and please continue the
gratifying work.
i’m stuck in step 5. I enter the exact details you gave and it moves just a little bit.
i really love this!
We double checked the instructions and the end result was as the tutorial suggests. Try repeating the steps, paying special attention to the increments suggested in the tutorial–create 1px squares and be sure to group them. Let me know if this works for you this time.
awesome! i like the idea of drawing over the typed word. usually I start from scratch. thanks for the inspiration!
I really like it when folks come together and share views.
Great website, continue the good work!