It’s almost Valentine’s Day! Rather than getting your loved one the same old cheap gifts you get every year, why not create a chocolate covered strawberry vector for them? You can easily apply this chocolate covered strawberry vector to your own valentine, t-shirt, or anything else you can think of. Moreover, you can apply this tutorial to other illustrations and logos.
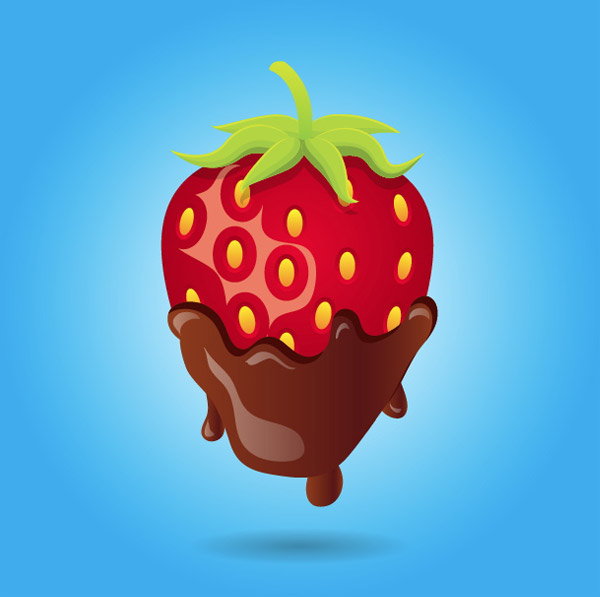
Final Image: Chocolate Covered Strawberry Vector
Below is the final chocolate covered strawberry vector we will working towards.
Tutorial Detail: Chocolate Covered Strawberry Vector
- Program: Adobe Illustrator
- Difficulty: Intermediate
- Topics Covered: Ellipse tool, Pencil tool, Pathfinder panel, Gradient panel, Custom Art Brush
- Estimated Completion Time: 20-30 minutes
Step 1
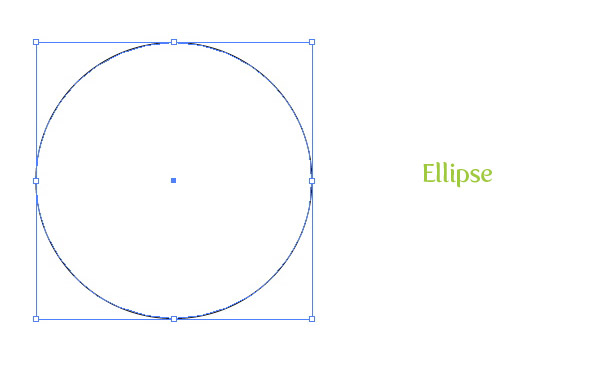
For the first step of this chocolate covered strawberry vector, create a new document and create an ellipse with the Ellipse tool (L).
Step 2
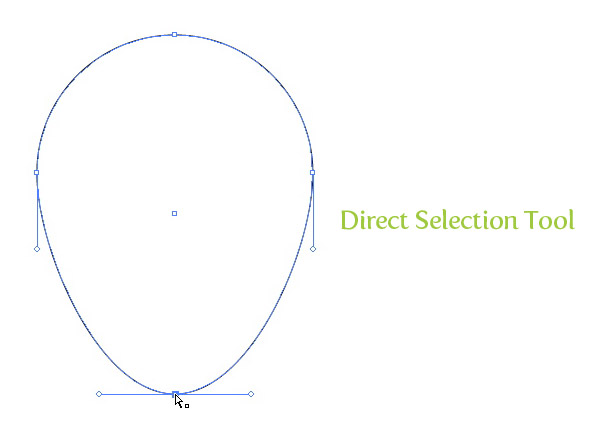
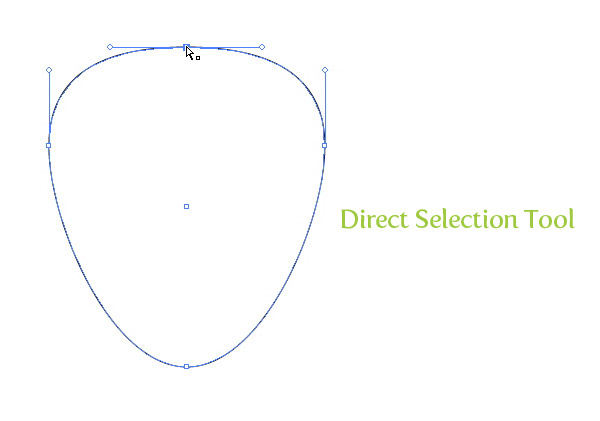
With the Direct Selection tool (A), grab the bottom anchor point, hold down the Shift key (to constrain the movements), and drag it down about one quarter of the original size of the ellipse.
Step 3
With the Direct Selection tool (A), grab the top anchor point, hold down the Shift key, and drag it down about one eight the original size of the ellipse.
Step 4
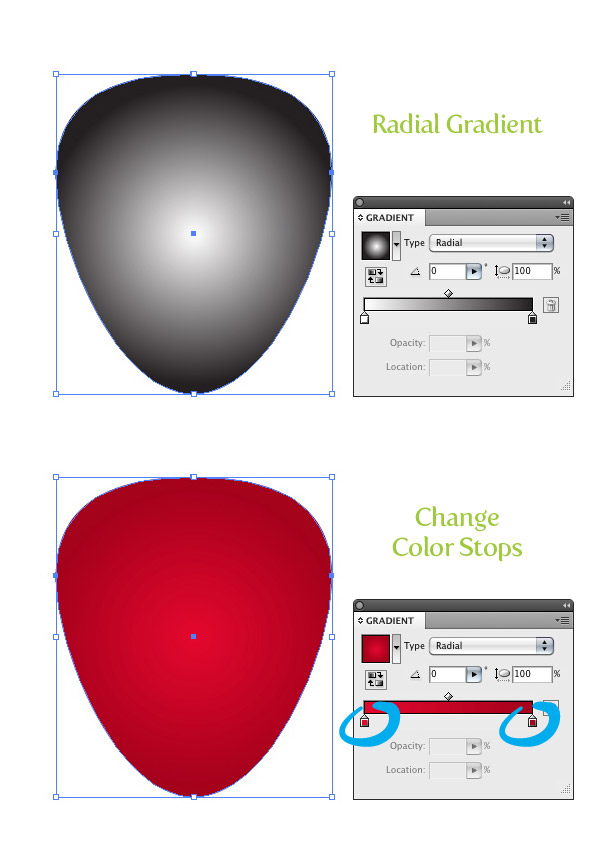
Fill the new shape with a radial gradient from the Gradient panel. Change the first color stop in the gradient to red and the second color stop to a darker red.
Step 5
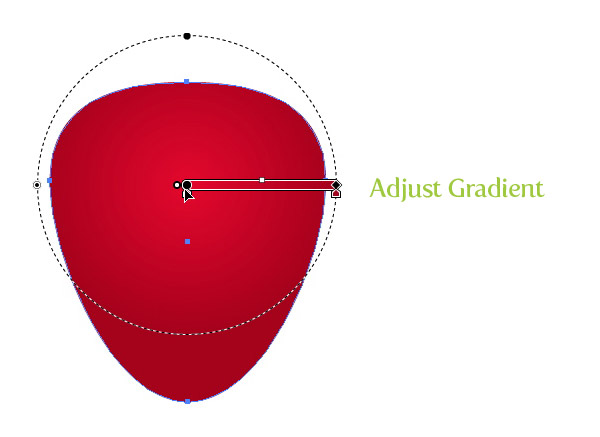
With the Gradient tool (G) adjust the radial gradient so the lightest part of the gradient is at the top of the chocolate covered strawberry vector shape.
Step 6
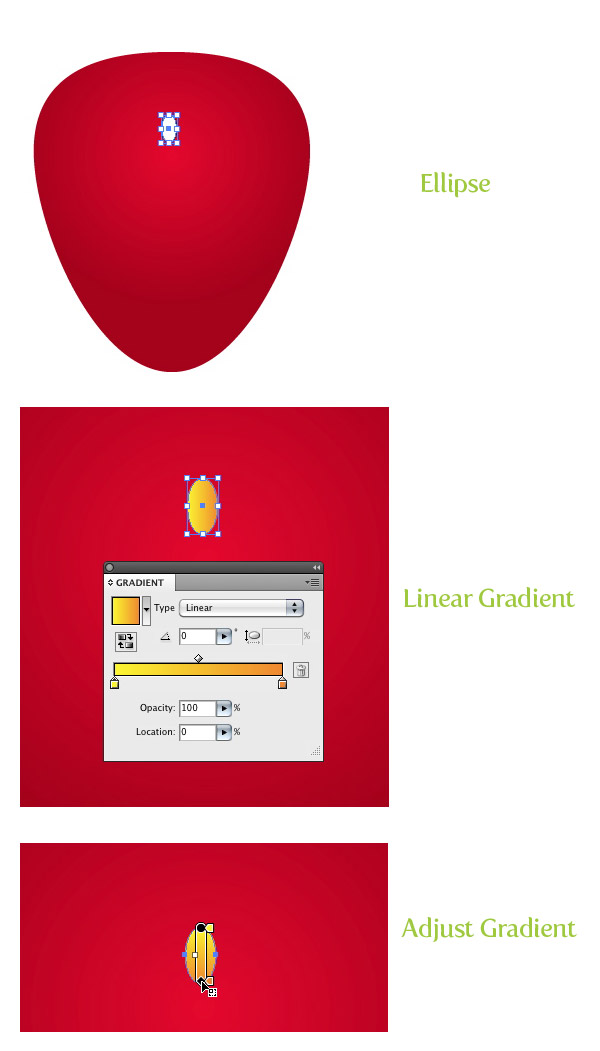
Create a small elongated ellipse toward to top center of the berry shape. Fill the ellipse with a linear gradient with the first color stop a light orange and the second color stop orange. Adjust the gradient with the Gradient tool (G) so the lightest part of the gradient is at the top of the ellipse.
Step 7
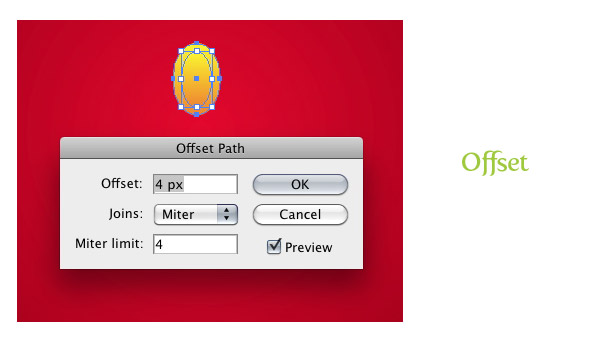
With the small ellipse selected, go Object > Path > Offset. Once the Offset dialog is open, change the Offset to 4 px. This measurement might be different depending on the dimensions of you artwork.
Step 8
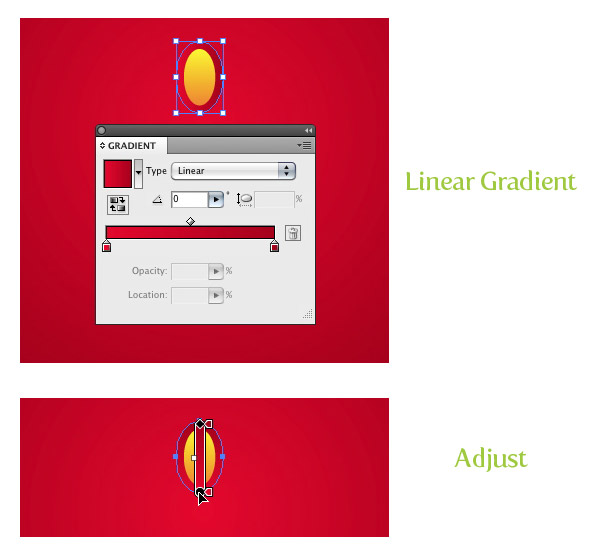
Fill the offset ellipse with a linear gradient with the same reds as the main berry shape. Adjust the gradient so the darker part of the gradient is at the top of the shape.
Step 9
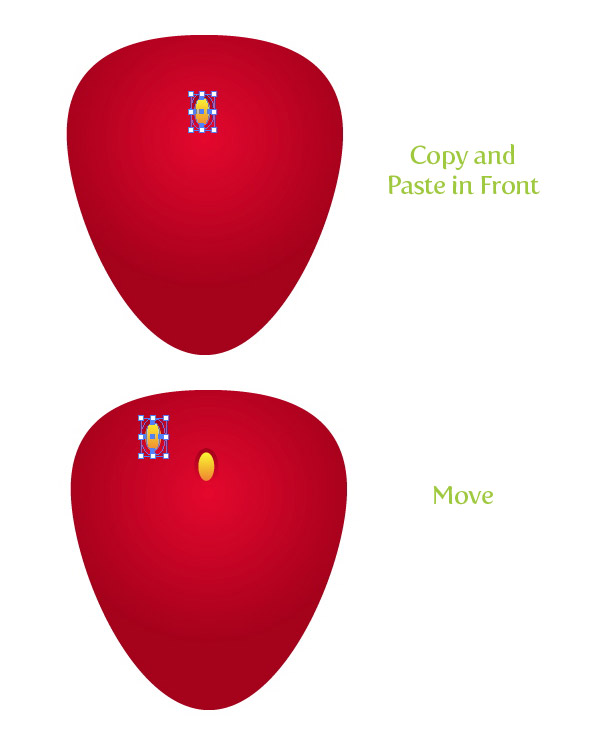
Select both shapes, Copy (Command + C), and Paste in Front (Command + F). With the copy still selected, move it above and to the left of the original ellipse shapes.
Step 10
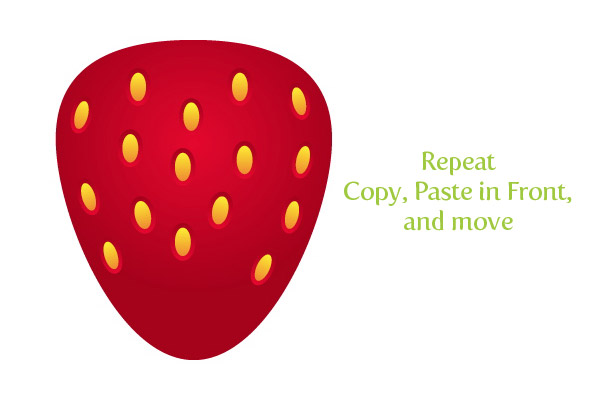
Repeat the previous steps placing copies of the small ellipses around the chocolate covered strawberry vector shape. When you are placing shapes close to the edge, rotate them with the Selection tool (V) to follow the curvature of the berry.
Step 11
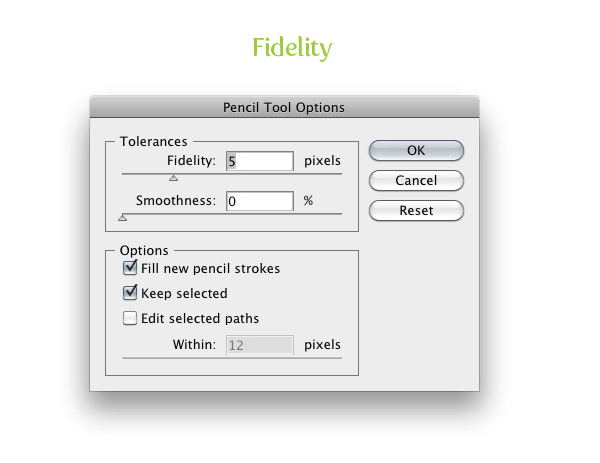
For this next step we are going to use the Pencil tool (N) because it is a quick way to draw paths. Before we start drawing with the Pencil tool (N), it is a good idea to set some tool preferences so we can get a smooth line while drawing. First, double-click on the Pencil tool (N) in the Tools panel to bring up the Pencil Tool Options. The option that we are most concerned about is the Fidelity. I like to set mine at 5 pixels to ensure a smooth line. You can always play around with these settings if you don’t like the line path quality in the next step.
Step 12
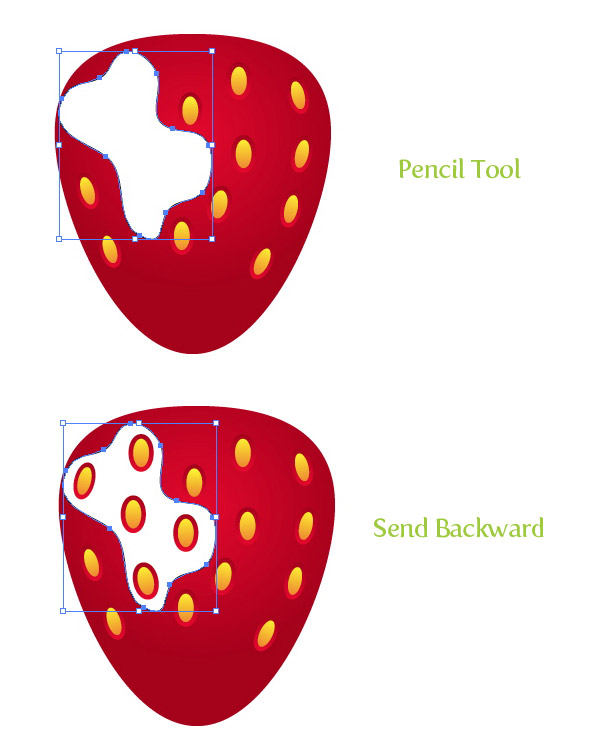
Now that our Pencil tool (N) is set. start drawing a shape around four or five of the smaller ellipses. Hold down the Alt / Option key when you are almost done to connect the beginning and end points. With the new shape selected, go Object > Arrange > Send Backward (Command + ]) until the shape is behind all the small ellipses.
Step 13
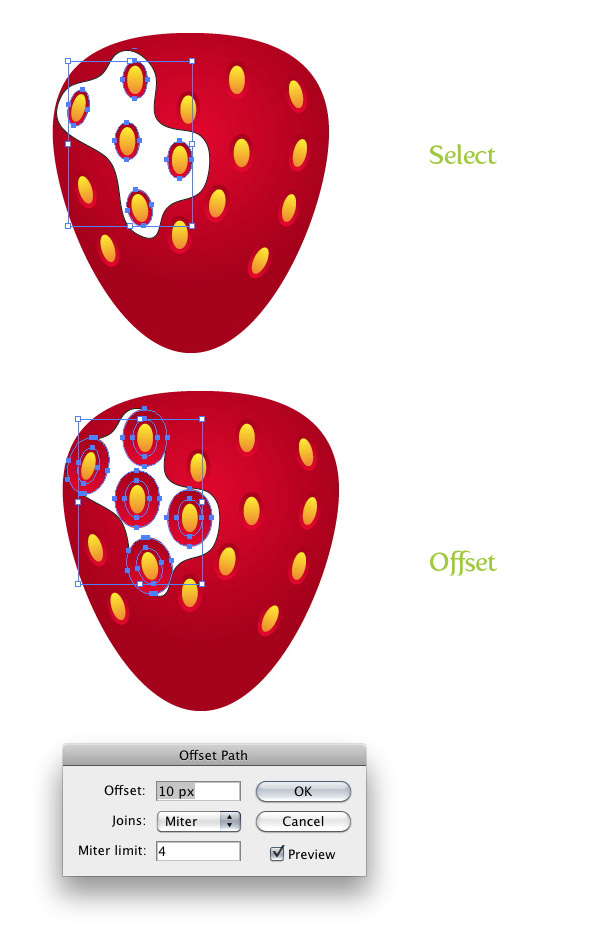
Select all the small red-gradient ellipses encompassed by the pencil shape, go Object > Path > Offset, and change the Offset to 10 px.
Step 14
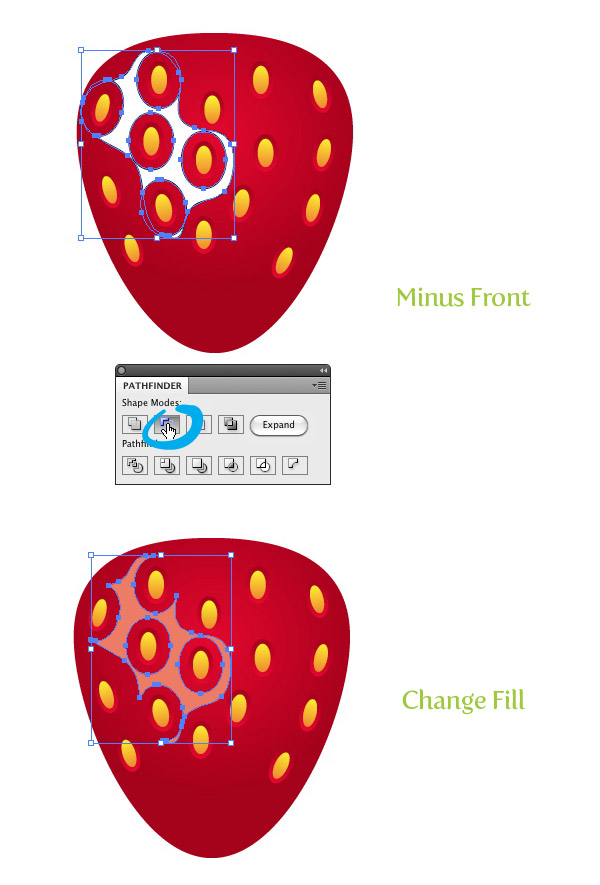
With the new offset ellipses still selected, hold shift, and select the pencil shape. From the pathfinder panel hold down Alt / Option and press the Minus Front button. Next, change the fill of the new shape to a light red color.
Step 15
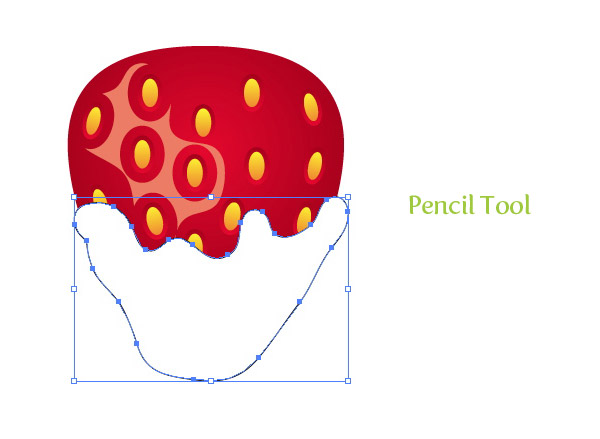
With the Pencil tool (N) draw a organic shape encompassing the bottom half of the chocolate covered strawberry vector.
Step 16
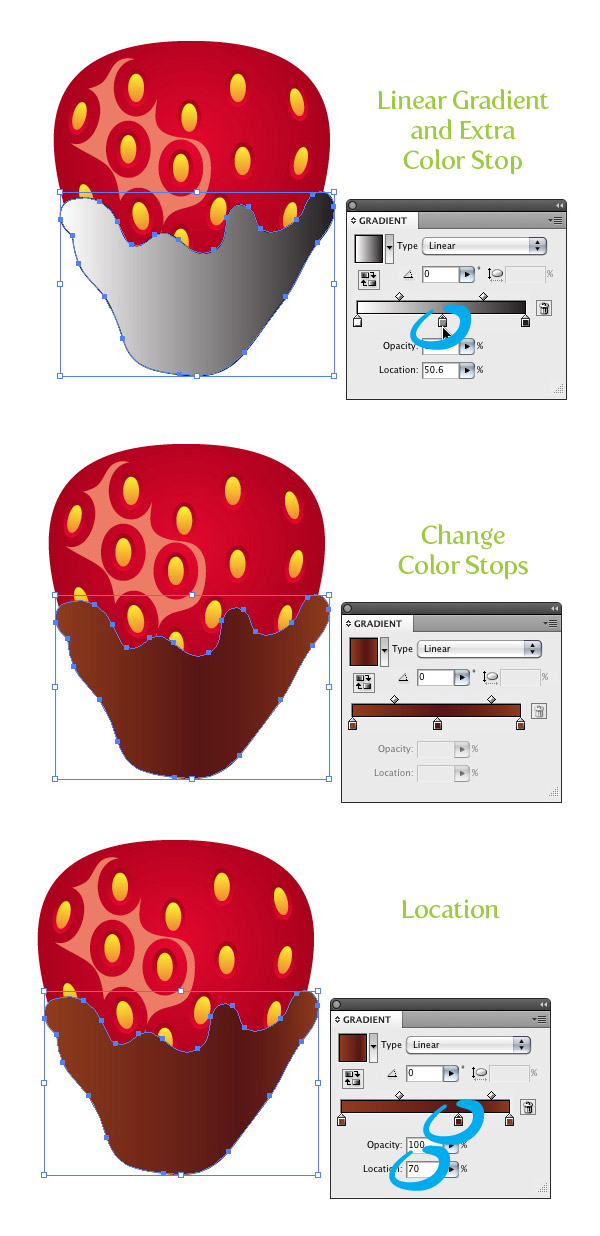
Fill the new shape with a linear gradient. For this gradient we need to add an extra color stop. To do this, simply click on the middle of the Gradient Slider in the Gradient panel. Change the first color stop to light brown, the second to a dark brown, and the third to your first light brown. Next, select the middle color stop and change the Location to 70 in the Gradient panel.
Step 17
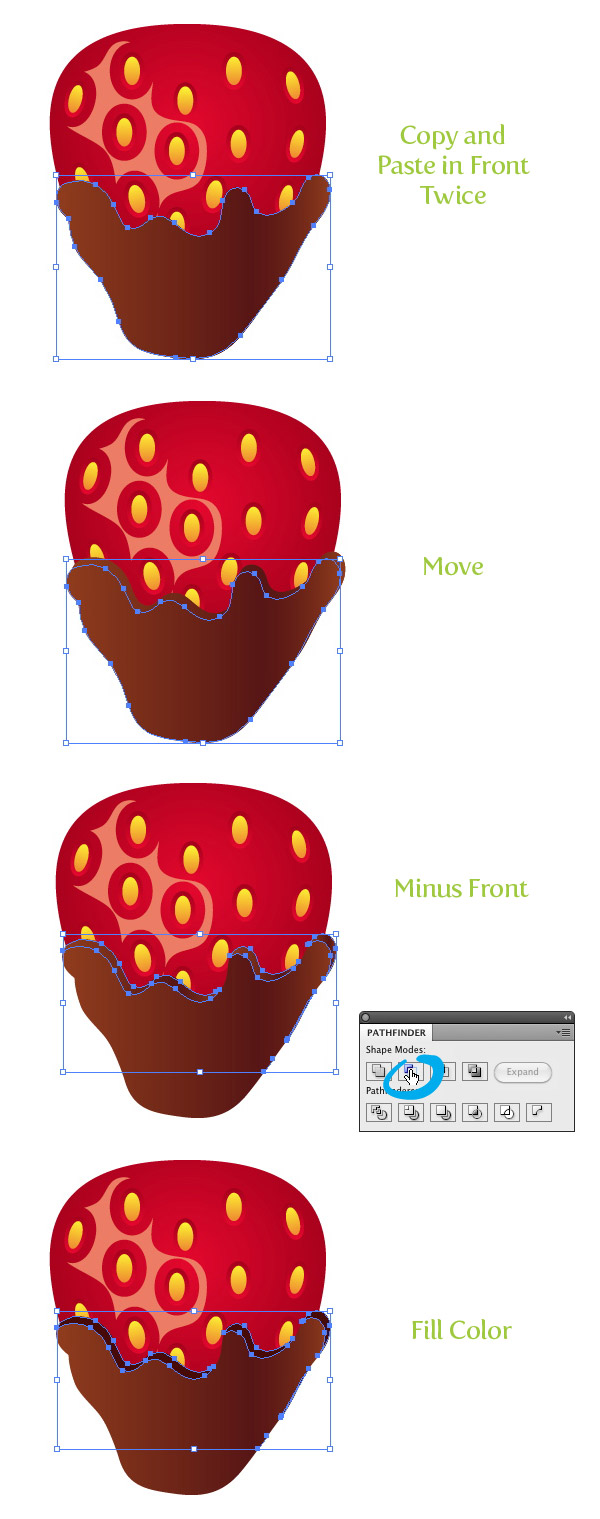
Select the chocolate shape and Copy (Command + C) and Paste in Front (Command + F). Do this one more time so you have three total shapes. Select the top copy and move it down and to the left slightly. Next, select the moved copy and the one underneath it and press the Minus Front button from the Pathfinder panel. Change the color of the new shape to a dark brown color.
Step 18
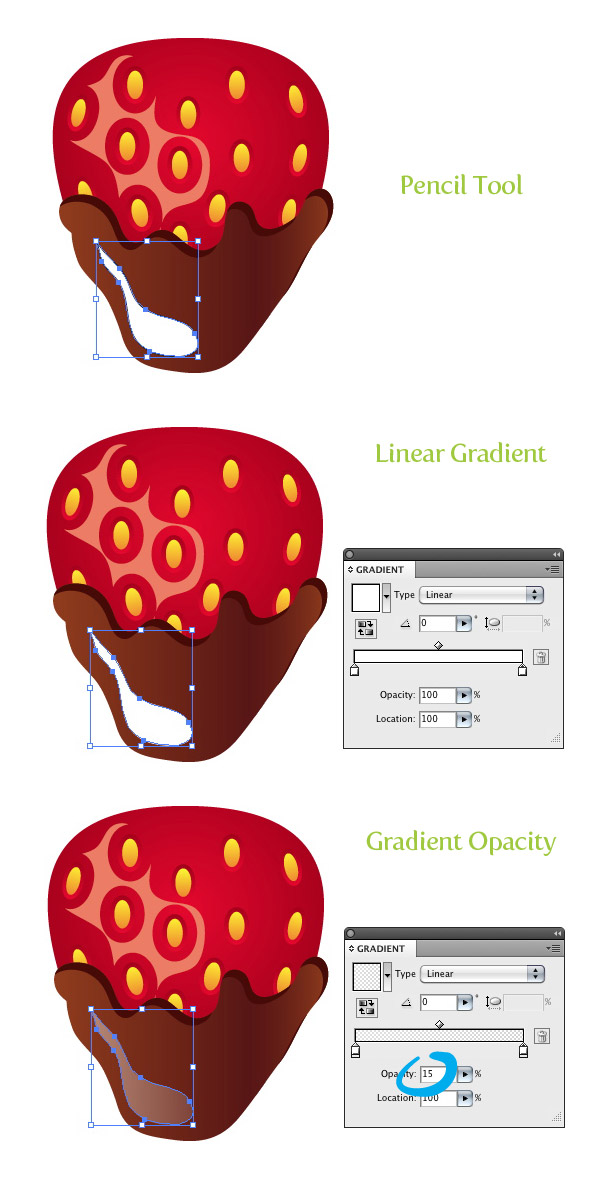
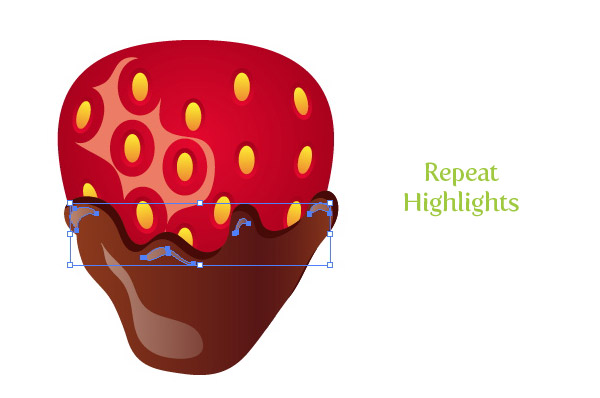
With the Pencil tool (N) draw a new highlight shape towards the bottom of the main chocolate shape in the chocolate covered strawberry vector. Fill the new shape with a linear gradient and make both color stops white. Change the opacity of the first color stop to 40 and the second color stop’s opacity to 15 from the Gradient panel.
Step 19
Create a couple more highlights around the top left curves of the main chocolate shape. Fill each new shape with the same white gradient as in the previous step.
Step 20
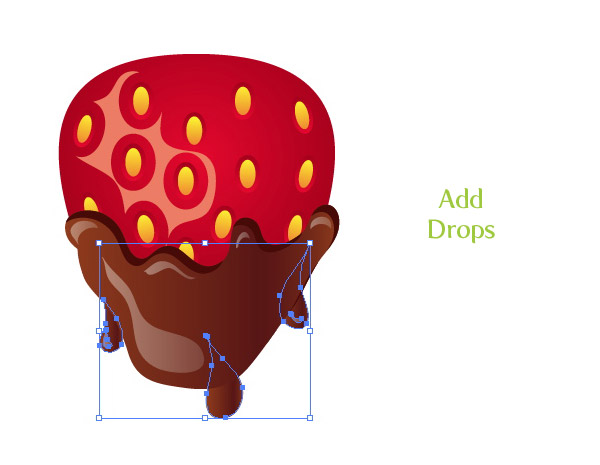
Create a couple more chocolate drops with the Pencil tool (N) and apply the same gradients as in the previous couple steps.
Step 21
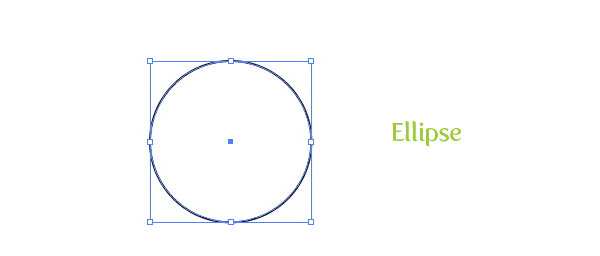
Now we can move onto the leaves and stem of the strawberry. For the leaves we are going to create an custom Art Brush, making it easy and quick to create the leaves. To start, create an ellipse with the Ellipse tool (L).
Step 22
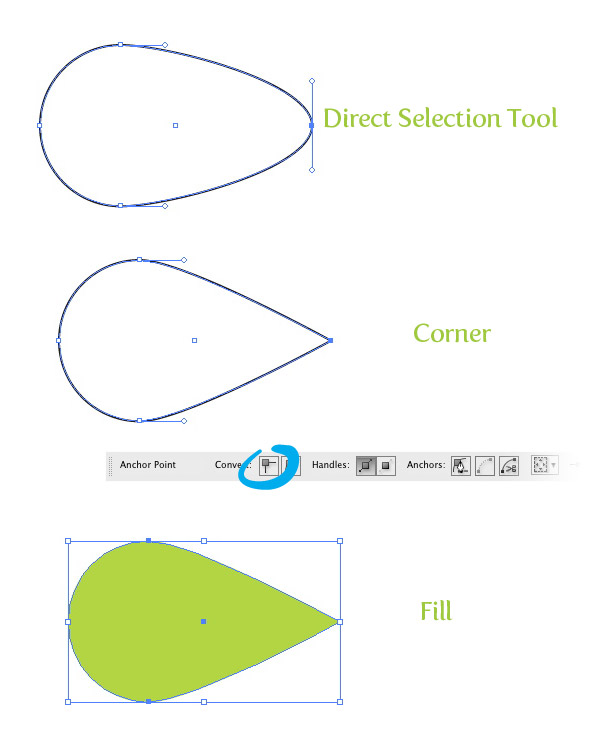
With the Direct Selction tool (A) grab the right anchor point of the ellipse and drag it right to about double the original width. With the point still selected, press the Convert to Corner button from the Control panel. Next, fill the shape with a green color.
Step 23
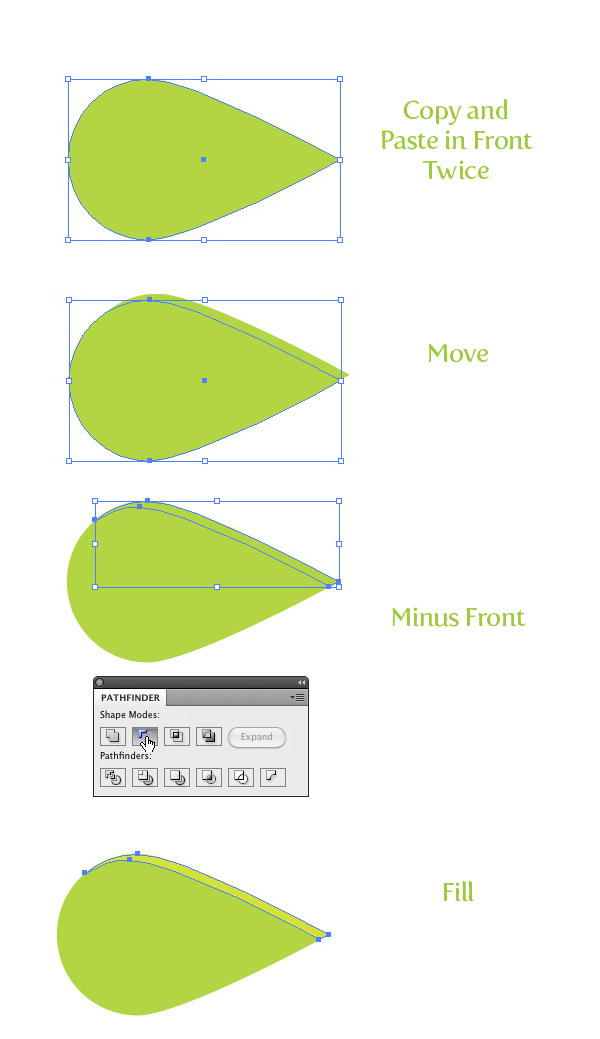
Copy (Command + C) and Paste in Front (Command + F) the ellipse shape twice. Select the top copy and move it down and to the left slightly. Select the two top copies and press the Minus Front button from the Pathfinder panel. Next, fill the shape with a light green color.
Step 24
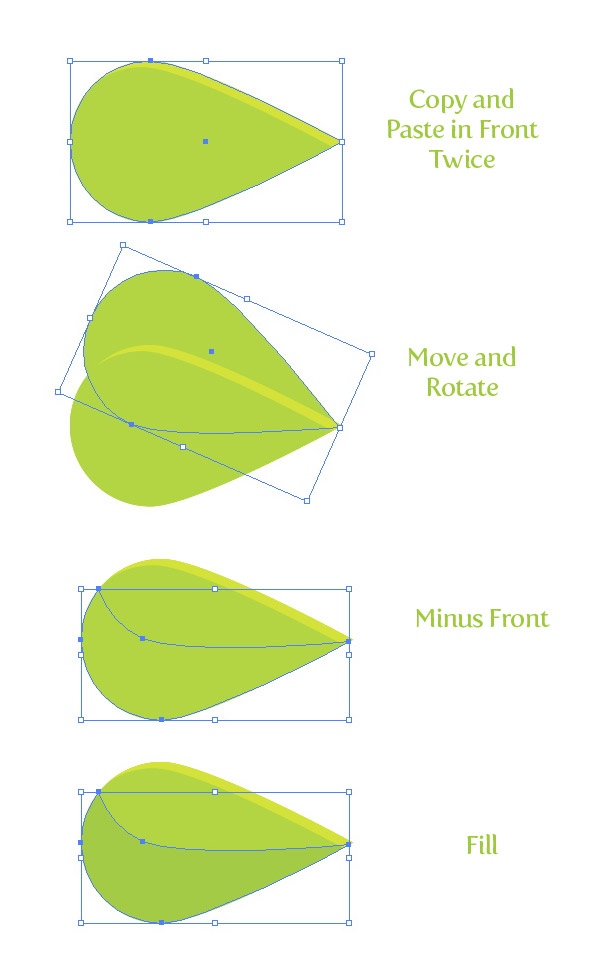
Select the main green shape and (Command + C) and Paste in Front (Command + F) twice. With the Selection tool (V), move the top copy up about half way up the original shape and rotate it so the points of the shape touch. Select both top copies, press the Minus Front button, and change the fill to a dark green color.
Step 25
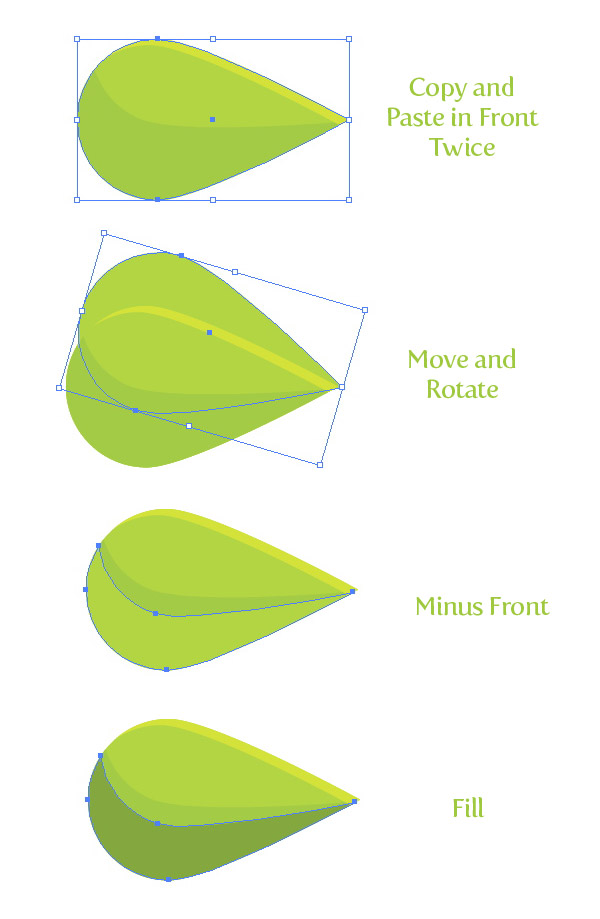
Select the main green shape and (Command + C) and Paste in Front (Command + F) twice. With the Selection tool (V) move the shape up and rotate it slightly, select both top copies, press the Minus Front button, and change the fill to a darker green than the previous step.
Step 26
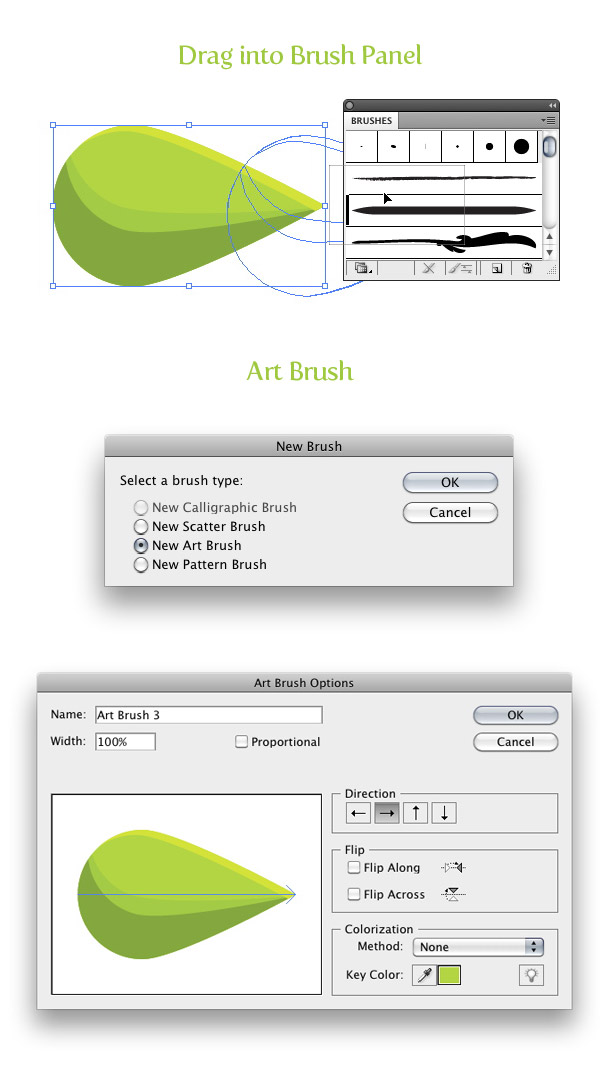
Select all the green shapes and drag them into the Brush panel. When the New Brush dialing opens, select the New Art Brush radial button. In the Art Brush Options keep all the default settings.
Step 27
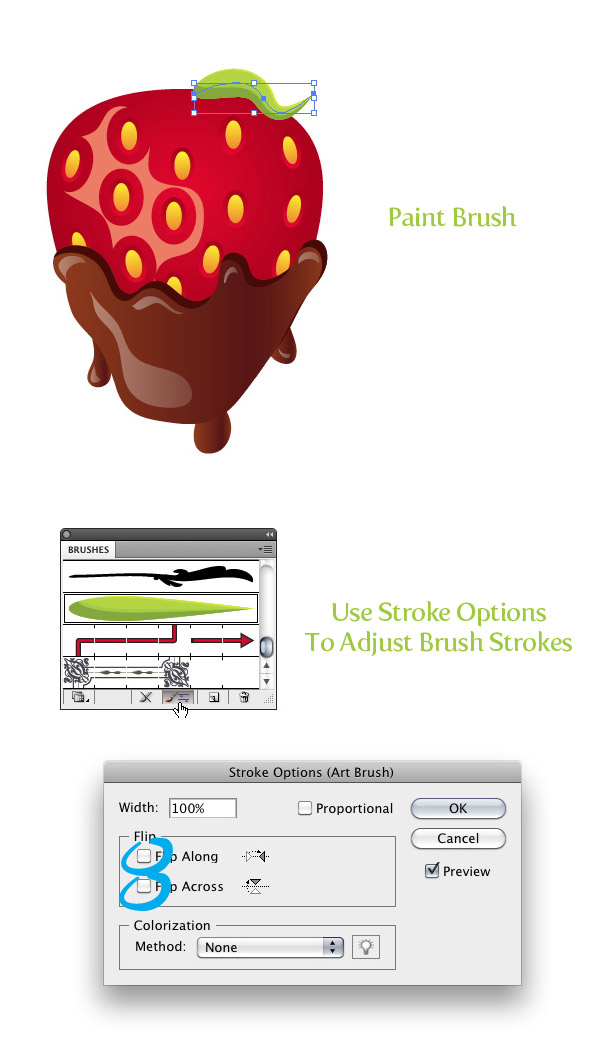
Use the Brush tool (B) with the new art brush and draw a leaf on the top of the chocolate covered strawberry vector. You might have to change the stroke of the path if the shape is too big or doesn’t look correct. When creating these brush strokes, make sure the darker part of the brush is facing down and the pointy part of the brush is facing away from the berry shape. If this is not how it looks after creating the path, press the Stroke Options button at the bottom of the Brush panel. When the Stroke Options dialog opens, you can select the Flip Along or Flip Across options until you get the desired arrangement.
Step 28
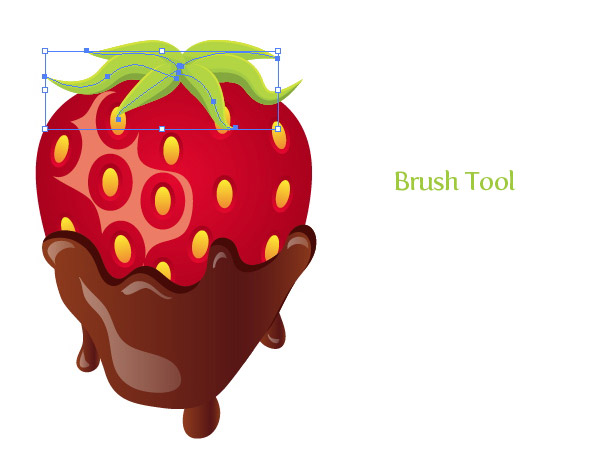
Create five to six more brush stroke with the Brush tool (B) and custom brush.
Step 29
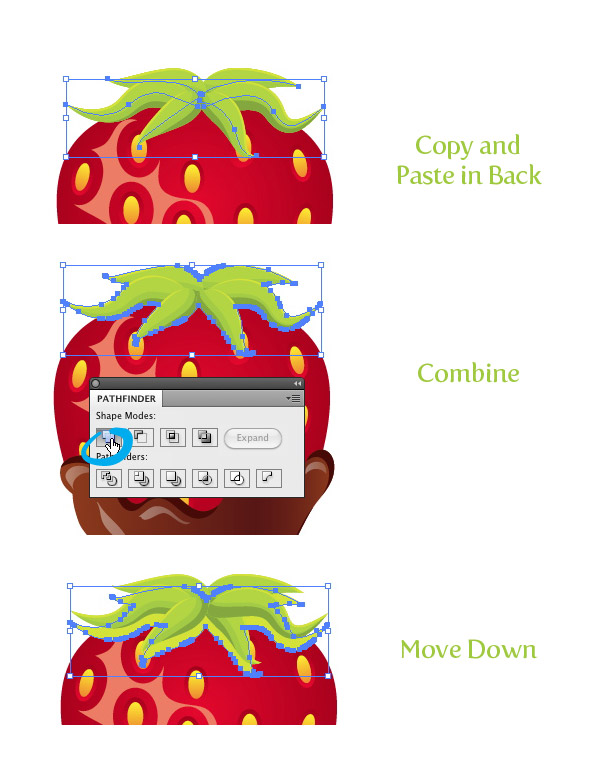
Select all the brush strokes, Copy (Command + C) and Paste in Back (Command + B). With the copies still selected, go Object > Expand Apperance. With the expanded brushes still selected, press the Unite button from the Pathfinder panel. Next, move the new shape down slightly.
Step 30
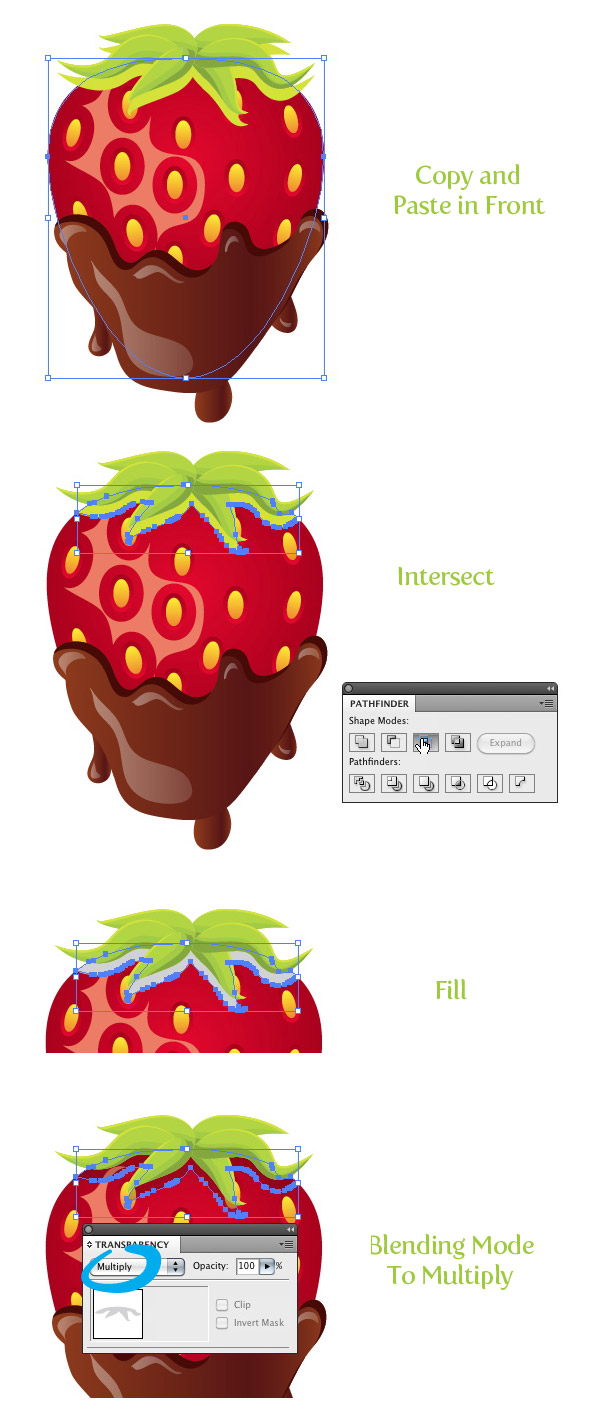
Select the main chocolate covered strawberry vector shape, Copy (Command + C), and Paste in Front (Command + F). Select the copied berry body shape and combined leaf shapes and press the Intersect button from the Pathfinder panel. Change the fill of the new shape to a grey color and set the Blending Mode to Multiply from the Transparency panel.
Step 31
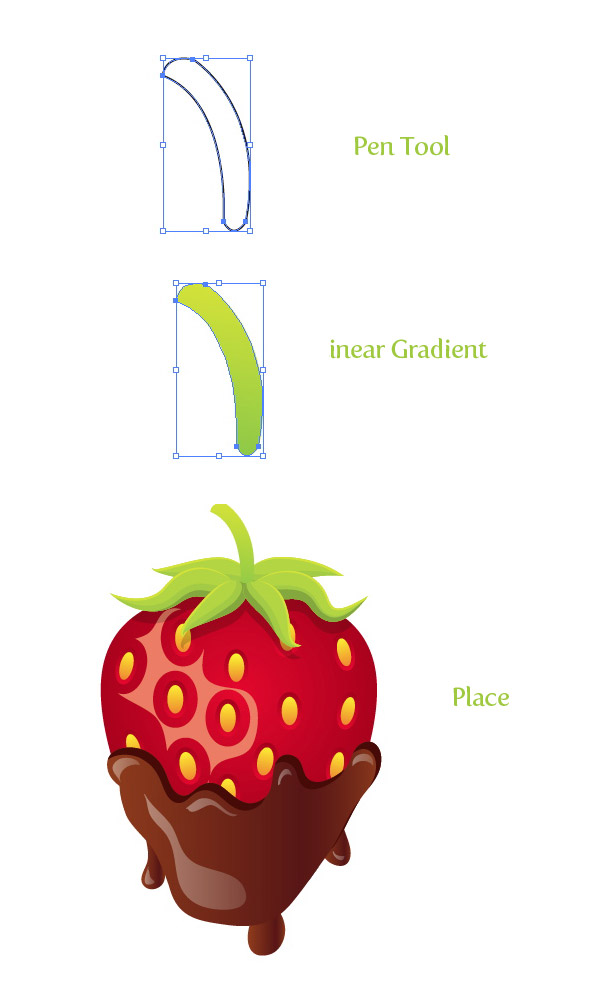
Use the Pen tool (P) to create a stem shape for the chocolate covered strawberry vector. Fill the shape with a linear gradient with the first color stop green and the second a darker green. With the stem selected, go Object > Arrange > Send Backward (Command + ]) until the bottom part of the stem is hidden from the top leaves. All done!
Final Image: Chocolate Covered Strawberry Vector
Enjoy your new chocolate covered strawberry vector! And have a Happy Valentine’s Day.


Thanks for the lessons!
Thank u sosososososo muachhhhh!!!!