Let’s cap off this week with a great tutorial on how to create a detailed bottle cap vector in Adobe Illustrator. For starters you will learn how to setup a simple grid and how to create the main shapes using basic tools and effect along with some neat stroke tricks. Using basic blending and vector shape building techniques along with the Appearance panel you will learn how to add color, shading and highlights for your main shapes. Finally, you will learn how to easily recolor your bottle cap vector.
Tutorial Details: Bottle Cap Vector
- Program: Adobe Illustrator CC
- Difficulty: Beginner-Intermediate
- Topics Covered: Basic Tools and Effects, Transform techniques and the Appearance panel
- Estimated Completion Time: 45 minutes
Final Image: Bottle Cap Vector
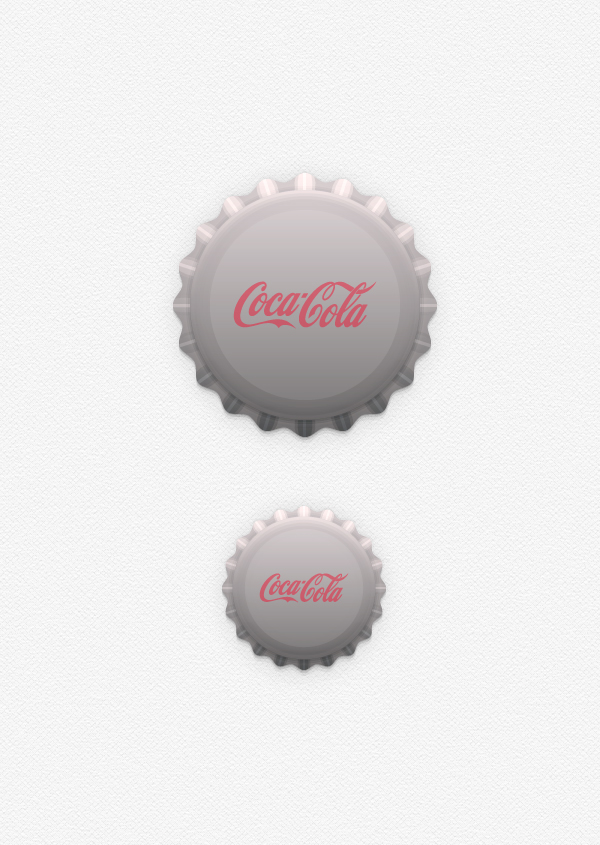
As always, this is the final bottle cap vector that we’ll be creating:
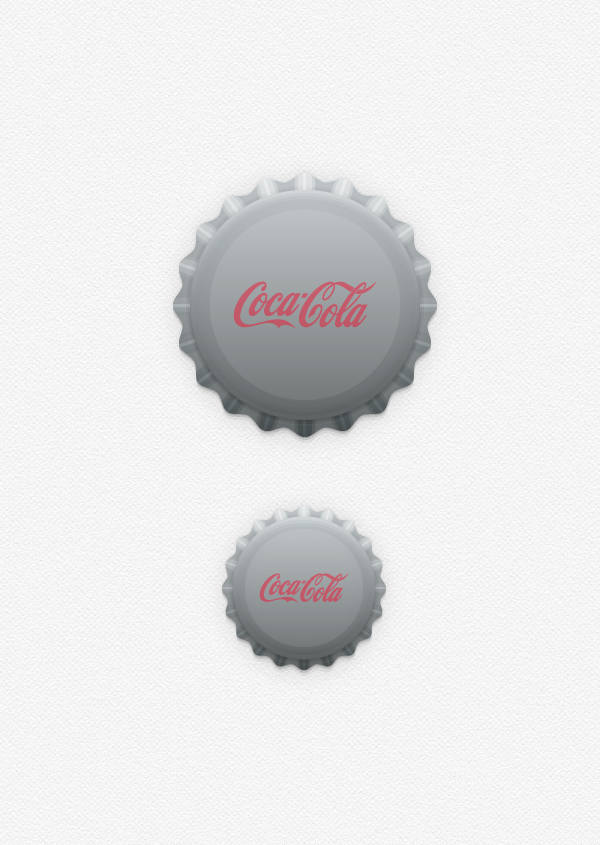
(I added the classic Coke logo to show how you can customize these bottle cap vectors to any project.)
Step 1
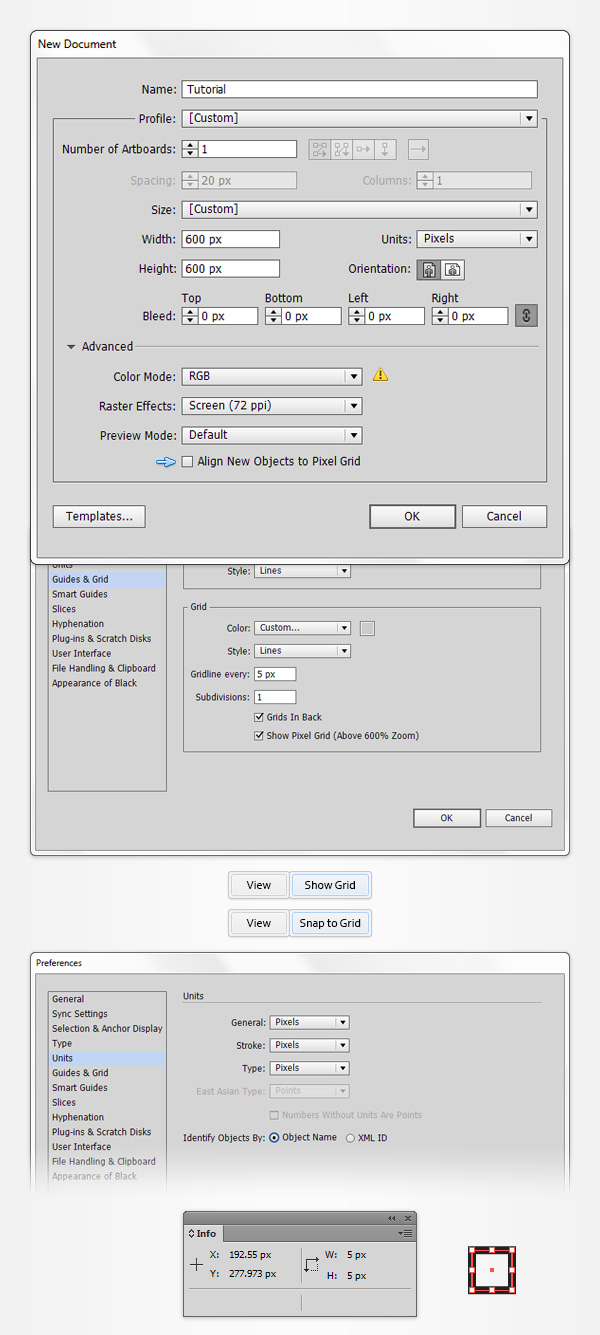
To begin with our bottle cap vector tutorial, hit Control + N to create a new document. Select Pixels from the Units drop-down menu, enter 600 in the width and height boxes and then click on the Advanced button. Select RGB, Screen (72ppi) and make sure that the Align New Objects to Pixel Grid box is unchecked before you click OK. Enable the Grid (View > Show Grid) and the Snap to Grid (View > Snap to Grid). For starters you will need a grid every 5px, so simply go to Edit > Preferences > Guides > Grid, enter 5 in the Gridline every box and 1 in the Subdivisions box. Try not to get discouraged by all that grid, it will ease your work and keep in mind that you can easily enable or disable it using the Control + “ keyboard shortcut. You should also open the Info panel (Window > Info) for a live preview with the size and position of your shapes. Do not forget to set the unit of measurement to pixels from Edit > Preferences > Units > General. All these options will significantly increase your work speed.
Step 2
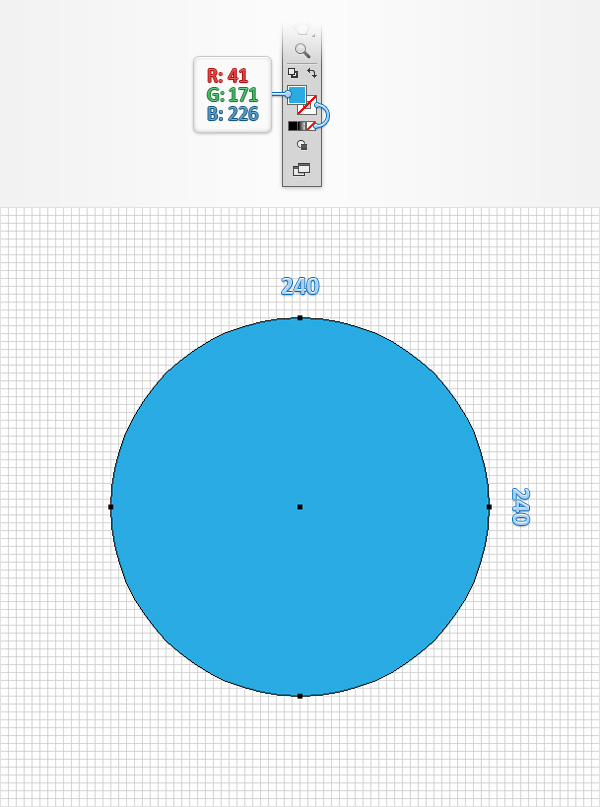
Pick the Ellipse Tool (L) and focus on your Toolbar. Remove the color from the stroke then select the fill and set its color at R=41 G=171 B=226. Move to your Artboard and simply create a 240px circle, the Snap to Grid feature should ease your work.
Step 3
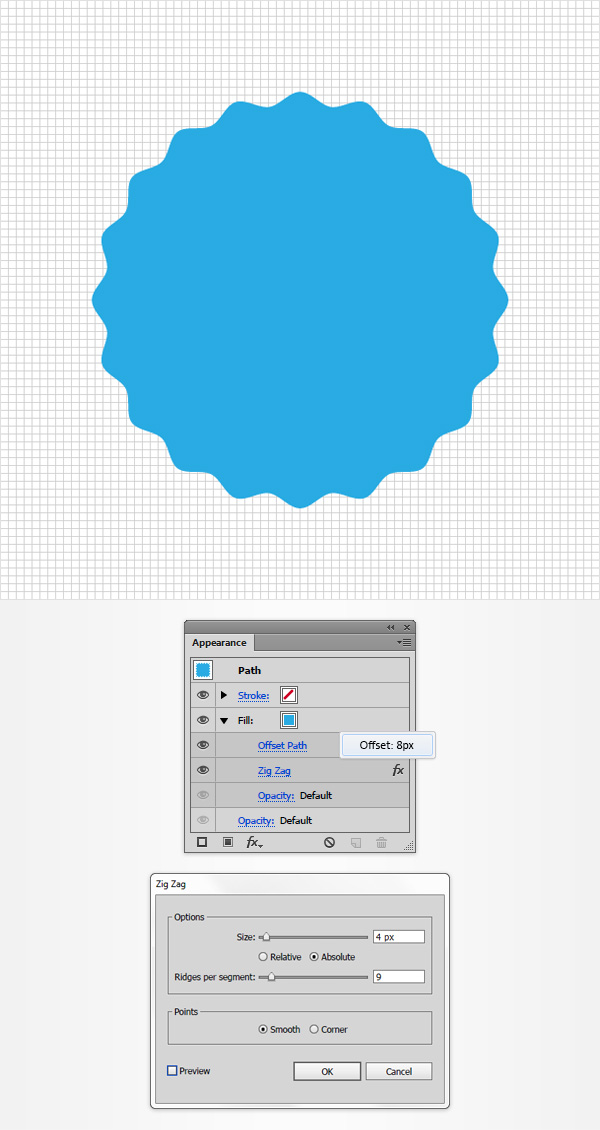
Make sure that your circle for the bottle cap vector stays selected and go to Effect > Path > Offset Path. Enter an 8px Offset, click OK and go to Effect > Distort & Transform > Zig Zag. Enter the attributes shown in the following image, click OK and go to Object > Expand Appearance. In the end your blue shape should look like in the following image.
Step 4
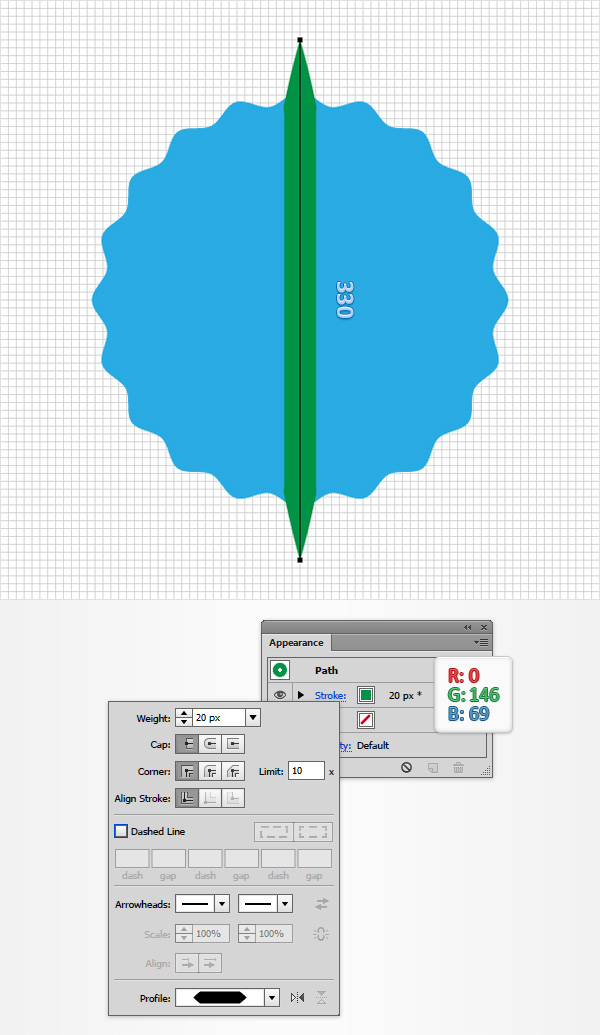
Pick the Pen Tool (P), create a 330px, vertical path and place it exactly as shown in the following image. Make sure that it stays selected and focus on the Appearance panel (Window > Appearance). First, make sure that there’s no color set for the fill and then focus on the stroke. Set its color at R=0 G=146 B=69 and then click that “Stroke” piece of text to open the Stroke fly-out panel. Set the Weight at 20px and select “Width Profile 3” from the Profile drop-down menu.
Step 5
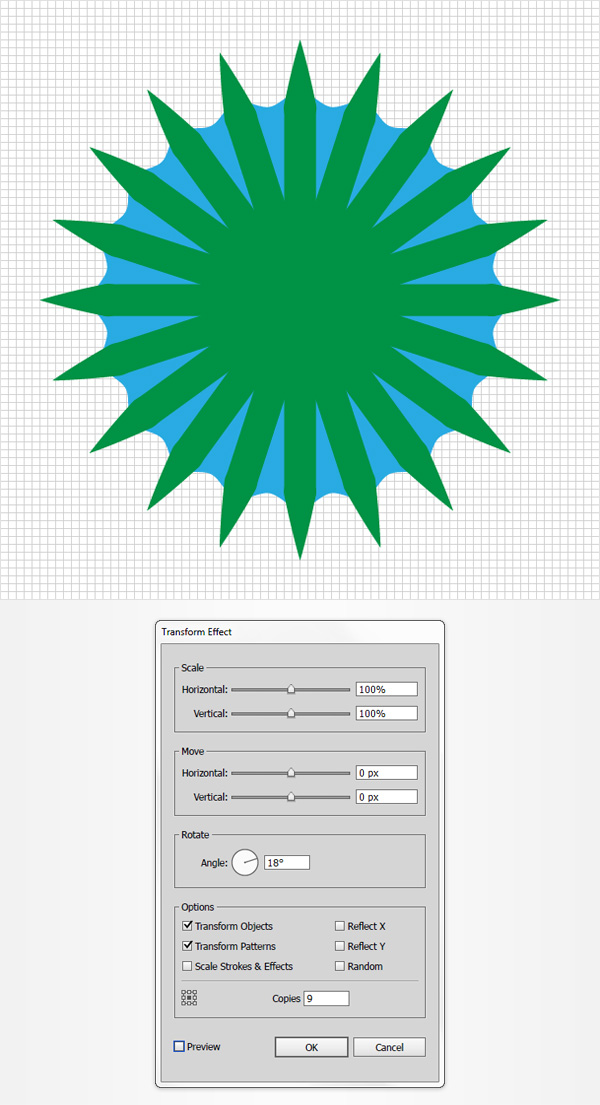
Make sure that your green path is still selected and go to Effect > Distort & Transform > Transform. Enter the attributes shown in the following image and click OK.
Step 6
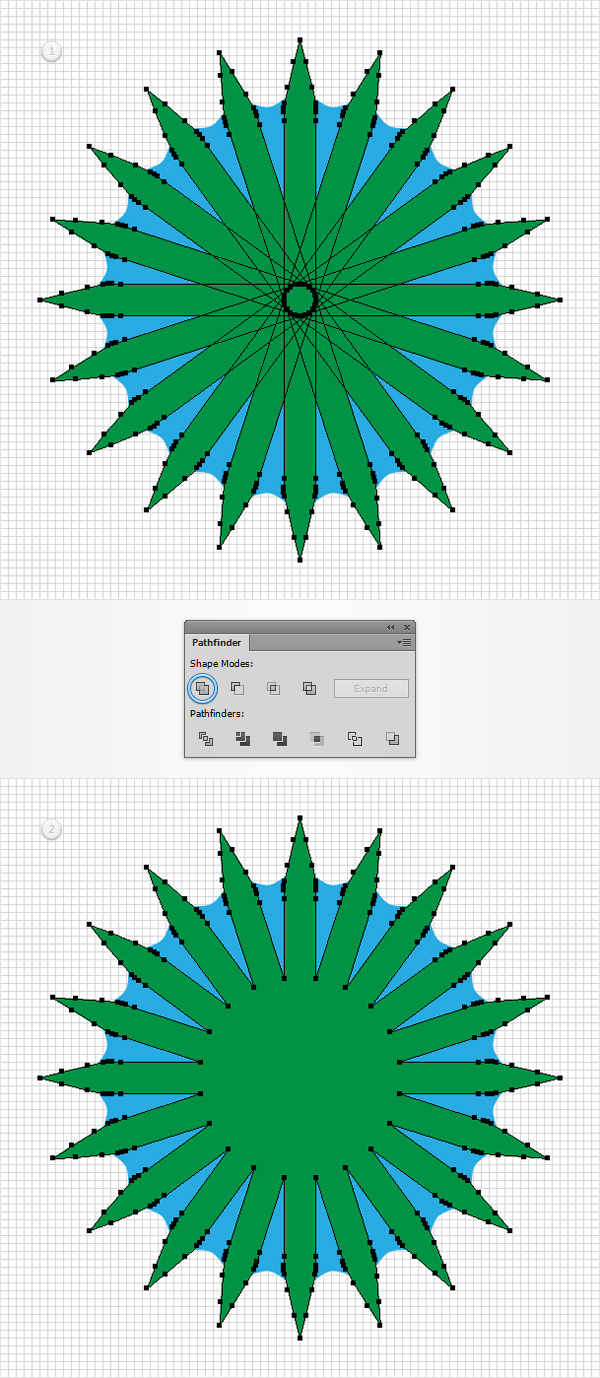
Reselect your green path your bottle cap vector and go to Object > Expand Appearance. Make sure that the resulting group is selected, open the Pathfinder panel (Window > Pathfinder) and click the Unite button. In the end your green shape should look like in the second image.
Step 7
Make sure that your blue shape is selected and make a copy in front using the Control + C > Control + F keyboard shortcut. Select it along with your green shape and click the Intersect button from the Pathfinder panel. Make sure that the resulting shape stays selected and focus on the Appearance panel. Lower the Opacity to 70%, change the Blending Mode to Soft Light and then replace the existing fill color with the linear gradient shown in the following image. Keep in mind that the yellow number (“30“) from the Gradient image stands for Opacity percentage.
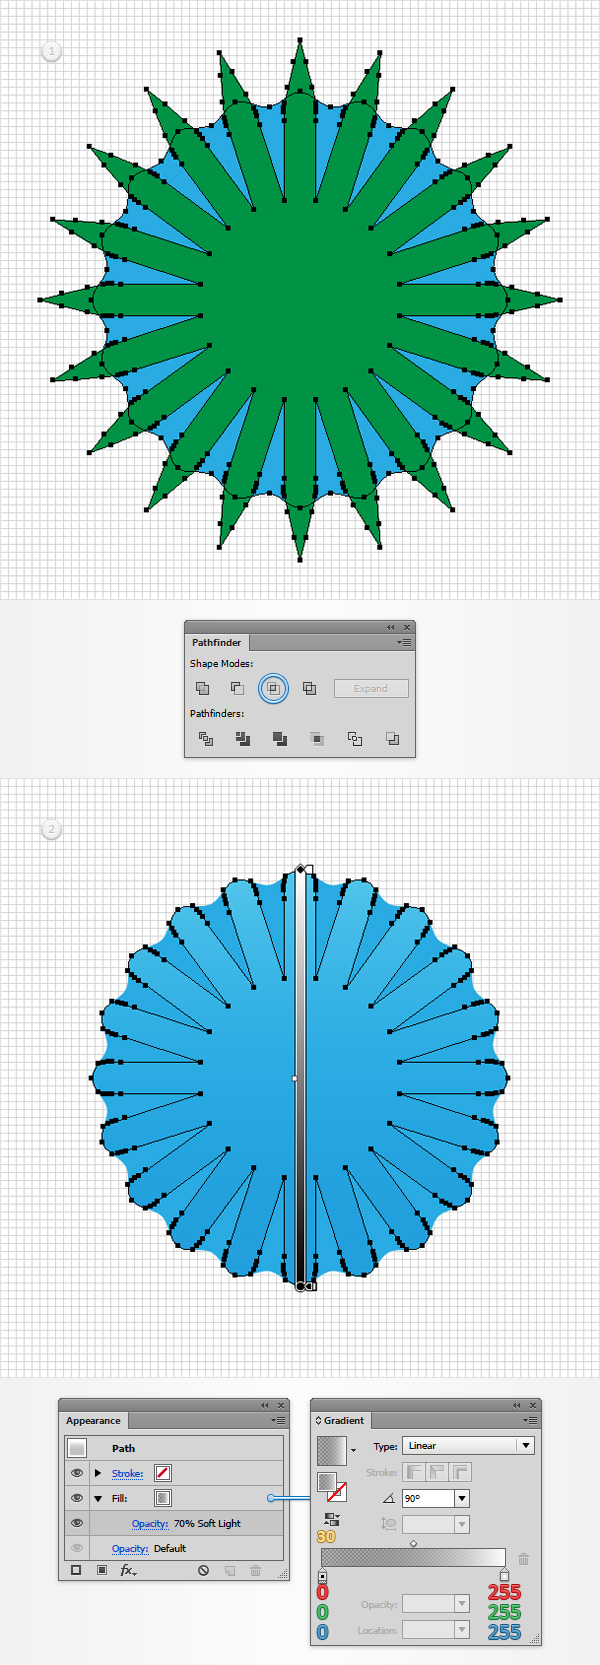
Step 8
Pick the Pen Tool (P), create a 330px, vertical path and place it exactly as shown in the following image. Make sure that it stays selected and focus on the Appearance panel. First, make sure that there’s no color set for the fill and then focus on the stroke. Set its color at R=147 G=39 B=143 and then open that Stroke fly-out panel. Set the Weight at 24px and select again the “Width Profile 3” from the Profile drop-down menu.
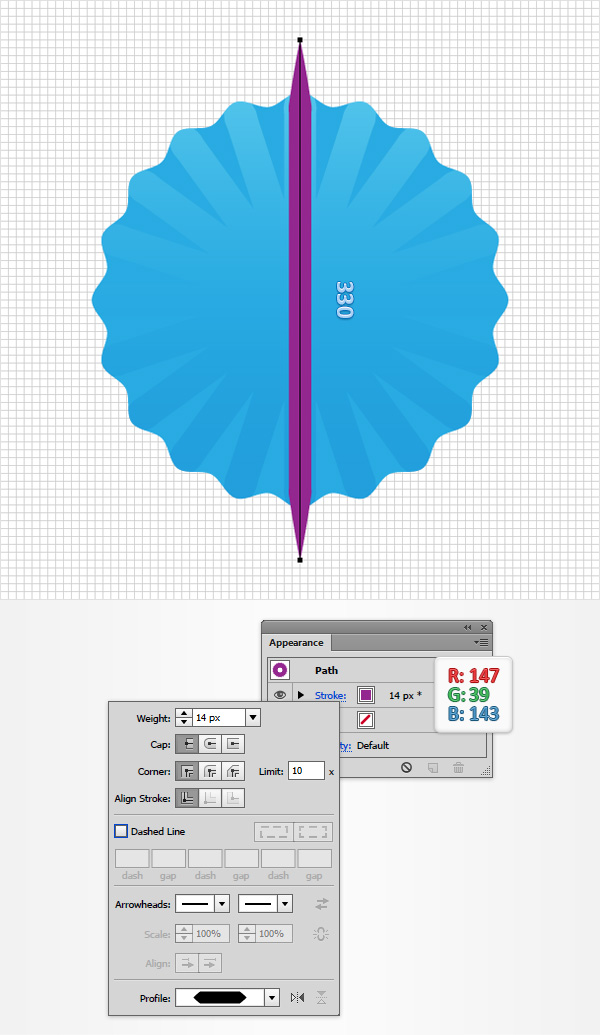
Step 9
Make sure that your purple path on your bottle cap vector is still selected and go to Effect > Distort & Transform > Transform. Enter the attributes shown in the following image and click OK.
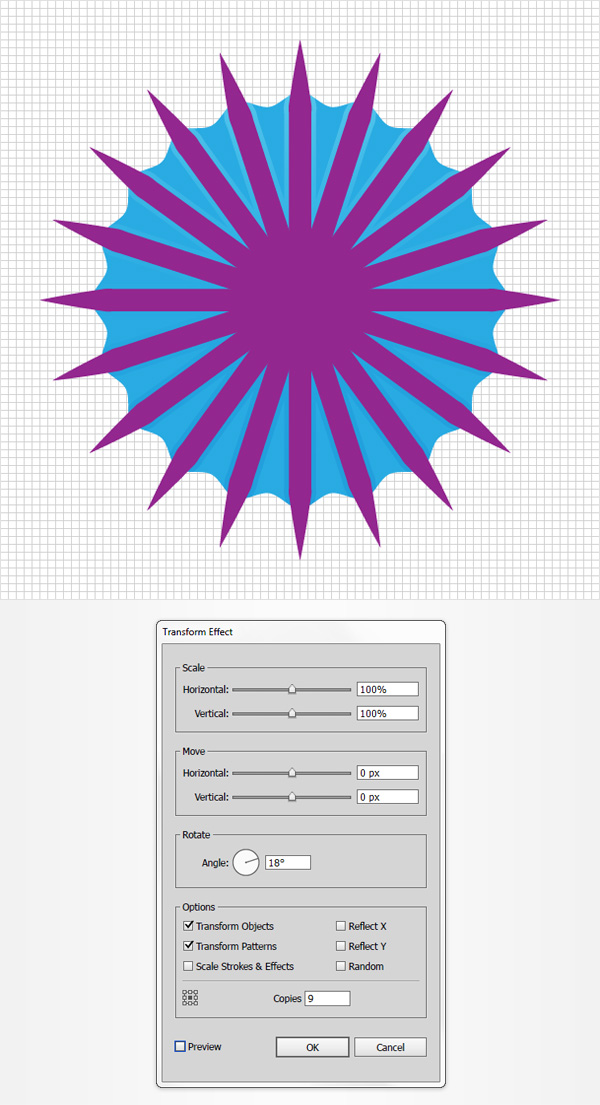
Step 10
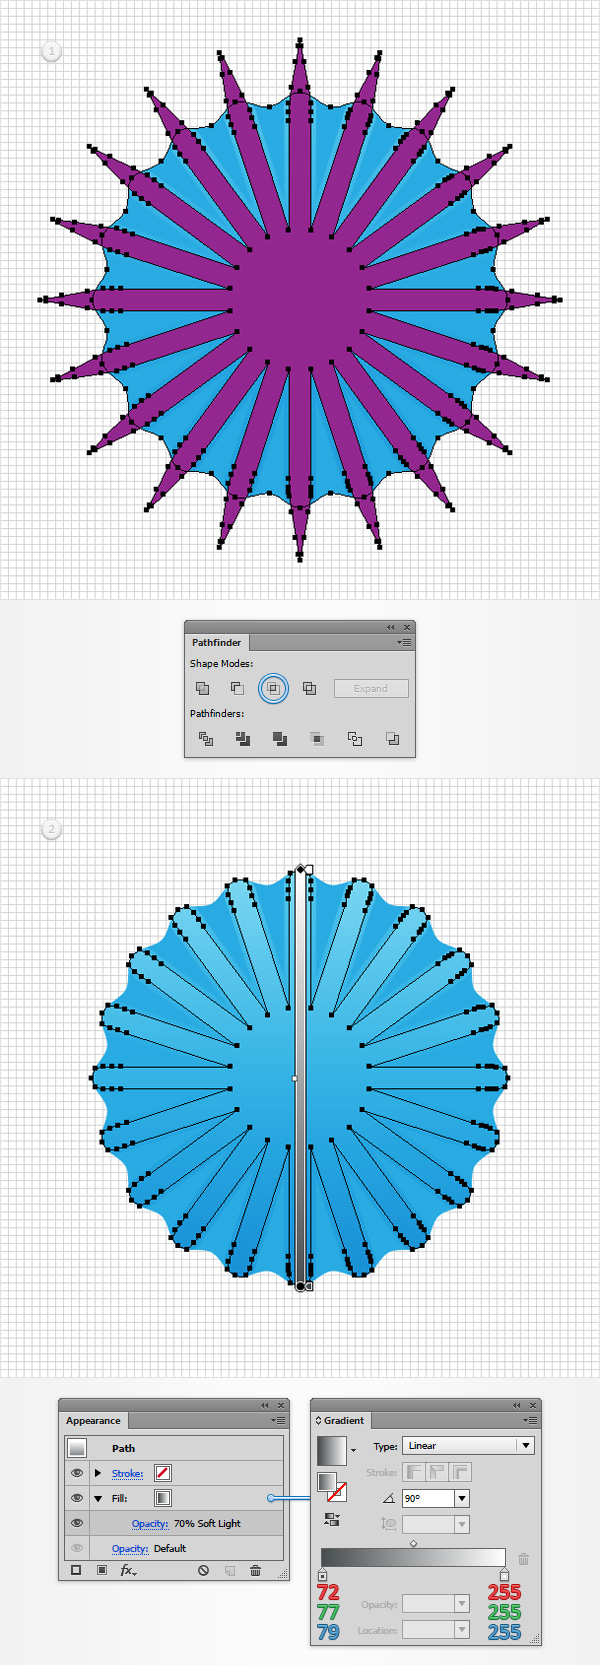
Reselect your purple path and go to Object > Expand Appearance. Make sure that the resulting group is selected and click the Unite button from the Pathfinder panel. In the end your purple shape should look like in the second image.
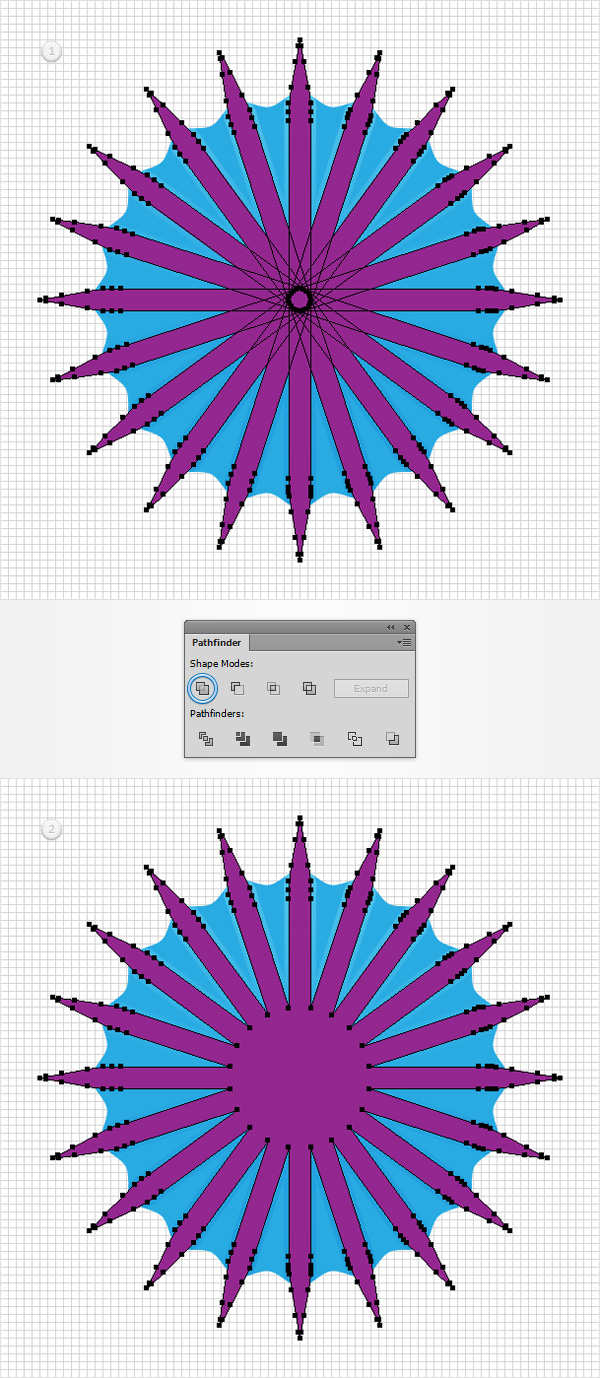
Step 11
Make sure that your blue shape is selected and make a copy in front using that same Control + C > Control + F keyboard shortcut. Select it along with your purple shape and click the Intersect button from the Pathfinder panel. Make sure that the resulting shape stays selected and focus on the Appearance panel. Lower the Opacity to 70%, change the Blending Mode to Soft Light and then replace the existing fill color with the linear gradient shown in the following image.
Step 12
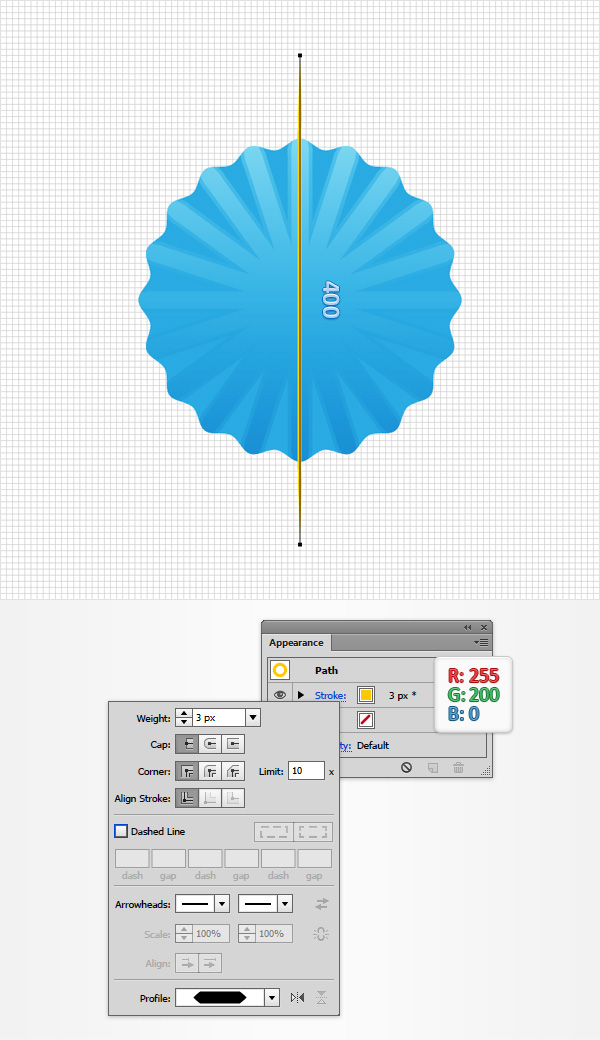
Pick the Pen Tool (P), create a 400px, vertical path and place it exactly as shown in the following image. Make sure that it stays selected and focus on the Appearance panel. First, make sure that there’s no color set for the fill and then focus on the stroke. Set its color at R=255 G=200 B=0 and then open that Stroke fly-out panel. Set the Weight at 3px and select again the “Width Profile 3” from the Profile drop-down menu. Now the bottle cap vector is beginning to take shape.
Step 13
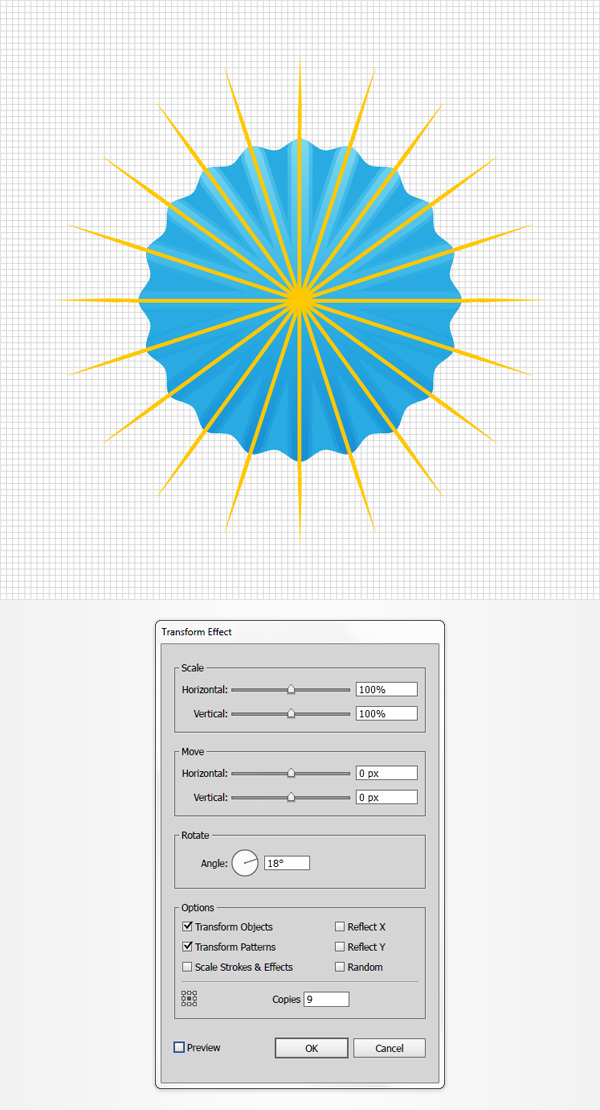
Make sure that your yellow path is still selected and go to Effect > Distort & Transform > Transform. Enter the attributes shown in the following image and click OK.
Step 14
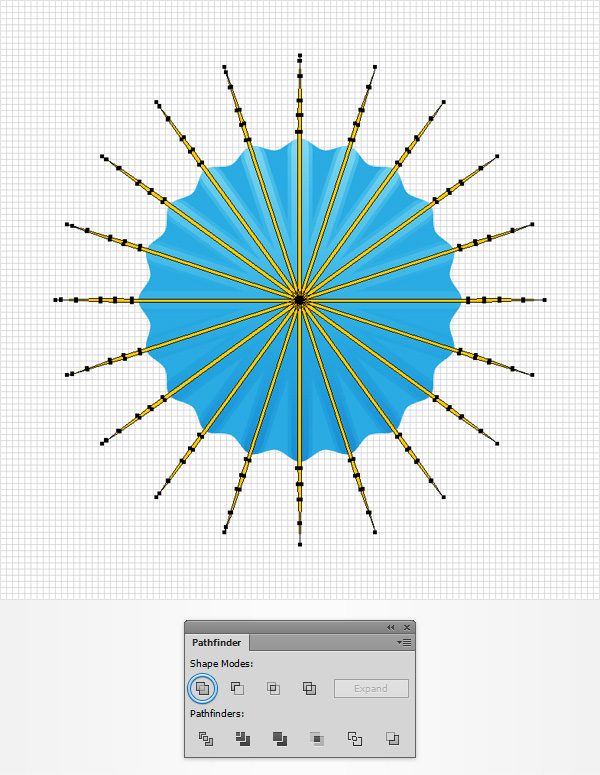
Reselect your yellow path and go to Object > Expand Appearance. Make sure that the resulting group is selected and click the Unite button from the Pathfinder panel.
Step 15
Make sure that your blue shape is selected and make a copy in front using that same Control + C > Control + F keyboard shortcut. Select it along with your yellow shape and click the Intersect button from the Pathfinder panel. Make sure that the resulting shape stays selected and focus on the Appearance panel. Lower the Opacity to 80%, change the Blending Mode to Soft Light and then replace the existing fill color with the linear gradient shown in the following image.
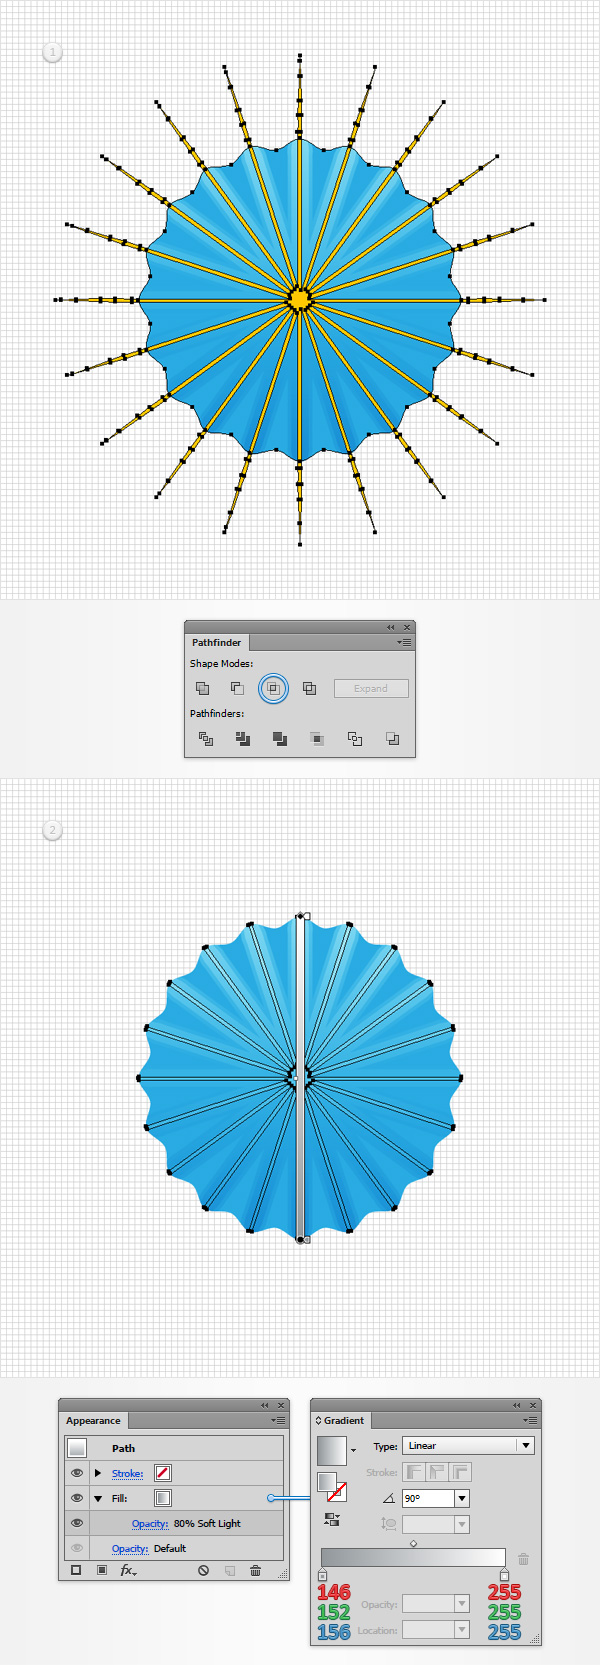
Step 16
Make sure that your blue shape is selected, focus on the Appearance panel and replace the existing fill color on the bottle cap vector with the linear gradient shown in the following image.
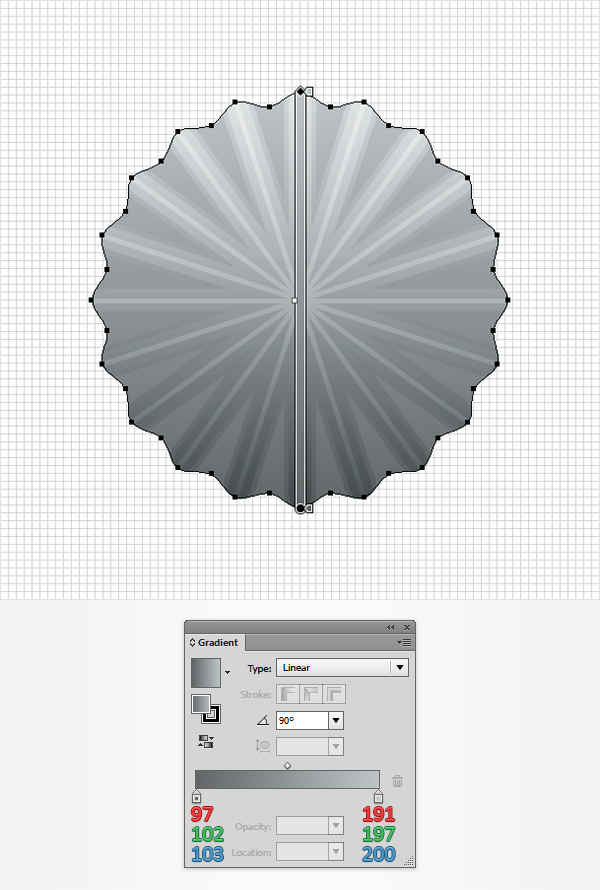
Step 17
Make sure that your wavy shape stays selected and focus on the Appearance panel. Select the existing stroke, make it black (R=0 G=0 B=0), set the Weight at 2px, align it to Outside and lower its Opacity to 3%.
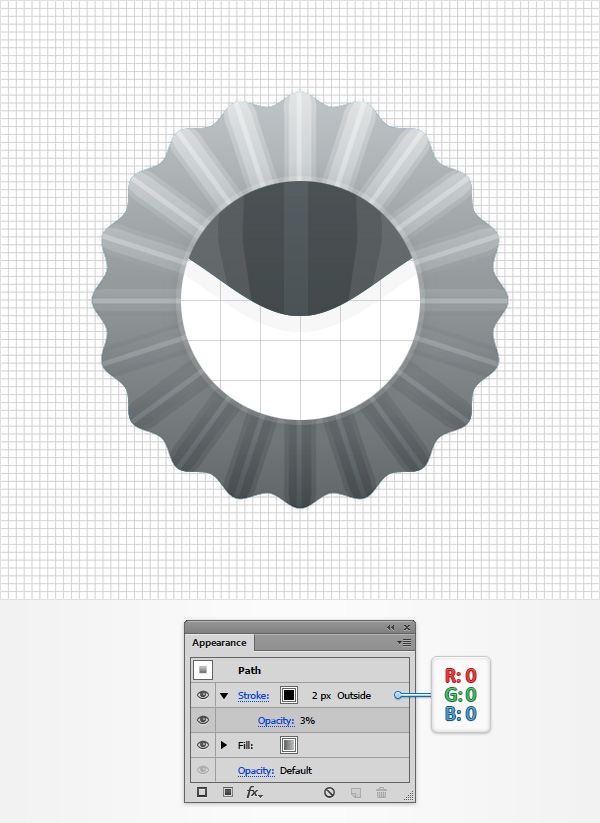
Step 18
Make sure that your wavy shape stays selected and keep focusing on the Appearance panel. Select the existing fill and go to Effect > Stylize > Drop Shadow. Enter the attributes shown in the top, left window (in the following image), click OK and then add the other four Drop Shadow effects shown below.
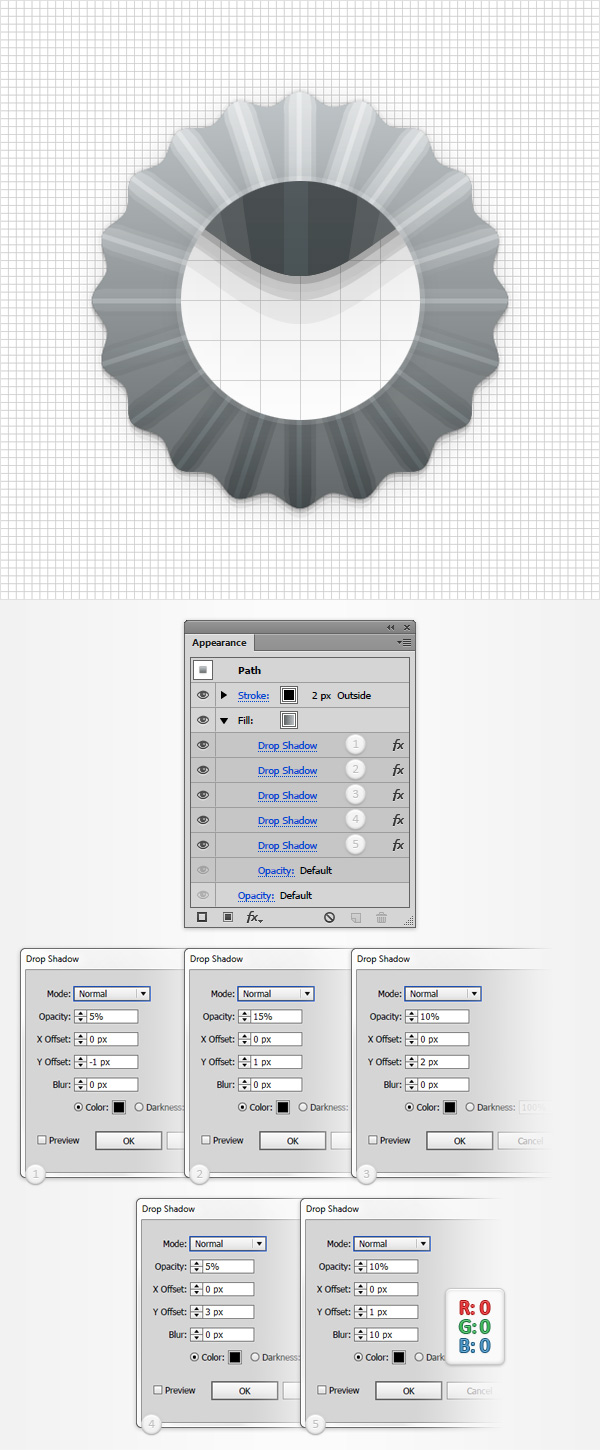
Step 19
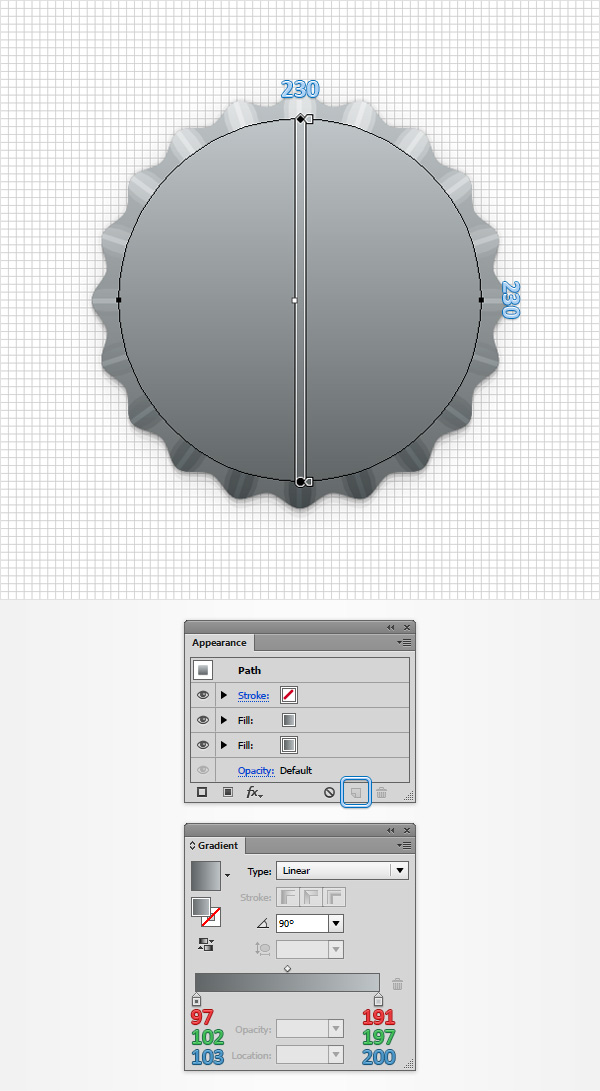
Using the Ellipse Tool (L), create a 230px circle, fill it with the linear gradient shown below and place it as shown in the following image. Make sure that this new shape stays selected and focus on the Appearance panel. Select the existing fill and simply duplicate it using the Duplicate Selected Item button.
Step 20
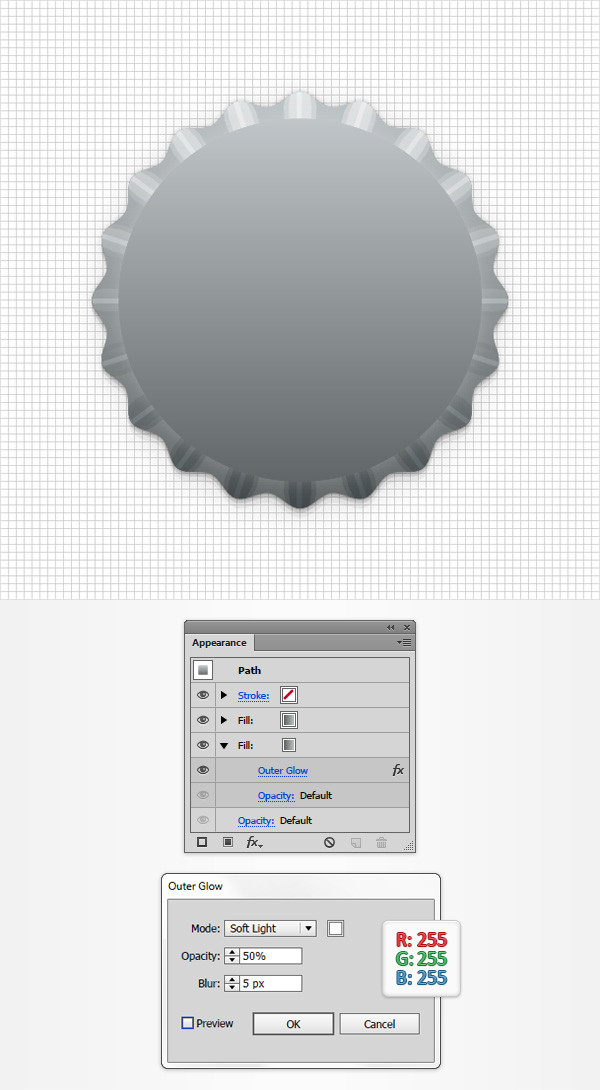
Make sure that your circle on your bottle cap vector stays selected and focus on the Appearance panel. Select the bottom fill and go to Effect > Stylize > Outer Glow. Enter the attributes shown in the following image and click OK.
Step 21
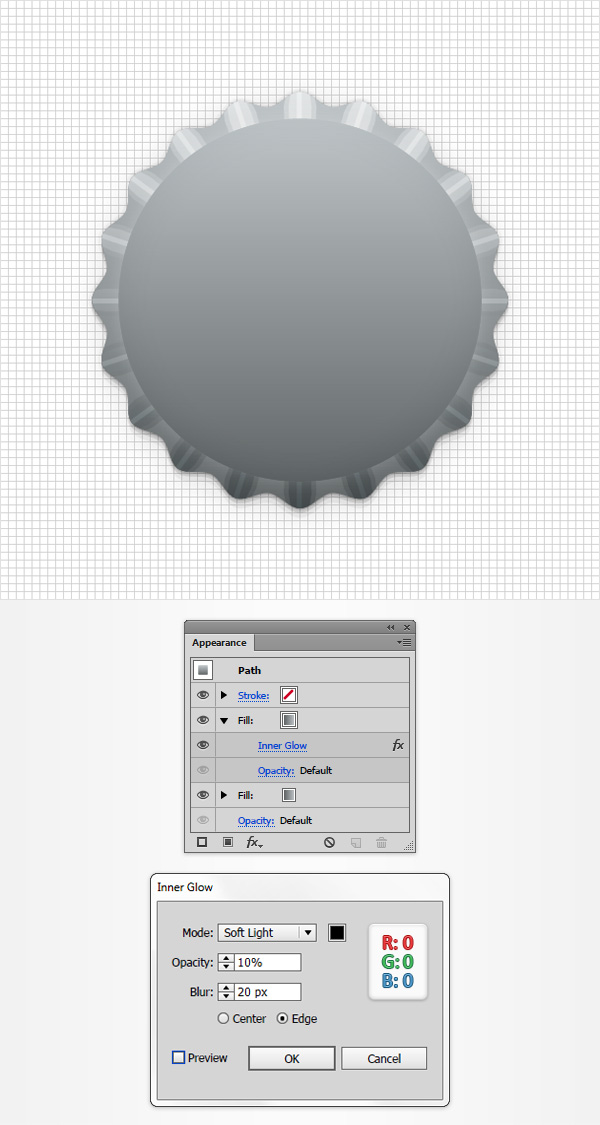
Make sure that your circle stays selected and keep focusing on the Appearance panel. Select the top fill and go to Effect > Stylize > Inner Glow. Enter the attributes shown in the following image and click OK.
Step 22
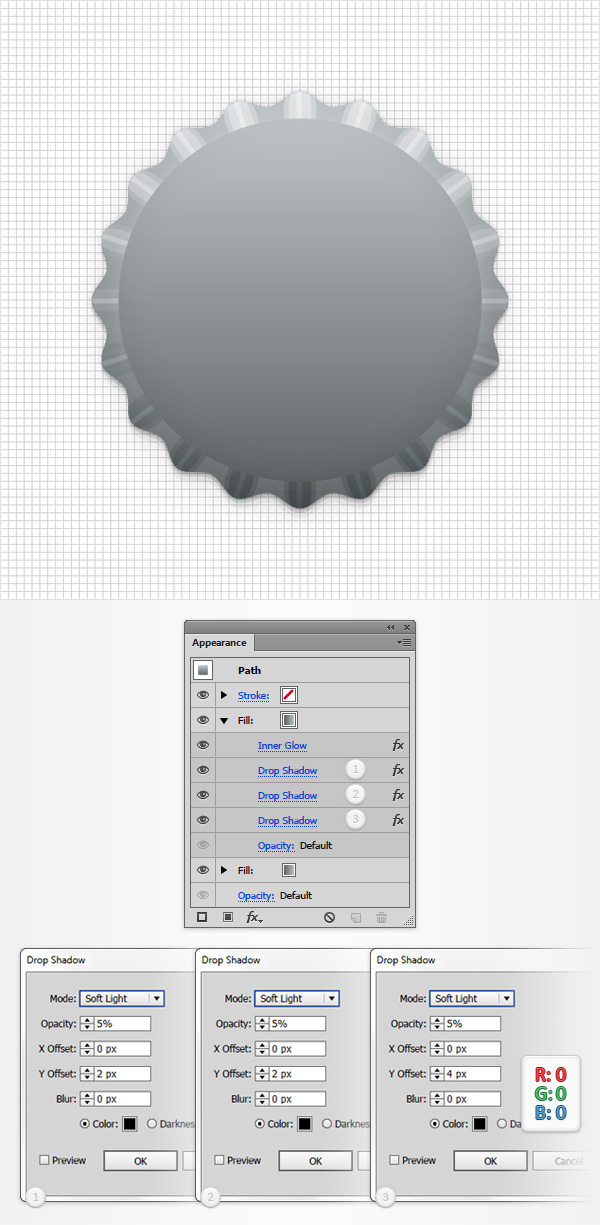
Make sure that your circle stays selected and keep focusing on the Appearance panel. Select the top fill and simply add the three Drop Shadow effects (Effect > Stylize > Drop Shadow) shown in the following image.
Step 23
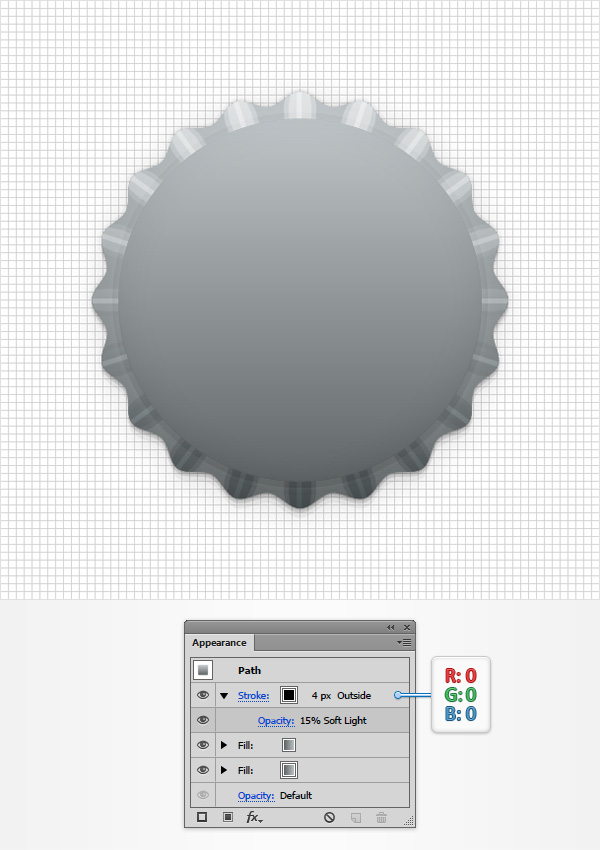
Make sure that your circle stays selected and keep focusing on the Appearance panel. Select the existing stroke, make it black, set the Weight at 4px, align it to outside, lower its Opacity to 15% and change the Blending Mode to Soft Light.
Step 24
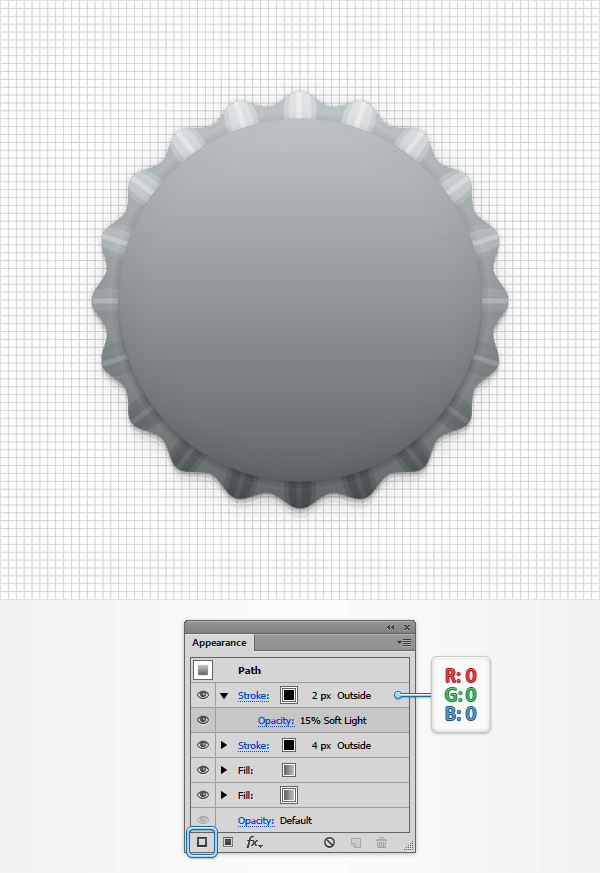
Make sure that your circle stays selected, keep focusing on the Appearance panel and add a second stroke using the Add New Stroke button. Select this new stroke, make sure that it’s black, set the Weight at 2px, align it to Outside, lower its Opacity to 15% and change the Blending Mode to Soft Light.
Step 25
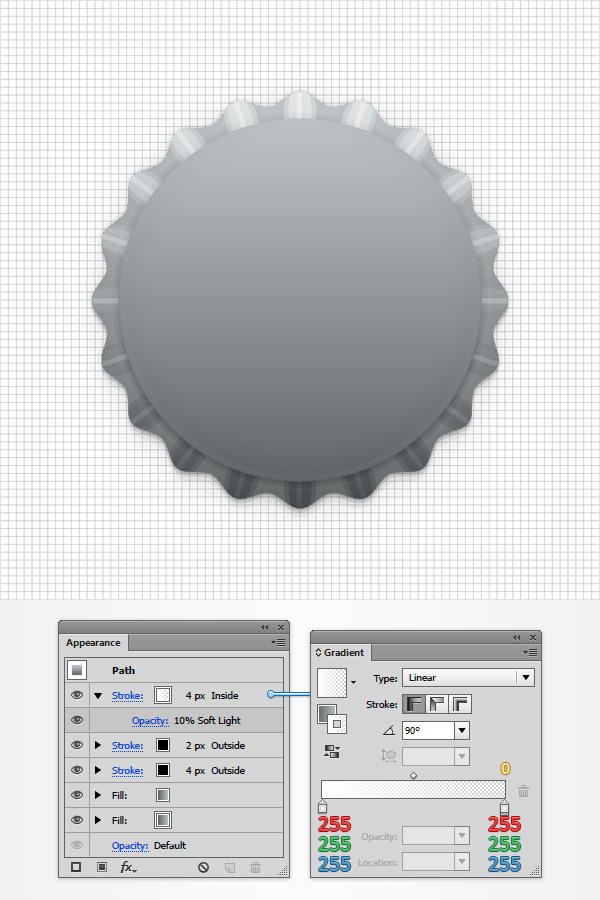
Make sure that your circle stays selected, keep focusing on the Appearance panel and add a third stroke using that same Add New Stroke button. Select this new stroke, set the Weight at 4px, align it to Inside, lower its Opacity to 10%, change the Blending Mode to Soft Light and then replace the existing color with the linear gradient shown in the following image. Don’t forget that the yellow zero from the Gradient image stands for Opacity percentage.
Step 26
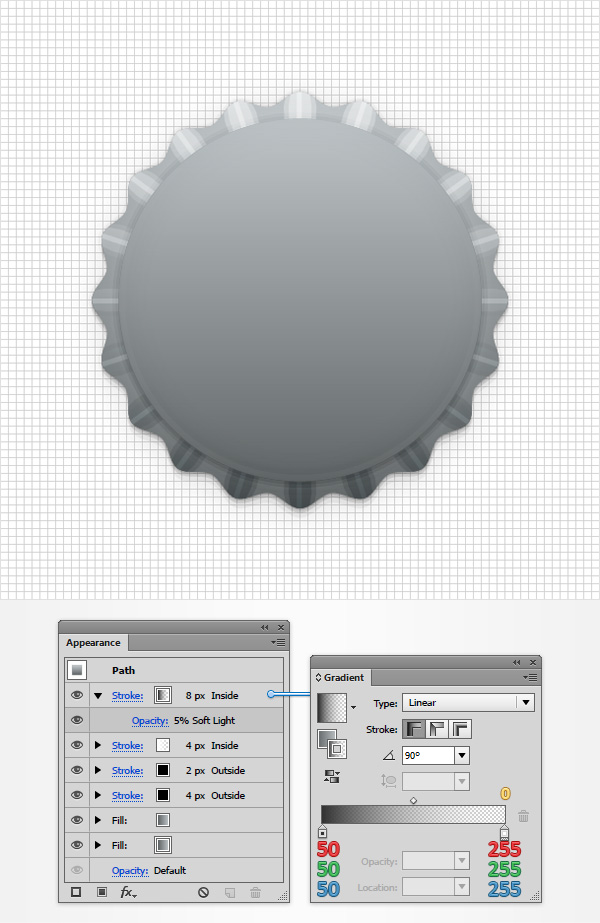
Make sure that your circle stays selected, keep focusing on the Appearance panel and add a fourth stroke using that same Add New Stroke button. Select this new stroke, set the Weight at 8px, align it to Inside, lower its Opacity to 5%, change the Blending Mode to Soft Light and then replace the existing color with the linear gradient shown in the following image.
Step 27
Make sure that your circle stays selected, keep focusing on the Appearance panel and add a fifth stroke using that same Add New Stroke button. Select this new stroke, set the Weight at 12px, align it to Inside, lower its Opacity to 5%, change the Blending Mode to Soft Light and then replace the existing color with the linear gradient shown in the following image.
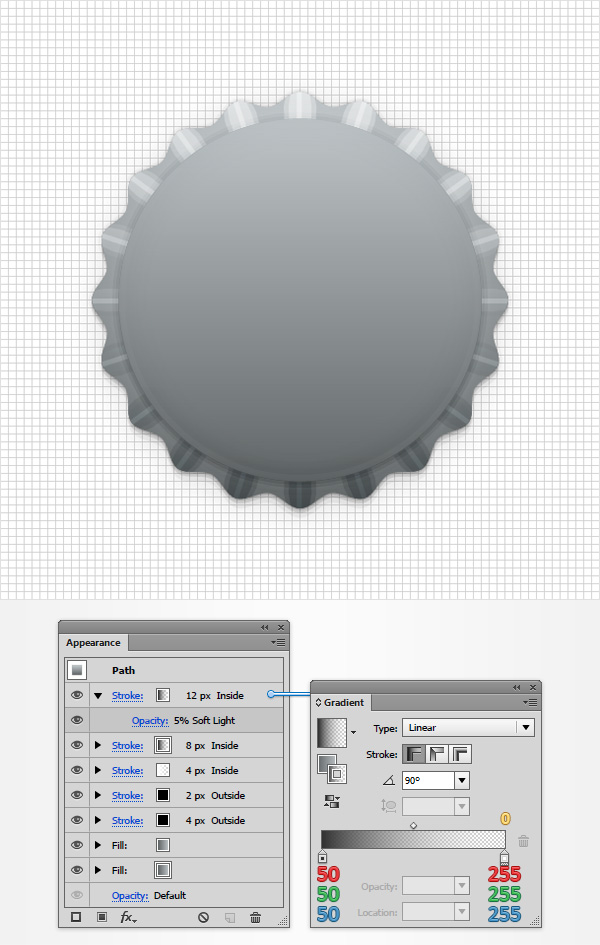
Step 28
Make sure that your circle stays selected, keep focusing on the Appearance panel and add a sixth stroke using that same Add New Stroke button. Select this new stroke, set the Weight at 3px, align it to Inside, lower its Opacity to 40%, change the Blending Mode to Soft Light and then replace the existing color with the linear gradient shown in the following image.
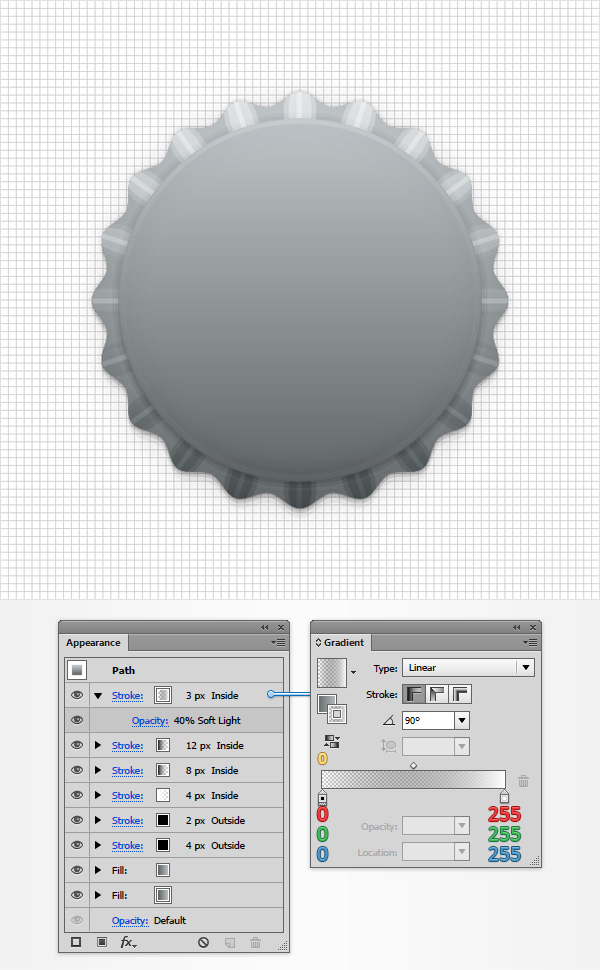
Step 29
Make sure that your circle stays selected, keep focusing on the Appearance panel and add a seventh stroke using that same Add New Stroke button. Select this new stroke, set the Weight at 6px, align it to Inside, lower its Opacity to 30%, change the Blending Mode to Soft Light and then replace the existing color with the linear gradient shown in the following image.
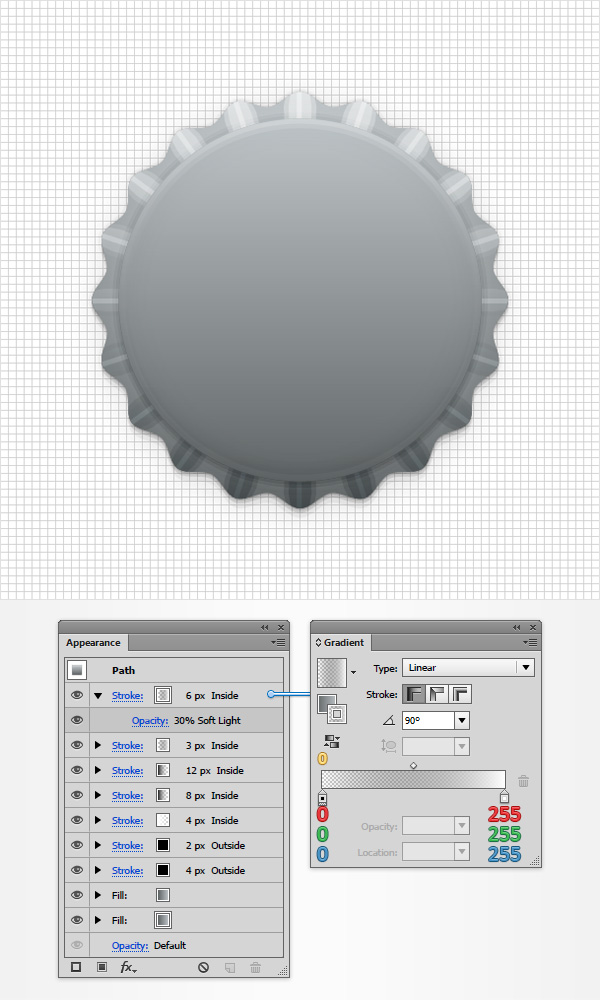
Step 30
Make sure that your circle stays selected, keep focusing on the Appearance panel and add a third stroke using that same Add New Stroke button. Select this new stroke, set the Weight at 9px, align it to Inside, lower its Opacity to 20%, change the Blending Mode to Soft Light and then replace the existing color with the linear gradient shown in the following image.
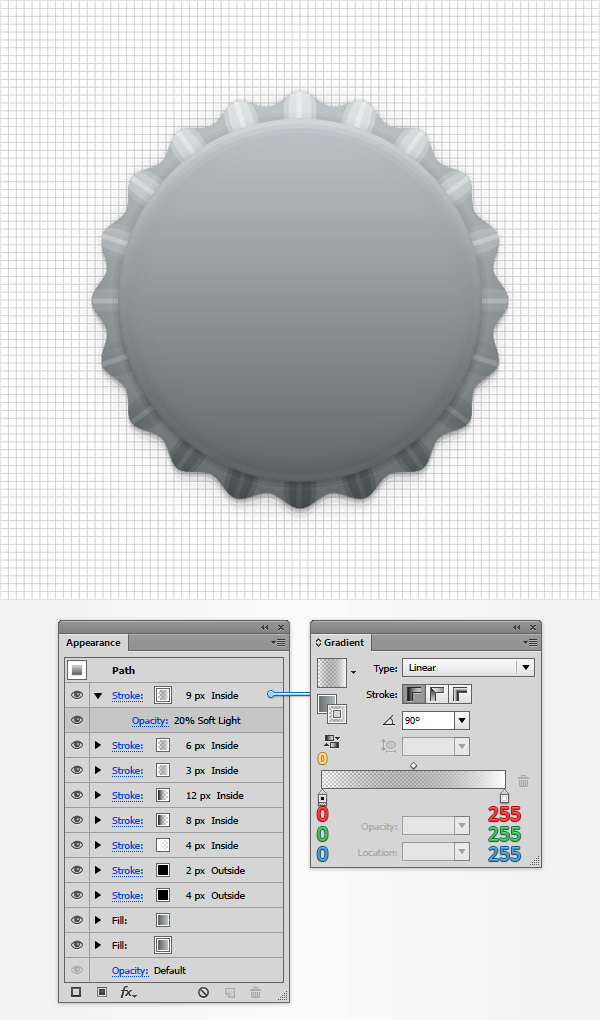
Step 31
Reselect your wavy shape, make a copy in front (Control + C > Control + F) and bring to front using the Shift + Control + ] keyboard shortcut. Make sure that this copy stays selected and simply hit the D button from your keyboard to replace the existing Appearance attributes with the default ones (white fill and 1px, black stroke). Move to the Appearance panel, remove the color from the stroke and then select the fill and replace the existing color with a simple black.
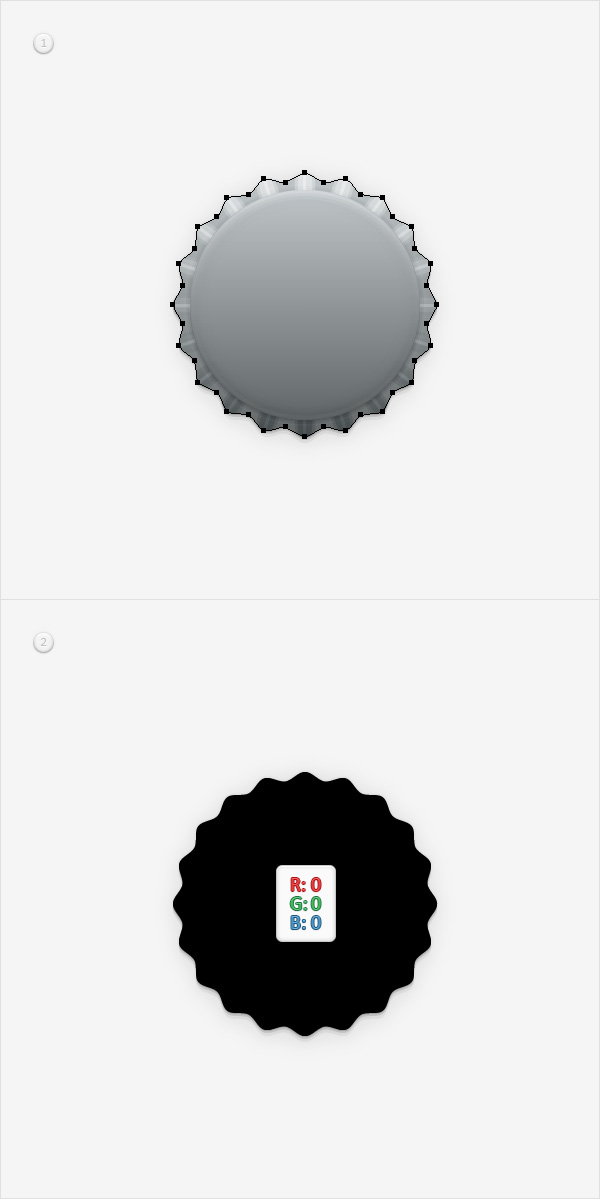
Step 32
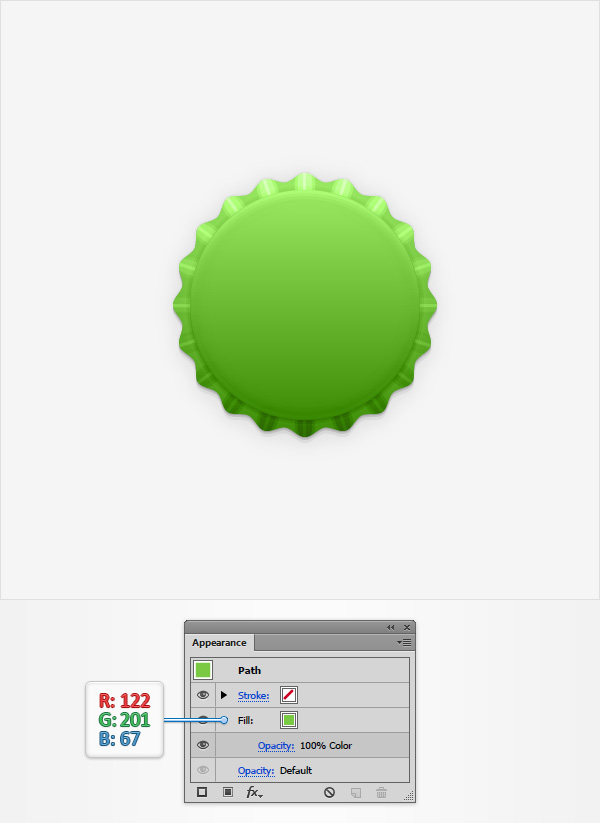
Make sure that your black, wavy shape is still selected and simply change its Blending Mode to Color Dodge. This is one simple technique that you can use to recolor your entire bottle cap vector.
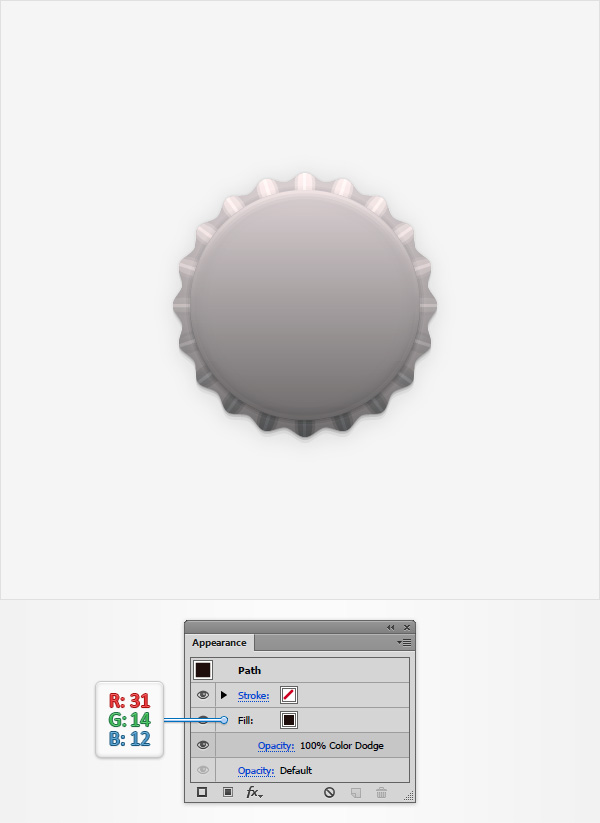
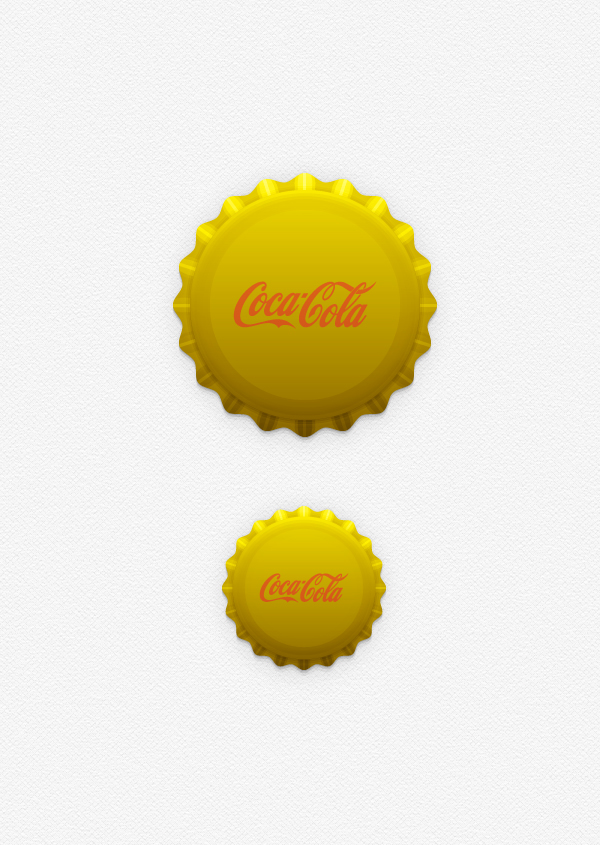
Feel free to try different colors for your bottle cap vector!
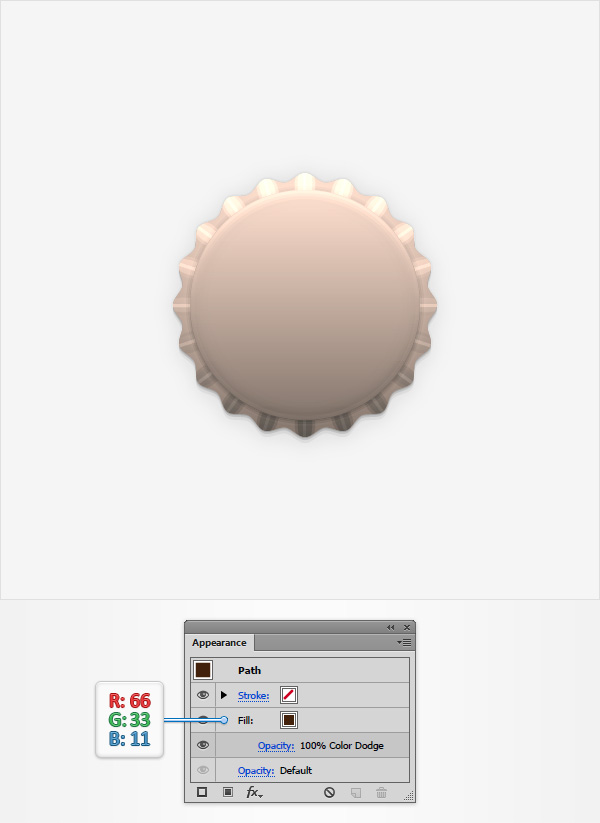
Step 34
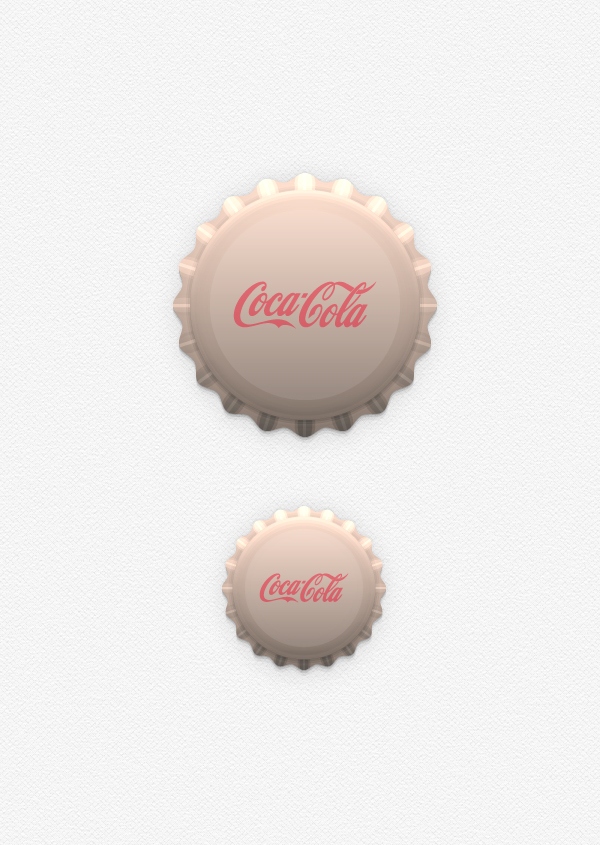
Or different colors with different blending modes.
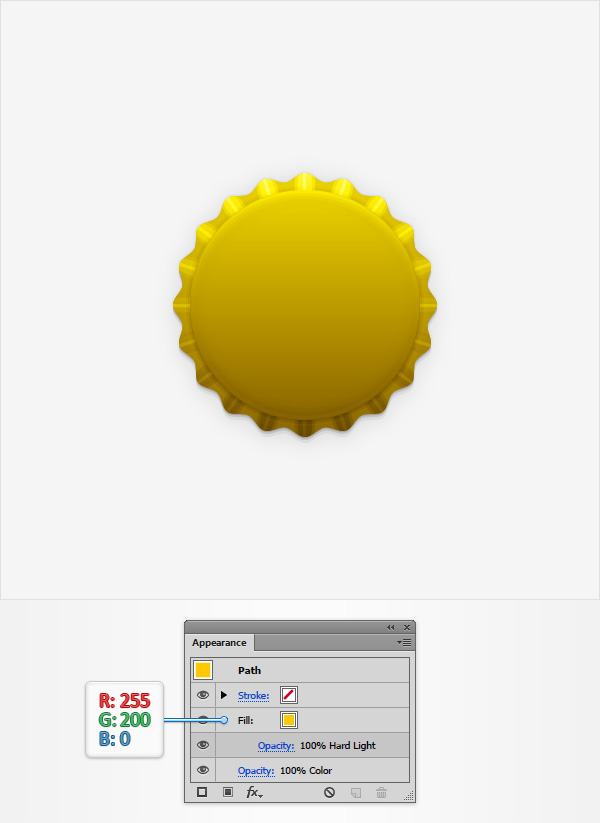
Step 34
Finally, you can add your label or brand logo on your bottle cap vector!

And We’re Done!
I hope you’ve enjoyed this bottle cap vector tutorial and can apply these techniques in your future projects.


Hi I´m stuck at step 17 I don´t what is the wavy shape could you tell me please.
Brilliant! I’ve been trying to think of a neat way of creating vector bottle caps for ages: you’ve beaten me to it! ;o)
Very nice result and thanks for the tutorial.
Nice tutorial.thanks for sharing.