

The Create Web 2.0 Stickers and Shiny Buttons tutorials have been very popular. With their popularity came many requests for reflections, another attribute synonymous with the Web 2.0 style. Creating these reflections is simple. With Vertical Flipping and Opacity Masks you can have a reflection in no time! Moreover, Opacity Masks are versatile, easy to edit, and not just for reflections.
Notes
This tutorial was created with Illustrator CS3. But these features should be available in all CS versions.
Keyboard shortcuts are displayed in orange. ⌘ is displayed for the Command key (mac), with the Ctrl key being the Windows equivalent (not displayed).
Opacity Masks
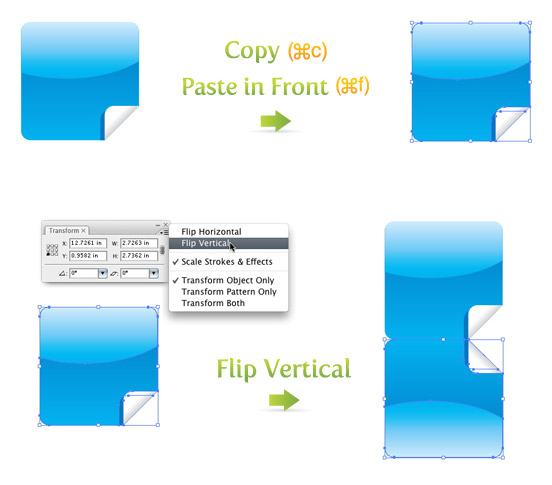
I’m going to use the sticker created from the previous tutorial Create Web 2.0 Stickers. Select all the artwork and Copy (⌘c) and Paste in Front (⌘f). With the copied artwork still selected, Group (⌘g) the objects (so it is easy to select the artwork) and select Flip Vertical from the pop-up menu of the Transform Panel.
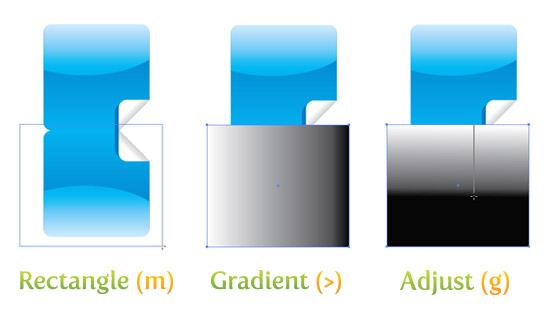
Now, cover the flipped sticker with a rectangle with the Rectangle Tool (m). Make the rectangle a Linear Gradient from the Gradient Panel and take off the stroke. As discussed in the previous post Quickly Change Fills and Strokes, another way to create a gradient is to press the > key when the artwork is selected, . Keep the gradient the default white and black swatches. With the Gradient Tool (g), select the top of the rectangle and drag half way down the rectangle.
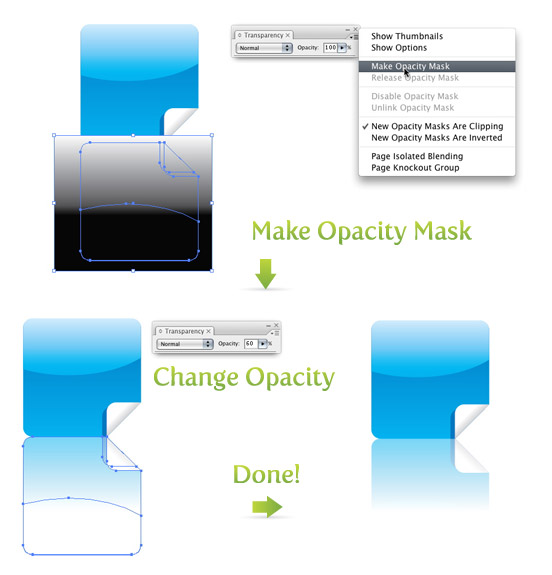
In an Opacity Mask, the white of the gradient will reveal artwork and the black will hide the artwork. This is a basic, but important, concept to understand when dealing with an Opacity Mask. Again, White will reveal, Black will hide, and any shades in-between will vary the opacity. Continuing, with the rectangle and the flipped artwork selected, select Make Opacity Mask from the pop-up menu of the Transparency Panel. Change the Opacity to 60% in the Transparency Panel and you are done!
Editing Opacity Mask
If you are not happy with the reflection you can always go back and edit the Opacity Mask. In the Transparency Panel select Show Thumbnails from the pop-up menu. You can also select Show Options from the pop-up menu, but I have never used these option. If someone has found a use for them, please let me know!
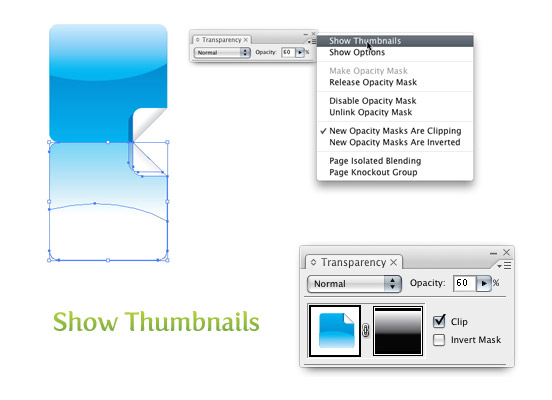
Now, there are two thumbnails. The first is the artwork and the second is the mask. With the artwork thumbnail selected, you can edit the artwork without affecting the gradient. Conversely, you can edit the gradient without affecting the artwork when the gradient thumbnail is selected. You can tell the current thumbnail selected by the thick black outline around the thumbnail. Moreover, the Layer Panel will change when the mask is selected.

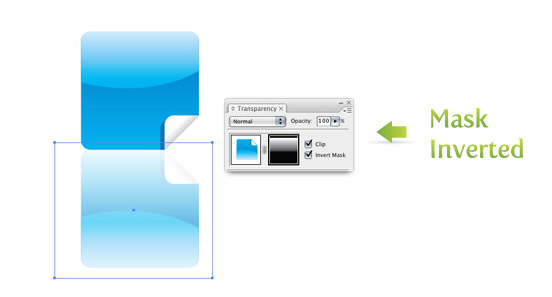
By default the mask is locked. You can press the link icon in the middle of the thumbnails to rearrange the artwork or mask. The Clip check box is also checked by default. Once this is unchecked, the mask will not clip the artwork. The other check box is the Invert Mask. Once the Invert Mask is checked, the gradient is reversed on the mask, reversing the hidden and visible parts of the artwork.
If you want to get rid of the Opacity Mask altogether, select Release Opacity Mask from the pop-up menu of the Transperacy Panel.
Experiment
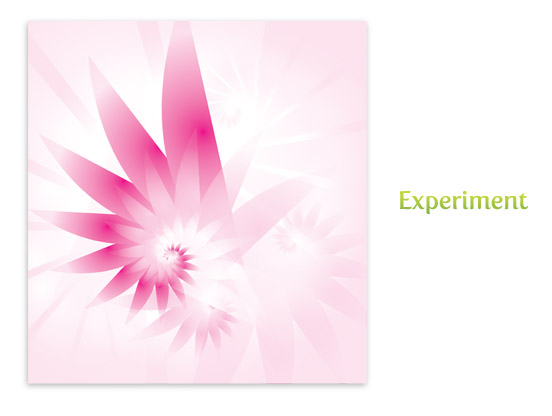
Reflections are just a taste of what Opacity Mask can offer. You need to experiment with multiple Opacity Masks, colors, or transparencies to get some different results. Below is an experiment I put together with the Opacity Masks and the Transform Tool.


Wonderfully useful. Thank you so much for your tutorials they are great. Please keep them coming and I will keep using them. As a self taught graphic artist there are just certain things that you cannot figure out on your own without some help.
Thank you. Really useful
very good
very nice… thanx a lot!!!
thanks my dear, nice , thanks , thanks
thank you Master!
thanks for tutorial
Great tutorial. What about creating reflections for odd shaped objects like a 3D square? Meaning an item with more then one side instead of a straight on, 2D view?
Thanks for this great tutorial. I will definitely be putting this one to good use!
Thank you very much!!
Great !!!
Just amazing !!!
Thanks again 🙂
Very helpful, thanks a gazillion!
Nice tutorial, but I have a question left related to reflections of text.
I need a reflection of the word “Publishing”. the problem comes with the final letter “g”. Since the bottom alignment of the letter g is different as the other letters. So after creating the reflection either way the 2 “g” clash or I have to pull my entire reflection down leaving a big gap between the letters and their reflection. How would you solve this problem?
I hope you can help me out!
thanks in advance
Expand the text, this will create a group of paths, and then you can apply a mask to each path individually
Thanks for this tutorial! I used your instructions to create most of the images on my website http://play4d.com. I used Adobe Illustrator CS3 on AI files that contained linked PSD files. I used gradient backgrounds to really make the reflections pop out.
Please check out my images and let me know what you think. Any suggestions on how to improve them?
Keep up the great work!
Rype,
I think you can help me, I’m trying to sort out photoshop since an short time. And when I try to draw an rectangle it has this black line as his contour. In illustrator you can shut this off easily, do you know how you can do the same thing in photoshop? thanks anyway!
dear vectips,
on the website of tutsplus.com you gave an tut about text effects, you give an tutorial about making text in an green leave content. You also draw an ladybug in this tutorial, however when i try to intersect the dots with the original ellipse i get the message that cs4 can’t intersect the dots with the original ellipse because they ain’t overlapping paths. How can i fix this?
This caught me off guard when I started using the new CS4. Try holding the Option/Alt key when Intersecting. This will make the Pathfinder not automatically expand when you Intersect. Let me know if that helps.
love the tut
i need some help
it worked at first bu t now i dosent any common mistakes that i should be avare of?
Great!!!! i’ve been looking for this for ages!!!!
Thank you verrrry much!!
Hi.I’m a student.Hey I loved the tutorials on ur website.Its gr8.Its very useful.Can u provide some more examples of creating reflections.
can you have one more tutorials about your bonus pic? how to transform this shape? how to add multiple opacity mask! ohh i get confused 🙁
I love VECTIPS!!! Thanks! I´ve been looking for this long time ago! Very useful and nice!
another great writing.
i just can’t wait to go home and play around with all this techniques.
(I’m reading this site at my workplace ;-))
Nice work man, this was very helpfull and without you’re help, I guess I would never even knew you could do this in AI.
Nice post !!!
Regards
Team
http://www.derivehost.com
Nice tutorial. I appreciate how simply you break down your tutorials. Even if I just have time for a quick read I can usually get enough of an understanding and a visual and store it in my brain, without having to do it manually along with you. Then I can get to it later. Thanks a lot!
Nice!! I’ve always this question, make a reflection in illustrator. Thanks a lot!!