 This blog post was previously published on our blog in 2009, and since it was so popular with our readers, we wanted to be sure the instructions were up-to-date. So we’ve updated this tutorial to be current with the most recent versions of Illustrator. Hope you enjoy revisiting this helpful tutorial in Illustrator CS6 & CC style. Want to see other articles revamped? Let us know by leaving a comment below.
Here are some popular sketch fonts available that are great for grungy and hand-drawn designs and illustrations. My problem is, I want to be able to use this sketchy style in any font. Turn’s out, it is actually really easy to do in Illustrator. Moreover, you can create a Graphic Style and easily apply the style to other editable fonts to create your very own custom sketch font!
Tutorial Details
- Program: Adobe Illustrator CS6 – CC
- Difficulty: Beginner
- Topics Covered: Appearance panel, Graphic Styles
- Estimated Completion Time: 10 minutes
Final Image
Below is an example of the sketch font we will be creating.
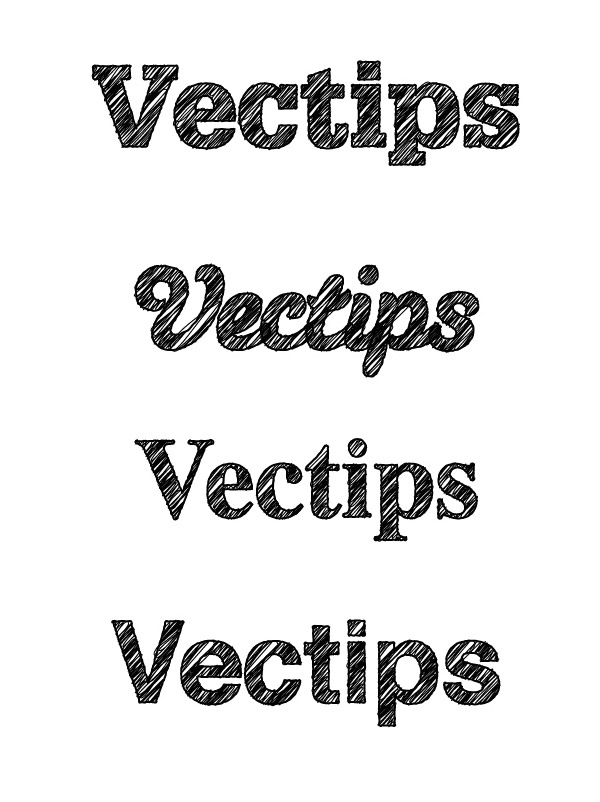
Step 1
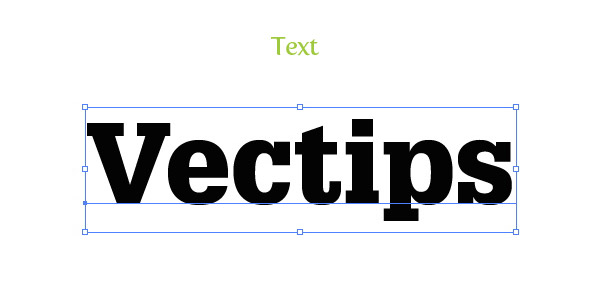
Create a new document and with the Text tool (T), type out some text with the font of your choosing. I am using Glypha Black as my font.
Step 2
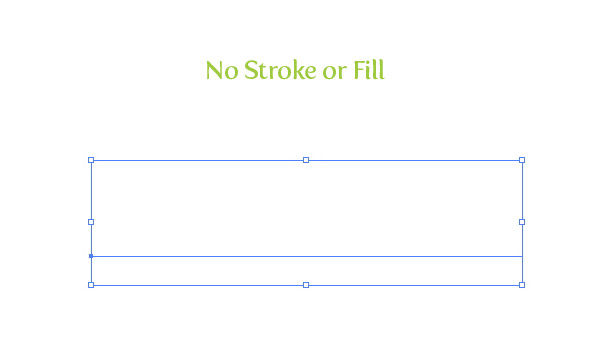
With the text selected, take off any stroke and fill. We are going to add a stroke and fill separate from each other in the Appearance panel in the next couple of steps.
Step 3
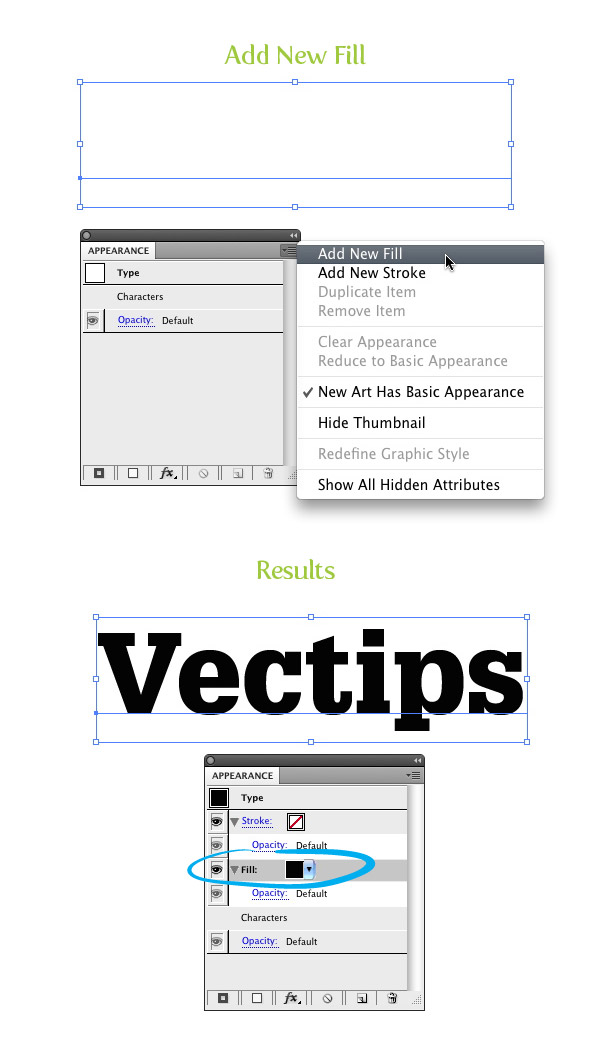
With the no fill and no stroke text selected, open the pop-up menu in the Appearance panel, and chose Add New Fill. Keep the default black color of the fill.
Step 4
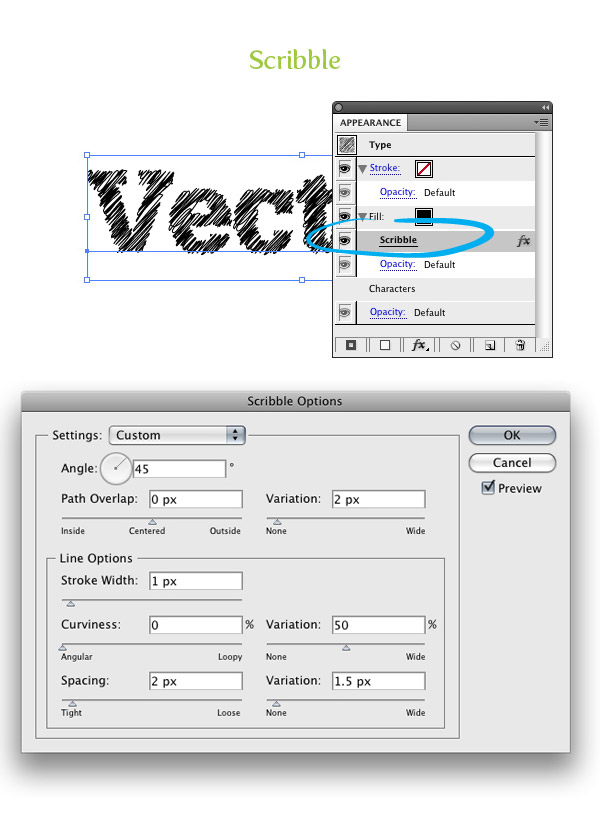
Select the new fill in the Appearance panel, and go Effect > Stylize > Scribble. With the Scribble Options dialog open, change the Angle to 45, the Path Overlap to 0 px, the Path Overlap Variation to 2 px, the Stroke Width to 1 px, the Curviness to 0, the Curviness Variation to 50, the Spacing to 2 px, and the Spacing Variation to 1.5 px.
Step 5
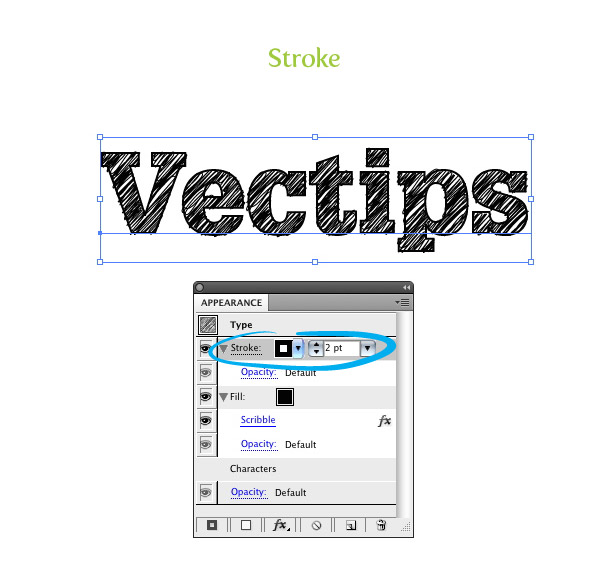
Select the Stroke option in the Appearance panel and give the text a 2 pt stroke.
Step 6
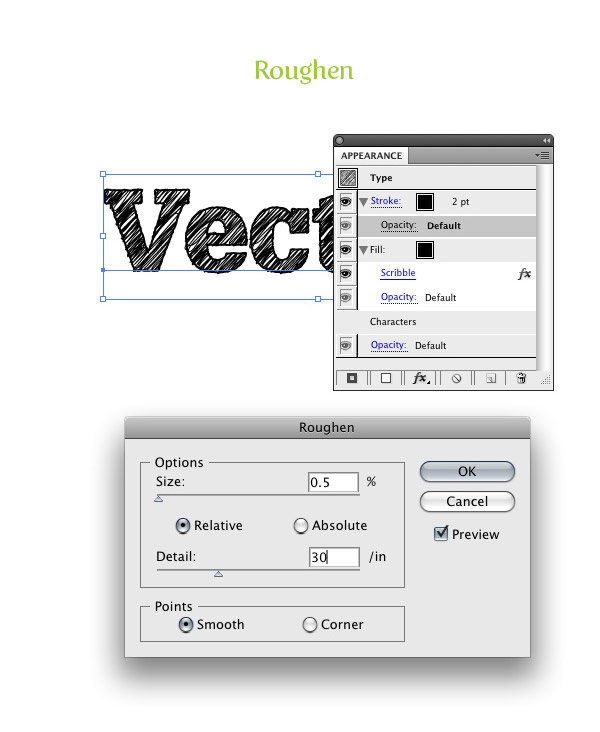
With the Stroke still selected in the Appearance panel, go Effect > Distort & Transform > Roughen. In the Roughen dialog, change the Size to .5, select the Relative radial button, change the Detail to 30, and select the Smooth radial button for Point. This will give the stroke a little distress.
Step 7
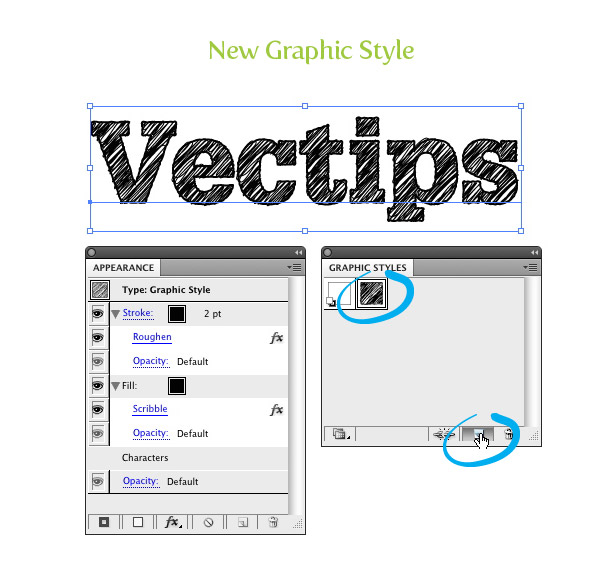
Now, we have a custom sketch font. Moreover, you can easily edit the font! To make this technique even more useful, let’s create a Graphic Style so we can quickly apply these effects to other fonts and text. First select your font and take a look at the Appearance panel. You can see all the effects in your type. Now, simply press the New Graphic Style Button in the Graphic Styles panel and name your new Graphic Style!
Step 8
Now type out some more text and change the font. With the text selected, press the thumbnail of your new sketchy Graphic Style and see all the wonderful sketchy results!
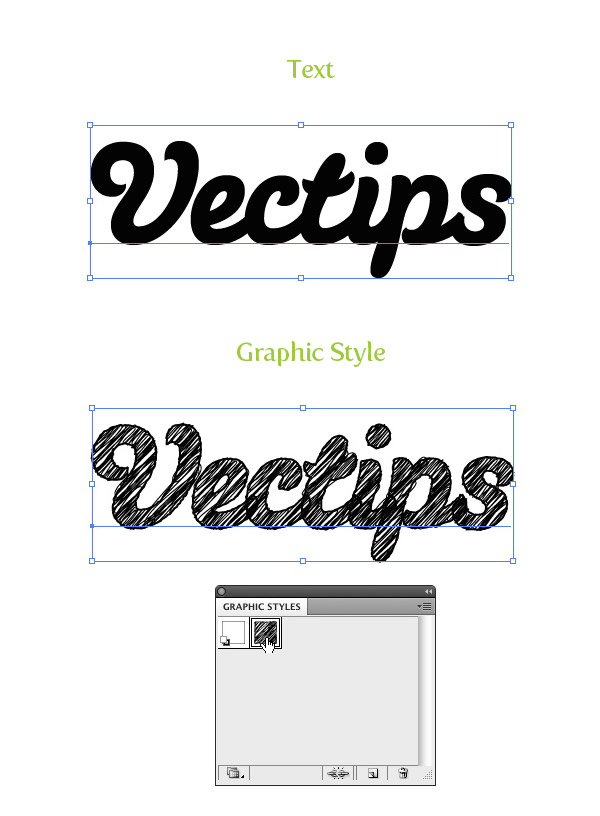
Experiment
You can apply the sketchy graphic style to other objects other than text. I also suggest playing around with the Scribble and Roughen effect settings. Post links to images in the comments with your results!


There as definately a lot to learn about this subject. I really like all of the points you made.
PRaaEL This is one awesome blog article.Much thanks again. Keep writing.
Great post, For a new graphic designer this post helps a lot such as me. I don’t know anything about photoshop tutorial. But now your blog help me a lot.
This is a cool vintage look which was surprisingly easy thanks to your great instructions, except for one thing- I am using illustrator cs4, and was unable to get the stroke to look like a solid line. It looks just like the rest of the scribble. The only way I could get a solid outline was in 2 pieces–duplicating the original text without a fill and adding a stroke and placing it over my scribble layer. I am not very ai adept-any thoughts on what i did wrong?
simple, but cool.
agreed. this was a simple, but nice tutorial. they should make more.
I just love your tips. Keep up the good work.
One question,
The Stroke option in the Appearance panel is defined by what?
Thank you very much. I use my custom font based in this article for my thumbnails of my youtube channel
https://www.youtube.com/user/gewregewre
You’re awesome whoever you are!! Thanks so much.
Thank you! This is awesome! Super helpful tutorial 😉
What size font are you using? I can’t get it to work. The lines come out huge.
I had just received a notice about a sale on a font that has a hand-drawn look to it. In the process of Googling to see if anyone had a comment about that font (named “Skitch”), I came across this GREAT tutorial of yours: “Turn Any Font Into a Sketch Font.”
I’ve just now finished duplicating your steps, using Ai CC v18.0.0.
This is WAY COOL.
On the LinkedIn group, “Adobe Illustrator,” I’m going to create as discussion with a link to your tutorial. I will name my discussion that same as your tutorial.
THANK YOU!!!
very cool. Thank you Bro!!!!!
Great tut !
Just add a “Reunion” pathfinder on the top, like this
https://dl.dropboxusercontent.com/u/68501296/sketch%20effect.png for a better visuel effect on script font 😉
(excuse my bad english and my french Illustrator…)
ThankU ThankU ThankU!!!
I love this!
Easy steps to follow too. Great tut!
Muito bom, obrigado por ter nos ensinado.
Parabéns.
Effect > Stylize > Scribble
I can’t find the scribble on stylize only Glowing Edges was on my CS6
Autumn, I double checked this and the Scribble feature should appear by default in CS6. Since you’re not seeing this by default on your version of Illustrator, you may try resetting your preferences by going to Window>Workspace>Reset Essentials. If the problems persist, you may try reaching out to Adobe.
awesome…!
Thanks for this great and easy tutorial! I’m just starting to learn some basic things with Illustrator.
can someone post a video with this tutorial?
Thanks bro,perfect executed!!!
Thank you so much! I just used your tutorial in my latest work. I was planning to do such an effect by hand, you saved me a lot of time 🙂
This was perfect for a typography poster that I am doing for a school project. By following the tutorial, mine also came out perfect. Don’t need to say just how grateful I am, thanks!
Thanks for the tutorial. I am creating a series of headlines using this and wonder if there is a way to change the color once a graph is made or if I will need to apply all the effects each time I want a new color. Thanks.
Thank you so much. I am new in Illustrator and this really helped me a lot. Easy steps and great results!! Am using it rt now. Thanks again 🙂
OMG..thanks a lot for the tutorial
Brilliant!!! So easy but so effective. Thanks
Thanks for a great tutorial! Just wondering if there is a way to then change the color of the scribble text? Thanks in advance!
Great tutorial! I love how easy it is to edit later, I probably would have used a clipping mask, but then I would have been kind of screwed on fixing it up after-the-fact. Thanks! Keep them coming!
Thank you !
Thank you! These tutorials are super helpful!
I like it with the stroke not roughened. It reminds me of a coloring book. Especially if you change the fill color.
Keep up the awesome work!
Grrrrreat!
Thanks, really good tutorial! Learnt a lot!
Thank a lot! I used this tutorial to design the logo of my new website.
Great tut thank you!
i’m having a few problems with it though.. i have to make my font 200 or so to get the sketchy-ness to look any good and even then it doesn’t look as smooth as yours?? I’ve played around with the settings in the scribble options dialogue box but it doesn’t seem to make it any better. my settings are in mm and i wondered if that was the problem? rather than px.. Any tips would be fantastic. Cheers
Thank you for this comment, I was starting to feel crazy! Increased my font to 200 and started to see the effect.
Hi, I had similar problem. The effect only seemed to add more lines around the text itself, and even enlarging the font didn’t help.
What worked for me was to retype the text in a new text box and try again, and it worked.
BTW awesome tut! (once you get it to work)
Thanks for the tutorial. awesome
thank you ! This helped me in my work
I love it again 🙂
simple, fast = awesome. Tks a lot!
thank you for nice tips!
Thank for this tutorial and for sharing it!
Love It!
When I went to “Effect > Stylize,” there was no “Scribble” option. What did I do wrong?
What version of Illustrator are you running?
What a great tutorial! Thanks so much! I see a whole new set of web buttons for my blog on the horizon.
amazing!!!!! can’t believe I had been suffering trying to get this effect for so long LOL your tut has made my day, thank you! 🙂
This is really awesome!!! It helped me ALOT…
You saved me all time of searching for a scribbled font type on line… Thanx sooooo much…
I’m in love with Illustrator, it a really Great program!
Thx u soooo much for wonderful tips….
I found this tutorial incredibly helpful in doing exactly what I was looking to do, create a sketchy look to a font. However, I want to take it a step further from Illustrator. I want to create a font from the effect. I have outlined the font in Illustrator with the effect on it so each letter is individual (with scribble effect still on it). I have then tried to copy and paste an individual letter into Fontographer without success (it comes through as a solid black version of the font). I have also tried and copy and paste it just into another Illustrator file and it goes all white, losing the effect as well. Is there any way I can take this style as individual letters from Illustrator into Fontographer to create a version of our house font, retaining the scribble effect which is so perfect in Illustrator from using this technique?
I love this tutorial!! but my results it’s not as yours why?
i have illustrator CS5, this is my result,
http://img560.imageshack.us/i/schermata20110113a17242.png/
but i want yours 🙁 how i can? what’s i wrong?
super!! love this so much..thanks a lot 🙂
Nice Tut, Thanks 🙂
Great tutorial – I have used it on both of my sites!
Super duper tutorial. Awesome. Thanks a ton.
can anybody help me?? scribble option does not exist in my illustrator… there just glowing edges style effect. i’ve use illustrator cs5.. how to make that option appears? i’ve try to clear uninstall and reinstall.. but still not work..
thx..
Is it just grayed out or not under Effects > Stylize > Scribble at all?
Hi, i have the same problem with illustrator cs5. The scribble effect isn’t there. It’s not grayed out. It’s just not there. Any suggestion?
I did the same thing on first glance. There are two Scribble options. You are looking at the one under Photoshop effects. Look in the section above that under Illustrator effects.
Hah. Yes, thank you so much. I definitely did not see that.
Awesome tip — you saved my morning!
very informative
Great Champ!!!
Thx a lot! You make my day! ^_^
You have some really great tutorials! Thanks for sharing them.
Awesome, thanks!
Thanks for a great tutorial!
cool! the style is nice.
WOW! And here’s me thinking I would never EVER understand illustrator and first time I get my perfect scribble text. Not just that, but I was even able to succesfully play around with the colours and scribble effect attributes to get the perfect scrawl. THANK YOU SO MUCH. xxx
Love this!
So simple, so useful. One tutorial as I like it.
super easy and looks really cool!! thank you for this…!!
what ya mind super
okaya
Wow, this was JUST what I needed! Thanx!
what if i wanted to make similar effects on vectors other than text?
i tried this method on vectors but got short on the part where you go to apply the scribble effect in stylize since the option doesnt exist? is it only for text?
thanks
You should have no problem applying to Graphic Style and techniques to other vector objects. When you are applying the Scribble effect, is it grayed out?
Nice tutorial bro great stuff
wau, interesting and easy step for me. I had combine any color for my font. thanks for your tips.
wao .. look (@-@) I love this !!
that`s what i`m talking about!
Great article, thx 🙂
Also some nice free fonts http://www.fonts2u.com
Awesome!!! Just like my friend design on inijie.com
Thanks for sharing, I will practice it now.
Wow, it’s actually a lot easier than I thought. Thanks for the great tutorial 🙂
what font is the second one try it on a different font???
It is a font called Susa.
cheers for that, but do you know where i can download it for free?
Just be sure to check the license on the typeface you’re going to use for this. You don’t want to end up doing this for a client, only to find yourself being sued by the type designer or foundry. Look specifically for lines that mention modifications to the original design. Some do, but some don’t. When in doubt, ask before you do anything other than just playing.
Really good point!
Hi,
Your teaching style is too good and information about photoshop is very useful for visitor
Thanks a lot, it’s wonderful tutorial !!!
Very useful! Thank you.
Thank you, this tutorial helped me out with my homework for a digital arts class I am taking at my local community college.
Awesome, cheers
Is anyone else struggling to roughen the stroke from the Appearance panel?
Is it just not working? What version of Illustrator are you on?
Creat tutorial. Really easy but so useful…
Hi Rype,
I am using Illustrator CS3 and i can not find Effect > Stylize > Scribble. Can you help me out. I have been looking for this technique for a while now.
Not sure what could be the problem, the Scribble Effect Should be under The Menu Bar > Effect > Stylize > Scribble for CS3 just like CS4. Does that help?
I have the same problem like Samson, My illustrator don’t have this effect too?
There are two stylize menus, one under illistrator and one on photoshop, make sure you’re using the top one.
haha wow, I feel stupid, thanks for the help
sweeeeeet!
Nice tutorial. This will be very handy for my upcoming site logo. Thanks Alot!
Dude, your tutorials are so great. This one come really handy with a new project I am working on, tyvm.
I put your tutorial on one screen and illustrator on the other screen and followed step-by-step and got the results, wow this is amazing, especially that we can reuse this effect with out all the work. well done.
Very nice! Thanks!
Awesome, always thought this was a typeface!
Superb! Very simple to apply and an Exceptional results!
Awesome tutorial!!!!
Thanks!
Wow! This is a great tutorial and money saver too.
Another nice tutorial, man I’m learning a lot from you!, thanks I’m just starting using Illustrator I have more experience with Photoshop.
Thank!.
Adorei!!!
Vlw…
Ok now, that was way easier than I thought that text effect would be. remarkable.
That is called a heavenly stuff!
Thank you a ton!
Thanks for this! I have used these tips to crate the title for my blog 🙂
aha..that’s easy..thanks for the guide..it’s really help me a lot.:P
Thx man 😉
What a great tip!! I can’t thank you enough for this! Just what I needed (I;m creating a T-shirt design and this is just perfect for what I had in mind).
Keep posting!!!
Great! thanks for your support!
Awesome! Thank you
Thanks for the tutorial 😀
your effect looks excellent in Japanese too.
thank you.
Nice tutorial.
WOW, that is so cool,thanks alot
this is awesome! thanks!
Thanks for your nice tutorial.
A real handy effect! Thanks!
Very Very useful and cool
Great Tutorial. Thanks a lot..
this is awesome !! fonts looks so much better .. thank you very much !
Thanks for sharing .That was quite useful and step by step tutorial.
Hope to have such more
-wow…love this, thank you!
Thank you a lot! I can’t believe – it’s so simple! :o)
Nice work as usual Rype. I definitely need to remember this one for those sketchy font moods. More unique and control this way.
Super useful tip!
Hope you keep up with Vectips dude, it really is one of the best illustration resources on the web!
Thanks allot, usefull and ez to understand as usual. Thnx m8
Your tutorials are always awesome!
Solid! Nice effect easy to replicate. Thanks!
That is awesome! Very useful to know how to make swatches of fills
Great TUT, Thanx a mil
I love this effect…thanks.
Here is my result http://twitpic.com/777vd
Thanks so much. Just played around a bit with it…
This is great …
I’ve used it already.
http://images-0.redbubble.net/img/clothing/bodycolor:grassgreen/cropped/size:large/style:mens/view:preview/3242358-1-scribble.jpg
Oops. Try here. http://www.redbubble.com/people/cathiet/t-shirts/3242358-1-scribble
That’s great thanks.
very nice and easy tutorial, thanks!!!
Thanks
Where can I find the appearance-button?
You can get to the Appearance panel by going Window > Appearance.
Holy Moly! Thats GREAT!
Thanks a lot, buddy!
How cool is that? This is great.
Excellent tutorial. Sure I’ll find a use for this.
Thanks for sharing 😀
Thanks for the tuts man!
Brilliant! And it doesn’t have that ‘vector feel’. I really looks believable.
Now I just have to find a project to apply this to…
Nice to see an experiment using line and fill layers. Great work.
The tutorial is sheer elegance, for this trendy visual approach. Not that I may use it too much, but thanks for this eye-treat!
WOW, great little tutorial so useful…Thanks.
Wow! That is just the best tip ever! I’ve been wondering how to do this for ages and can’t believe it’s so easy! Thank you a million scribbly times!!!
Awesome!
Nice but i already knew this.
why comment?
Basic and helpful guidelines 🙂
So simple and such a grate result! I love it!..the newsletter came in at the right time, Im using it already..thxs
What’s the cursive font you are using in the example?
It is called Susa
Thanks for filling (or should I say scribbling?) me in on the cool font. Great technique article!
Any free version of the ‘susa’ font ?
Not that I know of.
I cannot thank you enough. I’ve been searching for so long on how to do this. And it’s so simple even a novice like me could do it. thank you for your great site! 🙂
Like it. Very simple.
great tip! thanks!!!
Now that’s an awesome tutorial. Thank you.
How cool is this? I never would have imaged that creating a sketch font could be so easy.