

In this tutorial we’ll be creating a simple stylized Christmas tree, using the basic geometric shapes, dashed strokes and various tools and function of Adobe Illustrator. By the end of this tutorial we’ll turn our illustration into a festive Christmas postcard. Let’s start!
Tutorial Details: Stylized Christmas Tree
- Program: Adobe Illustrator CS6 – CC 2015
- Difficulty: Intermediate
- Topics Covered: Basic Shapes, Curvature Tool, Stroke panel
- Estimated Completion Time: 20 Minutes
Final Image: Stylized Christmas Tree

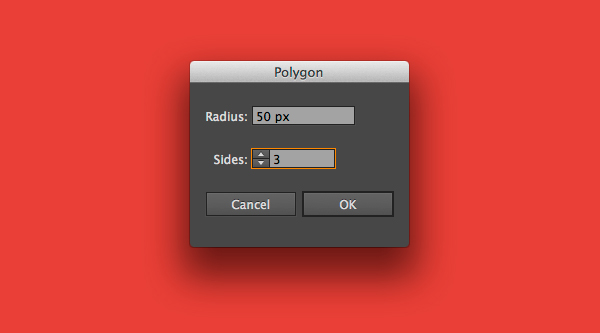
Step 1
Let’s start making our Christmas tree from its top. Take the Polygon Tool and single-click anywhere on the Artboard to open the Options window. Set the Sides value to 3 to make a triangle.
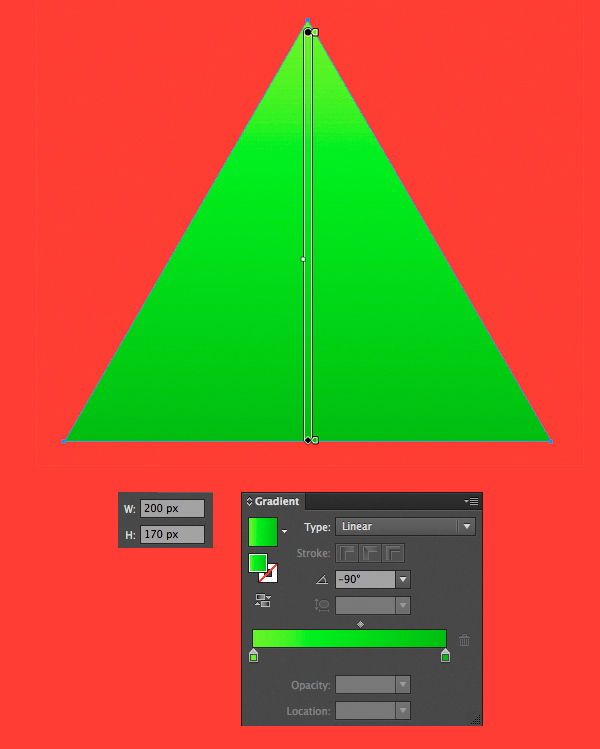
Step 2
Make a 200×170 px shape (you can adjust the size either in the control panel on top or in the Transform panel (Window > Transform)).
Fill the triangle with a bright linear gradient from light-green to darker green and use the Gradient Tool (G) to place it vertically while holding the Shift key. Otherwise, just set the Angle value to -90 degrees in the Gradient panel.
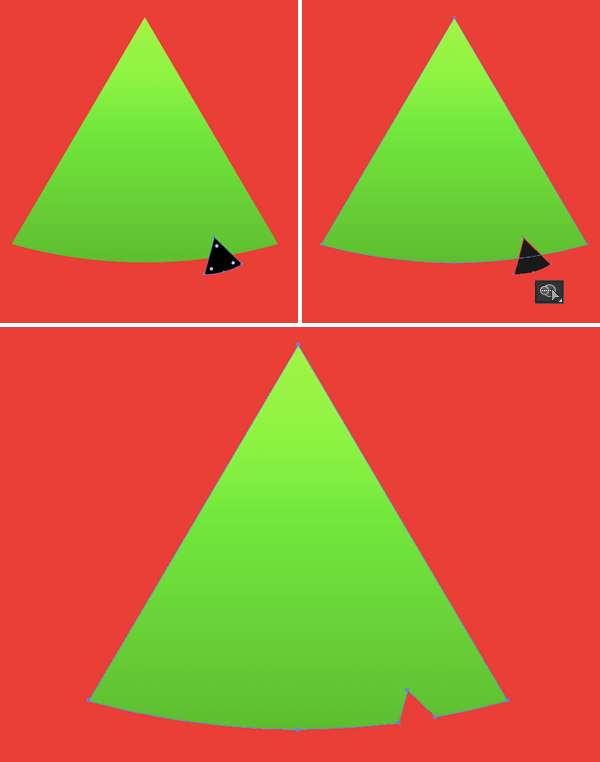
Step 3
Take the Curvature Tool (Shift-‘) and pull the bottom side of the triangle down, making it slightly arched.

Step 4
Copy (Control-C) the triangle and Paste (Control-V) it. Make the copy much smaller and place it in the bottom of the shape, as shown in the image below.
Take the Shape Builder Tool (Shift-M), select both shapes, hold down Alt and click both pieces of the black shape. This way we cut the small triangle out, making a gap.
Step 5
Use the Curvature Tool (Shift-‘) again to slightly bend the sides of the shape.

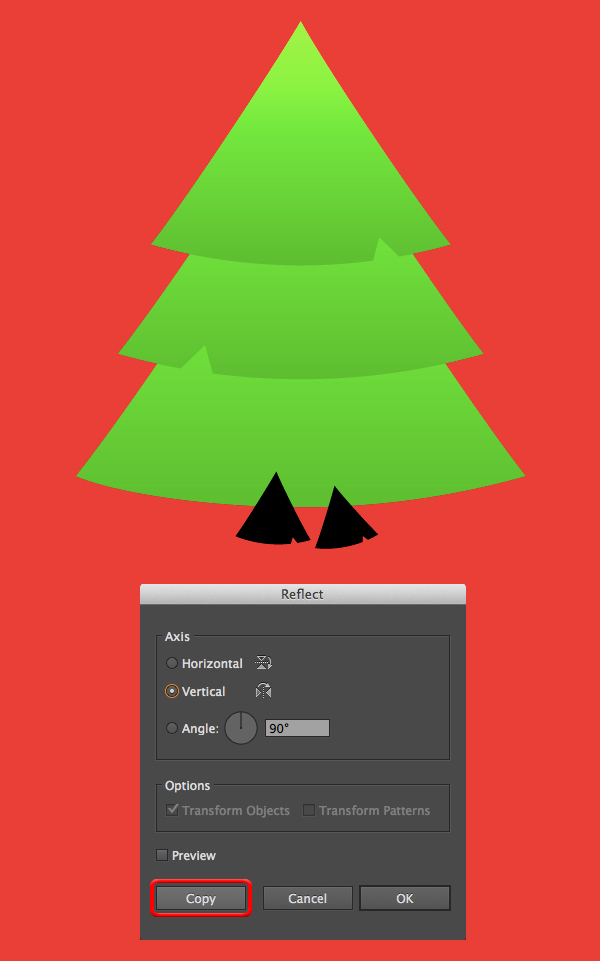
Step 6
Now select the created green shape and double-click the Reflect Tool (O). Select the Vertical Axis and click Copy to make a mirrored copy of the shape.
Send the copy to Back (Shift-Control-[), beneath the top triangle and move it down.
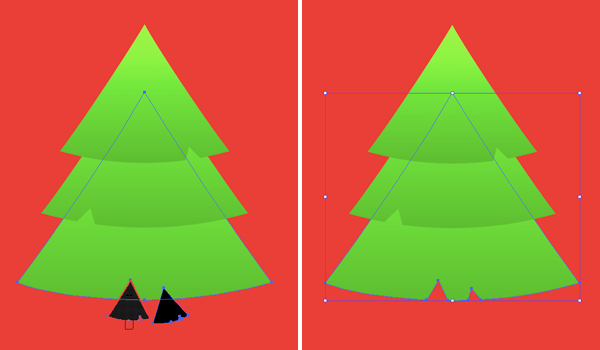
Create another triangle and Send to Back, making the bottom of the fir tree.
And let’s add a couple of gaps to the bottom shape, using the same technique as in the Step 4. Duplicate (Control-C > Control-V) the triangle twice and make the copies much smaller.
Step 7
Select all three shapes of the bottom part and use the Shape Builder Tool (Shift-M) while holding Alt to cut the tiny pieces out.
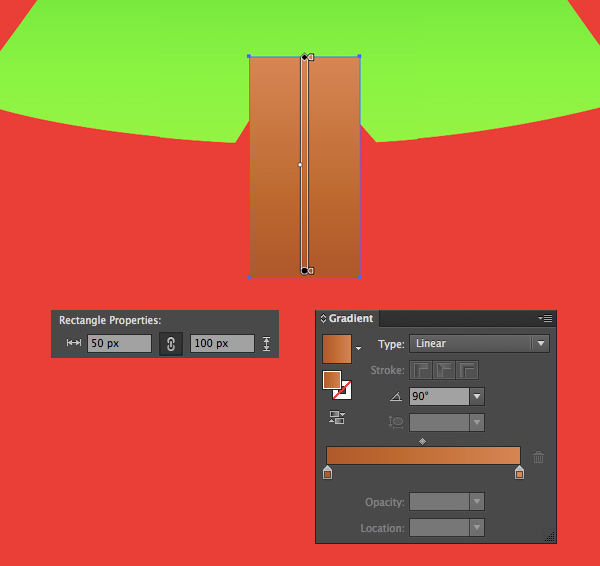
Step 8
Now we’ll shape the tree-trunk. Take the Rectangle Tool (M) and make a 50×100 px shape. Fill it with vertical linear gradient from light-brown on top to darker brown in the bottom.
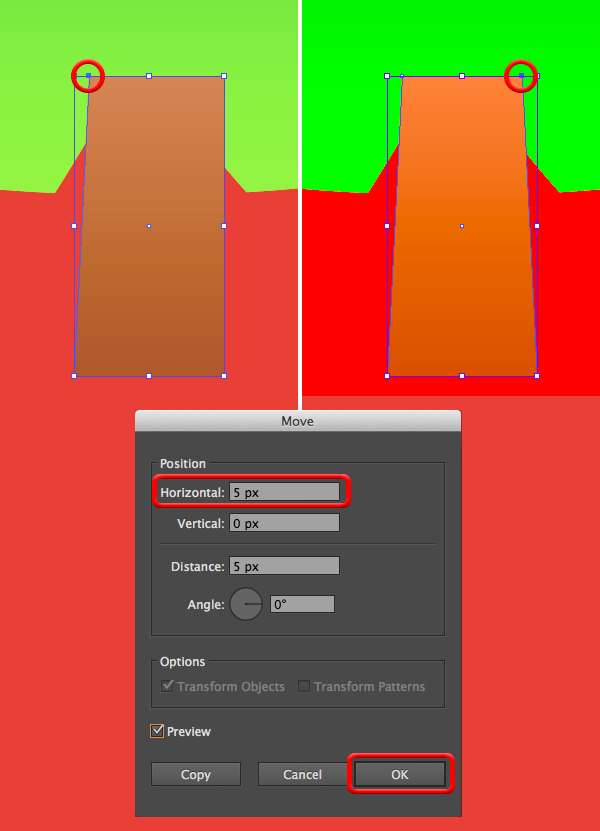
Step 9
Now we’ll take the Direct Selection Tool (A) and select the top left anchor point of the shape. Hit Enter to open the Move Options window and from here let’s set the Horizontal value to 5 px and Vertical value to 0 px. Click OK thus moving the point 5 px to the right.
Repeat the same for the opposite top anchor point, but this time set the Horizontal value to -5 px, thus moving the point to the left.
Step 10
Send the trunk to Back (Shift-Control-[), beneath the green shape.

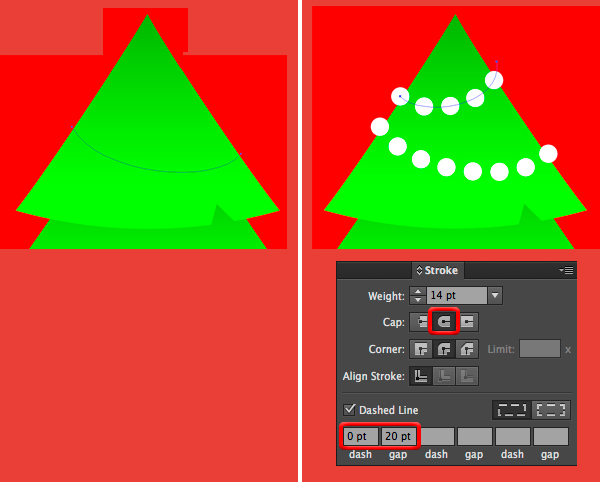
Step 11
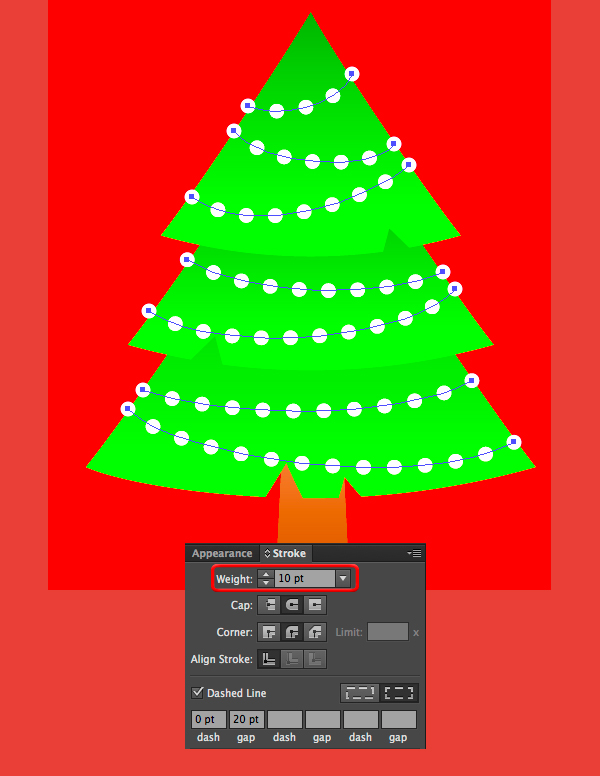
Now let’s add a simple garland to the fir tree. Use either the Arc Tool or the Pencil Tool (N) to make an arched line across the top of the tree. Apply white color to the Stroke and head to the Stroke panel.
Set the Weight to 14 pt and switch Cap to Round Cap. Tick the Dashed Line checkbox, set the dash to 0 pt and gap to 20 pt.
Step 12
Wrap more garlands around the tree and adjust the size of the bulbs by changing the Weight value in the Stroke panel.
Step 13
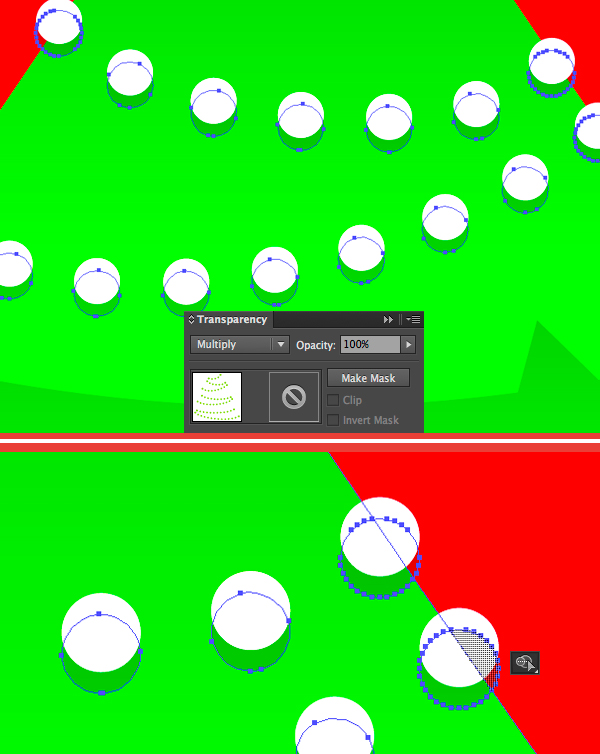
Let’s select all the created dashed strokes and Object > Expand Appearance and then Object > Expand to turn the strokes into Curves. Now we have each garland with a set of bulbs in a separate group.
Keeping the groups selected, Copy (Control-C) the garlands and Paste in Back (Control-B). Move the bottom copy down a bit and fill it with solid green color. Switch the Blending Mode to Multiply in the Transparency panel, thus creating gentle shadows from the bulbs.
Use the Shape Builder Tool (Shift-M) while holding Alt to delete the unneeded pieces outside the edges of the tree.
Step 14
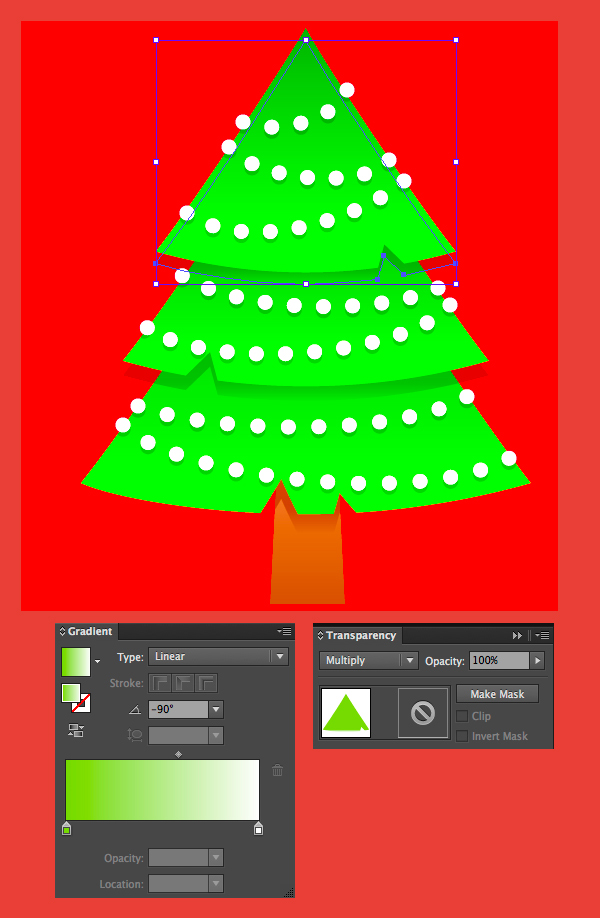
Use the same method to create shadows between the layers of the fir tree, but this time fill the shapes with vertical linear gradient from green to white. White color becomes transparent in the Multiply Blending Mode, thus adding depth to our illustration.
Step 15
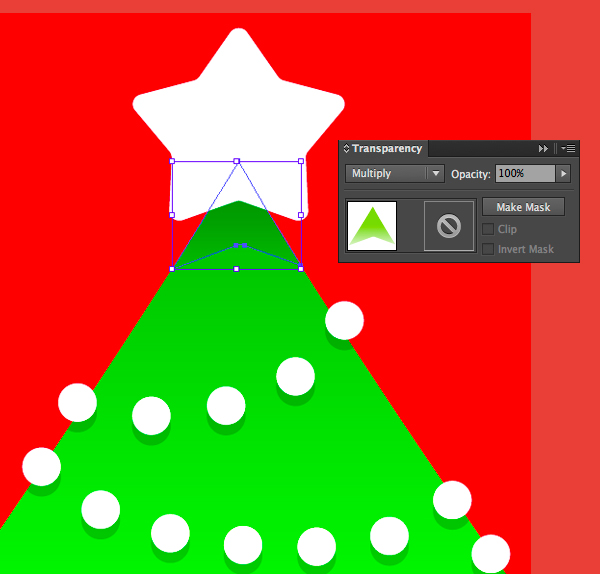
Now let’s decorate the top of the Christmas tree with a star. Use the Star Tool to make a 5-pointed shape. Select the created star with the Direct Selection Tool (A) and pull the circle marker of the Live Corners to make the points of the star slightly rounded.

Step 16
Add a gentle shadow from the star the same way as we did previously by making a copy and using the Shape Builder Tool (Shift-M) to delete the unwanted parts.
Step 17
Now as our Christmas tree is finished, we can add some text, turning our illustration into a Christmas card. I’m using the Henny Penny free font to give our postcard a playful look.

Ho-Ho-Ho! Merry Christmas!
Great job, everyone! Our stylized Christmas tree is ready!
I hope you’ve enjoyed following this tutorial and learned some useful tips and tricks that will help you to create more Christmas and New Year congratulation cards for your friends and family.
Have a very Merry Christmas and a Happy New Year!


I think this is a real great article. Cool.