

Sometimes you need to convert an Illustrator file to grayscale. This could be for a print ad, logo option, or even just to try something different. In Illustrator CS3 you have several options to easily change and edit any artwork to grayscale. There are a couple of simple options and a couple of options that give you more control of how the artwork will look.
Notes
This tutorial was created with Illustrator CS3.
Original
Below is the original artwork with the four grayscale Illustrator options for comparison.

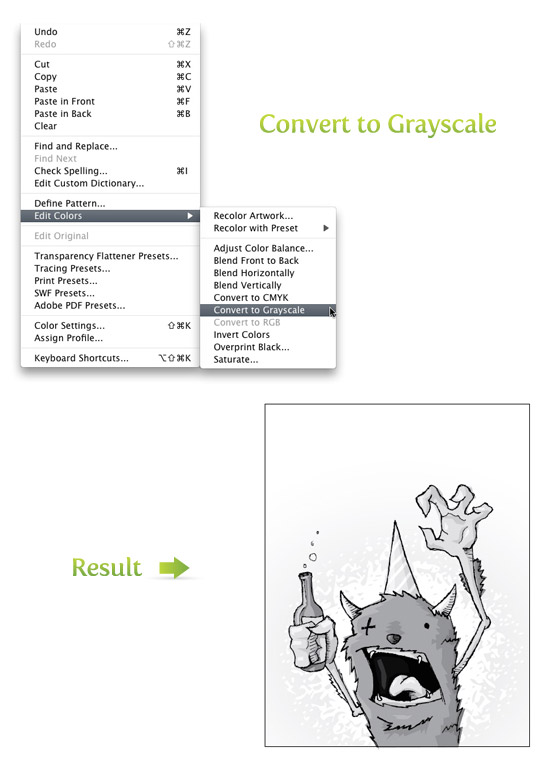
Convert to Grayscale Illustrator
This is probably the quickest but least versatile option. Select your artwork and go Edit > Edit Colors > Convert to Grayscale.
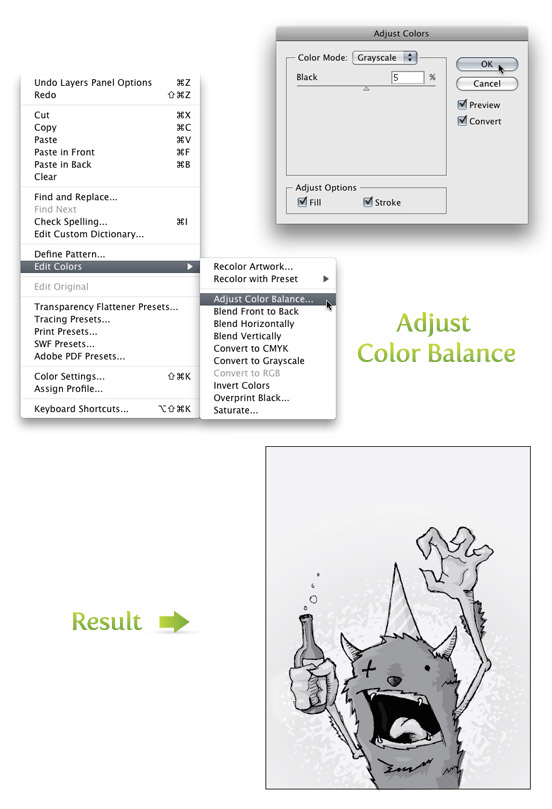
Adjust Color Balance
With this option, you have more control over the Black. Select your artwork and go Edit >Edit Colors > Adjust Color Balance. Select Grayscale from the Color Mode drop-down menu and check the Preview and Convert boxes. Now you can adjust the Black percentage with the slider.
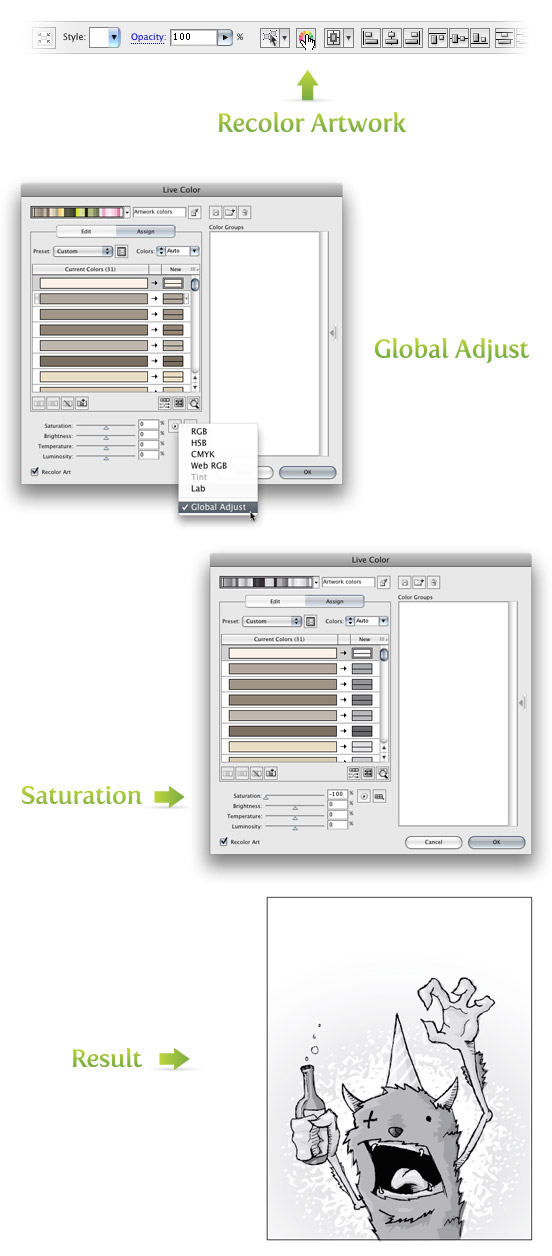
Desaturate
If you still want more control over the grayscale Illustrator vector, try the Adjust Color Balance option. Select your artwork and go Edit > Edit Colors > Recolor Artwork or click to color wheel icon in the control panel. Either way, it will bring up the Live Color dialog. At the very bottom of the dialog are sliders. To the right of the sliders are two buttons. Press the button that looks like a play button. Choose Global Adjust from the drop-down list and move the Saturation slider all the way to the left (-100). Play around with the Brightness, Temperature, and Luminosity sliders to get different results.
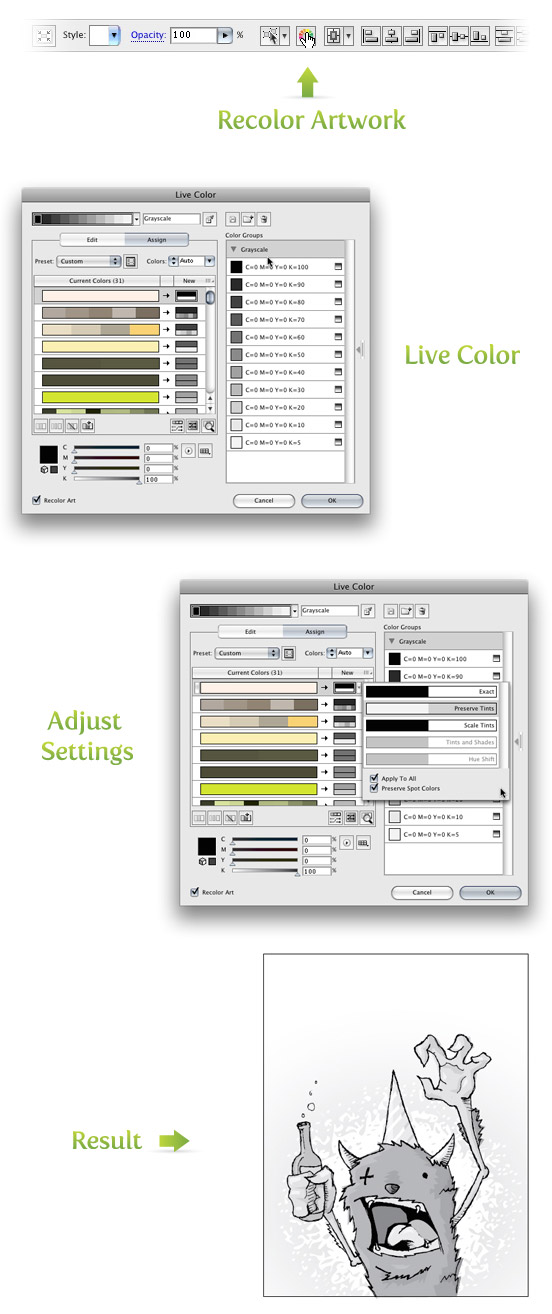
Recolor Artwork
If none of the previous options had enough control, you can try the Recolor Artwork option. First, you will need to load the default Print swatches if they are not open. Open the Swatch Libraries Menu on the bottom left of the Swatch panel and go Default Swatches > Print. Once these swatches are open, drag the folder of grayscale swatches into your Swatch panel. Again, you only need to do this if you don’t have the default print swatches open.
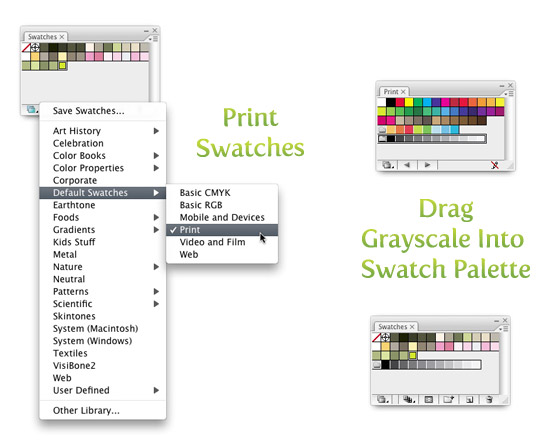
Now you can select the artwork and go Edit > Edit Colors > Recolor Artwork or click the color wheel icon in the control panel. Once in the Live Color dialog, select the Grayscale set of swatches in the right Color Group column. Now the artwork is grayscale, but the Live Color dialog lets you edit the black swatches assigned to the original colors.
Click the play button next to the sliders at the bottom of the Live Color dialog and select CYMK. Select the original color that you wish to edit from the Current Colors column and use the K (black) slider at the bottom to edit the black percentage . If you hover over the grayscale swatches in the New column next to the Current Colors on the left, you will see an arrow for a drop-down menu. I like Preserve Tints, but try the others for different results.
Ultimately, I liked the Adjust Color Balance option results, but I have used every option for different artwork. Which way works best for you? Hope this grayscale Illustrator tutorial has been helpful. Try it out!


I am extremely inspired along with your writing abilities and also with the structure on your weblog. Is that this a paid topic or did you modify it yourself? Anyway keep up the excellent high quality writing, it’s uncommon to peer a great weblog like this one today.
Thanks for sharing your very informative post.
Please keep up.
How excellent post you have published with us . Great thanks for this informative post .
Thanks for sharing this helpful content. These four ways very nice explain how to do convert to grayscale. Thanks for the tips. keep up the good work.
Thank you so much. This was great help
Your 4 ways to convert to grayscale was so helpful for me. I am really so happy that I found your blog. Thanks for sharing
hi,
I wanted to convert gray scale to black and white. Any shade of black to be converted to 100% black and white should remain white.
Thanks
Thanks for sharing this good tutorial with us. i like this tutorial.
buddy, this site rocks and I adore this character… keep it up.
Informative blog post,I enjoyed this blog post. It was funny. Keep on posting!
This is an excellent guide, thank you! Helped a lot for making a B&W version of a logo I’m making. Easy to follow and awesome 🙂
thank you dude, btw, nice pic up there
it will help me a lot .thanks for sharing. i enjoyed it .
It is extremely helpful for me. Thank you for taking the time to discuss this.
great
nice tutor & method of teach
This is awesome! Easy tutorial 🙂 saved me time in looking for it by myself
thank you so much for showing how it’s made. really fantastic
Thanks mate… big help
Very useful post… I’ve referred to others query.
thank you..!!!! 🙂
I love your post. I always keep on coming back for more.
Thank you!!
Thank you, saved me loads of time 🙂
I have placed a pic into AI, but the color edit choices are greyed out and and I cannot choose covert to grey scale. Can you help me figure out what I’m doing wrong?
Thanks, M
I’ve got the same problem.
Thanks for the tips! Makes my life so much easier when editing logos!
Really appreciate it!
Thanks forr finally writing about > Four Ways to
Convert to Grayscale | Vectips < Liked it!
Thanks, the quickest solution is very helpful and fast.
Chen
Your tutorial is excellent. 😀
Your tutorial is excellent. I liked the party animal image and all the screen shots to illustrate your step by step method. This saved me a lot of time! Very Grateful!
well done and very helpful, thank you!!! and i love your drunk party monster:)
thank you all.
thank you so much. This was great help 🙂
Excellent tips!
Some of those methods do not work with bitmaps, though (“Recolor Artwork” option is not available) and in my Illustrator work vectors and bitmaps are always used together. So here is a simple 5th method inspired by this post and comments…
* Draw a rectangle over your bitmap image
* Fill it with 50% gray
* With rectangle selected, use Transparency panel to choose the “Color” blending method.
Group them together for convenience.
Make the rectangle another color for another way of tinting…or only tinting a part of the photo.
Lifesaver!
thanx a lot,man..it helps me big time…
Thanks so much.
Almost 5 years later and this tip is still on the money. Thanks!
realy helpfull! thanks for your effort 🙂
thanks
thanks so much!!!!
There is also a fifth way you can use that is not distructive the entire artwork:
Use the transparent palet and select the color mode “Luminosity”
I found it super interesting and useful when you deal with “disabled black and white states” for buttons or other things like this.
When i try to convery to grayscale everything is grayed out. Why?
great stuff, i’ve been trying to figure this out for a while and used photoshop but the rasterized file looked terrible, thank you so much for this tut- it was so easy to follow, beautiful lay out of the blog too-
LOVED IT!!! I ALMOST CRY EVERYTIME I READ IT!!!
P.S.
I HATE PAPYRUS AND YES I AM ONE OF THOSE AVATAR COMPLAINY PEOPLE!
Thanks. I liked this post.
Thanks, saved me a lot of time!
Thank you – I thought there must be an easier way – but it was so difficult to find!
Thank You. I forgot how to convert to Grayscale but your post helped me do the job.
Is there a way to do a batch to convert hundreds of files to grayscale? These are files that do not need special attention since they are chemical formulas.
I believe there is using the Actions palette. I’ve converted a bunch of files from .ai to .eps before but using the same principle I believe you could convert from color to grayscale.
Once the image is grayscale, is there also a way to convert the document to grayscale, like in Photoshop? Or is that not necessary for vector images when printing one color jobs?
Nice. This kind of stuff is so fundamental but so hard to find online. Great post and great site!
Thank you so much! This was so helpful and saved me so much time!
Thanks, this is exactly what i needed, and it worked great.
This was suuuuper helpful. I always coloured
the images by hand.. I mean clicking the swatches one by
one. Now I can use the recolor option for colour schemes and grayscale.
Super helpful, thank you!! Your tutorial is very clear and visually attractive, well done.
nice! just what I needed! thax mate 😉
Thanks for the tips, I’ve been wondering how to do this 🙂
thanks!
Nice Tutorial. Thank You.
Great tutorial. I made a similar tutorial once having been without the knowledge of your tute, and now mine is definitely a sore loser. 😉
Seriously though, it’s fantastic now to have 4 additional methods of converting to greyscale.
P.S.
My original need was for overly complex, client-supplied logos that our firm would need to use for newspaper b&w advertising needs.
( http://howtoforward.com/2008/01/04/black-white-not-red-all-over/ )
you are the lord of vectors lol :p
Dude, this site rocks and I love this character…keep it up.
I commonly just use convert to grayscale. But these other options seem to give better results for some situations. Thanks for sharing!
nice blog, and nice tips 😉
Vector all over me