

In this tutorial we’ll be creating a stylized teapot scene for a warm and cozy scene in a trendy flat style. We’ll be using basic geometric shapes along with the Stroke options and the Pen Tool to preserve a minimalistic and well-balanced composition. Let’s get started!
Tutorial Details
- Program: Adobe Illustrator CS6 – CC
- Difficulty: Intermediate
- Topics Covered: Shape Building, Pen Tool, Eraser Tool, Stroke Panel
- Estimated Completion Time: 20 minutes
Final Image: Cozy Teapot Scene

Step 1
I prefer to start with the background by changing it’s color to something interesting for better contrast. Use the Rectangle Tool (M) to create a shape of a size of your Artboard (in my case it is 600 x 600 px) and keep it on a separate Layer in the Layers panel. Fill it with dark-purple color in the Color panel.
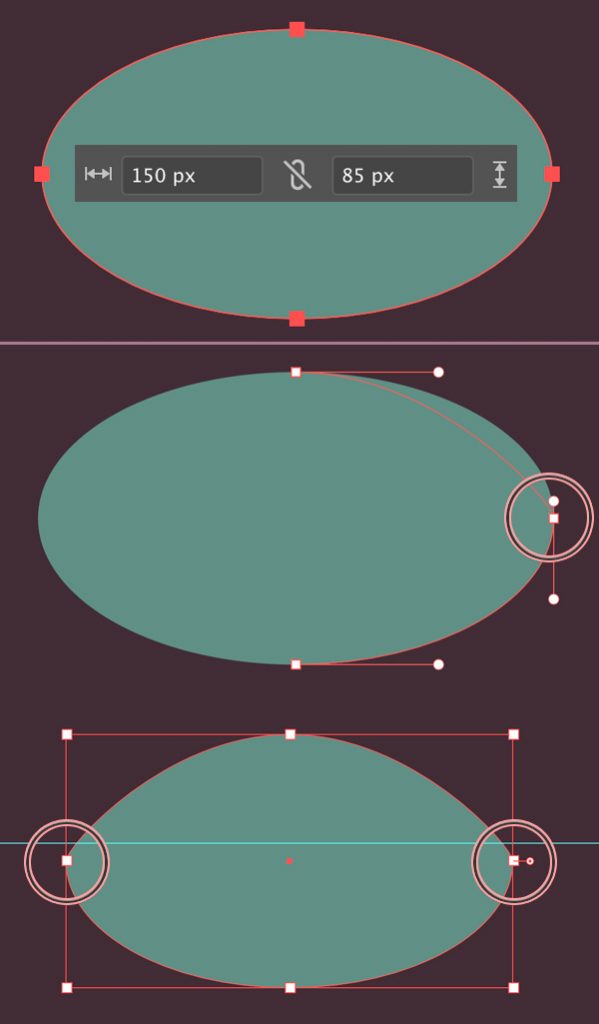
Now take the Ellipse Tool (L) and let’s start with the teapot. Make a 150 x 85 px turquoise shape and let’s modify the silhouette.
Select the right anchor point with the Direct Selection Tool (A) and shorten the anchor handles to make the point sharper.
I’m using a horizontal Guide line (bright-blue in the screenshot) to better control the height of the anchor handles on the both sides of the ellipse. In order to make a Guide, fist of all turn on the Rulers (Control-R) and than click and drag the guide down from the upper ruler if you need a horizontal guide line or from the side ruler on the left if you need a vertical guide line.
Once you finish with the shape, you can get rid of the Guides in the following menu: View > Guides > Clear Guides.
Step 2
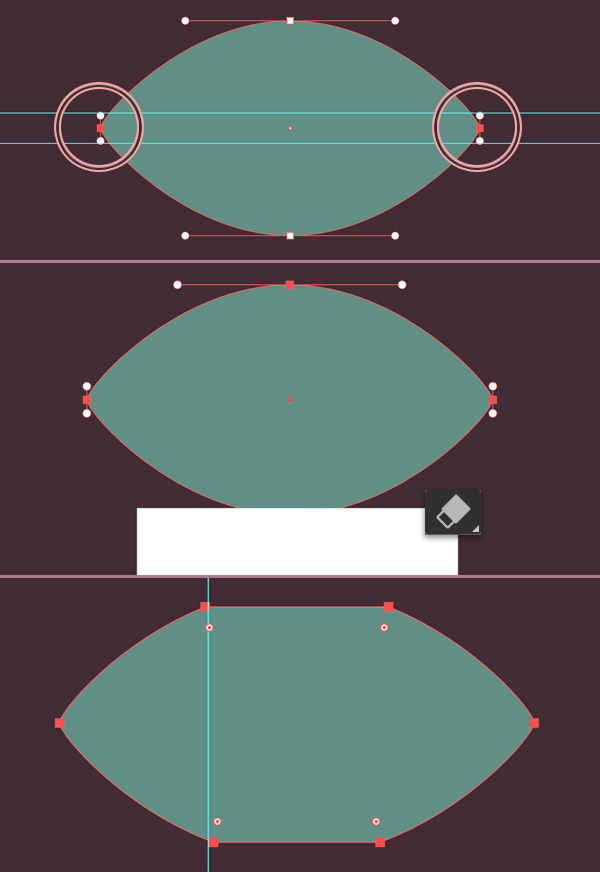
Make sure that you’ve adjusted the length of the anchor handles for the both sides of the ellipse.
Now let’s take the Eraser Tool (Shift-E) and hover over the bottom part of the ellipse to erase a small piece of it. We want to make the bottom edge flat so that our teapot can be put on the table or some other surface. Hold down Alt to create a rectangular selection and drag it over the piece that you want to erase.
Repeat the same for the top part of the teapot.
Step 3
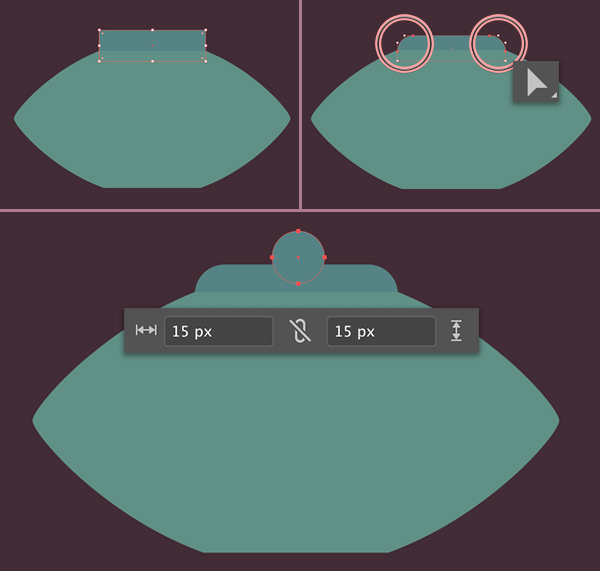
Take the Rectangle Tool (M) and let’s add a lid on top of the teapot. Make the color of the rectangle slightly darker than the base of the teapot and make the shape fit the flat part on the top edge of the teapot.
Select the top anchor points with the Direct Selection Tool (A) and drag the circle marker of the Live Corners closer to the center of the shape to make the corners slightly rounded. We can also control the value of the Live Corners manually from the control panel on top.
Finish up by adding a 15 x 15 px circle with the help of the Ellipse Tool (L). Now we have the knob on top of the lid.
Step 4
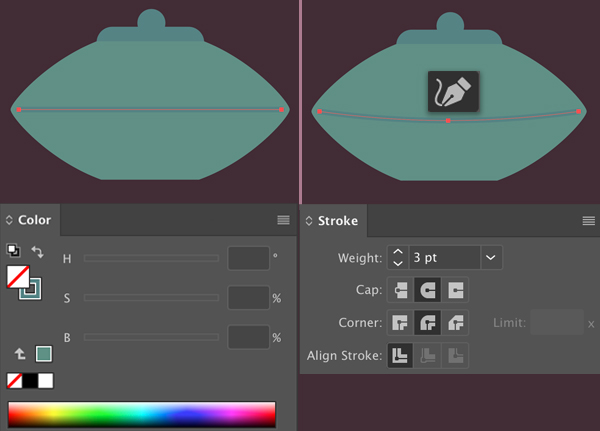
Let’s start adding decorative elements to the teapot. Take the Pen Tool (P) or the Line Segment Tool (\) and hold down Shift to create a straight horizontal line. Set’s its Stroke Color to the same dark-turquoise color as we have for the lid. You can use the Eyedropper Tool (I) to pick the colors from other elements.
We can adjust the thickness of the outline in the Stroke panel (Window > Stroke). Set the Weight to 3 pt.
Let’s make the line slightly bent to better define the volume of the teapot. Take the Curvature Tool (Shift-`) and drag the center point of the line down a bit.
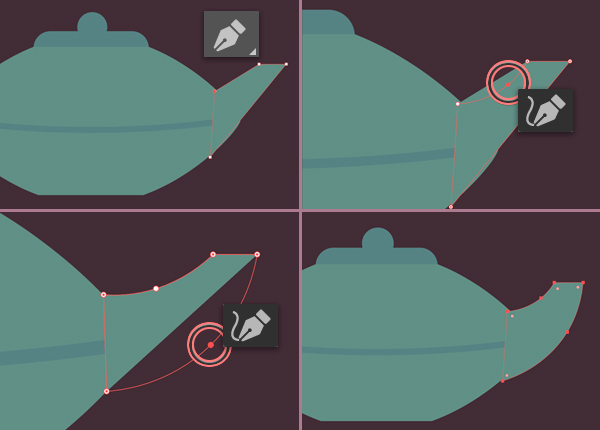
Step 5
Now we’ll add the spout of the teapot. Start with a simple rectangle made with the Pen Tool (P). Then use the Curvature Tool (Shift-`) again to bend the long sides of the spout, making the edges arched. Once you’re happy with the shape, press Shift-Control-[ to Send to Back.
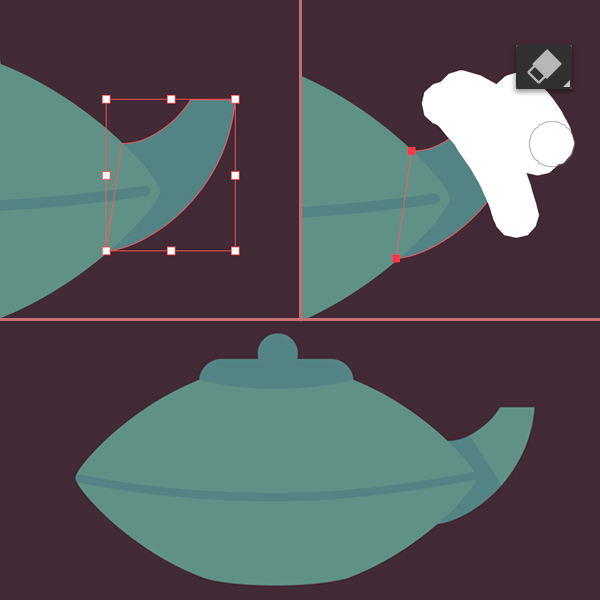
Step 6
Let’s add some simple shadows to the teapot to make it look more dimensional. First of all, Copy (Control-C) the spout and Paste in Front (Control-F). Keeping the top copy selected, change its fill color to dark-turquoise. Then switch to the Eraser Tool (Shift-E) and erase about a half of the shape, so that we have a subtle shadow at the base of the teapot.
Step 7
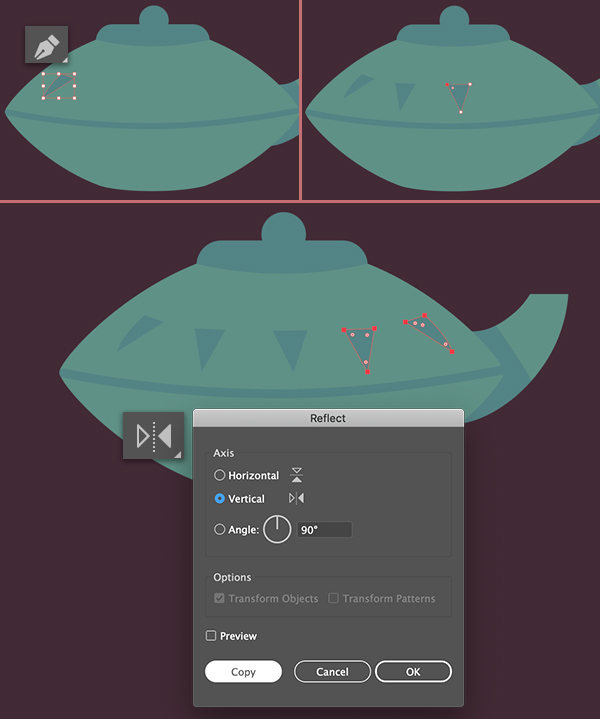
Now we’ll add more decorative elements to the body of the teapot. Use the Pen Tool (P) to draw a small upside-down triangle at the left edge of the teapot. We could also use the Triangle Tool for this purpose and then move the anchor points around, but making the desired shape with the Pen Tool (P) is much faster in this case. Try to fit the perspective, making the triangle narrow. This way we are showing that the surface of the teapot is bent and rounded.
Add two more triangles. Now that we have a central triangle, we can just copy and flip the first two to the other side. Select the first two triangles and double-click the Reflect Tool (O) in the Tools panel. Set the Axis to Vertical and click Copy. Move the created copies to their place.
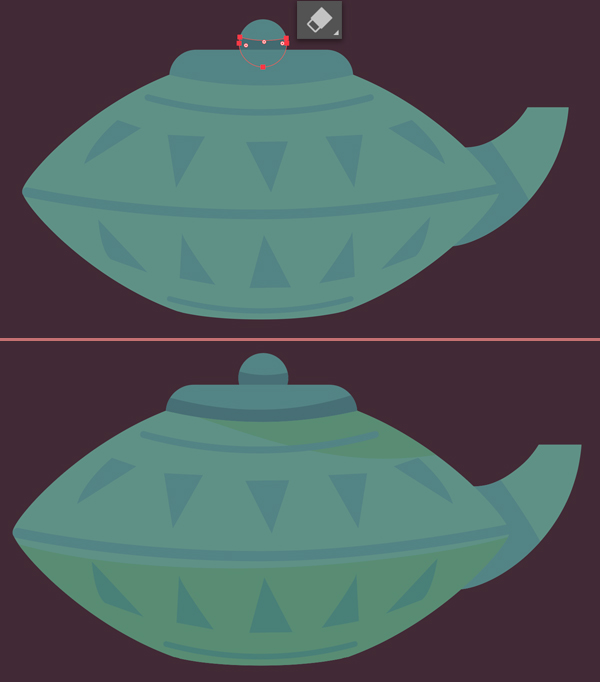
Step 8
Let’s add more shadows to the teapot using the same technique as we did for the spout in the Step 6.
Start with the knob and the lid adding darker copies of these elements and using the Eraser Tool (Shift-E) to create shadows.
As for the body of the teapot, I’ve changed the color of the shadows to dark-green so that they don’t blend with the decorative elements. This adds a nice color variation to the scene.
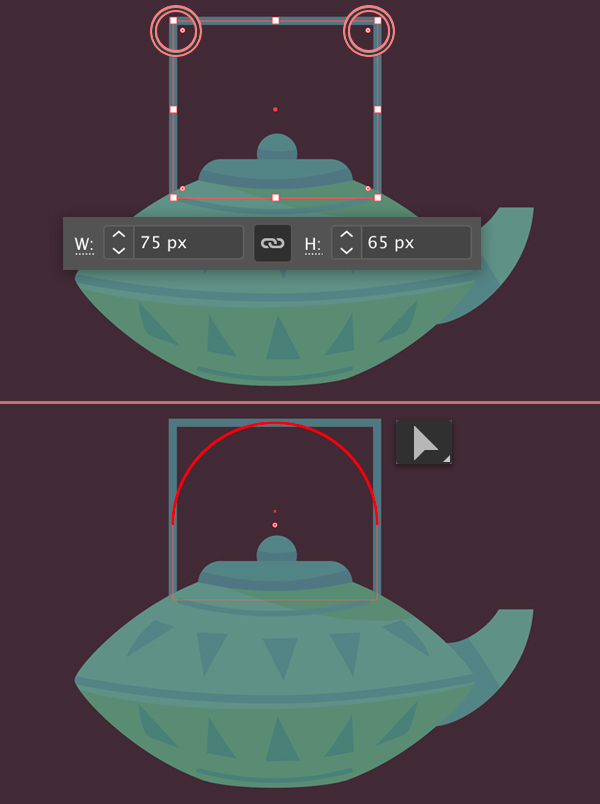
Step 9
Now we’ll add a handle on top of the teapot. Start by creating a 75 x 65 px rectangle with the help of the Rectangle Tool (M). Set its Fill color to None and it’s Stroke Color to dark-turquoise.
Make the outline thicker by setting its Weight to around 4 pt in the Stroke panel. Use the Direct Selection Tool (A) to select the top anchor points and make the corners fully rounded with the help of the Live Corners function.
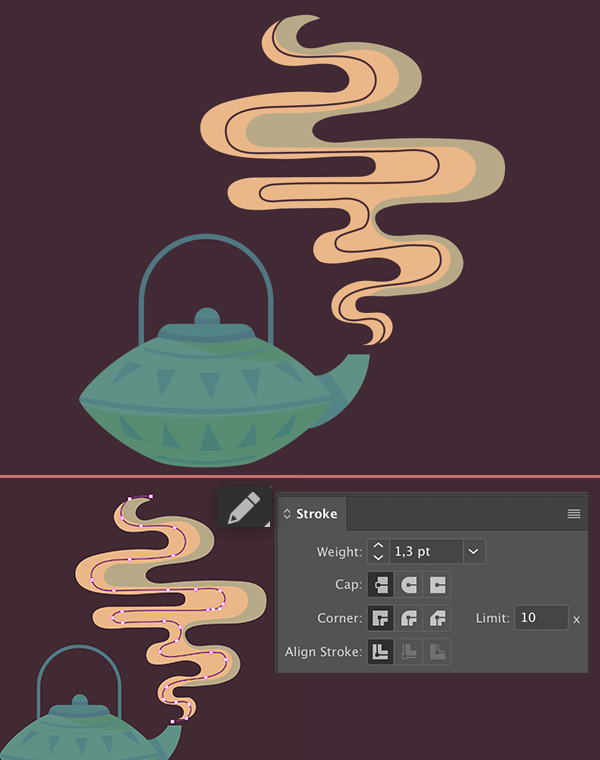
Step 10
Let’s make the teapot scene composition more interesting by adding a wavy steam raising from the spout. First of all, I decided to define the composition itself by creating a New Layer in the Layers panel and using the Pencil Tool (N) to make a rough sketch of the elements that I wanted to depict in the scene. These draft helps me to distribute the elements of the scene for better balance.
After I was happy with the sketch of the steam, I locked the sketch layer in the Layers panel by clicking the empty box next to the eye icon, and used the Pencil Tool (N) on another layer to draw a clean steam shape. We can adjust the final shape by getting rid of the excessive anchor points with the Delete Anchor Point Tool (-) and by pulling and rotating the anchor handles with the Direct Selection Tool (A).
The steam silhouette doesn’t have to be perfect or symmetrical because we are working with organic shapes. Small imperfections make it look more natural, however try to preserve the clean and balanced forms that are typical for flat style.

Step 11
Let’s fill the steam shape with a gentle beige color as if we had a camomile tea in the teapot. I’ve also added a subtle turquoise overtone and used the Pencil Tool (N) to draw a dark wavy stroke along the center of the shape just to make it look more detailed.
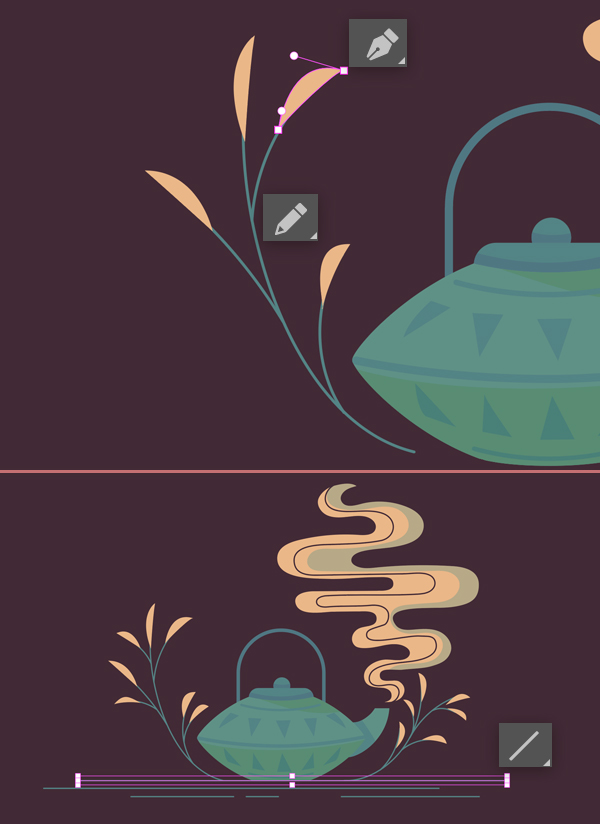
Step 12
Now let’s draw a simple floral element by the left side of the teapot. Use the Pencil Tool (N) with 1 pt Stroke to draw a stem. Add some yellow leaves with the help of the Pen Tool (P).
Draw a similar floral element on the opposite side of the teapot. This time I decided not to use the Reflect Tool (O) because such repetition of the plant parts would look unnatural.
Use the Line Segment Tool (\) to draw straight horizontal lines under the teapot to depict a simplified surface.
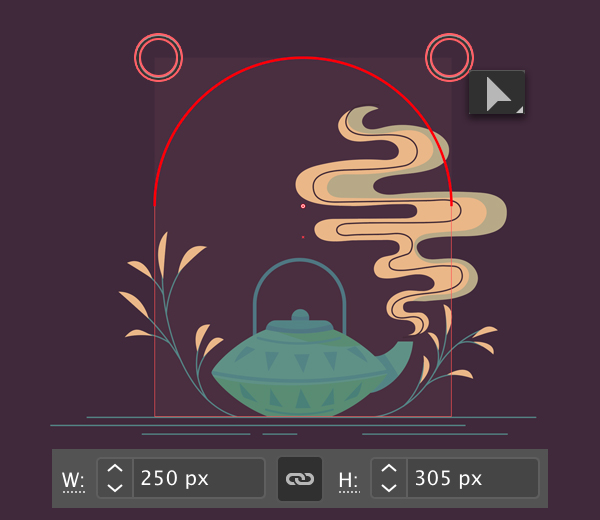
Step 13
Let’s finish up the teapot scene with the composition by adding a larger element to the background for better balance. I think, a minimalistic silhouette of a window would look good.
Start by making a 250 x 350 px rectangle and make its fill color slightly lighter than the background color.
Make the top of the shape fully rounded with the help of the Direct Selection Tool (A) and the Live Corners function.
Step 14
Let’s make the window silhouette a bit more detailed so that it fits the style of our illustration. Keeping the window shape selected go to Object > Path > Offset Path and set the Offset value to 10 px leaving all other options as default.
Now that we have a larger shape, let’s turn it into an outline by setting its Stroke Weight to 1 pt.
We can delete some of its parts by adding more anchor points with the Add Anchor Point Tool (+) and then selecting some of them with the Direct Selection Tool (A) and pressing the Delete key. This way we’re making the line dashed.
And there we have it! Your teapot scene is complete!

Congratulations! Our Cozy Teapot Scene is Finished!
Great work! The teapot scene looks balanced and harmonious! You can experiment with the colors to find another combination, for example, a sunny day scene instead of a dark one.
I hope you’ve enjoyed following this tutorial and learned some new tips and tricks that will be useful for your future projects!
Happy designing!
Author: Yulia Sokolova
2D/3D artist and tutorial instructor, focusing on character creation, icons, lettering design, and illustrations.


