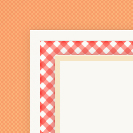
 In the following tutorial you will learn how to create your own gingham pattern vector in Adobe Illustrator, and you’ll get some tips for using it. For starters you will learn how to set up a simple grid for your gingham pattern vector. Using this gingham pattern, a single rectangle and taking full advantage of the Appearance panel you will learn how to create a menu cover that you could edit and take in any direction.
Tutorial Details: Gingham Pattern Vector
- Program: Adobe Illustrator CC
- Difficulty: Beginner-Intermediate
- Topics Covered: Basic Tools and Effects, Building Patterns, Appearance panel
- Estimated Completion Time: 45 minutes
Final Image: Gingham Pattern Vector & Menu Vector
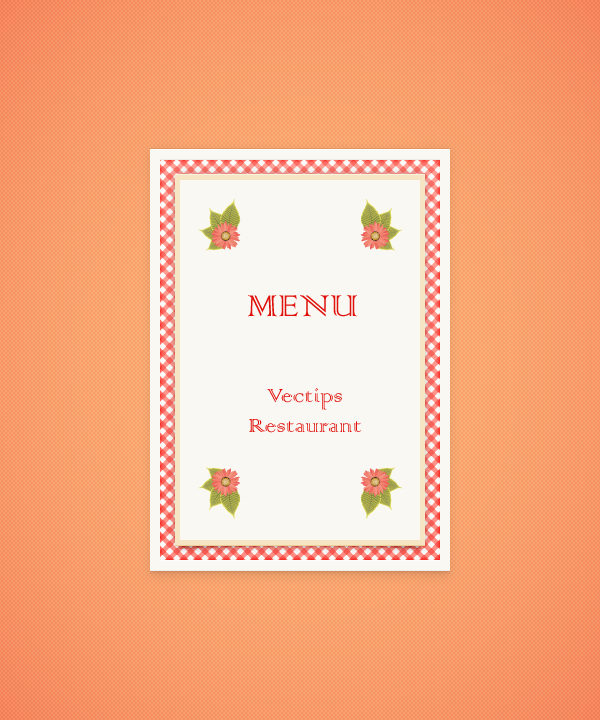
As always, this is the final image that we’ll be creating – our gingham pattern vector on a simple menu:
Step 1: Gingham Pattern Vector
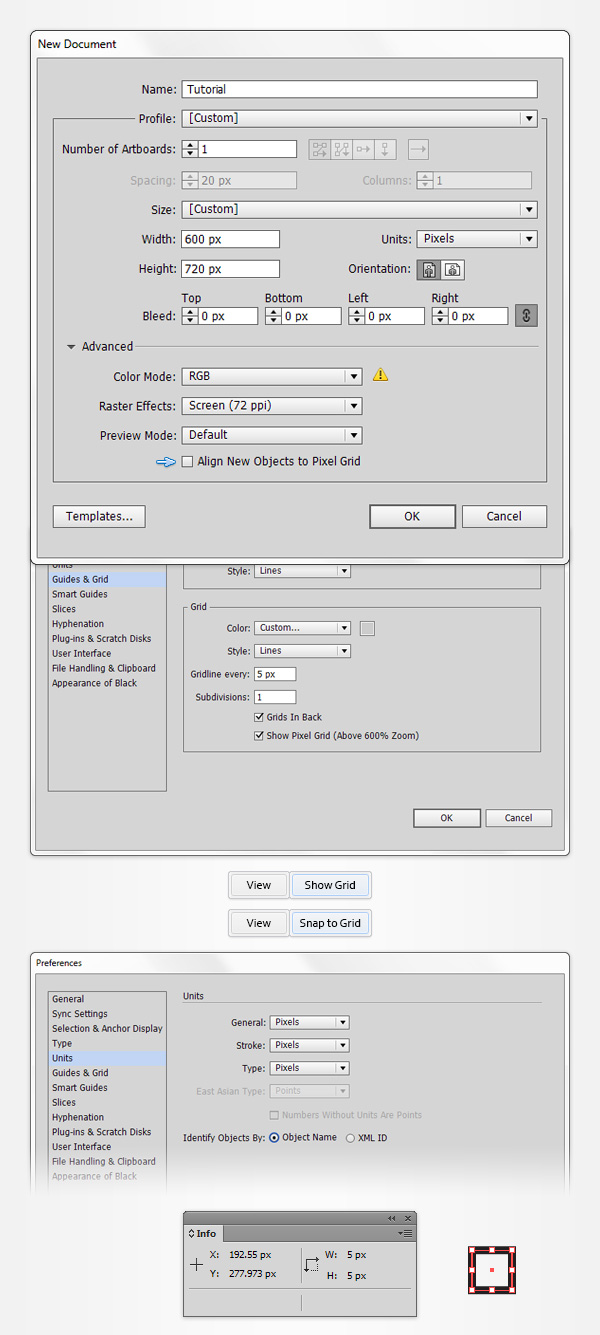
To start this gingham pattern vector tutorial, hit Control + N to create a new document. Select Pixels from the Units drop-down menu, enter 600 in the width box and 720 in the height box then click on the Advanced button. Select RGB, Screen (72ppi) and make sure that the Align New Objects to Pixel Grid box is unchecked before you click OK. Enable the Grid (View > Show Grid) and the Snap to Grid (View > Snap to Grid). You will need a grid every 5px, so simply go to Edit > Preferences > Guides > Grid, enter 5 in the Gridline every box and 1 in the Subdivisions box. Try not to get discouraged by all that grid, it will ease your work and keep in mind that you can easily enable or disable it using the Control + ‘ keyboard shortcut. You should also open the Info panel (Window > Info) for a live preview with the size and position of your shapes. Do not forget to set the unit of measurement to pixels from Edit > Preferences > Units > General. All these options will significantly increase your work speed.
Step 2
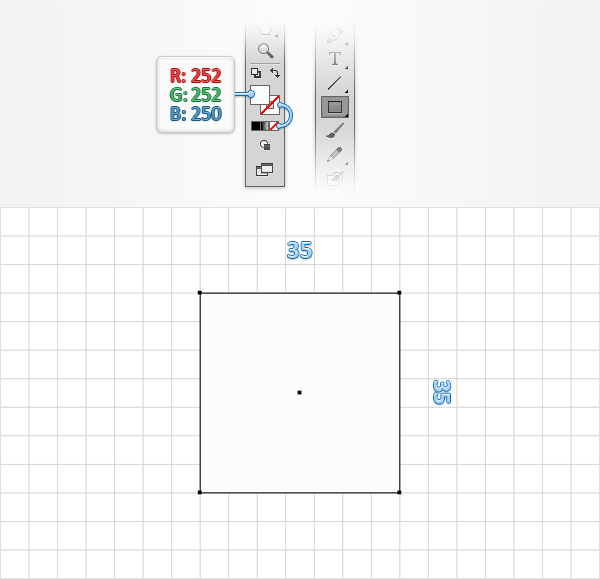
Pick the Rectangle Tool (M) and focus on your Toolbar. Remove the color from the stroke then select the fill and set its color at R=252 G=252 B=250. Move to your artboard and simply create a 35px square, the Snap to Grid should ease your work.
Step 3
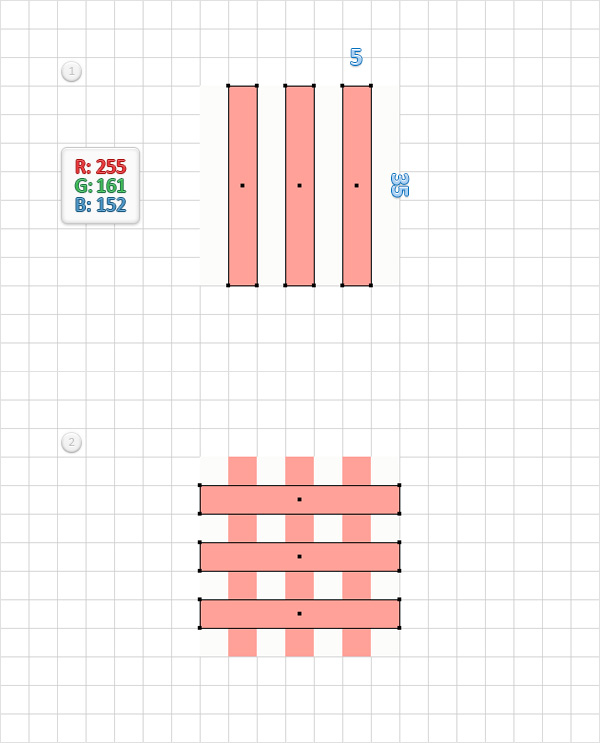
Return to your Toolbar and simply replace the existing fill color with R=255 G=161 B=152. Make sure that the Rectangle Tool (M) is still active, create three, 5 x 35px shapes and place them as shown in the second image. Using the Selection Tool (V), select all three, pink rectangles and go to Object > Transform > Rotate. Enter a 90 degrees Angle then simply click the Copy button. In the end things should look like in the second image.
Step 4
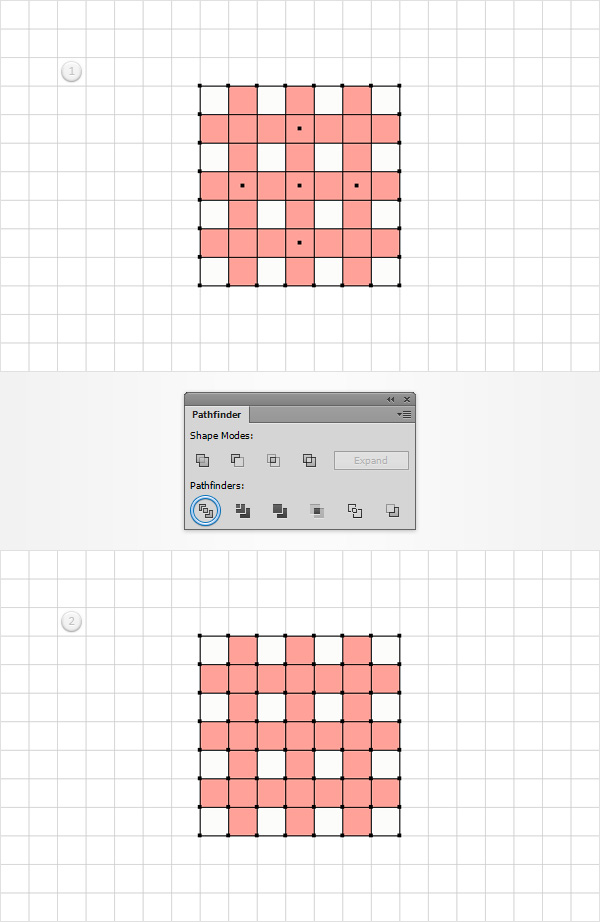
Select all the shapes made so far, open the Pathfinder panel (Window > Pathfinder) and click the Divide button.
Step 5
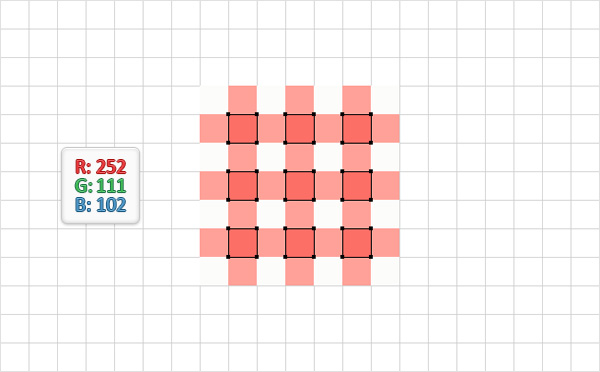
Using the Direct Selection Tool (A), select the nine squares highlighted in the following image and replace the existing fill color with R=252 G=111 B=102.
Step 6
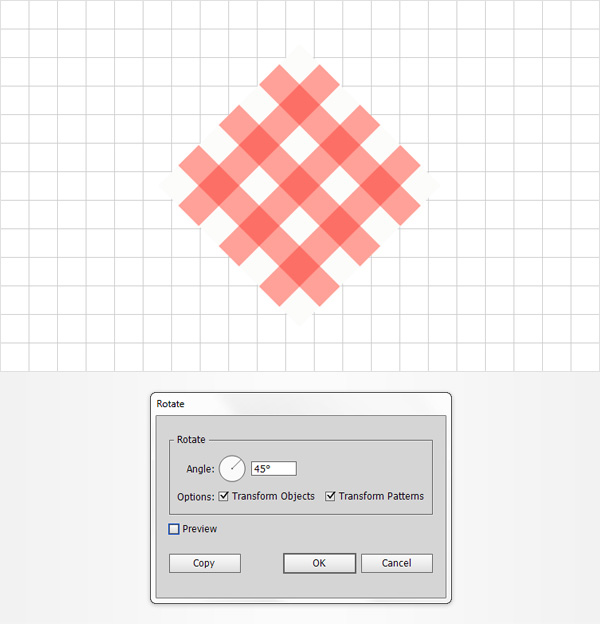
Reselect all the shapes made so far and go to Object > Transform > Rotate. Enter a 45 degrees Angle and click OK. You can start to see the beginning of the gingham pattern vector! Easy peasy.
Step 7
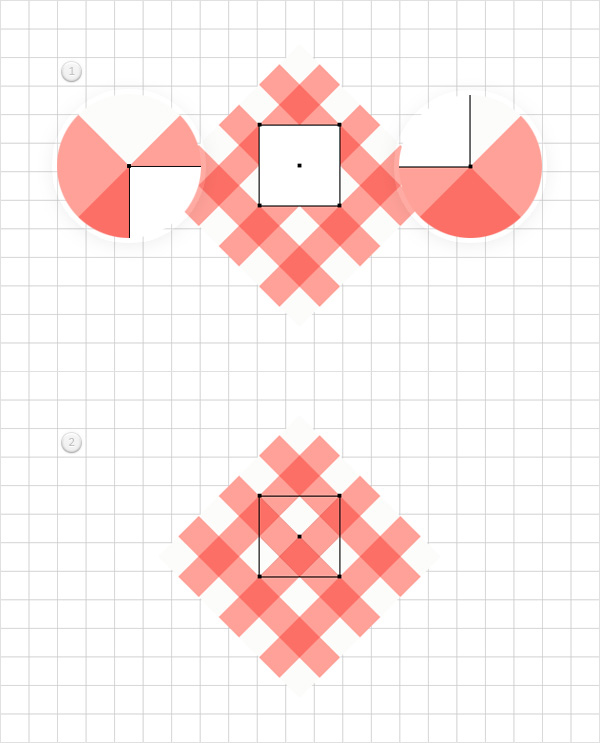
Get back to your Toolbar and replace the existing fill color with a simple white (R=255 G=255 B=255). Disable the Snap to Grid (Control + ‘ ) and enable the Smart Guides (Control + U). Using the Rectangle Tool (M) and taking full advantage of the Smart Guides create a simple square as shown in the first image. Start from the top, left corner, make sure that you get the “anchor” smart guide, create your shape and don’t release the mouse button until you get that same “anchor” smart guide in the bottom, right corner. Make sure that this white shape is selected and simply hit Shift + Control + [ to send it to back.
Step 8
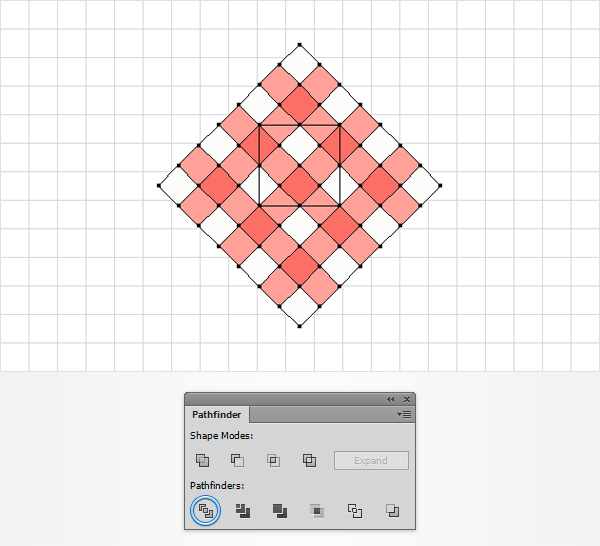
Reselect all the shapes made so far and click the Divide button from the Pathfinder panel. Make sure that the resulting group of shapes is selected and simply hit Shift + Control + G to Ungroup it.
Step 9
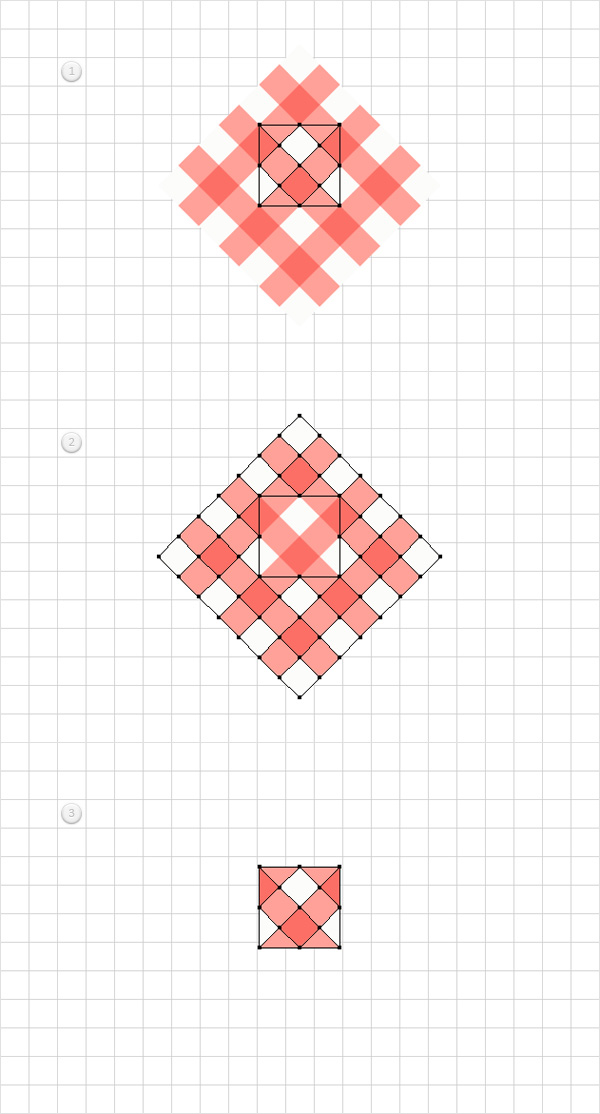
Using the Selection Tool (V) select the twelve shapes highlighted in the first image of the gingham pattern vector and simply hit Control + G to Group them. Select the rest of the shapes that are not part of the newly made group and simply hit the Delete button from your keyboard to get rid of them. In the end things should look like in the third image.
Step 10
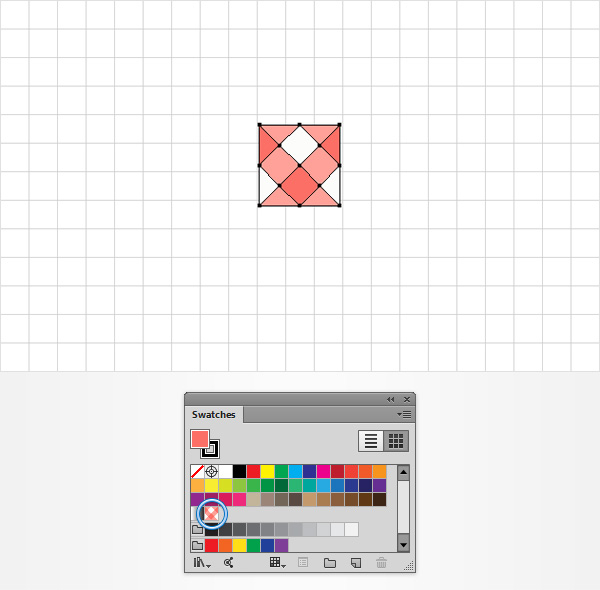
Make sure that your group of shapes is still selected and simply drag it inside the Swatches panel (Window > Swatches) to save your gingham pattern vector as a pattern. Once you’re done you can get rid of that group of shapes.
Step 11
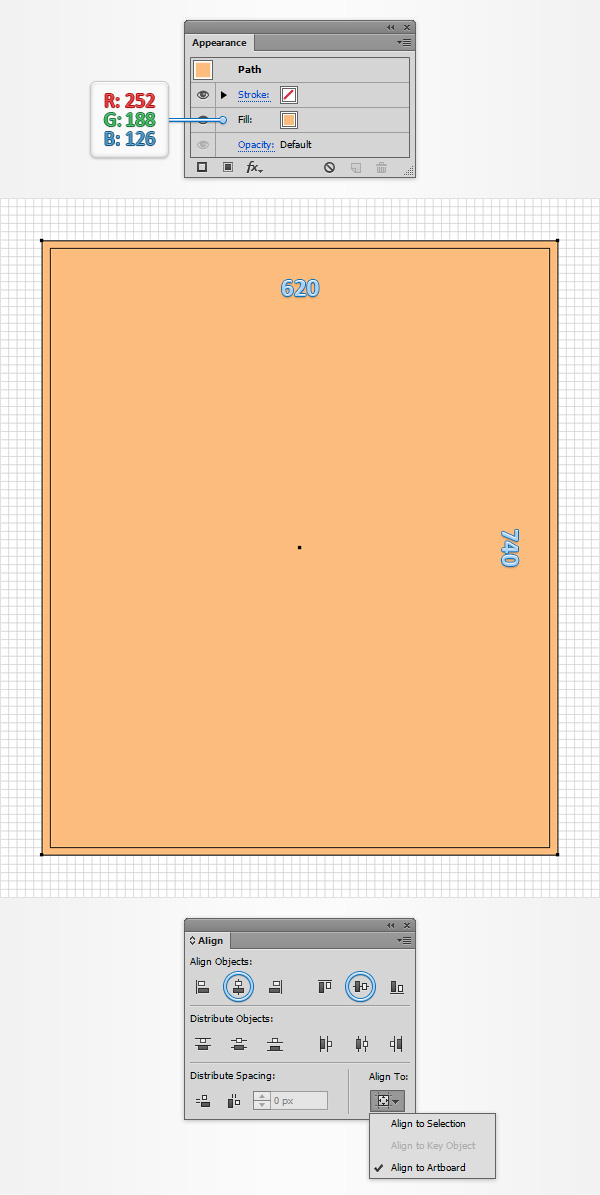
The next part of this tutorial will focus on one way you can use your new gingham pattern vector – in a restaurant menu! Gingham patterns are a classic staple in diners and restaurants, so I thought that would be a good choice. Focus on your Toolbar and replace the existing fill color with R=252 G=188 B=126. Pick the Rectangle Tool (M) and simply click on your artboard to open the Rectangle window. Enter 620 in the Width box and 720 in the Height box then click the OK button. Move to the Layers panel, open the existing layers, simply double click on the name of the shape made in this step and rename it “Background“.
Next, you will need to center your this rectangle, so open the Align panel (Window > Align). Set the aligning to Artboard (open the fly out menu and go to Show Options if you can’t see the Align To section as shown in the following image), make sure that your shape is selected then simply click the Horizontal Align Center and Vertical Align Center buttons. In the end your rectangle should cover the entire artboard as shown in the following image.
Step 12
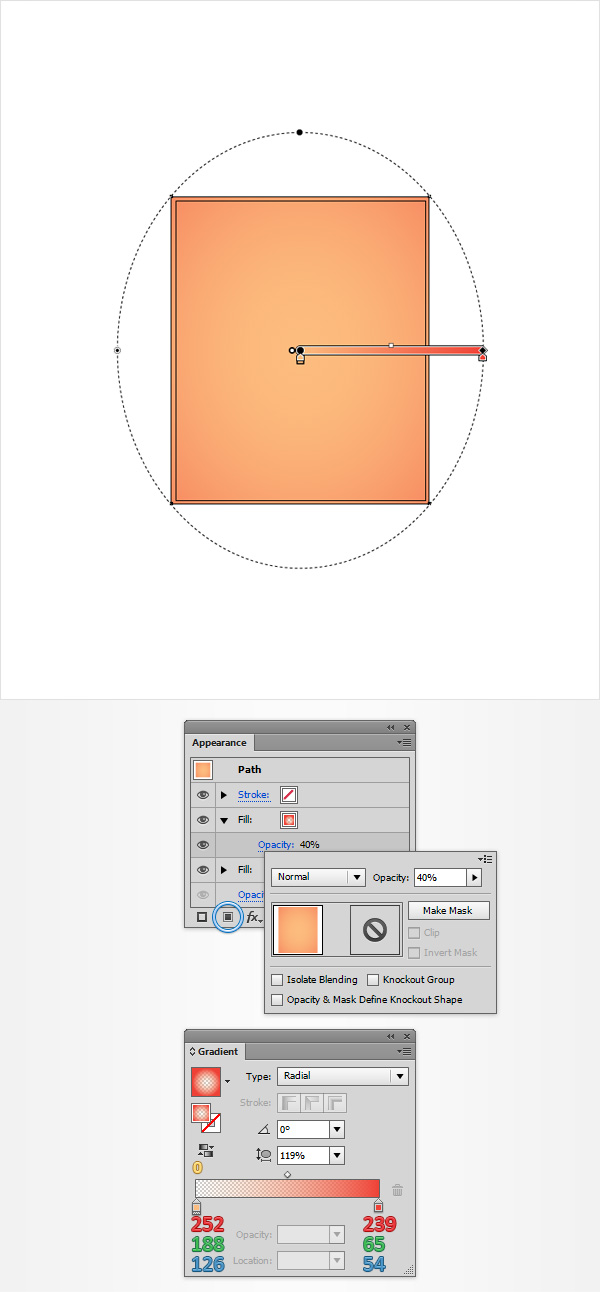
Make sure that your “Background” rectangle is still selected, focus on the Appearance panel (Window > Appearance) and add a second fill using the Add New Fill button. Select this new fill, open the Gradient panel (Window > Gradient) and simply click on the gradient thumbnail to add the default black to white linear gradient. Keep focusing on your Gradient panel, select Radial from the Type drop-down menu then move to the colors. Select the right slider and set the color at R=239 G=65B=54 then select the left slider, set the color at R=252 G=188 B=126 and lower its Opacity to 0%. Keep in mind that the yellow zero from the Gradient image stands for Opacity percentage which simply means that you need to select that gradient slider, focus on the Opacity box (from the Gradient panel) and set it at 0%. Move to the your artboard and use the Gradient Tool (T) to stretch your radial gradient as shown in the following image. Return to the Appearance panel and simply click on that “Opacity” piece of text that stands for the top fill to open the Transparency fly-out panel. Lower the Opacity to 40% then move to the next step.
Step 13
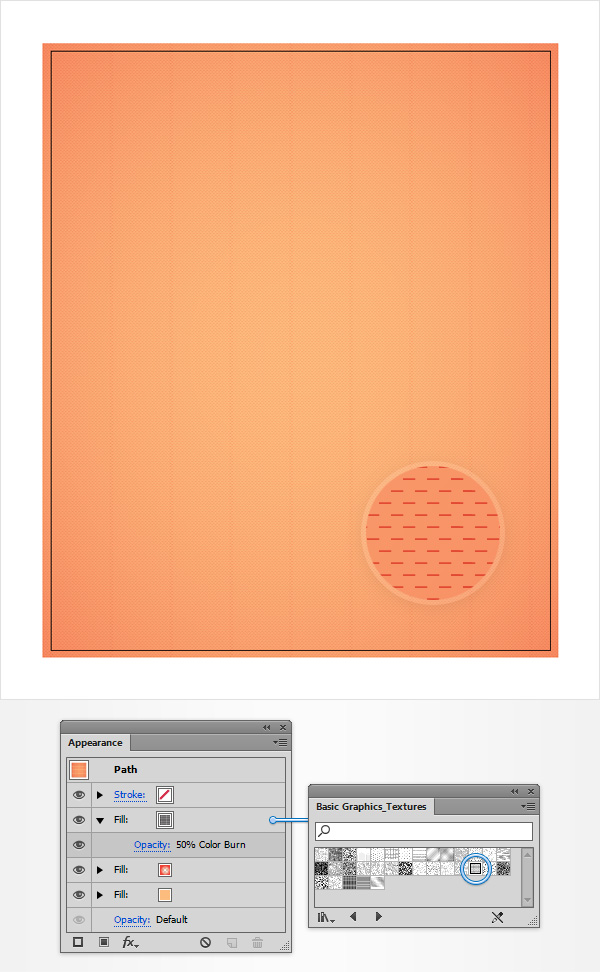
Make sure that your “Background” rectangle is still selected, focus on the Appearance panel and add a third fill using that same Add New Fill button. You will need a built-in pattern for this new fill, so return to the Swatches panel, open the fly-out menu and go to Open Swatch Library > Patterns > Basic Graphics > Basic Graphics_Textures. A new window with a set of built-in patterns should open. Make sure that the fill added in this step is still selected, add the USGS 19 Land Inundation pattern, lower its Opacity to 50% and change the Blending Mode to Color Burn.
Step 14
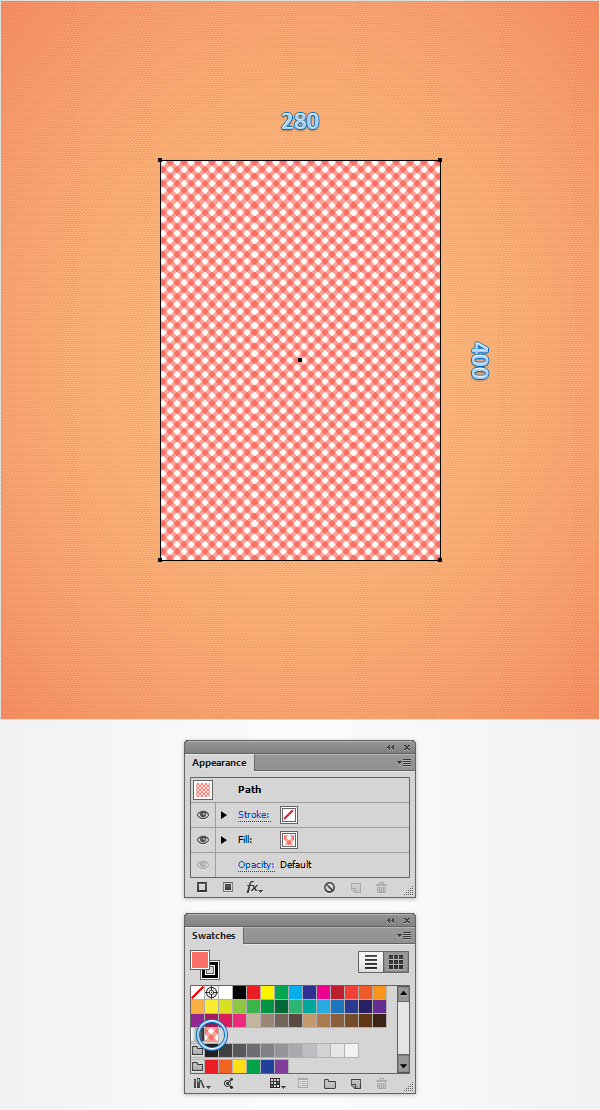
Using the Rectangle Tool (M), create a 280 x 400px shape and fill it with your gingham pattern vector. Move to the Layers panel, double click on the name of the shape made in this step and rename it “Cover“.
Step 15
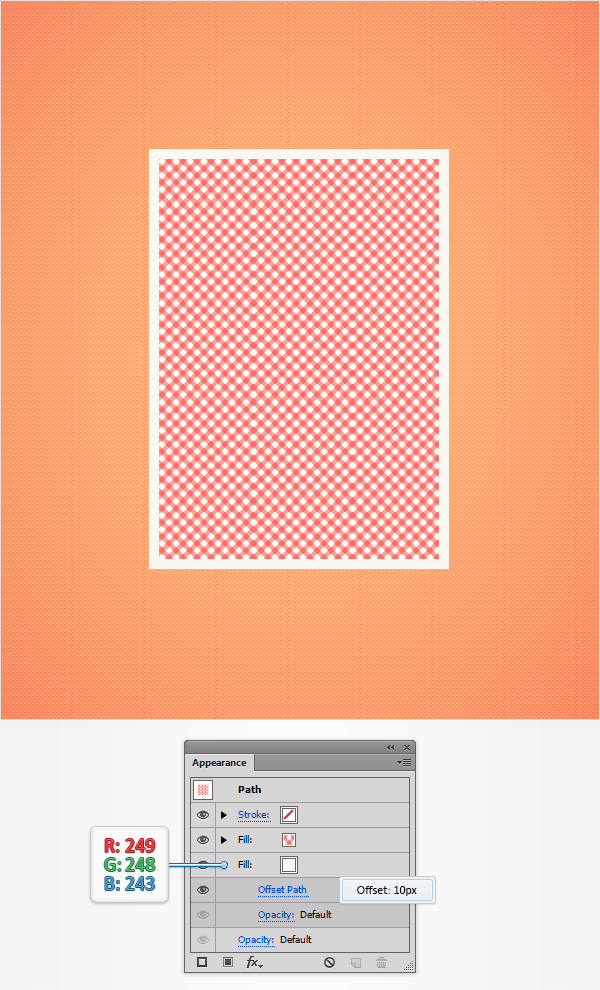
Make sure that your “Cover” rectangle stays selected, focus on the Appearance panel and add a second fill using that same Add New Fill button. Select this new fill, drag it in the bottom of the Appearance panel, set its color at R=249 G=248 B=243 and go to Effect > Path > Offset Path. Enter a 10px Offset and click OK.
Step 16
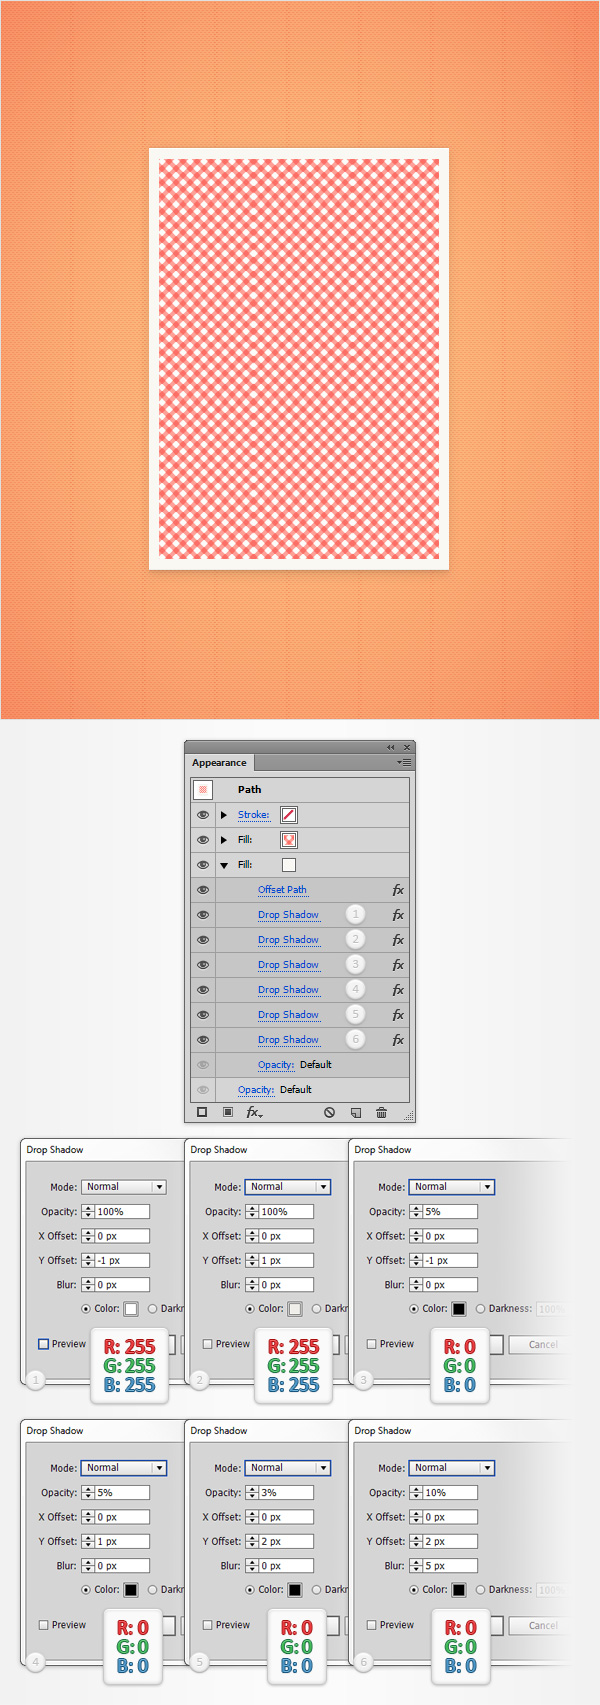
Make sure that your “Cover” rectangle stays selected, focus on the Appearance panel. Select the bottom fill and go to Effect > Stylize > Drop Shadow. Enter the properties shown in the top, left window (in the following image), click OK then add the other five Drop Shadow effects shown below.
Step 17
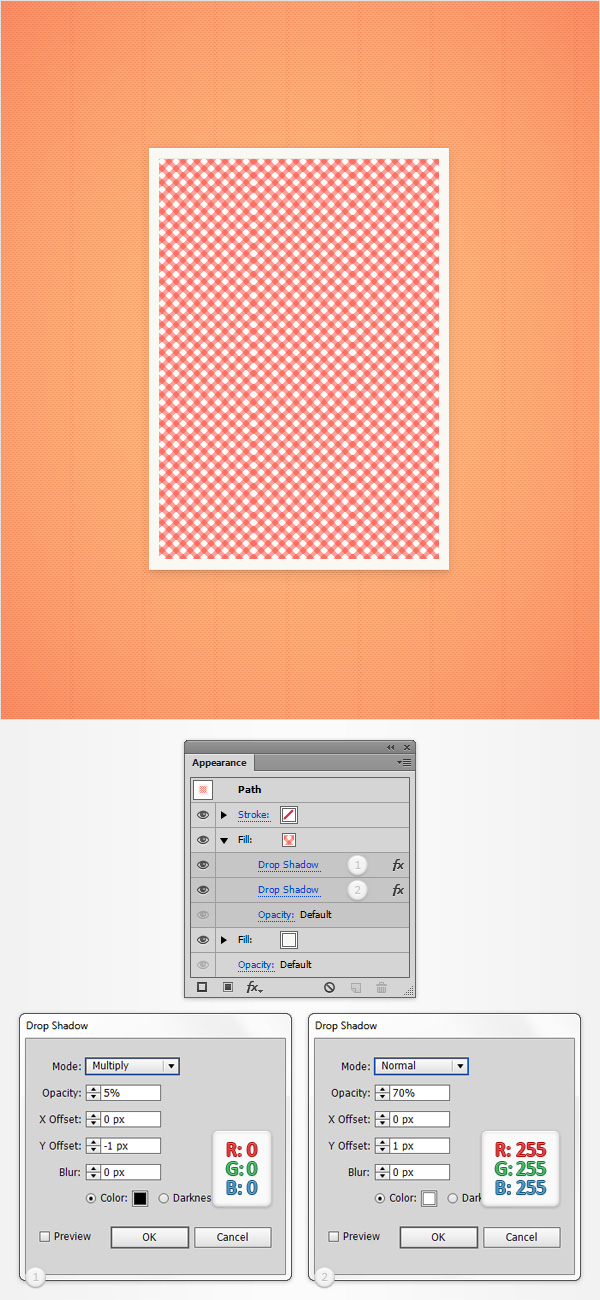
Make sure that your “Cover” rectangle stays selected and focus on the Appearance panel. Select the top fill and add the two Drop Shadow effects (Effect > Stylize > Drop Shadow) shown in the following image.
Step 18
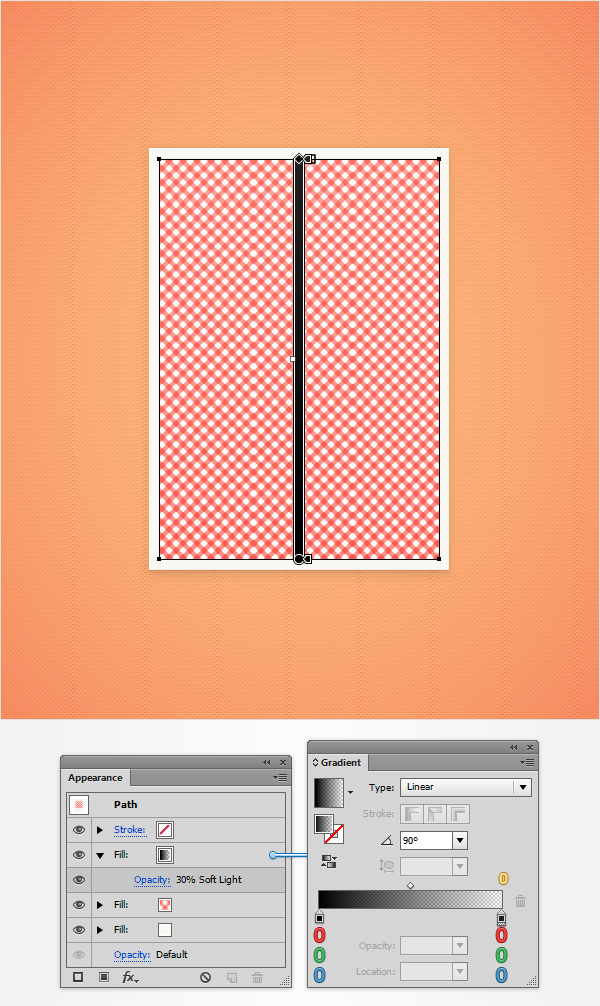
Reselect your “Cover” rectangle, focus on the Appearance panel, add a third fill and make sure that it goes in the top of the panel. Select this new fill, lower its Opacity to 30%, change the Blending Mode to Soft Light and add the linear gradient shown in the following image. Don’t forget that the yellow zero from the Gradient image stands for Opacity percentage.
Step 19
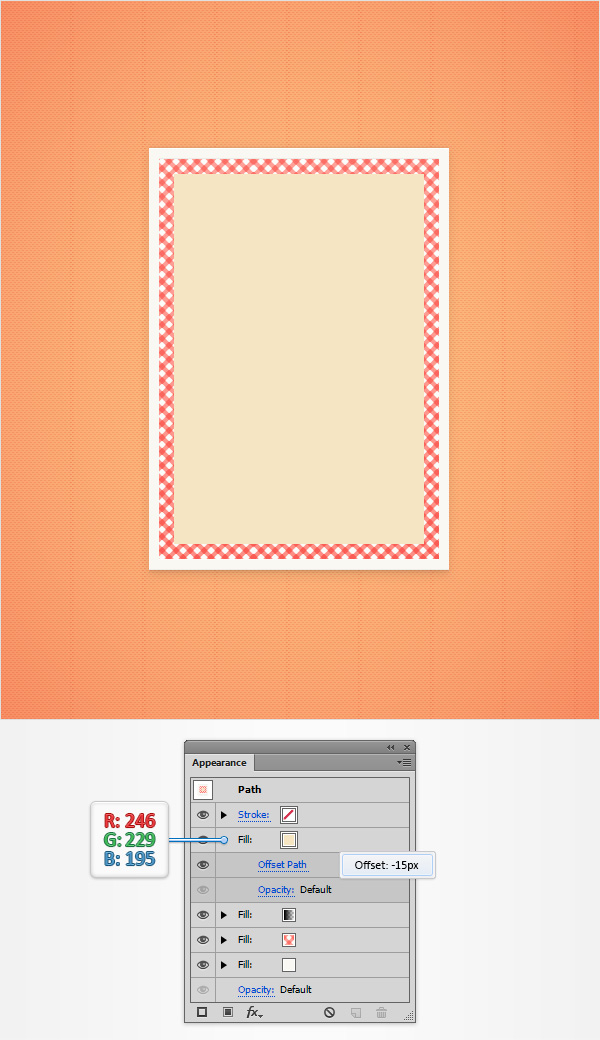
Reselect your “Cover” rectangle, focus on the Appearance panel, add a fourth fill and make sure that it goes in the top of the panel. Select this new fill, set its color at R=246 G=229 B=195 and go to Effect > Path > Offset Path. Enter a -15px Offset and click OK.
Step 20
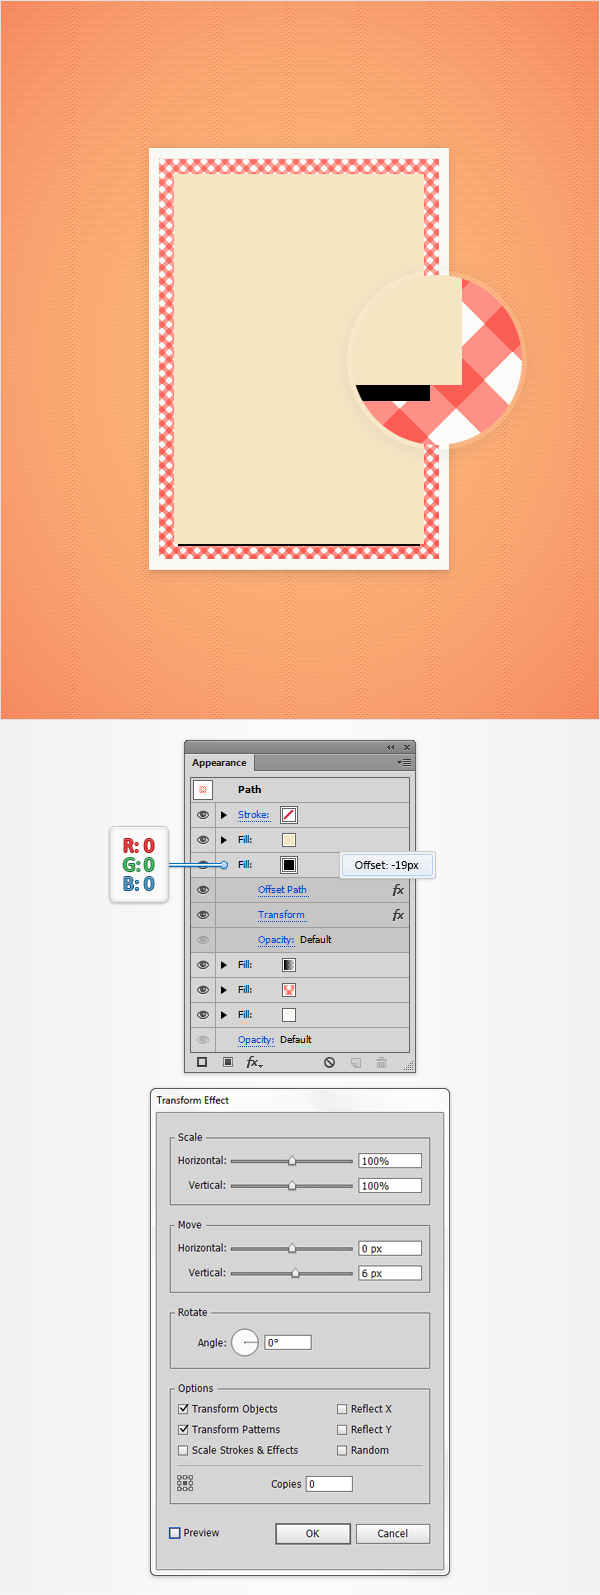
Reselect your “Cover” rectangle, focus on the Appearance panel, add a fifth fill and make sure that it goes below the top fill. Select this new fill, set its color at black and go to Effect > Path > Offset Path. Enter a -19px Offset, click OK and go to Effect > Distort & Transform > Transform. Drag the Move-Vertical slider at 6px and click OK.
Step 21
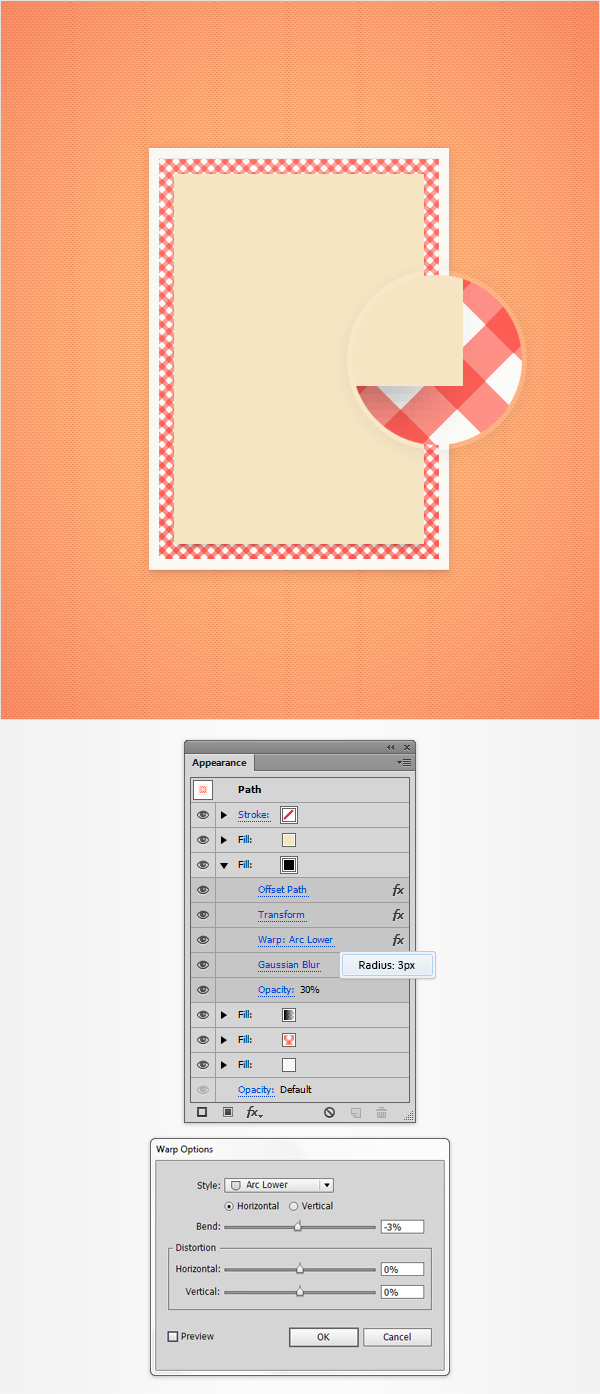
Make sure that your “Cover” rectangle stays selected and focus on the Appearance panel. Reselect that black fill, lower its Opacity to 30% and go to Effect > Warp > Arc Lower. Enter the properties shown in the following image, click OK and go to Effect > Blur > Gaussian Blur. Enter a 3px Radius and click OK.
Step 22
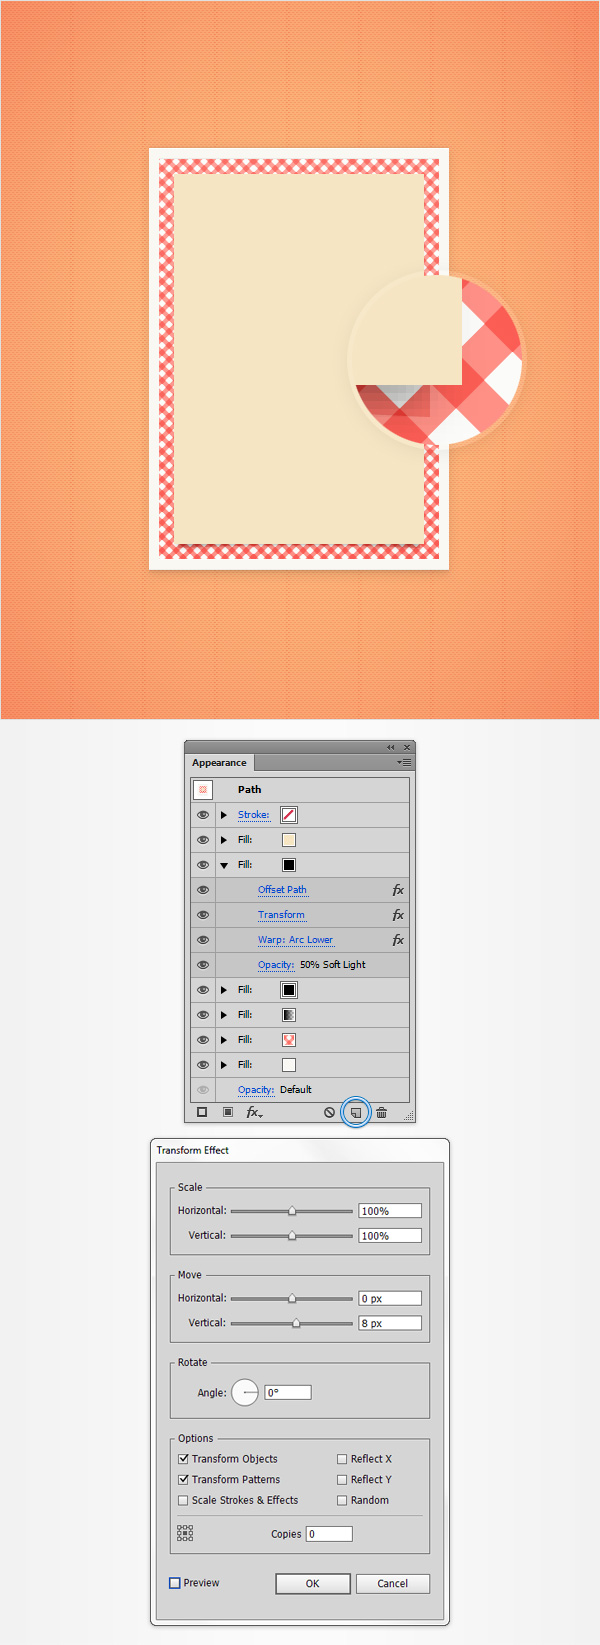
Make sure that your “Cover” rectangle stays selected and focus on the Appearance panel. Reselect that black fill and duplicate it using the Duplicate Selected Item button. Select this new fill, increase its Opacity to 50%, change the Blending Mode to Soft Light and remove the existing Gaussian Blur effect. Keep focusing on the fill added in this step and open the existing Transform effect. Drag the Move-Vertical slider at 8px and click OK.
Step 23
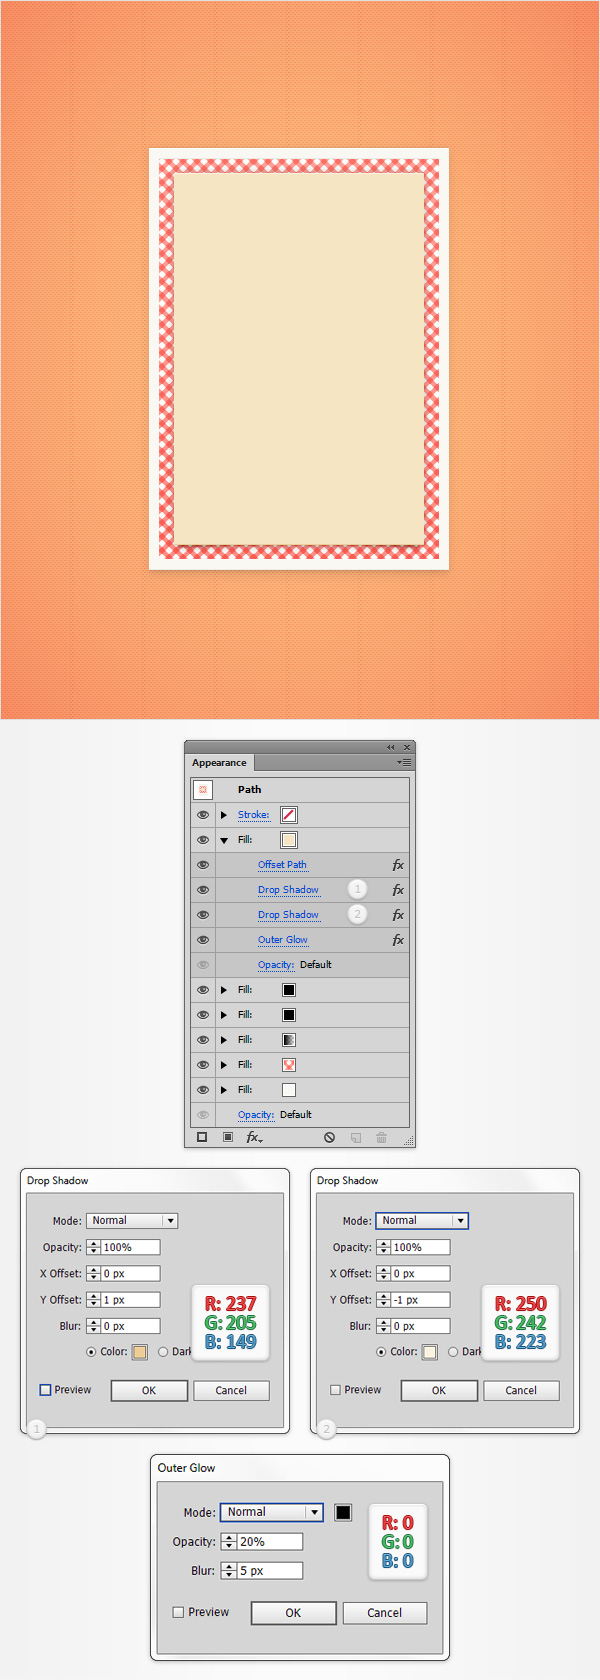
Make sure that your “Cover” rectangle stays selected and focus on the Appearance panel. Select the top fill, add the two Drop Shadow effects shown in the following image and then go to Effect > Stylize > Outer Glow. Enter the properties shown below and click OK.
Step 24
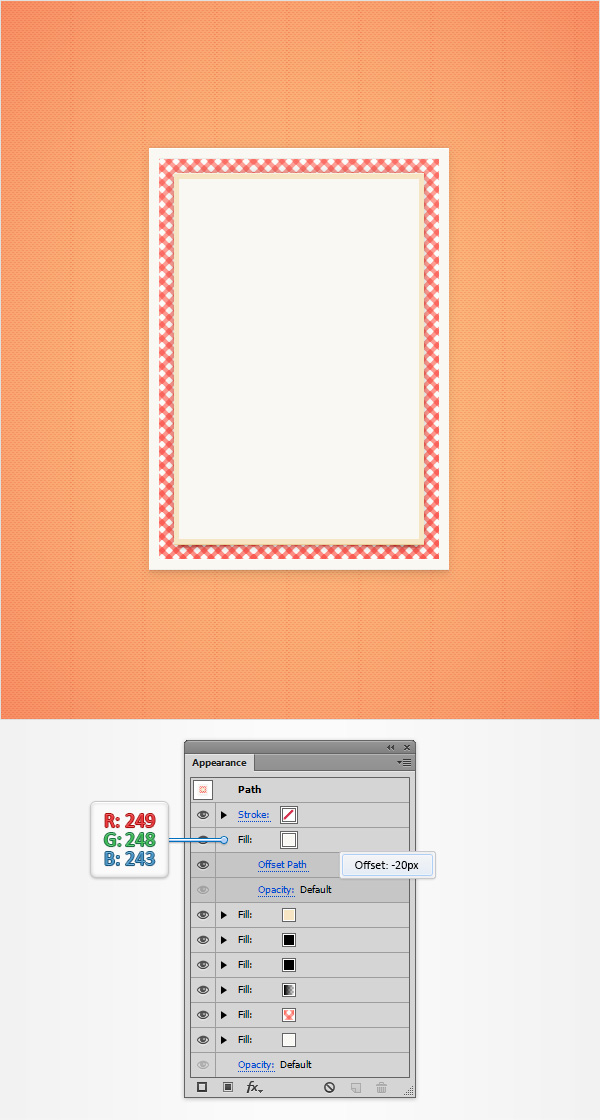
Reselect your “Cover” rectangle, focus on the Appearance panel, add a seventh fill and make sure that it goes in the top of the panel. Select this new fill, set its color at R=246 G=248 B=243 and go to Effect > Path > Offset Path. Enter a -20px Offset and click OK.
Step 25
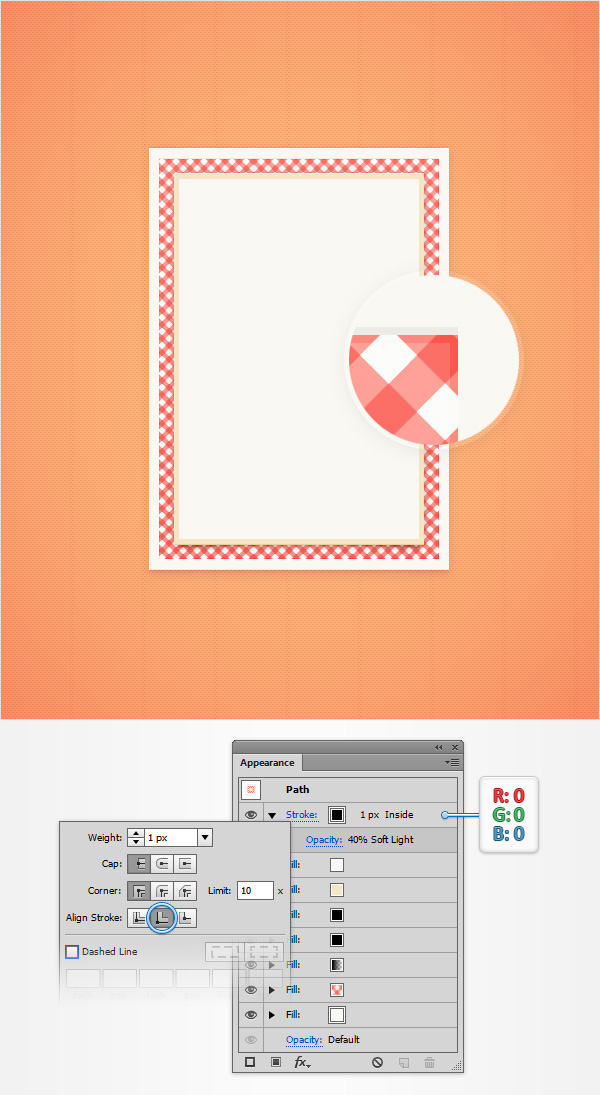
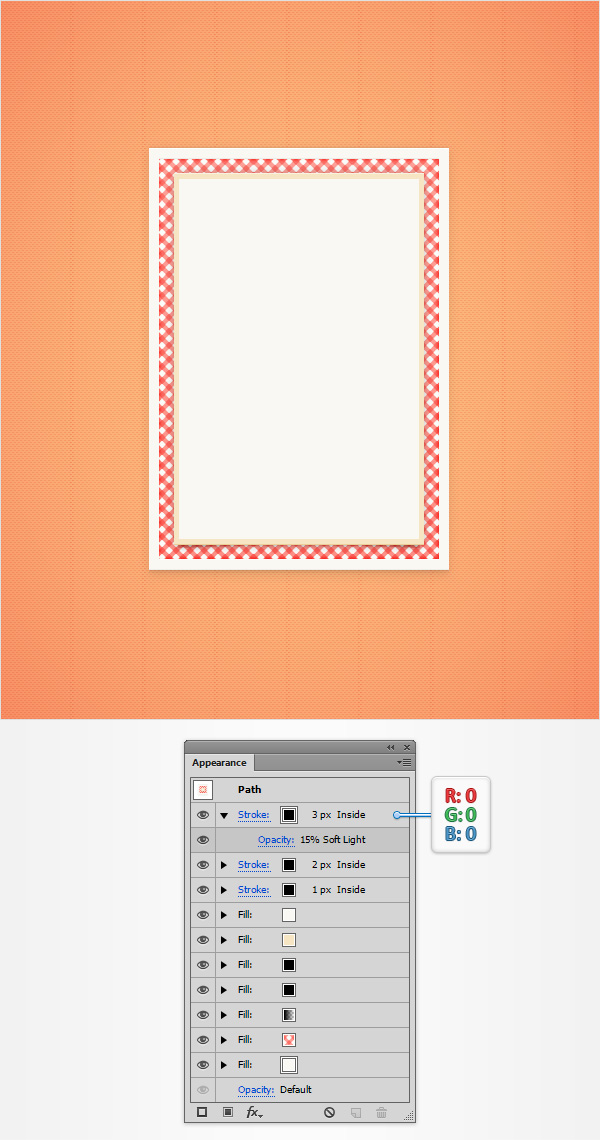
Make sure that your “Cover” rectangle stays selected, focus on the Appearance panel and select the existing stroke. Set the color at black, lower its Opacity to 40% and change the Blending Mode to Soft Light then simply click on that “Stroke” piece of text to open the Stroke fly-out panel. Make sure that the Weight is set at 1px and check the Align Stroke to Inside button.
Step 26
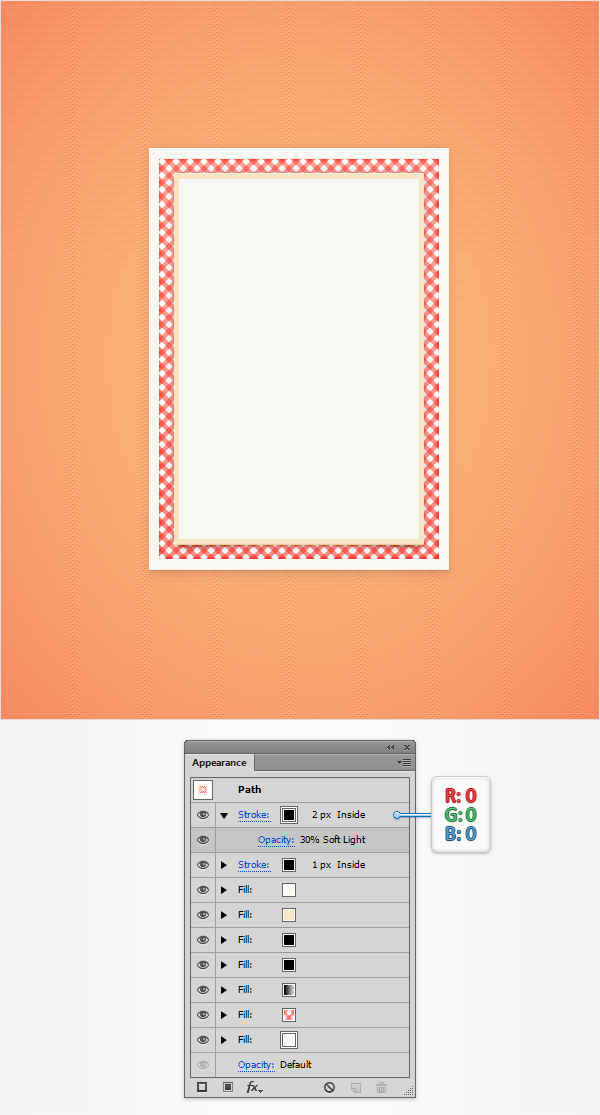
Make sure that your “Cover” rectangle stays selected and focus on the Appearance panel. Reselect that black stroke and duplicate it using that same Duplicate Selected Item button. Select this new stroke, lower its Opacity to 30% then open the Stroke fly-out panel and set the Weight at 2px.
Step 27
Make sure that your “Cover” rectangle stays selected and focus on the Appearance panel. Select the top stroke and duplicate it using that same Duplicate Selected Item button. Select this new stroke, lower its Opacity to 15% then open the Stroke fly-out panel and set the Weight at 3px.
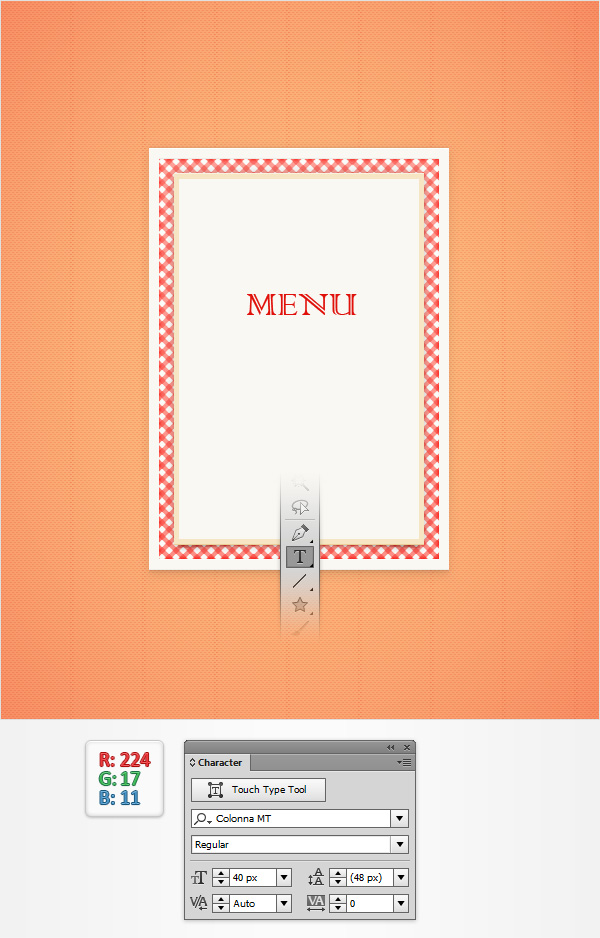
Step 28
Pick the Type Tool (T), simply click on your artboard and add the “MENU” piece of text. Set it color at R=224 G=17 B=11 and use the Colonna MT font with the size set at 40px.
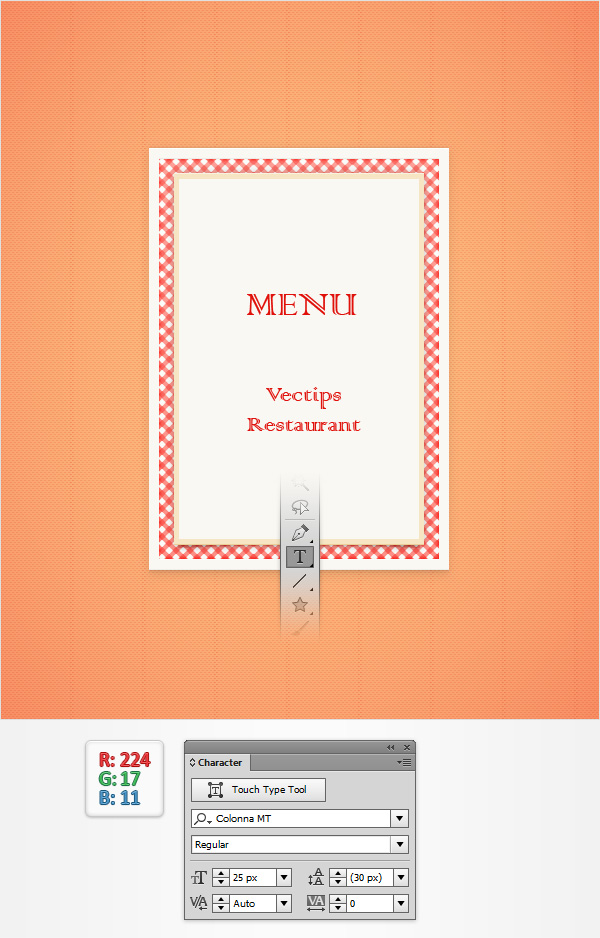
Step 29
Make sure that the Type Tool (T) is still selected and add the second piece of text. Use the same font and color, but lower the font size set to 25px.
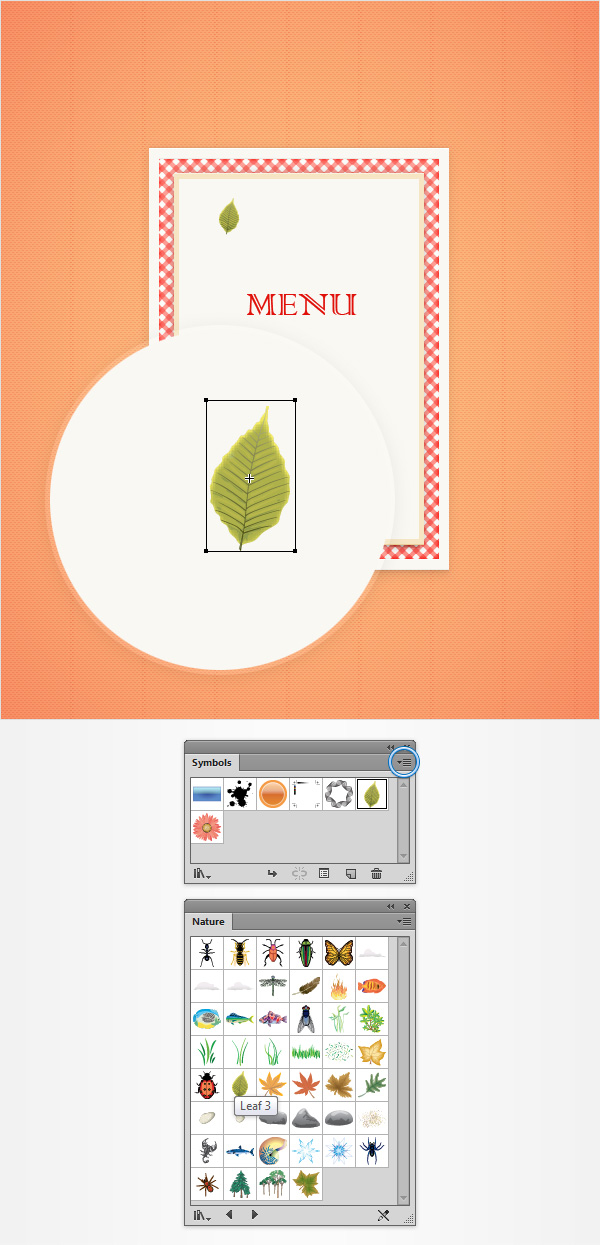
Step 30
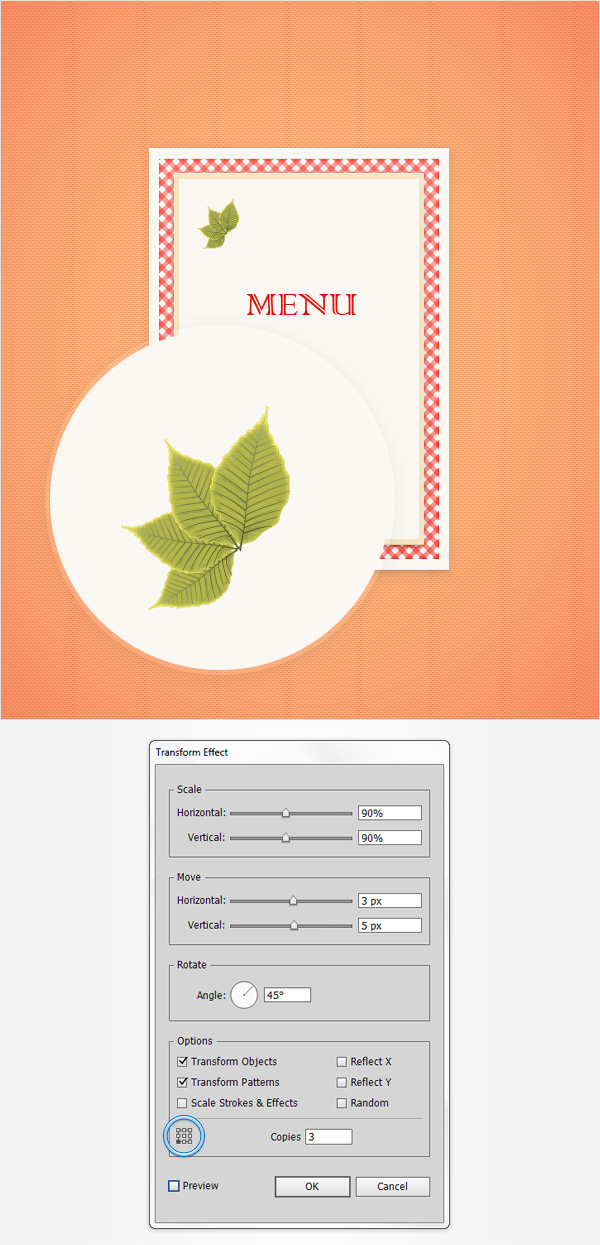
Open the fly-out menu of the Symbols panel (Window > Symbols) and go to Open Symbol Library > Nature. Select the “Leaf 3” symbol and simply drag it on your artboard. Resize this symbol and place it roughly as shown in the following image.
Step 31
Make sure that your leaf is still selected and go to Effect > Distort & Trasform > Transform. Enter the properties shown in the following image (don’t forget to check the bottom, left reference point) then click the OK button.
Step 32
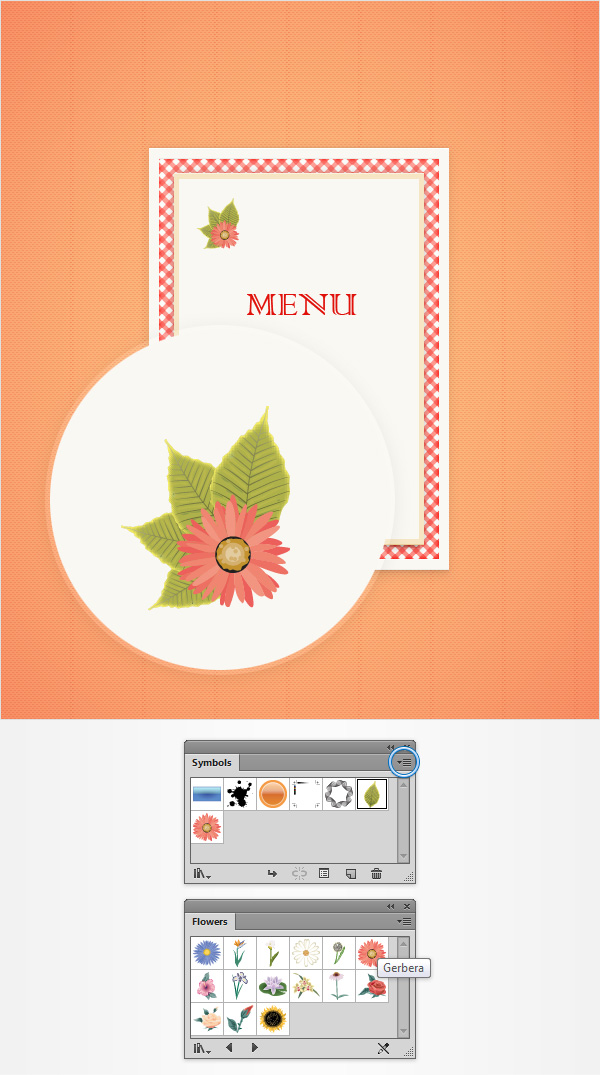
Return to your Symbols panel, re-open the fly-out menu and go to to Open Symbol Library > Flower. Drag the “Gerbera” symbol on your artboard then resize and place it as shown in the following image.
Step 33
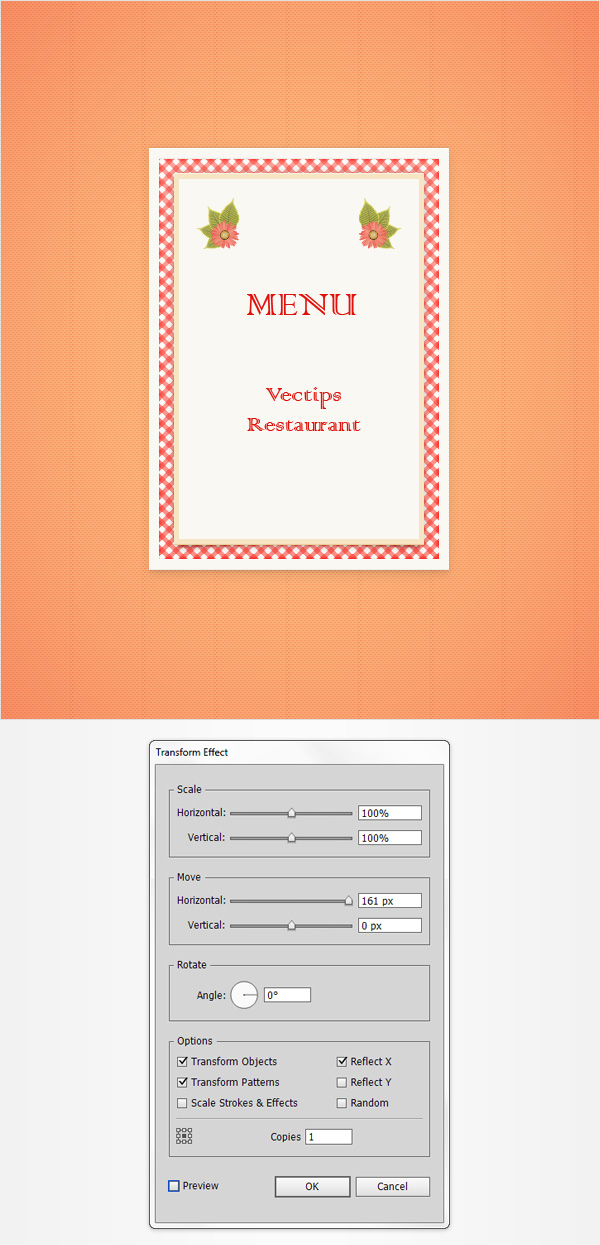
Reselect both symbols added so far and simply Group them (Control + G). Make sure that this new group stays selected and go to Effect > Distort & Transform > Transform. Enter the properties shown in the following image and click OK.
Step 34
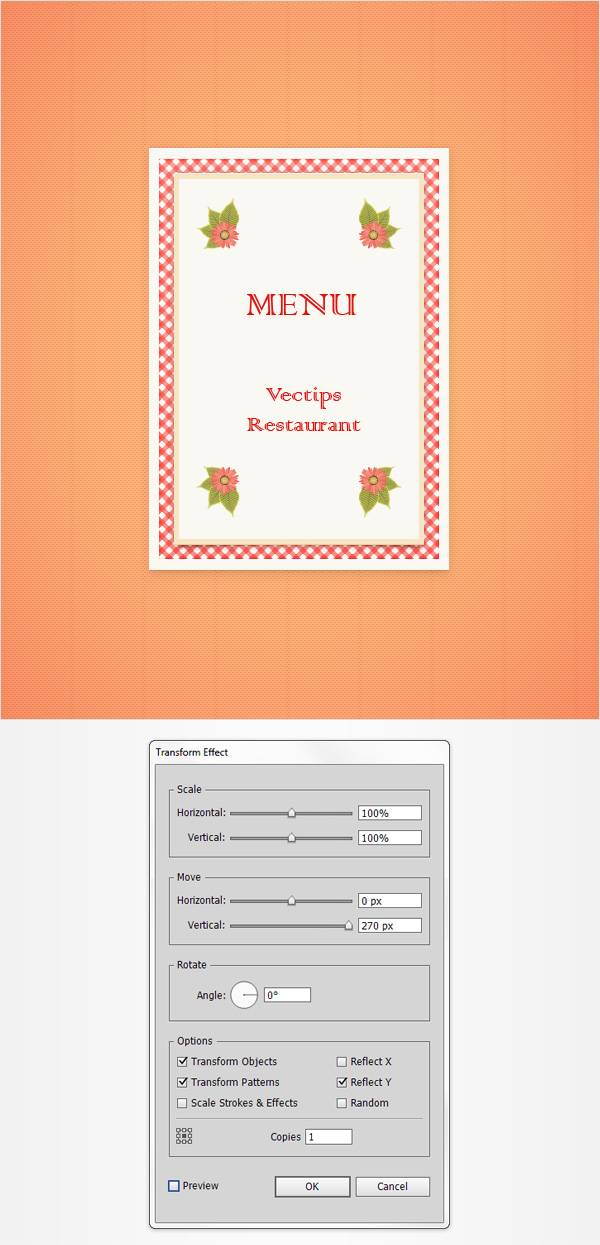
Make sure that your group of symbols is still selected and go again to Effect > Distort & Transform > Transform. Enter the properties shown in the following image, click OK and you’re done.
We’re Done with our Gingham Pattern Vector!
I hope you’ve enjoyed this gingham pattern vector tutorial and can apply these techniques in your future projects.


Thanks so much for sharing. After I add the square and divide the pieces again, spacing is happening between my pieces instead of having a smooth break like yours. No matter what I do, I can’t seem to get those to go away. Any tips on what I’m doing wrong and how to fix it.
Thanks again!
Awesome tutorial, we have featured it here : http://theneodesign.com/best-illustrator-tutorials-september-2014/
Wonderful!