
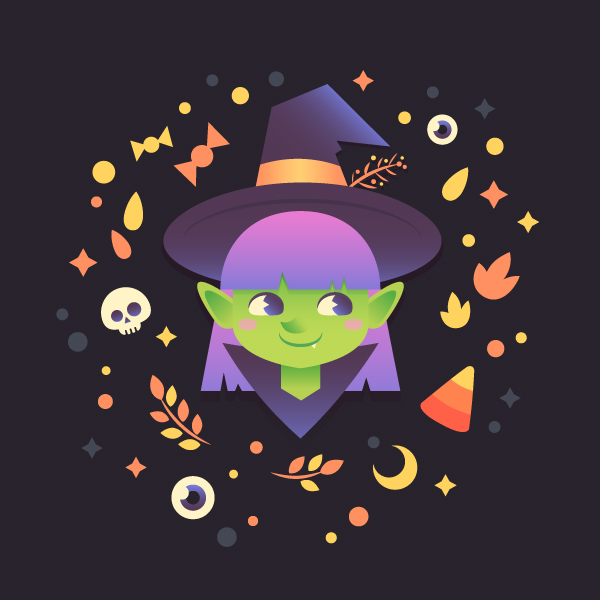
Are you excited to celebrate a magical holiday with pumpkins and fancy costumes? Follow this tutorial to create a lovely cartoon Halloween witch! We’ll be using simple geometric shapes and colourful gradients to make an appealing character in a simple and trendy style. Let’s begin!
Tutorial Details
- Program: Adobe Illustrator CS6 – CC
- Difficulty: Intermediate
- Topics Covered: Shape Building, Gradient panel, Transparency, panel, Pathfinder, Shape Builder Tool
- Estimated Completion Time: 20 minutes
Final Image: Cute Halloween Witch
Step 1
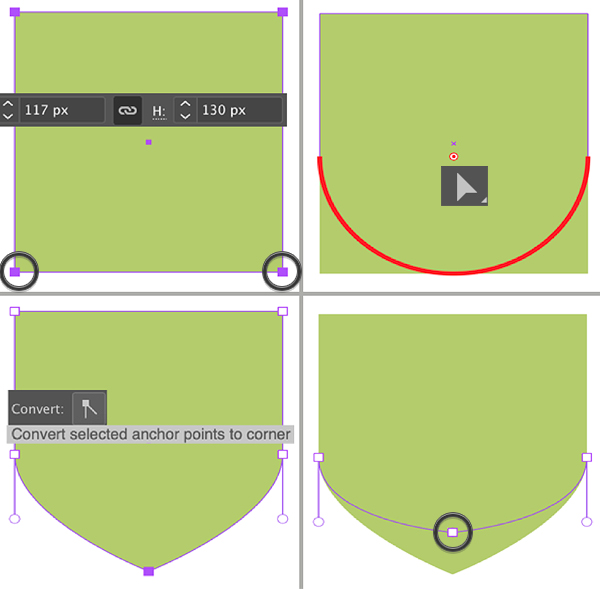
Let’s start with the head! Take the Rectangle Tool (M) and create a 117 x 130 px green shape.
Switch to the Direct Selection Tool (A) and select both bottom anchor points. Pull any of the Live Corners circle markers up to make the bottom of shape rounded.
Now we have two overlapping points in the bottom part. Delete one of them using the Delete Anchor Point Tool (-) by clicking the point. Select the remaining point with the Direct Selection Tool (A) and use the Convert function in the control panel on top to Convert selected anchor point to corner, making the chin pointed.
Drag the point up a bit to shrink the shape.
Step 2
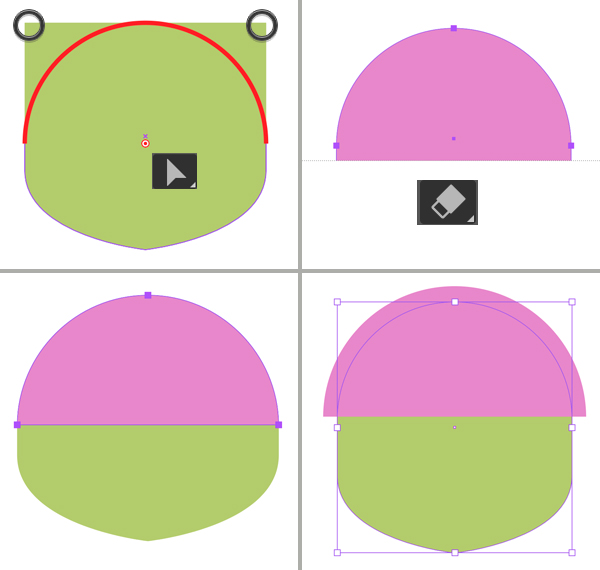
Make the top part of the head fully rounded using the Live Corners function.
Duplicate (Control-C > Control-F) the shape and let’s make the hair. Fill the copy with pink color and keep it selected. Take the Eraser Tool (Shift-E) and hold down Alt to make a rectangular selection over the part that you want to delete. Make the hair shape slightly larger. Now we have the bangs!
At this step I decided to make the head shape a bit taller for better proportions.
Step 3
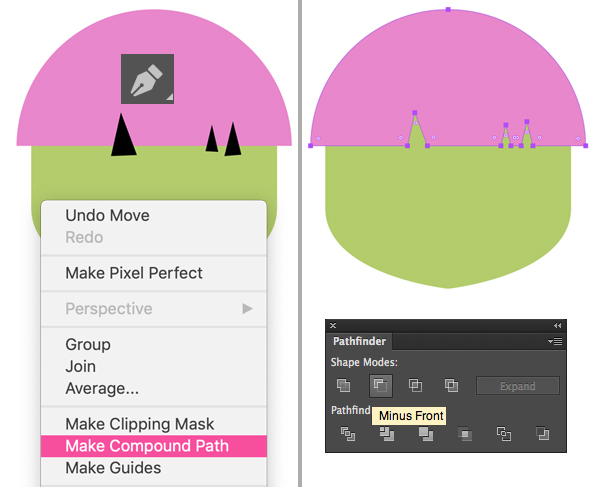
Let’s cut some parts of the bangs out to form stylized hair strands for our Halloween witch. Use the Pen Tool (P) to draw a few triangles above the bangs. Make sure that the shapes overlap as shown in the image below.
Select all the triangles and press Control-8 or Right Mouse Button > Make Compound Path this way turning three separate pieces into one.
Select the triangles together with the bangs and click Minus Front in the Pathfinder panel to cut the shapes out.
Step 4
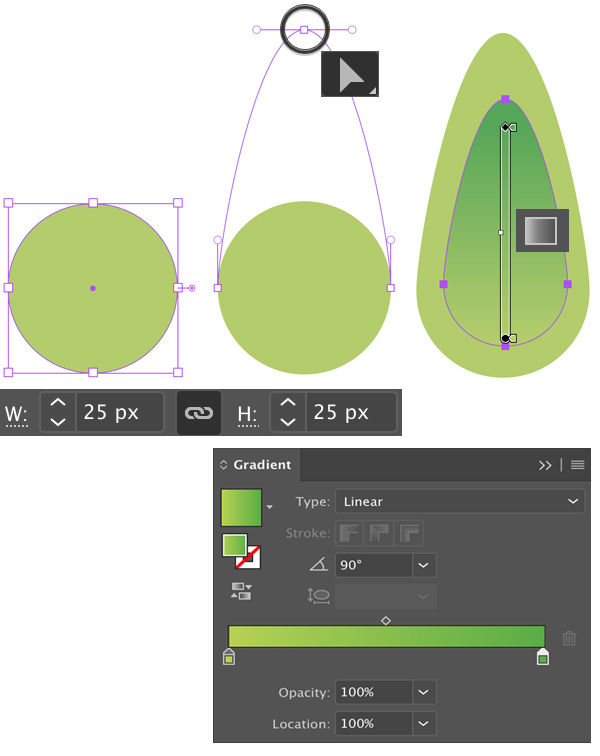
Let’s draw the ears! Use the Ellipse Tool (L) while holding down Shift to create a 25 x 25 px circle. Select its top anchor point with the Direct Selection Tool (A) and pull it up to make a pointed shape.
Duplicate the shape and make the copy smaller. Let’s apply a gradient to it to add some dimension to the ear! Open the Gradient panel (Window > Gradient) and set the left slider to the same light-green as we have for the ear. Set the opposite slider to darker green. Use the Gradient Tool (G) to apply a vertical Linear gradient to the shape by holding down Shift and dragging.
Step 5
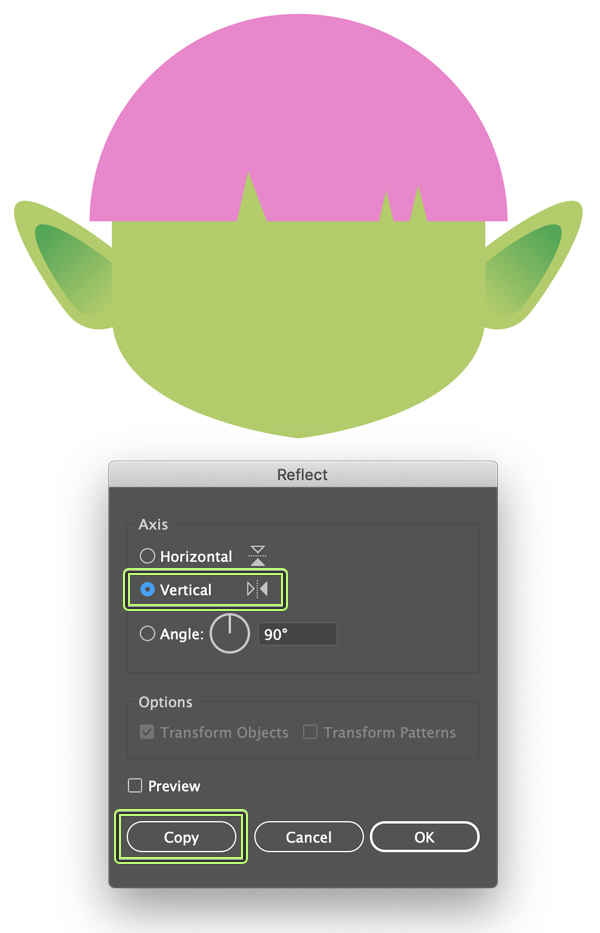
Group (Control-G) all the elements of the ear. Rotate the ear and attach it to the head. Press Shift-Control-[ to Send to Back placing the ear behind the head shape.
Use the Reflect Tool (O) to make a second ear. Double-click the tool icon in the Tools panel and select the Vertical Axis. Press Copy to create a mirrored shape.
Step 6
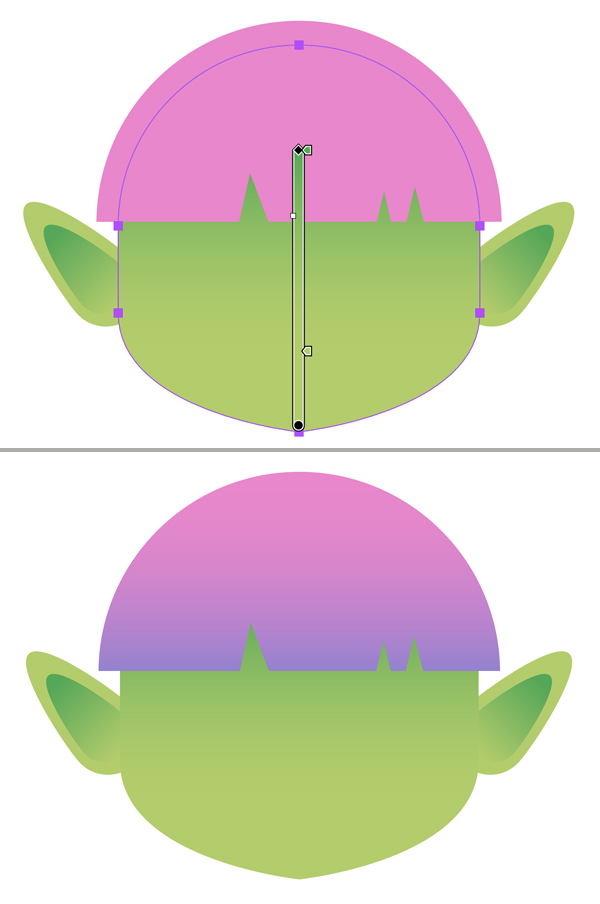
Let’s make the colors more interesting by applying linear gradients to the head and to the hair with the help of the Gradient Tool (G).
Step 7
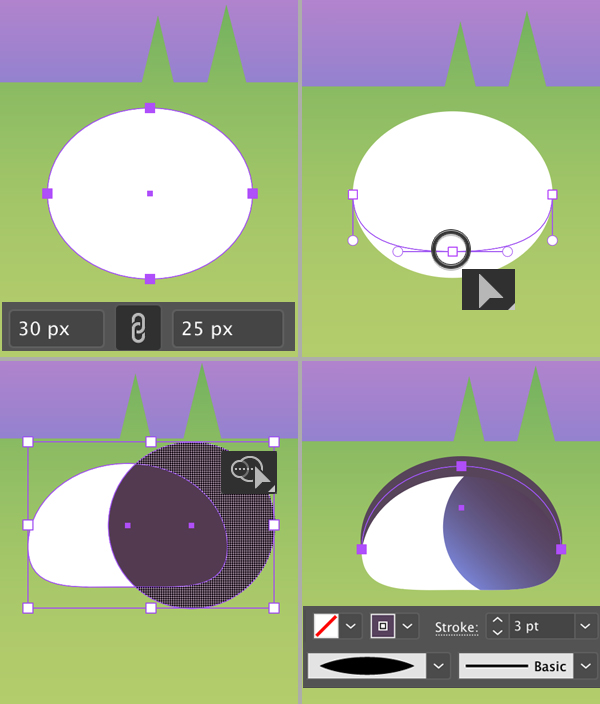
Now we’ll create the eyes! Start with a 30 x 25 px white ellipse. Select the bottom anchor point with the Direct Selection Tool (A) and drag it up a bit to make the bottom part of the eye flat.
Draw a dark circle for the pupil and place it above the eyeball. Let’s erase the outer part of the circle that we don’t need. Keeping both shapes selected, take the Shape Builder Tool (Shift-M), hold down Alt and click the part of the circle that you want to delete. There we have it!
Now we can apply a dark purple-blue gradient to the pupil and draw a stroke for the eyelashes along the top eyelid. Use the Pen Tool (P) to draw a stroke on top of the eye and apply a dark-purple color in the Colors panel. Go to the control panel on top (or to the Stroke panel in Window > Stroke) and set the Width to 3 pt and Variable Width Profile to Width Profile 1.
Step 8
Draw a white triangle for the eye highlight and Group (Control-G) all the elements of the eye. Duplicate (Control-C > Control-F) the eye and move the copy to the opposite side of the face holding down Shift.
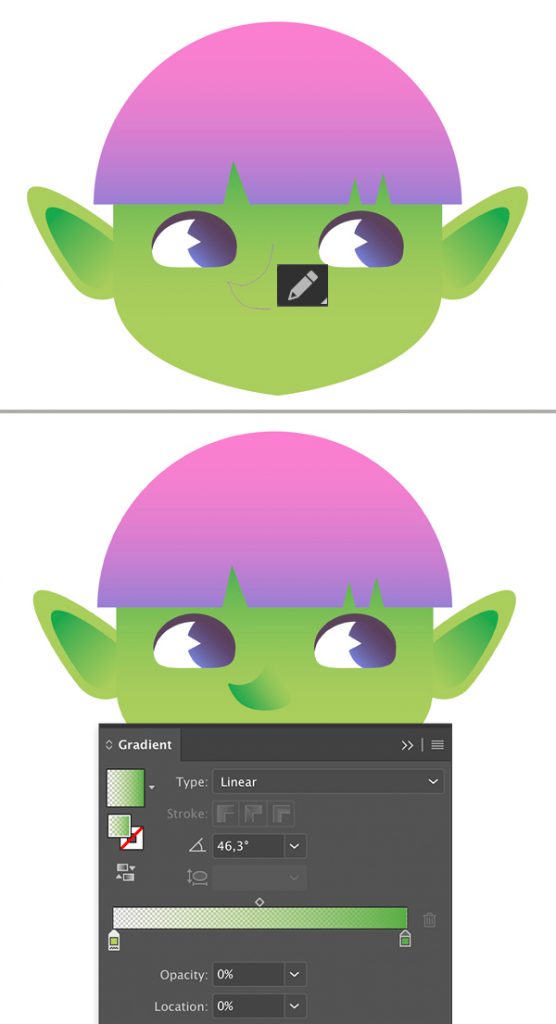
Now we can draw the nose! Take the Pen Tool (N) and draw a pointy shape. Fill it with the same linear gradient as we have for the inner part of the ears, making the tip of the nose dark-green. Try to blend the opposite side of the gradient with the face. To do so, set the Opacity of the left slider to 0% in the Gradient panel.
Step 9
Create a smiling mouth using a copy of the stroke that we’ve made for the eyelashes. Scale it up and turn it upside down. Use the Pen Tool (P) to add a funny fang in the corner of the mouth.
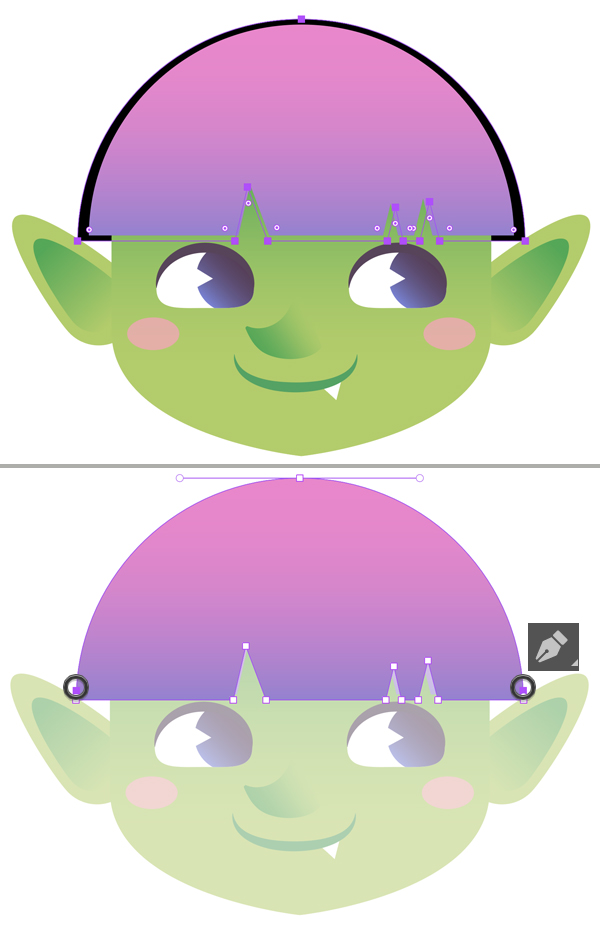
Let’s move on and create the back part of the Halloween witch’s hair. Duplicate the bangs and Send the copy to Back (Shift-Control-[).
Double-click the created copy to isolate it. We need to extrude its bottom part down to lengthen the hair, but if we do so right away, it will distort the top part of the shape. In order to preserve the desired silhouette, let’s take the Pen Tool (P) and add two more anchor points: one above the bottom left anchor point and another one on the opposite side, above the bottom right anchor point. These points will keep the top part of the shape from moving.
Step 10
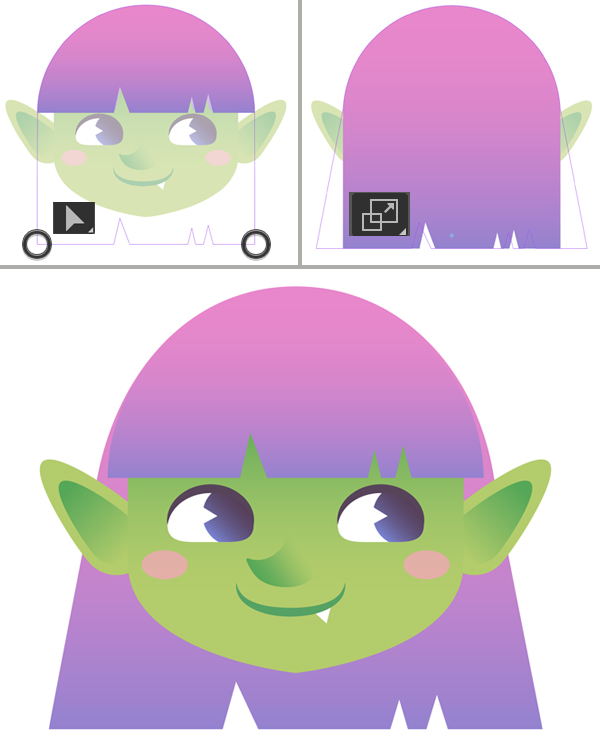
Use the Direct Selection Tool (A) to select all the points along the bottom edge of the shape (including the corners) and pull down while holding Shift.
We can make the shape fancier by expanding the width of the bottom part with the help of the Scale Tool (S).
Step 11
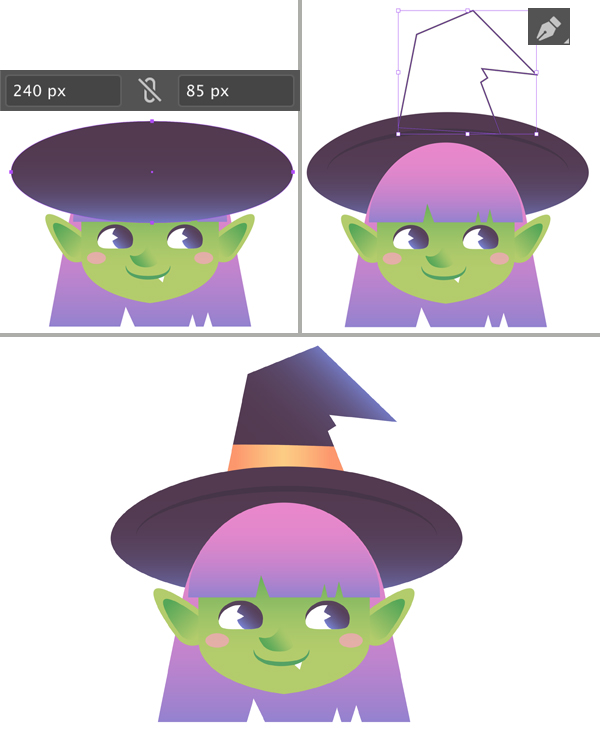
Now we’ll create another important element of our halloween witch – a witch’s hat! Start with a 240 x 85 px ellipse on top of the head. Send it to Back and switch to the Pen Tool (P) to draw the top part of the hat.
Add minor details to the hat to make it look more interesting. You can make a ribbon by duplicating the top part and using the Eraser Tool (Shift-E) to erase the unneeded parts, leaving only a narrow rectangle with a golden linear gradient.
Step 12
Our cute halloween witch looks almost completed! We can add a neck by making a rectangle with the Rectangle Tool (M). Use the Pen Tool (P) to add a point in the middle of the bottom edge and pull it down using the Direct Selection Tool (A).
Use the Polygon Tool or the Pen Tool (P) to create a large upside-down triangle for the collar. You can make its edges slightly arched with the help of the Curvature Tool (Shift-`).
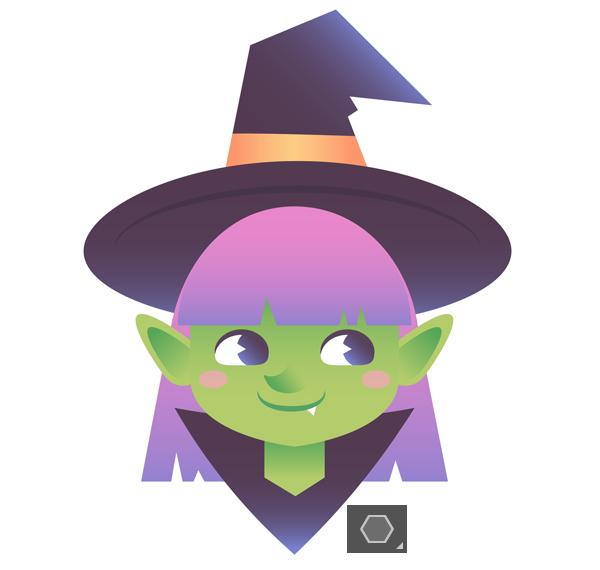
Our Cute Witch is Finished! Trick or Treat!
Great work! This Halloween witch turned out to be cute and not spooky at all! We can make the composition look more completed and interesting by putting a dark rectangle in the bottom of the layer for the background. I’ve used the same tools and techniques and added some Halloween elements around the character for Halloween vibes.
You can add some minor details to the composition to your liking, too!
I hope you’ve enjoyed following the tutorial and learned some new tips and tricks that will be useful for your future projects!
Happy drawing!

Author: Yulia Sokolova
2D/3D artist and tutorial instructor, focusing on character creation, icons, lettering design, and illustrations.


