

I have been asked many times how I create some of the shiny buttons I sell on iStock. Although there are other tutorials out there, this one shows you how to create these buttons without blends and transparencies. It is a relatively simply technique that can be applied to many different elements other than buttons. Moreover, using this shiny effect will create a cleaner, more accessible, and consistent file.
Notes
This tutorial was created in Adobe Illustrator CS3. Most, if not all, functions should be available in Illustrator 10 and up. Functions specific to Illustrator CS3 will be noted.
Keyboard shortcuts are displayed in orange. ⌘ is displayed for the Command key (mac), with the Ctrl key being the Windows equivalent (not displayed).
Step 1
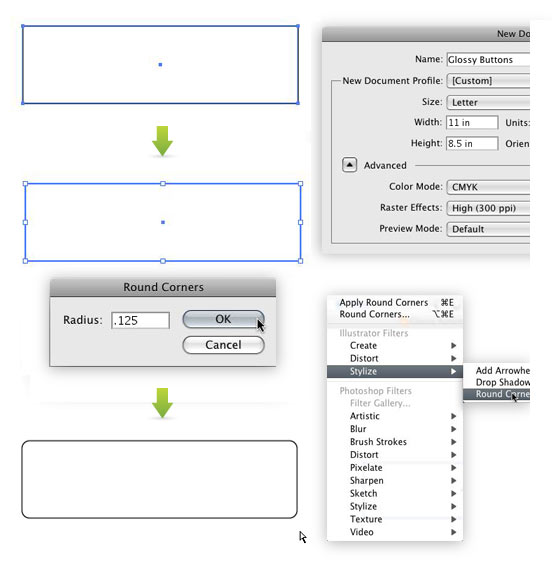
Create a new document in CMYK color mode (color mode can be changed later). Using the Rectangle Tool (m), create a rectangle the size of the button you want. If you want, you can round the corners by going Filters > Stylize > Round Corners and pick an appropriate measurement. I used .125″.
Step 2
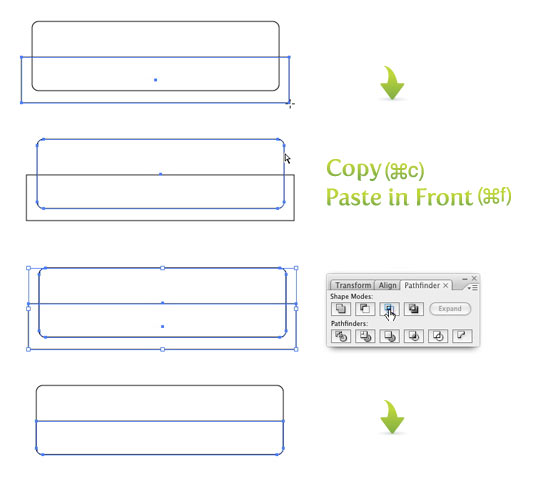
For this step you are going to create the shimmer of the button. Take the Rectangle Tool (m) and drawn a rectangle half way down the button shape. Make the new box slightly extend past the button shape to the left, right, and bottom.
You are going to want the shimmer shape to be roughly in the middle of the button. Copy (⌘c) the button shape and Paste in Front (⌘f). Select the shimmer shape,one copy of the button shape and Intersect the shapes. It also helps to expand the shape (the far right button in the Pathfinder Panel).
Step 3
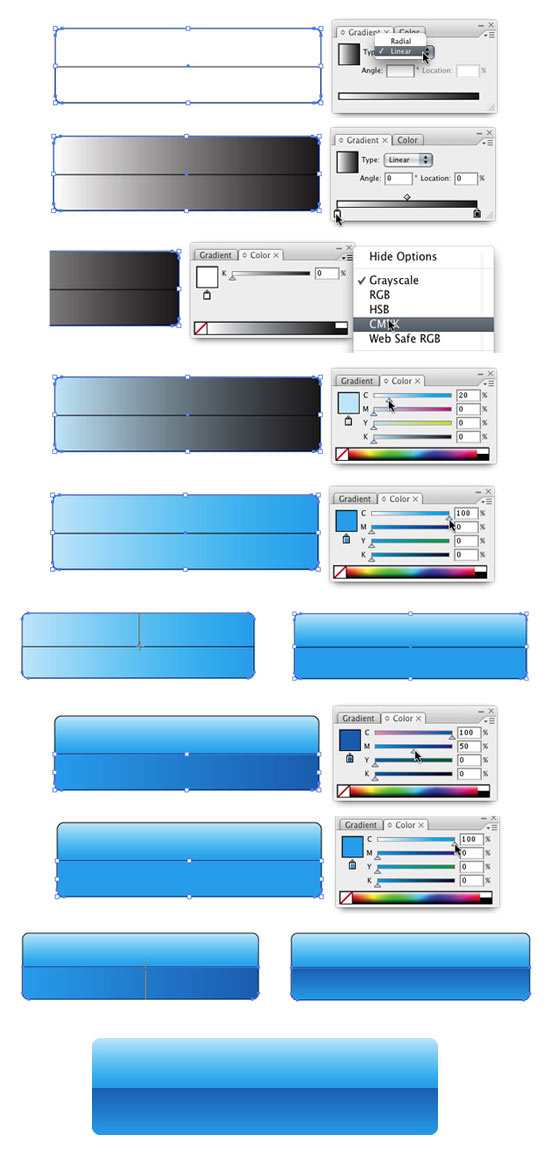
Now it is time to add gradients. Here is where the shiny goodness happens. First make the button shape a gradient by selecting Linear in the Gradient Panel. Click on the first swatch in the gradient and change the color in the Color Panel to 20% cyan. You might have to click the options in the top right of the Color Panel to bring up the CMYK sliders. Next, click the other swatch in the Gradient Panel, and make it 100% cyan. With the button shape still selected, use the Gradient Tool (g), click at the top of the button shape and drag till you reach the shimmer shape.
Next, make the shimmer shape a gradient like the button. This time, make the lighter color 100% cyan and the other color 100% cyan and 50% magenta. With the shimmer shape selected, take the Gradient Tool (g), click the bottom of the shimmer shape and drag to the top of the shape.
I use the Color Panel to mix colors, but if you are more comfortable picking colors with the Color Picker, that will work just the same.
Get rid of any borders and you have your button!
Step 4
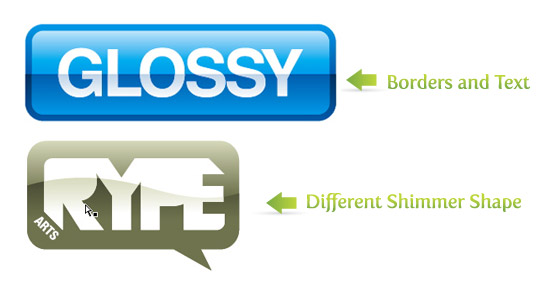
You can embellish the button any way you want. You can add borders, text, icons, or whatever! Look at the examples I provide. You can even add the shimmer to any element you embellish the button with. Just repeat steps 2 and 3 (it its good to change the colors) with the new element. Make sure that the shimmers on each element line up at the top.


Nice Tutorial for a beginner like me.
Please can you help me, I wanted to know
that How to remove the borders of the rectangle button we created here?
The black color borders around the buttons that were removed here,
please let me know how to do it…
Thanks a lot
Thank you. I enjoy reading all of your post. I like to write
a little comment to support you.
Great tutorial
it’s so cool dan simple tutorial
give me more :}
great one!!!
foe everyone who dont know how to make the text:
just write the text in white, put it on the button ant in the transparent panel select “hub” or “color” mode 🙂 that’s works fine.
Thank you. Great tutorial
Good Tutorial for a beginner like me.
Please can you help me, I wanted to know
that How to remove the borders of the rectangle button we created here?
The black color borders around the buttons that were removed here,
please let me know how to do it…
Thanks.
Awesome stuff
Hello everyone!
First I want to that this Website is awesome! In this Tutorial my problem is in Step 2. When I intersec the shapes then the Rectangle don’t get the shape of the original ( don’t get round edges our there is no straight line on the top). I don’t know what’s wrong maybe someone could help me. Thanks!
Read this tutorial, needs more detail in explaining. I’m really tired of people posting tutorials and not knowing how to explain it. grrr….
I use CS5, and I think its more easily use rounded rectangle tool than rectangle tool that combined with Illustrator rounded corner.
The quality of the tutorials here are excellent, I am a beginner to Illustrator and yet following all the steps, I managed to get that effect, bookmarked for all my future references 🙂
Ralph
sooo cool and clean EASY… great foundation lesson!!!!!
Just discovered your site and really like it. Thanks for the helpful info.
My Button 🙂
http://tinyurl.com/45lg8f7
Thanks for these wonderful tips
have been just 4 days using illustrator and your tutorials and tips help me get creative already……… tried out your above instructions and got this :
http://img854.imageshack.us/i/glossy.png/
is it correct?
Kind Regards,
kabir
If you are having problems with the text and the pathfinder try this:
Once you convert the text into outlines ungroup the text, then reselect each letter form an then create a compound path (command +8). After you do that then try step 2. It worked for me.
The reason you have to do this is because text converted to outlines is not a single shape, but really a group of distinct shapes which really do not overlap. To make an outlined text suitable for intersection, you have to ungroup it and convert it to a compound path (Cmd-8).
Hope this helps!
I have tried the tutorial over and over again, used every solution to problems mentioned in the comments, but IT WILL NOT WORK! The letters I mean by that. I was close once, but somehow the shape of my letters changed a bit, especially the ‘E’. -.-
thanks for the help and explanation, chantel; worked perfectly!
I am having trouble with offsetting paths… I am trying to recreate the shimmer effect on the border but when it just extends the shape rather then creating a different look. When offsetting paths, are you creating another shape to lay on top of the first one created, or should I have offset paths from the start? I tried to offset paths from the start but then the paths do not look different from the rest of the shape.
awesome its amazing ya very nice trutails
How can you remove the shape borders?
Good Informative Post.
Thanks,
(3cci.in)
Hi Rype!
I’m having the same problem as Erick had earlier – I can’t get the pathfinder tool to work with text paths for the embellishment.
how was this problem finally resolved? Whenever I try to use the intersect tool with the text and shimmer shape selected, I get an error saying that the tool requires 2 overlapping paths
Thanks!
Tim
Thanks for the tutorial. I tried to check out your stuff on iStock (we’re in the market for images), but iStock is down dealing with error.
In step 2 when i press Intersect i get all 4 corners rounded. How to make rounded only the lower ones?
If you are using CS4, try holding down Alt / Option when you are intersecting.
I’m using CS4 and when I do step 2 the bottom of the intersected shape has rounded corners and so does the top. Yours shows that the top has hard angles on the top and rounded corners on the bottom. Also, the expand button does not illuminate for me at all during this process.
I figured it out. I had to option click it to do so. Thanks or the tutorial.
awesome… great job!! i like it!
Hey Friend till stage i go ok but i get wrong in copy & past activity. First i copy that curve shape rectangle & then past it exactly above the older curve shape rectangle & then select all & click on intersect but i use to get single curve shape rectangle there is any middle line in new curve rectangle.
wow, step 3 is to hard to follow.
very nice post. thank you.
great article. thank you.
In step 2, after click on intersect, button’s bottom corners are no longer rounded. In your article they still looks like rounded. What am I doing wrong?
Cheers.
If you used Effects to Round the corners, you have to go Object > Expand Appearance. Did that help?
Yes, it helps. Thanks.
This is brilliant, such a straight forward way to create great shiny reflective butttons, fantastic. Something I will be using for my webdesign I am sure.
You just got one more fan! :O)
Great results! Thanks 😀
great stuff… nice tutorial
Thanx for such a good explanation about how to create buttons with Illustrator.
I will use it to create shiny buttons for my Money Makers Portal website.
Easy lesson, lots to be learned, thank you!
Great tutorial, thank you.
This is an awesome post. I’m loving this site!
Everything works nicely…thank you for the instructions. Just one thing – I’ve worked on your tutorial about stickers…all is good. I add text, create outlines, copy+paste front, intersect, add the gradient…but the top of my text changes color leaving the bottom white. This looks funny…so I want to make it darker on the bottom and gradient on the top part of the text. I seem to be struggling with this. How is this accomplished?
Cheers!
Thank you so much!!!!
Wonderful tutorial. I was impressed by the comments, too – extremely helpful and caring.
Thank you.
Very nice tutorial.
Keka,
With the bigger rectangle selected go Object > Path > Offset Path. Change the Offset to the desired amount (press preview to see how it looks). Then repeat the steps in the tutorial to get the glossy look on the border. Just make sure that the shimmers line up.
Let me know if that helps.
Slick!
how do you add the border?
I guess it is more of a preference. I just like everything outlined.
I tried it and it works nicely, but i have one question: why make outlines of the text when intersect works just fine with ordinary text?
Glad that worked!
Ta-daaa! It worked! Thanks! I was copying and pasting the other box twice. That’s why it wasn’t working.
Jim,
Before you Intersect the two shapes, make sure you Copy the Button Shape and Paste in Front. Now you should have two copies. Now drawn the shimmer shape and select ONE of the buttons shapes, then intersect and expand.
Let me know if that helps.
I’m getting hung up at Step 2. I’m able to follow everything else, but when I click the “Intersect” and “Expand” commands, the upper half of the shimmer object disappears – so only the bottom 1/2 of the button is left below the straight line.
What could I possibly be doing wrong?
BTW – Awesome tutorials – they’re very inspiring. Keep them coming!
I’m glad that worked out!
Thank you, so much you really help me
• Once you have your button, type the desired text and place it on the button.
• Select the Text and Outline by going, Type > Create Outlines.
• Make the Text White
• Select the Shimmer Shape of the Button and the Text and Copy and Paste in Front.
• With both object still selected Intersect the shapes from the pathfinder panel.
• Make the new object a Linear Gradient with on swatch white and the other a 5% Cyan, 5% Magenta, and 2% Black.
• Adjust the gradient.
Let me know if that helps.
Hi I’m having problems adding the text.
“With both object still selected Intersect the shapes from the pathfinder panel.”
When I do this it tells me to “select two overlapping paths”. Why wont these intersect? They ARE overlapping….I’m using CS4 and have only been using it for a week now.
Help!
I’m having the same problem in CS5. It says “The filter produced no results. Please select two overlapping paths.
What am I doing wrong?
If u can, then please explain that part with more detail,
I really need some help with that. Thanks-
For the Shimmer on the Text, just repeat steps 2 and 3. Just make sure the the text is outlined. If that doesn’t help any I can go into more detail.
Nice tutorial, no problems following this tutorial, but for make the shimmer, with letters, i really got lost in that part.
Thanks for this! I have been bumbling around trying to do exactly this on Illustrator for hours!
me too. thanks v.much