Always wanted to illustrate an HDD icon, but never knew how? Well, in today’s tutorial, we’ll take a close look behind the entire process and learn how to do just that, using nothing more than some basic geometric shapes.
Grab a fresh cup of coffee and let’s get started! Continue reading
In today’s tutorial we’re going to learn how to create our very own volume adjustment icon, using nothing more than some basic geometric shapes combined with the power of the Align panel.
So, without wasting anymore time, grab that hot cup of coffee and let’s get started!
Some of the graphic and 3D editors have a Live Mirror Drawing feature, which allows you to draw simultaneously on both sides of one or more axes of symmetry. Ufortunately, Adobe Illustrator does not have this feature although it is a very powerful and multi-feature application. We can, however, implement Live Mirror Drawing in Illustrator by using only its basic features. You will learn how to do it from reading today’s article. Continue reading
In today’s tutorial, we’re going to take a look behind the process of creating a tablet icon, and see how we can take some simple shapes and turn them into a finished usable asset. So, assuming you already have Illustrator up and running, let’s jump straight into it!
Welcome back to another Illustrator based tutorial, in which we’re going to take a quick look behind the process of creating a smartphone icon, and see how you can take some simple shapes and turn them into a finished usable product. That being said, let’s jump straight into it.
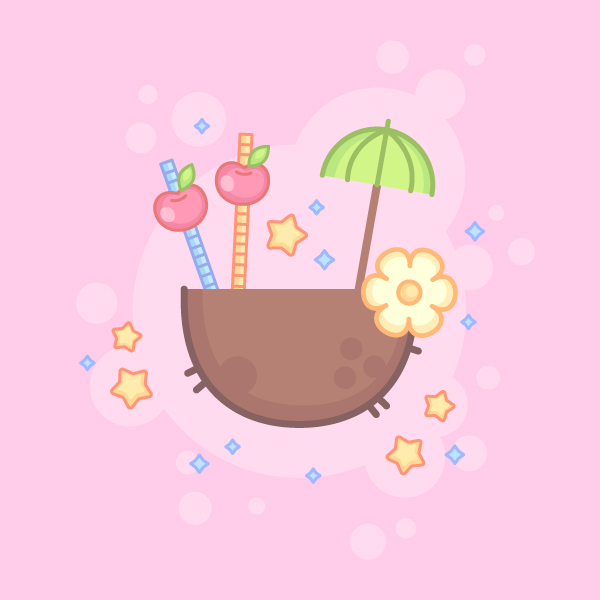
In this tutorial we’ll be creating a summer composition with tropical coconut cocktail in a trendy outlined flat style! Let’s learn how to work with the most useful tools of Adobe Illustrator to be able to modify basic geometric shapes and create vibrant illustrations for web-design, t-shirt prints, apparel design and many more! Are you ready? Let’s start!
Topics Covered: Shape Building, Stroke panel, Effects, Direct Selection Tool
Estimated Completion Time: 20 minutes
Final Image: Summer Coconut Cocktail
Step 1
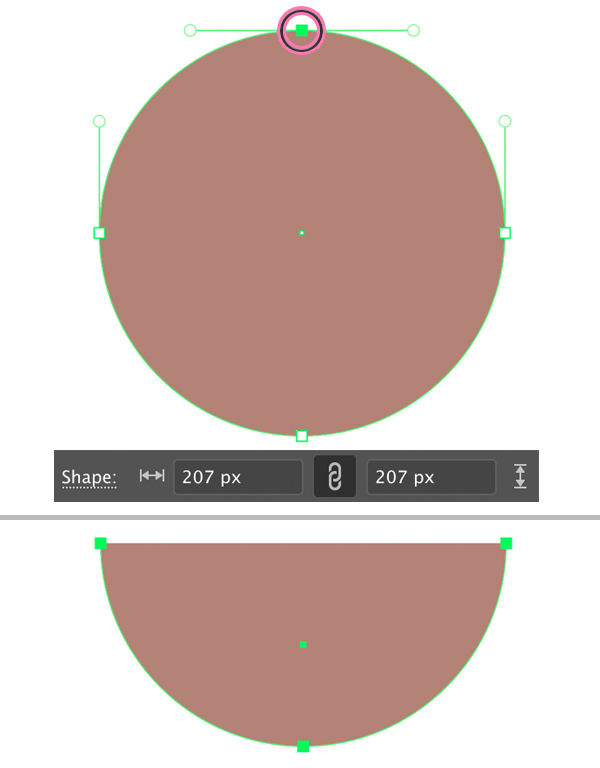
We’ll start with the coconut. Let’s take the Ellipse Tool (L), hold down Shift and create a circle of about a 207 x 207 px size. Fill it with brown color in the Color panel.
Take the Direct Selection Tool (A) and click the top anchor point to select it. Press the Delete key to remove the top point together with the top half of the circle.
Now the have the bowl-shape.
Step 2
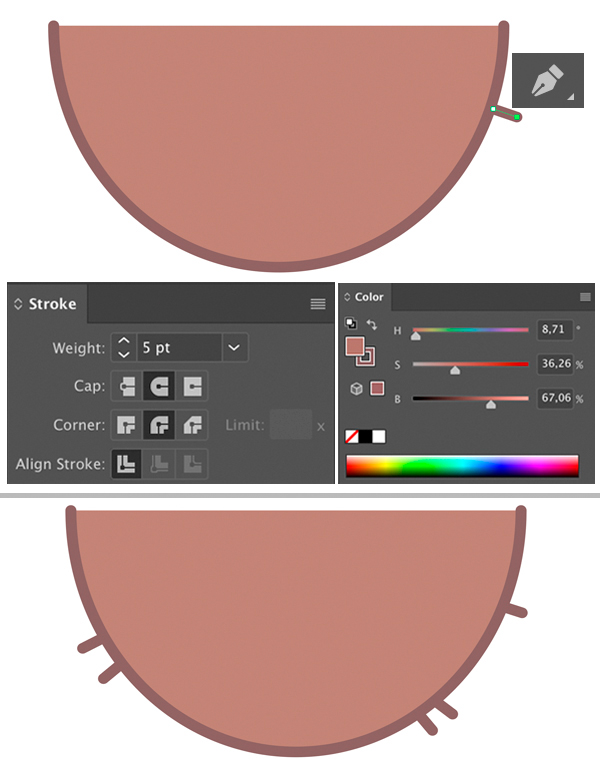
Let’s add an outline to our coconut by applying the Stroke in the Color panel. Select a darker brown color to turn on the Stroke and set its Weight to 5 pt in the Stroke panel (Window > Stroke) or in the control panel on top. Set the Cap to Round Cap to make the tips of the stroke rounded.
Use the Pen Tool (P) to add separate «hairs» to the coconut.
Step 3
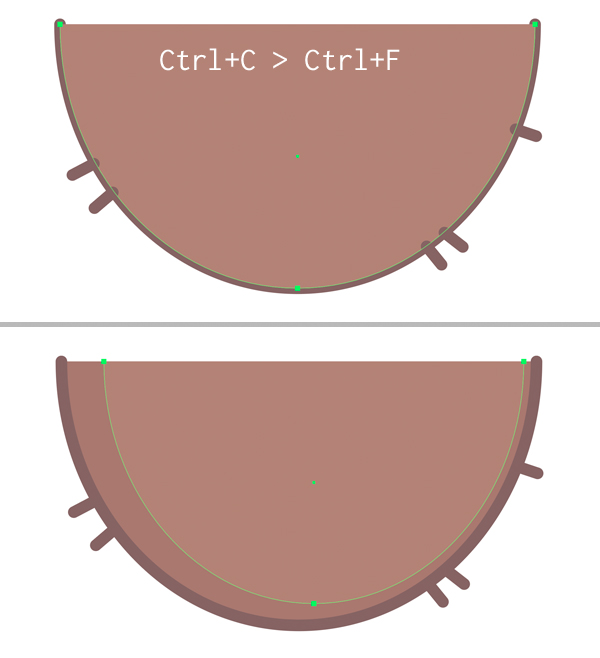
Now we’ll add a simple shadow to make the object more dimensional. Select the shape and duplicate (Control-C > Control-F) it.
Turn off the outline for the top copy by setting the Stroke to None in the Color panel. Make the shape slightly narrower and set its color to a lighter brown. Now the bottom copy is forming a nice simple shadow along the edge.
Step 4
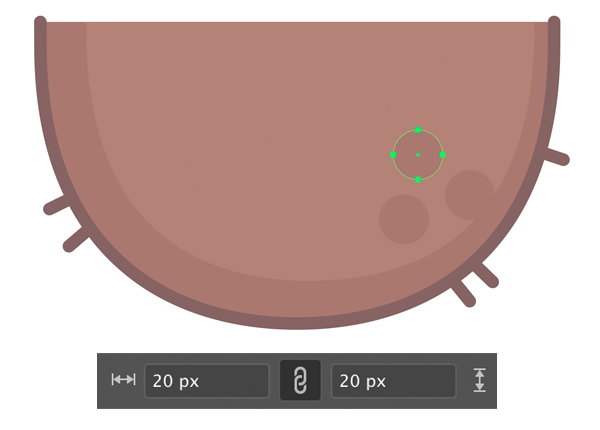
Use the Ellipse Tool (L) to add stylised holes on top of the coconut. Create three 20 x 20 px shapes and fill them with the same darker brown color as we have for the shadow along the edge. Use the Eyedropper Tool (I) to pick the color.
Step 5
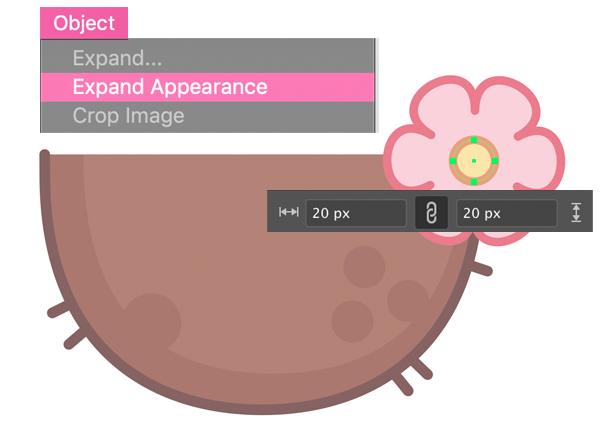
Let’s create a tropical flower to decorate our coconut cocktail! Start by finding the Polygon Tool in the Tools panel and double-click it. Set the number of sides to 6 to create a hexagon.
Keeping the shape selected, go to Effect > Distort & Transform > Pucker & Bloat. Set the Bloat value to 40% and click OK.
Step 6
Keeping the flower selected, go to Object > Expand Appearance to apply the effect.
Now we can use the Ellipse Tool (L) to place a 20 x 20 px yellow circle in the center of the flower and Group (Control-G) both elements.
Attach the flower at the right side of the coconut as shown in the image below.
Step 7
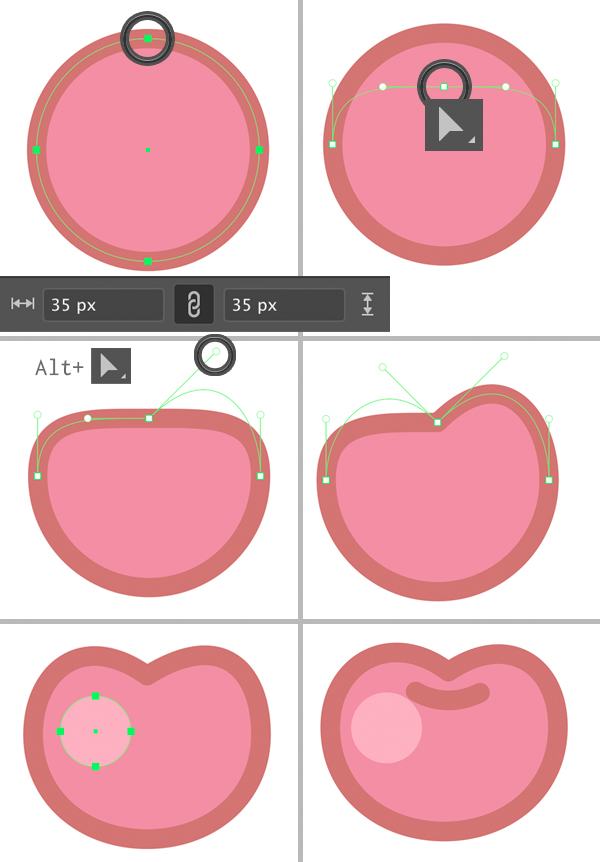
Let’s move on and create a cherry! Use the Ellipse Tool (L) again to create a 35 x 35 px pink circle with a dark outline.
Select its top anchor point with the Direct Selection Tool (A) and drag it down to squash the shape a bit.
Now hold down Alt and move one of the anchor handles up to about 30-45 degrees (you can also hold down Shift to move it exactly 45 degrees).
Repeat the same for the opposite anchor handle to create a heart-shaped top of the berry. Add a circular highlight without the outline using the Ellipse Tool (L).
Finish up with the cherry by adding a tiny arched line on top, using the Pen Tool (P).
Step 8
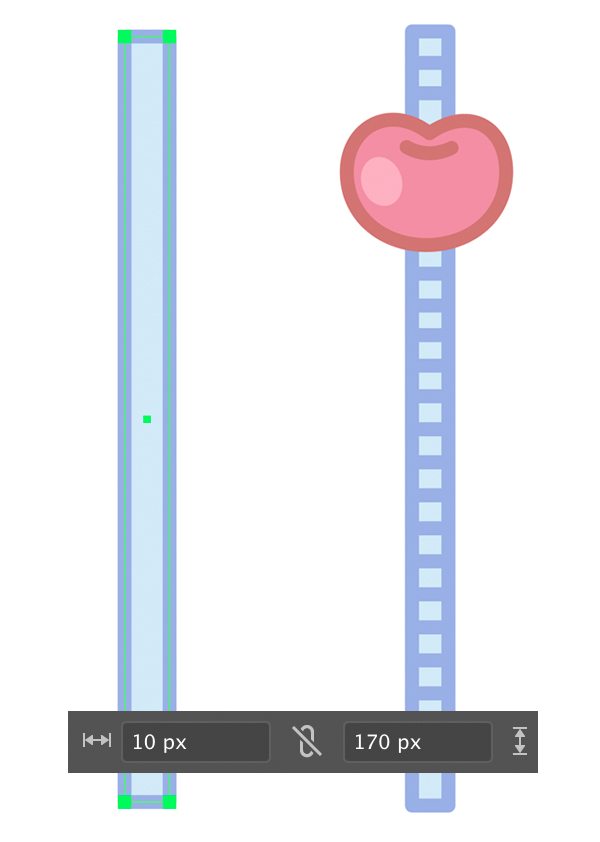
Now we’ll make a straw for the cocktail. Take the Rectangle Tool (M) and draw a 10 x 170 px blue shape with a darker outline. Attach our cherry on top. Use the Pen Tool (P) to add horizontal strokes to the straw making it look more interesting.
In order to add repeating elements fast and easy, do the following:
Create one stroke on top of the straw. Hold down Alt-Shift and drag the stroke down with the help of the Selection Tool (V) to create a copy;
Keep pressing Control-D over and over again to repeat the last action this way creating multiple copies until you cover the whole straw.
Voila! There we have it.
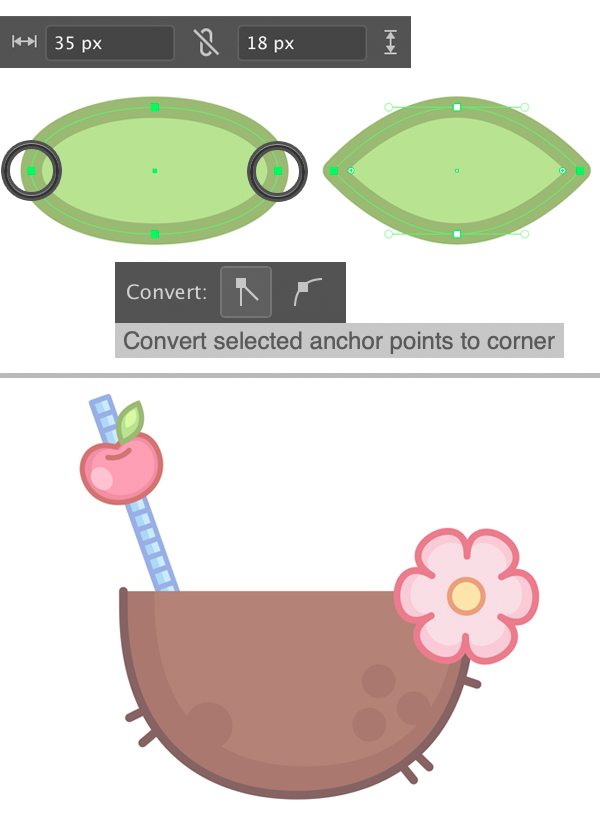
Step 9
Let’s add a simple leaf for the cherry. Use the Ellipse Tool (L) to draw a 35 x 18 px green oval. Select its left and right anchor points with the Direct Selection Tool (A) and click Convert selected anchor points to corner in the control panel on top to make the tips of the leaf pointed.
Attach the leaf to the cherry.
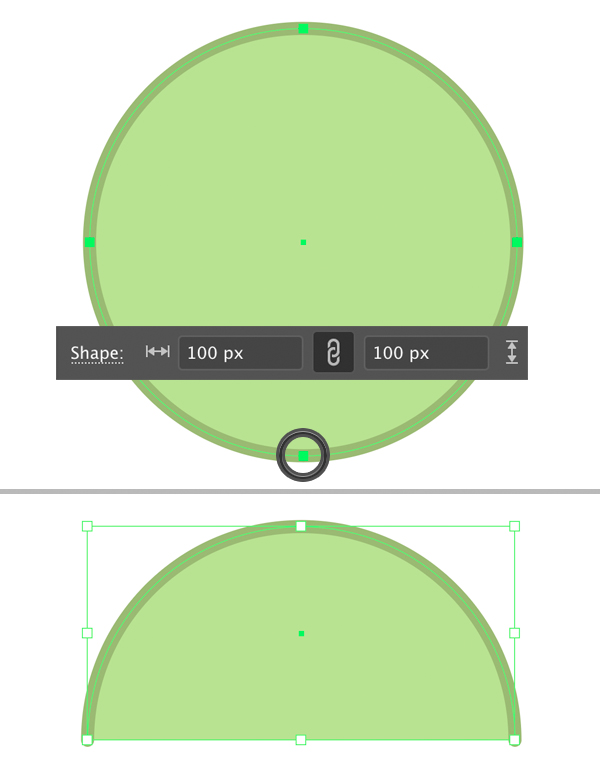
Step 10
Now we’ll create a stylised umbrella on a stick to decorate our coconut cocktail! Draw a 100 x 100 px circle using the Ellipse Tool (L). You can use the Eyedropper Tool (I) to pick the color and appearance from any other element, for example from the leaf.
Select the bottom point with the Direct Selection Tool (A) and Delete it, so that we have only the top half of the circle.
Step 11
Use the Pen Tool (P) to add some arched lines to the umbrella. Make the outlines thicker, if needed, and finish up by adding a brown stick. You can place it beneath the top part of the umbrella by pressing Shift-Control-[ to Send to Back.
Now our cocktail looks very festive!
I’ve added highlights and shadows to every element using the same duplicate-recolor-shrink technique as we did for the coconut in the Step 3.
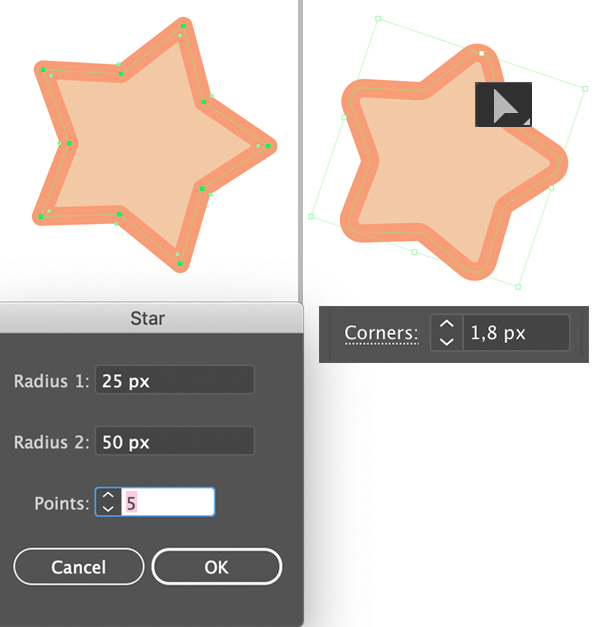
Step 12
Let’s make a simple star to fill the blank spaces of the composition. Double-click the Star Tool in the Tools panel and set the number of Points to 5. You can hold down the Control key to adjust the length of the points whenever you’re creating your star.
Keeping the star selected, take the Direct Selection Tool (A) and drag the Live Corners circle mark next to any point to make the corners slightly rounded. You can also adjust the Corners value in the control panel on top. I’ve set it to 1,8 px.
Step 13
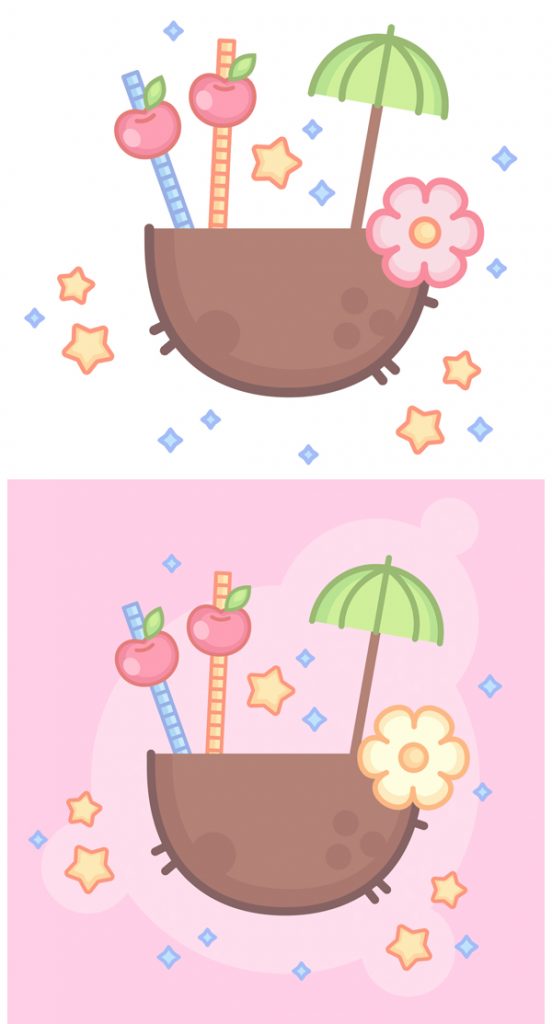
Speckle the stars around the coconut. Use the Star Tool to create 4-pointed stars as well for more variety.
We can export this image on a transparent background if we want to use it as a sticker or a print. Otherwise, we can add a colourful background with the help of the Rectangle Tool (M) and Ellipse Tool (L) and turn it into a colourful postcard.
I usually use a separate Layer for the background in the Layers panel to make my file more organized.
Relax & Chill! Our Summer Coconut Cocktail is Finished!
Great job, guys! I hope you’ve enjoyed following this tutorial and felt those sunny tropical vibes! Use these simple tips and tricks to create any outlined flat icons, logotypes or other elements for your future designs.
Have fun!
Author: Yulia Sokolova
2D/3D artist and tutorial instructor, focusing on character creation, icons, lettering design, and illustrations.
It’s the perfect time of year to start running! Let’s get motivated and create a running shoe achievement icon in a trendy flat style! We will be working with basic geometric and use various tools and functions of Adobe Illustrator to make the shapes work together, building a balanced composition with dynamic elements. Ready, steady, GO!
 Always wanted to illustrate an HDD icon, but never knew how? Well, in today’s tutorial, we’ll take a close look behind the entire process and learn how to do just that, using nothing more than some basic geometric shapes.