

The magical time of winter holidays is approaching! Let’s get prepared and design a simple festive postcard that we can send to our nearest and dearest. We’ll be using basic geometric shapes to create a clean and stylish design. Let’s begin!
Tutorial Details
- Program: Adobe Illustrator CS6 – CC
- Difficulty: Intermediate
- Topics Covered: Shape Building, Pathfinder, Gradient Tool, Pathfinder, Scale Tool
- Estimated Completion Time: 20 minutes
Final Image: Christmas Tree in a Glass Ball

Step 1
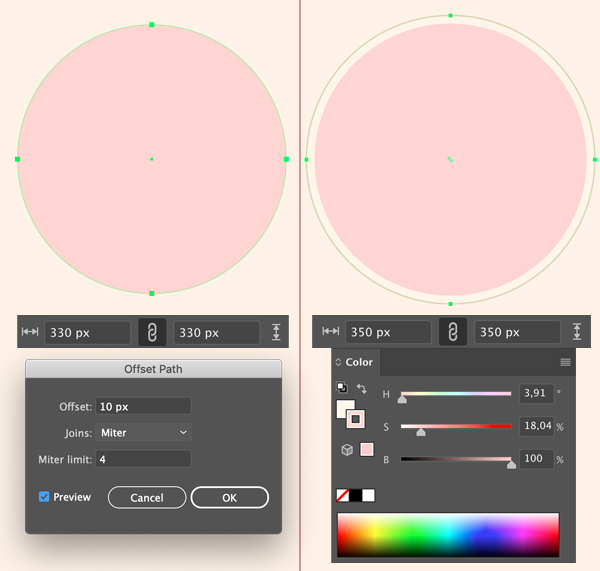
Take the Ellipse Tool (L) and let’s start with a glass ball. Hold down Shift and create a large even circle of 330 x 330 px size.
Now let’s add some thickness to the ball. Either use the Object > Path > Offset Path function with 10 px Offset value or just make a copy (Control-C > Control-B) and scale the bottom copy up to 350 x 350 px.
Fill the larger copy with beige color and apply a pink thin 2 pt stroke to it in the Color panel. You can vary the Stroke Width either from the control panel on top or from the Stroke panel (Window > Stroke).
Step 2
Now let’s start creating the Christmas tree. Take the Rectangle Tool (M) and make a 75 x 60 px green shape. Select its top anchor points with the Direct Selection Tool (A) and use the Scale Tool (S) to move the points closer to each other.
Use the Direct Selection Tool (A) to make the top corners fully rounded by pulling the circle of the Live Corners closer to the center of the shape. You can also set the Corners radius value manually in the control panel on top.

Step 3
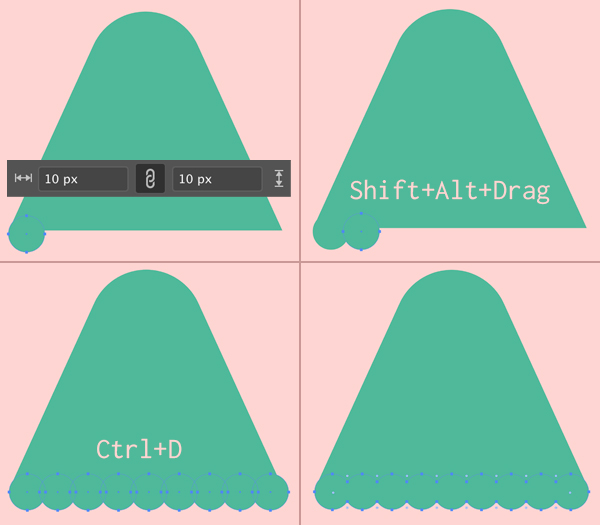
Let’s’ make the bottom edge of the shape look more fluffy. Use the Ellipse Tool (L) to create a small 10 x 10 px circle. Attach it as shown in the image below to make it fit the bottom left corner. Select the circle, hold down Shift-Alt and drag to the right, creating a copy.
Press Control-D multiple times to repeat the last action creating more copies. If the last circle doesn’t fit the length of the shape, don’t worry about that. Select all the circles and scale them down all together to make them fit the bottom edge of the shape.
Step 4
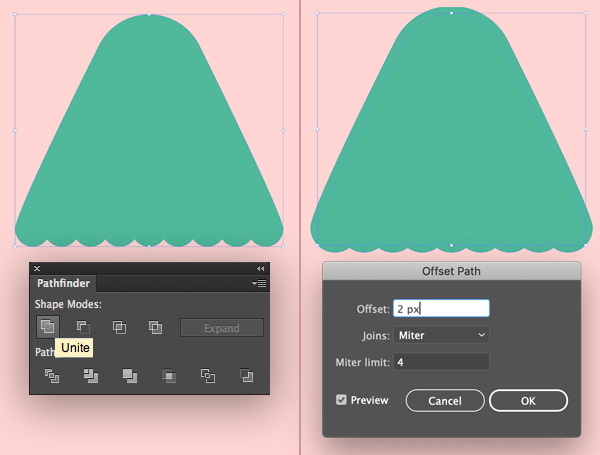
Select all the circles together with the large shape and Unite them in the Pathfinder panel (Window > Pathfinder).
Let’s add an outline to separate the shape from similar pieces that we’ll be creating for the tree. Select the shape and go to Object > Path > Offset Path. Set the Offset value to 2 px and leave all other options as default.
Step 5
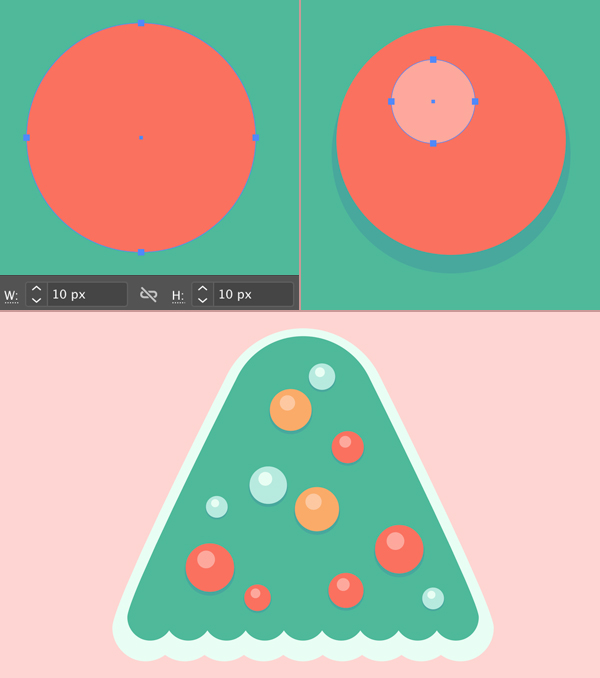
Now we can fill our outline with some light snowy color and add Christmas toy balls for decoration! Use the Ellipse Tool (L) to make circles of different sizes and colors. Don’t forget to add dark-green shadow beneath each ball and put a bright highlight on top.
Step 6
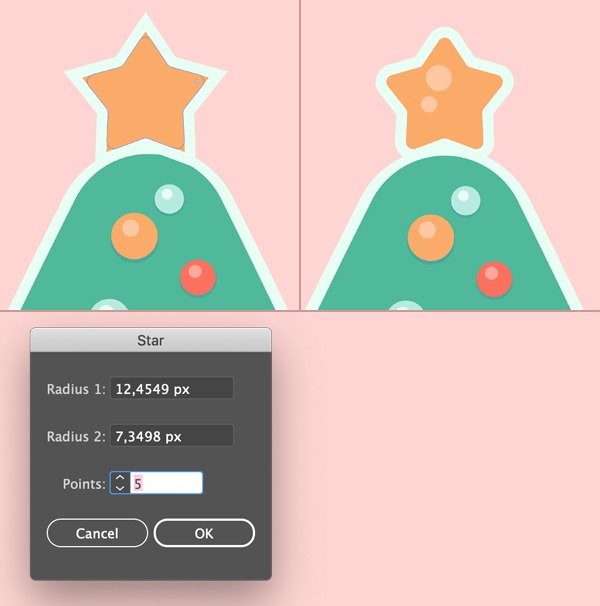
Use the Star Tool to put a golden star on top of the tree. You can vary the length of the beams by holding down Control while creating the shape.
Use the Direct Selection Tool (A) to make the points of the star slightly rounded. Don’t forget to add a couple bright circular highlights on top to make the star shiny.
Step 7
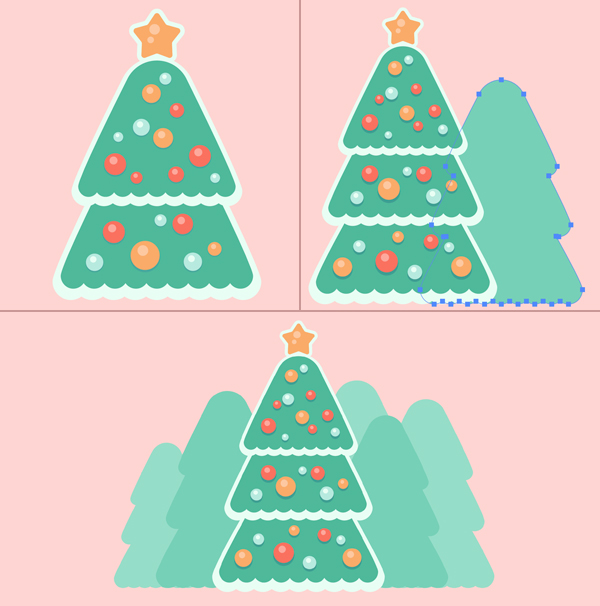
Now let’s create the layers to make the Christmas tree look completed. Group (Control-G) the green shape together with the balls and the outline. Hold down Shift-Alt and drag the shape down to make a copy. Send the copy Backward (Control-[) to locate it beneath the initial shape.
Repeat the same steps to create the third element of the Christmas tree. Now it looks festive!
Let’s add some tree silhouettes in the background to create an illusion of deep forest. We can use the outlines that we’ve made for our Christmas tree and Unite them in Pathfinder to create one merged silhouette.
Duplicate the created shape a few times and arrange the silhouettes behind our Christmas tree as shown in the image below. Vary the colors slightly to separate the silhouettes from each other.
Step 8
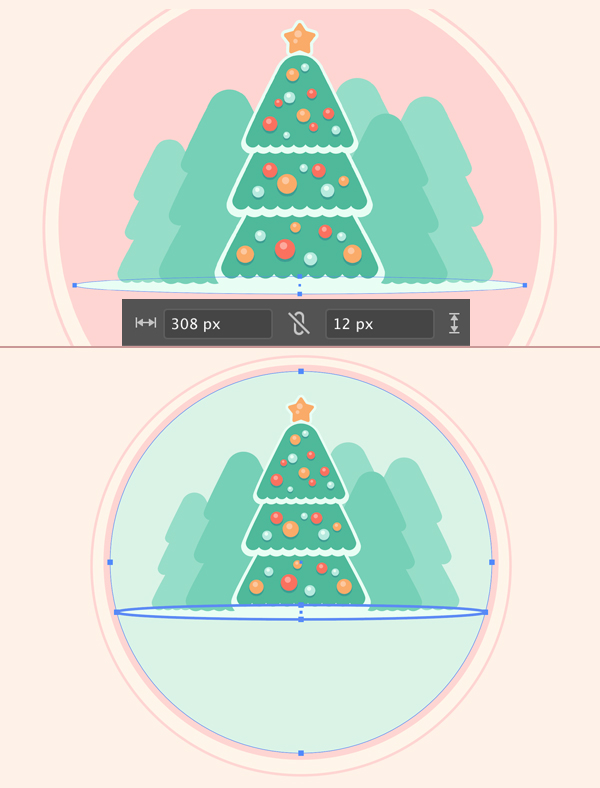
Let’s put our trees on a surface. Use the Ellipse Tool (L) to make a narrow 308 x 12 px shape and fill it with bright color to depict the snowy texture.
We need to fill the bottom part of the glass ball with snow as well. Duplicate (Control-C > Control-F) the pink circle (that we’ve created in Step 1) and fill the copy with bright snowy color. Make the circle slightly smaller and try to make it fit the width of the ground ellipse.
Step 9
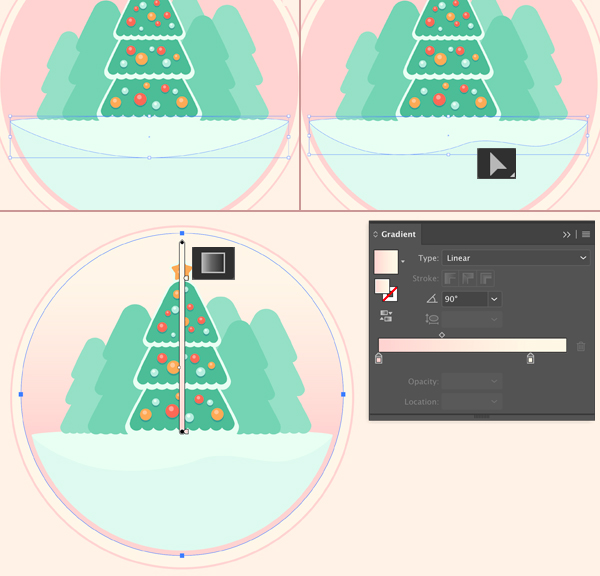
Let’s bend the ground ellipse a bit to make the snow look more natural and organic. Use the Direct Selection Tool (A) to pull and rotate the anchor handles, creating a wavy silhouette.
Let’s also add a subtle gradient effect to the glass ball to make it look more true-to-life. Select the pink circle and apply a vertical linear gradient with the help of the Gradient Tool (G). You can set the desired colors in the Gradient panel (Window > Gradient).
I’ve made the top part of the gradient the same light-beige color as I have for the background. It gives a transparency effect to the glass ball.
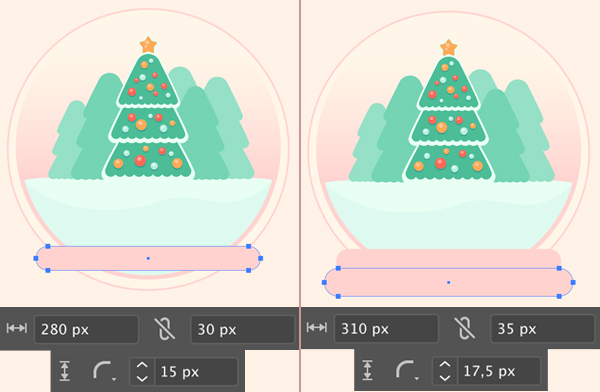
Step 10
Now we’ll design the base of the ball. Use the Rounded Rectangle Tool to make a 280 x 30 px shape for the top part of the stand.
Add a larger 310 x 35 px rounded rectangle for the bottom part. I’ve filled both elements with flat pink color so that the stand doesn’t distract the attention from the main element of the composition – our festive Christmas tree.
Step 11
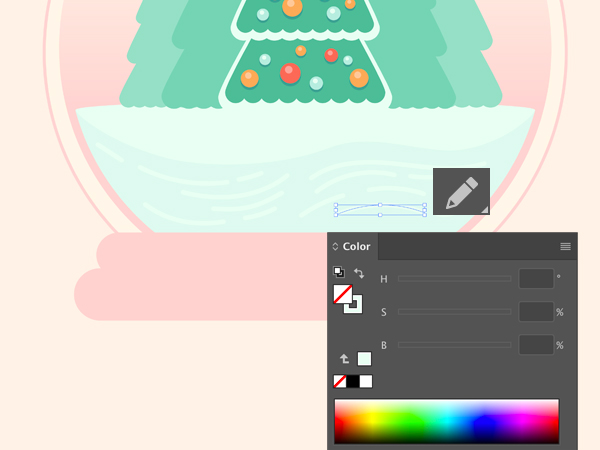
Here I’ve decided to add some more details to the snow with the help of the Pencil Tool (N). I’ve set the stroke color to white and made some wavy lines. You can adjust the Pencil Tool (N) settings by double-clicking it’s icon in the Tools panel. Setting the slider all way up to Smooth might be more comfortable.
Congratulations! Our Christmas Tree in the Glass Ball is Finished!
Great work! Our decorated Christmas tree looks very festive inside of the glass ball! We can add some minor details to make it look more completed. For example, I’ve added a text to the stand and scattered a few snowflakes inside of the ball.
I hope you’ve enjoyed following the tutorial and learned some new tips and tricks that will be useful for your future projects!
Happy drawing!
Author: Yulia Sokolova
2D/3D artist and tutorial instructor, focusing on character creation, icons, lettering design, and illustrations.


