
 The most magical time of the year is coming! Let’s get ready for Christmas and New Year and learn to draw a stylised isometric Christmas present in Adobe Illustrator using its tools for creating isometric objects and patterns! This is a good opportunity to try out modeling a simple isometric object as this style is still trendy. Let’s begin!
Tutorial Details
- Program: Adobe Illustrator CS6 – CC
- Difficulty: Intermediate
- Topics Covered: Shape Building, 3D Effect, Isometric Style, Swatches panel, Symbols panel, Appearance panel
- Estimated Completion Time: 25 minutes
Final Image: Isometric Christmas Present

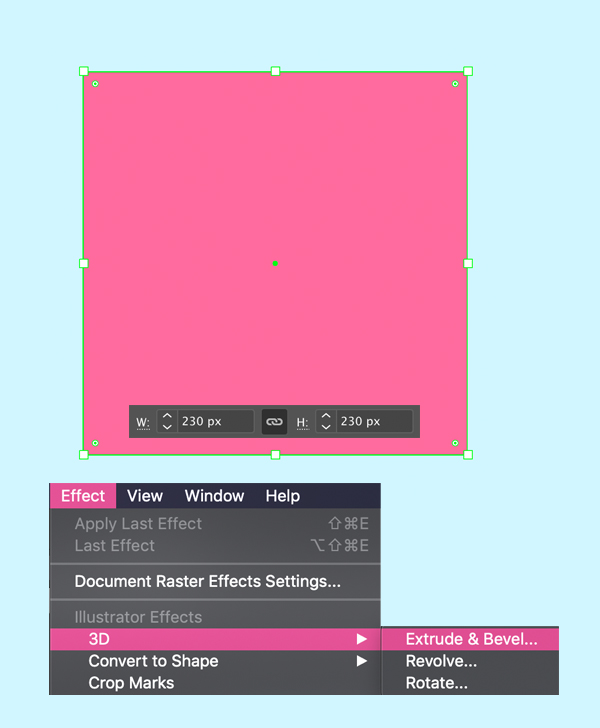
Step 1
Let’s start by creating a square using the Rectangle Tool (M). Hold down Shift and make a 230 x 230 px pink shape.
Let’s duplicate our square (Control-C > Control-F) and keep the copy in the Layers panel (click the eye icon to make it invisible) as we’ll need it later.
Now we’ll turn our first square into a cube! Keeping the shape selected, go to Effect > 3D > Extrude & Bevel.
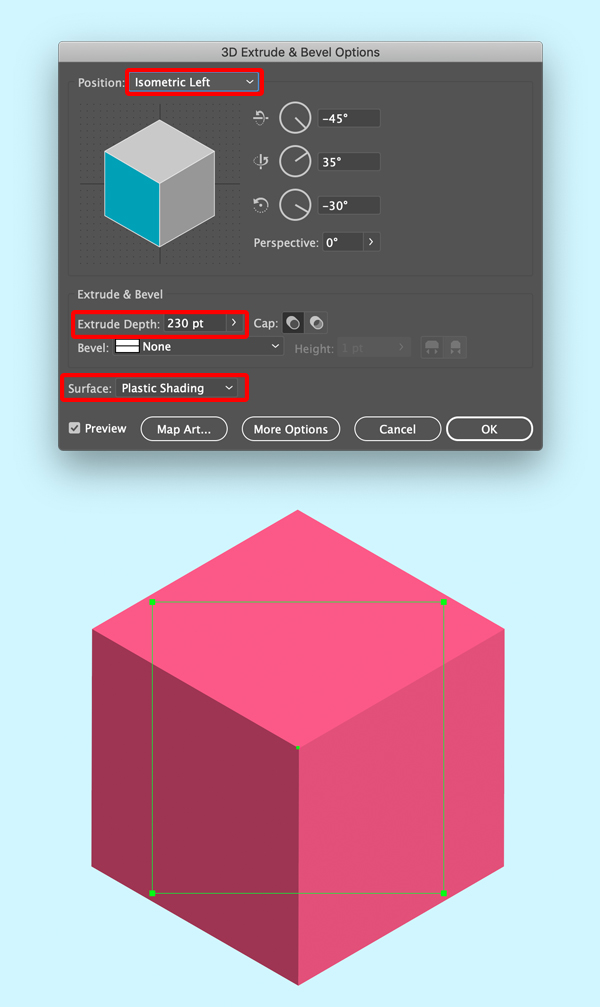
Step 2
Open the drop-down Position menu on top of the options window and select Isometric Left. Set the Extrude Depth to 230 pt (equal to the sides of our square). Set the Surface to Plastic Shading to get flat colors. Don’t forget to check the Preview box in the bottom of the options window to see all the changes in real time.
Click OK.
Step 3
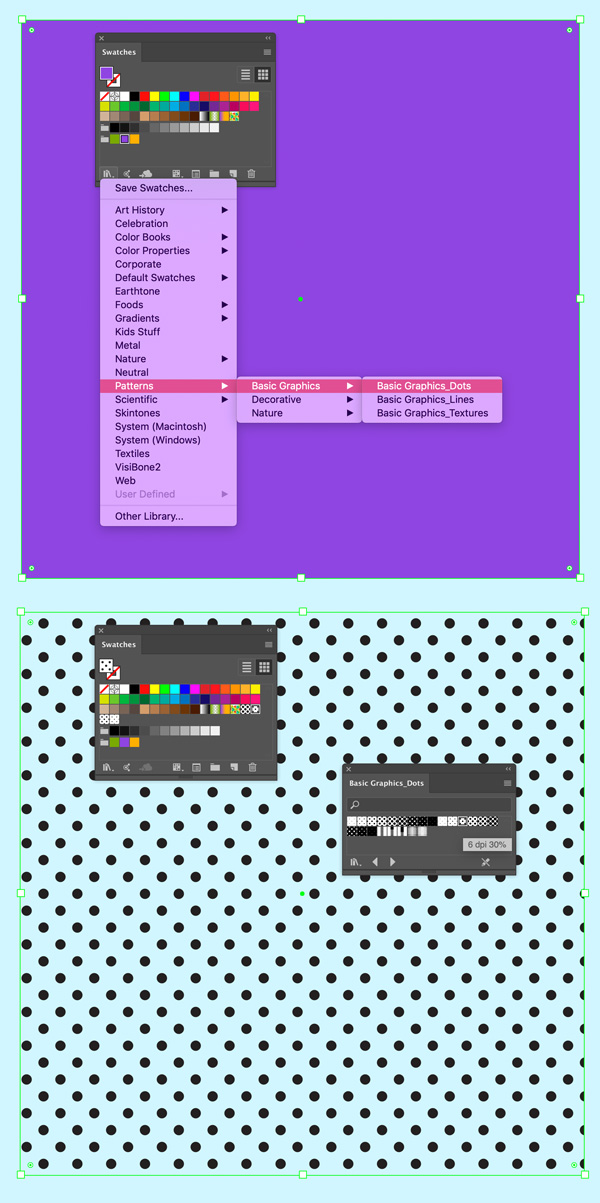
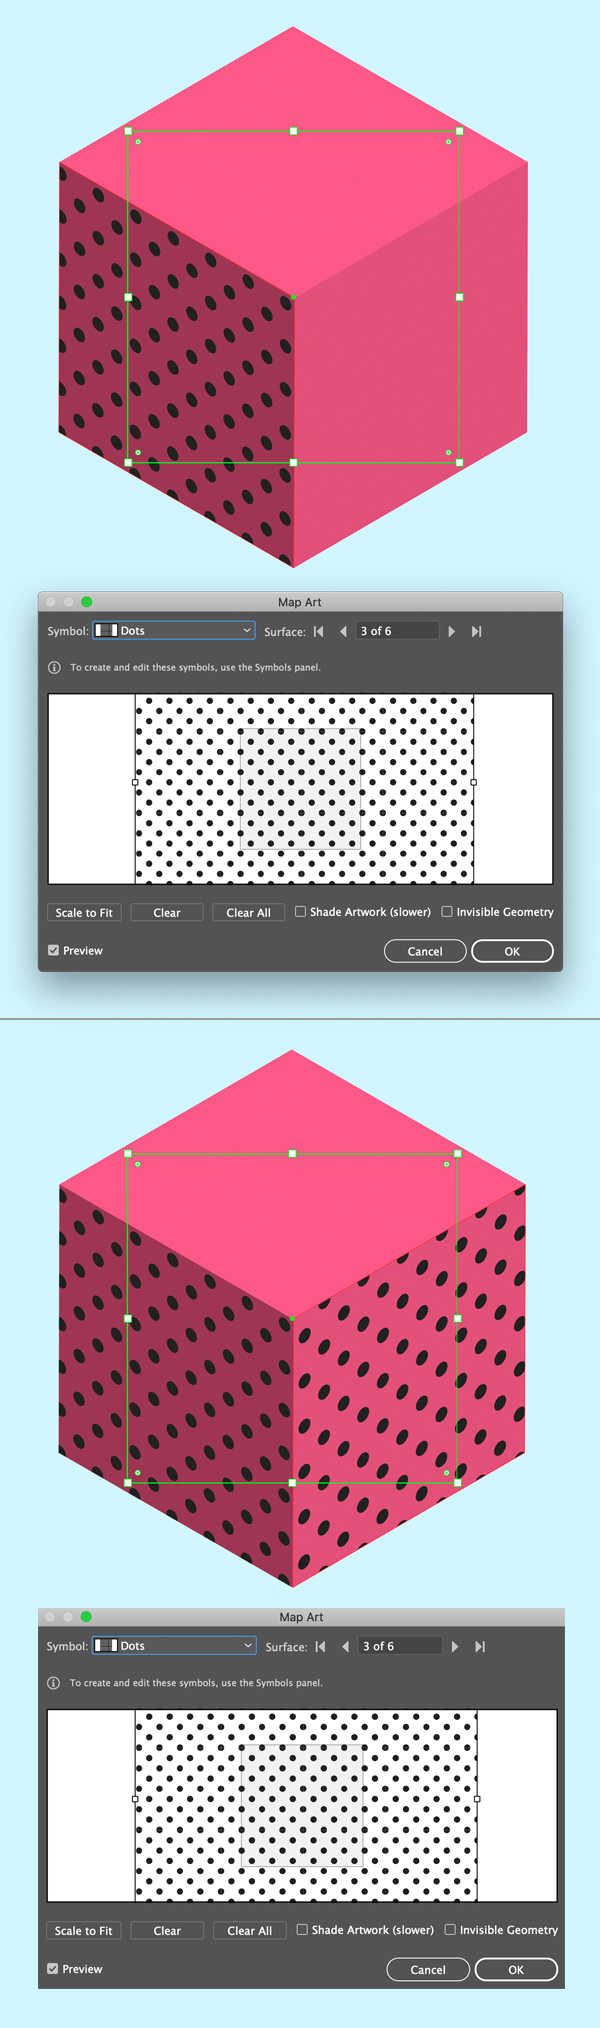
Now we’ll create a polka dot pattern for the festive wrapping material of our isometric Christmas present. Create a new square (400 x 400 px) of any color. Keeping it selected, open the Swatches panel (Window > Swatches), click the Swatch Libraries Menu icon and go to Patterns > Basic Graphics > Basic Graphics_Dots.
Apply the 6 dpi 30% dotted pattern by clicking it in the pop-up window.
Step 4
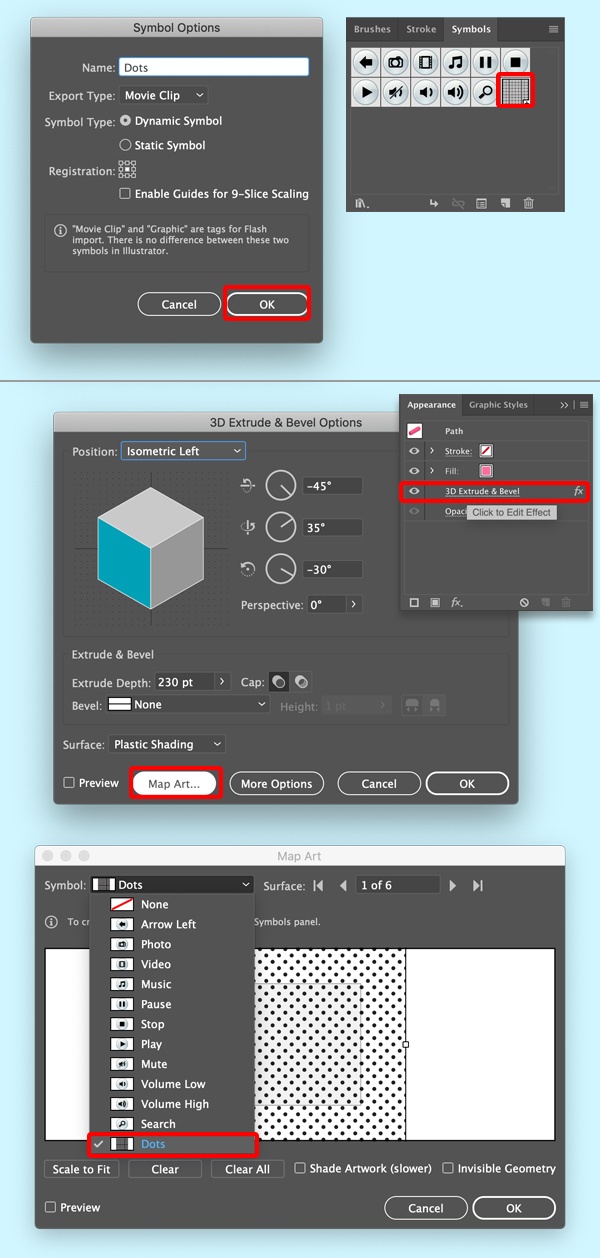
Now drag the pattern rectangle onto the Symbols panel (Window > Symbols) and drop it there. Click OK in the Symbol Options pop-up window, leaving all the options as default. You will see our dotted square in the Symbols window.
Let’s apply this pattern to our isometric Christmas present! Select our cube, open the Appearance panel (Window > Appearance) and click 3D Extrude & Bevel to open the options window of this effect again. As you can see, any effect can be adjusted and edited until we expand it on purpose.
Let’s click the Map Art button in the bottom of the 3D options window to open a new window with Map Art settings. Select our Dots pattern in the bottom of the drop-down list.
Step 5
Check the Preview box in the bottom left corner. Now we can see how our pattern looks when applied to the surface. We can move, scale and rotate in it the Map Art window to make it fit the box perfectly. The Scale to Fit function is very useful, but in my case, I’m not using it as I want to make the dots larger. To do so, I press Shift and extend the pattern until I’m happy with how it looks on the cube.
Press the Surface arrows in the top right corner to select another side of our cube. It will be marked with a red selection box. Apply the same pattern to the front and top faces of the isometric Christmas present, adjusting the size of the swatch.
Step 6
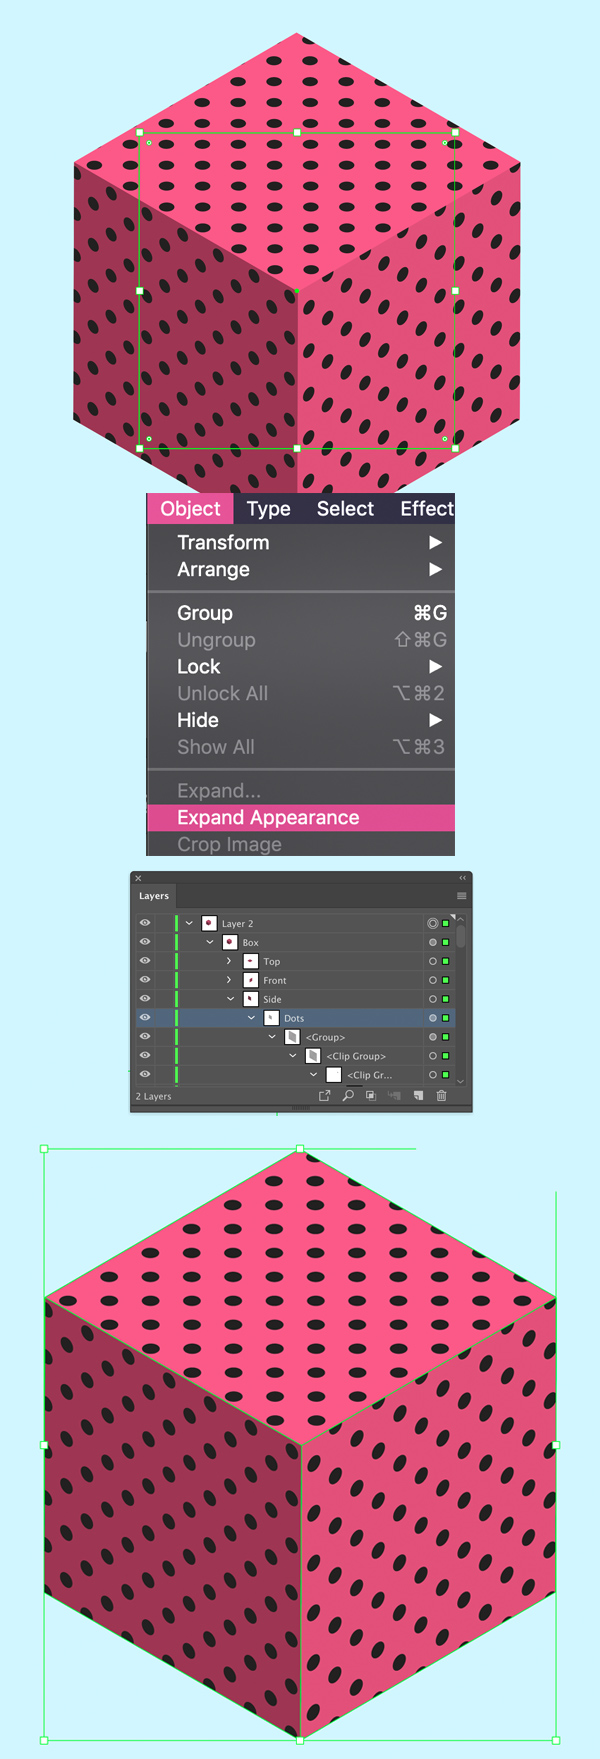
Now that the pattern is applied, let’s go to the Object menu and Expand Appearance. This way we apply the 3D effect completely, it can’t be edited in the Appearance panel anymore.
We can see every face of the cube in the Layers panel and open the groups and Clipping Masks to edit the contents. I clean up a lot of unneeded dots there, using the Pathfinder > Unite function to merge some of the overlapping pieces together. I also use the Direct Selection Tool (A) to select and delete the points around the faces that are invisible inside the Clipping Mask.
Step 7
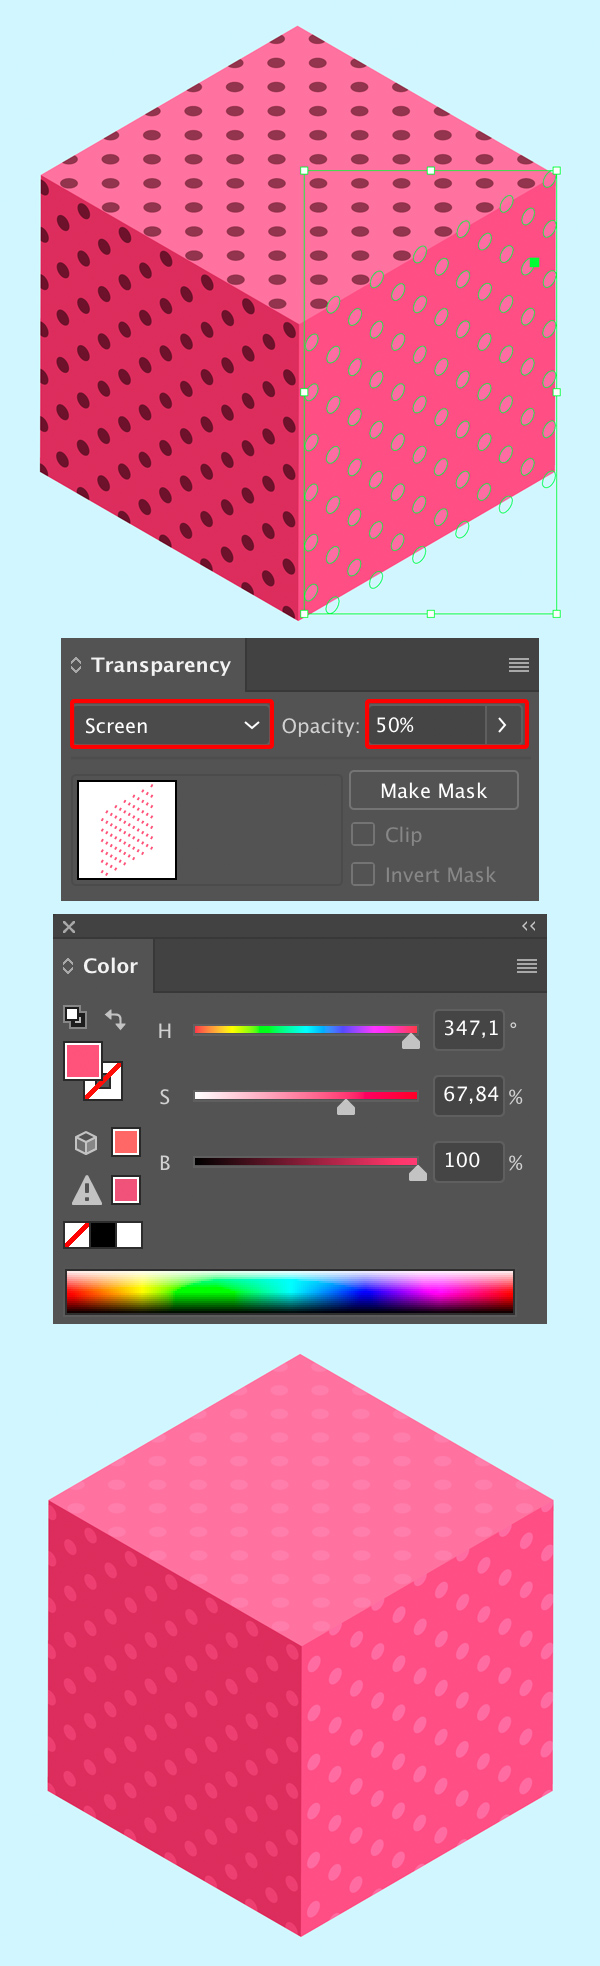
Now we can use the Magic Wand Tool (Y) to select all our black dots and change their color to pink. Then open the Transparency panel (Window > Transparency) and set the Blending Mode to Screen, Opacity to 50%, making the dots bright.
Step 8
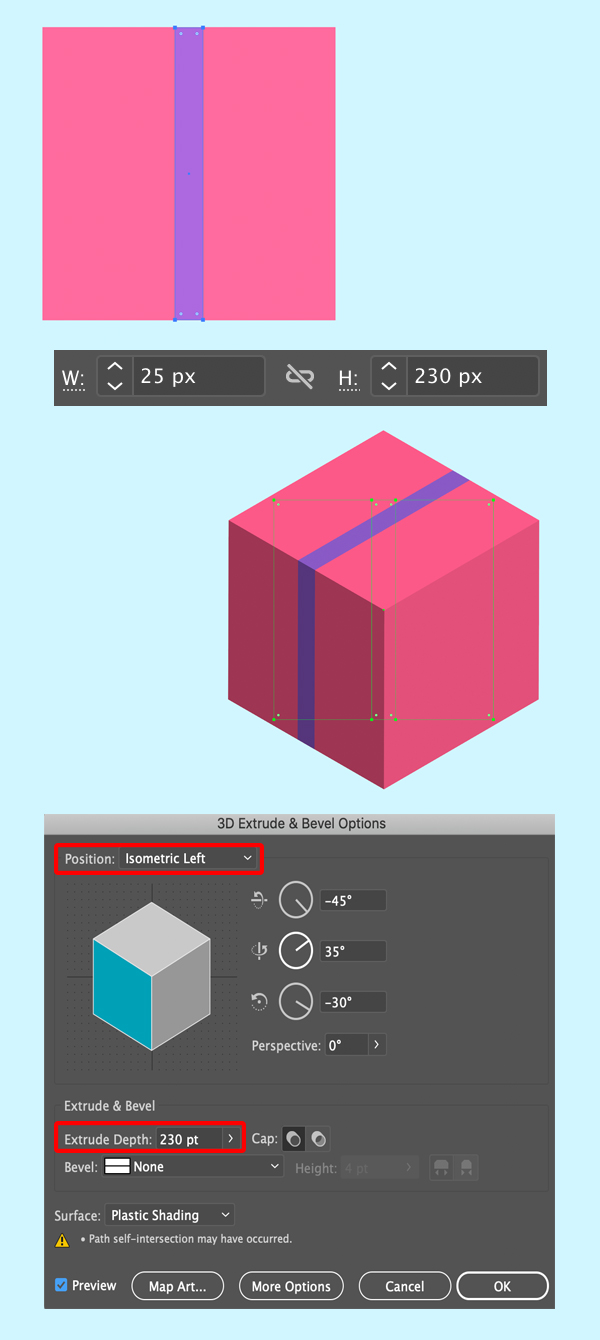
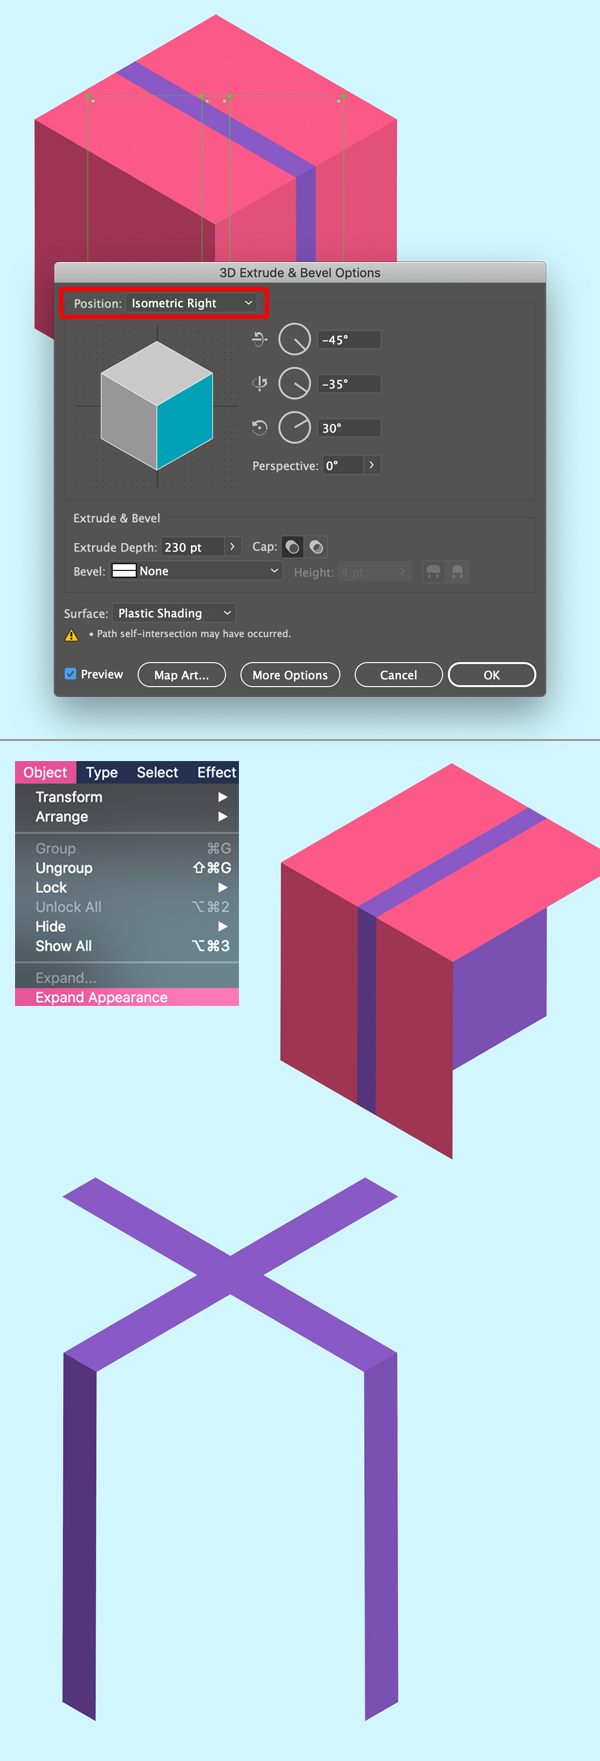
Let’s add a ribbon to our box. Remember the copy of the square we’ve created at the very beginning? It’s time has come! Make the shape visible again (click the eye icon in the Layers panel) and drag it to the top of the Layers panel to see it better (we can make the dotted cube invisible for now).
Use the Rectangle Tool (M) to create a 25 x 230 px violet stripe across the square. Group (Control-G) both shapes and go to Effect > 3D > Extrude & Bevel again. Set the Position to Isometric Left, Extrude Depth to 230 pt (equal to the sides of our square) and set the Surface to Plastic Shading.
Press OK to create top and left parts of the ribbon.
Step 9
Duplicate (Control-C > Control-F) the created cube and edit the 3D settings via the Appearance panel to change the Position to Isometric Right. Now we have the top and right pieces of the ribbon.
Let’s combine everything together!
Object > Expand Appearance of our cubes with ribbon and delete all the pieces that we don’t need by selecting them with the Direct Selection Tool (A).
Now we have only the ribbon!
Step 10
Let’s turn the visibility of our dotted box back on and check how the ribbon fits it. Perfect! Now it’s time to add the bow!

Step 11
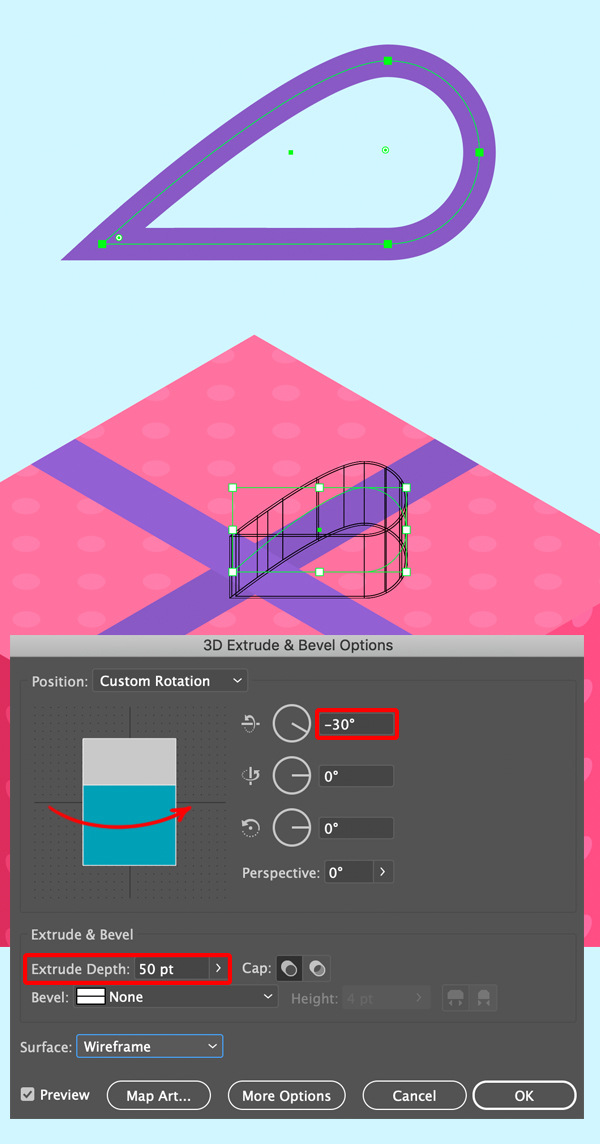
I’ve used the Ellipse Tool (L), the Anchor Point Tool (Shift-C) and the Direct Selection Tool (A) to make a drop-like shape with a sharp corner and violet Stroke.
Let’s apply a 3D Extrude & Bevel effect to this shape, too. Set the Position to Isometric Left and rotate the cube to the right by clicking and dragging the image in the 3D Extrude & Bevel Options window. We can also set the values of the axis manually in the boxes right next to the cube.
Set the Extrude Depth to 50 pt and check how the bow looks.
I’m setting the Surface to Wireframe only to make the shape visible above the isometric Christmas present. When I’m happy with the result, I change the Surface back to Plastic Shading and click OK.
Step 12
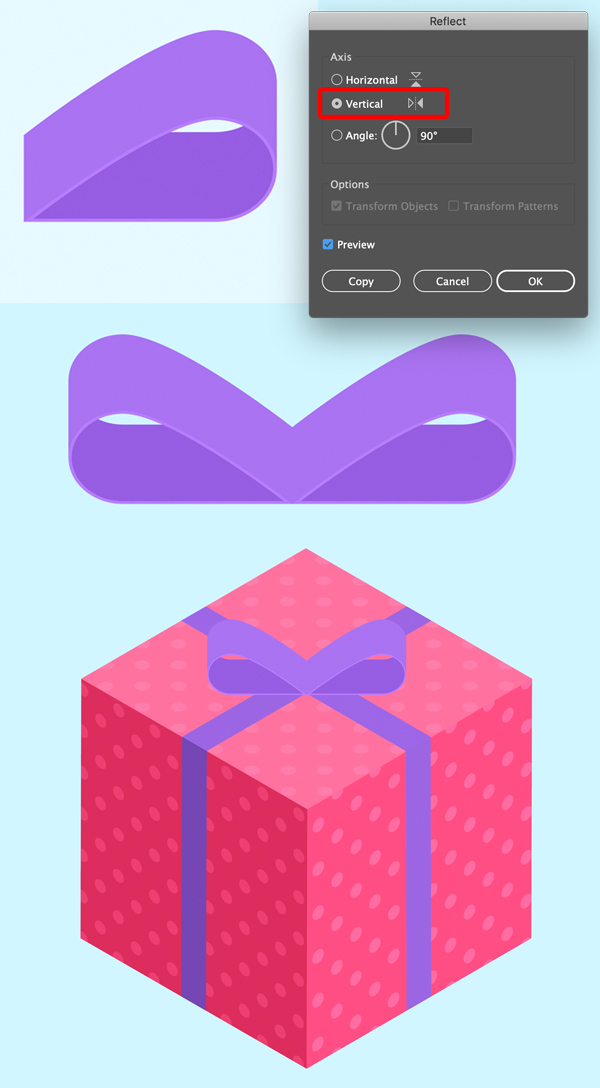
This time we need to fix the colors of our object as it has a bit more complicated shape than just a cube. Use my screenshot below as a reference.
Once you’re happy with the colors, find the Reflect Tool (O) in the Tools panel and double-click it. Select the Vertical Axis and click Copy to create the second half of the bow.
Attach the bow to the box and there we have it! Our isometric Christmas present is wrapped and ready!
Ho-Ho-Ho! Congratulations!
Great job, dear readers! Our isometric gift box looks fantastic! Now we can create more boxes and pile them up! Recolor the same one to create a fast composition for a minimalistic Christmas card or change the sizes and shapes to add variety. It’s up to you!
Have a very Merry Christmas!
Author: Yulia Sokolova
2D/3D artist and tutorial instructor, focusing on character creation, icons, lettering design, and illustrations.


This blog is pretty cool. How was it made !?