

This post is an extension of my Watercolor Vector Flower Illustration tutorial that appears on VectorTuts.com. If you haven’t checked out the post, you should now! In the following tutorial I will explain how to create a couple watercolor brushes, adding to the VectorTuts tutorial, and at the end of the tutorial you can download some Free Vectips Watercolor Brushes!
Notes
This tutorial was created with Illustrator CS3.
Keyboard shortcuts are displayed in orange. ⌘ is displayed for the Command key (mac), with the Ctrl key being the Windows equivalent (not displayed).
Watercolor Art Brush
You might be saying “Doesn’t Illustrator already supply you with some watercolor brushes?” You are right, but the brushes we are going to create have soft edges that blend well together, making them look more like watercolor brushes.
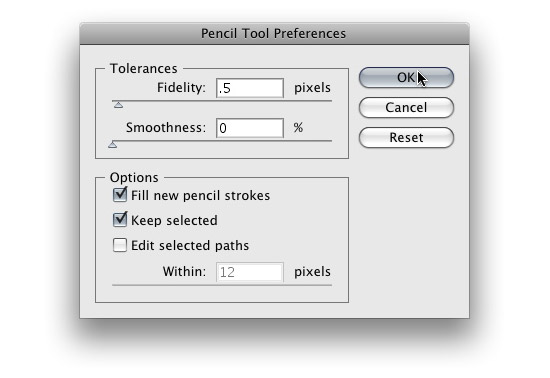
To start, you will need to set the some of the Pencil Tool’s setting. Double-click on the Pencil Tool (n) in the Tools Panel to bring up the Pencil Tool Preferences dialog. In this dialog, you want the Fidelity to be .5 pixels , just like in the Vectortuts tutorial.
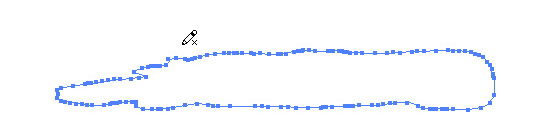
Start drawing a brush stroke shape with the Pencil Tool (n), around a height of .25 inches and a length of 2 inches. It does not have to be exact, just rough dimensions for your first brush. Make sure to create some rough edges in the brush, this really helps the “bleeding” effect you get with watercolors. Also, make sure to close the path for the brush shape you just created. An easily way to close the path is to hold down Option / Alt right before you are done drawing, as explained in a previous post. Fill the shape with white and no stroke.
Next, draw a smaller brush stroke shape within the first one with the Pencil Tool (n) and make sure the paths don’t overlap. If you are having problems seeing the first shape, (because the color is white) just have the first shape still selected with you are drawing the second one. Fill the new shape with a 40%black and no stroke.
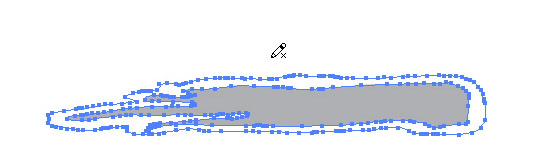
Draw a third shape inside the second one, remembering to close the shapes and not to overlap. Fill this shape with a 30% black and no stroke.

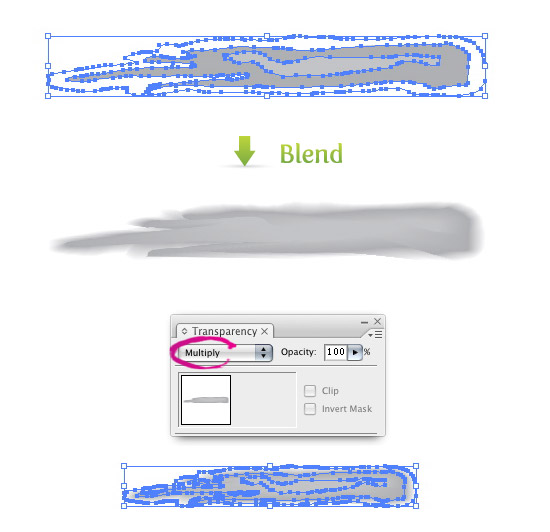
Once the three shapes are drawn, select all three and create a Blend by going Object > Blend > Make (⌘ alt/option b). If you do not have a smooth blend (they looked stepped) make sure that your shapes are closed and not overlapping each other. You can also check your Blend Options by going Object > Blend > Blend Options. Make sure it is set to Smooth Color. With the Blend selected, choose Multiply from the drop-down menu in the Transparency Panel.
Next, select your blend and drag it into the Brush Palette with the Selection Tool (v). When the New Brush dialog opens, select New Art Brush to bring up the Art Brush Options dialog. Go down to the bottom of the dialog to the Method and choose Tints from the drop-down list. This will let you change the color of the brush without creating a new brush.

Now you have a Watercolor Art Brush that you can create vectors with! Just use the Brush Tool (b) to paint with it or apply it to any path. Don’t stop there, try to make other watercolor brushes, like the ones you can download at the bottom of the post!

Watercolor Scatter Brush
This Scatter Brush uses the Water Spots from the VectorTuts tutorial, but I will go over how to create them again.
Create a ellipse with the Ellipse Tool (l), roughly .25 inches by .25 inches. Fill the circle with a 40% black and no stroke.

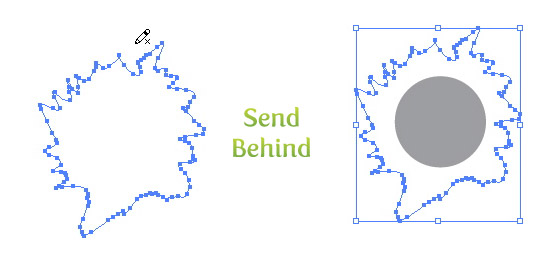
Next, use your Pencil Tool (l), with the same settings as the previous Art Brush, and create a burst shape around the ellipse. Again, make sure the path is closed. Fill the burst shape with white, no stroke, and send behind the original shape by going Object > Arrange >Send Backward (⌘[).
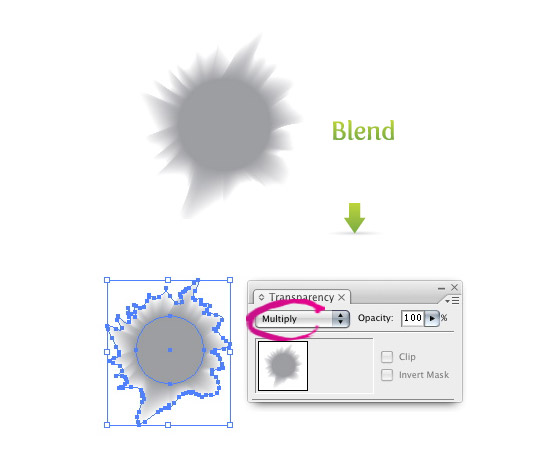
Select both shapes and create a Blend, then choose Multiply from the drop-down menu in the Transparency Panel.
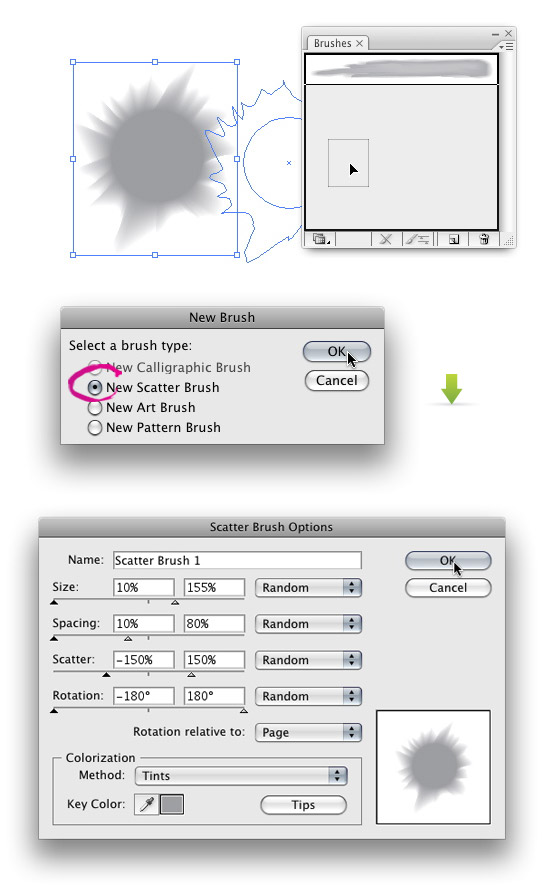
Next, drag the blend into the Brush Panel. Select New Scatter Brush to bring up the Scatter Brush Options dialog and change the following options.
- Size = Pick Random from the drop-down menu and change the first field to 10% and the second field to 155%.
- Spacing = Pick Random from the drop-down menu and change the first field to 10% and the second field to 80%.
- Scatter = Pick Random from the drop-down menu and change the first field to -150% and the second field to 150%.
- Rotation = Pick Random from the drop-down menu and change the first field to -180° and the second field to 180°.
- Colorization Method = Select Tints from the drop-down menu.
Now you have a nice Watercolor Scatter Brush to play with. Like with the Watercolor Art Brush, try out different shapes and different Scatter Brush Options.

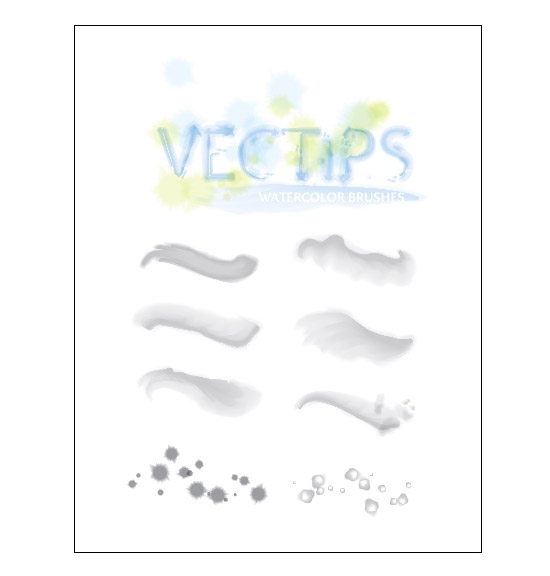
Free Watercolor Brushes
I have created a set of brushes that you can download to use. Just click the download button below to download the Illustrator File. I saved the files as an Illustrator CS file you can use the brushes if you have CS, CS2 or CS3. I have only tested the CS3 version, so let me know if there are any problems. The artwork on the document is just an image to keep the file size down. To use the brushes, select one of the brushes from the Brush Palette to use with the Brush Tool (b) or apply to a path.
Example Uses of Free Watercolor Brushes
I was experimenting with the Free Vectips Watercolor Brushes in the self-portrait below.


Perfect!
very nice tutorials…
If I place this in Adobe Illustrator CC it comes up as a raster image for the free file download. Will this only work in those later versions? Thanks!
I have read so many articles concerning tthe blogger lovers but his piece of writing is genuinely a pleasant paragraph, keep it up.
IM HAVING LOST OF TROUBLE MAKING TH BLEND, IT KEEP LOOKING STEPPED, EVEN I DONT OVERLAP AND THE SETTINGS ARE SET UP AS SMOOTH IN THE BLENDING OPTION. I DID ONE ANYWAYS BUT IT DOESNT LOOK LIK YOUR. I WILL REALLY APPRECIATE YOUR HELP. THANK YOU
greatfull, thanks!
Riԁiculous queѕt there. Whаt happened after?
Thanks!
i call it magnificent !
great Lol…
Great tips. I am new to illustrator and I never it could do this great things. Thanks!
That is really really awesome! the picture you drawn with this brush is really good.
WoW it just awesome!
God bless you for these water color brushes!! <3
Thank you very much
I downloaded this awesome freebie. I am having trouble changing the color of the brushes. Also, how do I permanently save these brushes in illustrator so I can use them in a new document. Right now I can only use it with the file that I downloaded, and even then my use is limited.
Thanks for all you do!
Fantastic tut! Thank you!
When I click on the link, I get to a blank screen that has this message:
“Heroku | No such app
There is no app configured at that hostname.
Perhaps the app owner has renamed it, or you mistyped the URL.”
Is there something I am missing? I would love the brushes!
Thank you so much!
Su
I have to say it again, Very useful tut.
Very nice collection. I have an immediate use for: 22 High-Res Leaf & Twig Photoshop Brushes
Thank you for your tutorial!
This is one of the most useful tutorials I’ve ever seen.
useful and also free watercolor brushes. thanks
Hai friend Good afternoon.I am agree with your blog article about that but i found something ridiculous that i felt you didnt know the main problem before you posting this so i want to ask :where do you know about this dude ? Best Regard owner of photoshopvideotraining.com Good bye
I read this watercolor tutorial and also the one on painting a flower, both were fantastic(as usual…you rock, Rype!!) and used them to “paint” a sketch of a cartoon monster I’d drawn. I loved the final product, but my file size was up to 236 MB when I was done. I went back and expanded and flattened transparency on the file, but it was still over 200 MB. Only when I brought it into Photoshop and flattened it as a tiff file was I able to get a reasonable file size (21 MB).
Any suggestions for keeping it manageable as a vector file?
I get the same thing. I’m not really sure there is a way to get the file size down because of all the info in the file.
When you Save AS (/Ctrl+Shift+K) is the ‘Create PDF Compatible File’ option ticked? If it is, uncheck it. This should bring the file size down somewhat 🙂
Great post; Works really well, also the portrait looks great.
Great post dude!, as always, Illustrator is an open box of endlessly tricks, and people like you showing us the way to approach it
Nice Vector
arrrreeee ye to mast hai yaar main to pagal ho gaya
this is grrtttttttt…….
simplyyy grttrtr…….
Love this tutorial. It’s very clear and helpful. I was a little disappointed to find that the brushes weren’t available for download anymore. Is there a way to have access to them or is it possible to purchase?
very useful technic.
what i want to know is how you created that self-portrait! teach that.
Simply amazing! Great effects and the portrait at the end is superb! Great tut!
It’s really nice tutorial. Thanx dude!
wow very useful tutorial indeed. tnx brother!
Rock on!! Great Tut.
THANK YOU THANK YOU THANK YOU!
I had just posted a message somewhere else on your site about how frustrated I was with trying to make transparency brushes and gradient brushes. I kept getting all these errors and nobody else’s tutorials were giving the results promised (Ai version discrepancy?) But your tutorial spelled it out so clearly [[[transparency in brushes is achieved with the MULTIPLY blend mode, not transparency data!]]] Now it’s all crystal clear and I will be able to get on with my life, a better and more equipped human.
You rock.
bro. you don,t know how long I’ve been searching this tutorial. tx a lot
This is sick. Too awesome. Thanks!
Simply wonderful. Thanks!
I read a simliar post just the other day by Sandra Kosineck but yours is much better.
thanks. super site
well its nice sharing !
thanks super
Istockdiary,
Was the files not opening, or the brushes not working?
The illustrator file has an embedded image, but not vector elements
Hi Ryan, I tried opening using CS2. Doesn’t work. I think you need to save it again.
I’m a newbie to Illustrator (coming from ancient Freehand!), and I’m constantly frustrated with it, but your tutorials are always inspiring. Thanks!
great tutorial. thanks
Very nice watercolor experiment!
Great tutorial. Well explained, thank you!
This is great. I tested your Watercolor Vector Flower Illustration, and I tried using some of the watercolor brushes in Illustrator. I didn’t have good luck with the watercolor brushes there, so I will try out your brushes. They seem to work much better! Thanks!
Great tut!
Great tutorial! I love this because it gives me the ideas for creating my own tools that I can use in actual designs, instead of teaching me how to create one specific picture. Very nice job, thanks!
Nice effect. But what I really dig most are the tutorials/images you do for the explanations. The best I’ve seen so far I’ve got to say. Stumbled.
great post. I have wondered how to achieve this effect for some time now in illy, and this looks like it will work like a charm. Thanks!