![]() In the following tutorial, you will learn how to create a calculator icon using basic shapes, the mesh tool, and pathfinder techniques. I hope you learn some handy tips along the way. So, let’s get started!
In the following tutorial, you will learn how to create a calculator icon using basic shapes, the mesh tool, and pathfinder techniques. I hope you learn some handy tips along the way. So, let’s get started!
Tutorial Details
- Program: Adobe Illustrator CS6-CC
- Difficulty: Beginner
- Topics Covered: Basic Shapes, the Mesh Tool, Pathfinder Tool
- Estimated Completion Time: 30 Minutes
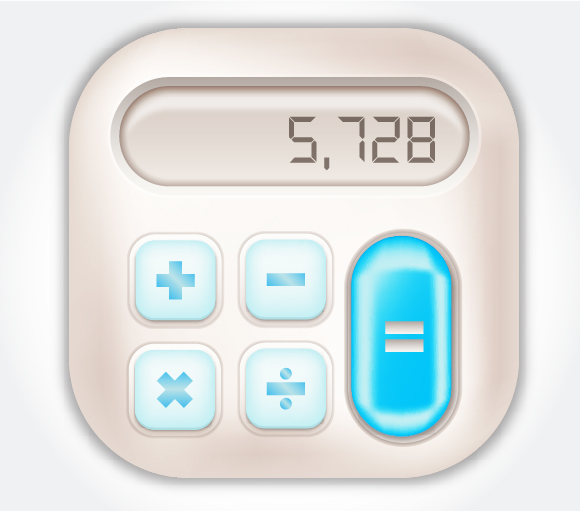
Final Image
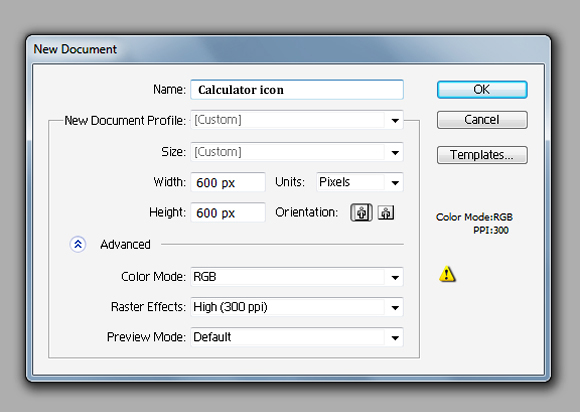
Start Adobe Illustrator, then go to the File > New…. create a new document with size of 600 x 600px, and in the opened dialog box choose RGB color mode.
Step 2
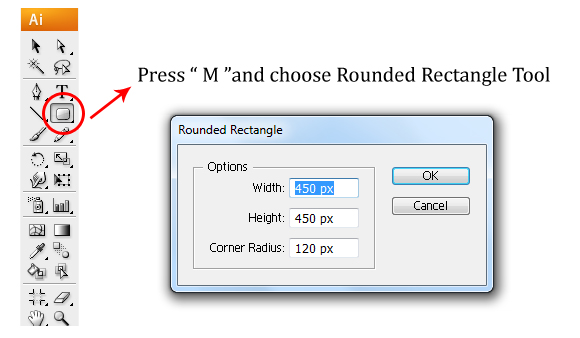
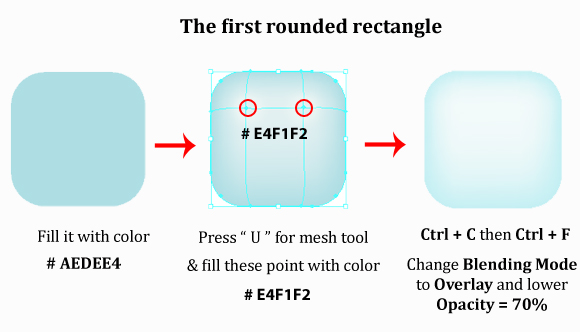
Next we’ll create the main shape of our calculator. Press “ M ” and choose the Rounded Rectangle Tool, set the Width = 450px , Height = 450px and the Corner Radius = 120px. Then using the Color Palette, set the fill color to #B4AAA4 with no stroke.
Step 3
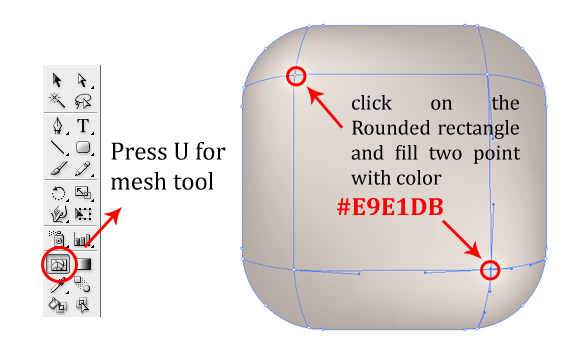
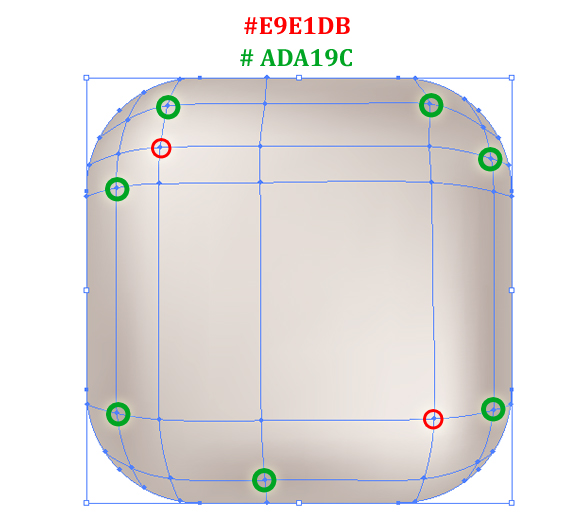
In the Layer Palette, name that layer is “Body “. Next, press “ U “ for the Mesh Tool, click on Rounded rectangle and create the mesh, then fill the points with the color #E9E1D1
Continuing with the mesh, click around the Rounded rectangle again, and fill with the color #ADA19C. You can see the effect in the image below.
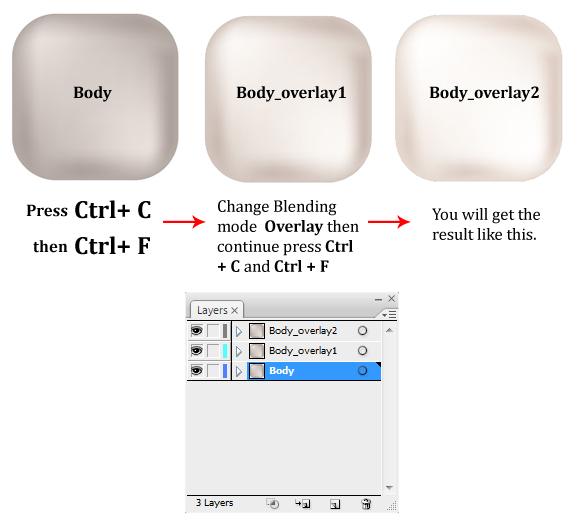
Now we’re almost done with the body. But wait, I want this icon look shiny so we will do a trick. Click on the icon and press Ctrl + C (copy) then Ctrl + F (Paste in front). Using the Appearance Palette, change the Blending mode to Overlay; then repeat these same steps to create an additional Body Layer.
Step 4
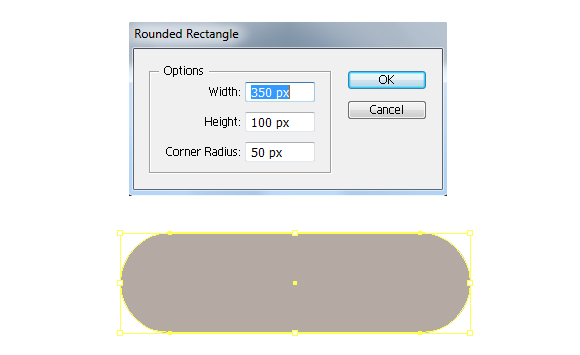
Next, we’ll create another shape, so press “ U “ again to create a new Rounded Rectangle, and set the dimensions to Width = 350px, Height = 100px, Corner Radius = 50px.
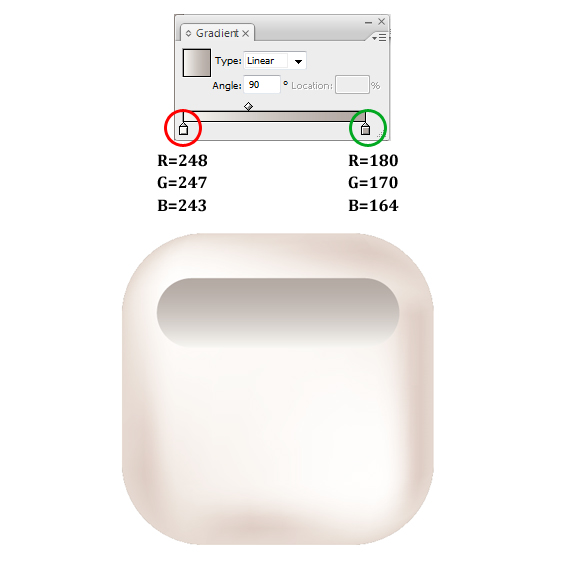
Then using the Gradient Palette, fill it the gradient like the image below.
Step 5
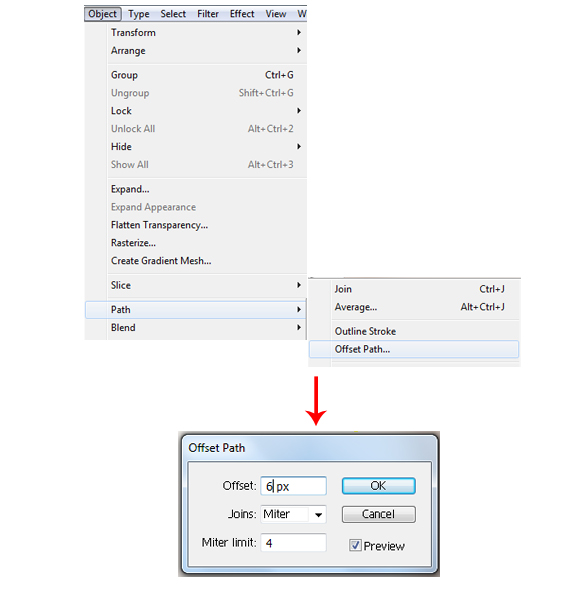
Select the Rounded rectangle that we have just created, click Object > Path > Offset Path.
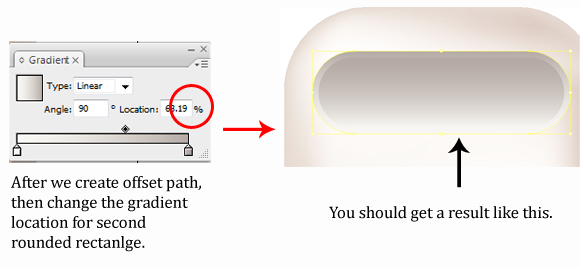
Now we have two rounded rectangles. Again using the Gradient Palette, change the gradient’s location to 69.19% on the second rounded rectangle that we have just created.
Step 6
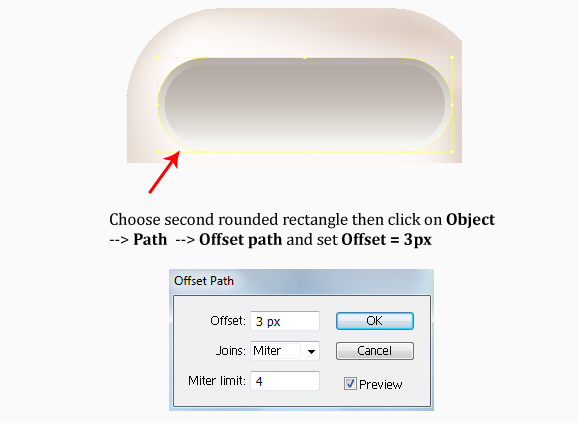
Next, let’s work with highlights. Click on the second rounded rectangle and repeat step 5 to create a third rounded rectangle.
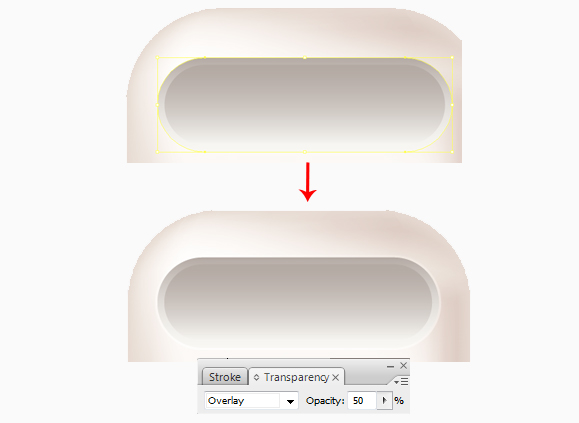
Using the Appearance Pallete, change the Blending Mode to Overlay and lower the Opacity = 50. Your image should look like the image below.
Step 7
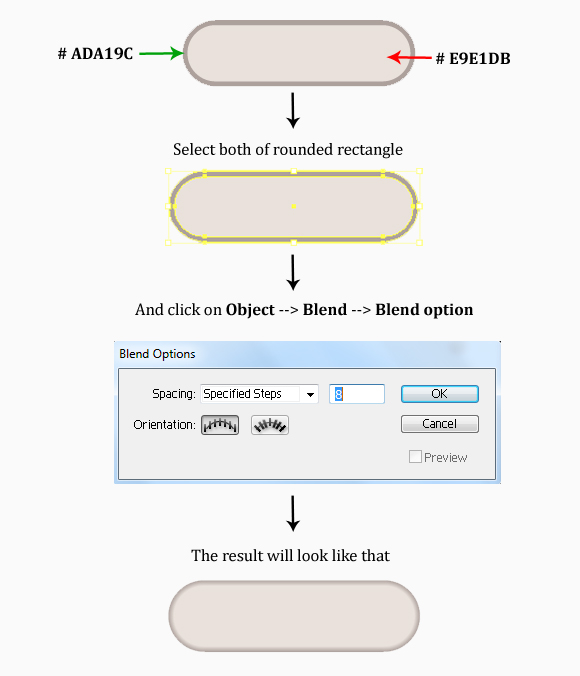
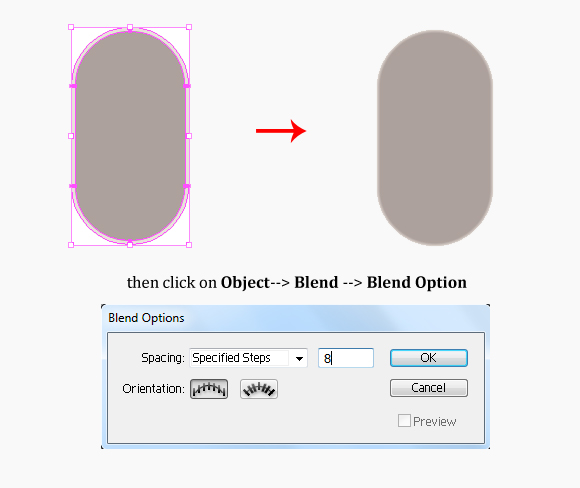
In this step, we’re going to create an inner shadow inside the screen of this calculator icon. Press “ M “ and set Width = 350px, Height = 100px, Corner Radius = 50. Then fill it with the color #ADA19C. Next click on Object > Path > Offset Path and set the Offset = – 8. Fill it with the color #E9E1DB. Select of both rounded rectangle and click on Object > Blend > Blend Options; Set Spacing : Specified Steps = 8 then press OK.
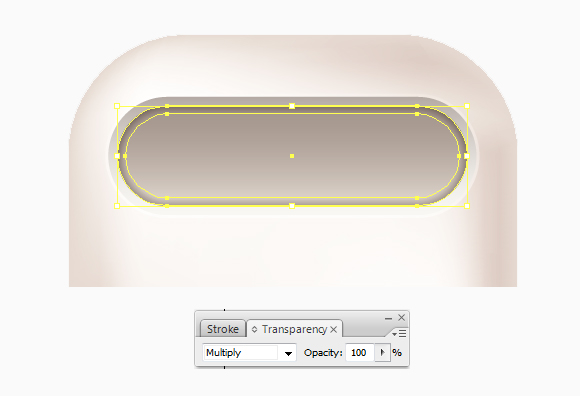
Change the Blending Mode to Multiply using the Appearance Palette.
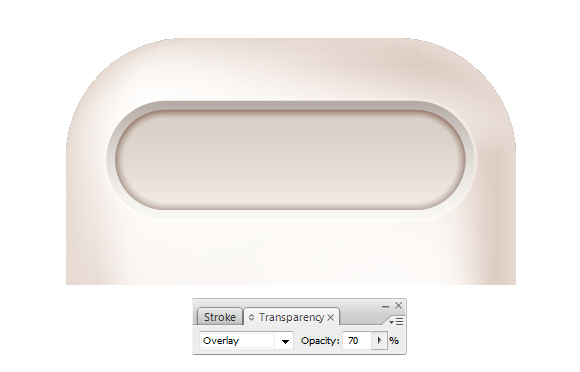
Press Ctrl + C (copy) then Ctrl + F (Paste in front). Using the Appearance Palette, change the Blending mode to Overlay and lower the Opacity to 70%.
Step 8
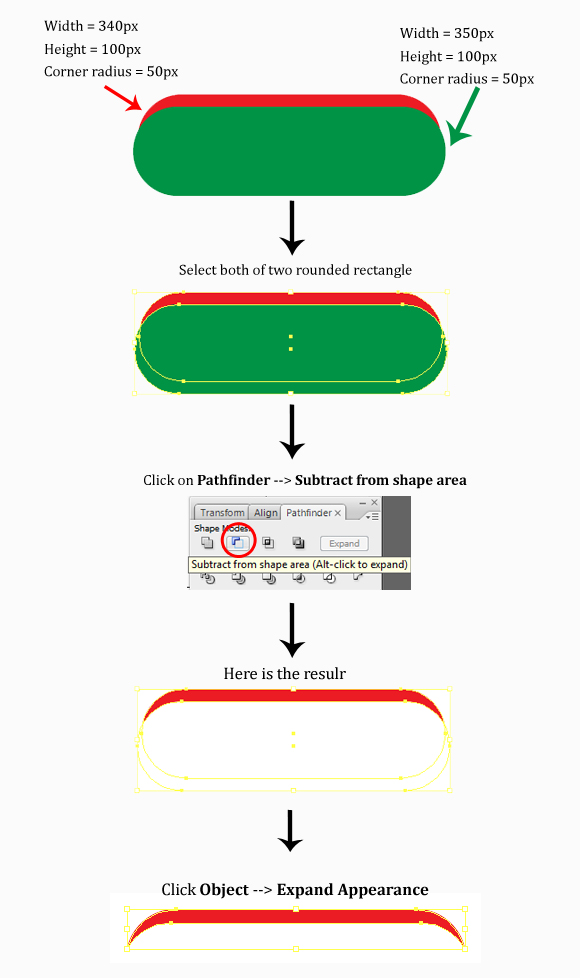
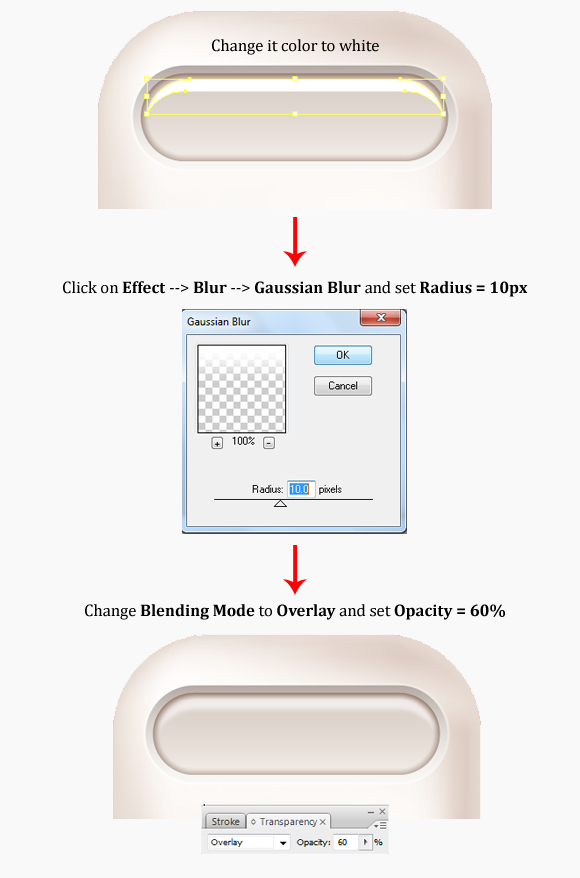
In this step, we’ll create a glossy sheen on the screen of the calculator icon. Press “ M “ to create 2 rounded rectangles. On the first one, set the settings to Width = 340px, Height = 100px, Corner radius = 50px, and the second one with Width = 350px, Height = 100px, Corner radius = 50px . Using the Layers Palette, place the second one in front of the first one like the image below.
Change top color of the top rectangle to #FFFFFF. Apply a Blur effect to it by clicking Effect > Blur > Gaussian Blur, and set the Radius = 10 px. Then using the Appearance Palette, change the Blending Mode to Overlay and lower its Opacity to 60%.
Step 9
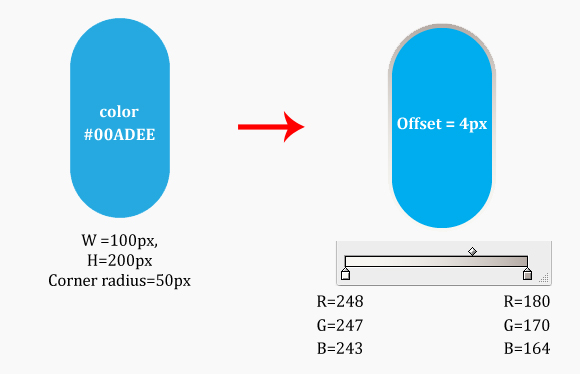
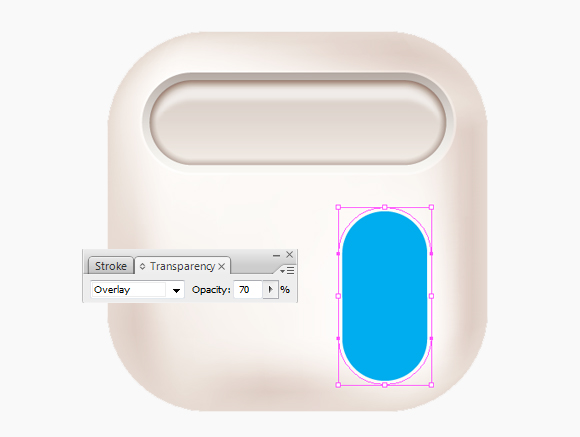
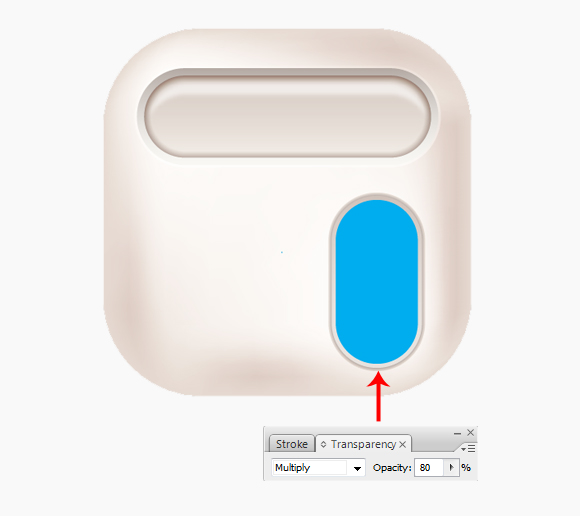
Now we’ll create the buttons for this calculator. First press “ M “ and set the size of the shape to Width = 100px, Height = 200px, Corner Radius = 50px. Fill this shape with color #00ADEE, then with it still selected, click Object > Path > Offset Path. Set the Offset = 4px and fill it with the same gradient as step 4; change the Blending Mode to Overlay and lower its Opacity to 70% from the Appearance Palette.
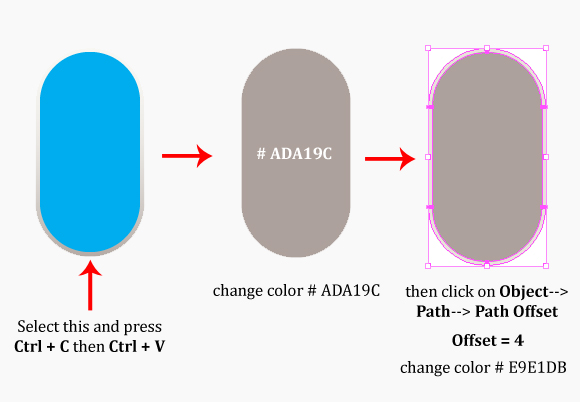
Next, we’ll create the shadow for the button. Duplicate the rounded rectangle by pressing Ctrl + C (copy) then Ctrl + V (Paste), change the color # ADA19C. With this shape still selected, click on Object > Path > Offset Path, set the Offset = 4px, and the fill color to #E9E1DB.
Select both shapes and click on Object > Blend > Blend Options.
Next, move the gray rounded shape below the blue shape using the Layers palette. Then with the gray shape still selected, change the Blending Mode to Multiply and lower the Opacity to 80% in the Appearance Palette.
Step 10
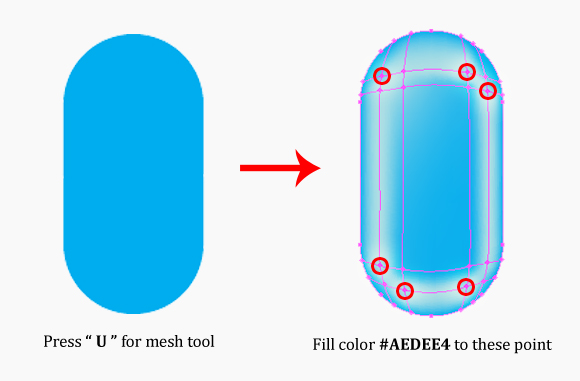
Press “ U “ for the Mesh tool to create a mesh for the blue button, then click on the blue button to add the mesh. See the example image below.
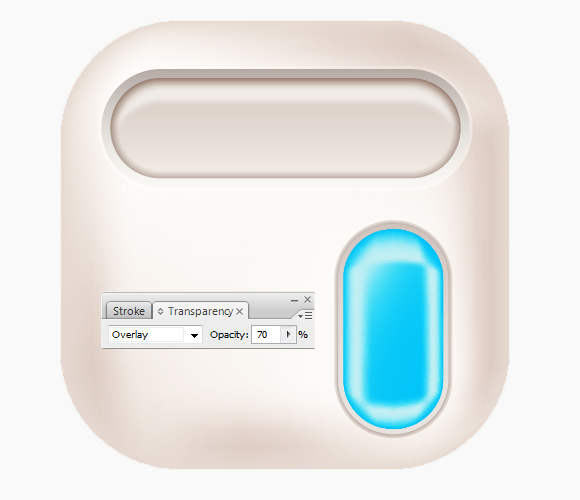
Create a copy of the blue shape by pressing Ctrl + C (copy) then Ctrl + F (Paste in front). Then using the Appearance palette, change the Blending mode to Overlay, and lower its Opacity to 70%.
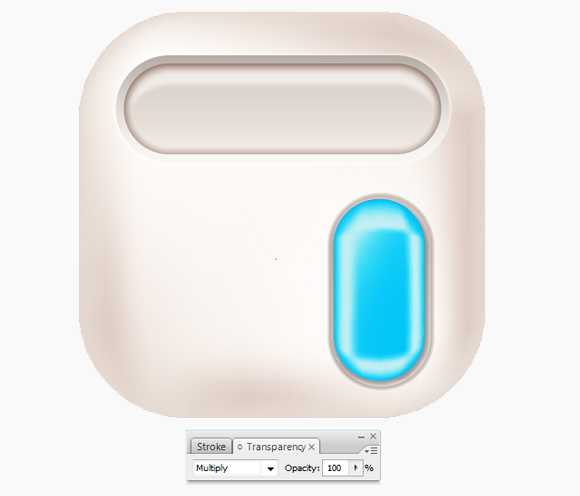
Now we’ll create another shadow for the button to make it look more realistic. Create a rounded rectangle with Width = 100px, Height = 200px, Corner Radius = 50px. Fill with the color #ADA19C and apply a Gaussian Blur by going to Effect > Blur > Gaussian Blur and set the Radius to 10px. Then change the Blending Mode to Multiply using the Transparency palette.
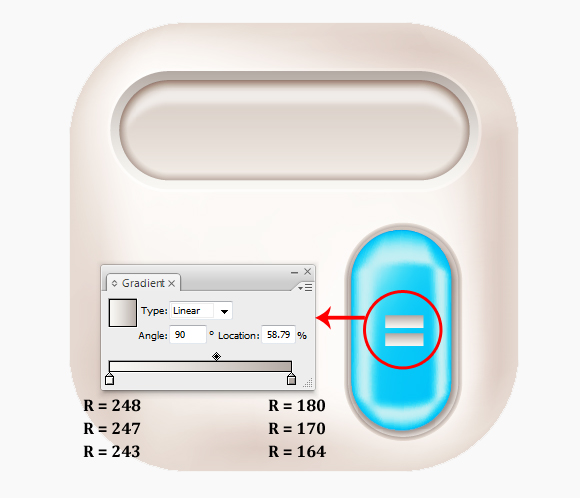
Next we’ll draw the equals symbol. Press “M” and draw a small rectangle with a fill (any color will do) with no stroke. Then using the Gradient Palette, apply a white to gray gradient on our rectangle. Next hit CTRL + C and CTRL + V to create a duplicate and space the 2 rectangles we’ve just created like the below image.
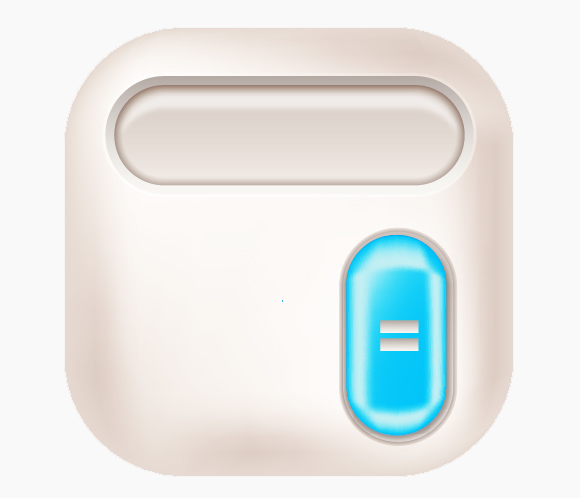
And we’re done with this button. Here is the result.
Step 11
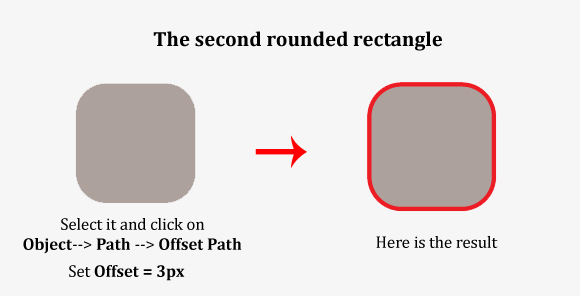
In this step, we are going to create a square button for the calculator icon. Press “ M “ for rounded rectangle with Width = 80px, Height = 80px, Corner radius = 20px. Then duplicate the rectangle by hitting Ctrl + C (copy) and Ctrl + V ( Paste).
And with the second rounded rectangle selected, click Object > Path > Offset path and set the Offset = 3px.
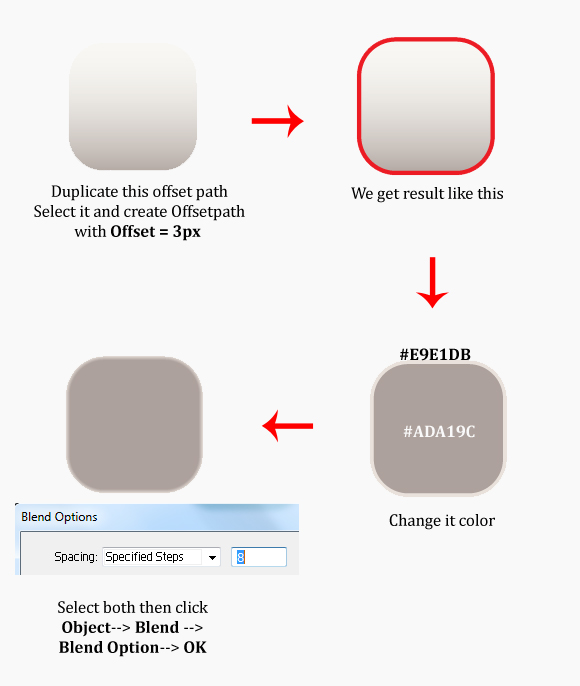
Now separate the rectangles and follow the below instructions.
Now we need one more shadow for this button. Press Ctrl + C (Copy) the offset path we have just created then Ctrl + V ( Paste ). Select it and create one more offset path with Offset = 3px.
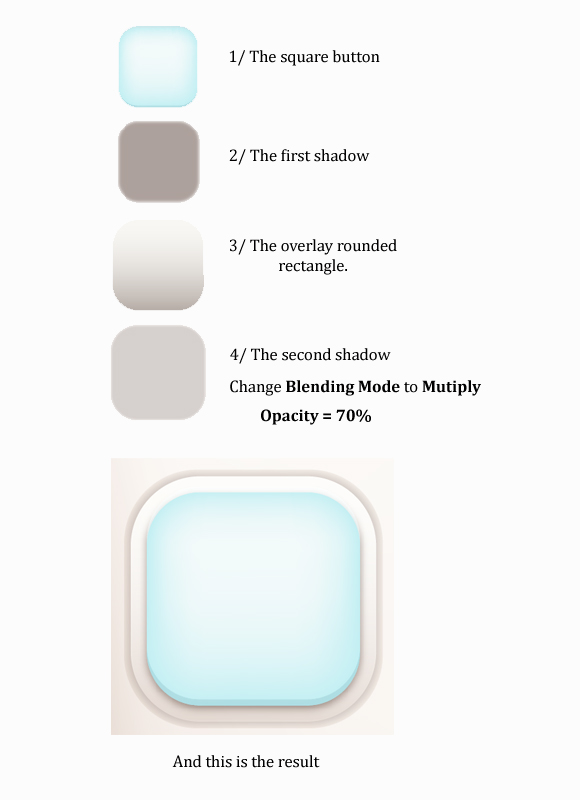
Now place all of the rectangles on top of each other, and using the Layers palette, layer them in the following order:
Group the 4 rectangles by hitting CTRL + G. Then create 3 duplicates of the square button by hitting CTRL + C (Copy) and CTRL + V (Paste) 3 times. Then arrange them like the image below.
Step 12
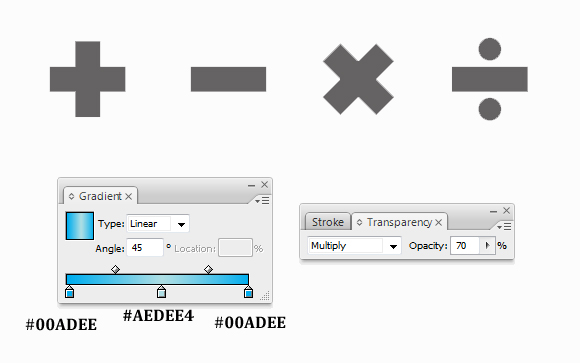
Now we’ll create 4 basic shapes and fill the with the gradient as in the image below. Then using the Transparency palette, change the Blending Mode to Multiply with lower the Opacity to 70%.
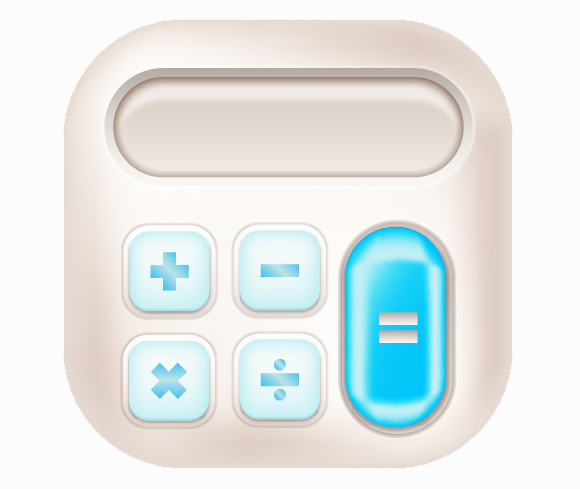
And you should get result like this.
Step 13
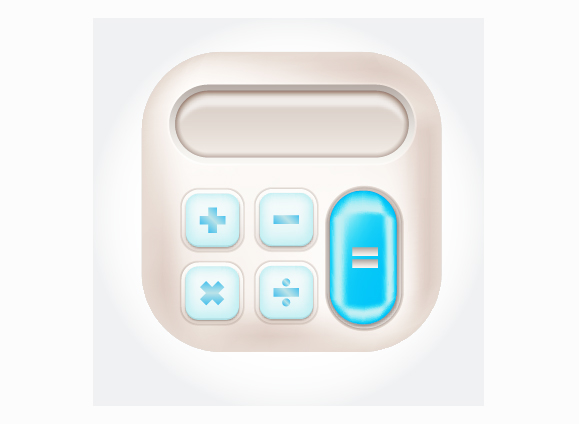
Now we need to add a background. Draw a rectangle using the Rectangle Tool (M) and apply a radial gradient to it using the Gradient Palette with a white color in the middle and gray on the edges. Then create a copy in front by hitting Ctrl + C (Copy) and Ctrl + F (Paste in front), and using the Appearance palette, change the Blending Mode to Overlay.
Step 14
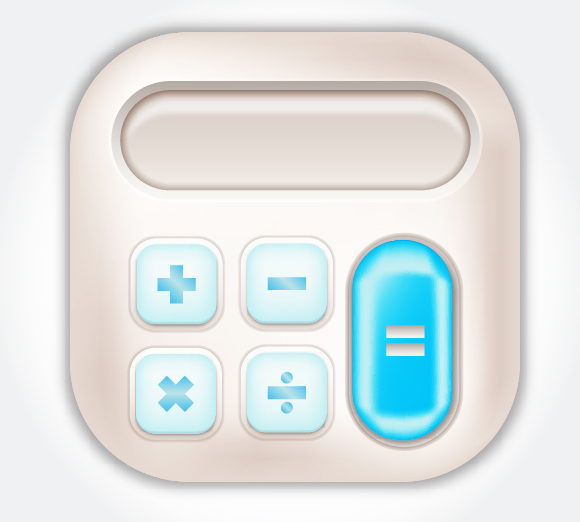
Next, we need to add a drop shadow on the icon, draw a rectangle using the Rectangle Tool (M) with Width = 460px , Height = 460 px , Corner Radius = 120 px , fill with color # 231F20, then go to Effect > Blur > Gaussian blur and set the Radius = 25px. Change the Blending Mode to Multiply the Opacity to 40% using the Transparency palette.
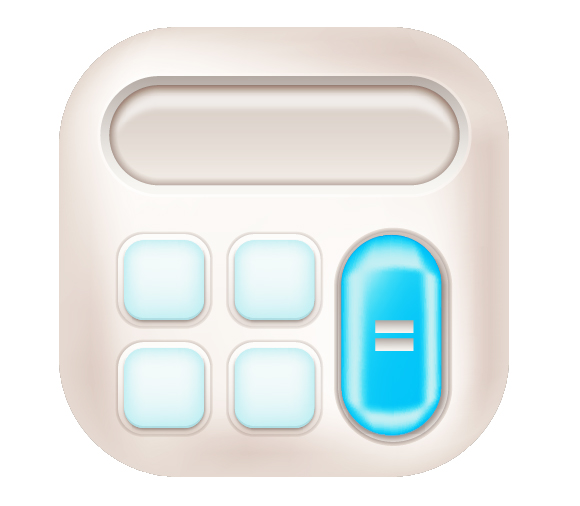
And this is final result.
Congratulations! You’re done!
I hope you’ve enjoyed this tutorial and can apply these techniques in your future projects.




Wow! this is a great and helpful piece of info. I am glad that you shared this helpful info with us. Please stay us informed like this. Keep writing.
It’s not a beginner level! I should say interm.
Step 6 was not clear and also step 12 how to make the symbols!
Thank you very much sir,
Excellent example for learning
Once again thank you very much Sir